
ST 4020 - Microscope LEICA - Notice d'utilisation et mode d'emploi gratuit
Retrouvez gratuitement la notice de l'appareil ST 4020 LEICA au format PDF.


| Type de produit | Automate de coloration linéaire |
| Marque | LEICA |
| Modèle | ST 4020 |
| Dimensions (L x P x H) | 620 mm x 250 mm x 200 mm |
| Hauteur avec capot ouvert | 430 mm |
| Poids (sec) | environ 16 kg |
| Poids avec accessoires | environ 19 kg |
| Poids emballé | environ 21 kg |
| Alimentation | 100 – 240 V CA, 50/60 Hz, 1 A max, 25 VA |
| Fusibles | 1,0 A T, ∅5,0 × 20 mm |
| Température de fonctionnement | 15 °C à 30 °C |
| Humidité relative | 20 % à 80 % sans condensation |
| Altitude maximale | ≤ 6500 ft (environ 1981 m) |
| Capacité de chargement | Jusqu'à 4 porte-lames |
| Nombre de stations | 14 maximum (réactifs et/ou rinçage) |
| Volume des réactifs par station | 50 ml |
| Agitation (trempages) | 0 à 3 par station (pour temps > 30 s) |
| Temps d'immersion réglable | 2 à 300 secondes par station |
| Débit des stations de rinçage | 250 ml/min ±100 ml |
| Écran | LCD 2 lignes de 16 caractères |
| Clavier | 6 touches à membrane (Menu, +, -, Entrée, Pause/Stop, Run) |
| Fonctions programmables | Temps de coloration, trempages, position de départ, mode continu, contraste |
| Nettoyage | Surfaces extérieures avec détergent doux ; intérieur acier inoxydable au détergent ; conteneurs au lave-vaisselle ≤ 65 °C |
| Accessoires inclus | 14 conteneurs réactifs, 3 conteneurs rinçage, 3 porte-lames, jeu de câbles, tuyaux, capot métallique |
| Normes | UL, cUL, CE |
FOIRE AUX QUESTIONS - ST 4020 LEICA
Questions des utilisateurs sur ST 4020 LEICA
0 question sur cet appareil. Repondez a celles que vous connaissez ou posez la votre.
Poser une nouvelle question sur cet appareil
Téléchargez la notice de votre Microscope au format PDF gratuitement ! Retrouvez votre notice ST 4020 - LEICA et reprennez votre appareil électronique en main. Sur cette page sont publiés tous les documents nécessaires à l'utilisation de votre appareil ST 4020 de la marque LEICA.
MODE D'EMPLOI ST 4020 LEICA
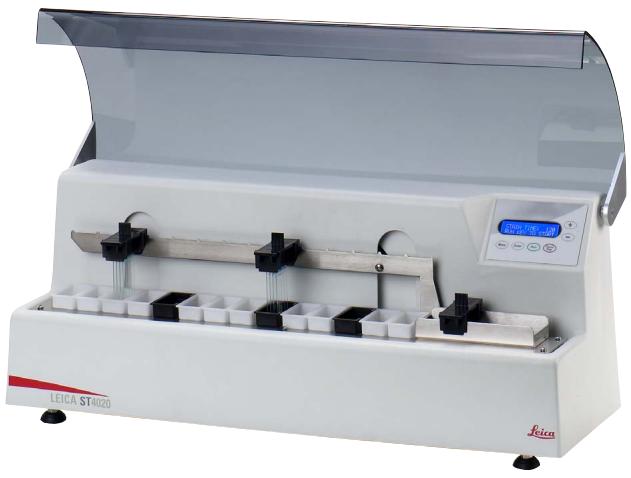
Leica ST4020
Petite coloratrice linéaire
CE
Manuel d'utilisation
Leica ST4020
V1.0 Français – 02/2010
Conservez toujours ce manuel avec l'instrument.
Lisez-le attentivement avant d'utiliser l'instrument.
Les informations, données numériques, notes et jugements de valeur contenus dans cette documentation représentent l'état actuel des connaissances scientifiques et de la technologie de pointe, tel que nous le comprenons après une étude approfondie dans ce domaine.
Nous ne sommes pas tenus de mettre à jour périodiquement le présent manuel en fonction des derniers développements techniques, ni de fournir à nos clients des exemplaires supplémentaires, des mises à jour, etc. de ce manuel.
Pour toute déclaration, dessin, illustration technique, etc. erronés contenus dans ce manuel, nous excluons toute responsabilité dans la mesure permise par le système juridique national applicable dans chaque cas. En particulier, aucune responsabilité n'est acceptée pour toute perte financière ou tout dommage consécutif causé par ou lié au respect des déclarations ou autres informations contenues dans ce manuel.
Les déclarations, dessins, illustrations et autres informations concernant le contenu ou les détails techniques du présent manuel ne doivent pas être considérés comme des caractéristiques garanties de nos produits.
Celles-ci ne sont déterminées que par les dispositions contractuelles convenues entre nous et nos clients.
Leica se réserve le droit de modifier les spécifications techniques ainsi que les procédés de fabrication sans préavis. C'est la seule façon d'améliorer en permanence la technologie et les techniques de fabrication utilisées dans nos produits.
Cette documentation est protégée par les lois sur le droit d'auteur. Tous les droits d'auteur de ce document sont conservés par Leica Biosystems Nussloch GmbH.
Toute reproduction de textes et d'illustrations (ou de parties de ceux-ci) par impression, photocopie, microfiche, webcam ou d'autres méthodes, y compris tout système et support électronique, nécessite l'autorisation écrite préalable de Leica Biosystems Nussloch GmbH.
Pour le numéro de série et l'année de fabrication de l'instrument, veuillez vous référer à la plaque signalétique située à l'arrière de l'instrument.
© Leica Biosystems Nussloch GmbH
Publié par :
Leica Biosystems Nussloch GmbH
Heidelberger Str. 17 - 19
D-69226 Nussloch
Allemagne
Téléphone : +49 (0) 62 24 143-0
Fax : +49 (0) 62 24 143-268
Internet : http://www.leica-microsystems.de
- Informations importantes......6
- Sécurité 7
2.1 Consignes de sécurité 7 2.2 Avertissements 7
- Composants de l'instrument et spécifications....10
3.1 Aperçu – Pièces de l'instrument ...... 10 3.2 Spécifications de l'instrument .... 11 3.3 Description fonctionnelle des composants - Vue d'ensemble du système.... 12 3.3 Zones fonctionnelles du porte-lames 14 3.4 Livraison standard 15 3.5 Données techniques 16
- Installation de l'instrument 17
4.1 Conditions d'emplacement 17 4.2 Déballage de l'instrument....17 4.3 Installation 19 4.4 Raccordement à l'eau 20 4.5 Installation des réservoirs d'eau de rinçage 20 4.6 Remède si le tuyau est trop court....24
- Fonctionnement 25
5.1 Mise sous tension de l'instrument 25 5.2 Fonctions du panneau de commande 25 5.3 Réglage des paramètres de fonctionnement 27 5.4 Réglage du débit d'eau de rinçage 30 5.5 Traitement des lames 31 5.5.1 Démarrage d'un cycle de coloration 32 5.5.2 Ajout de porte-lames supplémentaires pendant un cycle de coloration.... 33 5.5.3 Pause temporaire d'un cycle de coloration 34 5.5.4 Fin prématurée d'un cycle de coloration 35 5.5.5 Retrait des lames traitées 36
6. Nettoyage et entretien 38
6.1 Nettoyage de l'instrument 38 6.2 Instructions d'entretien....39
7. Dépannage 40
7.1 Généralités 40 7.2 Alarmes 40 7.3 Liste de détection et de correction des pannes 41 7.4 Panne de courant 43
8. Accessoires en option .... 44
8.1 Informations de commande 44
9. Garantie et service 51
Symboles dans le texte et leur signification

Avertissements
apparaissent dans un encadré gris et sont marqués par un triangle d'avertissement ⚠️.

Notes,
c'est-à-dire des informations importantes pour l'utilisateur, apparaissent dans un encadré gris et sont signalées par un symbole d'information.


Les solvants et réactifs inflammables sont identifiés à l'aide de ce symbole.

Ce symbole d'avertissement sur l'appareil signale aux utilisateurs le danger de choc électrique. Pour éviter tout risque de blessure par choc électrique, un panneau portant ce marquage, ou ce boîtier, ne doit pas être ouvert.

Les échantillons traités sur cet instrument peuvent être des risques biologiques. Des procédures de sécurité appropriées doivent être suivies pour prévenir tout risque biologique.
(5)
Les numéros entre parenthèses renvoient aux numéros d'articles dans les figures.
RUN
Les touches de fonction à presser sur l'instrument sont écrites en lettres majuscules en gras.
Utilisation prévue
Le Leica Small Linear Stainer ST4020 est utilisé pour la préparation automatisée de colorations histologiques et cytologiques de routine. Il est destiné à être utilisé dans les laboratoires de pathologie pour aider aux tâches suivantes :
- Coloration de fines coupes de tissus ou de spécimens cytologiques sur lames. Les coupes congelées peuvent également être colorées.
- L'instrument ne peut être utilisé que conformément aux instructions contenues dans ce manuel.
Toute autre utilisation de l'instrument est considérée comme inappropriée !
Qualification du personnel
- Le Leica ST4020 ne peut être utilisé que par du personnel de laboratoire formé.
- Tout le personnel de laboratoire désigné pour utiliser l'instrument Leica doit lire attentivement ce manuel d'utilisation et se familiariser avec toutes les caractéristiques techniques de l'instrument avant de tenter de l'utiliser.
Type
Toutes les informations contenues dans ce manuel d'utilisation s'appliquent uniquement au type d'instrument indiqué sur la page de couverture. Une plaque signalétique indiquant le numéro de série de l'instrument est fixée à l'arrière de l'instrument.
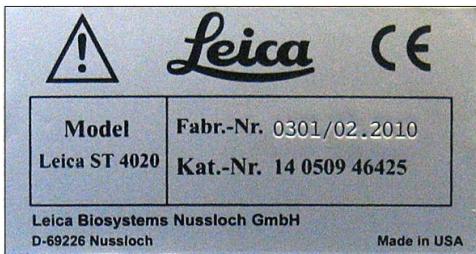
Fig. 1

Les consignes de sécurité et les avertissements de ce chapitre doivent être respectés à tout moment.
Assurez-vous de lire ces instructions, même si vous êtes déjà familiarisé avec le fonctionnement et l'utilisation d'autres produits Leica.
2.1 Consignes de sécurité
Ce manuel d'utilisation contient des instructions et des informations importantes concernant la sécurité de fonctionnement et la maintenance de l'instrument.
Le manuel d'utilisation est une partie importante du produit ; il doit être lu attentivement avant la mise en service et l'utilisation, et doit toujours être conservé à proximité de l'instrument.
Cet instrument a été construit et testé conformément aux réglementations de sécurité pour les appareils électriques de mesure, de contrôle, de régulation et de laboratoire.
Pour maintenir cette condition et assurer un fonctionnement sûr, l'utilisateur doit observer toutes les notes et avertissements contenus dans ce manuel d'utilisation.

Le manuel d'utilisation doit être complété par des instructions correspondantes si cela devient nécessaire en raison des réglementations nationales existantes sur la prévention des accidents et la protection de l'environnement dans le pays où l'instrument est utilisé.

Pour des informations à jour sur les normes applicables, veuillez vous référer à la déclaration CE de l'instrument et à notre site Internet : http://www.leica-microsystems.com

Les dispositifs de protection situés sur l'instrument et les accessoires ne doivent pas être retirés ou modifiés. L'instrument ne doit être ouvert et réparé que par des techniciens de service agréés par Leica.
2.2 Avertissements
Les dispositifs de sécurité installés dans cet instrument par le fabricant ne constituent que la base de la prévention des accidents. L'exploitation sûre de l'instrument relève avant tout de la responsabilité du propriétaire, ainsi que du personnel désigné qui utilise, entretient ou répare l'instrument.
Pour garantir un fonctionnement sans problème de l'instrument, veuillez respecter les instructions et avertissements suivants.
Dangers – consignes de sécurité sur l'instrument lui-même

Les étiquettes d'avertissement sur l'instrument, marquées d'un triangle d'avertissement, indiquent que les instructions d'utilisation correctes (telles que définies dans ce manuel d'utilisation) doivent être suivies lors de l'utilisation ou du remplacement de l'élément marqué. Le non-respect de ces instructions peut entraîner un accident, des blessures, des dommages à l'instrument ou à l'équipement accessoire.
Dangers – transport et installation

Une fois déballé, l'instrument ne peut être transporté qu'en position verticale.
Placez l'instrument sur une paillasse de laboratoire et alignez-le horizontalement.
L'instrument ne doit pas être placé en plein soleil (par exemple, près d'une fenêtre). Évitez les chocs, la lumière directe et les variations de température excessives.
Connectez uniquement l'instrument à une prise de courant mise à la terre. L'effet de protection ne doit pas être éliminé par une rallonge sans conducteur de protection.
L'instrument détecte automatiquement la tension/fréquence de la source d'alimentation.
Le lieu d'installation doit être bien ventilé et ne doit contenir aucune source d'inflammation. Les produits chimiques utilisés dans le Leica ST4020 sont facilement inflammables et dangereux pour la santé.
Ne faites pas fonctionner l'instrument dans des pièces présentant un risque d'explosion.
De l'eau de condensation peut se former dans l'instrument s'il y a une différence de température extrême entre l'entrepôt et le lieu d'installation et si l'humidité de l'air est élevée en même temps. Dans ce cas, un délai d'attente de deux heures doit être respecté avant de mettre l'instrument sous tension.
Avertissements – Manipulation des réactifs

Soyez prudent lors de la manipulation des solvants !
Portez toujours des gants en caoutchouc et des lunettes de sécurité lorsque vous manipulez les produits chimiques utilisés dans cet instrument.
Les réactifs utilisés peuvent être à la fois toxiques et/ou inflammables.
Lors de l'élimination des réactifs usés, respectez les réglementations locales applicables et les réglementations relatives à l'élimination des déchets de l'entreprise/institution dans laquelle l'instrument est utilisé.
Ne fumez pas à proximité de l'appareil de coloration ou des réactifs.
L'appareil de coloration doit être utilisé sous une hotte aspirante.
Risques – travail avec l'instrument

L'instrument ne peut être utilisé que par du personnel de laboratoire formé. Il ne doit être utilisé que dans le cadre de son usage prévu et conformément aux instructions de ce manuel.
En cas d'urgence, coupez l'interrupteur d'alimentation et débranchez l'instrument de la source d'alimentation.
L'instrument doit être positionné de manière à ce que la prise de connexion et l'interrupteur d'alimentation soient facilement accessibles à tout moment.
Le cordon d'alimentation doit être acheminé de manière à ce qu'il ne risque pas d'être piétiné ou pincé par des objets placés dessus ou contre lui.
Un vêtement de protection approprié (blouse de laboratoire, gants, lunettes de protection) doit être porté lors du travail avec les réactifs.
Il y a un risque d'incendie si une flamme nue (par exemple un bec Bunsen) est utilisée directement à côté de l'instrument (vapeurs de solvant). Par conséquent, maintenez toutes les sources d'inflammation à au moins 2 mètres de l'instrument !
Lorsque l'appareil de coloration n'est pas utilisé, gardez les récipients de réactifs couverts avec le couvercle de réactif fourni avec l'appareil.
Risques – nettoyage et entretien

Avant toute opération de maintenance, éteignez l'instrument et débranchez-le de l'alimentation électrique.
Lors de l'utilisation de produits de nettoyage, veuillez respecter les consignes de sécurité du fabricant et les règles de sécurité du laboratoire.
N'utilisez aucun des produits suivants pour nettoyer les surfaces extérieures de l'instrument : alcool, détergents contenant de l'alcool (nettoyants pour vitres), poudres abrasives, solvants contenant de l'acétone, du chlore ou du xylène !
Nettoyez la hotte et le boîtier avec des détergents ménagers doux du commerce. Les surfaces finies ne résistent pas aux solvants !
Empêchez les liquides de pénétrer à l'intérieur de l'instrument pendant le nettoyage ou le fonctionnement.
N'utilisez pas d'accessoires non recommandés par le fabricant du produit, car ils peuvent présenter des dangers, endommager l'instrument et annuler la garantie.
3. Composants et spécifications de l'instrument
3.1 Vue d'ensemble – Pièces de l'instrument
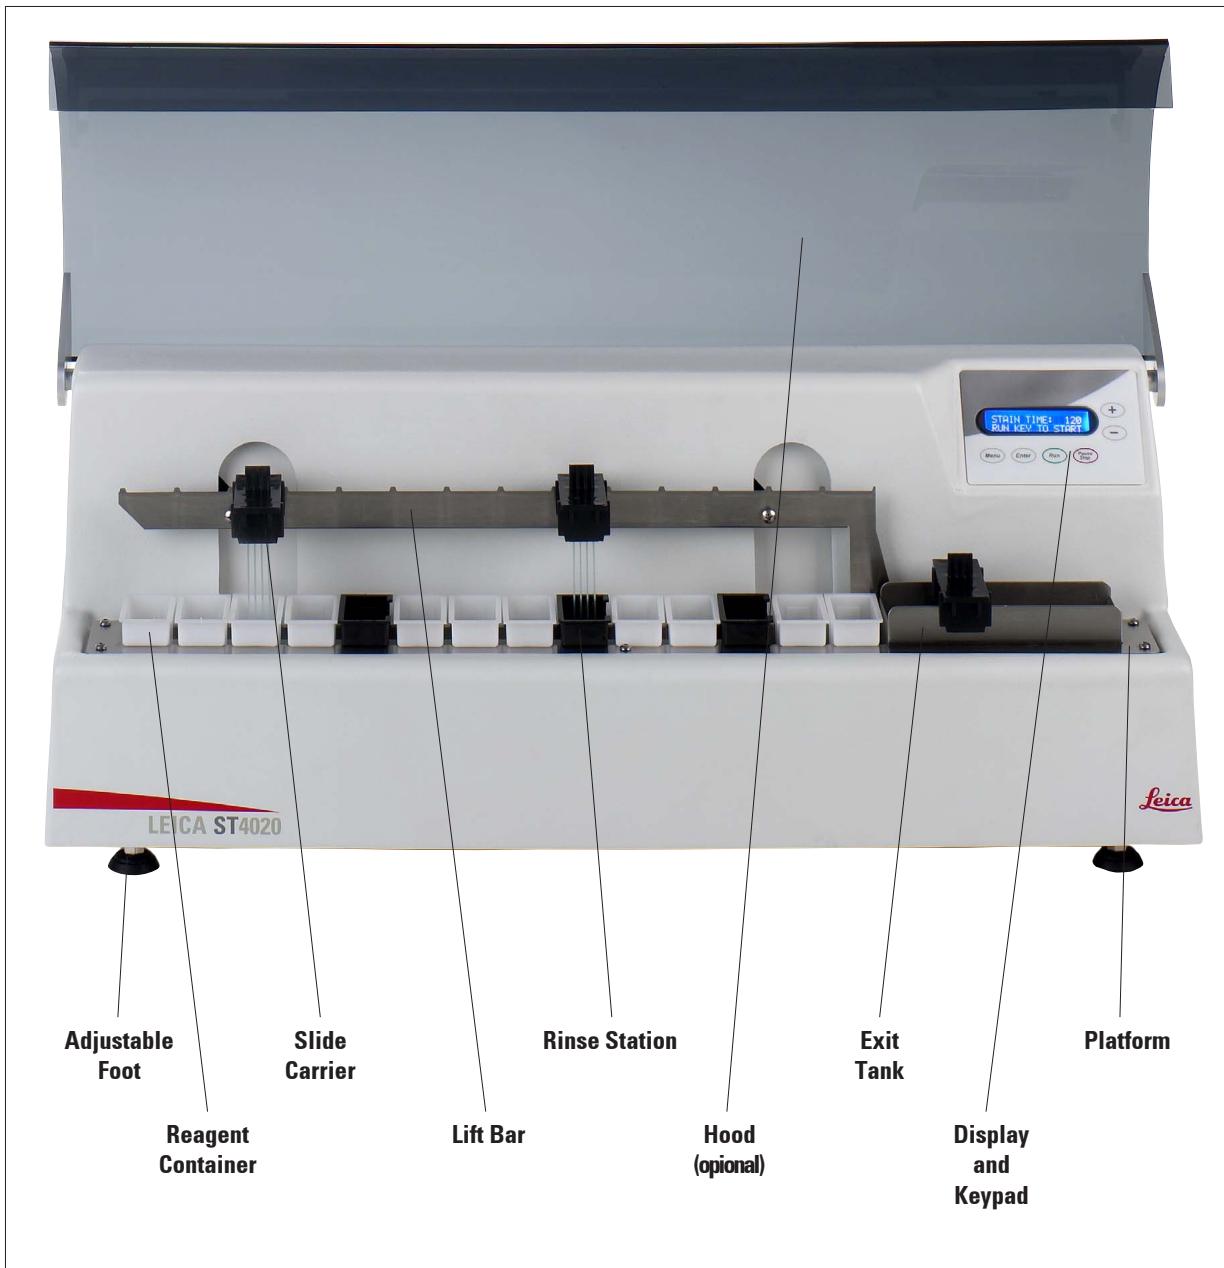
Fig. 2
Vue arrière de l'instrument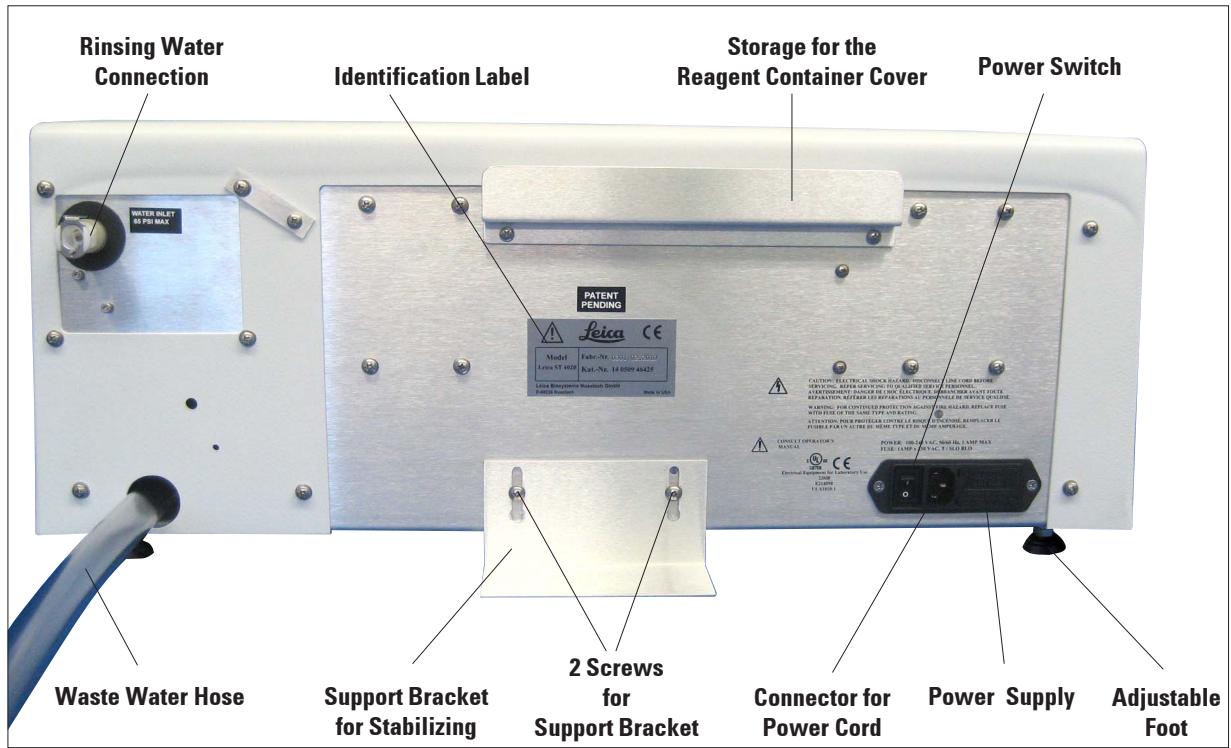
Fig. 3
3.2 Spécifications de l'instrument
Le Leica ST4020 est un colorateur linéaire automatique conçu pour une utilisation autonome, et peut être utilisé pour la coloration de coupes de tissus congelés dans les laboratoires d'histologie ainsi que dans les laboratoires d'anatomopathologie.
Il est idéal pour la coloration d'échantillons provenant de laboratoires utilisant la technique de Mohs, de laboratoires de coupes congelées ou de laboratoires de pathologie chirurgicale générale. De plus, il est destiné à être utilisé en hématologie, cytologie, ainsi que pour la réalisation de colorations H & E de routine.
L'utilisateur charge les lames dans un porte-lames pouvant contenir jusqu'à 4 lames à la fois. Le colorateur fournit 14 postes de réactifs qui peuvent être utilisés comme postes de réactifs ou comme postes d'eau de rinçage en continu, et dispose d'un réservoir de sortie pouvant contenir jusqu'à quatre porte-lames traités.
Les lames restent dans chaque poste de réactif pendant un temps programmable fixe, applicable à tous les postes pendant la coloration. Le temps de poste, le nombre de trempages et la position de départ sont programmables.
3.3 Description fonctionnelle des composants - Vue d'ensemble du système
La figure 2, page 10, montre une vue d'ensemble du colorateur.
Le colorateur linéaire Leica ST4020 comprend les zones fonctionnelles suivantes :
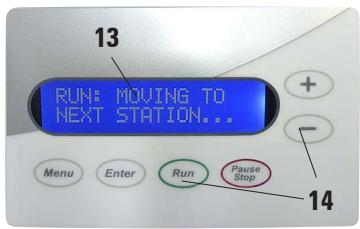
Fig. 4
Clavier (14) avec afficheur (13)
Un clavier à membrane avec 6 touches permet à l'utilisateur de régler les paramètres de traitement et de démarrer ou d'arrêter les cycles de traitement.
Un afficheur LCD composé de deux lignes de 16 caractères chacune, sur lequel sont affichés la progression du traitement des lames et les paramètres de traitement du colorateur. L'utilisateur est guidé pour effectuer diverses actions si nécessaire.
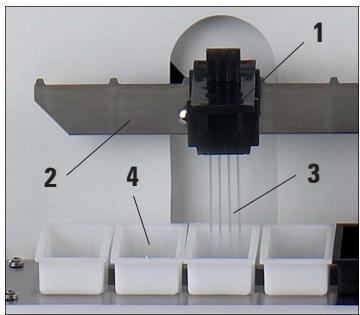
Fig. 5
Porte-lames (1) et barre de levage (2)
L'utilisateur insère les lames à colorer (3) dans les fentes du porte-lames (1). Celui-ci est ensuite placé sur la barre de levage (2), qui le transfère au premier récipient de réactif.
La barre de levage déplace les porte-lames d'un poste au suivant et les dépose finalement dans le réservoir de sortie.
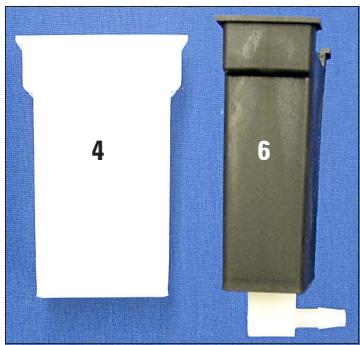
Fig. 6
Récipient de réactif (4) et récipient d'eau de rinçage (6)
Chaque récipient de réactif (4) peut contenir jusqu'à 50 ml de réactif pour la coloration et le traitement.
Au total, 14 conteneurs de réactifs et de rinçage (6) peuvent être disposés pour personnaliser le colorateur afin d'exécuter un protocole de coloration spécifique.
Chacune des 14 positions de traitement doit contenir soit un conteneur de réactif, soit un conteneur de rinçage.
Les conteneurs de rinçage permettent de soumettre les lames à un rinçage à l'eau courante pendant leur traitement.
Description fonctionnelle des composants (suite)
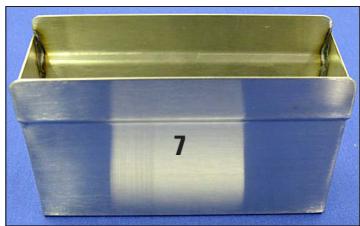
Fig. 7
Réservoir de sortie (7)
Le réservoir de sortie contient les lames traitées. Il peut contenir jusqu'à 4 porte-lames.
Dès que le réservoir de sortie est plein, le colorateur suspend le traitement jusqu'à ce que les porte-lames soient retirés.
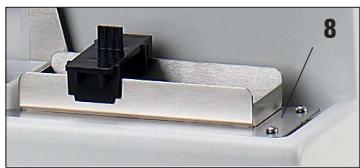
Fig. 8
Plateforme (8)
La plateforme maintient les conteneurs de réactifs, les conteneurs de rinçage et le réservoir de sortie à des emplacements fixes pour garantir le bon fonctionnement du colorateur. Les 14 conteneurs et le réservoir de sortie doivent être placés sur la plateforme pour assurer le bon fonctionnement du colorateur.
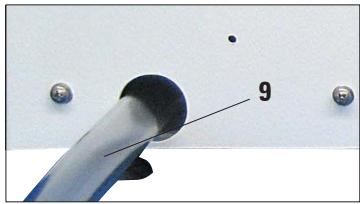
Fig. 9
Tuyau d'évacuation des eaux usées (9)
Le tuyau d'évacuation des eaux usées doit toujours être incliné vers le bas afin que l'eau de rinçage s'écoule dans un récipient collecteur ou un bac de drainage, et ne puisse pas s'accumuler dans le colorateur.
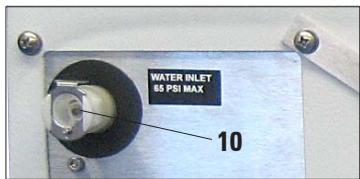
Fig. 10
Alimentation en eau de rinçage (10)
Un port de connexion pour l'alimentation en eau de rinçage est situé à l'arrière de l'appareil de coloration. Le tuyau de connexion nécessaire est inclus dans l'équipement fourni.
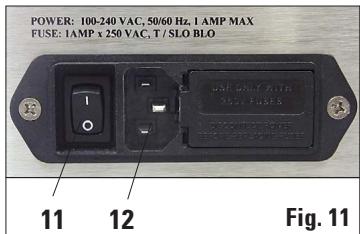
Interrupteur principal (11) et connexion à l'alimentation électrique (12)
L'appareil de coloration est connecté à l'alimentation électrique (12) par le cordon d'alimentation et activé avec l'interrupteur principal (11).
L'instrument peut fonctionner avec un courant alternatif de 100 à 230 volts avec une fréquence de puissance de 50/60 Hz.
3.3 Zones fonctionnelles du porte-lames
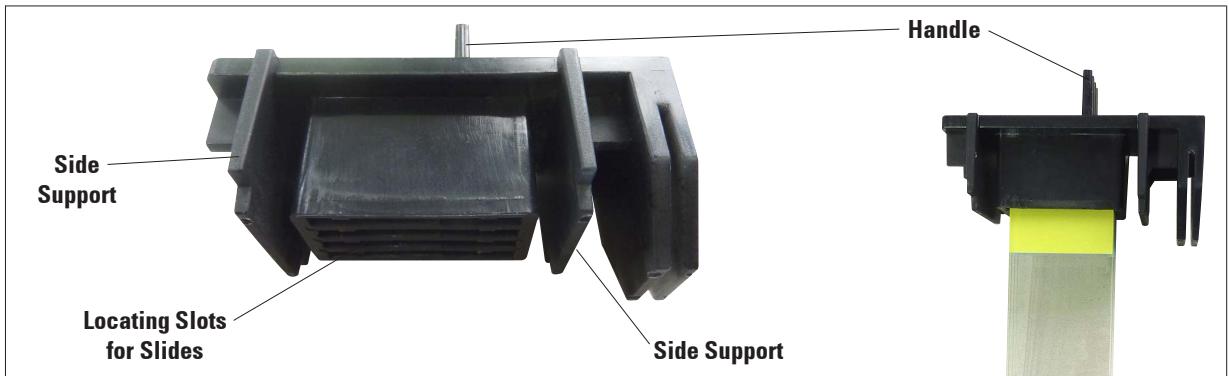
Les figures 12 et 13 montrent comment positionner les porte-lames au-dessus des conteneurs de réactifs.
Lors du placement d'un porte-lames avec des lames pour coloration dans la barre de levage, assurez-vous que les supports latéraux du porte-lames sont alignés de sorte que le porte-lames soit positionné au-dessus du conteneur.
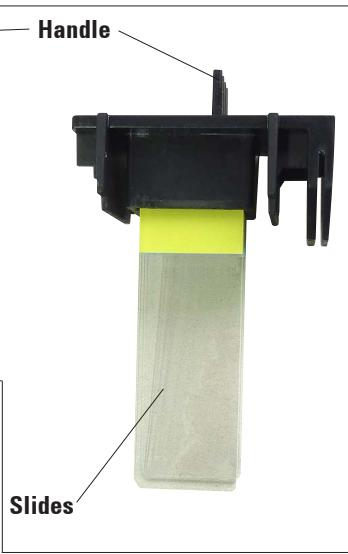
Fig. 12
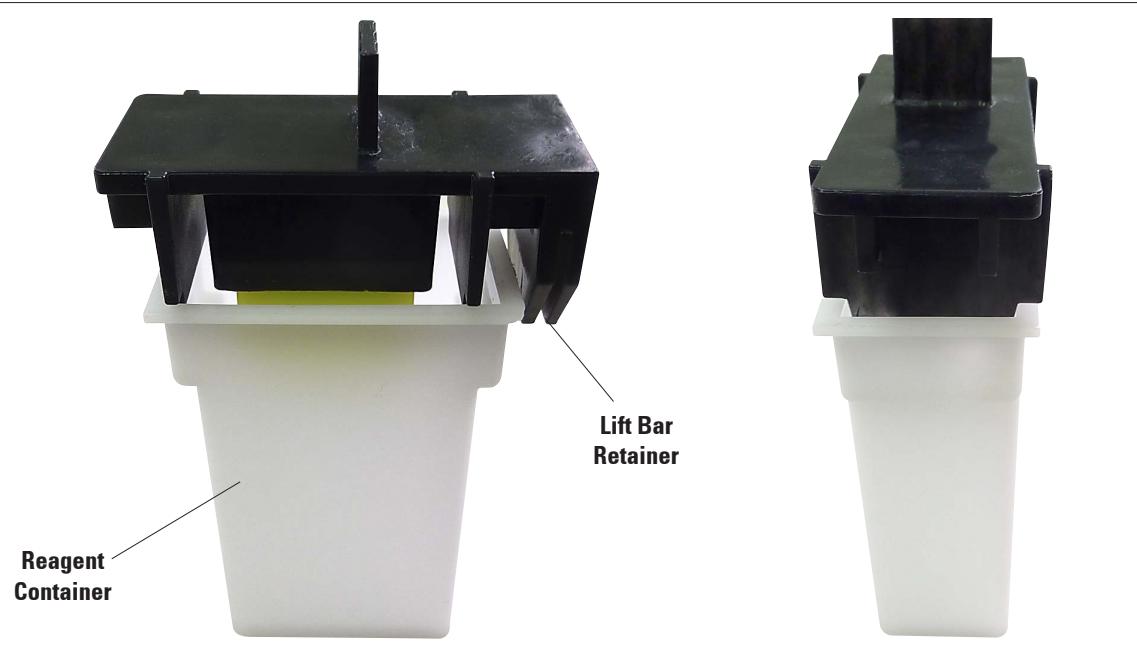
Fig. 13
3.4 Livraison standard
La livraison standard du Leica ST4020 comprend les articles suivants :
1 Leica ST4020 instrument de base 14 0509 46425 14 Conteneurs de réactifs (blancs) 14 0509 46437 3 Conteneurs de rinçage à eau (noirs) 14 0509 46441 3 Porte-lames 14 0509 46438 1 Jeu de cordons d'alimentation : 1 Cordon d'alimentation "D" 14 0509 46480 1 Cordon d'alimentation "UK" ST-BU F-5A 14 0509 46481 1 Cordon d'alimentation "US" 14 0509 46479 1 Tuyau d'entrée d'eau 14 0509 46532 1 Tuyau de drainage d'eau (déjà installé) 14 0509 46445 1 Collecteur de rinçage avec restrictor (déjà installé) 14 0509 46533 1 Réservoir de collecte de sortie 14 0509 46450 1 Jeu de tuyaux, raccords, attaches de câble : 14 0509 46459 1 Tuyau d'eau de 16 pouces de long, ∅1/8" 3 raccords en ligne 2 bouchons 10 attaches de câble 1 Support de montage 14 0509 46570 1 Couvercle métallique pour conteneur de réactifs 14 0509 46442 1 Jeu de fusibles de remplacement : 2 Fusibles 250 V, T 1.0 A 14 0509 46463 1 Manuel d'instructions pour Leica ST4020 "Small Linear Stainer" 14 0509 80001

Veuillez vérifier toutes les pièces livrées par rapport à la liste de colisage et à votre commande pour confirmer que la livraison est complète ! Si vous constatez des divergences, veuillez contacter sans délai votre bureau de vente Leica.
3.5 Données techniques
Général
| Admissions: | UL, cUL, CE |
| Nominal voltage: | 100 V – 240 V +/- 10% AC |
| Nominal frequency: | 50 to 60 Hz |
| Power draw: | 25 VA |
| IEC 1010 classification: | Protective class 1Pollution degree 2Overvoltage installation category II: |
| Secondary fuses: | Melting fuses 1.0 A T ∅ 5.0 x 20 mm |
| Operating temperature range: | 15°C to 30°C |
| Relative humidity: | 20% to 80%, non-condensing |
| Altitude: | ≤ 6500 ft (Ambient pressure. 29 - 31 inch Hg) |
Dimensions et poids
| Dimensions, (W x D x H): | 620 mm x 250 mm x 200 mm |
| Height with Hood open: | 430 mm |
| Dry weight, unpacked: | approx. 16 kg |
| Instrument with accessories: | approx. 19 kg |
| Weight incl. packing material: | approx. 21 kg |
Performances
| Slide processing rate: | Depends on program structure and loading |
| Loading capacity: | max. 4 slide carriers |
| Stations: | max. 14 |
| Reagent stations: | max. 14 |
| Washing stations: | max. 3 (then only 11 reagent stations are possible) |
| Reagent container volume: | 50 ml |
| Agitation: | 0 to 3 dips per station for dwell times >30 sec. |
| Throughput rate of washing stations: | 250 ml/min +/-100 ml, depending on number of stations |
| Dwell time adjustment: | 2 to 300 sec. at each station |
| Capacity of the slide carrier: | max. 4 slides |
| Capacity of the exit tank: | max. 4 slide carriers |
4.1 Conditions d'installation
- L'instrument nécessite une surface d'installation d'environ 250 x 700 mm. Un espace d'au moins 25 cm doit être laissé entre l'instrument et le mur le plus proche ou d'autres instruments.
- Si le colorateur doit être utilisé avec des postes de rinçage, les raccordements d'eau douce et d'eau usée doivent se trouver à moins de 1,2 m des orifices situés à l'arrière de l'instrument.
- Il faut veiller à ce qu'il y ait un espace libre suffisant (environ 30 cm) au-dessus de l'instrument pour permettre l'ouverture sans obstruction de la hotte en option. • Température ambiante constamment comprise entre +10°C et +30°C.
- Humidité relative de l'air maximale de 80 %, sans condensation.
- Sol pratiquement exempt de vibrations. Éviter les vibrations, la lumière directe du soleil et les fortes variations de température.

Les produits chimiques utilisés dans le Leica ST4020 sont facilement inflammables et dangereux pour la santé.
Le site d'installation du Leica ST4020 doit être bien ventilé et il ne doit y avoir aucune source d'inflammation de quelque nature que ce soit dans la zone.
L'instrument ne doit pas être utilisé dans des zones à risque d'explosion.
4.2 Déballage de l'instrument

Vérifiez d'abord la livraison pour détecter tout dommage externe à l'arrivée. S'il est évident que la livraison a été endommagée pendant le transport, veuillez immédiatement faire une réclamation auprès du transporteur.
- Ouvrez l'emballage.
- Retirez tout le matériau en mousse. • Sortez tous les accessoires et le manuel d'utilisation.
- Vérifiez le contenu du colis livré par rapport au bon de commande pour vous assurer que tous les composants et accessoires sont inclus.
Déballage de l'instrument (suite)

Ces instructions de déballage ne s'appliquent que si la boîte est placée avec les symboles orientés vers le haut pour le déballage.

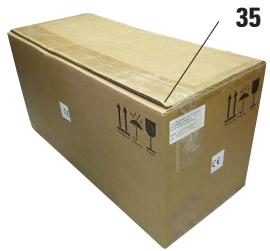
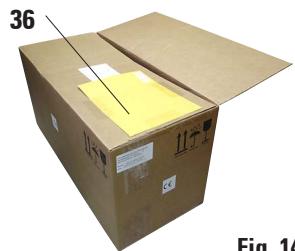
Fig. 14

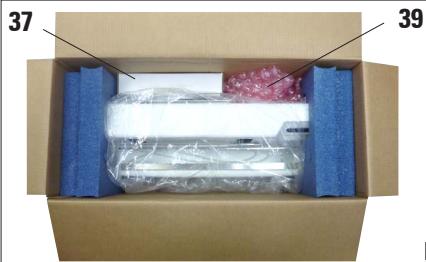
Fig. 15
- Coupez le ruban d'emballage (35) sur le bord supérieur de la boîte.
- Retirez l'enveloppe jaune contenant les « Documents de conformité » (36) et rangez-la dans un endroit sûr.
- Retirez les accessoires (37), le matériau d'emballage (39) et le manuel d'utilisation.
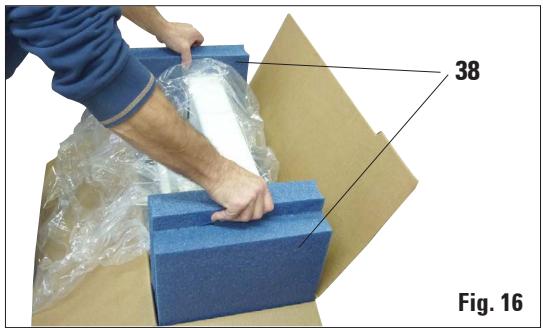
- Utilisez les blocs de mousse moulés (38) pour sortir l'instrument de l'emballage intérieur et placez-le sur une paillasse de laboratoire stable.

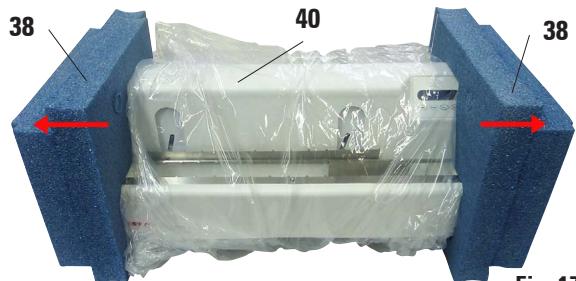
Fig. 17
- Écartez les blocs de mousse moulés (38) des côtés de l'instrument. Retirez le film protecteur (40) de l'instrument.
- L'instrument doit maintenant être préparé pour une utilisation correcte conformément aux instructions du manuel d'utilisation fourni.
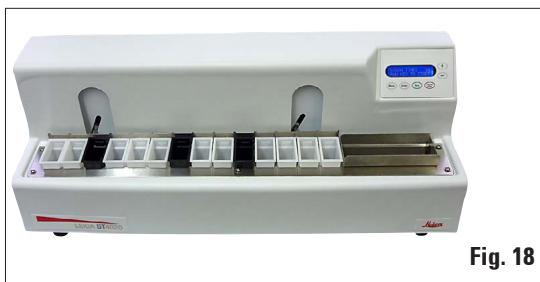

L'emballage doit être conservé pendant toute la durée de la garantie.
Pour retourner l'instrument, suivez les instructions ci-dessus dans l'ordre inverse.
4.3 Installation
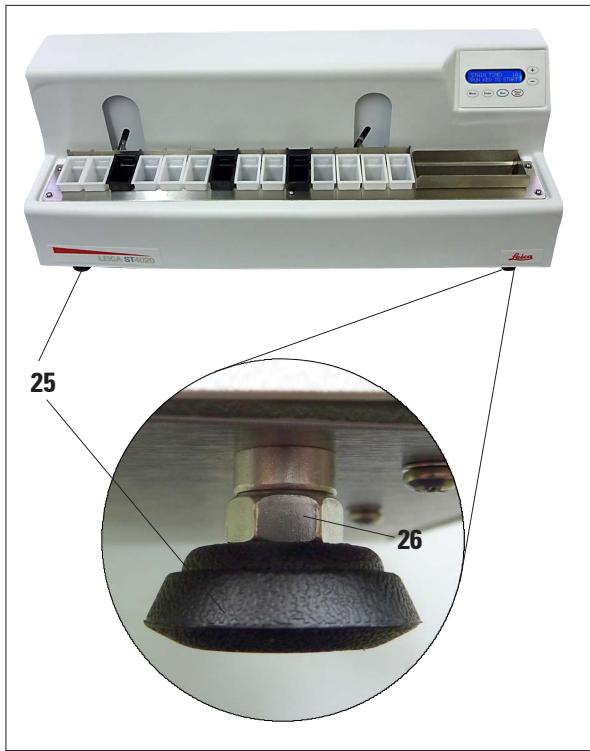
Fig. 19
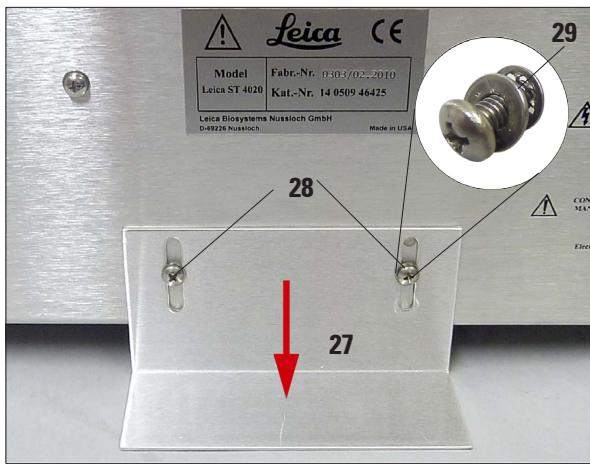
Fig. 20
Alignement horizontal
Pour un travail sûr et précis, il est important que tous les pieds de l'instrument soient en contact uniforme avec la surface d'installation.
Le colorateur est aligné horizontalement en usine. Si une surface parfaitement plane ou horizontale n'est pas disponible sur le site d'installation, l'instrument doit être réaligné.
À cette fin, les pieds de l'instrument (25) sont réglables en hauteur.
- Pour l'alignement, desserrez les contre-écrous (26) à l'aide d'une clé à fourche de taille 7/16".
- Réglez les pieds de l'instrument (25) jusqu'à ce que l'instrument soit dans une position stable sur le lieu d'installation, conformément aux exigences.
- Resserrez les contre-écrous.
Montage de l'équerre de support
Pour garantir que l'instrument ne puisse pas basculer lorsque ses touches sont enfoncées, l'équerre de support (27) doit être montée à l'arrière.
- Pour ce faire, dévissez d'abord les deux vis à tête cruciforme (28) avec un tournevis. Placez-les avec les deux rondelles associées (29)
- Placez le support de fixation contre l'arrière de l'instrument (Fig. 20), réinsérez les deux vis sans les serrer complètement.
- Appuyez sur le support de fixation vers le bas sur la surface de support jusqu'à ce qu'une face de la plaque soit affleurante avec la surface du banc, puis serrez la plaque dans cette position.
4.4 Raccordement à l'eau
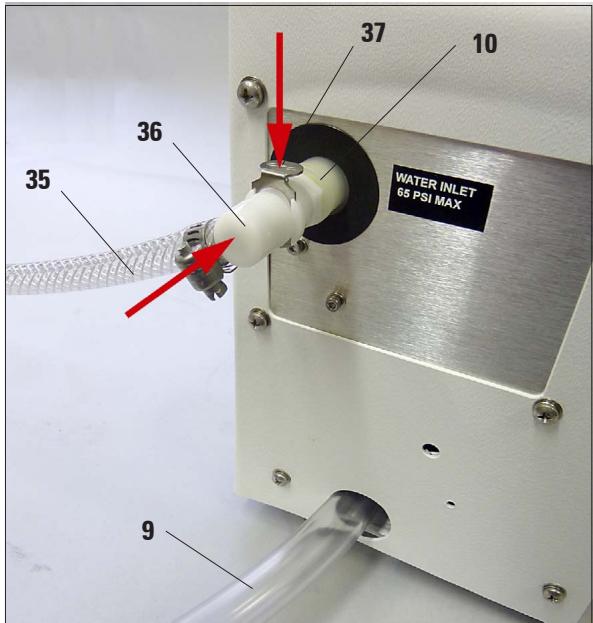
Fig. 21
- Acheminez le tuyau de vidange (9) dans un réservoir de collecte ou un bac à déchets approprié. Assurez-vous que le tuyau n'est pas plié et que l'eau peut s'écouler librement vers le bas.
- Connectez ensuite l'alimentation en eau de rinçage (35) au colorateur.
- Pour ce faire, poussez le connecteur (36) dans l'orifice (10) de l'instrument jusqu'à ce qu'il s'enclenche. Pour détacher le tuyau, appuyez sur la plaque (37) et retirez le connecteur.
- Connectez l'autre extrémité du tuyau à un robinet d'eau approprié. N'ouvrez pas encore l'alimentation en eau !
Le réglage du débit d'eau de rinçage est décrit au chapitre 5.4.
4.5 Installation des conteneurs d'eau de rinçage
Jusqu'à trois postes de rinçage peuvent être prévus sur le colorateur. Les conteneurs d'eau de rinçage peuvent être placés sur l'un des 14 postes de réactifs.
L'équipement fourni comprend trois tuyaux avec des raccords en Y. Les attaches de câble sur ces raccords en Y ne doivent pas être retirées. De plus, ne détachez pas les raccords en Y des tuyaux associés.
Des postes de rinçage étanches et fonctionnels, conformément au protocole de coloration souhaité, peuvent être mis en place à l'aide d'attaches de câble, de tuyaux, de bouchons et de connecteurs supplémentaires également inclus dans la livraison.

Lors de la mise en place des postes de rinçage, il faut s'assurer que les conteneurs d'eau de rinçage sont positionnés horizontalement sur la plateforme, et que tous les tuyaux sont posés horizontalement au fond du réservoir de vidange, en dehors de la trajectoire de la barre de levage. Les tuyaux d'eau de rinçage ne doivent subir aucune contrainte de traction ou d'étirement.
Installation des conteneurs d'eau de rinçage (suite)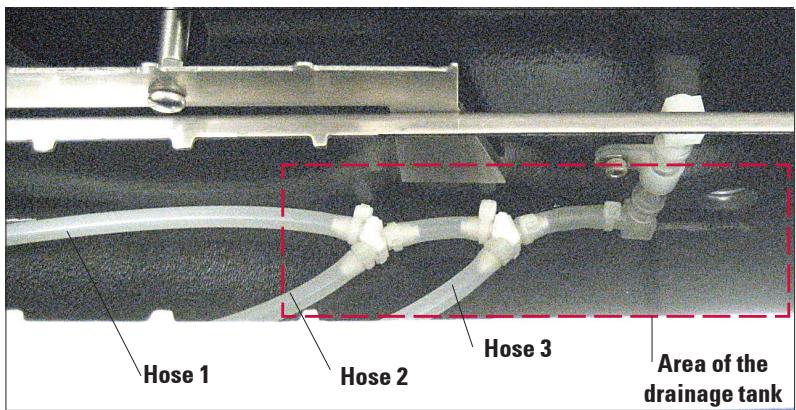
Fig. 22 La Fig. 22 montre comment les tuyaux sont acheminés dans l'instrument.
Si vous souhaitez travailler entièrement sans eau, aucune autre étape n'est nécessaire – il suffit de ne pas raccorder de conduite d'alimentation en eau à l'instrument.
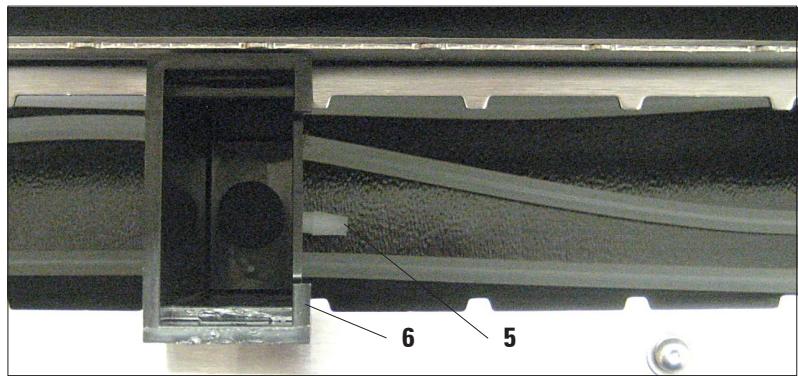
Fig. 23
Placez les récipients d'eau de rinçage (6) à la position souhaitée sur la plateforme. La barre de fixation du récipient de rinçage pointée (5) vers le réservoir de sortie (voir fig. 23).
Commencez par le poste le plus proche du réservoir de drainage.
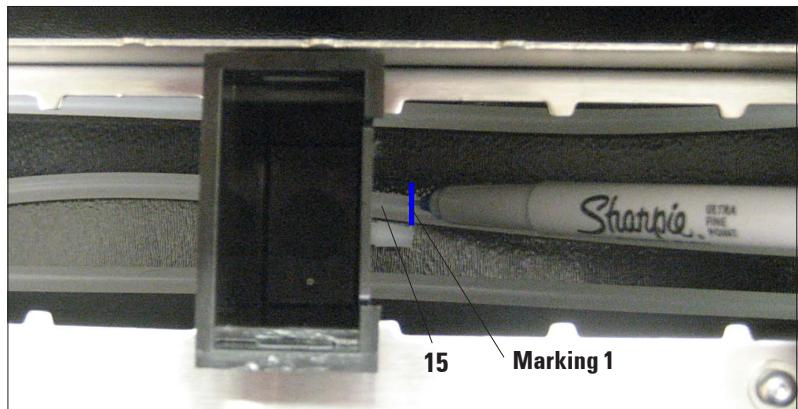
Fig. 24
Le tuyau (15) doit être posé à niveau le long du fond de l'instrument.
Marquez l'extrémité du tuyau qui sera raccordée au récipient d'eau de rinçage.
C'est le « Repère 1 ».
Installation des récipients d'eau de rinçage (suite)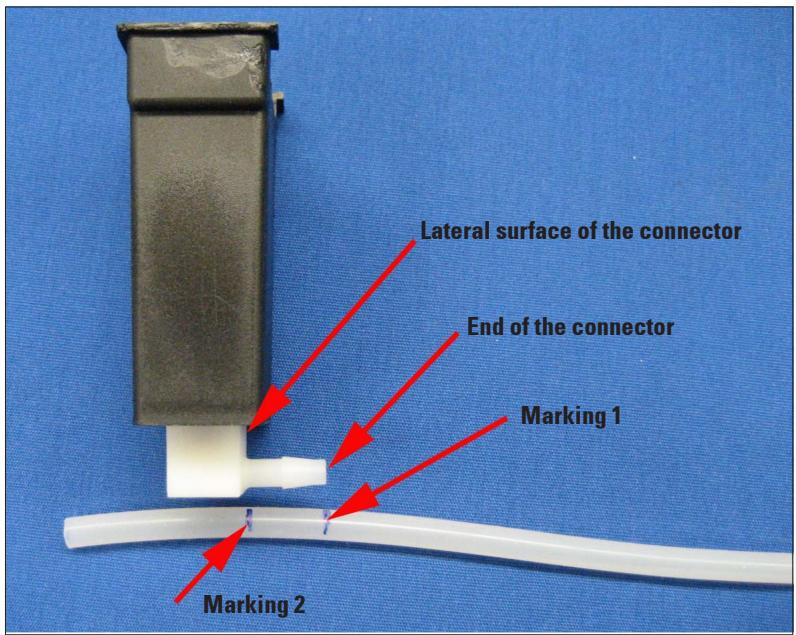
Fig. 25
- Retirez maintenant le récipient d'eau de rinçage et le tuyau du support.
- Alignez le repère 1 sur l'extrémité du connecteur et faites un deuxième repère (« Repère 2 ») pour indiquer la surface latérale du connecteur (Fig. 25).
- Coupez le tuyau au niveau du repère 2.
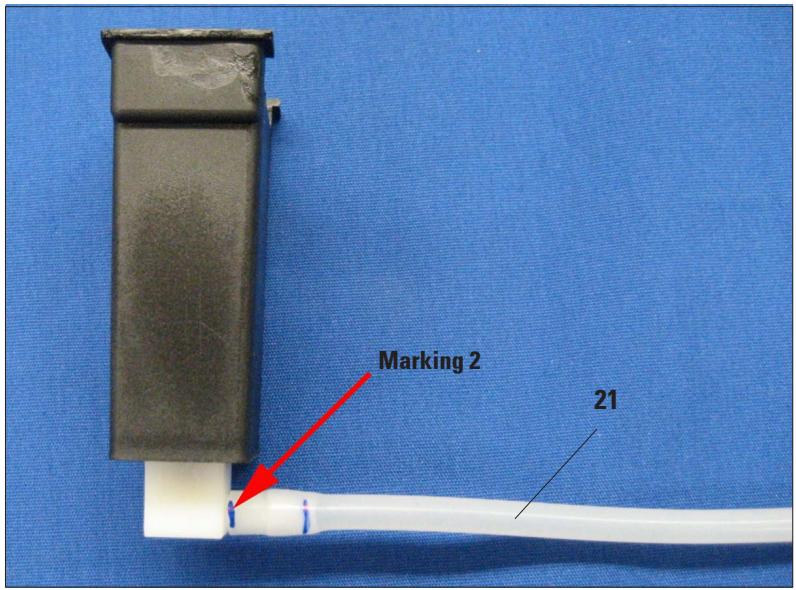
Fig. 26
- Poussez ensuite le tuyau (21) complètement sur le raccord en le tournant jusqu'à ce que l'extrémité du tuyau affleure la surface latérale du raccord (Fig. 26).
- Si le tuyau n'est pas poussé complètement sur le raccord, il risque de se détacher dès que l'alimentation en eau est ouverte.

Ne pas étirer le tuyau pour le faire tenir sur le raccord.
Installation des réservoirs d'eau de rinçage (suite)
- Replacez le réservoir d'eau de rinçage à la position souhaitée sur la plateforme. Vérifiez que le réservoir d'eau de rinçage est positionné horizontalement sur la plateforme. Si le tuyau est trop long, le réservoir d'eau de rinçage s'inclinera vers la droite ; s'il est trop court, il s'inclinera vers la gauche.

Si le réservoir d'eau de rinçage n'est pas positionné horizontalement sur la plateforme, le bon fonctionnement du filtre ne peut pas être garanti.
- Répétez les étapes décrites ci-dessus pour les autres postes de rinçage.
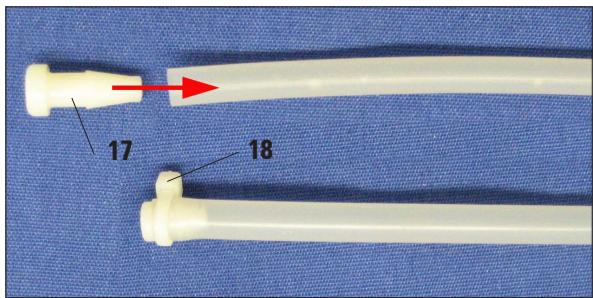
Fig. 27
Si un ou deux postes de rinçage seulement sont nécessaires, les tuyaux non utilisés doivent être obturés avec un bouchon (17), voir Fig. 27.
- Pour ce faire, tournez et poussez le bouchon complètement dans l'extrémité du tuyau, puis fixez-le avec un collier de serrage (18).
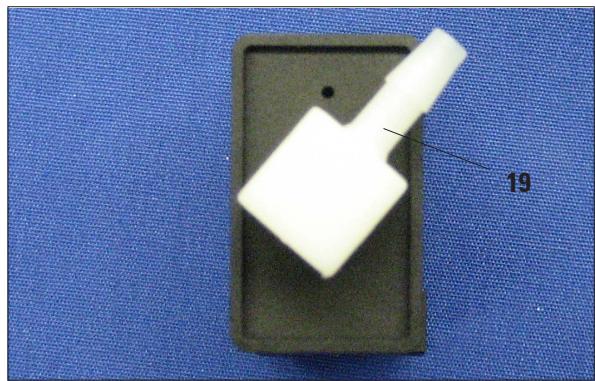
Fig. 28
Si deux postes de rinçage doivent être situés immédiatement l'un à côté de l'autre, le raccord (19) pour le poste de gauche doit être aligné comme indiqué sur la Fig. 28.
4.6 Remède si le tuyau est trop court
Si le tuyau (21) à l'un des postes est trop court, ou si un tuyau a été coupé trop court par erreur, le remède suivant peut aider :
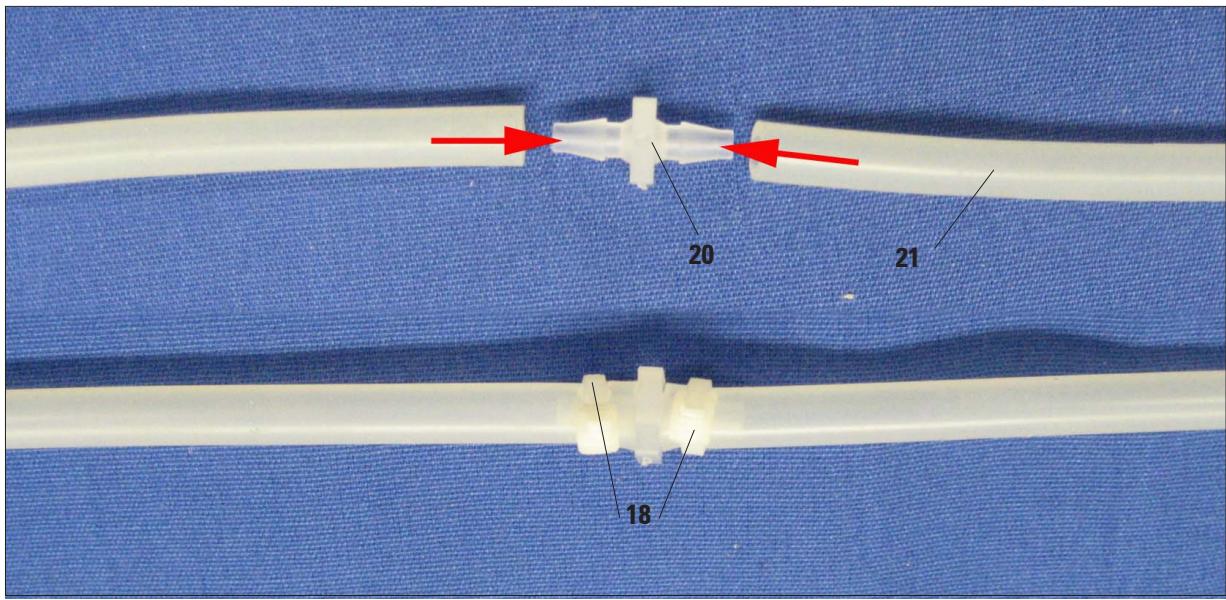
Fig. 29
- Coupez le tuyau approximativement au milieu entre le connecteur en Y et la station de rinçage.
- Utilisez le connecteur d'extension (20) fourni avec le paquet pour fixer une section de tuyau supplémentaire (21) de la longueur requise.
- Pour ce faire, mesurez à nouveau la longueur du tuyau et, si nécessaire, coupez-le exactement à la longueur requise.
- Poussez les deux extrémités du tuyau aussi loin que possible sur le connecteur d'extension, puis fixez chaque tuyau avec un collier de serrage (18).
- Enfin, vérifiez à nouveau que le réservoir d'eau de rinçage est positionné horizontalement sur la plateforme.
5.1 Mise sous tension de l'instrument

L'instrument DOIT être connecté à une prise de courant mise à la terre.
Seul le cordon d'alimentation fourni peut être utilisé, qui est destiné à l'alimentation électrique locale (prise). L'effet protecteur ne doit pas être éliminé par une rallonge sans conducteur de protection à la terre.
La prise secteur utilisée pour l'alimentation doit être proche de l'instrument et facilement accessible.
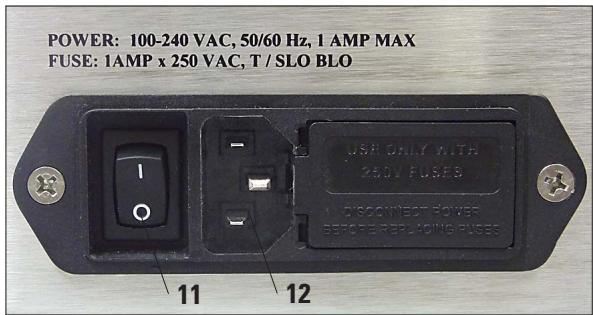
Fig. 30
- Avant de brancher l'instrument sur le secteur, assurez-vous que l'interrupteur principal (11) à l'arrière de l'instrument est en position OFF ("0").
- Branchez le câble d'alimentation dans la prise d'alimentation secteur (12) et connectez-le à la prise murale. Si applicable, allumez l'interrupteur de la prise.
- Ensuite, allumez l'interrupteur principal (11) sur l'instrument (ON = "I").
5.2 Fonctions du panneau de commande
Le panneau de commande se compose d'un clavier à membrane avec six touches à pression, et d'un écran composé d'un affichage à deux lignes, chaque ligne ayant 16 caractères.
Cette fonction sert à contrôler les fonctions de l'instrument et à programmer le logiciel. L'état actuel de l'appareil et les opérations en cours sont affichés pendant le traitement d'une tâche de coloration.
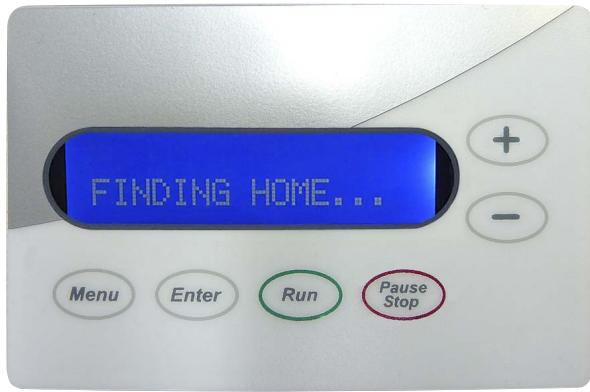
Fig. 31
- L'instrument met quelques secondes à s'initialiser. Pendant ce temps, la version du logiciel installée s'affiche sur le moniteur.
- Ensuite, la barre de levage effectue un mouvement circulaire pour s'assurer qu'elle est dans la bonne position au début de la coloration.
Le message FINDING HOME... s'affiche à l'écran.
Fonctions du panneau de commande (suite)

Il y a six boutons-poussoirs sur le panneau de commande, qui servent à régler les paramètres de fonctionnement et à contrôler l'instrument.
Les touches ont les fonctions suivantes :
Les paramètres de fonctionnement peuvent être affichés et vérifiés avec la touche MENU.
Chaque fois que la touche MENU est enfoncée, un autre des six paramètres de fonctionnement s'affiche.
Chaque nouveau réglage prend effet immédiatement. De plus, comme tous les réglages sont sauvegardés en mémoire, ils seront automatiquement utilisés la prochaine fois que le système sera mis sous tension.

Le paramètre de fonctionnement actuellement affiché peut être augmenté ou diminué en appuyant respectivement sur les touches PLUS (+, augmente la valeur affichée) et MOINS (-, diminue la valeur affichée).

Appuyer sur la touche PAUSE/STOP permet à l'opérateur de quitter le menu de configuration sans modifier le paramètre actuellement affiché.
Pendant le fonctionnement :
Appuyer une fois sur PAUSE/STOP interrompt l'opération de coloration en cours afin qu'un autre porte-lames puisse être placé dans la barre de levage.
Appuyer deux fois sur PAUSE/STOP (rapidement) met fin au programme en cours et le système revient en mode veille.

Si la touche ENTER est enfoncée, le paramètre sélectionné est mémorisé dans le système.
Le système revient en mode veille chaque fois qu'un nouveau réglage est saisi, ou lorsque l'utilisateur quitte le menu de configuration en appuyant sur la touche PAUSE/STOP.

Appuyer sur la touche RUN démarre une opération de coloration sur la base des valeurs affichées à l'écran. En même temps, la vanne de rinçage est activée, l'affichage change et le minuteur apparaît, décomptant le temps de traitement restant.
5.3 Réglage des paramètres de fonctionnement
Le processus de réglage des paramètres opérationnels est simple et direct.
Lorsque le système est "ON" et en mode veille (c'est-à-dire ni en mode RUNNING ni en mode SETUP), l'opérateur peut afficher et vérifier les paramètres de configuration en appuyant sur la touche MENU.
Si la touche ENTER est enfoncée, le paramètre sélectionné est mémorisé dans le système.
Appuyer sur la touche PAUSE/STOP permet à l'opérateur de quitter le menu de configuration sans modifier le paramètre actuellement affiché.
Chaque nouveau réglage prend effet immédiatement.
De plus, comme tous les réglages sont sauvegardés en mémoire, ils seront automatiquement utilisés à la prochaine mise sous tension du système.
Le système revient en mode veille chaque fois qu'un nouveau réglage est saisi, ou lorsque l'utilisateur quitte le menu de configuration en appuyant sur la touche PAUSE/STOP.
Temps de traitement
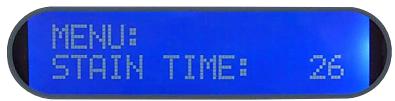



La durée d'immersion des lames à chaque poste peut être réglée de 2 à 300 secondes.
- Lorsque la touche PLUS ou MOINS ("+" ou "-") est enfoncée, le temps de coloration est modifié :
une seconde à la fois dans une plage de 2 à 30 secondes, cinq secondes à la fois dans une plage de 30 à 60 secondes, dix secondes à la fois dans une plage de 60 à 300 secondes.
- Après avoir appuyé sur ENTER, le nouveau temps de traitement est activé, et ce temps est mémorisé pour une utilisation future.
Contraste de l'affichage
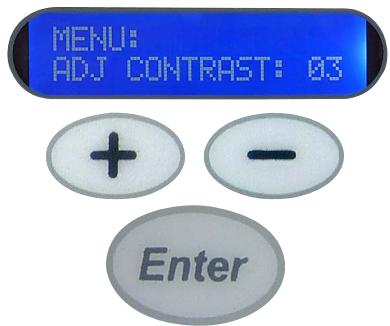
Le contraste de l'affichage à cristaux liquides peut être réglé selon les préférences de chaque utilisateur.
- La plage de réglage est comprise entre 1 et 15, 1 étant le réglage le plus lumineux.
- Appuyer sur la touche PLUS ou MOINS modifie la valeur de contraste de l'affichage. • Après avoir appuyé sur ENTER, le contraste réglé est mémorisé.
Étalonnage du mécanisme de transfert
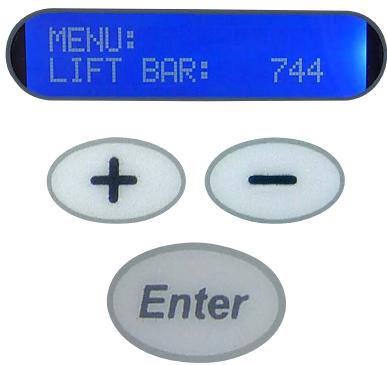
La position à laquelle le mouvement de transfert est interrompu et le traitement commence peut être ajustée en appuyant sur les touches PLUS (+) ou MOINS (-), puis sur la touche ENTER.
- Appuyer sur la touche PLUS ou MOINS modifie le nombre de pas effectués par le moteur pas à pas de 8. La valeur minimale autorisée est 704, la valeur maximale autorisée est 1000. Le réglage typique est de 944 à 960.
- Après avoir appuyé sur ENTER, le nombre de pas est mémorisé. De plus, le mécanisme de transfert avance jusqu'à la station suivante, s'arrêtant lorsque le nombre de pas sélectionné a été effectué.
Nombre d'immersions
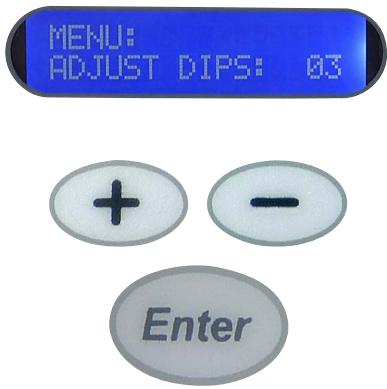
Le nombre d'immersions effectuées pour une coloration uniforme peut être réglé dans une plage de 0 à 3.
- Appuyer sur la touche PLUS ou MOINS modifie le nombre d'immersions effectuées par l'instrument. • Après avoir appuyé sur ENTER, le nombre d'immersions est mémorisé.
Si une valeur de 1, 2 ou 3 a été sélectionnée, le système immerge les porte-lames le nombre de fois correspondant dès qu'ils atteignent une station.
Tous les mouvements d'immersion suivants sont effectués à intervalles de 20 secondes chacun si le temps de traitement est de 30 secondes ou plus. Si le temps de traitement est inférieur à 30 secondes, aucune immersion ne se produira, quel que soit le réglage sélectionné.
Position de départ


Fonctionnement continu


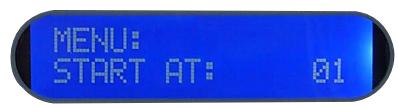
La position de départ doit être définie si des protocoles de coloration qui n'utilisent pas les 14 positions de coloration sont exécutés.
Afin de mettre les lames traitées à la disposition de l'utilisateur au niveau du bac de sortie dans les plus brefs délais, une fonction de position de départ programmable a été ajoutée.
- Appuyer sur la touche PLUS ou MOINS modifie le numéro de la position de départ exécutée par le système. Après avoir appuyé sur ENTER, la position de départ est mémorisée.
L'utilisateur peut spécifier quelle station est utilisée comme position de départ.
- Par exemple, un protocole qui ne nécessite que dix stations pourrait utiliser les stations 5 à 14 plutôt que de commencer à la première station.
- Cela place les lames dans le bac de sortie dès qu'elles quittent la dernière station de traitement. En spécifiant la position de départ comme position 5, l'utilisateur permet au système d'émettre son « bip de rappel » au bon moment.
- Ce bip informe l'opérateur que les lames ont atteint le bac de sortie.
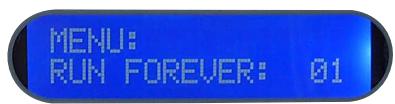
Il existe deux réglages, qui peuvent être définis à l'aide des touches PLUS ou MOINS.
- Avec un réglage sur « 00 », le colorateur fonctionne tant que des porte-lames sont chargés et subissent le processus de coloration.
- Un bip retentit chaque fois qu'un porte-lames est prêt. Lorsque 3 racks ont atteint le bac de sortie, un signal retentit 5 fois.
- Avec le réglage « 01 », le colorateur fonctionne en continu, qu'il soit chargé ou non. Un bip retentit chaque fois qu'un porte-lames est prêt. Après avoir appuyé sur ENTER, le mode de fonctionnement est mémorisé.
5.4 Réglage du débit d'eau de rinçage
Pour régler le débit de l'eau de rinçage, procédez comme suit :
![graph TD A["Menu"] --> B["STAIN TIME: 45 RUN KEY TO START"] B --> C["+ -"] C --> D["STAIN TIME: 60 RUN KEY TO START"] D --> E["Enter"] E --> F["Run"] F --> G["2x Pause Stop"] G --> H["RUN HALTED! PUSH ENTER TO RESET."] H --> I["Enter"] I --> J["FINDING HOME..."]](/content/2025/01/166276/images/12174087db8a9e6c80a6bdd2b5cb6a7a4f374c6e2b572bf845be7cdfbedb7c03.jpg)
- Réglez d'abord un temps de coloration de 60 secondes. Pour ce faire, appuyez une fois sur MENU, puis appuyez à plusieurs reprises sur la touche PLUS ou MOINS jusqu'à ce qu'un temps de traitement de 60 secondes soit affiché.
- Appuyez ensuite sur la touche ENTER pour confirmer ce temps de traitement.
- Appuyez maintenant sur RUN. Le compte à rebours du temps de station s'affichera tandis que la vanne d'eau de rinçage à l'intérieur de l'appareil s'active.
- Ouvrez maintenant lentement le robinet auquel le tuyau d'alimentation est connecté, et ajustez le débit afin que l'eau s'écoule dans le récipient d'eau de rinçage à un débit suffisant et que l'eau de rinçage puisse s'écouler sans obstruction.

N'ajustez PAS le débit trop élevé. Cela peut provoquer des débordements sur la plateforme vers la station de coloration suivante ou faire déborder la zone d'évacuation du colorateur.
- Une fois le débit correctement ajusté, appuyez deux fois sur la touche PAUSE/STOP, puis appuyez sur la touche ENTER pour réinitialiser le mécanisme lorsque l'instrument vous y invite.
5.5 Traitement des lames
Le colorateur Leica ST4020 est un système relativement simple et fiable. L'utilisateur doit informer le système via le clavier chaque fois que des lames doivent être ajoutées ou retirées du colorateur.
Les instructions pour ce faire sont données dans les sections suivantes. Les lames doivent être chargées et déchargées de la manière prescrite.

Important !
Le non-respect des instructions données ici peut entraîner un traitement incorrect ou incomplet des lames.
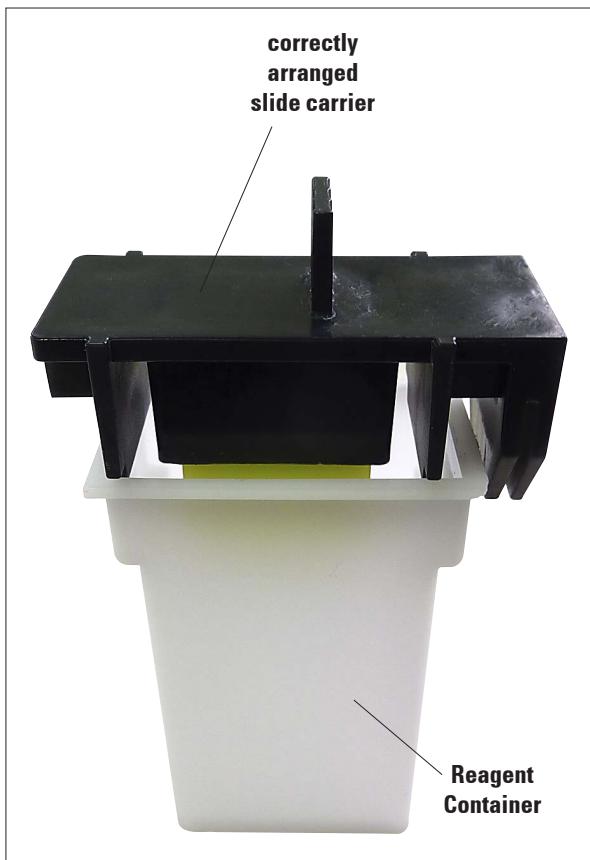
Fig. 32
- Le porte-lames doit être préparé avec soin, car s'il est mal positionné, les lames risquent de ne pas être correctement transportées par la barre de levage.
Il y a deux occasions où les lames peuvent être chargées sur la position de départ :
• avant le début du traitement, et • après le début du traitement.
Dans les deux cas, les lames seront immergées dans le réactif de la position de départ.
L'utilisateur doit être prêt à démarrer ou à reprendre le cycle de coloration dès que le porte-lames est en position, afin de minimiser le temps de coloration supplémentaire.
5.5.1 Démarrage d'un cycle de coloration
Il est bien entendu de la responsabilité de l'utilisateur de vérifier que chacun des paramètres de configuration (temps de station, nombre d'étapes, nombre de trempages, etc.) est réglé à une valeur acceptable avant de placer les lames dans la position de départ et d'appuyer sur RUN.
Les lames ne doivent pas être chargées pendant que l'utilisateur vérifie les paramètres de configuration, car la modification du nombre d'étapes ("étalonnage du mécanisme de transfert") fera avancer le mécanisme de transfert à la position suivante !
Tous les paramètres doivent être vérifiés AVANT de charger le premier jeu de lames.
Un cycle de coloration ne peut pas être démarré à moins que le colorateur soit en mode veille.
Dans ce mode, le système affiche le temps de traitement et les instructions pour appuyer sur la touche RUN pour démarrer :
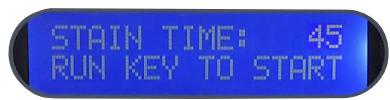


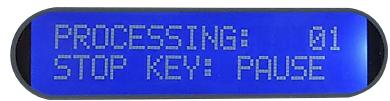

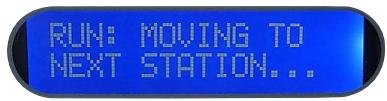
Lorsque la touche RUN est enfoncée, la vanne de rinçage est actionnée, l'affichage change et le temps de traitement restant apparaît, en comptant à rebours :
Lorsqu'un cycle de coloration est démarré en appuyant sur la touche RUN, le système reçoit l'information qu'il y a des lames dans la position de départ qui doivent être colorées.

Notez que le temps de traitement de la première station commence dès que la touche RUN est enfoncée. Cela signifie que les porte-lames doivent être chargés dans la position de départ immédiatement avant d'appuyer sur la touche RUN.
- Le colorateur continuera à fonctionner jusqu'à ce que ces porte-lames soient transférés de la station 14 au bac de sortie.
- L'opération en cours apparaît successivement à l'écran.
- Lorsque le dernier porte-lames a été transféré au bac de sortie, le système arrête le processus et revient en mode IDLE, à moins que d'autres lames soient insérées de la manière appropriée.
5.5.2 Ajout de porte-lames supplémentaires pendant un cycle de coloration
La fonction PAUSE/ARRÊT peut être utilisée pour permettre de placer des porte-lames supplémentaires dans l'instrument après le début du traitement.
La procédure suivante doit toujours être respectée :


VEUILLEZ ATTENDRE POUR CHARGER LES LAMES...
Veuillez patienter et ne pas ajouter d'autres lames !
Ce message s'affiche jusqu'à ce que les porte-lames aient été retirés d'une position par la barre de levage et transférés à la station suivante.

CHARGER LES LAMES... APPUYER SUR RUN.


TRAITEMENT : 01 TOUCHE STOP : PAUSE
Si un cycle de coloration est déjà en cours et que d'autres porte-lames doivent être insérés, appuyez une fois sur la touche PAUSE/ARRÊT.

Important !
N'appuyez sur PAUSE/ARRÊT qu'UNE SEULE FOIS !
Si cette touche est pressée deux fois, tout le cycle de coloration sera interrompu.
Lorsque :
CHARGER LES LAMES...
APPUYER SUR RUN
apparaît à l'écran, les nouveaux porte-lames doivent être insérés immédiatement à la position de départ, puis la touche RUN doit être pressée.
Dès que la touche RUN est enfoncée, le système reprend le traitement et continue le décompte du temps de processus.
Il convient également de noter que toute l'opération est interrompue jusqu'à ce que la touche RUN soit enfoncée à nouveau.
Par conséquent, l'opérateur doit être prêt à charger les nouvelles lames le plus rapidement possible et doit ensuite appuyer rapidement sur la touche RUN pour éviter que toutes les lames déjà dans le système ne passent un temps supplémentaire immergées.
5.5.3 Pause temporaire d'une coloration en cours

Si les touches PAUSE/STOP et RUN sont enfoncées dans cet ordre, l'instrument reçoit l'information que d'autres porte-lames ont été insérés à la position de départ.
Le colorateur continue de fonctionner jusqu'à ce que ces porte-lames soient transférés de la station 14 au bac de sortie.
Si aucune autre lame n'a été ajoutée entre-temps, il émet un signal sonore pour alerter l'opérateur que la coloration est terminée. Un message correspondant apparaît à l'écran.
COLORATION TERMINÉE !

Cette procédure s'applique à l'insertion de porte-lames après le début du traitement et doit être suivie en toutes circonstances.
Tenter d'ajouter des porte-lames sans appuyer sur les touches PAUSE et RUN entraînera le non-transport des porte-lames vers toutes les stations, car le colorateur ne saura pas que des porte-lames supplémentaires ont été ajoutés !
Il peut parfois être nécessaire d'arrêter le système lorsqu'il traite des lames. Cela peut également être fait avec la touche PAUSE/STOP.
La coloration peut être interrompue,
• pour permettre l'accès à l'instrument si des anomalies nécessitant une telle action surviennent pendant la coloration. • afin que les réactifs puissent être vérifiés et changés si nécessaire.
CHARGER LES LAMES... APPUYER SUR RUN.

Important !
La barre de levage terminera le cycle en cours et déplacera les portoirs de lames vers la station suivante. N'essayez pas d'ouvrir l'instrument tant que le message « CHARGEZ LES LAMES... APPUYEZ SUR RUN » ne s'affiche pas.
5.5.4 Arrêt prématuré d'une session de coloration
Le rôle de la touche PAUSE/STOP pour charger des lames supplémentaires a été décrit dans le chapitre précédent.
Cependant, cette touche a une seconde fonction : celle de mettre fin à une session de coloration déjà démarrée.
![graph TD A["Pause Stop"] --> B["RUN HALTED! PUSH ENTER TO RESET."] B --> C["Enter"] C --> D["FINDING HOME..."] D --> E["STAIN TIME: 44 RUN KEY TO START"]](/content/2025/01/166276/images/465b164c647b67a9e952e730ad7ea58406aabac942529b50d42eeb2411f734f8.jpg)
Il a déjà été noté que la touche PAUSE/STOP ne doit être enfoncée qu'UNE SEULE FOIS lorsque des lames supplémentaires doivent être chargées.
Car si la touche PAUSE/STOP est enfoncée DEUX FOIS, le traitement est arrêté. Si cela se produit, le message ci-contre s'affiche.
- Cela signifie que la session de coloration a été interrompue et que l'instrument doit être réinitialisé en appuyant sur ENTER.

Important !
Tous les portoirs de lames doivent être retirés de l'instrument, car toutes les informations du logiciel ont été réinitialisées.
- Dès que l'utilisateur appuie sur la touche ENTER dans cette situation, le mécanisme de transfert retourne à sa position de départ. C'est alors la même situation que lorsque l'instrument est allumé pour la première fois.
- Le message correspondant s'affiche.
- Dès que le mécanisme de transfert atteint la position de départ, le colorateur revient en mode veille ; puis, le même message d'état s'affiche que celui montré lors de l'initialisation de l'instrument après sa mise sous tension.
5.5.5 Retrait des lames traitées
Retirer les lames traitées ne signifie pas seulement l'acte physique de retirer les lames. Cela implique également d'informer l'instrument que des portoirs de lames ont été retirés, afin que le colorateur puisse maintenir un compte à jour du nombre de portoirs de lames encore présents dans le système.
- Chaque fois que le système transfère un porte-lames de la station 14 vers le bac de sortie, un signal sonore (bip) est émis pour informer l'utilisateur que les lames sont prêtes à être retirées.
- Le système incrémente également son compteur du nombre de porte-lames présents dans le bac de sortie.
- L'opérateur doit retirer les lames traitées le plus rapidement possible.
- Le bac de sortie peut contenir jusqu'à quatre porte-lames. Cela permet à l'opérateur de retirer les lames à un moment plus opportun.
- Dès qu'il y a 3 porte-lames dans le bac de sortie, le colorateur émet un signal sonore distinctif pour alerter l'opérateur.
- Dans ce cas, les lames doivent être retirées immédiatement, avant que le compteur du système ne soit réglé sur 4 ;

Important !
Dès qu'il y a quatre porte-lames dans le bac de sortie, le colorateur arrête le traitement, car le bac de sortie ne peut plus contenir de lames supplémentaires.
- Il est souvent pratique d'insérer de nouvelles lames pour coloration en même temps que l'on retire les lames traitées.
Dans ce cas, on peut supposer que l'opérateur retire normalement toutes les lames colorées du bac de sortie à chaque fois que de nouvelles lames sont chargées.
Retrait des lames traitées (suite)
Bien sûr, il y aura des moments où des lames seront retirées sans que de nouvelles lames soient chargées.
Ces deux situations différentes sont gérées de la manière suivante :
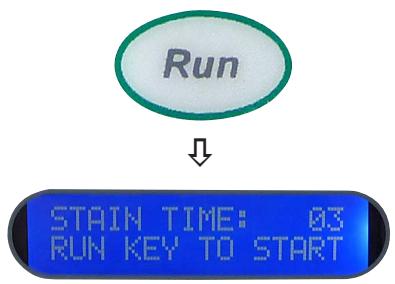
1 Pour retirer uniquement les lames traitées : - Retirez TOUS les porte-lames du bac de sortie de l'instrument. - Appuyez une fois sur la touche RUN pour démarrer le traitement des porte-lames chargés.
![graph TD A["Pause Stop"] --> B["LOAD SLIDES... PRESS RUN."] B --> C["Run"]](/content/2025/01/166276/images/f8b4063b6977702d9ff48746b27fb104a890c539b2303123b260c803f0546522.jpg)
- Pour retirer les porte-lames contenant les lames colorées et charger de nouveaux porte-lames :
- Appuyez une fois sur la touche PAUSE/STOP.
- Attendez que le système vous invite à charger les lames, puis appuyez sur la touche RUN.
- Placez les nouveaux portoirs de lames dans le système.
- Appuyez une fois sur la touche RUN.
- Retirez TOUTES les lames du réservoir de sortie.
6.1 Nettoyage de l'instrument

Avant de nettoyer l'instrument, coupez toujours l'alimentation électrique et débranchez le cordon d'alimentation !
Lors de l'utilisation de produits de nettoyage, respectez les consignes de sécurité du fabricant et les réglementations de sécurité du travail en vigueur dans votre laboratoire.
Éliminez les réactifs usagés conformément aux directives de laboratoire en vigueur dans votre pays !
Essuyez immédiatement tout déversement de solvants (réactifs) ! Les surfaces de la hotte n'ont qu'une résistance modérée en cas de contact prolongé avec des solvants !
Les surfaces peintes et le panneau de commande de l'instrument ne résistent pas au xylène ni à l'acétone !
N'utilisez aucun des produits suivants pour nettoyer les surfaces extérieures de l'instrument : alcool, détergents contenant de l'alcool (nettoyant pour vitres !), poudres abrasives, solvants contenant de l'acétone ou du xylène !
Aucun liquide ne doit entrer en contact avec les connexions électriques ou pénétrer à l'intérieur de l'instrument !
Intérieur de l'instrument
Retirez les conteneurs de réactif et d'eau de rinçage. Pour nettoyer les parois intérieures en acier inoxydable, utilisez un détergent ordinaire, puis rincez abondamment à l'eau.
Barre de levage
Essuyez les surfaces de la barre de levage avec un chiffon humide.
Extérieur de l'instrument
Les surfaces extérieures peuvent être nettoyées avec un détergent doux, puis essuyées avec un chiffon humide.
N'utilisez pas de solvants pour nettoyer les surfaces extérieures et la hotte !
Porte-lames
Nettoyez avec des agents de nettoyage domestiques ou de laboratoire si nécessaire.
Drain
Le tuyau de drainage doit être vérifié périodiquement pour détecter toute contamination, notamment par les algues, et nettoyé si nécessaire.
Afin de prévenir la contamination par les algues et les bactéries, le système de drainage peut être rincé avec une solution à 5 % d'hypochlorite de sodium. Cependant, les pièces métalliques ne doivent pas rester en contact avec cette solution pendant des périodes prolongées (par exemple, toute la nuit). Rincez abondamment à l'eau par la suite.
Nettoyage de l'instrument (suite)
Conteneur de réactif et conteneur d'eau de rinçage
Les conteneurs de réactif et d'eau de rinçage doivent être nettoyés régulièrement afin d'obtenir des résultats de coloration constamment bons.
Ils peuvent également être nettoyés au lave-vaisselle à une température maximale de +65°C. Tout agent de nettoyage standard pour lave-vaisselle de laboratoire peut être utilisé.

Attention !
Les postes ne doivent pas être exposés à des températures élevées (par exemple, dans les lave-vaisselle industriels, qui fonctionnent à une température de +85°C), car la chaleur peut déformer les postes !
6.2 Instructions de maintenance

Seul le personnel de service Leica autorisé et qualifié peut réparer l'instrument et accéder aux composants internes de l'instrument.
Pour votre sécurité, n'essayez jamais de réparer l'instrument vous-même.
Les réparations non autorisées annuleront toute réclamation au titre de la garantie.
Voir également la section sur la "Garantie" au chap. 8 à ce sujet.
L'instrument est fondamentalement sans entretien.
Pour garantir un fonctionnement sans problème de l'instrument sur une longue période, il est recommandé de :
- Faire vérifier l'instrument au moins 1 fois par an par un technicien de service qualifié autorisé par Leica.
- À la fin de la période de garantie, conclure un contrat de service. Pour plus d'informations, veuillez contacter votre centre de service technique Leica local.

Le tableau suivant répertorie les problèmes les plus courants qui peuvent survenir lors de l'utilisation de l'instrument, ainsi que les causes possibles et les procédures de dépannage.
Si des défauts surviennent qui ne peuvent pas être corrigés avec les procédures recommandées, ou s'ils se reproduisent, le service d'assistance Leica doit être informé immédiatement.
7.1 Généralités
Le Leica ST4020 est équipé d'un système simple de détection de défauts et peut identifier automatiquement certaines erreurs de mouvement.
- Si une erreur de fonctionnement est détectée, le mécanisme de transfert s'arrête d'abord.
- Il recule ensuite sur une courte distance, s'arrête à nouveau, puis avance dans une seconde tentative pour atteindre la position souhaitée.
- Si cette tentative de récupération d'erreur réussit, le traitement continue normalement.
7.2 Alarmes
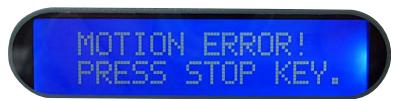
- Cependant, si la seconde tentative pour atteindre la position d'avancement des porte-lames échoue également, le système émet une alarme sonore continue.
- Le message affiché ici apparaît également sur l'écran.
![graph TD A["Pause Stop"] --> B["FINDING HOME..."] B --> C["STAIN TIME: 44 RUN KEY TO START"]](/content/2025/01/166276/images/0c622542ede403c4827dafba76cef343127e35f25a3c4827084013bb6a29c8d9.jpg)
- Dès que la touche PAUSE/STOP est enfoncée, le système revient à la position de départ, se réinitialise et passe en mode veille.
- Dans ce cas, toute coloration en cours est interrompue et doit être redémarrée.
7.3 Liste de détection et de correction des défauts
| Issue | Possible cause | Corrective action |
| The instrument cannot be started up | The power supply cord is not plugged into wall outlet properly.The power supply cord is not plugged into the stainer properly.The power supply in the instrument is faulty. | Check the cable connections at both ends, replace the power supply cord if necessary.Inform Technical Service. |
| Display appears blue, but no text is visible. | The contrast may have to be adjusted again.The control board in the instrument is faulty. | Adjust the contrast as described in Chapter 5.3.Inform Technical Service. |
| Unit powers up, but the transfer mechanism does not initialize. | The main mechanism is jammed.The motor seems to turn, but the Lift bar does not move because a belt is worn or broken, or a set screw on the motor has come loose. | Check for visible external obstruction and remove as necessary. |
| The motor does not turn. | Motor or control board faulty. | Inform Technical Service. |
7. Dépannage
| Issue | Possible cause | Corrective action |
| Keypad does not respond to key presses | The keypad or the control board is faulty. | Inform Technical Service. |
| Water does not flow. | Water hose is not connected.Tap is not open.The valve in the instrument is faulty (does not open) or the control board is faulty. | Connect the water hose to the stainer and the tap.Turn on the tap.Inform Technical Service. |
| Water overflows at the rinse stations. | Tap is open too far.The drain hose is clogged.The drain hose is routed incorrectly, gradient insufficient. | Adjust the flow rate for the rinsing water at the tap as described in Chap. 5.4.The drain hose must not be kinked.Check the drain hose for objects that might block it.Place the drain hose so that water does not have to rise above the level of the drain fitting. |
7.4 Panne de courant
- Vérifiez s'il y a une panne de courant générale (pas d'alimentation).
- Vérifiez que le cordon d'alimentation est correctement inséré dans la prise de courant et que la prise est allumée, le cas échéant.
- Vérifiez que le câble d'alimentation est correctement branché sur la prise de l'instrument.
- Vérifiez que l'interrupteur d'alimentation est correctement allumé.
- Certains dysfonctionnements / pannes de l'instrument sont causés par des fusibles défectueux.
Vérifiez si un ou les deux fusibles secondaires sont défectueux.

Avant de remplacer un fusible, éteignez toujours l'instrument et débranchez-le de l'alimentation électrique. Les fusibles défectueux ne peuvent être remplacés que par les fusibles de rechange fournis avec l'instrument.
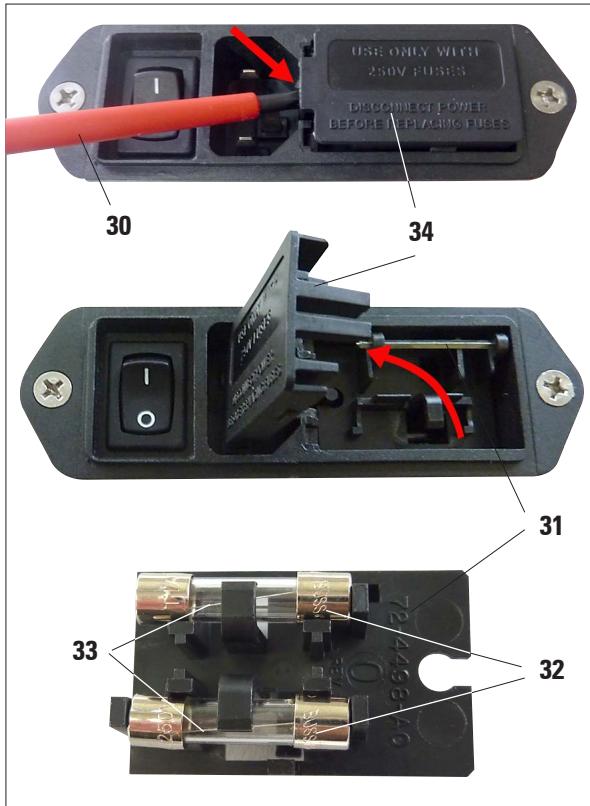
Fig. 33
Pour remplacer un fusible, procédez comme suit :
- À l'aide d'un tournevis (30), poussez délicatement le capot (34) du porte-fusible (31) à l'arrière de l'instrument et ouvrez-le vers le haut. (Fig. 33).
- Retirez le porte-fusible (31) – il contient deux fusibles (32) sur sa face arrière.
- Vérifiez que le fil fin (33) dans le capillaire en verre d'un fusible est intact. Sinon, le fusible doit être remplacé.

Avant de rebrancher le câble d'alimentation et de rallumer l'instrument, vous devez avoir identifié et corrigé la cause du fusible défectueux.
- Insérez le porte-fusible avec les deux fusibles et redémarrez l'instrument.
8.1 Informations de commande
Conteneurs de réactifs (6 par paquet) 14 0509 46437
Conteneurs de réactifs (48 par paquet) 14 0509 46439
Porte-lames (4 par paquet) 14 0509 46438
Porte-lames (48 par paquet) 14 0509 46440
Station de rinçage (1 conteneur, 1 buse de rinçage, 1 raccord, 1 tube).... 14 0509 46441
Tube de rinçage (24 pouces de long ; ∅ 1/8 pouce) 14 0509 46457
Kit de tubes et raccords (tube de réservoir de rinçage de 48 pouces - ∅ 1/8 pouce, 2 raccords en Y, 3 raccords en ligne, 2 bouchons, 10 attaches de câble).... 14 0509 46459
Ensemble de tuyau d'entrée d'eau (avec raccord, filtre en ligne et 4 colliers de tuyau,
2 raccords en laiton, 5 pieds de long, tube renforcé ∅ 1/4 pouce) 14 0509 46443
Ensemble de tuyau d'entrée d'eau (avec raccord, 2 colliers de tuyau, 5 pieds de long, tube renforcé ∅ 1/4 pouce, sans filtre en ligne) 14 0509 46532
Kit adaptateur pour connexion du tuyau d'entrée d'eau aux robinets (y compris un avec filetage mâle NPT de 3/4 pouce) 14 0509 46444
Tuyau de vidange (5 pieds de long, ∅ 5/8 pouce), attache de câble 1/8 pouce 14 0509 46445
Réservoir de sortie 14 0509 46450
Support de fixation.... 14 0509 46570
Barre stabilisatrice 14 0509 46451
Couvercle de conteneur de réactif (métal) 14 0509 46442
Hotte en plexiglas en option 14 0509 46478
Cordon d'alimentation nord-américain 14 0509 46479
Cordon d'alimentation européen 14 0509 46480
Cordon d'alimentation britannique 14 0509 46481
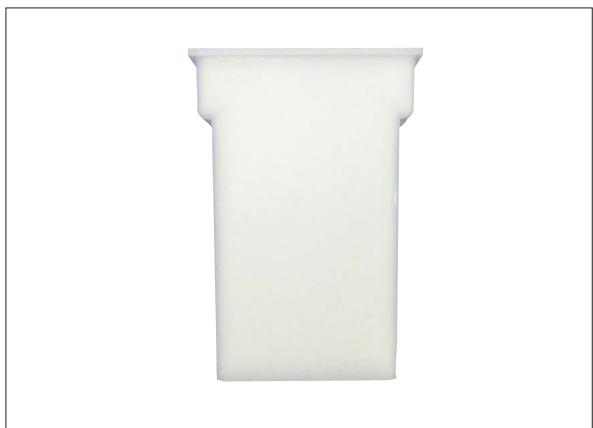
Fig. 34
Conteneurs de réactifs
6 par paquet
Réf. 14 0509 46437
48 par paquet
Réf. 14 0509 46439
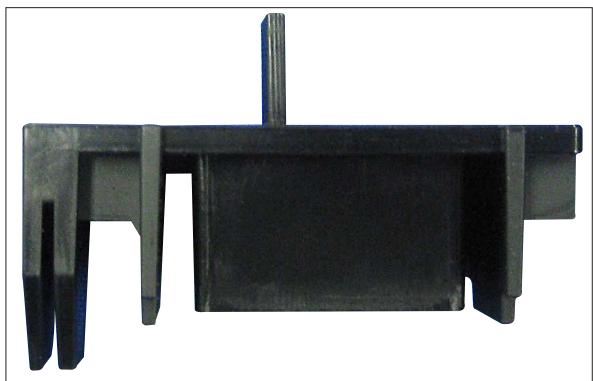
Fig. 35
Porte-lames
4 par paquet
Réf. 14 0509 46438
48 par paquet
Réf. 14 0509 46440
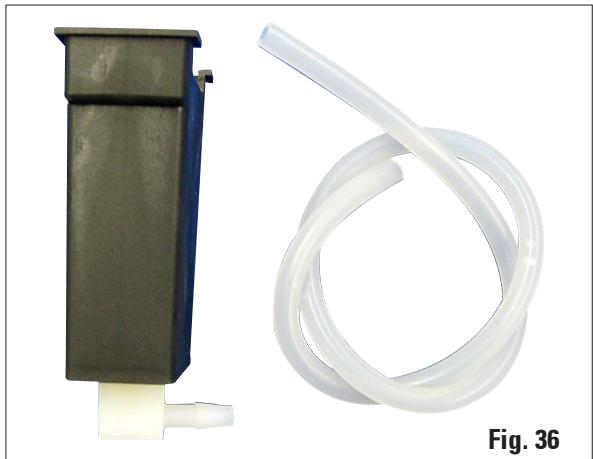
Station de rinçage
1 conteneur, 1 buse de rinçage, 1 raccord, 1 tube
Réf. 14 0509 46441
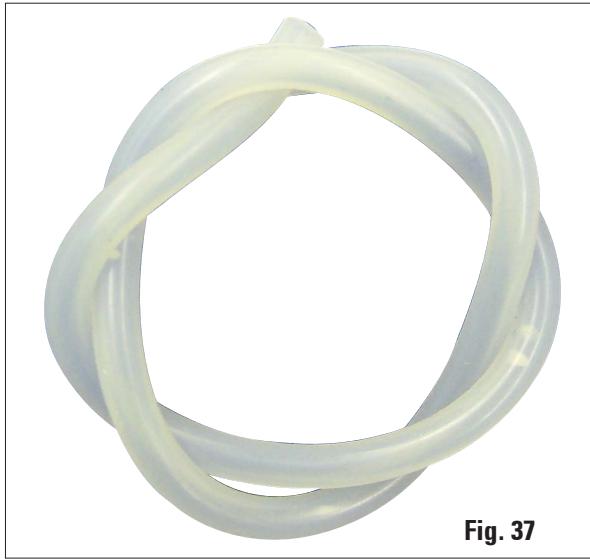
Tube de rinçage
Longueur 24" ; ∅ 1/8"
Réf. 14 0509 46457
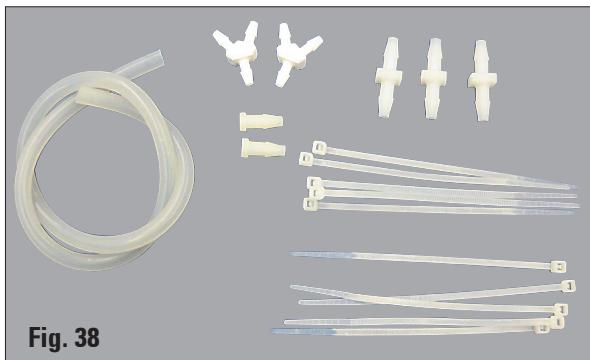
Kit de tubes et raccords
Tube de cuve de rinçage de 48" - ∅ 1/8", 2 raccords en Y, 3 raccords en ligne, 2 bouchons, 10 attaches de câble
Réf. 14 0509 46459
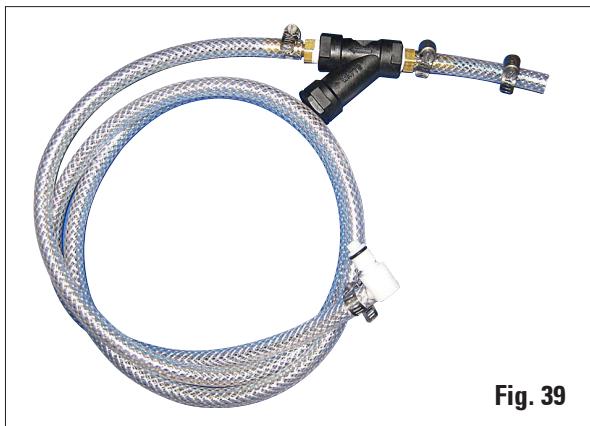
Ensemble de tuyau d'arrivée d'eau
avec raccord, filtre en ligne, et 4 colliers de serrage, 2 raccords en laiton, longueur 5', ∅ 1/4" tube renforcé
Réf. 14 0509 46443
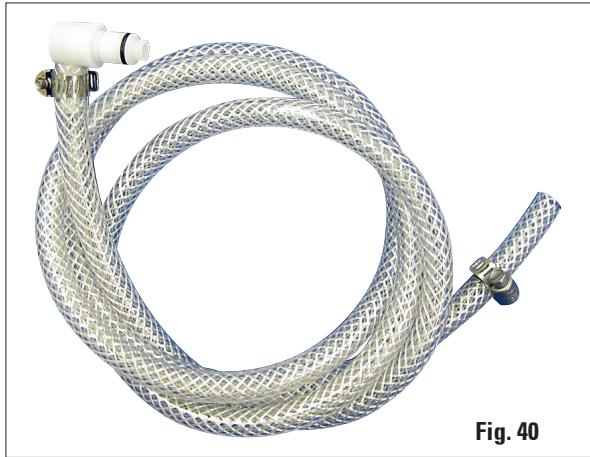
Ensemble de tuyau d'arrivée d'eau
avec raccord, 2 colliers de serrage, longueur 5', ∅ 1/4" tube renforcé, sans filtre en ligne
Réf. 14 0509 46532
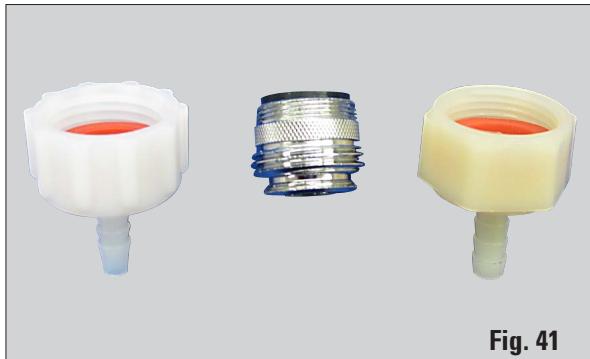
Kit adaptateur pour connexion du tuyau d'arrivée d'eau aux robinets
y compris un avec filetage mâle NPT de 3/4"
Réf. de commande 14 0509 46444
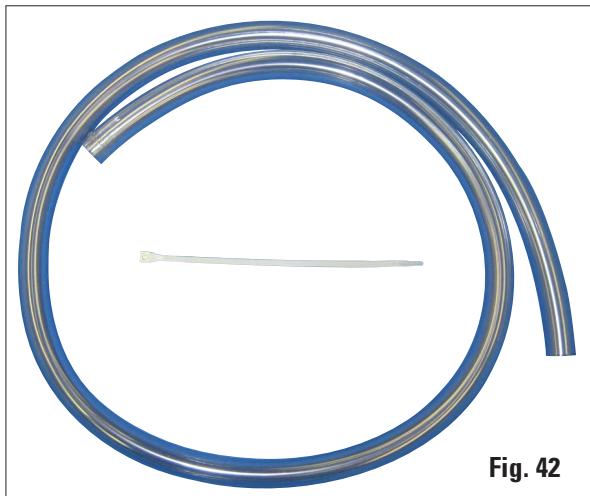
Tuyau de vidange
5 pieds de long, ∅ 5/8"), 1/8" collier de serrage
Réf. de commande 14 0509 46445
8. Accessoires en option
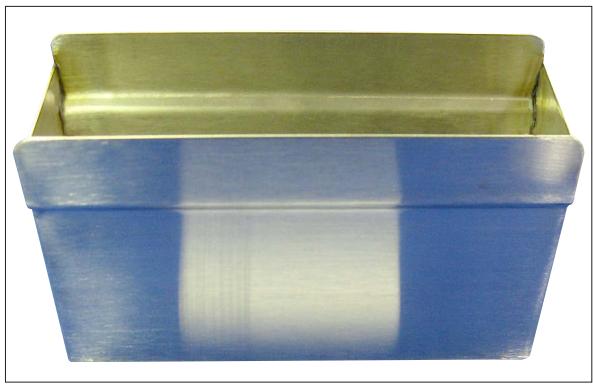
Fig. 43
Réservoir de sortie
Réf. de commande 14 0509 46450
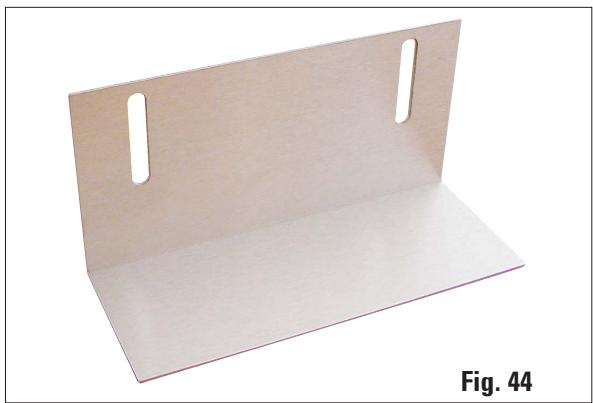
Support de fixation
Réf. de commande 14 0509 46570
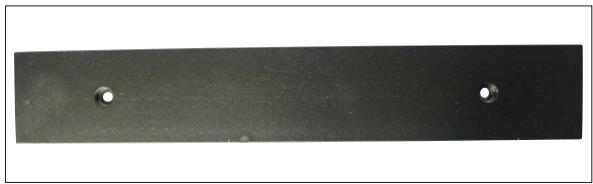
Fig. 45
Barre stabilisatrice
Réf. de commande 14 0509 46451
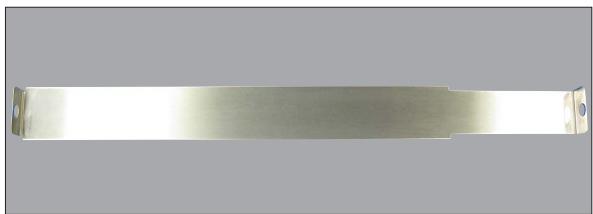
Fig. 46
Couvercle de récipient de réactif, métal
Réf. de commande 14 0509 46442
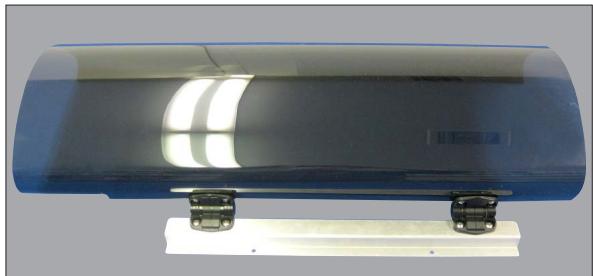
Fig. 47
Capot en plexiglas en option
Réf. de commande 14 0509 46478
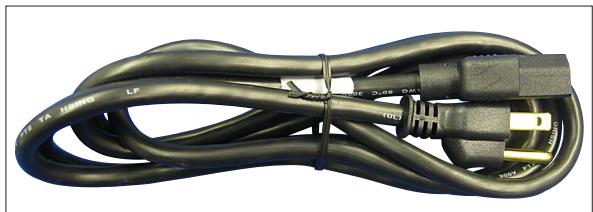
Fig. 48
Cordon d'alimentation nord-américain
Réf. de commande 14 0509 46479
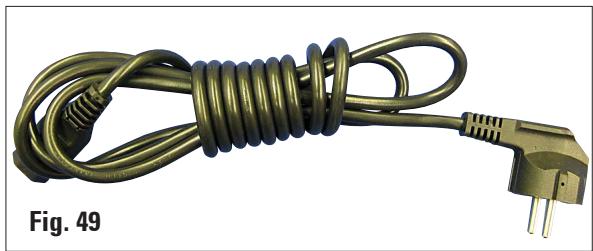
Cordon d'alimentation européen
Réf. de commande 14 0509 46480
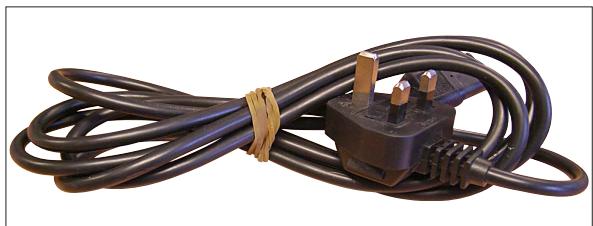
Fig. 50
Cordon d'alimentation britannique
Réf. de commande 14 0509 46481
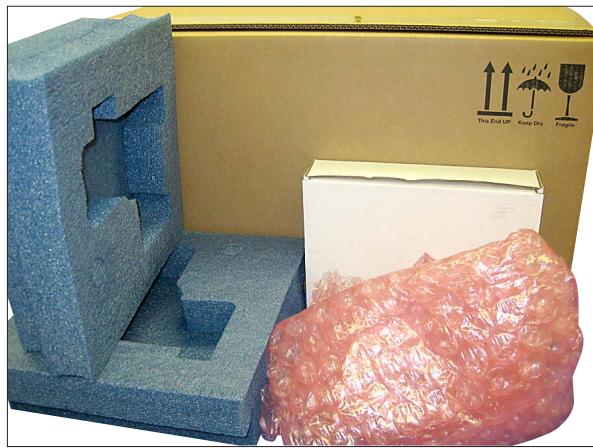
Fig. 51

Fig. 52
Emballage,
avec mousse, carton extérieur, film à bulles et boîte d'accessoires) avec instructions d'emballage
N° de commande 14 0509 46455
Carton extérieur uniquement
N° de commande 14 0509 46456
Garantie
Leica Biosystems Nussloch GmbH garantit que le produit contractuel livré a été soumis à une procédure complète de contrôle qualité basée sur les normes de test internes de Leica, et que le produit est sans défaut et conforme à toutes les spécifications techniques et/ou caractéristiques convenues.
L'étendue de la garantie est basée sur le contenu de l'accord conclu. Les conditions de garantie de votre organisation commerciale Leica ou de l'organisation auprès de laquelle vous avez acheté le produit contractuel s'appliquent exclusivement.
Informations sur le service
Si vous avez besoin d'un service client technique ou de pièces de rechange, veuillez contacter votre représentant Leica ou le revendeur Leica auprès duquel vous avez acheté l'appareil.
Veuillez fournir les informations suivantes :
- Nom du modèle et numéro de série de l'instrument.
- Emplacement de l'instrument et nom de la personne à contacter.
- Raison de l'appel de service.
- Date de livraison
Déclassement et élimination
L'unité ou ses composants doivent être éliminés conformément aux réglementations locales en vigueur.


- LEICA ST
- PETITE COLORATRICE LINÉAIRE
- MANUEL D'UTILISATION
- NETTOYAGE ET ENTRETIEN
- DÉPANNAGE
- ACCESSOIRES EN OPTION
- GARANTIE ET SERVICE
- SYMBOLES DANS LE TEXTE ET LEUR SIGNIFICATION
- UTILISATION PRÉVUE
- TOUTE AUTRE UTILISATION DE L'INSTRUMENT EST CONSIDÉRÉE COMME INAPPROPRIÉE
- QUALIFICATION DU PERSONNEL
- TYPE
- CONSIGNES DE SÉCURITÉ
- AVERTISSEMENTS
- RISQUES – TRAVAIL AVEC L'INSTRUMENT
- RISQUES – NETTOYAGE ET ENTRETIEN
- COMPOSANTS ET SPÉCIFICATIONS DE L'INSTRUMENT
- VUE D'ENSEMBLE – PIÈCES DE L'INSTRUMENT
- SPÉCIFICATIONS DE L'INSTRUMENT
- DESCRIPTION FONCTIONNELLE DES COMPOSANTS - VUE D'ENSEMBLE DU SYSTÈME
- CLAVIER (14) AVEC AFFICHEUR (13)
- PORTE-LAMES (1) ET BARRE DE LEVAGE (2)
- RÉCIPIENT DE RÉACTIF (4) ET RÉCIPIENT D'EAU DE RINÇAGE (6)
- DESCRIPTION FONCTIONNELLE DES COMPOSANTS (SUITE)
- RÉSERVOIR DE SORTIE (7)
- PLATEFORME (8)
- TUYAU D'ÉVACUATION DES EAUX USÉES (9)
- ALIMENTATION EN EAU DE RINÇAGE (10)
- INTERRUPTEUR PRINCIPAL (11) ET CONNEXION À L'ALIMENTATION ÉLECTRIQUE (12)
- ZONES FONCTIONNELLES DU PORTE-LAMES
- LIVRAISON STANDARD
- DONNÉES TECHNIQUES
- CONDITIONS D'INSTALLATION
- DÉBALLAGE DE L'INSTRUMENT
- DÉBALLAGE DE L'INSTRUMENT (SUITE)
- INSTALLATION
- ALIGNEMENT HORIZONTAL
- MONTAGE DE L'ÉQUERRE DE SUPPORT
- RACCORDEMENT À L'EAU
- INSTALLATION DES CONTENEURS D'EAU DE RINÇAGE
- INSTALLATION DES RÉSERVOIRS D'EAU DE RINÇAGE (SUITE)
- REMÈDE SI LE TUYAU EST TROP COURT
- MISE SOUS TENSION DE L'INSTRUMENT
- FONCTIONS DU PANNEAU DE COMMANDE
- FONCTIONS DU PANNEAU DE COMMANDE (SUITE)
- RÉGLAGE DES PARAMÈTRES DE FONCTIONNEMENT
- TEMPS DE TRAITEMENT
- CONTRASTE DE L'AFFICHAGE
- ÉTALONNAGE DU MÉCANISME DE TRANSFERT
- NOMBRE D'IMMERSIONS
- POSITION DE DÉPART
- FONCTIONNEMENT CONTINU
- RÉGLAGE DU DÉBIT D'EAU DE RINÇAGE
- TRAITEMENT DES LAMES
- IMPORTANT
- DÉMARRAGE D'UN CYCLE DE COLORATION
- AJOUT DE PORTE-LAMES SUPPLÉMENTAIRES PENDANT UN CYCLE DE COLORATION
- CHARGER LES LAMES
- APPUYER SUR RUN
- PAUSE TEMPORAIRE D'UNE COLORATION EN COURS
- ARRÊT PRÉMATURÉ D'UNE SESSION DE COLORATION
- RETRAIT DES LAMES TRAITÉES
- RETRAIT DES LAMES TRAITÉES (SUITE)
- NETTOYAGE DE L'INSTRUMENT
- INTÉRIEUR DE L'INSTRUMENT
- BARRE DE LEVAGE
- EXTÉRIEUR DE L'INSTRUMENT
- PORTE-LAMES
- DRAIN
- NETTOYAGE DE L'INSTRUMENT (SUITE)
- CONTENEUR DE RÉACTIF ET CONTENEUR D'EAU DE RINÇAGE
- ATTENTION
- INSTRUCTIONS DE MAINTENANCE
- GÉNÉRALITÉS
- ALARMES
- LISTE DE DÉTECTION ET DE CORRECTION DES DÉFAUTS
- PANNE DE COURANT
- INFORMATIONS DE COMMANDE
- CONTENEURS DE RÉACTIFS
- STATION DE RINÇAGE
- TUBE DE RINÇAGE
- KIT DE TUBES ET RACCORDS
- ENSEMBLE DE TUYAU D'ARRIVÉE D'EAU
- KIT ADAPTATEUR POUR CONNEXION DU TUYAU D'ARRIVÉE D'EAU AUX ROBINETS
- TUYAU DE VIDANGE
- EMBALLAGE
- GARANTIE
- INFORMATIONS SUR LE SERVICE
- DÉCLASSEMENT ET ÉLIMINATION
Marque : LEICA
Modèle : ST 4020
Catégorie : Microscope