
AR 661 CD - Autoradio CLATRONIC - Notice d'utilisation et mode d'emploi gratuit
Retrouvez gratuitement la notice de l'appareil AR 661 CD CLATRONIC au format PDF.

| Type de produit | Autoradio avec lecteur CD et MP3 |
| Marque | CLATRONIC |
| Modèle | AR 661 CD |
| Tension d'alimentation | DC 13,8 V |
| Consommation électrique | 7 A max |
| Puissance de sortie | 4 × 30 W |
| Plage de fréquences FM | 87,6 - 108,0 MHz |
| Sensibilité FM | 3 µV |
| Fréquence intermédiaire FM | 10,7 MHz |
| Formats CD compatibles | CD, CDR, CDRW, MP3 |
| Rapport signal/bruit (CD) | 50 dB (1 kHz) |
| Réponse en fréquence (CD) | 20-100 Hz ≤ 5 dB ; 10-20 kHz ≤ 5 dB |
| Nombre de canaux | 2 (stéréo) |
| Dimensions (L × H × P) | 178 × 50 × 165 mm |
| Fonctions principales | RDS, EON, PTY, TA, AF, lecture MP3, face avant amovible, recherche automatique et manuelle, mémorisation de stations, égaliseur, fonctions CD (lecture aléatoire, répétition, intro) |
| Entretien et nettoyage | Nettoyer la face avant et le boîtier avec un chiffon doux et sec. Nettoyer les CD avec un chiffon anti-poussière en partant du centre vers le bord. Ne pas utiliser de solvants. |
| Sécurité | Ne pas exposer l'appareil à la pluie ou à l'humidité. Ne pas ouvrir le boîtier. Utiliser des haut-parleurs d'impédance 4 Ω. Respecter la polarité et la tension. |
| Pièces détachées et réparabilité | En cas de dysfonctionnement, contacter un professionnel. Le fusible (7 A) est remplaçable. |
| Informations générales | Garantie 24 mois. Certifié CE. Élimination conforme à l'environnement. |
FOIRE AUX QUESTIONS - AR 661 CD CLATRONIC
Questions des utilisateurs sur AR 661 CD CLATRONIC
0 question sur cet appareil. Repondez a celles que vous connaissez ou posez la votre.
Poser une nouvelle question sur cet appareil
Téléchargez la notice de votre Autoradio au format PDF gratuitement ! Retrouvez votre notice AR 661 CD - CLATRONIC et reprennez votre appareil électronique en main. Sur cette page sont publiés tous les documents nécessaires à l'utilisation de votre appareil AR 661 CD de la marque CLATRONIC.
MODE D'EMPLOI AR 661 CD CLATRONIC
Bedienungsanleitung/Garantie
Gebruiksaanwijzing/Garantie · Manual de instruções/Garantia Istruzioni per l'uso/Garanzia · Instruction Manual/Guarantee Istrukcja obslugi/Gwaranca
Autoradio mit CD-Player
Autoradio met CD-speler • Radio para automóveis con leitor de CDs Autoradio conlettore CD · Car radio with CD player Radio samochodowe z odtwarzaczem CD
AR 661 CD / MP3
(C)
Inhalt
Inhoud · Índice · Indice · Contents · Spis tresci
D Übersicht Bedienelemente . 3
Bedienungsanleitung . 4
Garantie 18
NL Overzicht bedieningselementen . 3
Gebruiksaanwijzing 19
Garantie 33
P Vista geral dos elementos de commando . Pagina 3
Manual de instruções Párgina 34
Garantía Párgina 47
I Descrizione dei singoli peszzi 3
Istruzioni per l'uso . 48
Garanzia 63
GB Control element overview Page 3
Instruction Manual 64
Guarantee 78
PL Przeglad elementów obslugi Strona 3
Instrukcja obslugi Strona 79
Gwarancja Strona 94
Übersicht der Bedienelemente
Overzicht van de bedieningselementen · Descrição dos elementos
Elementi di lavoro - Overview of the Components
Przeglad elementów oblsugi
D
Allgemeine Sicherheitshinweise
Um das Risiko von Feuer oder einem elektrischen Schlag zu vermeiden, sollen den Sie das Gerät nicht Regen oder Feuchtigkeit aussetzen. Das Gerät nicht in unmittelbarer Höhe von Wasser betreiben (z.B. Badezimmer, Schwimmbecken, feuchte Keller).
Verwenden Sie das Gerät nur für den vorgesehenen Zweck.
Das Görtät ausschließlich an eine vorschrifsmäßig instellierte Steckdose anschließen. Achten Sie darauf, dass die angegebene Spannung mit der Spannung der Steckdose übereinstimmt.
Bei Verwendung von externen Netzeleinen auf die richtige Polarität und Spannung achten, Batterien stets richtigerum einlagen.
Das Gerät so aufstellen, dass vorhandene Lüftungsöffnungen nicht verdeckt werden.
Niemals das Gehäuse des Gerätes öffnen. Durch unsachgemäße Reparaturen konnen erhebliche Gefahren für den Benutzer entstehen. Bei Beschädigung des Gerätes, insbesondere des Netzkabels, das Gerät nicht mehr in Betrieb nehmen, sondern von einem Fachmann reparieren lessen. Netzkabel regelmäßig auf Beschädigungen prufen.
Ein defektes Netzkabelarf nur vom Hersteller, unserem Kundendienst oder einerähnlich qualifizierten Person durch ein gleichwertiges Kabel ersetzt werden, umGefährungen zu vermeiden.
Benutzen Sie das Gerät langere Zeit nicht, ziehen Sie den Netzstecker aus der Steckdose, bzw. entnahmen Sie die Batterien.
These Symbole können sich ggfs. auf dem Gerät befinden und sollen Sie auf folgenden hinweisen:

Das Blitz-Symbol soll den Benutzer auf Teile im Inneren des Gerätes hinweisen, die gefährlich hohe Spannungen führen.

Das Symbol mit Ausrufezeichen soll den Benutzer auf wichtige Bediennungs- oder Wartungs-Hinweise in den Begleitpapieren hinweisen.

Geräte mit thisem Symbol arbeiten mit einem „Klasse 1-Laser“ zur Abtastung der CD. Die eingebauten Sicherheitsschalter sollen verhinnend, dass der Benutzer gefährlichem, für das menschliche Auge nicht sightbarem Laserlicht ausgesetzt wird, wenn das CD-Fach geöffnet ist.
These Sicherheitsschafter sollen auf keine Fall überbruckt oder manipuliert werden, sonst besteht die Gefahr, dass Sie sich dem Laser-Licht aussetzen.
Installation
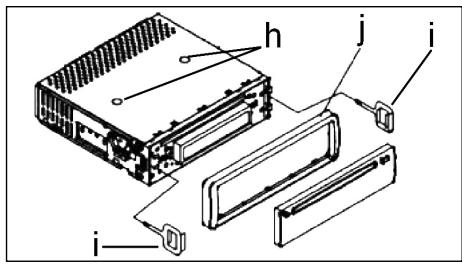
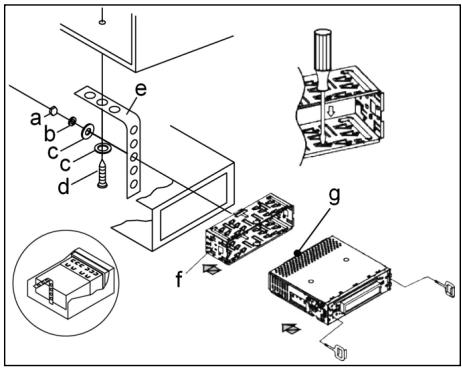
Montieren Sie das Radiogerät gemäß folgender Darstellungen.

a Mutter
b Federscheibe
c Unterlegscheibe
d Schraube
e Montagewinkel
f Einschubgehause
G Gewindebolzen

Achtung!
h Schrauben der Transportsicherung (Bitte vor der Montage entnehmer)
i Ausziehwerkzeug (Schlussel fur die Demontage)
j Blendrahmen

Setzen Sie die Bedienblende erst an derrechten Seite an undrasten Sie, sie dann aufder linken Seite ein.

Anschluss
Stellen Sie die Anschlüsse gemäß des Schaubildes her.
Achtung:
D
- Setzen Sie das abnehmbare Bedienfeld erst nach dem Anschluss der Kabel auf.
- Verwenden Sie Laufsprecher mit einer Impedanz von 4 Ohm.
Wichtige Zusatzinformation zum Einbau Ihr's Autoradios!
- Bitte beachten Sie beim Einbau/Anschluss Ihr Gerätes, dass Ihr Auto über einen originalen "ISO Anschluss" verfügt. Dieser ist das Gegenstück zu dem am Geräteausgang vorhandenen Stecker (ISO Anschluss).
Bei der Belegung des "Dauer +" (Backup) kann es je nach Fahrzeugtyp zu Abweichungen kommt.
Wenden Sie sich in diesen Fälleitte an eine autorisierte KFZ Werkstatt, da eine permanente/dauerhafte Stromversorgung Ihres Radios sonst nicht gewährleistet ist. (These is yetoch fur die Speicherung Senderstationen notwithstanding).
- Je nach Fahrzeugtyp konnen in Ausnahmefällen Störgeräische im Radio/CD Betrieb auftreten. Diese lassten sich mit einem zusätzlichen Entstörfilter entsprechend beseitigen. Ihr Gerät ist bereits seriennig mit einem Entstörfilter ausgerüstet. Trotzem kann es fahrzeugbedingt zu Beeinträchtigungenkommen.
Entstörfilter erhalten Sie im Autozubehörhandel und/oder bei ihrer KFZ Werkstatt.
Bei technischen Fragen wenden Sie sichitte an unsere Hotline.
Vorsichtsmaßnahmen und Wartung
- Die Schrauben (h) der Transportsicherungitte vor der Montage entfer- nen, da sonst die CD nicht eingezogen werden kann.
- Das Gerät ist für den Minuspol der Batterie ausgelegt, der an die Fahrzeugkarosserie angeschlossen sein muss. Diesitte vor Installation überprüfen.
- Wenn die vordere Bedientafel während des Radio- oder CD-Betriebs abgenommen wird, wird das Gerät automatisch ausgeschaltet.
- Fehlfunktion. Nach dem Wiedereinsetzen der vorderen Bedientafel erscheint in der LCD-Anzeige eine Fehlermeldung (ERROR). Drücken Sie mit Hilfe eines Drahtes o.ä. die Taste RESET (24), um die Elektronik wieder zurückzustellen (RESETEN). Diese Taste finden Sie bei abgenommenem Bedienfeld rechts...,...,...,...,...,..., ......, ... ... ... ... ... ... ... ... ... ... ... ... ... ... ... ... ... ... ... ... ... ... ... ... ... ... ... ... ... ... ... ... ... ... ... ... ... ... ... ... ... ... ... ... ... ... ... ... ... ... ... ... ... ... ... ... ... ... ... ... ... ... ... ... ... ... ... ... ... ... ... ... ... ... ... ... ... ... ... ... ... ... ... ... ... ... ... ... ... ... ... ... ... ... ... ... ... ... ... ... ...
-
- The Taste of the Day
-
- The Taste of the Night
-
- The Taste of the Night
-
- The Taste of the Day
-
- The Taste of the Night
-
- The Taste of the Day
-
- The Taste of the Night
-
- The Taste of the Day
-
- The Taste of the Night
-
- The Taste of the Day
-
- The Taste of the Night
-
- The Taste of the Day
-
- The Taste of the Night
-
- The Taste of the Day
-
- The Taste of the Night
-
- The Taste of the Day
-
- The Taste of the Night
-
- The Taste of the Day
-
- The Taste of the Night
-
- The Taste of the Day
-
- The Taste of the Night
-
- The Taste of the Day
-
- The Taste of the Night
-
- The Taste of the Day
-
- The Taste of the Night
-
- The Taste of the Day
-
- The Taste of the Night
-
- The Taste of the Day
-
- The Taste of the Night
-
- The Taste of the Day
-
- The Taste of the Night
-
- The Taste of the Day
-
- The Taste of the Night
-
- The Taste of the Day
-
- The Taste of the Night
-
- The Taste of the Day
-
- The Taste of the Night
-
- The Taste of the Day
-
- The Taste of the Night
-
- The Taste of the Day
-
- The Taste of the Night
-
- The Taste of the Day
-
- The Taste of the Night
-
- The Taste of the Day
-
- The Taste of the Night
-
- The Taste of the Day
-
- The Taste of the Night
-
- The Taste of the Day
-
- The Taste of the Night
-
- The Taste of the Day
-
- The Taste of the Night
-
- The Taste of the Day
-
- The Taste of the Night
-
- The Taste of the Day
-
- The Taste of the Night
-
- The Taste of the Day
-
- The Taste of the Night
-
- The Taste of the Day
-
- The Taste of the Night
-
- The Taste of the Day
-
- The Taste of the Night
-
- The Taste of the Day
-
- The Taste of the Night
-
- The Taste of the Day
-
- The Taste of the Night
-
- The Taste of the Day
-
- The Taste of the Night
-
- The Taste of the Day
-
- The Taste of the Night
-
- The Taste of the Day
-
- The Taste of the Night
-
- The Taste of the Day
-
- The Taste of the Night
-
- The Taste of the Day
-
- The Taste of the Night
- Wenn das Fahrzeuginnere extrem heißt ist, z. B. nach einer längeren Parkdauer in praller Sonne, den Player nicht einschalten, bis das Fahrzeug nach einer kurzen Fahrzeit im Inneren etwas abgekühlt ist.
- Um das abnehmabare Bedienteil sicher aufzubewahren, stets die davon vorge-sehene Schutzhülle verwenden.
D
Bedienung
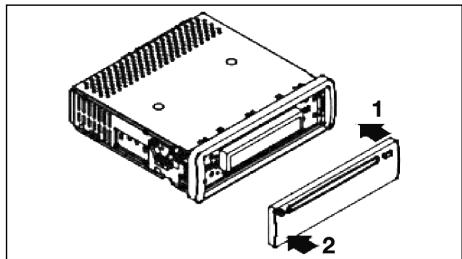
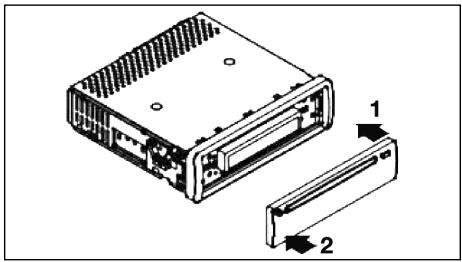
1. REL-Taste
Drucken Sie die REL-Taste zum Herausnehmen des vorderen Bedienfeldes.
2. +/-Tasten
Im normalen Spielbetrieb dienen die Tasten zur Einstellung der Lautstärke. In Verbindung mit der zuvor gedrückten SEL-Taste konnen Änderungen in Menus z. B. dem Schallmodus vorgenommen werden.
3. SEL-Taste (Auswahl)
a) Drücken Sie die SEL-Taste kurz, um in das Auswahlmenü des Schallmodus zu gelangen. Im Display erscheidt „VOL“ zur Einstellung der Lauststärke. Durch wiederholtes Drücken der SEL- Taste konnen Sie nun die einzelnen Menupunkte wie VOLUME, BASS, TREBLE, BALANCE und FADER anwahlen. Sie ändern die Einstellungen der einzelnen Menupunkte mit Hilfe der „+“- oder „-“-Taste.
Hinweis: Sind unter DSP Equalizeinstellungen wie z. B. POP, ROCK gewählt, können BASS und TREBLE nicht eingestellt werden.
b) Drücken Sie die SEL-Taste lang, um in das Auswahlmenü TA SEEK/TA ALARM, MASK DPI/MASK ALL, DSP OFF, LOUD ON/OFF, BEEP ON/OFF, SEEK1/2, STEREO/MONO; LOCAL/DX; VOL LAST/ADJ zu gelangen. Im Display erscheidt „TA SEEK".
Durch wiederholtes Drücken der SEL-Taste konnen Sie nun die einzelnen Menupunkte anwahlen. Sie ändern die Einstellungen der einzelnen Menupunkte mit Hilfe der "+"-oder "-"Taste.
TA SEEK-MENU (Verkehrsfunk-Sendersuche)
Wahlen Sie TA SEEK, wenn bei der Wahl der TA- Funktion automatisch ein Verkehrsfunk sender gesucht werden soll.
Wahlen Sie TA ALARM, erhalten Sie eine Warnmeldung im Display, sobald Sie unter der TA Funktion einen Sender eingestellt haben, der keine Verkehrsfunkeninformationen übermittelt.
- MASK DPI/ALL
Verbergen von Alternativfrequenzen (AF) während deruche nach einer ProgrammKennung (PI).
MASK DPI: Sucht das Gerät nach der Programmknennung (PI) eines Senders bleiben die Alternativfrequenzen mit anderer Programmknennung im Verborgenen.
MASK ALL: Bei der Suche nach einer Programmkennung (PI) bereits Alternativfrequenzen mit anderer Programmkennung und Sonder mit starkem Signalpegel ohne RDS Signal im Verborgenen.
DSP
Im DSP konnen Sie die Equalizereinstellungen POP M; ROCK M, CLASS M und FLAT M wahlen. Wahlen Sie DSP OFF um eigene Einstellungen vorzunehmen. Siehe auch Pkt. 3a.
- LOUD ON/LOUD OFF
Ein- und Ausschalten der LOUDNESS-Funktion.
Im niedrigen Lautstärkebereich wird mit der Funktion LOUDNESS (LOUD) das Klangbild erweitert. Höhen und Bässe werden angehoben.
BEEP ON/OFF Bestätigungston
Den Bestätigungston beim Tastendruck konnen Sie in zwei Arten wahlen.
BEEP ON: Der Bestätigungston erfolgt bei jedem Tastendruck.
BEEP OFF: Der Bestätigungston ist abgeschaltet.
- SEEK 1, SEEK 2 (Nur im Radiobetrieb wahlbar)
Suchfunktion mit den / -Tasten im Radiobetrieb
SEEK 1: Halten Sie die «▶/»-Tasten gedrückt und das Radio wird bei der nachsten erreichbaren Sendestation stoppen.
SEEK 2: Solange Sie die I- / > I-Tasten gedrückt halten wird der Suchlauf im Frequenzband weiter geführt.
STEREO/MONO Umschaltung (Nur im Radiobetrieb wahlbar)
- LOCAL/DX (Nur im Radiobetrieb wahlbar)
Ihr Radio kann RDS EON Daten empfangen. Unter EON versteht man die Übermittlung von zusätzlichen Senderinformationen innerhalb einer Senderkette z. b. des WDR. Im Falle einer Verkehrsdurchsage (TA) wird innerhalb einer Senderkette von einem Nicht-Verkehrsfunkender auf den entspruchenden Verkehrsfunkender der Senderkette umgeschaltet. Der Empfang dieser Sendedaten wird durch das EON Zeichen im Display angezeigt. Sie können zwischen dem EONTA LOCAL bzw. EONTA DISTANCE-Modus für den lokalen oder den Fernverkehrsfunkempfang wahren.
Der Zweck dieser Funktion besteht darin, ein unerwünschtes Umschalten auf eine EON-TA-Verkehrsansage zu unterträcken. Liegt ein EON Sender sehrweit entfern, so können z.T. trotzdem EON TA-Information von dieser Station empfangen werden. Das Radio schaltete zu dieser EON-Verbindungsstation um und versucht die Verkehrsinformationen zu empfangen. Der Signalpegel ist aber zu schwach und der Empfang ist schlecht, da diese EON-Verbindungsstation zuweit außerhalb lag.
Deshalb schaltet das Radio dann auf den zuvor eingestellenten SenderTomorrow.
Bei der oben beschriebenen Betriebsart hört der Anwender für eine kurze Zeitspanne ein falsches Programm oder überhaupt nichts.
EONTA LOCAL:
Durch diese Funktion wird ein Umschalten zu einer EON-Verbindung mit zu schwachem Signalpegel vermieden.
Das Radio schaltet nicht auf diesen Sender um und der Hörer nimmt kaum Störungen wahr.
EON TA-DISTANCE-Modus:
In this modus versucht die EON TA Schaltung die EON TA Informationen von einem erreichbaren Sender zu erhalten und so die Empfangsqualität zu verbessern.
D
VOL LAST/VOL ADJ
VOL LAST: Das Radio schaltet sich mit der zuletzt tatsächlich eingestellt den Lautstärke ein.
VOL ADJ: Mit Hilfe der + - und -Tasten wahlen Sie eine gleichbleibende Einschaltlautstärke vor.
4. POWER-Knopf
Zum Ein- bzw. Ausschalten des Gerätes diese Taste drucken.
5. LCD-Display (Flüssigkristallanzeige)
6. BAND-Taste
Drücken Sie kurz die BAND-Taste, um zwischen den drei FM- (UKW) Ebenen umzuschalten. Die Bezeichnung der entsprechenden Ebene FI, F2, F3 wird in der LCD-Anzeige angezeigt.
7.8.1▲/▶I-Tasten TUNE, SEEK, TRACK, SKIP UP/DOWN
a) Im Radiodomus: Drücken Sie kurz die I- oder I-Taste, um manuell einen gewünschten Radiosender einzustellen. Halten Sie die I- oder I-Taste gedrückt, um die Sueche nach einem Radiosender zu starten. Siehe auch die Funktion SEEK 1 / SEEK 2.
b) Im CD-Modus: Zum Vor- bzw. Rückwärtspringen die Taste I bwz. I kurz drücken. Zum Spulen von Titeln die Pfeiltaste I zw. gedrückt halten.
9. MODUS-Taste
Drucken Sie diese Taste zur Auswahl des CD-Player- bzw. Radio-Modus.
10. MUTE-Taste
Drücken Sie die MUTE-Taste, um die Lautsprecher für kurze Zeit stumm zu schalten. Drücken Sie diese Taste erneut, um diese Funktion wieder aufzuheiten.
11. AP-Taste (Automatische Senderspeicherung)
Im Radio-Modus:
a) Speicherfunktion:
Drücken Sie die AP-Taste länger als eine Sekunde, um die automatische Senderspeicherung zu aktivieren.
Das Gerätucht innerhalb des aktuellen Frenzbandes z. B. FM 1 nach den größten Signalstarkepegel bis der Suchzyklus abgeschlossen wird.
Die sechs stärksten Sender werden den entsprechenden Speicherplatz zugeordnet.
Die nun gespeicherten Sender werden jeweils ca. 5 sek. lang angespielt und danach wird der Sender des ersten Speicherplatzes eingestellt.
Möhlen Sie noch weitere Sender im FM-Band suchen drücken Sie die BAND-Taste um auf das FM2 bzw. FM3 Band zu wechseln. Drücken Sie die AP-Taste erneut länger als eine Sekunde, um die weitere Suche zu starten.
b) Anspielfung:
Nach kurzem Drücken der AP-Taste spiel das Radio alle voreingestellt. Sender des Freqenzbandes an.
Hinweis: Die Anspielfungtion endet automatisch wieder bei dem Speicherplatz von dem aus sie gestartet wurde.
AP-Taste als Suchfunktionen im MP3 Betrieb
Sind beim Erstellen einer CD im MP3 entsprechende Daten angelegt worden, können diese über folgenden Funktionen gesucht werden:
a) Direkteingabe der Titelnummer bei CD's im MP3-Format:
- Drucken Sie 1X die AP-Taste. Im Display erscheint „TRK SCH".
- Drucken Sie kurz die SEL-Taste. Im Display erscheint „TRK SCH 001". Die Einerstelle blinkt.
- Mit Hilfe der + / - Tasten haben Sie nun die Möglichkeit an der Einerstelle eine Titelnummer von 0 bis 9 einzugeben.
- Drücken Sie erneut kurz die SEL-Taste. Die Zehnerstelle blinkt. Verfahren Sie wie unter Pkt. 3 beschreiben.
- Drücken Sie erneut kurz die SEL-Taste, um ggf. eine Hundererstelle einzugeben.
- Schlieben Sie die Eingabe der Titelnummer durch längeres Drucken(1 sek.) der SEL-Taste ab. Unmittelbar danach wird der gewährte Titel abgespielt.
b) Dateisuchfungtion bei CD's im MP3-Format:
- Drucken Sie 2X die AP-Taste. Im Display erscheint „FILE SCH".
- Drücken Sie kurz die SEL-Taste, um den ersten ausgewählten Ordner im Display anzuzeigen.
- Mit Hilfe der + / - Tasten haben Sie nun die Möglichkeit die verschiedene- den Ordner auf der CD anzuwahlen.
- Drücken Sie die SEL-Taste länger (1 sek.). Der gewährte Ordner wird vom ersten Lieed an abgespielt. Drucken Sie die SEL-Taste kurz und Sie konnen mit Hilfe der +/- Tasten einen Titel im Ordner auswahlen.
- Schlieben Sie die Eingabe durch längeres Drücken (1 sek.) der SEL-Taste ab. Unmittelbar danach wird der gewährte Titel abgeschliert.
c) Stichwortsuchfunktion bei CD's im MP3-Format:
- Drucken Sie 3X die AP-Taste. Im Display erscheint „CHAR SCH".
- Drücken Sie kurz die SEL-Taste. Links im Display erscheint ein „A".
- Durch das wiederholte Drücken der +/- Tasten können Sie nun an der ersten Stelle des Displays einen Buchstaben von A bis Z oder eine Ziffer von 0 bis 9 eintragen.
Hinweis: Die Eintragung der weiteren Ziffern und Buchstaben erfolgt von links nach rechts.
- Drücken Sie die SEL-Taste kurz. Auf der zweiten Stelle des Displays erscheint ein „A". Verfahren Sie bei der Eintragung von Ziffern und Buchstaben wie unter Pkt. 3 beschrieben.
D
- Wiederholen Sie die Tätigkeiten unter Pkt. 2 und Pkt. 3 solange bis Sie ihren mehrstelligen Suchbegriff eingegeben haben.
Hinweis: Löschen Sie die letzte Eintragung durch das drücken der AP-Taste.
- Schlieben Sie die Eingabe durch längeres Drücken (1 sek.) der SEL-Taste ab. Unmittelbar danach wird der gewährte Titel abgeschweit.
Hinweis: Die Wiedergabe anwenderseitig erstellter CD kann durch die Vielzahl der verfügbaren Software und CD-Medien nicht garantiert werden. Beim normalen Spielbetrieb vom CD's im MP3-Format kann mit den I▲ - bzw.▶I-- Tasten um jeweils einen Titel rauf oder runter gesprungen werden. Mit den Stationstanten 5 bzw. 6 kann um jeweils 10 Titel herunter bzw. Herauf gesprungen werden.
12-17.als Stationstasten (1-6) vorgewähler Sender und als
1TOP-, 2INT-, 3 RPT-, 4RDM- Tasten im CD Betrieb
a) Radio-Betrieb
Durch kurzes Drücken wird über diese Tasten ein voreingestelter Radio-sender direkt angewählt. Werden diese Tasten länger als eine Sekunden gedrückt, wird der aktuell eingestellte Sender unter der gewährten Stations-taste gespeichert.
b) CD-Betrieb
- Drücken Sie die 1TOP-Taste, um das Abspielen der CD zu unterbrechen (Pausenfunktion). Drücken Sie diese Taste erneut, um diese Funktion wieder aufzuheben.
- Drucken Sie die 2INT-Taste. jeder Titel der CD wird jeweils 10 Sekunden lang angespielt. Drucken sie diese Taste erneut, um die Suche abzubrechen. Der aktuell angewählte Titel wird abgespielt.
- Drücken Sie die 3RPT-Taste. Der aktuelle gespiefte Titel wird wiederholt. Drücken Sie diese Taste erneut um diese Funktion wieder aufzuheiten.
- Drücken Sie die 4RDM-Taste. Die CD Titel werden in zufälliger Reihenfolge abgeschlossen. Drücken Sie diese Taste erneut um diese Funktion wieder aufzuheben.
18. TA Traffic Announcement (Vorrangschaftung für Verkehrsfunk)
Die TA-Funktion wird durch kurzes Drucken der TA-Taste aktiviert und durch ein TA-Zeichen im Display angezeigt. Beim Radiobetrieb in einem FM Freuenband beginnnt automatisch die Suche nach einem Verkehrsfunksender (TA SEEK).
Wenn ein FM-Sender empfangen wird, der periodisch die neuesten Verkehrsfunkinformationen ausstrahlt, leuchtet die TP-Anzeige im Display auf.
Bei eingeschalteter TA-Funktion unterbrechen die FM Verkehrsfunkinformationen automatisch den CD Betrieb. Der Lautstärkepegel wird auf den Mindestswert für die Übertragung von Verkehrsnachnichten angehoben.
Nach Beendigung der Verkehrsfunkinformationen setzen das vorher eingestellte Programm wieder ein.
Unterbrechung der TA-Funktion:
Möhlen Sie die aktuelle Verkehrsnachricht unterbrechen, Drücken Sie kurz die TA-Taste. Der TA-Modus wird hierdurch nicht ausgeschaltet.
19. PTY-Taste Wahl des Programmtypes
Neben dem Sendername übermitteln eine FM-Sender auch Informationen über den Programtyp hises Programms. Diese Informationen konnen von Ihr Automotid angeseigt werden.
Solche Programmtypen können z.B. sein:
SPORT
NEWS
POP
CLASSICS
Mit der PTY-Funktion konnen Sie gezielt Sender eines bestimmten Programmtypes ausgehalten.
Drucken Sie die PTY-Taste 1X um in die PTY Musikgruppe zu gelangen.
Im Display entscheidt das Zeichen ,PTY".
Mit Hilfe der Stationstasten 1-6 konnen Sie nun wie folgt eine Auswahl treffen.
| 1X drücken | 2X drücken | |
| Stationstaste 1 | POP M | ROCK M |
| Stationstaste 2 | EASY M | LIGHT M |
| Stationstaste 3 | CLASSICS | OTHER M |
| Stationstaste 4 | JAZZ | COUNTRY |
| Stationstaste 5 | NATION M | OLDIES |
| Stationstaste 6 | FOLK M |
Drücken Sie die PTY-Taste 2X um in die PTY Sprachgruppe zu gelangen. Mit Hilfe der Stationstasten 1-6 konnen Sie nun wie folgt eine Auswahl treffen.
| 1X drücken | 2X drücken | 3X drücken | |
| Stationstaste 1 | NEWS | AFFAIRS | INFO |
| Stationstaste 2 | SPORT | EDUCATE | DRAMA |
| Stationstaste 3 | CULTURE | SCIENCE | VARIED |
| Stationstaste 4 | WEATHER | FINANCE | CHILDREN |
| Stationstaste 5 | SOCIAL | RELIGION | PHONEIN |
| Stationstaste 6 | TRAVEL | LEISURE | DOCUMENT |
Drücken Sie die PTY-Taste 3X um in die Funktion wieder auszuschalten.
Wenn PTY angewählt wird, startet das Radiogerät die Sueche nach entspruchenden PTY-Informationen und stoppt, wenn die gesuchte PTY-Information gefunden wurde.
Wird der gesuchte Programmtyp nicht gefunden erscheint im Display „NONE PTY".
Wenn die gesuchte PTY-Information nicht mehr besteht, schaltet sich die PTY-Funktion automatisch auf normalen Modus um.
D
20. AF (Alternative Frenzen) REG-Funktion
a) AF ist eine Funktion die mit Hilfe des RDS (Radio Data System) arbeitet und nur bei FM Sendern genutzter werden kann. Das Gerät sicht im Hintergrund die am besten zu empfängene Freqenz des eingestellen Senders. Wenn die AF-Funktion angewählt wird, prüft das Radio laufend die Signalstarke der AF-Frequency. Das Prüfinterval für jeder AF-Frequency hängt von der Signalstarke des aktuellen Senders ab und variiert von einaar Minuten im Fall eines starken Senders bis zu einaar Sekunden bei schwachen Sendern. Jedes Mal, wenn die neue AF-Frequency stärker ist, als die aktuell eingestellte Station, schaltet das Gerät für kurze Zeit auf diese Freqenz um und es wird ein bis zwei Sekunden lang die Meldung „NEW FREQUENCY" angezeigt. Da die Stummzeit beim Freqenzwechsel bzw. der Prüfzeit sehr kurz ist, ist dies während des normalen Programms fast nicht hörbar.
Die AF Funktion wird durch kurzes Drücken der AF-Taste aktiviert und der Status der AF Funktion wird durch ein AF-Zeichen im Display angezeigt.
- Erscheint das AF Zeichen im Display ist die AF-Funktion eingeschaltet und es werden RDS-Sendedaten empfangen.
- Blinkt das AF Zeichen im Display, ist die AF-Funktionzar angewählt, es kann jedergerade kein RDS-Sendesignal empfangen werden.
- Betätigten Sie die AF-Taste erneut, um diese Funktion wieder auszuschalten. Das AF Zeichen im Display erlischt.
b) REG-Funktion
Eine Sender teilen zu bestimmten Zeiten ihr Programm in Regionalprogramme mit entsprechlichem Inhalt auf.
- REG ON: Durch langes Drücken der AF-Taste wird der regionale Modus eingeschäftet. Im Display erscheint weniger Sekunden lang die Meldung „REG ON".
Hinweis: Die Anzeigekapazität des Displays ist begrenzt. Es ist möglich, dass im doppelten Anzeigemodus einzeln Segmente des Displays gelöscht sind.
Mit der Funktion REG ON wird verhindert, dass das Radio zu Alternativfrequenzen wechselt, die einen anderen regionalen Programminhalt haben.
- REG OFF: Durch erneutes langes Drücken der AF-Taste wird der regionale Modus ausgeschelt. Im Display erscheint weniger Sekunden lang die Meldung „REG OFF".
Die ProgrammKennung (PI) des Regionalsendeprogramms wird bei der Sache nach einer Alternativfrequenz (AF) oder einer Programmkennung (PI) ignoriert.
21. CD-Schlitz
22. Auswurftaste (EJECT)
Zum Auswerfen der CD diese Taste drucken.
- Blinkende LED-Anzeige (ohne Abbildung)
Beim Abnehmer der vorderen Bedientafel blinkt diese Anzeige.
D
- RESET-Knopf (ohne Abbildung)
Zum Wiederherstellen des gestörten Programms diese Taste drücken. Diese Taste finden Sie bei abgenommenem Bedienfeld rechts darüber dem Display.
Technische Daten
Allgemeines
Netzspannung
DC 13,8 V
Stromverbrauch
7A Max.
Leistung
4×30W
FM-Bereich
Frequenzbereich
87,6 MHz bis 108,0 MHz
Nutzbare Empfindlichkeit
3 uV.
I.F. Freqenz
10,7 MHz
Ausgangsleistung (Wahlweise)
Ausgang
bei CD max. 1200mV
CD-Player
System
CD-Gerat
Verwendbare CDs
CD/CDR/CDRW/MP3 Disks
Anzahl der Quantizierungsbits
1 bit.
Signalformat
Musterfrequenz 44,1 KHz
Frequenzcharakteristika
20-100Hz≤5dB
10 - 20KHz ≤ 5dB
Signal-Rausch-Verhältnis
50 dB (1KHz)
Anzahl der Kanäle
2 Stereo-Kanäle
Gehäuseabmessungen
178 B x 50 H x 165 T
D
Störungsbehebung
Bevor Sie die Checkliste durchgehen,itte zunachst den Anschluss fertig stellen. Wenn nach erfolgtem Durchprüfen der Checkliste immer noch Fragen offen sind, wenden Sie sichitten einehlre nachstgelegene Kundendienstelle.
| Fehlersymptom | Grund | Lösung |
| CD's werden nur bis zur Hälfte in den CD Schacht eingezogen. | Die Schrauben der Transportsicherung sind nicht entfern worden. | Enternen Sie die Schrauben der Transportsicherung. |
| Nach Einlagen in das Gerätläuft die CD oder Kassette nicht. | Der Lautstärkeregler ist zu leise eingestellt. | Den Lautstärkeregler höher einstehen. |
| Die Anschlüsse sind nicht korrekt ausgeführrt. | Den +12V- sowie den Mas-se-anschluss überprüfen. | |
| Der Ton des CD-Players hupft. | Die Straβenoberfläche ist rauh. | Zum Abspielen der CD warten, bis die Straße glatter wird. |
| Das Gerätl ist nicht fest eingebaut. | Das Gerätl fest einbauen. Sicherstellen, dass die hin-tere Befestigung verwendet wird, wenn das Fahrzeug keine geeignete Aufnahme für den hinteren Gerätsteil bietet. | |
| Die CD ist defekt. | Eine andere CD auspro-bieren. Wenn diese korrekt lauft, ist die erstede CD wahr-scheinlich beschädigt. | |
| Die CD ist verschmutzt. | Die CD reinigen. | |
| Kein Strom. | Die Zündung ist ausge-schaltet. | Den Zündschlüssel auf „ON“ oder „ACC“ drehen. |
| Die Sicherung ist durch-gebrannt. | Die Sicherung durch eine andere 7A-Sicherung ersetzen. | |
| Das Gerätl funktioniert nicht richtig (EJECT, LOAD, PLAY). | Der Mikrocomputer wurde durch elektr-magnetische Felder gestört. | Die CD oder Kassette hereaus-nehmen und wieder einlegen. Das Gerätl aus- und dann wieder einschalten. |
| Kein Radioempfang. | Das Antennenkabel ist nicht angeschlossen. | Das Antennenkabel fest in die Antennenbuchse des Gerätes stecken. |
| Im automatischen Such-modus stoppt das Radio bei keiner Sendestation. | Die Sendesignale sind zu schwach. | Manuell eine Sendestation einstellen. |
Abspielen einer CD
D

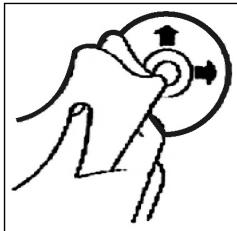
Reinigen der CD
Vor dem Abspielen, die CD mit einem sauberen, staubfrei Reinigungstuch abwischen. Die CD in Pfeilrichtung abziehen.
Hinweis: Keine Lösungsmittel wie Benzin oder Verdünner verwenden. Die allgemein erhähtliche Reinigungsmittel oder Anti-Statiksprays beschädig den Gerät.
Einlegender CD
Wenn die CD mit dem Aufdruck nach unter einge- lect wird, kann das Gerat beschadigt werden.
CD immermitdemLabelnachoben einlegen.
Hinweis: Wenn sich bereits eine CD im CD-Schlitz befindet, nicht versuchen, eine weitere CD einzulegen. Dies kann zu Schäden am Gerät führen.

Anfassen der CD
Die CD stets am Rand anfassen. Um die CD sauber zu halten, nicht an der Oberfläche anfassen.
- Keine Aufkleber oder Klebeband auf die CD kleben.
Die CD nicht direkter Sonneneinstrahlung oder Wärmequellen wie Heizungsrohren aussetzen und sie auch nicht im Auto halten, wenn这点es in praller Sonne gesparkt wird, da dies zu einem betrachtlichen Temperaturanstieg führt.
Dieses Gerat wurde nach allen zuteffenden, aktuellen CE-Richtlinien geprüft, wie z.B. elektromagnetische Vertragslichkeit und Niederspannungsdirektive und wurde nach den neuesten Sicherheitsnichen Vorschriften gebaut.
Technische Änderungen vorbehalten!
Bitte führen Sie das ausgediente Gerät einer umweltgerechten Entsorgung zu.
D
Garantie
Wir übernehmen für das von uns vertriebene Gerät eine Garantie von 24 Monaten ab Kaufdatum (Kassenbon).
Innerhalb der Garantiezeit beseitigen wir unentgeltlich die Mängel des Gerätes oder des Zubehörns*, die auf Material- oder Herstellungsfehler berufen, durch Reparatur oder, nach unserem Ermessen, durch Umtausch. Garantieleistungen bewirken weder eine Veränderung der Garantiefrist, noch beginnnt dadurch ein Anspruch auf eine neue Garantie!
Als Garantienachweis gilt der Kaufbeleg. Ohne diesen Nachweis kann ein kostenloser Austausch oder eine kostenlose Reparatur nicht erfolgen.
Im Garantiefall geben Sieitte das komplette Gerät in der Originalverpackung zusammen mit dem Kassenbon an ihren Handler.
*) Schäden an Zubehörteilen führen nicht automatisch zum kostenlosen Umtausch des kompletten Gerätes. Wenden Sie sich in thisem Fallitte an unsere Hotline! Glasbruchschäden bzw. Brüche von Kunststoffteilen sind grundsätzlich kostenpflichtig!
Sowohl Defekte an Verbrauchszubehör bzw. Verschleibeiten (z.B. Motorkohlen, Knethaken, Antriebsriemen, Ersatzfernbedienung, Ersatzzahnbürsten, Sägebäterm usw.), als auch Reinigung, Wartung oder der Austausch von Verschleibeiten, fallen nicht unter die Garantie und sind deshalb kostenpflichtig!
Die Garantie erlischt bei Fremdeingriff.
Nach der Garantie
Nach Ablauf der Garantiezeit können Reparaturen kostenpflichtig vom entspruchenden Fachhandel oder Reparaturservice ausgeführten werden.
Algemene veiligheidsinstructies
NL
Voorkom risico's voor brand en elektrische schokken en stel het apparaat Niet bloot aan regen von vocht. Gebruik het apparaat Niet in de directe nabijeheid van water (bijv. badkamer, zwembad, vochtige kelder).
Gebruik het apparaat uitsluitend voor het waarvoortestemde doel.
Sluit het apparara uitsluiert aan op een correct gefinstalleerde contactdoos. Let op dat de aangegeven spanning overeenstemt met de spanning van de contactdoos.
Let bij het gebruik van externe adapters op de juiste polariteit en spanning enplaats batterijen altiijd in de juiste richting.
Plaats het apparaat zodenig dat de aangebrachte luchtopeningen nicht worden afgedekt.
Open nooit de behuizing van het apparaat. Door ondeskundige reparations können aanzienlijke bevaren voor de gebruiker ontstaan. Neem het apparaat Niet更是 in gebruik wanner het apparaat - en in het bijzonder de kabel - beschadigingen vertoont, maar laat het eerst door eenvakman repareren. Controllerer de kabel regelmatin op beschadigingen.
Een defecte kabel mag alleen door de fabrikant, once technische dienst of een soortgelijk gekwalificeerd persoon worden verrangen. Alleen zo konnen bevaren vermeden worden.
Onderbreek de stroomtoevoer of verwijder de batterijen wanner u denkt, het apparaat langerearend Niet te gebruiken.
Volgende symbolen können op uw apparaat zich aangebracht. Zij hebden de volgende betekenis:

Het bliksemsymbol wijst de gebruiker op onderdelen in het inwendige van het apparaat die gevaarlijk hove spanning voeren.

Het symbol met het uitroepteken verwijst maar belangrijke bedienings- en onderhoudsinstructies in de begeleidende documentatione.

Apparaten met dit symbol Werken met een „Klasse 1-laser_, voor de afstavg van de CD. De ingebouwde veilighheidsschakelaars要去en voorkomen dat de gebruiker worden blootgesteld aan gevaartlijke, voor het menselijk oog onzichtbaar laserlicht wanneer het CD-vak geopend is.
Deze veiligheidsschakelaars mogen in geen geval overbrugd of gemanipuleerd worden,ondat u anders gevaar loopt, aan het laserlicht te worden blootgesteld.
NL
Installatie
Monteer het radioapparaat volgens de onderstaande afbeeldingen

a Moer
b Veerring
c Onderlegplaatje
d Schroef
e Montagehoek
f Inschuifbehuiizing
g Schroefdraadbout
Let op!
h Schroeven van de transportbeveiliging (a.u.b. voor de montage verwijderen)
i Uitrekgereedschap (sleutel voor de demontage)
j Raamwerk
Zet het bedieningselementeerst aan tegen de rechterzijde en klik het verzolvgens aan de linkerzijde in.
Aansluting
Breng de aansluiting tot stand volgens de afbeelding.
NL
NL
Opgelet
- Plaats het verwijdberbare bedieningselement pas na de aansluiting van de kabels.
- Gebruik luidsprekers met een impedantie van 4 Ohm.
Belangrijke aanvullende informatiekoor de montage van uw autoradio!
- Let bij de montage/aansluiting van uw apparaat op dat uw auto over een originele „ISO-aansluiting"要去 beschikken. Deze aansluiting is de tegenhanger van de aan de apparaatui tung aangebrachte steker (ISO-aansluiting).
Bij de toewijzing van de Tijdsduur ^+ (back-up) konnen darüber al naargelang het voertuigtype afwijkingen optreden.
Neem in deze gezallen a.u.b. contact op met een geauthoriseerde autogarage waar dat een permanente/constante stroomverzorging van uw radio anders nicht gewaarborgd is. (Dit is darüberoodzekelijk voor de opslag van de zenderstations).
- Al naargelang het voertuigtype kutten in uitzonderingsgevallen stoorgeluiden in de radio/CD-modus optreden. Deze kutten worden verholpen met een extra ontstoorfilter. Uw apparaat is standarda reeds uiterust met een ontstoorfilter. Desondanks kutten er afhankelijk van het voertuigtype storingen optreden.
Ontstoorfilters়ijn verkrijgbaar Aunt in een zaak voor autotoebehoren en/of bij uw garage.
Veiligheidsmaatregelen en onderhoud
- Verwijder vór de montage a.u.b. de schroeven (h) van de transportbeveiliging ontdat in het andere geval de CD Niet kan worden geladen.
- Het apparaat is geconcipcieerd voor de minpool van de accu die aan de carros-serie van het voertuig dient te zich aangesloten. U dient dit voor de installment te controlen.
- Wanner het voorste bedieningselementijdens de radio- en CD-modus worden verwijderd, worden het apparaat automatischuitgeschakeld.
- Functiestoring. Na het terugplaatsen van het voorste bedieningsselement verschijnt op het LC-display een foumtelding (ERROR). Druk met behulp van een draad of iets dergelijkde toets RESET (24) in om de elektronica waar terug te zetten (RESETTEN). Deze toets kut u bij verwijderd bedieningsveld rechts naast het display vinden.
- Wanneer het extreem heet in het voertuig is, bijv. nadat de auto gedurende een langereijd in de zon geparkeerd stond, dient u de CD-speler pas in te schakenen nadat het na een korte rijduur een beetje is afgekoeld.
- Gebruik steeds de voorhanden beschemhoes om het afneembare bedieningselement veilig te bewaren.
22
Bediening
NL
1. REL-Taste
Druk op de REL-toets om het voorste bedieningselement te verwijderen.
2. + / - - toetsen
In de normale spelimodus zijn deze toetsen bedoeld voor het instellenen van de geluidssterkte. In combinatie met de tevoren ingedrukte SEL-toets hunnen veranderingen in menu's, bijv. de klangmodus, worden uitgevoerd.
3. SEL-toets (selectie)
a) Druk kort op de SEL-toets om maar het selecti菜单 van de klankmodus te schaken. Op het display beschijt „VOL“ voor de instelling van de geluidssterkte. Door herhaaldelijk op de SEL-toets te drukken kunt u nu de afzonderlijke menupunten zoals VOLUME, BASS, TREBLE, BALANCE en FADER selectoren. U kut den instelleningen van de afzonderlijke menupunten veranderen met behulp van de „+“- of „-“-toets.
Opmerking: wanner onder DSP equalizerinstallingen zoals bijv. POP, ROCK geselecteerd zich, können BASS en TREBLE nicht worden ingesteld.
b) Druk lang op de SEL-toets om maar het selectienu menu TA SEEK/TA ALARM, MASK DPI/MASK ALL, DSP OFF, LOUD ON/OFF, BEEP ON/OFF, SEEK1/2,STEREO/MONO;LOCAL/DX;VOL LAST/ADJ te schakelen.
Op het display verschijnt „TA SEEK".
Door herhaaldelijk op de SEL-toets te drukken kut u nu de afzonderlijke menupunten selecteren. U kut de instellening van de afzonderlijke menupunten veranderen met behulp van de +^+ - of +^+ - toets.
TA SEEK-menu (verkeersberichten-zenderzoekfunctie)
Selecteer TA SEEK wanneer bij de selectie van de TA-functie automatisch een zender met verkeersberichten gezocht dient te worden.
Wanneer u TA ALARM selecteert, ontvangent u een waarschuwing op het display, zodia u onder de TA-functionie een zender hebt ingesteld die geen verkeersberichten uitzendt.
- MASK DPI/ALL
Verbergen van alternative frequencies (AF)ijdens het zoekenaar een programme-identificatie (PI).
MASK DPI: wanneer het apparaat waar de programme-identificatie (PI) van een zender zoekt, blijven de alternatieve frequencies met een andere programme-identificatie verzorgen.
MASK ALL: bij het zoeken aan een programme-identificatie (PI) blijven alternatieve frequencies met een andere programme-identificatie en zenders met een sterke signaal niveau zonder RDS-signaal verborgen.
DSP
In het DSPkest de equalizerinstallingen POP M, ROCK M, CLAAS M en FLAT selecteren. Selecteer DSP OFF om eigenginstellenenuit te voeren. Zie hiervoort ook punt 3a.
NL
- LOUD ON/LOUD OFF
Aan- en uitschakelen van de LOUDNESS-functie.
In het lagere volumebereik worden door middel van de functie LOUDNESS (LOUD) het geluidsbeeld uitgebreed. Hoogten en bassen worden versterkt.
BEEP ON/OFF bevestigingsgeluid
Voor het bevestigingsgeluid bij het indrukken van toetsen hebt u twee keuzemogelijkheden.
BEEP ON: het bevestigingsgeluid klinkt na iedere druk op de toets.
BEEP OFF: het bevestigingsgeluid isuitgeschakeld.
- SEEK 1, SEEK 2 (kan alléén in radiomodus worden geselecteer)
Zoekfunctie met de I- / -toetsen in radiomodus
SEEK 1: houd de I- / > I-toetsen ingedrukt en de radio stopt bij het volgende ontvangbare zenderstation.
SEEK 2: houd de I<▶/▶I-toetsen ingedrukt totdat de Zoekfungtie in de frequentieband worden voortgezet.
STEREO/MONO-omschakeling (alleén selecteerbaar in radiomodus).
- LOCAL/DX (alleen in radiomodus selecteerbaar)
Uw radio kan RDS EON-gegevens ontvangen. Met EON worden de overdracht van extra zenderinformatie binnen een zenderketen, bijv. de WDR, bedoeld. In geval een verkeersbericht (TA) worden binnen een zenderketen van een Niet-verkeerszender overgeschakeld maar de desbetreffende verkeerszender van de zenderketen. De ontvangst van deze zendergeveens worden door middel van het EON-teken op het display weergeven. U kunt kiezen ut de EONTA LOCAL- resp. EONTA DISTANCE-modus voor de lokale of de langeafstandsverkeersberichten.
Het doel voor deze functie bestaat daarin, een ongewenst overschakenen maar een EON-TA-verkeersbericht te onderdrukken. Wanner een EON-zender zeer ver weg Light, kutu gedeelelijk toct EON TA-informatie van dit station ontvangen. De radio schakelt over maar dit EON-verbindingsstation en probeert de verkeersinformatie te ontvangen. Het signaal is beschter te zwak en de ontvangst is slecht omdat dit EON-verbindingsstation te ver buitten het bereik ligt.
Daarom schakelt de radio terug maar de tevoren ingestelde zender.
Bij de hierboven beschreiben bedrijfsmodus hoog de gebruiker gedurende een korteijd een verkeerd programma of helemaal niets.
EONTA LOCAL:
door middel van deze functie worden omschakenaar een EON-ver-binding met een te zwak signaal vermeden.
De radio schakelt Niet over maar deze zender en de luisteraar neemt de storing nauwelijks waar.
EON TA-DISTANCE-modus:
in deze probeert de EON TA-schakeling de EON TA-informatie van een bereikbare zender te ontvangen en de ontvangstkwaliteit op deze wijze te verbeteren.
VOL LAST/VOL ADJ
VOL LAST: de radio schakelt in met de op hetIRST ingestelde geluidssterkte
VOL ADJ: met behulp van de +- en -toetsenkest u een gelijkblijven de geluidssterkte vooraf instellen.
4. POWER-knop
Druk op.Deze toets om het apparaat in- of uit te schakelen.
5. LC-display (vloeibaar-kristaldisplay)
6. BAND-toets
Druk kortstandig op de BAND-toets omussen de drie FM- (UKW) niveaus heen en een wee te schaken. De benaming van de desbetreffende niveaus FI, F2, F3 worden op het LC-display weergeveen.
7.8.1< /▶I-toetsen TUNE, SEEK, TRACK, SKIP UP/DOWN
a) In de radiomodus: druk kortstondig op de I- of I-toets om een radio-zender handmatig in te stellen.
Houd de I▲ of ▷▶I-toets ingedrukt om het zoekenaar een radiozender te starten.
Zie hiervoor ook de functie SEEK 1 / SEEK 2.
b) In de CD-modus: druk kortstondig op de toetsen 1▶ of >I om voorruit ofchteruit te springen. Om titels voorruit ofchteruit te spoelen houdt u de pijtoetsen 1▶ of >I ingedrukt.
9. MODUS-toets
Druk op deze toets om de CD-speler- of de radiomodus te selecteren.
10. MUTE-toets
Druk op de MUTE-toets om de luidspekers kortstondig uit te schakelen. Druk de toets opniew in om de functie wee te deactiveren.
11. AP-toets (automatische zenderopslag)
In de radiomodus:
a) Opslagfunctie:
druk langer dan 1 seconde op de AP-toets om de automatische zenderopslag te activeren.
Het apparaat zoekt binnen de actuèle frequentieband bijv. FM 1aar de groostte sigmaalsterktepegel totdat de zoekcyclus worden gestopt. De zes sterkste zenders worden toegewezen aan de dienovereenkomstige geheugenplaatsen.
De nu opgeslagen zenders worden telkens ca. 5 seconden lang aangespeeld en daarna worden de zender van de eerste geheugenplaats ingesteld.
Indien u nog meer zenders op de FM-band wilt zoeken, drukt u op de BAND-toets om maar de FM2-of FM3-band over schakelen. Druk opnieuw langer dan 1 Seconde op de AP-toets om verder te zoeken.
NL
b) Aanspeelfunctie:
nadat u de AP-toets kort hebt ingedrukt, speelt de radio alle Vooringestelde zenders van de frequentieband aan.
Opmerking: de aanspeelfunctie eindigt automatisch waar bij de geheugenplaats waarop deze werden gestart.
AP-toets voor Zoekfunctie in de MP3-modus
Wanneer bij het produceren van een CD in MP3-formaat Dienovereenkomstige gevevens werden aangelegd, können deze met behulp van de volgende functies worden gezocht.
a) Directe invoer van het titelnummer bij CD's in MP3-formaat:
- druk 1x op de AP-toets. Op het display verschijnt „TRK SCH".
- druk kortstandig op de SEL-toets. Op het display verschijnt „TRK SCH 001". Het LASTE CICIFER VOR DE KOMMA KNIPPERT.
- Met behulp van + / - toetsen hebt u nu de mogelijkheid om als LASTCijfer vór de komma een titelnummer van 0 t/m 9 in te voeren.
- Druk opnieuw kortstandig op de SEL-toets. Het op een na laatste cider vór de komma knippert. Ga te werk als onder punt 3 beschreiben.
- Druk opniewu kortstandig op de SEL-toets om eventueel nog het op twee na LASTe cijfer voor de komma in te voeren.
- Sluit de invoer van het titelnummer af door langer (1 sec.) op de SEL-toets te drukken. Ommiddelijk daarna worden de geselecteerde titel afgespeel.
b) Zoekfunctie voor bestanden bij CD's in MP3-formaat
- Druk 2x op de AP-toets. Op het display verschijnt „FILE SCH".
- Druk kortstondig op de SEL-toets om de eerste geselecteerde map op het display wee ter given.
- Met behulp van de + / - toetsen hebt u nu de möglichkheid om de verschillende ordners op de CD te selecteren.
- Druk langer op de SEL-toets (1 sec.).
De geselecteerde map worden vanaf de eerste titel afgespeeld.
Druk kortstondig op de SEL-toets en u=kunt met behulp van de +/ -toetsen een titel in de map selecteren.
- Sluit de invoer af door langer (1 sec.) op de SEL-toets te drukken.
Onmiddelijk daarna worden de geselecteerde titel afgespeeld.
c) Zoekfunctie voor sleutelwoorden bij CD's in MP3-formaat:
- Druk 3x op de AP-toets. Op het display verschijnt „CHAR SCH".
- Druk kortstondig op de SEL-toets. Links op het display verschijt een "A".
- Door herhaaldelijk indrukken van de + / - toetsen kutn u nu op de eerste plaat vs het display een letter van A t/m Z of een cijfer van 0 t/m 9 invoeren.
Opmerking: het invoeren van verdere cijfers en letters geschiedt van links maar rechts.
- Druk kortstondig op de SEL-toets. Op de tweede plaats van het display verschijnt een „A". Ga bij het invoeren van cijfers en letters te werk als beschrenven onder punt 3.
- Herhaal de stappen van punt 2 en punt 3 totdat u uw Zoekbegrip hebt ingevoerd.
Opmerking: wis de LASTE invoer door het indrukken van de AP-toets.
- Sluit de invoer af door langer (1 sec.) op de SEL-toets te drukken.
Onmiddelijk daarna worden de geselecteerde titel afgespeeld.
Opmerking: de weergave van een door de gebruiker gemaaakte CD kan opgrund van de vele beschikbare programma's en CD-media nicht worden gegardeend.
In de normale afspeelmodus van CD's in MP3-formaat kutn u met de I- of I-toetsen telkens eén titel omhoog of omlaag springen. Met de stationstoetsen 5 en 6 kutn u telkens 10 titels omlaag of omhoog springen.
12-17.als stationstoetsen (1-6) van voorgeselecteerde zenders en als 1TOP-, 2INT-, 3RPT-, 4RDM-toetsen in de CD-modus
a) Radio-modus
Door kortstandig indrukken sunt u via deze toetsen een voorgeselecteerde radiozender direct selecteren. Wanneer u deze toetsen langer dan een seconde indrukt, worden de actuel ingestelde zender onder de geselecteerde stationstoets opgeslagen.
b) CD-modus
- Druk op de 1TOP-Taste om het afspelen van de CD te onderbreken (pauzefunctie). Druk de toets opnieuw in om de functie wee te deactiveren.
- Druk op de 21NT-toets. Iedere titel van de CD worden gedurende 10 seconden afgespeeld. Druk opnieuw op deze toets om de Zoekfunctie af te breken. De actueel geseleerde titel worden afgespeeld.
- Druk op de 3RPT-toets. De actuelle titel worden herhaald. Druk de toets opnieuw in om de functie waar te deactiveren.
- Druk op de 4RDM-toets. De CD-titels worden in willekeurige volgorde afgespeeld. Druk de toets opnieuw in om de functie waar te deactive-ren.
18. TA traffic announcement (voorrangschakeling voor verkeersberachten)
De TA-fuCNTie worden door het kort indrukken van de TA-toets geactiveerd en door het TA-symbol op het display weergegeven. In de radiomodus in een FM-frequentieband begint het zoeken aan een verkeersberichtzender (TA SEEK) automatisch.
Wanner een FM-zender worden ontvangen die periodiek de niedwste verkeers-informatie uitzendt, brandt de TP-weergave op het display.
Wanneer de TA-functionie isingeschakeld, onderbreken de FM verkeersberachten automatisch de CD-modus. De geluidssterkte worden opgevoord maar de minimale waarde voor de overdracht van de verkeersberchten.
NL
Na afloop van de verkeersinformatie worden het tevoren ingestelde programma voortgezet.
Onderbreking van de TA-functie:
wanneurudeweergave van de actuelseverkeersberachten wilt onderbreken, druktukortopdeTA-toets.De TA-moduswordthierdoornietuitgeschakeld.
19. PTY-toets selectie van het programmatype
Naast de nom van de zender geven sommige FM-zenders ook informatie over het programmatype van hun programa. Deze informatie kan door uw autoradio worden weergegeven.
Deze programmatypes konnen bijv.:
SPORT
NEWS
POP
CLASSICS
zijn.
Met de PTY-functie=kunt u doelgericht zenders uitkiezen van een bepaald programmatype.
Druk 1x op de PTY-toets om maar de PTY-muziekgroep te schakelen.
Op het display verschijnt het teken "PTY".
Met behulp van de stationstoetsen 1-6 kutn u nu de volgende selectie treffen.
| 1X indrukken | 2X indrukken | |
| Stationstoets 1 | POP M | ROCK M |
| Stationstoets 2 | EASY M | LIGHT M |
| Stationstoets 3 | CLASSICS | OTHER M |
| Stationstoets 4 | JAZZ | COUNTRY |
| Stationstoets 5 | NATION M | OLDIES |
| Stationstoets 6 | FOLK M |
Druk 2x op de PTY-toets om maar de PTY-taalgroep te schakelen. Met behulp van de stationstoetsen 1-6 kutn u nu de volgende selectie treffen.
| 1X indrukken | 2X indrukken | 3X indrukken | |
| Stationstoets 1 | NEWS | AFFAIRS | INFO |
| Stationstoets 2 | SPORT | EDUCATE | DRAMA |
| Stationstoets 3 | CULTURE | SCIENCE | VARIED |
| Stationstoets 4 | WEATHER | FINANCE | CHILDREN |
| Stationstoets 5 | SOCIAL | RELIGION | PHONEIN |
| Stationstoets 6 | TRAVEL | LEISURE | DOCUMENT |
Druk 3x op de PTY-toets om de functie weeui te schakelen.
Wanneer u PTY hebt gekozen, start de radio de Zoekfunctie waar dienovereenkomstige PTY-informatie en stopt, zodra de gezochtte PTY-informatie werden gevonden.
Wanneer het gezochtete programmatype zich verwonden, verschijnt op het display "NONE PTY".
Wanneer de gezochte PTY-informatie nicht meer bestaat, schakelt de PTY-functie automatisch over maar de normale modus.
NL
20. AF (alternative frequencies) REG-functie
a) AF is een functie die met behulp van het RDS (Radio Data System) werkst en alleen bij FM-zenders kan worden gezrukt. Het apparaat zoekt op de achtergrund de Beste te ontvangen frequenties van de ingestelde zenders. Wanner de AF-functione wordt geseleeteerd, controleert de radio voortdurende signalsterkte van de AF-frequente. Het controle-interval voor iedere AF-frequente is afhankelijk van de signalsterkte van de actuèle zender en variegt van eenaar minuten in geval van een sterke zender tot eenaar seconden bij zwakke zenders. Iedere keer wanner de neue AF-frequente sterker is dan het actuelt ingestelde station, schakelt het apparaat voor een korteijd maar dieze frequentie over en er worden gedurende een tot twee seconden de melding weergegeven "NEW FREQUENCY". Omdat de geluidloze overschakelingstijd tijdens de frequentiewissel resp. de controliijd zeer kort is, is ditijdens het normale programma nauwelijks hoortaar.
De AF-functie worden door kort indrukken van de AF-toets geactiveerd en de status van de AF-functie worden door een kort AF-teken op het display weergegeven.
- Wonneer het AF-teken op het display verschijnt, is de AF-functie ingeschakeld en worden RDS-zendgegevens ontvangen.
- Wanneer het AF-teken op het display knippert, is de AF-functie weliswaar ingeschakeld, maar kan geen RDS-zendsignaal worden ontvangen.
- Druk opnieuw op de AF-toets om de functie weeer uit te schakelen. Het AF-teken op het display dooft.
b) REG-functie
Sommige zenders spreiden hun programma's op bepaaldeijdstippen in regionale programma's met verschillende inhoud.
- REG ON: door lang indrukken van de AF-toets worden de regionale modus ingeschakeld. Op het display verschijnt gedurende enkele seconden de melding "REG ON".
Opmerking: de weergavecapaciteit van het display is beperkt. Het is waarom möglichk dat in de dubbele weergavemodus enkele segmenten van het display gewist zich.
Met de functie REG ON worden vermeden dat de radio overschakeltaar alternatieve frequencies die een andere regionale programma-inhoud hebben.
- REG OFF: door het opnieuw lang indrukken van de AF-toets worden de regionale modus uitgeschakeld. Op het display verschijnt gedurende enkele seconde de melding "REG OFF".
De programme-identificatie (PI) van het regionale zendprogramma wordenijdens het zoekenaar een alternativene frequentie (AF) of een programma-identificatie (PI) geneeerd.
NL
21 CD-sleuf
22. Uitwerptoets (EJECT)
Druk op deze toets om de CD uit te werpen.
- Knipperende LED-weergave (zonder afbeelding)
Deze weergave knippert wanner u het voorste bedieningselement verwijdert.
- RESET-toets (zonder afbeelding)
Druk op deze toets om een storende zender te herstellen. Deze toets kut u bij verwijderd bedieningsveld rechts naast het display vinden.
Technische gegevens
Algemeen
Netspanning
DC 13,8 V
Stroomverbruik
7A Max.
Stroomverbruik
4 × 30 ~W
FM-bereik
Frequentiebereik
87,6 MHz tot 108,0 MHz
Effectieve gevoeligheid
3 V
IF-frequentie
10,7 MHz
Uitgangsvermögen (selecteerbaar)
Uitgang
bij CD max. 1200mV
CD-speler
System
CD-apparaat
Afspeelbare CD's
CD/CDR/CDRW/MP3 disks
Aantal kwantificeringsbits
1 bit.
Signaalformaat
Monsterfrequentie 44,1 KHz
Frequentiekarakteristiek
20-100Hz≤5dB
10 - 20KHz≤ 5dB
Signaal-ruis-verhouding
50 dB (1KHz)
Aantal kanalen
2 stereokanalen
Apparaatbehuiizing
178 B x 50 H x 165 D
Verhelpen van storingen
NL
Voer eerst alle aansluitingen uit voordat u de checklist doorloopt. Wanner u na controle aan de hand van de checklist nog steeds vragen hebt, neem dan a.u.b. contact op met de dichtstbijzende klantenservice.
| Storingssymptom | Reden | Oplossing |
| CD's worden maar tot de helft in de CD-sleuf getrokken. | De schroeven van de transportbeveiliging werden nicht verwijderd. | Verwijder de schroeven van de transportbeveiliging. |
| Na hetplaatsen in het apparaat loopt de CD of de cassette Niet. | De volumeregelaar is te zicht ingesteld. | Stel de volumeregelaar hoger in. |
| De aansluitingen zijn nicht correct uitgevoerd. | Controler de +12V- en de massa-aansluiting. | |
| Het geluid van de CD-spe-ler springt. | Het wegdek is ruw. | Wacht met het afspelen van de CD totdat het wegdek vlakker worden. |
| Het apparaat is Niet vast gemonteerd. | Bouw het apparaat vast in. Waarborg dat de achechterste bevestiging worden gebruikt wanneer het voertuig Niet over een geschikte opname voor het achechterste apparaatgedeelte beschikt. | |
| De CD is defect. | Probeer een andere CD. Wannereer deze correct fonctioniert is de eerste CD waarschijnlijk beschidg. | |
| De CD is verontreinigd. | Reinig de CD. | |
| Geen stroom. | De ontsteking is uitgeschakeld. | Draai ontstekingsstreutelঀar de stand „ON“ of „ACC“. |
| De zekering is doorge-brand. | Vervang de zekering door een andere 7 A-zekering. | |
| Het apparaat functioneert Niet correct (EJECT, LOAD,PLAY). | De microcomputer waredoor elektromagnetische velden gestoord. | Verwijder de CD of cassette en plaats deze weeR.Schakel het apparaat uiten weer in. |
| Geen radio-ontvangst. | De antennekabel is Niet aangesloten. | Steek de antennekabel vast in de antennebus van het apparaat |
| In de automatische Zoek-modus stopt de radio Niet bij zenderstation(s). | De zendersignalen zijn te zwak. | Stel het zenderstation handmatig in. |
NL
Afspelen van een CD
Reinigen van de CD
Reinig de CD vór het afspelen met een schone, stofvrijne reinigingsdoek. Verwijder het stof van de CD in pijrichting.
Opmerking: gebruik gelein oplosmiddelen zoals benzine of verdunner. De algemeen verkrijgbare reinigingsmiddelen of antistatische sprays beschadigen het apparatusaat.

Plaatsen van de CD
Wanneer de CD met de opdrukaar beneden wordt geplaatst, kan het apparatusaat beschadigd worden.
Plaats de CD algijd met het label maar boven.
Opmerking: tracht nicht, een Cd teplaaten wannere zich reeds een CD in de CD-sleuf befindt. Hierdoor kan het apparaat worden beschadigd.

Vastpakken van de CD
Grijp de CD allijd aan de rand vast. Om de Cd schoon te houden, mag u deze Niet aan het oppervlak vastpakken.
- Plak geen papier of plakband op de CD.
Stel de CD Niet bloot aan directe zoninstraling of warmtebronnen zoals verwarmingsbuizen en laat de CD ook niet in de auto liggen wannerde ze in de zon geparkeerd staat omdat dit een aanzienlijke temperatuurstijing tot gevolg heeft.
Dit apparaat is gekeurd conform de op dit moment van toepassing[zijnde CE-richtlijnen zoals bijvoorbeeld elektromagnetische compatibilititeit en laagspanningsvoorschriften en is geconstrueree volgens de niedwste veiligheidstechnische voorschriften.
Technische wizzigingen voorbehonden!
Garantie
NL
Voor het door ons geleverde apparaat verlenen wij een garantie van 24 maanden vanaf koopdatum (kassabon).
Eventuele gebreaken aan het apparaat of aan het toebehoren*) die zich ontstaan door productie- of materiaalfouten verhelpen wij binnen dezeperiode kostenoos door middel van reparatie of, maar ons oordeel, door verranging. Eventuele garantiegevallen verlungen noch de geldigheidsduur van de garantie, noch begint dadoor een十几年e garantieperiode!
Het koopbewijs geldt als garantiebewijs. Zonder dit bewijs kan geen kostenoze reparatie of verranging plaatsvinden.
Geef in garantiegevallen het complete apparaat in de originele verpakking samen met de kassabon af bij uw handelaar.
*) Schade aan onderdelen leidt Niet automatisch tot kosteloze verranging van het complete aparaat. Neem in dit geval contact op met once hotline! De reparatie van glasbreuk of breuk van kunststofonderdelen worden alsijd berekend!
Niet defecten aan de hulpstukken of aan de slijtende onderdelen (bijv. koolborstels, deeghaken, drijfriemen, reserveafstandsbediening, reservoirandenborstels, zaagbladen enz.), maar ook reiniging, onderhoud de verwang van slijtende delen vallen nicht onder de garantie en geschieden als itijd gegen berekening! Bij ingrepen door derden kommt de garantierverlening teervallen.
Na de garantieperiode
Na afloop van de garantieperiode konnen reparaties gegen berekening worden uitgevoerd door de betreffende vakhandelaar of de technische Dienst.
P
Indicações geralis de segurança
Para evitar o perigo de fogo ou de你怎么elétrico nãodeferavelocalar nunca o aparelho à chuva ou humidade. Não se deverá por o aparelho a funcional muito perto de agua (por exemplo na casa de banho, na piscina ou numa cavehumida).
Utilize o aparelho so para o fim previsto.
Ligar so o aparelho a uma tomada de corrente devidamente instalada. Faça atençao para que a tensao indica corresponda a tensao da tomada de corrente.
No caso de se utilizes partes externas da rede, deve-se fazer atençao a polaridade e a tensao exacta. Colocar sempre a bateria do lado exacto.
Colocar o aparecido de forma a que as aberturas de arejamento existentes não fiquem tapadas.
Nunca se deve abrir a caixa do aparelho. Devido a consertos inadequados poderao resultar da' grandes perigos para o'utilizar do aparelho. No caso de estragos no aparelho, principalmente referentes ao cabo da rede, nunca se devera voltar a pôr o aparelho a funcionar, mas sim mandar consertá-lo por um especialista. No que respeita a possivel estragos é aconsehlâvel verificar-se regularamente o cabo de rede.
Um cabo de rede defeitozsodeferaser substituido por othersemelhanteelo fabricante,pelo nosso serviceao cliente ou otherpessoa que sera competente para fazer este trabalho,afimde se evitarem riscos.
No caso de não se utilizes o aparelho por longo tempo deverá退回-se a ficha da rede da tomada de corrente ou退回 as baterias.
Poderao encontrar-se"These@simbolos no aparecido. Eles servem para chamar a atençao para o segunte:

O simbolo de raiodeerva chamar a atencao doutilizador paraas peçasdo interiordoaparelho,asquaispodemotivarperigosde alta tensao.

O simbolo com pontos de exclamacao devera chamar a atencao ao'utilizar para importantes instruções de service e de assistencia que se encontrar nas folhas anexas.

Aparelhos com este symbolo travaham com um "Laser de 1-classes" o qual examina o CD. O interruptor de seguranca que se encontrar montado, serve para evitar que o usozador, ao abrir a gaveta de CD fique exposto à luz laser, a qual é muito perigosa e não é visivel aos olhos humanos.
Com把这些 interruptores de segurar nunca se devera fazer ponte nem Manipular senso existo o perigo de se ficar exposto à radiação laser.
INSTALACAO
A instalacao do auto-radio deve ser efectuada de acordo com as figuras seguintes:
a porca de parafuso
b anilha de borracha
c anilha rasa
d parafuso
e acessório de suporte
f passagem da caixa
g cavilha do parafuso

Nota:
h Remova os parafusos antes da instalação e guarde-os durante o transporte.
i ferramenta (chave) de extracao.
quadro
Comece por colocar o painel do lado direito e prenda(before do lado esquerdo.
LIGACAO
Ligue o aparelho de acordo com o segunte diagrama:
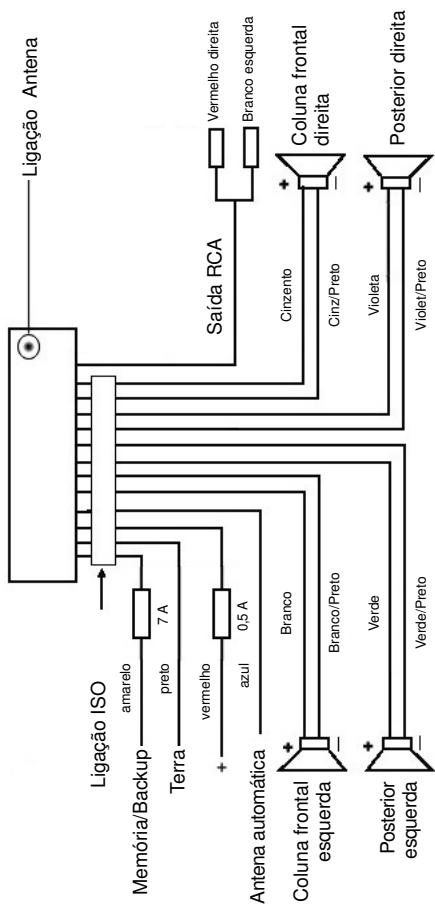
NOTA:
- Não colocar o painei de controle antes de ligar todos os cabos.
- Utilize as colunas com uma impedência de 4 ohm.
INFORMAÇÃO IMPORTANTE PARA A INSTALLação DO SEU AUTO-RADIO AR 661 MP3
- Para uma instalação apropriadna do auto-rádio certificque-se por favor de que o seu carro possui uma ficha ISO original.
- Caso o seu carro não tenha esta ficha contacte o técnico do seu automóvel. De qualquer forma é necessário ter esta ficha ISO para instalar o auto-rádio.
- Dependendo do tipo de carro pode suceder haber interferências durante as operações ríadio/CD. Estas interferências podem ser fácilmente evitadas com um FILTER de interferências adicional. Este auto-rádio já vem preparado com esse FILTER adacional. Se for se o caso contacte o专业技术o do seu automóvel.
PRECAUÇÖES E MANUTENÇAO
- Os parafudos (h) para transporte que prender o aparecido devem ser removidos antes da instalação poised de contrário não consigue inserir o CD.
- Este aparelho foi Concebido para a polaridade minima da bateria que tem que ser ligada ao corpo do veiculo. Verifique a polaridade antes da instalacao do aparelho.
- Se retiring o painei de controle frontal do auto-radio enquanto o radio ou o CD estiverem ligados, o aparelho é automaticamente desligado.
- DepoS de colocar novamente o painei de controle frontal no auto-rádio aparecerá uma mensagem deerro no visor (ERROR).Utilize um fio para pressionar o botão RESET (24) de forma a voltar a programar o auto-rádio.
- No caso do interior do carro aquecer muito, por exemplo ficando muito tempo exposto ao Sol, não ligue o aparecido sem primeiro deixar a temperatura arrefecer.
- Deve utilizes sempre a caixa protectora para que o pailen de controle frontal fique guardado em segurança.
P
FUNCTIONAMENTO
1. Tecla REL
Pressione a tecla REL para retirar o pailen frontal.
2. Tecla +/-
Pressione estas teclas para augmentar ou diminuir o volume do som durante a leitura do CD. SePrimeo pressionar a tecla SEL edeoas asteclas + / - pode aceder ao menu e fazer alteracoes, por exemple no modo do som.
3. Tecla SEL (Selecciónar)
a) Pressione ligeiramente a tecla SEL para aceder ao menu de escolha do modo do som. As letras VOL aparecem para poder configurar o som.
Pressionando repetidamente a tecla SEL pode seleccionar individualmente os items do menu como : Volume, TREBLE, BASS, BALANCE e FADER.
Para alterar as configurações pressione a tecla + ou - . Nota: Se as configurações equalisadoras POP e ROCK foram selecionadas sob DSP não é possivel ajustar o BASS e o TREBLE.
b) Pressione a tecla SEL durante muitas volte para aceder ao menu TA SEEK, TA ALARM, MASK PDI, MASK ALL, DSP OFF, LOUD ON/OFF, BEEP ON/OFF, SEEK ½, STEREO/MONO, LOCAL/DX, VOL LAST/ADJ.
As letras "TA SEEK" aparecem no visor. Pressionando repetidamente a tecla SEL vai aceder acos它们individuals do menu. Para alterar as configurações pressione a tecla + ou -.
- Menu SEEK (Sintonia de estação de tránsito)
Se pretender ouvir informações sobre o estado do tránsito selección está tecla e a procura é feita automaticamente.
Se selecionar a tecla TA ALARM para obter uma mensagem de食欲 no visor assim que tiver uma {?ação que não transmitta informações sobre o?) tranciso.
- MASK DPI/ALL
Esta tecla esconde frequências alternativas (AF) durante a procura da identificacao de um programa (PI).
MASK DPI
quando o aparecido procura uma identificacao de programa (PI) de uma estação, as frequencias alternativas com identificacao de programas differentes ficam escondidas.
MASK ALL
quando o aparecido procura uma identificacao de programa (PI) de uma estaque, as frequencias alternativas com identificacao de programas differentes e estacoes com sinal muito forte e sem sinal RDS ficam esconidas.
DSP
No modo DPS pode selecionar as configurações do equalizarador POP M, ROCK M, CLAS M e FLAT M. SeLECTIONE DPS OFF para fazer as suas opções. (Veramente lamento a该怎么 3^th ).
- LOUD ON/OFF
Pode mudar a amplificação dossons baixos (LOUDNESS)para ligado ou desligado. quando o volume está boa, a funcao LOUDNESS (LOUD) expandsa ascharacteristicado som atraves do aumento dossons TREBLE e BASS.
BEEP ON/OFF
Pode seleccionar bois temas de beep quando una tecla é pressionada.
Beep On: O beep é ouvido quando qualquer teça é pressionada.
Beep Off: O beep é desligado.
- SEEK 1, SEEK 2 (só disponible when o rádio está ligado)
Selezione as funções'utilizando as teclas I▲/▶I.
SEEK 1: Mantenha pressionadas as teclas I<▶/▶I para a direita ou para a esquerda e a busca para na estação segunte.
SEEK 2: Enquanto estas teclas estiverem pressionadas a funcao de procura de estação na mesma banda mantém-se.
STEREO/MONO
Para Mudar de stereo para mono e vice-versa (só disponible quando o rádio está ligado).
- LOCAL/DX (só disponible cuando o rádio está ligado).
Este aparecido pode receber informação RDS EON. O termo EON aparece no visor e sinaliza a transmissão de informação de uma estação adicional dentro de umacadeia de estações. Pode escolher entre a EON TA LOCAL e a EON TA DISTANCE para obter informações sobre oTRSito local ou distante.
VOL LAST/VOL ADJ
VOL LAST: O radio é ligado com o mesmo volume de som com que FOI desligado a ultima vez.
VOL ADJ: Utilizando as teclas + e - pode pre-selectacionar um volume de som constante.
4. Tecla POWER
Pressione esta tecla para ligar e desligar o aparelho.
5. LCD (visor de cristal liquido)
6. Teclas BAND
Pressione ligeiramente a tecla BAND para selecionar a frequencia que deseja ouvir. A designação das varias bandas surge no visor: F1, F2, F3.
7.8.Teclas I / TUNNING, SEEK, TRACK, SKIP UP/DOWN
a) Rário: Pressione ligeiramente a tecla ↓↓ ou ▷▶ para sintonizarmanualamenteuma estação de rário.
Pressione durante mais de um segundo a tecla 1▲ ou >1 para,iniciar a procura automatica de uma estação de rádio que tenha sinal forte.
P
b) CD: Pressione ligeiramente a tecla I▶ ou >I para saltar para arente ou para这只是. Se desejar ver todos os titles das faixas basta manter estas teclas pressionadas.
9. Tecla MODE
Pressione esta tecla para selectionar o leitor de CD ou o rádio. Pressione novamente a tecla para cancelar esta função.
10. Tecla MUTE
Pressione a tecla MUTE para desligar temporariamente as colunas. Pressione novamente a tecla para cancelar esta funcao.
11. Tecla AP (Memória automática de estaqão de rádio)
Rádio:
a) Funcão Memória: Pressione durante mais de um segundo a tecla AP para fazer a memória automatística da estatção. O rádio procurar dentro da banda frequência sintonizada, por ex., FM 1, para sinai mais forte antes do ciclo da procurata terminal. As 6 estações com sinai mais forte são memorizadas nas memórias com n°s correspondentes. As estações que foram memorizadas são ouvidas aprox. durante 5段时间os cada e seguidamente a primarya estação épresentada. Se desejar procurar mais estações na banda FM pressiona a tecla BAND para alterar para FM 2 ou FM 3. Pressione novamente durante mais de um segundo a tecla AP para,iniciar a continuação da procurata.
b) Funcão Scan: DepoS de pressionar ligeiramente a tecla AP o RADIO transmitite todas as estações pré-defenidas na banda de frequência em que está durante um curto periodo de tempo. Nota: A funcão SCAN termina automaticamente quando atinge o n° da memória a partir do qual iniciou a funcão.
A funcão da tecla AP durante a leitura de MP3
Casos os datos foram criados em FORMAT MP3, poderá reproduzi-los'utilizando as seguições funções:
a) Entrada directa dos números das faixas nos CDs em formato MP3:
- Pressione uma vez a tecla AP. Surgem no visor as letras "TRK SCH".
- Pressione uma vez a tecla SEL. Surgem no visor as letras "TRK SCH 001".
- Com a ajuda das teclas + / - é possível ahora colocar um número de 0 a 9 nas faixas.
- Pressione brevemente mais uma vez a tecla SEL. Proceda como descripto no n^3 .
- Presseione ligeiramente a tecla SEL para introduzir 100 número de faixas.
- Pressione a tecla SEL durante um segundo para completar a entrada dos números de faixas. Imediamente a seguir a faixa seleccionada é ouvida.
b) Funcao de procura do ficheiro num CD em formato MP3:
- Pressione duas vezes a tecla AP. Aparece no visor "FILE SCH".
- Pressione ligeiramente a tecla SEL para ver o primeiro directorio que foi selecionado no visor.
- Com a ajuda das teclas + / - é posível ahora selectionar os various directorios do CD.
- Pressione a tecla SEL por um segundo. O directorio的选择ado é ouvido com a primarya música. Pressione ligeiramente a tecla SEL e pode選擇aruna faixa do directorio usingando as teclas + / -
- Complete a entrada dos titulos pressionando a tecla SEL durante um segundo. Imediamente a partir a faixa selecionada é ouvida.
c) Função procura de número num CD em formato MP3:
- Pressione tres vezes a tecla AP. As letras "CHAR SCH" aparecem no visor.
- Pressione ligeiramente a tecla SEL e a letra "A" aparece no visor do lado esquerdo.
- Pressionando repetidamente as teclas + / - pode inserir uma letra de A a Z ou um numero de 0 a 9a primary多位 do visor. Nota : As letras enumbers segentes sao inseridos da esquerda para a direita.
- Pressione ligeiramente a tecla SEL e a letra "A" aparece no visor na segunda posicao do visor. Procede da mesma forma que no numero anterior.
- Repita o processo descrito no número 2 e 3 até ter inserido a sua entrega. Nota: A ultima entrada pode ser apagada pressionando a tecla AP.
- Complete a entrada da procura pressionando a tecla SEL durante um segundo. Immediamente a partir a faixa selecionada é ouvida.
Note: Durante a execção normal de um CD em formato MP3 as teclas I e ↑I podem ser realizadas para mover uma boa para cima ou para bixo. As teclas doippo 5 e 6 podem ser pressionadas para mover 10 faixas de uma boa quando para cima ou para bixo.
12-17. Teclas dos postos (1-6) de estações pré-seLECTIONadas e teclas 1 TOP, 2INT, 3RPT e 4RDM durante a leitura do CD
a) Rádio:
Pressionando ligeiramente estas teclas selecciona directamente una estação pré-selectionada. Se estas teclas foram pressionadas mais do que um segundo a estação de rádio que está a ser ouvida no momento é memorizada na tecla seleccionada.
b) CD/MP3 :
- Pressione a tecla 1TOP para interromper a leitura do CD (função Pausa).
- Pressione a tecla novamente paraContinuar a ouvir o CD/MP3.
- Pressione a tecla 2INT Cada faixa do CD é lida durante 10 segundos. Pressione a tecla novamente para terminar a funcção. e a faixa actual escolhida é lida.
- Pressione a tecla 3RTP A faixa actual que está a ser lida é repetida. Pressione a tecla novamente para terminar a funcção.
P
- Pressione a tecla 4RDM As faixas do CD são lidas aleatoriamente. Pressione a tecla novamente para terminar a funcao.
18. TA Informação sobre o Trânsto (Prioritário)
Esta função é activada pressionando ligeiramente a tecla TA. O*símulo TA aparece no visor. quando o rádio está na frequência FM a procura de uma estação que transmits informação sobre trânso ité automatica (TA SEEK).
A tecla TP aparece no visor quando há uma estação em FM que transmits periodically as ultimas noticias de trêsito.
Quando a funcção TA está ligada e se o aparenho estiver a ler um CD, este é automaticamente interrompço pelautersão de rado das informações sobre o transito. O som desta transmissao é diminuido.
Interruption da funcao TA:
Se desejar interromper a informação do trânsite pressione ligeiramente a tecla TA.Esta acção não desliga o modo TA.
19. Tecla PTY - Selecção de tipo de programa
Paraeldomo name das estações,algumas estações FM también transmitem informação sobre o tipo de programas.Esta informação pode ser vista no visor do auto-rádio.
Exemplos de temas de programas:
SPORT
NEWS
POP
CLASSICS
Com a tecla PTY pode selecionar estações espécicas que Transmitam determinados temas de programa.
Pressione uma vez a tecla PTY para aceder ao grupo de música PTY. O*síbolo "PTY" aparece no visor. Utilizando as teclas 1-6 pode fazer a seleção como segue:
| Pressione 1x | Pressione 2x | |
| Tecla de radio 1 | POP M | ROCK M |
| Tecla de radio 2 | EASY M | LIGHT M |
| Tecla de radio 3 | CLASSICS | OTHER M |
| Tecla de radio 4 | JAZZ | COUNTRY |
| Tecla de radio 5 | NATION M | OLDIES |
| Tecla de radio 6 | FOLK M |
Pressione das vezes a tecla PTY para aceder ao grupo de idiomas da PTY. Utilizando as teclas 1-6 pode fazer a selecao como segue:
| Pressione 1x | Pressione 2x | Pressione 3x | |
| Tecla de radio 1 | NEWS | AFFAIRS | INFO |
| Tecla de radio 2 | SPORT | EDUCATE | DRAMA |
| Tecla de radio 3 | CULTURE | SCIENCE | VARIED |
| Tecla de radio 4 | WEATHER | FINANCE | CHILDREN |
| Tecla de radio 5 | SOCIAL | RELIGION | PHONEIN |
| Tecla de radio 6 | TRAVEL | LEISURE | DOCUMENT |
Pressione très vezes a tecla PTY para desligar esta funciona novoamente.
Quando selección PTY o rádio inicia a procura da correspondente informação PTY e para quando esta informação é encontrar.
Se o tipo de programa que se procura não éencionado, surge no visor a informacao "NONE PTY".
Se a informação que seprocura nãoexistemais,afuncao PTY muda automaticamente para o modo normal.
20. AF (Frequências Alternativas) Função REG
a) AF funciona com a ajuda do RDS (Sistema de Informação Rádio) e são pode ser'utilizada com theseções FM. O rádio procura nas suas bases a melhor frequência rececionada que já foi sintonizada. Se a frequção AF estiver ligada, o rádio testa continuallyamento a forca do sinal da frequência AF. O intervalo de testes para cada frequência AF depende da forca do sinal e varia de algunos minutos no caso do sinal ser forte a poucços segudos no caso do sinal ser fracão. Sempre que o sinal da frequência AF está maior do que aquele da本站ação que está a ouvir, o rádio muda para esta frequência por um curto periodo de tempo e aparece no visor a mensagem "NEW FREQUENCY".
AuvefAéactivada pressionando ligeiramentea tecla AFe estesimbolo surge no visor.
- Se o símbelo AF aparece no visor significica que a função AF está ligada e a transmissão RDS está a ser recebida.
- Se o*símbolo AF piscá no visor significica que a função está selecciónada mas que não há sinal RDS no momento.
- Pressione a tecla AF novamente para desligar a funcao AF e o*simbolo desaparece do visor.
b) Funcão REG
Em algunos momentos algumas estações de rádio dividem os seuis programas em programas regionais.
- REG ON: Pressione por um longo tempo a tecla AF e o modo regionalica ligado. A mensagem "REG ON" aparece no visor.
Esta funciona evita que o rádio mude para frequências代替as que tenham um programa regional分娩. - REG OFF: Pressione a tecla AF novamente para desligar esta funcao e o*simbolo desaparece do visor.
21. CD Slit
22. Tecla Eject (EJECT)
Pressione esta tecla para ejectar o CD.
23. LED a piscar
Quando o paine frontal é retirado fica uma luz a piscar.
24. Tecla RESET
Quando ha una interferência pressione a tecla Reset para reiniciar.
P
ESPECIFICAÇÖS TÉCNICAS
GERAL
MODELO:
VOLTAGEM:
CONSUMO:
POTÉNCIA:
AR 661 MP3
DC 13.8 V
max.7A.
4×30W
BANDA FM
Rao de frequência:
Sensibilitadde:
Frequência I.F.
87.6 MHz a 108.0 MHz
3uV
10.7 MHz
POTÊNCIA DE SAÍDA:
MAX. 1200mV no CD
LEITOR DE CD
Sistema:
Cd's compatibleis:
Formato do sinal:
Characteristicasdafrequency:
Aparelho de CD
CD/CDR/CDRW/MP3
frequência 44.1 KHz
20-100Hz<5dB
10K-20 KHz<5dB
Proporção sinal-ruído:
Número de canais:
Dimensoes da caixa:
50 dB (1 KHz)
2 canais stereo
178× 50× 165
SOLUTIONES DE PROBLEMAS
P
Leia atentamente aabela abaixo antes de contactar os serviços de assistencia técnica. Com algunos testes simples ou��enhas regulações, poderá eventually解決ar o problema e促成ir que o aparecido funcao correctamente.
| Sintoma (frequente) | Causa | Solução |
| Os CD's apenas entraram até metade da bandeja do CD. | Os parafusos de transporte não foram retirados. | Retire os parafusos de transporte. |
| Depois de inseridos no auto-rádio, o CD ou a cas-sete não é reproduzida. | O volume encontrar-se demasiado boa. | Aumente o volume. |
| O dispositivo não foi ligado corretoamente. | Verifique as ligações terrae +12 V. | |
| O som do leitor de CDs falha. | O piso da estrada é muito irregular. | Aguarde até que o piso se torne mais regular para reproducir o CD. |
| O aparvelho não está firmamente instalado. | Instale o aparvelho firme-mente. Assegure-se de que o suporte da parte traseira éutilizando caso o veiculo não possua nenhum retentor apropriadopara a parte traseira do aparvelho. | |
| O CD encontrar-se avariado. | Experimente及其他 CD. Caso funcao correctamente, provavelmente oPrimeiro CD encontrar-se avariado. | |
| O CD está sujo. | Limpe o CD. | |
| O auto-rádio não liga. | A igniação do carro está desligada. | Movimento a crave da igniação para "ON" ou "ACC". |
| O fusível está fundido. | Substitua por及其他 fusível de amperagem igual. | |
| O aparvelho não funciona correctamente (EJECT, LOAD, PLAY).. | O micro-computadoruí interferido por um campo electromagnétrico. | Retire o CD ou cassette e volta a inscri-lo. |
| Não háreichecção de radio. | O cabo de antenna não está ligado. | Ligue o cabo da antennafirmamente na entrada adequada do aparvelho. |
| No modo automatico de procura de uma estação de radio, o auto-rádio não paba. | Os sinais de transmissao são demasiado fracos. | Faça a procura de uma estação de radio manu-almente. |
P
USO E MANUTENÇÃO DE CDs

Limpeza do CD
Antes de reproduzir um CD, limpe a sua superficie com um pano macio e humido (só com agua).
Quando se limpam CDs, mova sempre o pano do centro para o rebordo.
Nota: Não utilize solvents como petróleo ou agentes diluidicos. Produtos de limpeza commerciais ou sprays podemearestragar o aparelho.
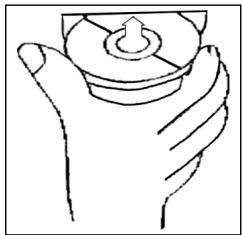
Inserir o CD
Se insertir o CD com o lado impresso para baixo, poderá provocar uma avaria no aparelho.
Insira sempre o CD com o lado impresso para cima.
Nota: Caso ja se encontrar um CD no ccompartimento de CDs, não tente insertir um segundo CD,PGA podara avariar o aparecido.
Segurar o CD
Segure o CDengo rebordo para não fazer a sua superficie com dedadas. Dedadas, sujidade e ricos poderaocauseuma reproducaoirregulare defeituosa.
- Não cole nenhuma etiqueta no CD. Não exponha o CD直达mente contra o sol ou fontes de calor. Não deixce CDs no carro caso se encontrar estacionado num local com exposicao solar directa.
Garantia
P
O aparecido vendido pela)nossaEmpresa tem uma garantia de 24meses a partir da data da compra (talão).
Durante o periodo de garantia, procederemos à remoçao Gratis - por reparacao, ou, segudo a nossa decisao, por substituicao - das deficiencias do aparelho ou dos accesarios*) que provenham de erros de material ou de fabricacao. A prestacao de serviceos relacionados com a garantia nao prolongarao a mesma, nem iniciaar um novo prazo de garantia!
O talão de compra consistirá prova esta garantia. Sem o mesmo, não está possível proceder-se a qualquer troca ou reparação gratis.
Em caso de garantia, entrega o aparecido completeo, juntamente com o talão de compra, na loja onde o mesmo foi comprado.
*) No caso de danos em quaisquer accesórios, não sera efectuada automatistically uma substituição completeness do aparelho. Contacte este caso a minha hotline! Danos causados por quebras de peças de vidro ou de plástico terao de ser pagos pelo cliente!
Não está incluíos na garantia quaisquer defeitos de acessórios ou de peças que se desgastem (como, por exemplo, carvões do motor, varinhas, correias do motor, telecomando, escovas de dentes, folhas de serra, etc.), nem a limpeza, a manutenção ou a substituição de peças que se desgastem, devendo tais despêsas ser reembolsadas!
A garantia terminará sempre que tenha havido intervenção alheia nos aparelhos.
Apos a garantia
Apos a expelled do prazo de garantia, poderao ser efectuados arranjos por pessoal especializzato, ouPelos nossoiservicosde reparacoes,contra reembolso.
1
Avvertenze generali per la sicurezza
Per evitare il rischio di incendio o di scosse, non si deve mai tenere l'apparecchio sulla pioggia o in ambienti umidi. Quindi non usare l'apparecchio nelle immeditate vicinanze di acqua, per esempio in prossimità di una vasca, di una piscina o in una cantina umida.
Utilizzato l'apparecchio solo per l'uso previsto.
Collegare l'apparecchio esclusivamente ad una presa installata a norma. Fare attenzione a che la tensione indica corrisponda alla tensione della presa. Se si impiegano alimentatori esterni, fare attenzione all'esattezza di polarità e di tensione, insereire le batterie sempre correttamente.
Collocare l'apparecchio in modo che le aperture per l'asperazione esistenti non vengano coperte.
Non togliere mai la protezione dell'apparecchio. Riparazioni non a regola d'arte possono causare notevoli pericoli per l'utente. Se l'apparecchio presenta danni, soprattutto nella zona del cavo di collegamento, non metterlo più in funzione, ma farlo riparare prima da un esperto. Esaminare regolarmente il cavo di collegamento alla rete per verificare che non ci siano danni.
Un cavo di collegamento difettoso può essere sostituito con un cavo equivalente solo dal produttore, dato lo lavoro assistenza o da persona similmente qualificale, al fine di evitare pericoli.
Se l'apparecchio non viene usato per un periodo di tempo prolongato, togliere il blocchetto alimentatore alla presa ovvero estrarre le batterie.
Questi significi possono trovarsi eventualmente sull'apparecchio e rimandano ai seguenti elementi:

Il significato del lampo fa presente all'utente la presenza di pezzi all'interno dell'apprecchio che sono produrre alte tensioni pericolose.

Il significato con il punto esclamativo fa presente all'utente la presenza di importanti averventenze per l'uso e la manutenzione nei fogli di accompagnamento dell'apparechio.

Gli apparecchi dotati di quello significato lavorano con un „Laser classe 1" per riproduire i CD. Gli interruttitori di sicurezza integrati hanno lo scopo di impedire che l'utente venga esposto alla luce non visibile del laser, pericolosa per l'occhio umano, agliendo lo scomparto per i CD.
Questi interruttori di sicurezza non devono mai essere cavallottati né manipolati perché altrimenti sussiste il rischio di esposizione alla luce del laser.
Installazione
Montare la radio operando conformamente alle illustrazioni seguenti

a Dado
b Rosetta elastica
c Rondella
d Vite
e Squadra di montaggio
f Alloggamento di insertimento
g Tirante filettato

Attenzione!
h Viti delsystemadi sicurezza per il tramporto (da rimuovere prima del montaggio)
i Dispositivo di estrazione (chiave per le operazioni di smontaggio)
j Fissaggio

Appoggiare prima il frontalino con i comandi sul lato destro e poi innestarlo in posizione sul lato sinistro.
1
Allacciamento
Realizzare l'allcianto conformmente a quanto indicato dal grafico.
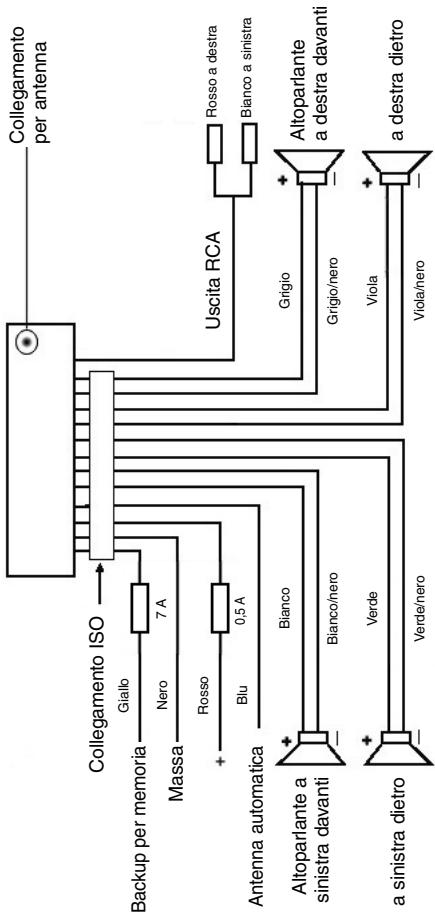
Attenzione
1
- Il pannello di lavoro rimovibile delve essere montato soltanto dopo aver effettuato l'allacciamento del cavo.
- Si consiglia di utilizzato altoparlanti con un'impedenza para a 4 ohm.
Informazioni importanti per il montaggio della vostra autoradio!
- Tenete presente che durante nella fase di montaggio/smontaggio del vosto apparecchio la sua macchina deve disponre di un „Collegamento ISO " originale. Questa è la controparte alla spina presente all'uscita dell'apparecchio (Collegamento ISO).
Nel caso di backup Durata +“, a seconda del tipo di veicolo possono esserci differenze.
In questo caso rivolgetevi ad un'officina autorizzata perché un'alimentazione permanente della vostra radio altrimenti non è garantita. (Qesto è necessario per memorizzare le stazioni emittenti).
- A seconda del tipo di veicolo in casi eccezionali possono presentarsi disturbi nel funzionamento Radio/CD. Questi si possono eliminare con unrello antidisturbo supplementare. Malgrado il vostro apparecchio CD sua giornata in series di unrello antidisturbo, possono esserci ugualmente limiti dovutti alla vettura.
Potete ave甚么过滤nei nego di accessori auto e/o presso la vostra officina di fiducia.
Misure di prevenzione e manutenzione
- Le viti della sicura di trasporto (h) devono essere rimoso prima del montaggio altrimenti il CD non entra.
- L'apparechio è configurato per il polo negativo della batteria, il quale deve essere collegato alla carrozza del veicolo. Accertarsene prima di procedere all'installazione.
- Nel caso in cui il quadro comandi anteriore venga rimioso durante il funzionamento della radio o dellettore CD, l'apparecchio si disattiva automaticamente.
- Funzione errata. Dopo aver inserto il pannello frontale appara nel display LCD il messaggio dimostrante un erre (ERROR). Con I'auto di un filo di ferro o simili premere il tasto RESET (24), per ripartire l'electronica dello stato originale. (RESETTEN). Questo tasto si trova sul Campo di lavoro staccato a destra accanto al display.
- Nel caso in cui la temperatura all'interno dell'abitacolo del veicolo sua particolaremente elevata, per esempio quando il veicolo sua rimasto parcheggiato a lungo al sole, si consiglia di non attivare illettore finché la temperatura dell'abitacolo non sua diminuita in seguito a un breve periodo di marcia.
- Affinché le pannello di lavoro rimovibile possa essere conservato in condizioni di sicurezza, si consiglia di utilizzare a tale scopo l'involucro protettivo appositamente previsto allo scopo.
1
Funzionamento
1. Pulsante REL
Premere il tasto REL per staccare il Campo di lavoro anteriore.
2. Pulsanti +/-
Durante il funzionamento dell'apparecchio, quosti pulsanti servono ai fini della regolazione del volume. Azionati in abbinamento al pulsante SEL, a sua volta premuto, è possibile effettare modifiche nei menu, per esempio per quanto concerne la modalità acustica.
3. Pulsante SEL (selezione)
a) Premere brevamente il pulsante SEL per aprire il menu di selezione della modalità acustica. Sul display viene visualizzato ,VOL" ai fini dell'impostazione del volume. Azionando ripetutamente il pulsante SEL, è quindi possibile selezioneare the singole opzioni di menu quali, per esempio, VOLUME, BASS, TREBLE, BALANCE e FADER. Per poter modificare le impostazioni delle varie opzioni di menu, è sufficiente serviri dei pulsanti "+" oppure "-" Nota: se sono state selezione impostazioni dell'equalizzatore in DSP, p.e. POP, ROCK, non si possono impostare BASS e TREBLE.
b) Tenere premuto a lungo il pulsante SEL per aprire il menu di selezione TA SEEK/TA ALARM, MASK DPI/MASK ALL, DSP OFF, LOUD ON/OFF, BEEP ON/OFF, SEEK1/2, STEREO/MONO; LOCAL/DX; VOL LAST/ADJ. Sul display viene visualizzato il messaggio „TA SEEK".
Azionando ripeturamente il pulsante SEL, è quindi possibile selezioneare le varie opzioni di menu. Per poter modificare le impostazioni delle varie opzioni di menu, è sufficiente serviri dei pulsanti „+“ oppure „-".
- Menu TA SEEK
(ricerca dell'emittente di notiziari sulle condizioni del traffico)
Qualora si desideri che durante la funzione TA venga ricercata automaticamente un'emittente di notiziari sulle condizioni del traffico, è necessario selezionare TA SEEK.
Nel caso in cui se selezioni TA ALARM, il display visualizza un messaggio di avventenza non appena sua stato impostata, durante la funzione TA, una stazione radio che non trasmette informazioni in materia di traffico.
- MASK DPI/ALL
Oscuramento delle frequence alternative (AF) durante la ricerca di un codice identificativo di programma (PI).
MASK DPI: quando l'apparecchio ricerca il codice identificativo di programmà (PI) relativo a una data emittente, le frequenze alternative caratterizzate da un codice identificativo di programmà differente non vengono visualizzate.
MASK ALL:
durante la ricerca del codice identificativo di programma (PI), le frequenze alternative caratterizzate da un codice identificativo di programma differente e le emittenti aventi un forte livello del segnale perché segnale RDS non vengono visualizzato.
1
DSP
In DSP si posso nselezionare le impostazioni dell'equalizzatore POP M; ROCK M, CLASS M e FLAT M. Per inseire impostazioni personali selezionare DSP OFF. V. anche il punto 3a.
- LOUD ON/LOUD OFF
Accendere e spegnere della funzione LOUDNESS.
Con la funzione LOUDNESS (LOUD) si espando le cattratteristiche del suono quando il volume è basso; si augmentanoosi gli alte e bassi.
BEEP ON/OFF segnale acustico di conferma
Si cui selezionare il segnale di conferma in due modi premendo i tasti.
BEEP ON: il segnale acustico di conferma viene genrato igniqualvolta si azioni un pulsante.
BEEP OFF: il segnale acustico di confirma è disattivato.
SEEK 1, SEEK 2 (seLECTIONabile solo nella modalità radio)
Funzione di ricerca con i tasti 1 1 / nella modalità radio.
SEEK 1: tenendo premuti i tasti (\text{山山山山山山山山山山山山山山山山山山山山山山山山山山山山山山山山山山山山山山山山山山山山山山山山山山山山山山山山山山山山山山山山山山山山山山山山山山
SEEK 2: finché si tengono premuti i tasti 1 / , la ricerca nella banda di frequenza continua.
STEREO/MONO commutazione
(selezionabile solo nel funzionamento radio)
- LOCAL/DX (selezionabile solo nel funzionamento radio)
La radio può ricevere dati RDS EON. Con l'espressione „EON" si intende la trasmissione di ulteriori informazioni in merito all'emittente nell'ambito di una catena di stazioni radio, come nel caso di WDR. Nel caso specifico di un annuncioc sul traffico (TA) nell'ambito di una catena di stazioni radio, si passa da una emittente che non trasmette notiziari radiofonici sul traffico alla corrispondente stazione radio con trasmissione di notiziari sul traffico della catena di stazioni radio stesse.
La ricezione di quosti dati è segnalata sul display attraverso il symbolo EON. Per la ricezione delle informazioni sul traffico urbano o interurbano si cui scagliere tra la modalità EONTA LOCAL ovvero EONTA DISTANCE. Scopo di但这a funzione è sopprimere una commutazione indesiderata a un'informazione sul traffico EON-TA indesiderata.
Nel caso in cui un'emittente EON si trovi molto distante, esta ciononostante in parte possibile ricevere informazioni EON TA da parte di quella stazione. La radio si sintonizza su quella stazione di trasmissione EON e
1
tenta di ricevere le informazioni sul traffico. Tuttavia, il livello del segnale è troppo debole e la qualità della ricezione cattiva, in quanto esta stazione di trasmissione EON è troppo distante.
Di seguenza, la radio si sintonizza nuovamente sull'emittente precedentemente impostata.
Nel caso della modalità sulla descritta, l'utente sente per un dato intervallo di tempo un programma sbagliato oppure non ode nulla.
EONTA LOCAL:
Attraverso esta funzione si evita la sintonizzazione su un collegamento EON caratterizzato da un livello di segnale troppo debole.
La radio non si sintonizza su questa emittente e l'utente non avverte alcun disturbo.
Modalità EONTA DISTANCE:
in esta modalità, la commutazione di tipo EONTA tenta di ricevere le informazioni EONTA da un'emittente raggiungibile e di ottimizzato, in quello modo, la qualità della ricezione.
VOL LAST/VOL ADJ
VOL LAST: la radio si accende con il volume impostato per ultimo.
VOL ADJ: con l'aiuto dei tasti +- e - si selezione un volume d'accensione permanente.
- Pulsante POWER
Premere Anything pulsante per attivare e disattivare l'apparecchio.
- Display LCD (display a cristalli liquidi)
- Pulsanti BAND
Premere per un attimo il tasto BAND per passare tra i tre livelli FM (UKW). La denominazione del corrispettivo piano F1, F2, F3iene visualizzata nel display LCD.
7.8. Pulsanti I TUNE, SEEK, TRACK, SKIP UP/DOWN
a) Nella modalità radio:
Premere per un attimo i tasti or per impostare manualemente una stazione emittente a scelta.
Tenere premuto il tasting o per dare avvio alla ricerca di un'emittente radio.
V.anche la funzione SEEK1/SEEK2.
b) Nella modalità CD: per avanzare o tornare indietro, premere breve-mente il pulsante 1
- Pulsante Modus
Premere quello pulsante per selezionare illettore CD o la modalità radio.
- Tasto MUTE
Premere il tastinge MUTE per disattivare il volume per un breve lasso di tempo.
Premere di nuovo"Thistostato per ripristinare il volume.
54
11. Pulsante AP (memorizzazione automatica dell'emittente)
Nella modalità radio:
a) Funzione di memoria:
Per attivare la funzione di memorizzazione automatica dell'emittente, è necessario premere il pulsante AP per più di un secondo.
L'apparecchio ricerca il livello di segnale con maggiore intensità all'interno della banda di frequenza corrente, per esempio FM 1, sino alla conclusione del ciclo di ricerca stesso. Le sei emittenti caratterizzate da segnale a intensità più elevata vengono abbinate alle correpondenti positizioni di memoria.
Le emittenti ora memorizzate vengono avviare per ca. 5 secondi e poi viene impostata l'emittente della prima posizione di memoria.
Se si desidera cercare ancora altre emittenti nella banda FM, premere il tasto BAND per passare a FM 2 o FM 3. Tenere di nuovo premuto per più di un secondo il tasto AP per dare avvio alla successiva ricerca.
b) Funzione Intro-Scan:
Dopo aver premuto per un attimo il tasto AP, la radio d'avvio a tutte le emittenti pre-impostate della banda di frequenza attuale.
Nota: la funzione Intro-Scan termina automaticamente alla posizione di memoria da cui si è partiti.
Pulsante AP per le funzioni di ricerca nella modalità MP3
Se nella creazione di un CD in formato MP3 sono stati inserti i corrispetti dati,质疑 si possono cercare mediante le seguenti funzioni:
a) Inserimento diretto del numero del titolo per i CD con formato MP3:
- Premere 1x il tasting AP. Nel display appeare "TRK SCH".
- Premere per un attimo il tastinge SEL. Nel display appeare "TRK SCH 001". La posizione dell'unità lampeggia.
- Ora con I'aioo dei tasti + / - è possiblo inserire un numero di brano da 0 a 9.
- Premere di nuovo per un attimo il tasting SEL. La posizione delle decine lampeggia. Procedere come descritto al punto 3.
- Premere di nuovo per un attimo il tasting SEL per inseire eventualmente una posizione per le centinaia.
- Chidere l'inserimento del numero dei brani tenendo premuto il tasto SEL per 1 secondo. Immediamente aftero ha inizio la riproduzione del brano corrispondente al titolo selezionato.
b) Funzione di ricerca di file per i CD con formato MP3:
- Premere 2x il tasting AP. Nel display appeare „FILE SCH".
- Premere per un attimo il tastingo SEL per visualizzare nel display il primo raccoglitore selezionato.
- Ora con l'aiuto dei tasti +/- è possible selezionare i vari raccogliatori sul CD.
- Tenere premuto il tasto SEL per 1 secondo. Il raccoglitore selezionato viene riproduotto a partire dal primo brano.
Premere per un attimo il tasto SEL: con l'aiuto dei tasti +/- è possibile selezionare un brano nel raccoglitore.
1
- Conclude l'inserimento tenendo premuto il tasto SEL per 1 secondo. Immediamente dopo ha inizio la riproduzione del brano corrispondente al titolo selezionato.
c) Funzione Intro-Scan nei CD in fornato MP3:
-
Premere 3x il tasting AP. Nel display appeare „CHAR SCH".
-
Premere per un attimo il tasto SEL. A sinistra nel display appara una "A".
-
Ora premendo più volte i tasti +/- si può insere nella prima posizione del display una lettera da A a Z o una cífra da 0 a 9.
Nota: l'insertimento delle altre cifre o lettere si esegue da sinistra a destra.
-
Premere per un attimo il tasto SEL. Nella seconda posizione del display appara una „A". Procedere nell'insertimento di cifre e lettere come descritto al punto 3.
-
Ripetere le operazioni del punto 2 e 3 finché non avete inserto il termine di ricerca a più positioni desiderato.
Nota: cancellare ora l'ultimo inserimento premendo il tasting AP.
- Conclude l'insertimento tenendo premuto il tasto SEL per 1 secondo. Immediamente后再o ha inizio la riproduzione del brano corrispondente al titolo selezionato.
Nota: la riproduzione di CD creati dall'utente non più essere garantita alla moltiplicità di software disponibili e media CD.
Durante la normale modalità di riproduzione di CD con formattingo MP3 è possible passare al titolo precedente o al titolo superiore mediante i pulsanti I▲ e >I. Azionando i tasti di stazione 5 e 6 si cui inceve scorrere rispettovmente a 10 titoli più in basso o più in alto.
12-17. Tasti di stazione (1-6). Emittente preselezionata e pulsanti 1TOP, 2INT, 3RPT, 4RDMin modalità conlettore CD
a) Modalità radio
Azionando brevamente quosti pulsanti è possible selezionare direttamente una stazione radio precedenteamente impostata. Qualora quosti pulsanti vengano premuti per più di un secondo, l'emittente correntemente impostata viene memorizzata in corrispondenza del tasto di stazione selezionato.
b) Modalità CD/MP3
-
Premere il pulsante 1TOP allo scopo di interrompere la riproduzione del CD (funzione di pausa). Per avviare nuovamente la riproduzione del CD, azionare nuovamente quello pulsante.
-
Premere il pulsante 2INT. Ognuno dei brani del CD viene riproduotto per 10 secondi. Per interrompere la ricerca, azionare nuovamente quello pulsante. Viene in这种方式 riproduotto il brano corrispondente al titolo currentemente selezionato.
-
Premiere l pulsante 3RPT. Il brano correspondente al titolo presente viene ripetuto. Per annullare esta funzione, premere nuovamente quello pulsante.
-
Premere il pulsante 4RDM. I brani corrispondenti ai titoli del CD vengono prodotti in una sequenza casuale. Per annullare esta funzione, premere nuovamente quello pulsante.
1
18. TA Traffic Announcement
commutazione prioritaria per le informazioni radiofoniche sul traffico)
La funzione TAiene attivata premendo brevamente il pulsante TA ed è segnata sul displayattraverso il symbolo TA correspondente. Nel caso della modalità radio in una banda di frequenza FM, ha inizio automaticamente la ricerca di un emittente di notiziari sulle condizioni del traffico (TA SEEK).
Quando si riceve un'emittente FM che trasmette periodicamente informazioni aggiornate sulle condizioni del traffico, il symbolo TP si illumina sul display.
Nel caso in cui la funzione TA sa attivata, la trasmissione delle informazioni sul traffico FM interrompe automaticamente la modalità CD. Il livello del volume viene incrementato sino al valore minimo necessario ai fini della trasmissione dei notiziani sul traffico. Una volta terminata la diffusione delle informazioni sul traffico, viene ripreso il programma impostato in precedenza.
Interruzione della funzione TA:
Qualora si desideri interrompere l'ascolto delle informazioni attuali sulle condizioni del traffico, azionare brevamente il pulsante TA. La modalità TA restà tuttavia attiva.
- Pulsante PTY – Selezione del tipo di programma
Oltre al nome dell'emittente alcune emittenti FM trasmettonoanche informazioni in merito al tipo di programma in oggetto. Queste informazioni sonoessere visualizzate dalla propria autoradio.
Questi tipi di programma possono essere, per esempio, i seguenti:
SPORT
NEWS
POP
CLASSICS
Mediating the funzione PTY è possible selezionare in modo mirato delle emittenti relative a un determinato tipo di programma.
Premiere il pulsante PTY 1X per visualizzare il gruppo musicale PTY. Nel display appara il carattere „PTY". Servendosi dei tasti di stazione 1-6, è possible effettuire una selezione conformmente a quanto指示o seguito.
| Premere 1X | Premere 2X | |
| Tasto di stazione 1 | POP M | ROCK M |
| Tasto di stazione 2 | EASY M | LIGHT M |
| Tasto di stazione 3 | CLASSICS | OTHER M |
| Tasto di stazione 4 | JAZZ | COUNTRY |
| Tasto di stazione 5 | NATION M | OLDIES |
| Tasto di stazione 6 | FOLK M |
Premiere l pulsante PTY 2X per aprir il gruppo linguistico PTY. Servendosi dei tasti di stazione 1-6, è possible effettuire una selezione conformmente a quanto indicate di seguito.
1
| Premere 1X | Premere 2X | Premere 3X | |
| Tasto di stazione 1 | NEWS | AFFAIRS | INFO |
| Tasto di stazione 2 | SPORT | EDUCATE | DRAMA |
| Tasto di stazione 3 | CULTURE | SCIENCE | VARIED |
| Tasto di stazione 4 | WEATHER | FINANCE | CHILDREN |
| Tasto di stazione 5 | SOCIAL | RELIGION | PHONEIN |
| Tasto di stazione 6 | TRAVEL | LEISURE | DOCUMENT |
Premere il pulsante PTY 3X per disattivare nuovamente la funzione.
Quando si selezione PTY, la radio avvia la ricerca delle corrispondenti informazioni PTY. Questa operazioni continua finché sudette informazioni PTY non vengano effettamente trovate.
Nel caso in cui il tipo di programma ricercato non venga trovato, il display visualizza il messaggio „NONE PTY".
Qualora l'informazione PTY ricercata non sia più disponibile, la funzione PTY passa automaticamente alla modalità normale.
20. AF (frequenze alternative) – Funzione REG
a) AF è una funzione che opera con l'ausilio delsystema RDS (Radio Data System) e più essere utilizzata escludivamente per le emittenti FM. L'apparecchio ricerca in background la frequenza dell'emittente impostanza che più essere ricevuta nel modo migliorie. Quando si sleziona la funzione AF, la radio controllinga costamente l'intensità del segnale della frequenza AF. L'intervallo di prova per agli freuenza AF dipende dall'intensità del segnale stesso dell'emittente corrente e più variate tra i due minuti rilevabili nel caso di emittenti con segnale intenso e i due secondi nel caso di emittenti dal segnale debole. Ognialvolta la nuova freuenza AF abbia un segnale più forte rispetto a quello della stazione impostata, l'apparecchio si sintonizza per un breve intervallo di tempo su quella freuenza, e sul display viene visualizzato il messaggio „NEW FREQUENCY" per uno o due secondi. Poiché il tempo della commutazione silenziosa durante ilchio di freuenza e il tempo di controllo sono molto brevi,QLA sua operazione non viene pressché percepita durante il normale programmà.
La funzione AFiene attivata premendo brevamente il pulsante AF, quando lo stato della funzione AF è visualizzato sul displayattraverso un simbolo AF.
- Se il symbolo AF viene visualizzato sul display, la funzione AF è attiva e vengono ricevuti dati RDS.
- Se il symbolo AF lampeggia sul display, la funzione AF è selezionata, ma non è possible ricevere alcun segnale RDS.
- Per disattivare nuovamente questa funzione, azionare ancorta una volta il pulsante AF. Il symbolo AF presente sul display si spagne.
b) Funzione REG
In determinati momenti alcune emittenti ripartiscono il programma in programmi regionali con diverso contenido.
- REG ON: premendo a lungo il pulsante AF, si attiva la modalità regiore. Per alcuni secondi nel display appara la segnalazione „REG ON".
Avvertenza: il display ha una disponța limitata. Puito pertanto accadere che nella modalità di visualizzazione doppi singoli segmenti del display siano cancellati.
Attraverso la funzione REG ON si impedisce la radio si sintonizzi su frequenza alternative che abbiano un altro contento di programma regionale.
- REG OFF: premendo nuvamente a lungo il pulsante AF, si disattiva la modalità regionale. Per alcuni secondi nel display appeare la segnalazione „REG OFF".
Il codice identificativo di programma (PI) del programma regionale viene incontrato durante la ricerca da una frequenza alternatively (AF) o di un codice identificativo di programma (PI).
21 Apertura per CD
22. Pulsante di espulsione (EJECT)
Premere Anything pulsante per estrarre il CD.
- Display luminoso (LED) lampeggiante (senza imagine)
Allorché si rimuove il quadro comandi anteriore, quello display lampeggia.
- Pulsante RESET (senza imagine)
Premere quello pulsante per ripristinare il programma disturbato. Dopo aver smontato il pannello, si più trovare il tasto a destra del display.
1
Dati tecnici
Generalità
Tensione di rete
Consumo di corrente
Potenza
DC 13,8 V
7A Max.
4 × 30 ~W
Ambito FM
Ambito di frequenza
Sensibilità utile
Frequenza I.F.
87,6 MHz - 108,0 MHz
3 V
10,7 MHz
Potenza d'uscita
Uscita
per CD max. 1200mV
Lettore CD
Sistema
CDutilizzabili
Numero di bit di quantificazione
Formato del segnale
Caratteristiche di frequenza
Apparecchio CD
CD/CDR/CDRW/MP3 Disk
1 bit.
Frequenza modello 44,1 KHz
20-100Hz≤5dB
10K-20KHz≤5dB
Rapporto segnale-disturbo
Numero di canali
Dimensioni dell'alloggiamento
50 dB (1KHz)
2 canali stereo
178 L x 50 H x 165 P
Eliminazione delle anomalie
Prima de esaminare la lista di risconto, completare en primo luogo l'allciantamento. Nel caso in cui vi siano alla range in seguito alla verifica sulla base della lista di risconto, si consiglia di rivolversi a centro di assistenza tecnia più vicino.
| Anomalie | Causa | Soluzione |
| I CD's vengono inserti solo fino a metà nel vano CD. | Le viti e la sicura per il trasporto non sono stati rimossi. | Rimuovere le viti e la sicura per il trasporto. |
| In seguito all'insertimento nell'apparecchio, il CD o la cassetta non funziona. | Il regolatore del volume è impostato su un valore troppo basso. | Impostare un valore più elevato per il regolatore del volume. |
| Gli allacciamenti non sono stati effettuali in modo corretto. | Controllare il collegamento da +12V e il collegamento di massa. | |
| Il tono dellettore CD tremola. | La superficie della strada aspra. | Prima diMETTERE in funzione il CD attendere che la strada diventi piania. |
| L'apparecchio non è stato montato in modo saldo. | Montare l'apparecchio salute-mente.Acertarsi che venga utilizzato ilsystema di fissaggio posteriore nel caso in cui il veicolo non dispon-ga di supporti appropriati per la parte posteriore dell'apparecchio. | |
| Il CD è difettoso. | Provar con un'alto CD.Qualora quest'ultimo non presenti anomiale, il CD precedente è probabilmente danneggiato. | |
| Il CD è sporco. | Pulire il CD. | |
| Assenza di corrente. | Il systemadi accensione è disattivato. | Ruotare la chiave di accensione su „ON“ oppure „ACC“. |
| Il dispositivo di sicurezza è bruciato. | Sosituire il dispositivo di sicureza con un'alto da 7A. | |
| L'apparecchio non funziona correttamente (EJECT, LOAD,PLAY). | Il microcomputer è stato disturbato da campi elettromagnetici. | Estrarre il CD o la cassetta in oggetto, quindi effettuare nuova-mente l'insertimento.Disattivare l'apparecchio e riattivarlo nuovoamente. |
| Non vi è alcuna risizione radio. | Il cavo dell'antenna non è collegato. | Inserire correttamente il cavo dell'antenna nella pressa corrispondente dell'apparecchio. |
| Nella modalità di ricerca auto-matica la radio non si arrosta su alcuna stazione radiofonica. | I segnali di emissione sono troppo deboli. | Impostare una stazione radiofoni-ca manually. |
1
Riproduzione di un CD
Pulizia dei CD
Prima di attivare illettore CD, pulire il CD con un panno pulito e privo di polvere. Tirare il CD nel senso indicate alla freccia.
Avvertenza: non utilizzato solventi quali la benzina o diluenti. I comuni detergenti o gli spray antistatici danneggiano l'apparechio.

Insetamento CD
Se si inserisce il CD con le scritte rivolte verso il basso, l'apparecchio pouso essere danneggiato.
Inserire sempre i CD con l'etichetta rivolta verso l'alto.
Avverenza: nel caso in cui nell'apposita aperture per CD sua è stata presente un CD, si raccomanda di non tentare di inseire un ulteriore CD. In caso contrario, si potrebbe danneggiare l'appareccchio.

Toccare il CD
I CD devono essere afterati sempre sul bordo. Af-finché i CD possano mantenersi puliti, non afterrarli sulla superficie.
Non incollare etichette o nastri adesivi sui CD.
Non esporre i CD ai raggi solari o a fonti di calore quali, per esempio, i tubi di riscaldamento. Non lasciarli inoltre in auto, quando quest's ultima è parcheggiata al sole, poiché si potrebbe verificare un considerevole aumento della temperatura.
Questo apparecchio è stato controllato sulla base di tutte le direttive CE attuali in vigore in quello settore, quali per esempio la normalità in materia di compatibilità elettromagnetica e la direttiva in materia di bassa tensione, ed è stato costruito conformmente alle norme di sicurezza più moderne.
Con riserva di apportare modifiche tecniche.
Garanzia
Per l'apparecchio da moiMESSO in commercio ci assumiamo una garanzia di 24 mesi alla data di acquisso (scontrino).
Durante la garanzia nei ci impeggniamo ad eliminare Gratisamente i guasti dell'apparecchio o degli accessori ^* ), dovuti a difetti di materiai o di fabbricazione, riparandi o, a nostra discrezione, sostituendoli. Le prestazioni in garanzia danno luogo a una preroga della garanzia né danno dirito ad una nuova garanzia!
Per la garanzia è sufficiente lo scontrino di acquisso. Senza quello scontrino non sussiste il diritto né ad una sostituzione né ad una riparazione gratuite.
Nel caso si ricorra alla garanzia, restituire al rivenditore l'apparecchio completo in agli sua parte, nell'imballaggio originale unitamente allo scontrino.
*) Danniagliaccessori non giustificano automaticamente lo scambio Gratisodell'apparecchio completo. Si prega di mettersi in contatto con la sua stercatetelefonica.Dannali alle parti dovetro oppure fratture ai pezzi di materia plastica sonoobligatoriamente a spese del cliente.
La riparazione di pezzi d'uso ovvero soggetti a logoramento (cursori, ganci impastatori, cinghie di trasmissione, telemandi di ricambio, spazzolini di ricambio, lame di seghe ecc.) come ancche operazioni di pulizia e manutenzione o la sostituzione di pezzi soggetti a logoramento non rientrano nella garanzia e quando sono a pagamento!
La garanzia si annulla nel caso di intervento da parte di terzi.
Dopo la garanzia
Al termine della garanzia le riparazioni possono essere eseguite dietro lavoro dal corrispettivo negotio specializzato o servizio riparazioni.
GB
General safety instructions
To avoid the risk of fire or an electric shock, you should not expose the device to rain or moisture. Consequently, do not use the device in the immediate vicinity of water - for example near a bath tub, a swimming pool or in a damp cellar.
Use the device only for the intended purpose.
Only connect the device at a properly installed plug socket. Pay attention that the specified voltage corresponds to the voltage of the plug socket.
When using external mains supply, pay attention to the correct polarity and voltage. Always place the batteries in the correct direction.
Assemble the device in such a way that the available ventilation openings are not covered.
Never open the housing of the device. Incorrect repairs can constitute a considerable risk for the user. Should the device become damaged, in particular the mains supply cable, do not operate the device any longer, but rather have it repaired by an expert. Check the mains supply cable regularly for damage.
For safety reasons a broken or damaged mains lead may only be replaced by an equivalent lead from the manufacturer, our customer service department or a similar qualified person.
If the device is not used for a longer period, remove the plug connector from the plug socket or take out the batteries.
These symbols may be found on the machine and are intended to indicate the following:

The lightning symbol should advise the user of parts in the inside of the device which carry dangerously high voltage levels.

The symbol with an exclamation mark should advise the user of important operation or maintenance instructions in the accompanying documentation.

Devices bearing this symbol work with a „class 1 laser“ for tracing the CD. The built-in safety switches should prevent the user being exposed to dangerous laser light, which is invisible to the human eye, when the CD compartment is opened.
Under no circumstances should these safety switches be bypassed or manipulated, as this could result in a danger of exposure to the laser light.
Installation
GB
Please install the car radio as shown below

a Nut
b Spring washer
c Plain washer
d Screw
e Mounting bracket
f Slide-in housing
g Threaded bolt

Note:
h Retaining screws during transport (please remove before installation)
I Extraction tool (spanner for dismantling)
j Frame

First place the operating panel in position on the right-hand side and then lock it into place on the left.
Connection
Connect the device as shown in the diagram.
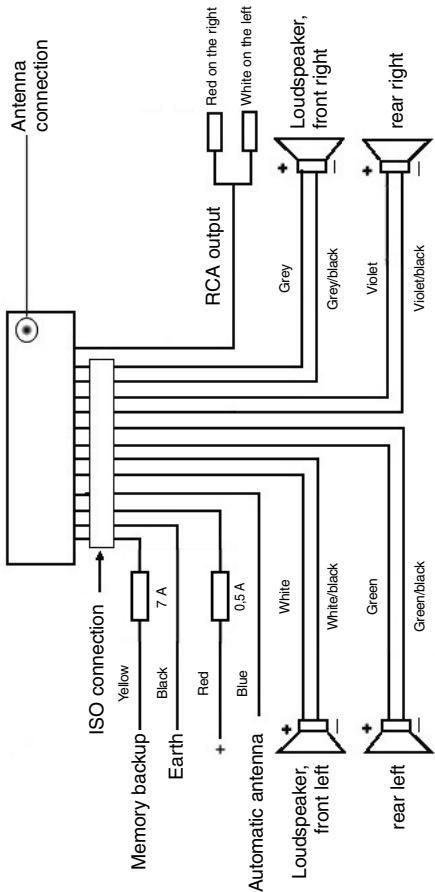
Note
GB
- Do not attach the removable control panel until after connection of the cables.
- Please use loudspeakers with an impedance of 4 ohm.
Important Information for installing your carradio!
- For proper instalment of your car radio, please make sure that your car provides an original „ISO jacket". This is prepared as the counter part of the „ISO jacket" of your car radio.
Depending on the specific car type, different wiring connection of the Backup wire are available.
In these case please contact your authorized car dealer. (However, this is necessary for storing the radio stations).
- Depending on the specific car type, interferences can be possibly arise during radio/CD operation. These interferences can avoided easily with an additional Interferences filter. (Your car radio is originally prepared with an Interference Filter already).
In these case, please contact your authorized car dealer.
Precautionary Measures and Maintenance
- The screws (h) of the transport locking device should be removed before installation, as otherwise the CD cannot be inserted.
- The device is designed for the minus pole of the battery, which must be connected to the body of the vehicle. Please check this before installation.
- If the front control panel is removed while the radio or CD is on, the device is automatically switched off.
- Error. After the front panel has been reinserted an error message (ERROR) appears in the display. Use a piece of wire or similar item to press the RESET button (24) in order to return the electronics to its original state. When the operating panel is removed this button is to be found on the right next to the display.
- If the interior of the vehicle becomes very hot, for example after standing in direct sunlight for a prolonged period, do not switch on the player until the inside of the vehicle has cooled down a little after you have been driving for a few minutes.
- In order to keep the removable control panel in a safe place you should always use the protective case provided.
GB
Operation
1. REL Button
Press the REL button to remove the front operating panel.
2. +/- Button
During normal playback these buttons are used to set the volume. If the SEL button has been pressed beforehand these buttons can be used to make changes to the menus, for example the sound mode.
3. SEL Button (Select)
a) Press the SEL button briefly to access the selection menu of the sound mode. The letters „VOL“ appear in the display for setting the volume. By repeatedly pressing the SEL button you can now select the individual menu items such as VOLUME, BASS, TREBLE, BALANCE and FADER. The settings of the individual menu items are changed using the „+“ or „-“ button.
Note: If equaliser settings such as POP and ROCK have been selected under DSP it is not possible to adjust the BASS and TREBLE.
b) Press the SEL button for a longer time to access the selection menu TA SEEK/TA ALARM, MASK DPI/MASK ALL, DSP OFF, LOUD ON/OFF, BEEP ON/OFF, SEEK1/2, STEREO/MONO; LOCAL/DX; VOL LAST/ADJ. The letters „TA SEEK“ appear in the display. Repeatedly pressing of the SEL button now brings up the individual menu items. The settings of the individual menu items are changed using the "+" or "-" button.
A SEEK Menu (Traffic Announcement Station Search)
Select TA SEEK if you would like the radio to automatically search for a traffic announcement station when you select the TA function.
Select TA ALARM to bring up a warning message in the display as soon as you have set a station under the TA function which does not transmit traffic announcements.
- MASK DPI/ALL
This hides alternative frequencies (AF) during the search for a programme identification (PI).
MASK DPI: When the device is searching for the programme identification (PI) of a station the alternative frequencies with a different programme identification remain hidden.
MASK ALL: In the search for a programme identification (PI) alternative frequencies with a different programme identification and stations with a strong signal level without an RDS signal remain hidden.
DSP
In DSP mode you can select the equaliser settings POP M, ROCK M, CLASS M and FLAT M. Select DSP OFF to carry out your own adjustments. See also section 3a.
- LOUD ON/LOUD OFF
Switching the LOUDNESS function on and off.
When the volume is low the LOUDNESS function (LOUD) expands the sound characteristics by increasing the treble and bass sounds.
BEEP ON/OFF Confirmation Beep
You can select two types of confirmation beep when a button is pressed.
BEEP ON: The confirmation beep is heard whenever a button is pressed.
BEEP OFF: The confirmation beep is switched off.
- SEEK 1, SEEK 2 (only available during radio operation)
Seek function with the I< / I buttons during radio operation.
SEEK 1: Keep the I / I buttons pressed down and the radio will stop at the next station that is reached.
SEEK 2: As long as the I▶/▶I buttons are pressed down the search function will continue in the frequency band.
STEREO/MONO switching (only possible during radio operation)
- LOCAL/DX (only available during radio operation)
Your radio can receive RDS EON data. The term „EON“ signifies the transmission of additional station information within a station chain, e.g. WDR. If a traffic announcement (TA) is made within a station chain, the radio switches from a station which does not transmit traffic announcements to one that does within the same station chain. Reception of this station data is shown in the display by the EON symbol. You can choose between the EONTA LOCAL and EONTA DISTANCE mode for local or long-distance traffic news. The purpose of this function is to prevent the radio switching unnecessarily to an EON-TA traffic news item. If an EON station is a long distance away, it may be that in some cases EON TA information can still be received from the station. The radio then switches to this EON station and tries to receive the traffic announcements. The signal is too weak, however, and reception is poor as this EON station is too far away. Therefore the radio switches back to the station that was set previously.
During the type of operation described above the listener hears the wrong programme for a short time or nothing at all.
EONTA LOCAL:
This function prevents switching to an EON station whose signal is too weak. The radio does not switch to this station and the listener does not hear any interference.
EONTA DISTANCE Mode:
In this mode the EONTA circuitry tries to receive the EONTA information from any available transmitter and thus improve reception quality.
VOL LAST/VOL ADJ
VOL LAST: The radio switches on at the actual volume it had when it was last switched off.
GB
VOL ADJ: Using the + and - buttons you can pre-select a constant switch-on volume.
4. POWER Button
Press this button to switch the device on and off.
5. LCD (liquid crystal display)
6. BAND button
Press the BAND button briefly to switch between the three FM levels. The designation of the corresponding level - F1, F2 and F3 - is shown in the LCD.
7.8.1 / I Buttons TUNING, SEEK, TRACK, SKIP UP/DOWN
a) In radio mode:
Press the I<or button briefly to tune into a radio station manually.
Keep the I or button pressed down in order to start searching for a radio station.
See also the function SEEK 1 / SEEK 2.
b) In CD mode: Press the or button briefly to jump forwards or backwards. If you would like to scroll the titles of the tracks keep the or arrow button pressed.
9.ModeButton
Press this button to select the CD player or radio mode.
10. MUTE Button
Press the MUTE button to switch off the loudspeakers for a short time. Press this button again to cancel this function.
11. AP Button (Autostore - Automatic Station Storage)
In radio mode:
a) Memory function : Press the AP button for longer than one second to activate automatic station storage. The radio searches within the current frequency band, e.g. FM 1, for the strongest signal level until the search cycle has finished. The six strongest stations are then allocated to the corresponding storage locations.
The stations that have now been stored are played for approximately 5 seconds each and then the station of the first storage location is set. If you would like to search for more stations in the FM band, press the BAND button in order to change to the FM 2 or FM 3 band. Press the AP button again for more than one second in order to start the continued search.
b) Scan Function: After the AP button has been pressed briefly the radio plays all the pre-set stations in the current frequency band for a short time.
Note: The scan function ends automatically when it reaches the storage location from which it started.
AP button as a search function during MP3 playback
If the corresponding data were created when a CD was made in MP3 format, these can be searched for using the following functions:
a) Direct input of the track number for CDs in MP3 format:
- Press the AP button once. The letters „TRK SCH“ appear in the display.
- Press the SEL button once. The letters „TRK SCH 001“ appear in the display. The units place flashes.
- With the help of the + / - buttons it is now possible to put in a track number from 0 to 9 in the units place.
- Press the SEL button briefly once more. The tens place flashes. Proceed as described under 3 above.
- Press the SEL button briefly once more to put in a hundreds place if necessary.
- Press the SEL button for 1 second to complete entry of the track numbers. Immediately after this the selected track is played.
b) File search function for CDs in MP3 format:
- Press the AP button twice. „FILE SCH“ appears in the display.
- Press the SEL button briefly to show the first directory that has been selected in the display.
- Using the +/- buttons it is now possible to select the various directories on the CD.
- Press the SEL button for 1 second. The selected directory is played starting with the first song. Press the SEL button briefly and you can select a track in the directory using the +/- buttons.
- Complete entry of the titles by pressing the SEL button for 1 second. Immediately after this the selected track is played.
c) Keyword search function for CDs in MP3 format:
- Press the AP button three times. The letters "CHAR SCH" appear in the display.
- Press the SEL button briefly. The letter „A“ appears on the left of the display.
- By repeatedly pressing the + / - buttons you can now enter a letter from A to Z or a number from 0 to 9 in the first position of the display. Note: The following letters and numbers are entered from left to right.
- Press the SEL button briefly. An "A" appears in the second position of the display. Proceed as for the entry of numbers and letters as described under 3 above.
- Repeat the process described under 2 and 3 above until you have entered your search term. Note: The last entry can be deleted by pressing the AP button.
- Complete entry of the search term by pressing the SEL button for 1 second. Immediately after this the selected track is played. Note: It is not possible to guarantee that CDs created by the user can be played back due to the large variety of software and CD media available.
GB
During the normal playback of CDs in MP3 format the I< and I buttons can be used to move up or down one track. Station buttons 5 and 6 can be pressed to move up and down 10 tracks at a time.
12-17.Station buttons (1-6) of preselected stations and as 1TOP, 2INT, 3RPT and 4RDM buttons during CD operation
a) Radio Operation
Pressing these buttons briefly directly selects a preset radio station. If these buttons are pressed for more than one second, the station currently being listened to is stored under the selected station button.
b) CD/MP3 Operation
- Press the 1TOP button to interrupt playback of the CD (pause function). Press this button again to continue listening to the CD/MP3.
- Press the 2INT button. Each track on the CD is played for 10 seconds. Press this button again to stop searching. The currently selected track is played.
- Press the 3RPT button. The track currently being played is repeated. Press this button again to cancel this function.
-
Press the 4RDM button. The CD tracks are played at random. Press this button again to cancel this function.
-
TA Traffic Announcement (Priority for Traffic Information)
The TA function is activated by pressing the TA button briefly. The TA symbol appears in the display. During radio operation in one FM frequency band the search for a traffic announcement station is started automatically (TA SEEK). If an FM station is being received which transmits the latest traffic announcements from time to time, the TP display lights up.
When the TA function is switched on, the FM traffic announcements automatically interrupt CD operation. The volume level is increased to the minimum value for the transmission of traffic announcements. After the traffic announcement has finished, the programme that was previously running is resumed. Interruption of the TA Function:
If you would like to interrupt the current traffic announcement, press the TA button briefly. This does not switch off the TA mode.
- PTY Button - Selection of the Programme Type
Besides the station name, some FM stations also transmit information on the type of programme. This information can be displayed by your car radio.
Examples of such types of programme are:
SPORT
NEWS
POP
CLASSICS
With the PTY function you can specifically select stations transmitting a particular type of programme.
Press the PTY button once to access the PTY music group. The symbol „PTY“ appears in the display. Using the station buttons 1-6 you can now make a selection as follows:
| Press once | Press twice | |
| Station button 1 | POP M | ROCK M |
| Station button 2 | EASY M | LIGHT M |
| Station button 3 | CLASSICS | OTHER M |
| Station button 4 | JAZZ | COUNTRY |
| Station button 5 | NATION M | OLDIES |
| Station button 6 | FOLK M |
GB
Press the PTY button twice to access the PTY language group. Using the station buttons 1-6 you can now make a selection as follows:
| Press once | Press twice | Press three times | |
| Station button 1 | NEWS | AFFAIRS | INFO |
| Station button 2 | SPORT | EDUCATE | DRAMA |
| Station button 3 | CULTURE | SCIENCE | VARIED |
| Station button 4 | WEATHER | FINANCE | CHILDREN |
| Station button 5 | SOCIAL | RELIGION | PHONEIN |
| Station button 6 | TRAVEL | LEISURE | DOCUMENT |
Press the PTY button three times to switch this function off again.
When PTY has been selected the radio starts searching for corresponding PTY information and stops when the PTY information has been found. If the programme type being searched for is not found, "NONE PTY" appears in the display. If the PTY information being searched for no longer exists, the PTY function automatically switches to normal mode.
20. AF (Alternative Frequencies) REG Function
a) AF is a function that works with the help of RDS (Radio Data System) and can only be used with FM stations. The radio searches in the background for the best frequency reception of the station that has been tuned into. If the AF function has been switched on, the radio continuously tests the signal strength of the AF frequency. The test interval for each AF frequency depends on the signal strength of the current station and varies from a few minutes in the case of a strong signal to a few seconds in the case of weak signals. Whenever the new AF frequency is stronger than the station that is currently tuned in, the radio switches to this frequency for a short time and the message „NEW FREQUENCY“ is displayed for one to two seconds. As the mute time during the frequency change and the test time is very short, this is almost inaudible during the normal programme.
The AF function is activated by briefly pressing the AF button and the status of the AF function is shown in the display by an AF symbol.
- If the AF symbol appears in the display, the AF function is switched on and RDS transmission data is being received.
- If the AF symbol flashes in the display, the AF function is selected but no RDS signal can be received at the moment.
GB
- Press the AF button again to switch off this function. The AF symbol in the display goes off.
b) REG Function
At certain times some stations divide up their programmes into regional programmes with varying content.
- REG ON: If the AF button is pressed for a longer time the regional mode is switched on. The message "REG ON" appears in the display for a few seconds.
Note: The display capacity is limited. It is possible that in the double display mode some segments of the display are deleted.
The function REG ON prevents the radio from switching to alternative frequencies which have a different regional programme content.
- REG OFF: Pressing the AF button again for a longer time switches off the regional mode. The message „REG OFF" appears in the display for a few seconds.
The programme identification (PI) of the regional programme is ignored during the search for an alternative frequency (AF) or a programme identification (PI).
21 CD Slit
22. Eject Button (EJECT)
Press this button to eject the CD.
23. Flashing LED (not shown)
When the front control panel is removed this display flashes.
24. RESET Button (not shown)
Press this button to reset the programme on which there is interference. With the control panel removed the button is to be found on the right next to the display.
Technical data
GB
General
Supply voltage
DC 13.8 V
Power consumption
max. 7 A
Power
4×30W
FM band
Frequency range
87.6 MHz to 108.0 MHz
Effective sensitivity
3 uV.
I.F. frequency
10.7 MHz
Output Power
Output
at CD max. 1200mV
CD player
System
CD device
Suitable CDs
CD/CDR/CDRW/MP3 disks
Number of quantising bits
1 bit
Signal format
Sampling frequency 44.1 KHz
Frequency characteristics
20-100Hz≤5dB
Signal-to-noise ratio
10K-20KHz≤5dB
Number of channels
50 dB (1 KHz)
Housing dimensions
2 stereo channels
178 x 50 x 165 (W x H x D)
GB
Troubleshooting
Before going through the checklist please make all the connections first. If you still have questions after going through the checklist, please consult your local customer service representative.
| Fault Symptoms | Cause | Solution |
| CDs are drawn only half way into the CD tray. | The transport screws have not been removed. | Remove the transport screws. |
| After being inserted into the device the CD or cassette does not turn. | The volume control is set too low. | Turn up the volume. |
| The device has not been correctly connected. | Check the +12V and earth connection. | |
| The sound of the CD player „jumps“. | The surface of the road is uneven. | Wait until the road becomes smoother before playing the CD. |
| The device is not firmly installed. | Install the device firmly. Ensure that the rear attachment is used if the vehicle does not have any suitable retainer for the rear section of the device. | |
| The CD is damaged. | Try another CD. If this works correctly, the first CD is probably damaged. | |
| The CD is dirty. | Clean the CD. | |
| There is no power. | The ignition is switched off. | Turn the ignition key to "ON" or "ACC". |
| The fuse has blown. | Replace the fuse by another 7A fuse. | |
| The device does not work correctly (EJECT, LOAD, PLAY). | The microcomputer has been interfered with by electromagnetic fields. | Remove the CD or cassette and reinsert it. Switch the device off and on again. |
| No radio reception. | The antenna cable is not connected. | Insert the antenna cable firmly into the antenna socket of the device. |
| In automatic search mode the radio does not stop at a transmitting station. | The transmission signals are too weak. | Tune in to a radio station manually. |

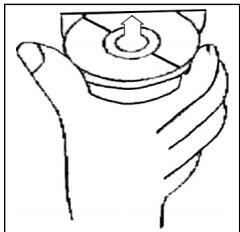

Playing a CD
Cleaning the CD
Before playing a CD, wipe it off with a clean, dust-free cleaning cloth. Pull out the CD in the direction of the arrow.
Note: Do not use any solvents such as petrol or thinning agents. Commercially available cleaning substances or antistatic sprays will damage the device.
Inserting the CD
If the CD is inserted with the printed side facing downwards, the device may be damaged.
Always insert the CD with the label facing upwards.
Note: If there is already a CD in the CD slit, do not try to insert a second CD. This may damage the device.
Touching the CD
Always hold CDs by the edge. In order to keep the CD clean do not touch the surface.
- Do not attach any stickers or adhesive tape to the CD.
- Do not expose the CD to direct sunlight or sources of heat such as heating pipes. Do not leave CDs in the car if it is parked in direct sunlight as this will lead to a considerable rise in the temperature inside the car.
This device has been tested according to all relevant current CE guidelines, such as electromagnetic compatibility and low voltage directives, and has been constructed in accordance with the latest safety regulations.
Subject to technical changes without prior notice!
GB
Guarantee
The device supplied by our Company is covered by a 24 month guarantee starting on the date of purchase (receipt).
During the life of the guarantee any fault of the device or its accessories *) ascribable to material or manufacturing defects will be eliminated free of charge by repairing or, at our discretion, by replacing it. The guarantee services do not entail an extension of the life of the guarantee nor do they give rise to any right to a new guarantee!
Proof of the guarantee is provided by the proof of purchase. Without proof of purchase no free replacement or repair will be carried out.
If you wish to make a claim under the guarantee please return the entire machine in the original packaging to your dealer together with the receipt.
- Damage to accessories does not mean automatic free replacement of the whole machine. In such cases please contact our hotline. Broken glass or breakage of plastic parts are always subject to a charge.
Defects to consumables or parts subject to wearing (e.g. motor pistons, kneading blades, drive shafts, spare remote control, spare toothbrushes, saw blades, etc.) as well as cleaning, maintenance or the replacement of said parts are not covered by the guarantee and hence are to be paid!
The guarantee lapses in case of unauthorized tampering.
After the expiry of the guarantee
After the expiry of the guarantee repairs can be carried by the competent dealer or repair service against the payment of the ensuing costs.
Ogólne wskazówki zwiazane z bezpieczna obstuga
PL
Urzejdtiene chronie nalezy przy deseczem i wilgocia, aby zapobiec grozbie pozarlu lub porazeniu pradem. Nie nalezy go wie uzywać w povlbu wody, a wie przyk现代农业 w povlbu wanny, basenu lu w zawilgocone pijnicy.
Urzadzenie nalezy uzywać tylko zgodnie z seinen przyznaczenia.
Urzejdenie nalezy podlaczyc tlyko i wylacznie do przysepisode zamontowanego gniażdka. Proszewrćic uwage na to, zdehy podane napiecie zgadzalo są z napieciem w gniażdku.
W przypadyku uzywania oddzielnych zasiłaczy nalezy zworci uwage na biegunowość i napiecie, baterie musza zostac wozone do urzadzenia zgodnia z oznaczona biegunowość.
Urzadzenie nalezy w taki sposob ustawic, zeby istniejace otwory wentylacyjne nie zostaly przykryte.
Nigdy nie wolno owierać obudowy urzadzenia. Niefachowo przypoprowadzone naprawy moga byc grożne w skutkach dla uzytkownika. Przy uszkodzeniu urzadzenia, w szczególnosci kabla sieciwoego, urzadzenia nie maye bye uzywane dopóki nie zostanie naprawione przy czobź wymaganymi uprawnieniami. Przewód zasilajczyNSE regularnie sprawdzać, czy nie jest uszkodzony.
W razie awari prosze nie naprawić urzadzenia samemu lecz skorzystać z pomocy autoryzowanego spezialisty. Ježeli przywod zasilajacy niedoizaczny ulegnie uzzkodzeniu, to powinien onby wyemioniyu wytworcy lub w spejalny zakladzie naprawczym alboprevious wykwalifikowanosobe w celu unikićnia zagrozenia.
Ježeli urzadzenie nie bedzie przy dluzszy czas uzywane, naleź wymiąnac wtyczkte z gniazdka lub wyjac baterie.
Ponizsze symbole moga znajdować sie na urzadzeniu i major zwracć Państwa uwage na:

Symbol blyskawicy ma zworci owage uzytkownika na znajdujace sie we wnetrzu urzadzenia czeci, ktore są pod niebepezcieznie wysokim napieciem.

Symbol z wykrzynikiem ma zwroćic uwage uzytkownik na znajdujace s w załazonych dokumentach sągne wskazowej z obłowag konserwacja urzadzenia.

Urzadzenia z tym symbolism uzywaja do odczytywania dzwieku z plyty kompaktowej „Lasera klasy A". Wbudowany wylącznik bezpieczenstwa ma zapobiec temu, zeby uzytkownik w czasie otworiania kieszeni odtrwarzacza plyt kompaktowych zostal poddany niebepieczernemu dla ludzkich oczu oddzialywniu niewidocznego swiatla lasera.
Wylacznikakiego ne sie nały w zadnym wypaduk zmostkował lub teź przy nim manipulować, ponieważ grozi to niebepezciezistwem, ze uzytkownik poddani zostanie oddzialywniuNiebespezconoego dludzkich oczu niewidocznego swiatla lasera.
PL
Instalacja
Radioodiornik nalezy zamontowac zgodnie z ponizsza ilustracja

a nakretka
b podkladka sprezysta
c podkladka
d sruba
e katownik montažowy
f wsuwana obudowa
g kolki gwintowane

Uwaga!
h s Ruby zabezpieczajace na czas transportu (przed montazem usunać)
i narzedzie do wusuwania sprzetu (kluczdo demontazu)
j Ramka przeslony

Zaslepke panelu sterowania proszpe przylozyc napjierw po prawej stronie i wcisnac ja, az zaskoczyc po stronie lewej.
Podlaczenie
PL
Wykonac połaczenia zgodnie ze schematem.
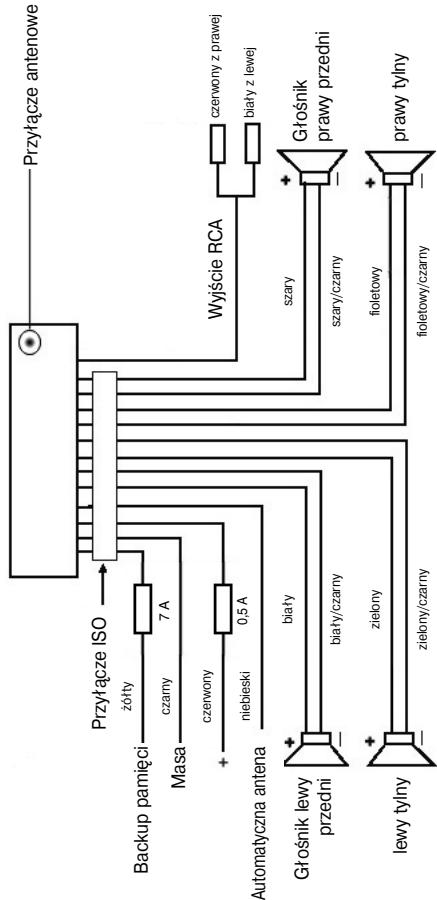
PL
Uwaga
- Zdejmowany panel obstugi nalezy załyć dopiero po podlączeniuk kabli.
- Naleź stosowej glównymi od impedancji 4 ohm.
Wañne informações dodatkowe, dotyczade instalazioni Waszego radioodiornika samochodowej!
- Podczas instalacji / przyłączenia urzadzenia prosze zworćić uwage na to, zeby Wasz samochód dysponowal oryginalnym polacznieniem „ISO Podȩczenia".
Jest on opadowiednikiem wtyczki znejdujoucej są na wyjsciu aparatu (ISO Podȩczenia).
Przy zajeci Czas trwania + " (Backup), wazoleżnosci od typu pojazdu, moź dojsć do odchyń.
W tych przypadkach prosze sie zwracać do autoryzowanego warsztatu samochodowo, gdyż inaczej nie jest zagwarantowane ciagle/ stale zasilanie przemwęgo radia (Potrzebne"Justak do zapisywania staci nadawczych do pamięci).
- Wazoleński od typu pojazdu w wyjatkowych sytuacjach moga wystapić szymi zaktecaję w trybie RADIO/CD. Mnza je odpowiednio usunarę przyez dodatkowy filtr przyciwzikócienowy. Mimo togo, ze Wasz aparat uż seryjnie wyposaźony jest w filtr przyciwzikócienowy, to wazoleński od pojazdu sądość do pogorszonego odbioru.
Otrzymaję je Państwo w handlu z akcesoriami samochodowych i/lub w Waszym warsztacie samochodwym.
Środki ostrożnosci i konserwacja
- Šruby (h) zabezieczajace w transporcie prosze usunac przy montazem, gdyż inaczej CD nie bedzie wciagana.
- Urzadzenie dostosowane jest do podłaczenia do ujemné go bieguna akumulatora, ktymi sąby podłaczony do karoserii pojazdu. Prosimy o sprawdziego tego przyżęstćysto instalacja.
- Ježeli podczas przy w trybie radia lub CD zostanie zdjety panel przydni, nastapi automatyczne wylączenia urzadzenia.
- Wadliwe dzialanie. Po załozeniu z powrotem przydniego panelu oblsugi w wyswietlaczu ciełokrystalicznym pojawia sie meldunek o blędie (ERROR). Przy pomocy drucika lub podobnégo przydmiotu prosze wcisnć przyczisk RESET (24), by elektroniki sprowadzić do stanu wyjsciwoego (ZRESETOWAC). Ten przyczisk zaNajdą Pański po czȩciu panelu sterowania z sprawej strony obok wyswietlacza.
- Ježěi wⁿétrze pojazdu jestardo nagrzane, np. na skutek dṛluszsego parkowania w moćn naslonecznonym mistrscu, to tie nalezy wówczas wączać odtwarzacza CD, do momentu ochlodzenia są wⁿétrza w trackie jazdy.
- W celu bezpiecznego przechowywnia panela przydnoego, nalezy stosowa przyeznaczone do tego celu etui.
Obstega
PL
1. Przycisk REL
Prosze wcisnac przycisk REL w celu wyjecia przyedniego panelu sterowania.
2. Przyciski +/-
Podczas normalego trybu odztwarzania przyciski te sluza do ustawiania glosnosci. W polaczeniu w ciarsniemtym przyciskiem SEL mozza wropyadza zmiany w menu np. w zakresie charakterystyki dzwieku.
3. Przycisk SEL (wybór):
a) Aby otworzyc menu charakterystyki dzwieku, nalezy krtok nacisnac przycisc SEL. Kiedy na wyswietlaczu LCD pojawi sie „VOL" mozyme ustawic gliśnosć. Ponowne naciśćcie przyciscu SEL pozwala nam na wybranie{jedné z punktów menu, jak: VOLUME, BASS, TREBLE BALANCE i FADER. Ustawienie posczegoźnych punktów menu zmienia sie za pomocamy przyciscu „+“ lub „-".
Wskazówka: Jeźeli pod DSP wybrane zostaly ustawienia korektora czestotliwość, takie jak np.: POP, ROCK, to nie pozna ustawic BASS i TREBLE.
b) Poprzej naciść i przytrzymanie przycisku SEL otwieramy menu wyboru TA SEEK/TA ALARM, MASK DPI/MASK ALL, DSP OFF, LOUD ON/OFF, BEEP ON/OFF, SEEK1/2, STEREO/MONO; LOCAL/DX; VOL LAST/ADJ. Na wyświetlaczu pojawia sie „TA SEEK". Po ponownym naciśću przycisku SEL要去 wyjbierać poszȩgólne punktymi menu. Zmiany w zakresie poszȩgólnych punktów menu wyprowadźamy za pomoczą przycisku „+“ lub „-”.
- Menu TA SEEK (wyszukiwanie informaci o ruchu)
Ježeli wybor faktcji TA ma spowodowo automatyczne wyszukanie staci nadajacej informacja o ruchu, naleź wybrać TA SEEK.
Jezeli wyibierzemy fumkcje TA ALARM, to woczcas, w przypadku ustawienia staci ji ne nadajcej informaci o ruchu, na wyswietlaczu pojawi sie odpwiednie ostrzezenia.
- MASK DPI/ALL
Ukrywanie czestotliwość alternatywnych (AF) podczas wyszukiwania identifikacji programu (PI).
MASK DPI: jezeli odbiornik wyszukije wg identifikaci programu (PI) danej staci, to wowczas czestotliwość alternatywne o内在ej identityfikacja programu pozostaj ukrtey.
MASK ALL: podczas wyszukiwania identifikacji programu (PI) czestotliwość alternatywnze z inna identifikacja programu oraz nadajniki o silnym sygnale bez RDS-u pozostaj ukrYTE.
PL
DSP
W DSP moga. Państwo wybrać ustawienia korektora czestotiwość: POP M; ROCK M; CLASS M i FLAT M. Prosze wybrać DSP OFF, by dokonac wlasnych ustawień. Patrz równeż Pkt. 3a.
- LOUD ON/LOUD OFF
Wlaczanie i wylaczanie funkci LOUDNESS.
W niskim przy uzyci fungcji LOUDNESS (LOUD) poszerza sie obrad zwieku. Tony wysokie i niskie dostaja podwyyszzone.
- BEEP ON/OFF bzwiek potwierdzenia.
Ton potwierdzajcy przy wciȩgnięci klawiszma myza wybrać w dwóch rodzajach:
BEEP ON: dzwiek potwierdzenia pojawia sie przy kaźdym naciśću przycisku.
BEEP OFF: dzwiek potwierdenia jest wylaczony.
SEEK 1, SEEK 2 (do wyboru tylko w trybie „radio")
Funkcja szukania przyciskami I▲/■I w trybie „radio"
SEEK1: Prosze trzymać wcińskipty przycisk I▲/■ a radio zatrzyma są na najblźsej odbieranej staci.
SEEK2: Póki trzymaja Panstwo wciśniete przyciski I ▲/▶I, odbywa sie dalsze szukanie staci w danym sąmie czestotliwość.
- Przelączanie STEREO/MONO (do wyboru tylko w trybie „radio")
- LOCAL/DX (do wyboru tylko w trybie „radio")
Wasze radioMZe odbieraC dane RDS EON. Pod pojeciem EON Rozumemy mozliwoSc odbioru dodatkowych informaciw w ramach danej sieci staci np.WDR.W przypadku komunikatu o ruchu (TA) w ramach danej sieci staci radiowych nastapi automatyczne przelaczenia ze staci nie nadajacej informaciO ruchu na odpwiednia staje nadajcaktie informacionw danej sieci staci.OODBiorze tego typu danych informuje znaczek EON na wyswietlaczu odbiornika.MogaPaNtsto wybieracmiedzy trybem EONTA LOACAL lub EONTA DISTANCE celed odbioru lokalnych komunikatow drogowych lub meldunkow radiowych dlra ruchu dalekobieznego.Sens tej funkci polega na zatrzymuniu neipozadanedo prezlaczania na meldunko drogowe EON-TA.Jezeli stacia EON jest bardzo daleko,to czeciowo i tak moga byc odbierane informacione EON TA z tej staci. Radio przelaczy sie na tstace EON i spróbuje odebrac informacione o ruchu. Jednak poziom sygnalu jest slyaby a odbior zly, poniewaz dana stacia EON polozone jest zbyt daleko.Dlatego radio ponownie przelacza sie na uprzednio wybrana stacie.
Przy powyyszym trybie przy uzytkownik ulsysz przy重点领域 inny program niz wybrany lub nastapi chwilowa cisza.
EONTA LOCAL:
Dziegi tej funkci unikamy przyelaczania na stacie EON o slabym sygnale. RadioNie przylacza sie na te stacja a sluchacz nie zauwa za jakichkolwiek zaklocen.
Tryb EONTA DISTANCE
W tym trybie funkcja EONTA próbuje uzyskć informacja EONTA zosiagalnej staci i w ten spośob poprawić jakość odbioru.
VOL LAST/VOL ADJ
VOL LAST: Radioość zostatnio ustawiona faktyczna glosnocea.
VOL ADJ: Przy pomocy klawisz „+“ i „-“ ustawiaja Państwo glosnosć niezmymienną przy wynczaniu.
4. Przycisk POWER
Do włacznia/wyłacznia odiornika.
- Wyswietlacz LCD (wyswietlacz ciekłokrystaliczny)
6. Przyciski BAND
Prosze wcisnac krto przycisk BAND, by przelaczy na inny (jeden spostr od trzech) poziom FM (UKF). Oznaczenia opdowiedniago poziimu F1, F2, F3 uzakuzie sie w wyswietlaczu ciekłocrystalicznym.
7.8. Przyciski I / TUNE, SEEK, TRACK, SKIP UP/DOWN
a) W trybie „radio":
Prosze wcisć krótko przycisk I lub, by ustawic ręcznie pożadana stȩcie radiowa.
Prosze trzymać wcińskiropy przycisk I<\triangleleft> lub by rozpoczamy szukanie staci radiowych.
Patrz tez fungcja SEEK1/SEEK2.
b) W trybie CD: w celu przeskoczania do przodu lub do tylu nalezy nacinacja pryszick i 一 lub I. W celu przywijania utworow nalezy nacinacja i przytrzymaco przyczisk ze strzalka; I lub I.
9. Przycisk Modus (tryb)
Nacisnac w celu dokonania wyboru pracy w trybie radia lub CD.
10. Przycisk MUTE
Prosze wcisnac przycisk MUTE, by wyciszyc na krótko glosniki. Prosze po-nownie wcisnac ten przycisk, by powyzsza funkcję z powrotem skasowac.
- Przycisk AP (automatyczne zapamietywanie stacji)
W trybie radia:
a) Funkcja pamięci:
aby aktywować automatyczny tryb zapamietywania staci,NSEy nacisnac i przytrzynać przyczysk AP przydzej niedej sekunde.. Odiornik -w ramachactualny gnasa czestotliwośćnp. FM 1-wyszuka staje o najwyższym poziomie sygnalu.Sześć staci o najniliejszym sygnale zostanie zapamietyanych w kolejnosci rosnących czestotliwość i zostana im przypisane kolejne numery.
PL
Teraz każda zapisana do pamięci stacja wącza sie na ok. 5 sekund, a nastepnie wybrana zostaje stacja utrwalona na pierwssszej poźycji wAMIAMIJI.
Jezeli ccha Państwo szuća dalszych staci w zakresie FM, to prosze wcisnac przyczisk BAND, by przyść do FM2 lub FM3. Prosze ponorwie wcisnac przyczysk AP na dluzej niż sekunde, by Rozpoczac dalsze szukanie.
b) Funkcja krótkiego wączania staci:
Po roktim wciński piuszkruski AP radio walksa na krótko wzystkie ustawione stacea aktualnego pasma czestotlwość.
Wskazowska: Funkcja krótkiego w��czania staci kończy sie automatyczne zchwila dojscia do pozycji wAMIci, z ktorej zostafa wystartowan.
Przycisk AP也是如此 wyszukiwania w trybie MP3
Ješli przy zestawianiu plyty CD w formacie MP3 zostaly wpisane oppowiedniedane, toMZna je odszukać droga nastepujczych funkocij:
a) bezposrednie wprovadzenie numeru utworu na plytach CD w formacie MP3:
- Prosze wcisnac jeder raz przycisk AP. W wyswieltlaczu pojawia sie TRK SCH".
- Prosę wciasnć krótko przyczisk SEL. W wyświetlaczu pojawia są „TRK SCH 001". Pozycja jedernek miga.
- Przy pomocy przycisków +/-major teraz Państwo moziwość podania numeru tytulu od 0 do 9 w pozycji jedynek.
- Prosze ponownie wciśnac na krótko przycisk SEL. Pozycja dziesiatek miga. Dalej prosze prostepować zgodnia z opisem w pkt. 3.
- Prosze ponownie wcisnac na krótko przycisk SEL, by ewentualnie dokonać wpisu w pozycji setek.
- Wpisywanie numerus titulu prosze zakończyczrzejdtuźsze wcijsniedie (1 sek.) przycisku SEL. Bezposrednio po tym zestanie odtworzony utwor o wybranym numerze.
b) Funkcja wyszukiwania pliku na plytach CD w formacie MP3:
- Prosze wcisnac dwa razy przycisk AP. W wyswietlaczu pojawia sie "FILE SCH".
- Prosze wcisnac krtok przycisk SEL, by w wyswietlaczuPokazal sie pierwszy wybrany katalog.
- Przy pomocy przycisków +/-major teraz Państwo moziwość wybrania rożnych katalogów na plycie CD.
- Prosze wcisnac dluzej (1 sek.) przycisk SEL. Wybrany katalog odtwarzany jest od pierwszej piosenko.
Prosze wcisnac krto przycisk SEL i przy pomocy przycisków +/- moga Państwo wybrać jaki tytul w katalogu. - Prosę zakończy wpisywania przyezdȩzse wciȩść (1 sek.) przycziku SEL. Bezpośrednio po tym zestanie odztworzony utwor o wybranych numerze.
c) Funkcja szukania wg hasla, dotyczy plyt CD w formacie MP3:
- Prosze wcisnac trzy razy przycisk AP. W wyświetlaczu pojawia są „CHAR SCH".
- Prosze wiscnac krtok przycisk SEL. W wyswietlaczu z lewej strony pojawia sie „A".
- Wciskajc wielokrotnie przyciski +/- moga teraz Państwo wpisać w pierwszej pozycji wyświetlacza liter od A do Z lub cyfre od 0 do 9.
Wskazowska: Wpisywanie nastepnych cyfri liter odywa sie od strony leewj do prawej.
- Prosze wcisnac krótko pryzcisk SEL. W drugiej pozycji wyswietlacza pajowa sie „A". Wpisujac cyfry i litery prosze postebowac zgodnie z opisem w pkt. 3.
- Prosze powtarzać czynnosci w pkt. 2 i 3 tak dlugo, az wpisza Państwo poszukiwane pojejcie wieloznakowe.
Wskazowska: Ostatni wpiis prosze kasowac przy zwiśniecie klawiszapAP.
- Prozę zakończyć wipsywanie przyż dluszne wciȩść (1 sek.) przyczisku SEL. Bezpos省教育nio po tym zestanie odztworzony utwor o wybranych numeria.
Wskazówka: Odtwarzania ptyt CD, nagranych przy pomocy dowolnégo oprogramwomania, nieMZA zagwartotwuć ze wźględu na duźciezbe istniejȩchyc programów i mediwy CD.
W normalnym trybie odwartaria plyt CD w formacie MP3:noza za pomocaprziscikow I▲ lub ▷I przeskoczyc o jedem utwor w gore lub w do|. Za pomocaprziscikow staci 5 lub 6:noza kaźdorazowo przeskoczyc o 10 tylów w gore lub w do|.
12-17.Przyciski (1-6) zapisanych staci(orazjako przyciski 1TOP,2INT,3RPT, 4RDM wtrybie CD.
a) Tryb radia
Krotkie naciśćcie tych przycisków spowoduje bezpośredni wyborwczesnej zapisanej stajci radiowej. Jeźeli dany przycisk zostanie przytrzymana dluzzej niż 1 sekunde, to wównas do danego przycisku zostanie przypzisaniactualnie ustawionia staacja.
b) Tryb CD/MP3
- W celu przerwania odtwarzania CD nacinność przycisk 1TOP (pauza). Ponowne nacinnośćkiego przycisku wznowy odtwarzanie plyty.
- Nacisnac przycisk 2INT. Kaźdy tylu出入境 zozny sąze 10 sekund. Ponowne naciść przyciscy oznacja przerwanie procesu wyszukiwania i odworzony zostanie aktualnie wybryan utwor.
- Nacinacja przyczysk 3RPT. Aktualnie odztwarzy utwor zostanie powórzony. Ponowne naciśćtieideo przycisku spowoduje uniewaźniazenia tej funkcj.
- Nacisnac przycisk 4RDM. Utwory besteht odwartze w przypadkowej kolejnosci. Ponowne naciśćte goło przycisku spowoduje uieważenie tej funkymi.
PL
18. TA Traffic Announcement
(uklad priorytetu dla radiowych komunikatów drogowych)
Funkcjte TA załuczamy poprzej krótkie naciśniece przycisku TA, a o jej uakytnwiemiu informujne znaczek TA na wyswietlaczu. W trybie radia w danym zagreskie czestotiwość FM Rozpocznie są automatyczne wyszukwanie staci nadajciej informacja o rchu (TA SEEK).
Ježeli odzierana bedzie stacja, która co pewien czas{nadaje najświeźsze informacja o ruchu, to wówczas na wyświetlacz zapali sie wskaznik TP.
Przy zaączonej funkcjä TA informacja o ruchu nadawane na FM spowoduja automatyczne przyranie odztwarzenia plyty CD. Głosnosć automatycznie zwiekszy są dominimalné goźmiwo wȩciwogo dl transmisji informacja o ruchu. P zo zaćnczeniu informacja o ruchu nastapi powróć do wczesnej ustawionego programu.
Przerwanie funkcjTA:
Ježeli chemy przerwć的实际nie nadawanie informaci o ruchu, naleź na krótko nacisnć przycisk TA. Nie spowoduje to wyłaczenia trybu TA.
19. Przycisk PTY - wybor rodzaju programu
Niekótre stace FM oprocz nazwy przykażu równeź informacja na temat typuemitowanyachrzpieznie programów. Wasz odbiornik samochodowy moze pokozywać te informacja na swoim wyswietlaczu.
Moga to byc nastepujace typy programow np.:
SPORT
NEWS
POP
CLASSICS
Za pomocaj funkcji PTY mozymy wybrać stacje nadajęcz poźadny przyez nas typ programu. Aby wegrś do grupy rodzajów muzyki w trybie PTY naleź y 1X nacisnagy przyczisk PTY. W wyswietlaczu pojawia sąznak „PTY". Za pomocaj przyczisków staci 1-6 mozyme dokonac nastepujacego wyboru.
| 1 X nacisnám | 2 X nacisnám | |
| przycisk staci 1 | POP M | ROCK M |
| przycisk staci 2 | EASY M | LIGHT M |
| przycisk staci 3 | CLASSICS | OTHER M |
| przycisk staci 4 | JAZZ | COUNTRY |
| przycisk staci 5 | NATION M | OLDIES |
| przycisk staci 6 | FOLK M |
W celu wejscia do grupy rodzajow audyci mówionych nały 2X nacisn污染防治. PTV. Za pomocza przycisków stacli 1-6 moźemy dokonac nastepujućego wyboru.
| 1 X nacinacja | 2 X nacinacja | 3 X nacinacja | |
| przycisk staci 1 | NEWS | AFFAIRS | INFO |
| przycisk staci 2 | SPORT | EDUCATE | DRAMA |
| przycisk staci 3 | CULTURE | SCIENCE | VARIED |
| przycisk staci 4 | WEATHER | FINANCE | CHILDREN |
| przycisk staci 5 | SOCIAL | RELIGION | PHONEIN |
| przycisk staci 6 | TRAVEL | LEISURE | DOCUMENT |
W celu ponownego wyłaczenia tej funkci sąȩzy 3X nacinść przyczysk PTY.
Ježeli wybrny jest tryb PTY radioodbiornik Rozpoczyna wyszukwanie odpo-wiednich informaci PTY i zatrzymuje sie, ježeli znajdzie poźadne przyż nas informacja PTY.
Jeżeli poszukiwany typ programu nie zestanie znaleziony, to wówczas na wyświetlaczu pojawsię informacja „NONE PTY".
Ježeli poszukiwana informacja PTY juz nie istnieje, to funkacja PTY automatycznej przyłączy są w zwykły tryb odBORU.
20. AF (częstotliwość alternatywne) fungcka REG
a) AF jest funkacja wykorzystuacja RDS (Radio Data System) i wykorztysty-wana jest tylko przyżstace FM. Uradzdenie wyszukuju w tle najlepsza czestotliwość nastawioneji staci (sledzenia sieci).
Jezeli wybierzemy fungkcje AF to radioodbiornik bedzie na biezaço kontrlowac sile sygnalu danej czestotliwosci AF. Czestotliwosc prerpopwadzania tych kontroli zalezy od sily sygnalu z aktualnej staci i mieci sie w zakresie od kilki minut w przypadku silnego sygnalu do kilku sekund przy slabym nadajniku. Za kaźdym razem, gdy nowa czestotliwosc AF jest silniejsza, niż aktualnie nastawiona stacja, to wówczas odiornik na krótko przeloczca sie na te czestotliwosc i przyez 1 do 2 sekund na wyswietlaczu pojawia sie informacja „NEW FREQUENCY". Poniewacz czas wycsiszenia przyzmianie czestotliwosci wzgl. czas kontroli jest bardzo krótki, to w trakcie odbioru programu jest to sprawie nieslyszalne.
Funkcja AF aktywowana jest poprzej krótkie naciść przycisku AF, a o jej wyborze informuje znaczek AF na wyświetlaczu radia.
- Ježeli na wyświetlączu zznajduje są zacznęk AF oznaczta to, ze załȩczona jest faktcja AF i odzierane są dane emitowane w systemie RDS.
- Ježeli na wyświetlaczu znaczec AF miga, to funkća AF jest wȩprawdie wybrana, ale w danym momencie nie moga byc odzierane sygnaly nadawane w systemie RDS.
- Ponowne naciść przycisku AF spowoduje wylączenia funkcj. Na wyświetlaczy gaźne znaczek AF.
b) Funkcja REG
Niekótre stace o okreslonych godzinach Dziela swoj program na programy regionalne o zróznicowanej tresci.
- REG ON: naciśćcie i dluzsze przytrzymanie przyczisku AF spowoduje wączenia trybu Regionalno. W wyświetlaczu pojawia są na kilka sekund meldunek „REG ON".
Uwaga:移动端sWSkazan na wyswietlaczu jest ograniczona.
Mozliwe, ze w podwojnym trybie wskazań poszczególne segmenty wyswietlacza zostana wygaszone.
Funkija REG ON zapobiega przelaczaniu sie radioodbiornika na czestotliwość alternatywne, na ktorych nadawane są programy现阶段ne o内在j tresci.
PL
- REG OFF: Ponowne naciść i dlustrzne przytrzymanie przycisku AF wylączta tryb regionalty. W wyświetlaczu pojawia są na kilka sekund meldunek „REG OFF".
Podczas wyszukiwania czestotliwosci alternatywnych (AF) lub identifikaci programów (PI) ignorowska ist jestidifikacja programów (PI) zprogramu nawadanoego przy stacje regionalna.
21 OtwórnayphytCD
22. Przycisk wysuwania (EJECT)
Aby wysunac plye CD nalezy nacsinac ten przycisk.
23. Migajaca dioda LED (bez ilustraci)
Dioda ta miga przy zdejmowaniu panela przydniego.
24. Przycisk RESET (bez ilustraciji)
W celu przywoćenia zakołoconego programu nalezy naciność tem przyzycisk. Po czȩciu przydnięgo panelu przyzycisk tem nożna zna引擎 z sprawej strony obok wyświetlacza.
Dane techniczne
Ogólne
napieccezasilania
pobór pradu
moc
DC 13,8 V
7 A max.
4 × 30 ~W
Zakres FM
zakres czestotliwość
czuftyć uzywalna
czestotliwość posrednia
87,6 MHz do 108,0 MHz
3 uV
10,7 MHz
Moc na wyjsciu
wyjscie
W przypadku CD maks. 1200mV
Odtwarzacz CD
system
czytane formaty
ilosc bitow kwantowania
format sygnalu
Frequenzcharakteristika
stosunek sygnalu do szumów
ilosckanalow
wymiaru obudowy
odtwaracz CD
phyt y CD/CDR/CDRW/MP3
1 bit.
44.1 KHz
20 - 100Hz≤ 5 dB
10K-20KHz≤5dB
50 dB (1 KHz)
2kanaly stereo
178 szer. x 50 wys. x 165GLEB.
Usuwanie usterek
PL
Przed skorzystaniem z. listy kontrlnej nalezy najpirow sprawdzić,czy urzadzenia jest wȩciewi podlaczone. Jeźeli spowarzemu calej listy kontrlnej uterka nie zostanie w pelni usunieta, nalezy skonsultowć są z nojbliszym punktem serwisowym.
| Oznaki usterki | Powód | Sposob usuniecia usterki |
| Plyty kompaktowe wciagane są do otworu na CD tylko do polowy. | Śruby zabezipieczajce w transporcie nie zostaly usuniete. | Prosze usunęć s Ruby zabezipieczajce w transporcie. |
| Brak odtrwarzania po wlożeni do odtrwarzacza pplyt CD lub kasety. | Za maly poziom gołyßenośćustawionej na regulatorze. | Zwiększyć poziomgołyßeność. |
| Nieprawidłowowy wykonane przyłącza. | Sprawdzić przyłącze +12V i masé. | |
| Dźȩwć odtrwarzacza CD przesekakuje. | Powierzchnia drogi jest nierówna. | W celu odtkworzenia CDzazȩkać aź droga stanie sie bardẑej równa. |
| Uradydenie nie jest za-montowane na stäre. | Zabudowań uradydenie na stäre. Upȩnić są, czewy przypadku, gdy poźajdniecie oferuju opadowiednigo podparcia dla tylnejaciousu uradydenia, zastosowano tylne mocowanie. | |
| Uszkodzona pplyta CD. | Sprawdzić inna pplyteCD. Jeźeli;będzie ona dziać pradwidowo, to byc要去 poprzejdia CD jest uszkodzona. | |
| Brudna pplyta CD. | Wyczyscić CD. | |
| Brak zasilania. | Wączony zapłon. | Obrácić kluczymi zapłonuw poźycie „ON“ lub „ACC“. |
| Spalony bezpiecznik. | Wymienić bezpiecznik na inny bezpiecznik 7A. | |
| Uradydenie nie dwila prawidlowo (EJECT, LOAD, PLAY). | Nastapilo zlokocenie mi-krokomputera przyłą elektromagnetyczne. | Wyȩć i ponownie włość CD lub kasety. Wyczyscć i ponownie przyłącyć odbiornik. |
| Brak odbioru radiowego. | Niepodźyczy kabel antenowy. | Mocno wetywność kabelantenowy w zlokawe ante-nowe na uradydeniu. |
| W trybie wyszukiwania automatyczné radio-odbiornik nie zatrzymujsie przyźadnej staci. | Nadawane sygnaly są zbyt sąbe. | Wybrać stacje w trybiereachznym. |
PL

Odtwarzanie CD
Czyszczenie CD
Przed odtworzeniem, plyte CD nalezy przytrzeci czysta, niedzakurzonachusteczka do czyszczenia.
Uwaga: nie stosowac zadnych rozpuszczalników jak benzyni lub subsistence rozcienczaję. Powszechnie dostepne sądki czyszczace lub spraye antystatyczne powoduja uszkodzenia urzadzenia.
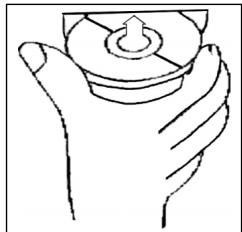
Wkladanie plyty CD
Wlozenie plyty CD zadrukowan strona do dolu\ moze spowodowauc uszkodzenia urzadzenia.
CD nalezy zawsze wkladac etykieta zwrocona do gory.
Uwaga: jezeli w kieszeni CD znajduje sie ju z phyta, nie nalezy usilowa wkladać tam kolejnej phyta, ponieważ要去 spowodowa uszkodzenia urzadzenia.
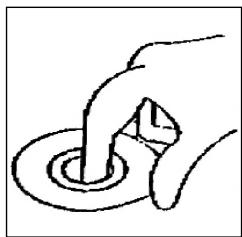
Chwytanie plyty CD
Plyty CD nalezy zawsze chwytać za krawędzie.
Aby zapewnić czystość plyty, nie nalezy dotykać jej powierzchni.
- Nie naklejac na plytach CD zadnych naklejek, ani taśm klejacych.
- Nie wystawiać plyt CD na bezposrednia dzialanie promieni slonecznych lub zrodeciepla są rury grzewcze oraz nie pozostawiać ich w samochodzie, jeźeli pojadź jest parkowy w mistryscu naslonecznionym, poniewaz powoduje to znaczny wzrost temperatury.
Niniejsze uradzdenie opodiwida wymaganiom normy bezpieczeneistwa uzytkowania our spelnia wymagania dyrektywy niskonapięciowej i kompatybilinosci elektromagnetycznej.
Zastrzega sie prawo dozmian technicznych!
WARUNKI GWARANCJI
PL
Przyznajemy 24 mieszpie gwarancji na produkt liczac od DATy zakupu.
W tym okresie bedziemy bezplatnie usuwac w terminie 14 dni od Daty dostarczenia wadiwego sprzetu z karta gwarancjna do.), uzaku wszystkie uzkodzenia powstaleymtymuzadzeniu na skutek wady materialow lub wadiwego wykonania, naprawiacz orang wymiieniag wadiwe ceci lub (jesli uznamy za stosowne) wymiieniag cale urzadzenie na nowe.
Sprzêt do naprawy powinien byc dostarczony w komplecie wraz z dowodem zakupu oraz z wazna karta gwarancjna do sprezdawcy w miar態度wocki w oryginalnym opakowianu lub innym odpownim dla zabezpieczenia przyzeduszkidonienw. W razie braku kompletné opakowania fabrcznego, ryzyk uz-kodzenia sprzȩtu podczas transporte do i zjejmesca zakupu ponsi reklamujucy.
Naprawa gwarancjna nie dotyczzy czynosci przywidzianych w instrukcji obslugi, do wykonania ktorych zobowiazny jest uzytkownik we wlasnym zakresie i na wlasny koszt.
Gwarancja nie obejmuye:
- mechanicznych, termicznych, chemicznych uszkodzen przytu i wywoanych nimi wad,
- uszkodzen powstalych w wyniku dzialania sil zewétrznych takich jak wyladowania atmossferyczne, zmiana napiecia zasilania i innych zdarzen losowych,
- nieprawidlowego ustawientia wartosci napiecia elektrycznego, zasilanie znieodpowedniego gniażda zasilania,
sznurów połaczeniowych, sieciowych, zarowek, baterii, akumulatorów, - uszkodzen wyrobu powstalych wwyniku niewlasciwoego lub niezgodnego z instrukcje loro uzytkowania, przechowywania, konserwacci, samowolnego zrywnia plomb oraz wszelkich przerobek izmian konstrukcyjnych dokonanyche przyez uzytkownika lub obsoy niedipowolane,
roszczen z tytulu parametrów technicznych wyrobu, o ile są one zgodne z podanymi przyez produkta, - prawidlowego zuzycia iuszukodzen, kréme为主要istotny wplyw na wartosć lub dzialanie tego urzadzenia.
Karta gwarancyjna bez pieczatki sklepu, daty sprezedazy, nie wypelniona, zle wypelniona, ze sladami poprawek, niedzelytna wskutek zniszczenia, bez moziwość ustanenia.),不错adazy oraz dołaczonego dowodu zakupu jest niewazna.
Korzystanie z uslug gwarancjynch nie jest mozilwie po uplywie daty waznosci gwarancji. Gwarancja na czeci lub cale urzadzenie, ktore są wymieniane konczy sie, wraz z koicem gwarancj na to urzadzenie.
PL
Wszystkie innate roszczenia, wiccajac w to odszkodowania są wykloczone chyba, przy prawo przywiduje inaczej. Roszczenia wykraczaje poza ta umoweNie są uwzględniane przy z ta gwaranje.
Gwarancja na sprzedany towar konsumpyjny nie wylacza, nieogranoica ani nie zawiesza uprawnien kupujacego winikajacych z niezgodnosci towaru z umowa.
Gwarancja oraz zawarte w nied warunki obowiazujna terenie Rzekzpospolitej Polskiej.

CIATRONIC®
INTERNATIONAL GMBH
D-47906 Kempen/Germany · Industriering Ost 40
Telefon 02152/2006-666
Internet: http://www.clatronic.de·email: info@clatronic.de
