
AR 661 CD - Car stereo CLATRONIC - Free user manual and instructions
Find the device manual for free AR 661 CD CLATRONIC in PDF.

| Product type | Car radio with CD and MP3 player |
| Brand | CLATRONIC |
| Model | AR 661 CD |
| Supply voltage | DC 13.8 V |
| Power consumption | 7 A max |
| Output power | 4 × 30 W |
| FM frequency range | 87.6 - 108.0 MHz |
| FM sensitivity | 3 µV |
| FM intermediate frequency | 10.7 MHz |
| Compatible CD formats | CD, CDR, CDRW, MP3 |
| Signal-to-noise ratio (CD) | 50 dB (1 kHz) |
| Frequency response (CD) | 20-100 Hz ≤ 5 dB; 10-20 kHz ≤ 5 dB |
| Number of channels | 2 (stereo) |
| Dimensions (W × H × D) | 178 × 50 × 165 mm |
| Main functions | RDS, EON, PTY, TA, AF, MP3 playback, removable front panel, automatic and manual search, station memory, equalizer, CD functions (random play, repeat, intro) |
| Maintenance and cleaning | Clean the front panel and housing with a soft dry cloth. Clean CDs with a dust-free cloth from the center to the edge. Do not use solvents. |
| Safety | Do not expose the device to rain or moisture. Do not open the housing. Use speakers with impedance 4 Ω. Observe polarity and voltage. |
| Spare parts and repairability | In case of malfunction, contact a professional. The fuse (7 A) is replaceable. |
| General information | Warranty 24 months. CE certified. Environmentally compliant disposal. |
Frequently Asked Questions - AR 661 CD CLATRONIC
User questions about AR 661 CD CLATRONIC
0 question about this device. Answer the ones you know or ask your own.
Ask a new question about this device
Download the instructions for your Car stereo in PDF format for free! Find your manual AR 661 CD - CLATRONIC and take your electronic device back in hand. On this page are published all the documents necessary for the use of your device. AR 661 CD by CLATRONIC.
USER MANUAL AR 661 CD CLATRONIC
PRECAUÇÖES E MANUTENÇAO
87.6 MHz a 108.0 MHz
3uV
10.7 MHz
POTÊNCIA DE SAÍDA:
MAX. 1200mV no CD
LEITOR DE CD
Sistema:
Cd's compatibleis:
Formato do sinal:
Characteristicasdafrequency:
Aparelho de CD
CD/CDR/CDRW/MP3
frequência 44.1 KHz
20-100Hz<5dB
10K-20 KHz<5dB
General safety instructions
To avoid the risk of fire or an electric shock, you should not expose the device to rain or moisture. Consequently, do not use the device in the immediate vicinity of water - for example near a bath tub, a swimming pool or in a damp cellar.
Use the device only for the intended purpose.
Only connect the device at a properly installed plug socket. Pay attention that the specified voltage corresponds to the voltage of the plug socket.
When using external mains supply, pay attention to the correct polarity and voltage. Always place the batteries in the correct direction.
Assemble the device in such a way that the available ventilation openings are not covered.
Never open the housing of the device. Incorrect repairs can constitute a considerable risk for the user. Should the device become damaged, in particular the mains supply cable, do not operate the device any longer, but rather have it repaired by an expert. Check the mains supply cable regularly for damage.
For safety reasons a broken or damaged mains lead may only be replaced by an equivalent lead from the manufacturer, our customer service department or a similar qualified person.
If the device is not used for a longer period, remove the plug connector from the plug socket or take out the batteries.
These symbols may be found on the machine and are intended to indicate the following:

The lightning symbol should advise the user of parts in the inside of the device which carry dangerously high voltage levels.

The symbol with an exclamation mark should advise the user of important operation or maintenance instructions in the accompanying documentation.

Devices bearing this symbol work with a „class 1 laser“ for tracing the CD. The built-in safety switches should prevent the user being exposed to dangerous laser light, which is invisible to the human eye, when the CD compartment is opened.
Under no circumstances should these safety switches be bypassed or manipulated, as this could result in a danger of exposure to the laser light.
Installation
GB
Please install the car radio as shown below
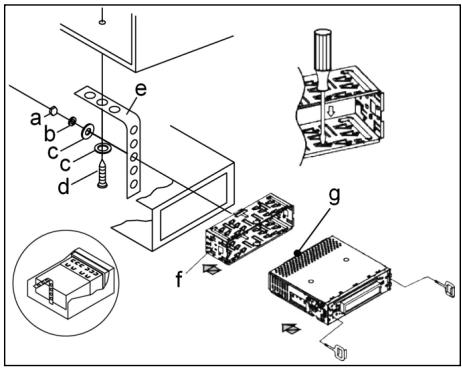
a Nut
b Spring washer
c Plain washer
d Screw
e Mounting bracket
f Slide-in housing
g Threaded bolt
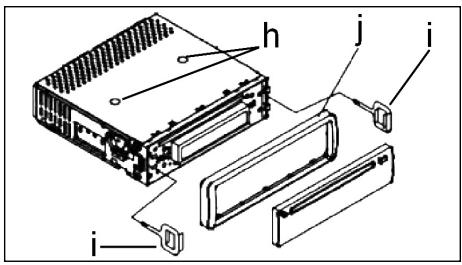
Note:
h Retaining screws during transport (please remove before installation)
I Extraction tool (spanner for dismantling)
j Frame

First place the operating panel in position on the right-hand side and then lock it into place on the left.
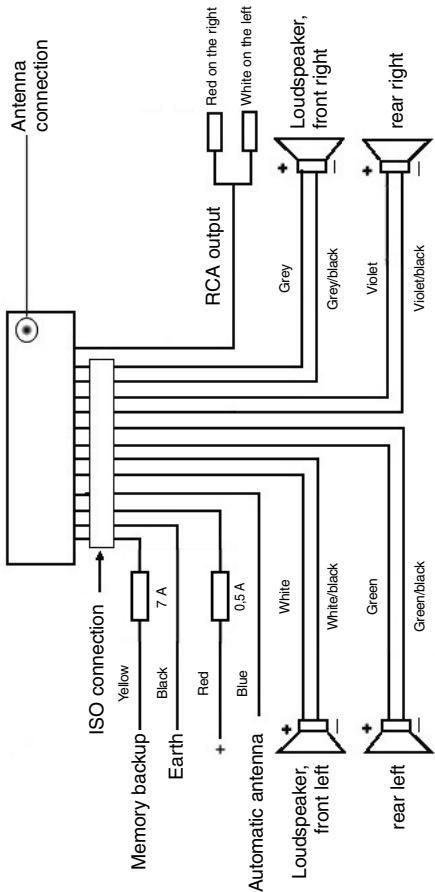
Connection
Connect the device as shown in the diagram.
Note
GB
- Do not attach the removable control panel until after connection of the cables.
- Please use loudspeakers with an impedance of 4 ohm.
Important Information for installing your carradio!
- For proper instalment of your car radio, please make sure that your car provides an original „ISO jacket". This is prepared as the counter part of the „ISO jacket" of your car radio.
Depending on the specific car type, different wiring connection of the Backup wire are available.
In these case please contact your authorized car dealer. (However, this is necessary for storing the radio stations).
- Depending on the specific car type, interferences can be possibly arise during radio/CD operation. These interferences can avoided easily with an additional Interferences filter. (Your car radio is originally prepared with an Interference Filter already).
In these case, please contact your authorized car dealer.
Precautionary Measures and Maintenance
- The screws (h) of the transport locking device should be removed before installation, as otherwise the CD cannot be inserted.
- The device is designed for the minus pole of the battery, which must be connected to the body of the vehicle. Please check this before installation.
- If the front control panel is removed while the radio or CD is on, the device is automatically switched off.
- Error. After the front panel has been reinserted an error message (ERROR) appears in the display. Use a piece of wire or similar item to press the RESET button (24) in order to return the electronics to its original state. When the operating panel is removed this button is to be found on the right next to the display.
- If the interior of the vehicle becomes very hot, for example after standing in direct sunlight for a prolonged period, do not switch on the player until the inside of the vehicle has cooled down a little after you have been driving for a few minutes.
- In order to keep the removable control panel in a safe place you should always use the protective case provided.
GB
Operation
1. REL Button
Press the REL button to remove the front operating panel.
2. +/- Button
During normal playback these buttons are used to set the volume. If the SEL button has been pressed beforehand these buttons can be used to make changes to the menus, for example the sound mode.
3. SEL Button (Select)
a) Press the SEL button briefly to access the selection menu of the sound mode. The letters „VOL“ appear in the display for setting the volume. By repeatedly pressing the SEL button you can now select the individual menu items such as VOLUME, BASS, TREBLE, BALANCE and FADER. The settings of the individual menu items are changed using the „+“ or „-“ button.
Note: If equaliser settings such as POP and ROCK have been selected under DSP it is not possible to adjust the BASS and TREBLE.
b) Press the SEL button for a longer time to access the selection menu TA SEEK/TA ALARM, MASK DPI/MASK ALL, DSP OFF, LOUD ON/OFF, BEEP ON/OFF, SEEK1/2, STEREO/MONO; LOCAL/DX; VOL LAST/ADJ. The letters „TA SEEK“ appear in the display. Repeatedly pressing of the SEL button now brings up the individual menu items. The settings of the individual menu items are changed using the "+" or "-" button.
A SEEK Menu (Traffic Announcement Station Search)
Select TA SEEK if you would like the radio to automatically search for a traffic announcement station when you select the TA function.
Select TA ALARM to bring up a warning message in the display as soon as you have set a station under the TA function which does not transmit traffic announcements.
- MASK DPI/ALL
This hides alternative frequencies (AF) during the search for a programme identification (PI).
MASK DPI: When the device is searching for the programme identification (PI) of a station the alternative frequencies with a different programme identification remain hidden.
MASK ALL: In the search for a programme identification (PI) alternative frequencies with a different programme identification and stations with a strong signal level without an RDS signal remain hidden.
DSP
In DSP mode you can select the equaliser settings POP M, ROCK M, CLASS M and FLAT M. Select DSP OFF to carry out your own adjustments. See also section 3a.
- LOUD ON/LOUD OFF
Switching the LOUDNESS function on and off.
When the volume is low the LOUDNESS function (LOUD) expands the sound characteristics by increasing the treble and bass sounds.
BEEP ON/OFF Confirmation Beep
You can select two types of confirmation beep when a button is pressed.
BEEP ON: The confirmation beep is heard whenever a button is pressed.
BEEP OFF: The confirmation beep is switched off.
- SEEK 1, SEEK 2 (only available during radio operation)
Seek function with the I< / I buttons during radio operation.
SEEK 1: Keep the I / I buttons pressed down and the radio will stop at the next station that is reached.
SEEK 2: As long as the I▶/▶I buttons are pressed down the search function will continue in the frequency band.
STEREO/MONO switching (only possible during radio operation)
- LOCAL/DX (only available during radio operation)
Your radio can receive RDS EON data. The term „EON“ signifies the transmission of additional station information within a station chain, e.g. WDR. If a traffic announcement (TA) is made within a station chain, the radio switches from a station which does not transmit traffic announcements to one that does within the same station chain. Reception of this station data is shown in the display by the EON symbol. You can choose between the EONTA LOCAL and EONTA DISTANCE mode for local or long-distance traffic news. The purpose of this function is to prevent the radio switching unnecessarily to an EON-TA traffic news item. If an EON station is a long distance away, it may be that in some cases EON TA information can still be received from the station. The radio then switches to this EON station and tries to receive the traffic announcements. The signal is too weak, however, and reception is poor as this EON station is too far away. Therefore the radio switches back to the station that was set previously.
During the type of operation described above the listener hears the wrong programme for a short time or nothing at all.
EONTA LOCAL:
This function prevents switching to an EON station whose signal is too weak. The radio does not switch to this station and the listener does not hear any interference.
EONTA DISTANCE Mode:
In this mode the EONTA circuitry tries to receive the EONTA information from any available transmitter and thus improve reception quality.
VOL LAST/VOL ADJ
VOL LAST: The radio switches on at the actual volume it had when it was last switched off.
GB
VOL ADJ: Using the + and - buttons you can pre-select a constant switch-on volume.
4. POWER Button
Press this button to switch the device on and off.
5. LCD (liquid crystal display)
6. BAND button
Press the BAND button briefly to switch between the three FM levels. The designation of the corresponding level - F1, F2 and F3 - is shown in the LCD.
7.8.1 / I Buttons TUNING, SEEK, TRACK, SKIP UP/DOWN
a) In radio mode:
Press the I<or button briefly to tune into a radio station manually.
Keep the I or button pressed down in order to start searching for a radio station.
See also the function SEEK 1 / SEEK 2.
b) In CD mode: Press the or button briefly to jump forwards or backwards. If you would like to scroll the titles of the tracks keep the or arrow button pressed.
9.ModeButton
Press this button to select the CD player or radio mode.
10. MUTE Button
Press the MUTE button to switch off the loudspeakers for a short time. Press this button again to cancel this function.
11. AP Button (Autostore - Automatic Station Storage)
In radio mode:
a) Memory function : Press the AP button for longer than one second to activate automatic station storage. The radio searches within the current frequency band, e.g. FM 1, for the strongest signal level until the search cycle has finished. The six strongest stations are then allocated to the corresponding storage locations.
The stations that have now been stored are played for approximately 5 seconds each and then the station of the first storage location is set. If you would like to search for more stations in the FM band, press the BAND button in order to change to the FM 2 or FM 3 band. Press the AP button again for more than one second in order to start the continued search.
b) Scan Function: After the AP button has been pressed briefly the radio plays all the pre-set stations in the current frequency band for a short time.
Note: The scan function ends automatically when it reaches the storage location from which it started.
AP button as a search function during MP3 playback
If the corresponding data were created when a CD was made in MP3 format, these can be searched for using the following functions:
a) Direct input of the track number for CDs in MP3 format:
- Press the AP button once. The letters „TRK SCH“ appear in the display.
- Press the SEL button once. The letters „TRK SCH 001“ appear in the display. The units place flashes.
- With the help of the + / - buttons it is now possible to put in a track number from 0 to 9 in the units place.
- Press the SEL button briefly once more. The tens place flashes. Proceed as described under 3 above.
- Press the SEL button briefly once more to put in a hundreds place if necessary.
- Press the SEL button for 1 second to complete entry of the track numbers. Immediately after this the selected track is played.
b) File search function for CDs in MP3 format:
- Press the AP button twice. „FILE SCH“ appears in the display.
- Press the SEL button briefly to show the first directory that has been selected in the display.
- Using the +/- buttons it is now possible to select the various directories on the CD.
- Press the SEL button for 1 second. The selected directory is played starting with the first song. Press the SEL button briefly and you can select a track in the directory using the +/- buttons.
- Complete entry of the titles by pressing the SEL button for 1 second. Immediately after this the selected track is played.
c) Keyword search function for CDs in MP3 format:
- Press the AP button three times. The letters "CHAR SCH" appear in the display.
- Press the SEL button briefly. The letter „A“ appears on the left of the display.
- By repeatedly pressing the + / - buttons you can now enter a letter from A to Z or a number from 0 to 9 in the first position of the display. Note: The following letters and numbers are entered from left to right.
- Press the SEL button briefly. An "A" appears in the second position of the display. Proceed as for the entry of numbers and letters as described under 3 above.
- Repeat the process described under 2 and 3 above until you have entered your search term. Note: The last entry can be deleted by pressing the AP button.
- Complete entry of the search term by pressing the SEL button for 1 second. Immediately after this the selected track is played. Note: It is not possible to guarantee that CDs created by the user can be played back due to the large variety of software and CD media available.
GB
During the normal playback of CDs in MP3 format the I< and I buttons can be used to move up or down one track. Station buttons 5 and 6 can be pressed to move up and down 10 tracks at a time.
12-17.Station buttons (1-6) of preselected stations and as 1TOP, 2INT, 3RPT and 4RDM buttons during CD operation
a) Radio Operation
Pressing these buttons briefly directly selects a preset radio station. If these buttons are pressed for more than one second, the station currently being listened to is stored under the selected station button.
b) CD/MP3 Operation
- Press the 1TOP button to interrupt playback of the CD (pause function). Press this button again to continue listening to the CD/MP3.
- Press the 2INT button. Each track on the CD is played for 10 seconds. Press this button again to stop searching. The currently selected track is played.
- Press the 3RPT button. The track currently being played is repeated. Press this button again to cancel this function.
-
Press the 4RDM button. The CD tracks are played at random. Press this button again to cancel this function.
-
TA Traffic Announcement (Priority for Traffic Information)
The TA function is activated by pressing the TA button briefly. The TA symbol appears in the display. During radio operation in one FM frequency band the search for a traffic announcement station is started automatically (TA SEEK). If an FM station is being received which transmits the latest traffic announcements from time to time, the TP display lights up.
When the TA function is switched on, the FM traffic announcements automatically interrupt CD operation. The volume level is increased to the minimum value for the transmission of traffic announcements. After the traffic announcement has finished, the programme that was previously running is resumed. Interruption of the TA Function:
If you would like to interrupt the current traffic announcement, press the TA button briefly. This does not switch off the TA mode.
- PTY Button - Selection of the Programme Type
Besides the station name, some FM stations also transmit information on the type of programme. This information can be displayed by your car radio.
Examples of such types of programme are:
SPORT
NEWS
POP
CLASSICS
With the PTY function you can specifically select stations transmitting a particular type of programme.
Press the PTY button once to access the PTY music group. The symbol „PTY“ appears in the display. Using the station buttons 1-6 you can now make a selection as follows:
| Press once | Press twice | |
| Station button 1 | POP M | ROCK M |
| Station button 2 | EASY M | LIGHT M |
| Station button 3 | CLASSICS | OTHER M |
| Station button 4 | JAZZ | COUNTRY |
| Station button 5 | NATION M | OLDIES |
| Station button 6 | FOLK M |
GB
Press the PTY button twice to access the PTY language group. Using the station buttons 1-6 you can now make a selection as follows:
| Press once | Press twice | Press three times | |
| Station button 1 | NEWS | AFFAIRS | INFO |
| Station button 2 | SPORT | EDUCATE | DRAMA |
| Station button 3 | CULTURE | SCIENCE | VARIED |
| Station button 4 | WEATHER | FINANCE | CHILDREN |
| Station button 5 | SOCIAL | RELIGION | PHONEIN |
| Station button 6 | TRAVEL | LEISURE | DOCUMENT |
Press the PTY button three times to switch this function off again.
When PTY has been selected the radio starts searching for corresponding PTY information and stops when the PTY information has been found. If the programme type being searched for is not found, "NONE PTY" appears in the display. If the PTY information being searched for no longer exists, the PTY function automatically switches to normal mode.
20. AF (Alternative Frequencies) REG Function
a) AF is a function that works with the help of RDS (Radio Data System) and can only be used with FM stations. The radio searches in the background for the best frequency reception of the station that has been tuned into. If the AF function has been switched on, the radio continuously tests the signal strength of the AF frequency. The test interval for each AF frequency depends on the signal strength of the current station and varies from a few minutes in the case of a strong signal to a few seconds in the case of weak signals. Whenever the new AF frequency is stronger than the station that is currently tuned in, the radio switches to this frequency for a short time and the message „NEW FREQUENCY“ is displayed for one to two seconds. As the mute time during the frequency change and the test time is very short, this is almost inaudible during the normal programme.
The AF function is activated by briefly pressing the AF button and the status of the AF function is shown in the display by an AF symbol.
- If the AF symbol appears in the display, the AF function is switched on and RDS transmission data is being received.
- If the AF symbol flashes in the display, the AF function is selected but no RDS signal can be received at the moment.
GB
- Press the AF button again to switch off this function. The AF symbol in the display goes off.
b) REG Function
At certain times some stations divide up their programmes into regional programmes with varying content.
- REG ON: If the AF button is pressed for a longer time the regional mode is switched on. The message "REG ON" appears in the display for a few seconds.
Note: The display capacity is limited. It is possible that in the double display mode some segments of the display are deleted.
The function REG ON prevents the radio from switching to alternative frequencies which have a different regional programme content.
- REG OFF: Pressing the AF button again for a longer time switches off the regional mode. The message „REG OFF" appears in the display for a few seconds.
The programme identification (PI) of the regional programme is ignored during the search for an alternative frequency (AF) or a programme identification (PI).
21 CD Slit
22. Eject Button (EJECT)
Press this button to eject the CD.
23. Flashing LED (not shown)
When the front control panel is removed this display flashes.
24. RESET Button (not shown)
Press this button to reset the programme on which there is interference. With the control panel removed the button is to be found on the right next to the display.
Technical data
GB
General
Supply voltage
DC 13.8 V
Power consumption
max. 7 A
Power
4×30W
FM band
Frequency range
87.6 MHz to 108.0 MHz
Effective sensitivity
3 uV.
I.F. frequency
10.7 MHz
Output Power
Output
at CD max. 1200mV
CD player
System
CD device
Suitable CDs
CD/CDR/CDRW/MP3 disks
Number of quantising bits
1 bit
Signal format
Sampling frequency 44.1 KHz
Frequency characteristics
20-100Hz≤5dB
Signal-to-noise ratio
10K-20KHz≤5dB
Number of channels
50 dB (1 KHz)
Housing dimensions
2 stereo channels
178 x 50 x 165 (W x H x D)
GB
Troubleshooting
Before going through the checklist please make all the connections first. If you still have questions after going through the checklist, please consult your local customer service representative.
| Fault Symptoms | Cause | Solution |
| CDs are drawn only half way into the CD tray. | The transport screws have not been removed. | Remove the transport screws. |
| After being inserted into the device the CD or cassette does not turn. | The volume control is set too low. | Turn up the volume. |
| The device has not been correctly connected. | Check the +12V and earth connection. | |
| The sound of the CD player „jumps“. | The surface of the road is uneven. | Wait until the road becomes smoother before playing the CD. |
| The device is not firmly installed. | Install the device firmly. Ensure that the rear attachment is used if the vehicle does not have any suitable retainer for the rear section of the device. | |
| The CD is damaged. | Try another CD. If this works correctly, the first CD is probably damaged. | |
| The CD is dirty. | Clean the CD. | |
| There is no power. | The ignition is switched off. | Turn the ignition key to "ON" or "ACC". |
| The fuse has blown. | Replace the fuse by another 7A fuse. | |
| The device does not work correctly (EJECT, LOAD, PLAY). | The microcomputer has been interfered with by electromagnetic fields. | Remove the CD or cassette and reinsert it. Switch the device off and on again. |
| No radio reception. | The antenna cable is not connected. | Insert the antenna cable firmly into the antenna socket of the device. |
| In automatic search mode the radio does not stop at a transmitting station. | The transmission signals are too weak. | Tune in to a radio station manually. |
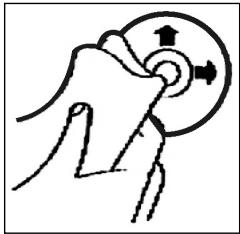
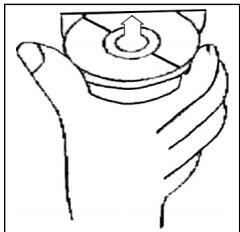
Playing a CD
Cleaning the CD
Before playing a CD, wipe it off with a clean, dust-free cleaning cloth. Pull out the CD in the direction of the arrow.
Note: Do not use any solvents such as petrol or thinning agents. Commercially available cleaning substances or antistatic sprays will damage the device.
Inserting the CD
If the CD is inserted with the printed side facing downwards, the device may be damaged.
Always insert the CD with the label facing upwards.
Note: If there is already a CD in the CD slit, do not try to insert a second CD. This may damage the device.
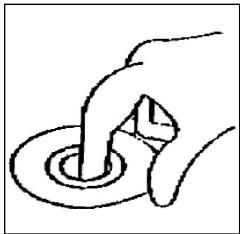
Touching the CD
Always hold CDs by the edge. In order to keep the CD clean do not touch the surface.
- Do not attach any stickers or adhesive tape to the CD.
- Do not expose the CD to direct sunlight or sources of heat such as heating pipes. Do not leave CDs in the car if it is parked in direct sunlight as this will lead to a considerable rise in the temperature inside the car.
This device has been tested according to all relevant current CE guidelines, such as electromagnetic compatibility and low voltage directives, and has been constructed in accordance with the latest safety regulations.
Subject to technical changes without prior notice!
GB
Guarantee
The device supplied by our Company is covered by a 24 month guarantee starting on the date of purchase (receipt).
During the life of the guarantee any fault of the device or its accessories *) ascribable to material or manufacturing defects will be eliminated free of charge by repairing or, at our discretion, by replacing it. The guarantee services do not entail an extension of the life of the guarantee nor do they give rise to any right to a new guarantee!
Proof of the guarantee is provided by the proof of purchase. Without proof of purchase no free replacement or repair will be carried out.
If you wish to make a claim under the guarantee please return the entire machine in the original packaging to your dealer together with the receipt.
- Damage to accessories does not mean automatic free replacement of the whole machine. In such cases please contact our hotline. Broken glass or breakage of plastic parts are always subject to a charge.
Defects to consumables or parts subject to wearing (e.g. motor pistons, kneading blades, drive shafts, spare remote control, spare toothbrushes, saw blades, etc.) as well as cleaning, maintenance or the replacement of said parts are not covered by the guarantee and hence are to be paid!
The guarantee lapses in case of unauthorized tampering.
After the expiry of the guarantee
After the expiry of the guarantee repairs can be carried by the competent dealer or repair service against the payment of the ensuing costs.
87,6 MHz do 108,0 MHz
3 uV
10,7 MHz
Moc na wyjsciu
wyjscie
