
H2 - Enregistreur audio portable ZOOM - Notice d'utilisation et mode d'emploi gratuit
Retrouvez gratuitement la notice de l'appareil H2 ZOOM au format PDF.

| Type de produit | Enregistreur audio portable |
| Marque | ZOOM |
| Modèle | H2 |
| Dimensions | 63,5 x 110 x 32 mm |
| Poids | 110 g |
| Alimentation | 2 piles AA (alcalines recommandées) ou adaptateur secteur 9 V DC / 300 mA (ZOOM AD-0006) |
| Modes d'enregistrement | Stéréo (2 canaux) et 4 canaux |
| Microphones intégrés | Micro stéréo W-XY, 3 motifs : FRONT 90°, REAR 120°, SURROUND 2CH/4CH |
| Entrées | Entrée micro externe (mini-jack stéréo, alimentation plug-in 2,5 V), entrée ligne (mini-jack stéréo) |
| Sorties | Casque/sortie ligne (mini-jack stéréo) |
| Formats de fichier | WAV (16/24 bits, 44,1/48/96 kHz) et MP3 (48-320 kbps, VBR) |
| Support d'enregistrement | Carte SD/SDHC (16 Mo à 4 Go) |
| Fonctions principales | Tuner chromatique/guitare/basse, métronome, AGC/compresseur/limiteur, filtre coupe-bas, enregistrement auto, pré-enregistrement, marqueurs, normalisation, conversion MP3, interface audio USB |
| Affichage | Écran LCD 128 x 64 points avec rétroéclairage |
| Connectivité | USB 2.0 Full Speed (mode stockage de masse et interface audio) |
| Autonomie (piles) | Environ 4 h en enregistrement, 4,5 h en lecture |
| Entretien et nettoyage | Utiliser un chiffon doux et sec. Ne pas utiliser de produits abrasifs ou de solvants. |
| Sécurité | Éviter les températures extrêmes, l'humidité, la poussière et les chocs. Utiliser l'adaptateur secteur spécifié. Retirer les piles en cas d'inutilisation prolongée. |
| Pièces détachées et réparabilité | Piles et carte SD remplaçables. Mise à jour du firmware possible via carte SD. |
| Informations générales | Notice disponible en téléchargement. Enregistreur portable adapté à la musique, aux réunions et aux prises de son sur le terrain. |
FOIRE AUX QUESTIONS - H2 ZOOM
Questions des utilisateurs sur H2 ZOOM
0 question sur cet appareil. Repondez a celles que vous connaissez ou posez la votre.
Poser une nouvelle question sur cet appareil
Téléchargez la notice de votre Enregistreur audio portable au format PDF gratuitement ! Retrouvez votre notice H2 - ZOOM et reprennez votre appareil électronique en main. Sur cette page sont publiés tous les documents nécessaires à l'utilisation de votre appareil H2 de la marque ZOOM.
MODE D'EMPLOI H2 ZOOM
Handy Recorder
H2
Operation Manual
200m
© ZOOM Corporation
Reproduction of this manual, in whole or in part, by any means, is prohibited.
SAFETY PRECAUTIONS / Usage Precautions
SAFETY PRECAUTIONS
In this manual, symbols are used to highlight warnings and cautions for you to read so that accidents can be prevented. The meanings of these symbols are as follows:

This symbol indicates explanations about extremely dangerous matters. If users ignore this symbol and handle the device the wrong way, serious injury or death could result.

This symbol indicates explanations about dangerous matters. If users ignore this symbol and handle the device the wrong way, bodily injury and damage to the equipment could result.
Please observe the following safety tips and precautions to ensure hazard-free use of the H2.

Power requirements
Since power consumption of this unit is fairly high, we recommend the use of an AC adapter whenever possible. When powering the unit from batteries, use only alkaline types.
[AC adapter operation]
- Be sure to use only an AC adapter which supplies 9 V DC, 300mA and is equipped with a "center minus" plug (Zoom AD-0006). The use of an adapter other than the specified type may damage the unit and pose a safety hazard.
- Connect the AC adapter only to an AC outlet that supplies the rated voltage required by the adapter.
- When disconnecting the AC adapter from the AC outlet, always grasp the adapter itself and do not pull at the cable.
- During lightning or when not using the unit for an extended period, disconnect the AC adapter from the AC outlet.
[Battery operation]
- Use two conventional IEC R6 (size AA) batteries (alkaline).
- The H2 cannot be used for recharging.
- Pay close attention to the labelling of the battery to make sure you choose the correct type.
- When not using the unit for an extended period, remove the batteries from the unit.
- If battery leakage has occurred, wipe the battery compartment and the battery terminals carefully to remove all remnants of battery fluid.
- While using the unit, the battery compartment cover should be closed.
![ZOOM H2 - [Battery operation] - 1](/content/2025/01/152219/images/348f2c7657782c1a75d3e6fde177401176bd3761e1405d9de771736605741938.jpg)
Environment
To prevent the risk of fire, electric shock or malfunction, avoid using your H2 in environments where it will be exposed to:
- Extreme temperatures
- Heat sources such as radiators or stoves
High humidity or moisture
- Excessive dust or sand
- Excessive vibration or shock

Handling
- Never place objects filled with liquids, such as vases, on the H2 since this can cause electric shock.
- Do not place naked flame sources, such as lighted candles, on the H2 since this can cause fire.
- The H2 is a precision instrument. Do not exert undue pressure on the keys and other controls. Also take care not to drop the unit, and do not subject it to shock or excessive pressure.
- Take care that no foreign objects (coins or pins etc.) or liquids can enter the unit.

Connecting cables and input and output jacks
You should always turn off the power to the H2 and all other equipment before connecting or disconnecting any cables. Also make sure to disconnect all connection cables and the power cord before moving the H2.

Alterations
Never open the case of the H2 or attempt to modify the product in any way since this can result in damage to the unit.

Volume
Do not use the H2 at a loud volume for a long time since this can cause hearing impairment.
Usage Precautions
Electrical interference
For safety considerations, the H2 has been designed to provide maximum protection against the emission of electromagnetic radiation from inside the device, and protection from external interference. However, equipment that is very susceptible to interference or that emits powerful electromagnetic waves should not be placed near the H2, as the possibility of interference cannot be ruled out entirely.
With any type of digital control device, the H2 included, electromagnetic interference can cause malfunctioning and can corrupt or destroy data. Care should be taken to minimize the risk of damage.
Cleaning
Use a soft, dry cloth to clean the H2. If necessary, slightly moisten the cloth. Do not use abrasive cleanser, wax, or solvents (such as paint thinner or cleaning alcohol), since these may dull the finish or damage the surface.
Please keep this manual in a convenient place for future reference.
Contents
SAFETY PRECAUTIONS / Usage Precautions 2
What the H2 Can Do 5
Parts of the H2 8
Getting Connected 10
Operation on Battery Power 11
About SD Cards 11
Recording 12
Setup 12
Power-on 13
Selecting the operation mode 14
Setting the input sensitivity and recording level 15
Recording and playback 17
Power-off 17
Stereo Mode Recording 18 About the stereo mode 18
Setup example (1): Built-in mics 19
Setup example (2): External mic 20
Setup example (3): External component 20
Selecting the mic pattern for the built-in mics 21
Recording 23
Playback 25
4-Channel Mode Recording 27
About the 4-channel mode 27
Setup examples 29
Recording 29
Playback 31
Adjusting the front/rear/left/right balance (3D panning) 32
Convenient Recording Functions 35
Selecting the recording mode 35
Using the AGC/compressor/ limiter function 37
Attenuating the low frequencies 38
Using the auto record function 39
Using the pre-record function 42
Recording a stereo signal in mono (stereo mode only) 43
ConvenientPlayback Functions 45
Selecting the play mode 45
Using the A-B repeat function 46
File Operations 47
Files and folders 47
Selecting a folder (stereo mode only) 48
Selecting a file 48
Viewing file information 49
Assigning a name to a file (stereo mode only) 50
Deleting a file 52
Dividing a file (stereo mode only) 53
Raising the overall file level (normalize function) 54
Converting a WAV file into an MP3 file (stereo mode only) 55
Converting a 4-channel file pair to a stereo file (4-channel mode only) 57
Checking the mark list 59
SD Card Operations 60
Checking the remaining time on the card. 60
Formatting a card 61
SD card dropout errors 62
Tuning an Instrument 63
Using the chromatic tuner 63
Using the dedicated guitar/ basstuner 64
Adjusting the reference pitch of the tuner 66
Using the Metronome Function 67
Switching the metronome /pre-count on and off 67
Making metronome/ pre-count optional settings 69
Connecting the H2 to a Computer ....71
Using the H2 as a card reader 71
Using the H2 as an audio interface ....73
Other Functions 78
Setting the date and time 78
Using the monitor function. 79
Supplying power to an external mic (stereo mode only) 80
Adjusting the display contrast 81
Controlling the backlight on/off setting 82
Specifying the battery type 83
Making settings for the key hold function 84
Updating the system software. 84
Specifications 86
Troubleshooting 88
Error Messages 89
Index 90
- Windows, Windows XP, and Windows Vista are registered trademarks of Microsoft Corporation.
- Macintosh and MacOS are registered trademarks of Apple.
- The SD symbol and SDHC symbol are trademarks.


- The use of MPEG Layer-3 audio compression technology is licensed from Fraunhofer IIS and Sisvel SpA.
- All other trademarks, product names, and company names mentioned in this documentation are the property of their respective owners.
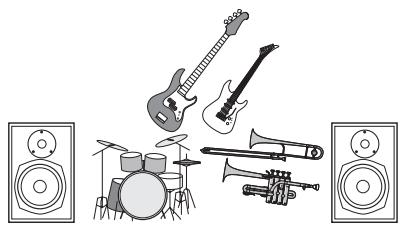
What the H2 Can Do
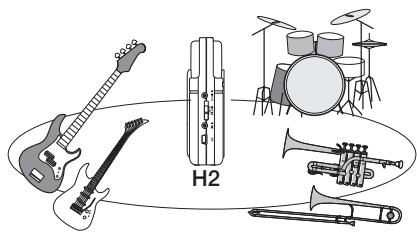
Thank you for selecting the ZOOM Handy Recorder H2 (subsequently referred to simply as the "H2"). The H2 is a nifty SD card based recorder with two operation modes for 2-channel (stereo) or 4-channel recording. This section describes the main features of this product.
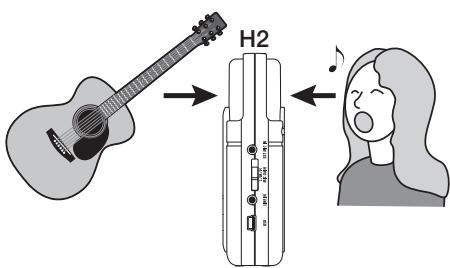
Stereo mode recording ( p. 12, p. 18)
In stereo mode, you use the built-in mics or another source such as an external mic or a CD player to record a 2-channel stereo signal.
Using the built-in mics
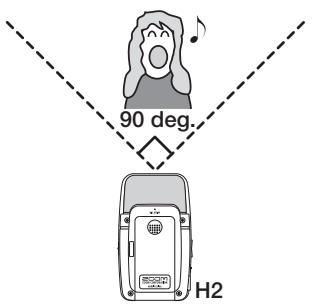
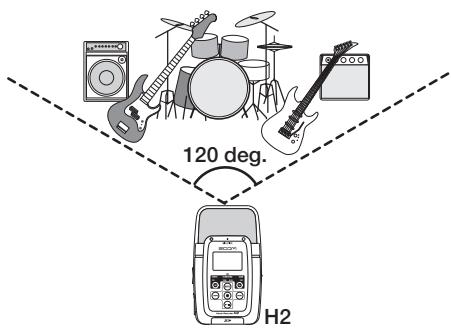
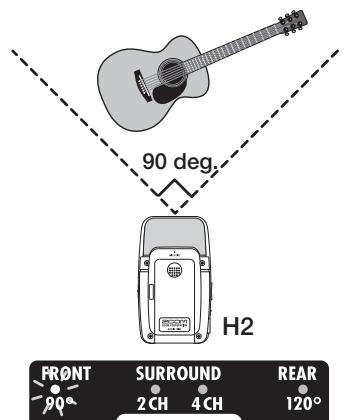
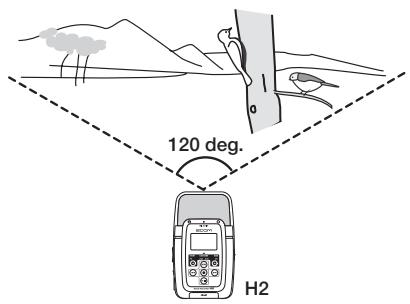
The built-in mics allow you to record sound coming either from the front panel or the rear panel direction of the unit. The directivity angle covered by the mics is fixed to 90 degrees for the front side mics and 120 degrees for the rear side mics. Choose the side that is best suited for a given recording situation. Some examples for using the built-in mics are shown below.
- Solo vocals or a single instrument
Point the front panel of the H2 towards the sound source. The 90 degree directivity angle will help in excluding unwanted sounds.
- Recording a band or capturing sounds in the field
Point the rear panel of the H2 towards the
sound source. The 120 degree directivity angle will help in capturing the ambience of the venue.
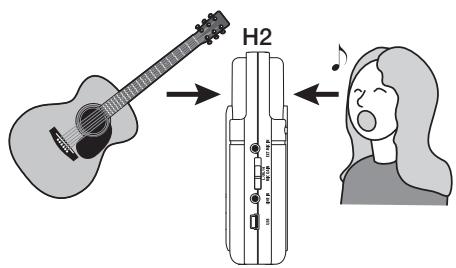
Recording front and back simultaneously
By positioning the H2 upright, it is possible to record sound coming both from the front and back of the unit.
This is great for a conversation between two people or recording an instrument and a singer facing each other.
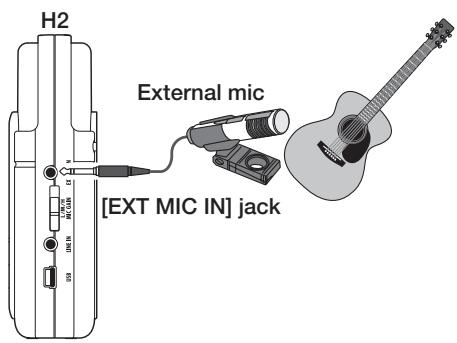
Using an external mic
Simply connect the microphone to the [EXT MIC IN] jack and place it near the sound
source. If a mono mic is used, only the left channel signal will be recorded.
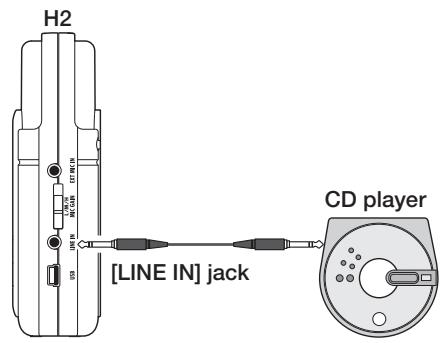
■Recording other external sources
The [LINE IN] jack lets you connect a CD player or other external component, for easy line recording of its output signal.
4-channel mode recording ( .27)
In 4-channel mode, the built-in mics pick up sources in stereo both from the front and rear panel direction and create a 4-channel recording. The front/back/left/right level balance can be adjusted later, and for playback the result can be mixed into a 2-channel (stereo) signal.
Audio files created in 4-channel mode can also serve as source material for a surround sound encoder. This makes it possible to produce surround sound audio that can be played on a home entertainment type 5.1ch surround sound system.
Recording a band rehearsal
When the members of the band are facing each other, the H2 can be placed in the middle to record sound coming from the front and rear.
The 4-channel content is mixed into 2 channels (stereo) for playback.
The front/back/left/right balance can easily be adjusted after the recording is made.

Field recording
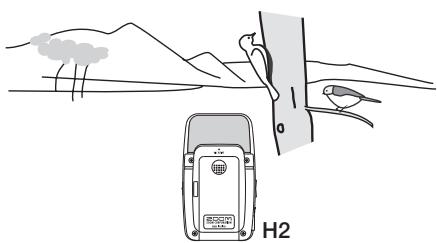
Position the H2 upright and have the front panel face the main sound source.
Metronome function ( p. 67)
The built-in metronome function of the H2 is convenient for use as a guide rhythm during recording. During playback, the metronome sound can be turned off. Another useful application of the metronome is for providing a pre-count before recording.
Tuner function ( p. 63)
The tuner function of the H2 makes it easy to tune instruments anywhere. Besides the universally applicable chromatic tuning, standard tuning for guitar and bass as well as various special tuning modes are also available.
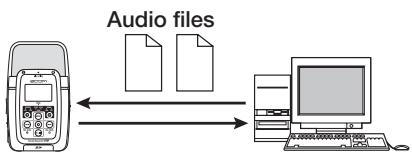
Exchanging audio files between a computer and the H2 ( p. 71)
You can copy files that you have recorded on the H2 to a computer, for processing with waveform editor software or burning to CD. Copying edited files back to the H2 for playback is also a cinch.
Use as audio interface ( p. 73)
The H2 can serve as audio interface for a computer, letting you directly record the input signal of the H2 on the computer, or play the computer output signal via the H2.

File operations ( p. 47)
Audio files stored on SD card can be deleted, split into multiple files, and various information about the files can be displayed.
SD card operations ( p. 60)
You can initialize SD cards in the H2 and check how much recording time is left on a card.
Parts of the H2
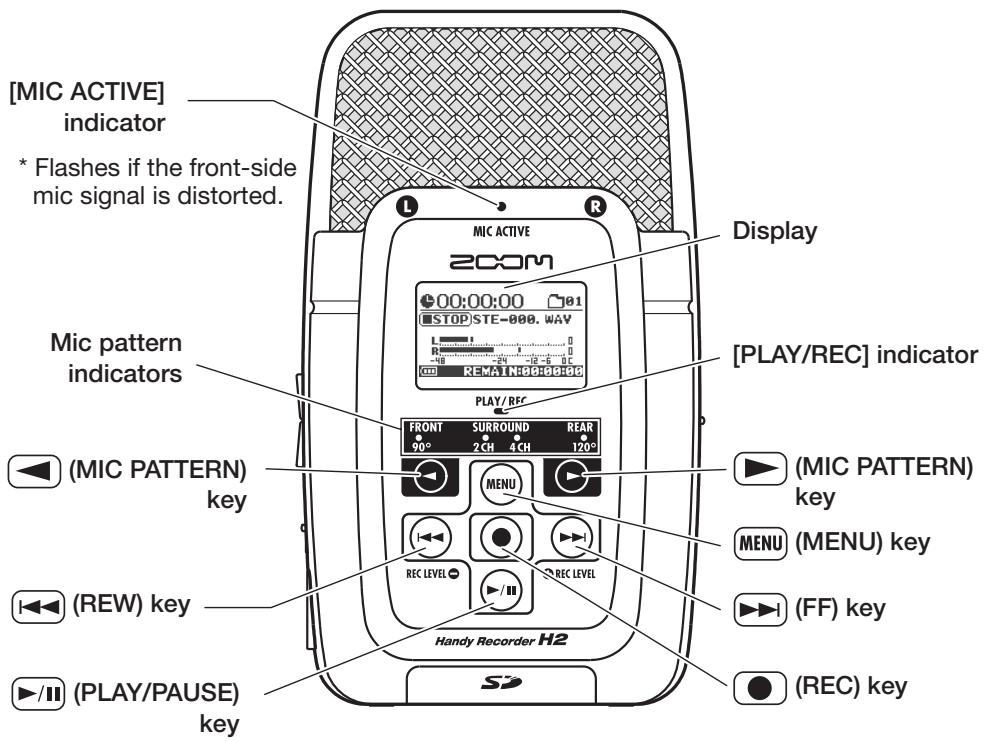
Front panel
Internal clock date/time setting
The H2 has an internal clock that is used for time stamping of files created during recording. When you turn the H2 on for the first time, a message asking you to set the date/time appears. Follow the instructions in the section "Setting the date and time" on page 78.
Note that if you skip this step, the clock will be set to the default (2007/01/01).
Getting Connected
Make connections to other equipment such as microphones and audio components as shown below.
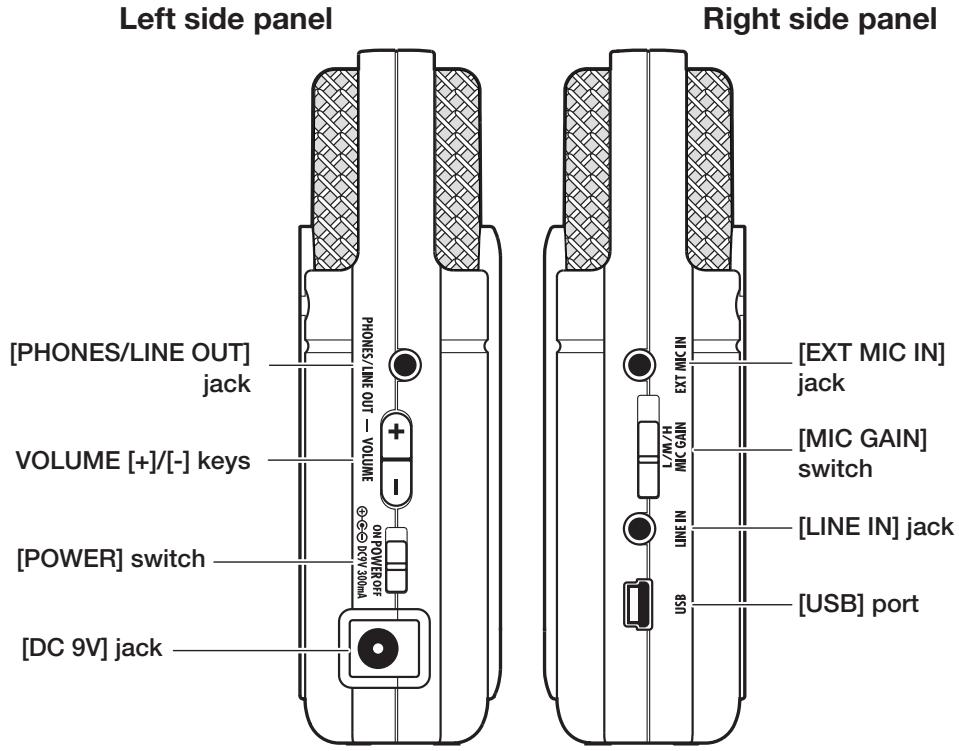
To monitor the output of the H2 using a stereo system, connect a Y cable to the [PHONES/LINE OUT] jack (stereo mini phone jack) and adjust the volume with the VOLUME [+] /[-] keys.
To use an external microphone, connect the mic to the [EXT MIC IN] jack (stereo mini phone jack). Plug-in power type microphones are also supported (p.80).
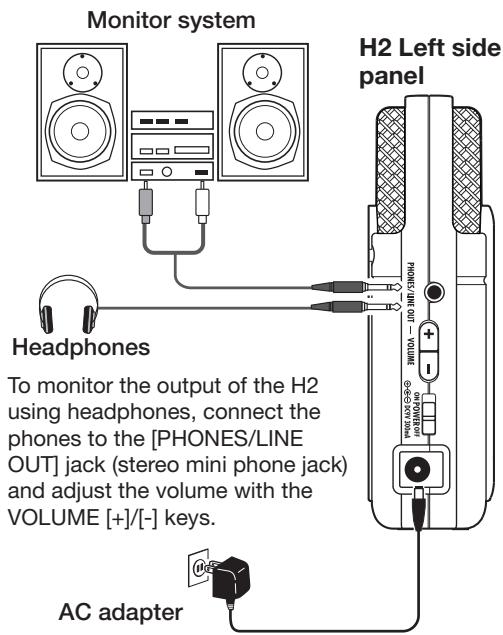
To operate the H2 on AC power, be sure to use only the supplied AC adapter. Using a different adapter can lead to damage.
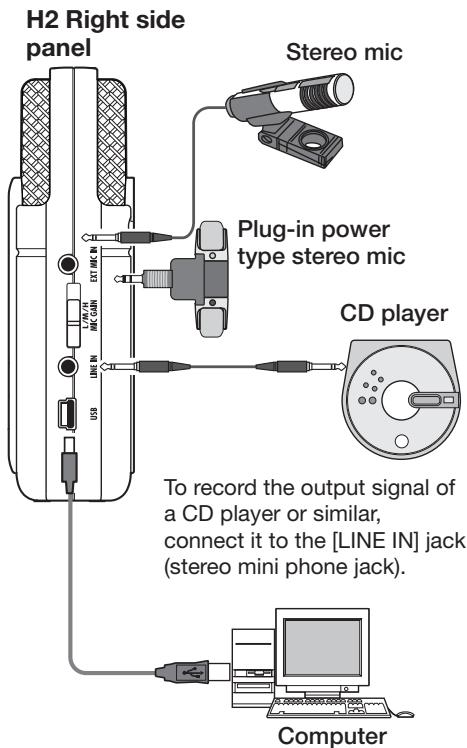
When the H2 is connected to a computer via the [USB] port (mini USB), it can be used as audio interface for the computer, and audio files stored on the SD card in the H2 can be transferred to the computer.
NOTE
- To use the built-in mics, disconnect any equipment from the [EXT MIC IN] jack or [LINE IN] jack. If anything is connected to these jacks, the built-in mics are deactivated.
- If equipment is connected both to the [EXT MIC IN] jack and [LINE IN] jack, the [LINE IN] jack has priority.
Operation on Battery Power
The H2 can be powered from batteries which must be purchased separately. Insert the batteries as follows.
1. Open the battery compartment cover.
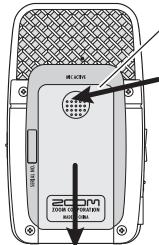
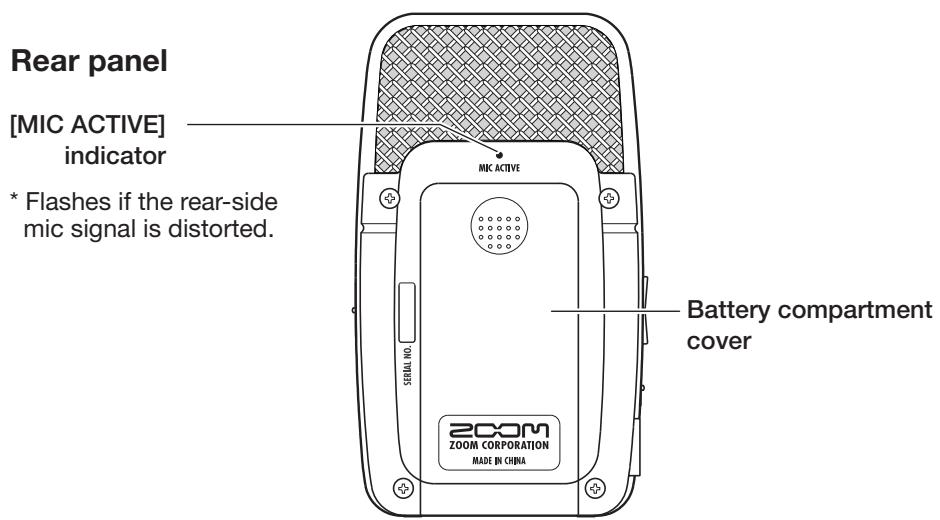
H2 rear panel
(2) Slide downwards
Battery compartment cover
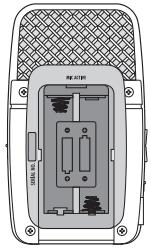
(1) Press the receded section

2. Insert two IEC R6 (size AA) batteries.
HINT
Use alkaline/oxyride batteries or rechargeable nickel-hydride batteries.
3. Close the battery compartment cover.
NOTE
- When the unit is operated on batteries, the indication "Low Battery!" will appear on the display when the batteries are exhausted. In this case, turn the unit off and replace the batteries as soon as possible with fresh ones.
- When the unit is operated on batteries, do not open the battery compartment cover while the unit is on, because this will cut power and may lead to data loss.
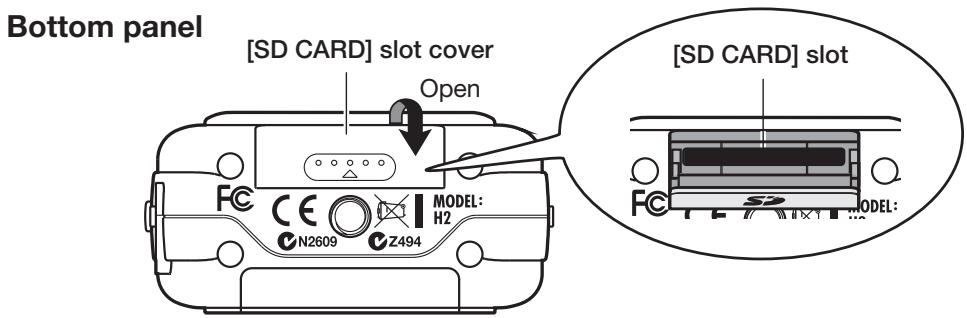
About SD Cards
For using the H2, an SD card is required as a recording medium. Before turning power to the H2 on, insert the card into the [SD CARD] slot as shown here.
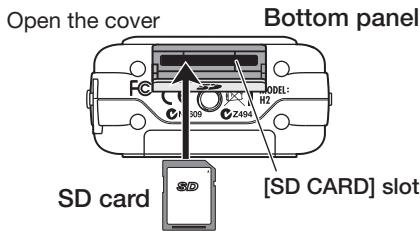
Push the card fully into the slot until it locks into place. To remove the card, give it a light push inwards, causing it to pop up slightly, then pull it out.
NOTE
- If the SD card is inserted with wrong orientation, it will not go all the way into the slot.
- Never insert or remove the SD card while power to the H2 is on. Otherwise data can be destroyed.
- You can use off-the-shelf SD cards with a capacity from 16 MB to 2 GB. 4 GB SD HC cards can also be used.
- When you attempt to perform a function requiring the SD card while no card is inserted, the indication "No Card" appears on the display.
Recording
This section shows how you can try out the H2 straight away by doing some recording. The steps are for using the stereo mode (2-channel recording) with the built-in mics.
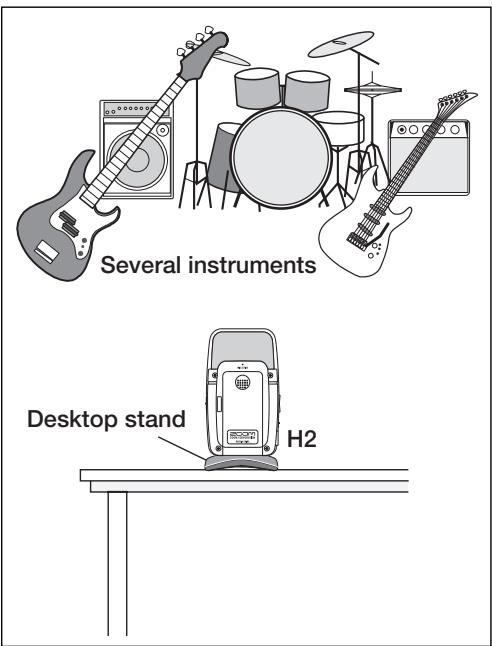
Setup
Place the H2 at a suitable position for the sound source to be recorded. The sound can be coming either from the front or the rear of the H2, but the recording angle will be different (front: 90 degrees, rear: 120 degrees). In this example, we will use the front-facing position.
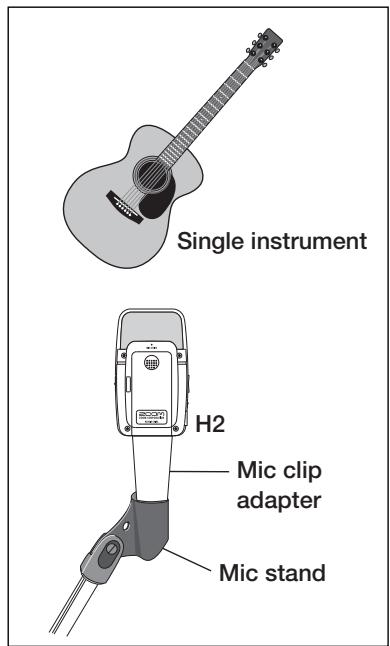
Use the supplied desktop stand to place the H2 on a table or other flat surface. Alternatively, you can use the supplied mic clip adapter to mount the H2 on a mic stand.
Power-on
Use the following procedure to turn the H2 on.
1. Insert a SD card into the H2.
Verify that power to the H2 is off. Then insert the SD card into the [SD CARD] slot ( p.11)
Verify that a monitor system or headphones are connected to the [PHONES/LINE OUT] jack of the H2.
HINT
When using an external monitor system, make sure that the volume is fully turned down and power is off.
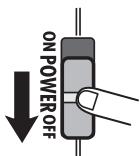
2. Turn power on in the order H2 → monitor system.
To turn the H2 on, slide the [POWER] switch into the ON position. Next, turn power to the monitor system on and adjust the volume.

NOTE
- If the indication "No Card" appears when you turn the H2 on, no SD card was detected. Make sure that the SD card is inserted properly.
- If the indication "Format Card?" appears when you turn the H2 on, the inserted SD card has not been initialized. To initialize (format) the card, use the (REW)/(FF) keys to move the cursor to "YES" and press the (REC) key.
When the H2 starts up, the following screen is shown.

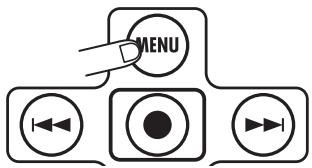
This is called the "top screen". From here, you can access the various functions of the H2. If another screen is currently shown, press the (MENU) key repeatedly until the above screen appears.
HINT
The top screen will look slightly different, depending on the currently selected mode (stereo mode or 4-channel mode).
The H2 has an internal clock that is used for time stamping of files created during recording. When you turn the H2 on for the first time, a message asking you to set the date/time appears. Follow the instructions in the section "Setting the date and time" on page 78.
NOTE
If you skip this step, all files will be time stamped with the default "2007/01/01".
Selecting the operation mode
The H2 has two operation modes: stereo mode for 2-channel recording, and 4-channel mode. In this example, we will select the stereo mode.
1. Verify that the top screen is being shown.

If another screen is currently shown, press the (MENU) key repeatedly until the top screen appears.
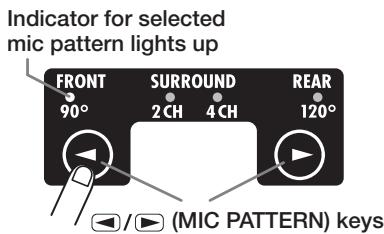
2. Select the mic pattern.
The "mic pattern" is a setting which specifies whether sound is to be picked from the front or rear and how wide the directivity angle should be. When you switch the mic pattern, the appropriate operation mode is automatically chosen.
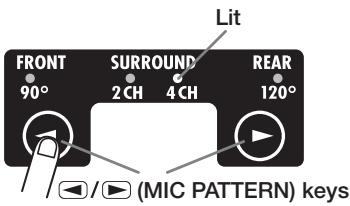
To switch the mic pattern, use (MIC PATTERN) keys. The currently selected pattern is shown by the mic pattern indicators.
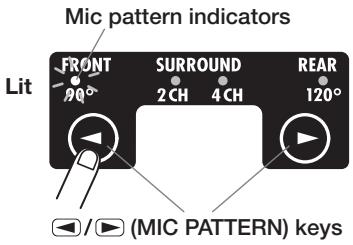
Select FRONT 90 (stereo recording of sound coming from the front, using a 90-degree angle) or REAR 120 (stereo recording of sound coming from the rear, using a 120-
FRONT 90
Stereo recording of sound sources located in front of the H2, within a 90-degree range

REAR 120
Stereo recording of sound sources located in rear of the H2, within a 120-degree range
degree angle), depending on the width of the sound source and the distance to it. For details on mic patterns, see page 21.
When one of the above mic patterns is chosen, the operation mode automatically becomes stereo (2-channel).
NOTE
When the H2 is in the playback, recording, or recording standby condition, or when something is connected to the [EXT MIC IN] jack or [LINE IN] jack, the mic pattern setting cannot be changed.
HINT
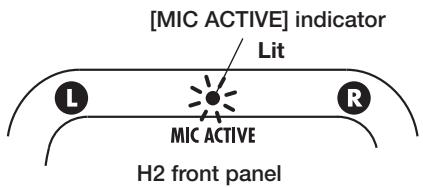
- The [MIC ACTIVE] indicator on the front panel and rear panel of the H2 shows which mic is currently selected.
- If the sound level as picked up by the front or rear mics is too high, causing signal distortion, the respective [MIC ACTIVE] indicator flashes.
Setting the input sensitivity and recording level
For best results, the input sensitivity and the recording level must be set to appropriate values.
1. Set the sensitivity of the built-in mics.
Setting the input sensitivity means adjusting the gain of the input section of the H2, so that the signal from the built-in mics or from the [EXT MIC IN] jack can be recorded with minimal noise and distortion.
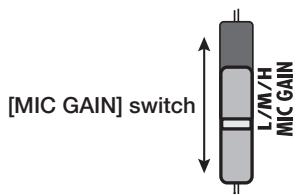
The [MIC GAIN] switch on the right side panel of the H2 is used for setting the input sensitivity.
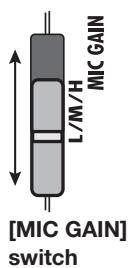
H Use this position if the sound source is at a distance from the H2 or if its level is low.
M Use this position for recording an acoustic guitar or other instruments with relatively low volume.
Use this position if the sound source is close to the H2 or if you are recording a band performance or other loud sound source.
When you change the position of the [MIC GAIN] switch, the new setting will be shown on the display for about two seconds (for example "MIC GAIN LOW").
Select the position of the [MIC GAIN] switch so that the [MIC ACTIVE] indicator on the front panel or rear panel does not flash when the volume of the sound source is at maximum. If the indicator flashes, the recording will be distorted.

2. Set the H2 to the recording standby condition and adjust the recording level.
Adjusting the recording level means adjusting the level of the signal as recorded on the SD card. To do this, verify that the stereo mode top screen is shown, and press the (REC) key.

The H2 is now in the recording standby condition and the [PLAY/REC] indicator on the front panel flashes in red.

The input signal level is shown by the level meters on the display, and the sound of the input signal can be monitored via the [PHONES/LINE OUT] jack.
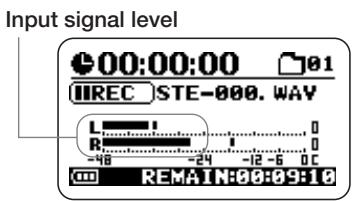
To adjust the recording level, use the (REW)/FF) keys.

When you press either of these keys once, the current recording level setting is shown on the display.
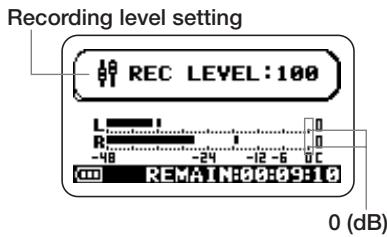
When you continue to press the key, the recording level changes. Set the level as high as possible but so that the meter indication does not exceed 0 (dB) during the loudest passages. The setting range is 0 - 127.
3. Cancel the recording standby condition.
To cancel the recording standby condition, press the / u (PLAY/PAUSE) key.

Recording and playback
The steps for recording and playback are as follows.
1. Set the H2 to the recording standby condition.
With the stereo mode top screen shown on the display, press the (REC) key to set the H2 to recording standby.
2. Start recording.
Press the (REC) key once more. The [PLAY/REC] indicator on the front panel is now constantly lit in red, and the counter on the display indicates the progress of the recording.
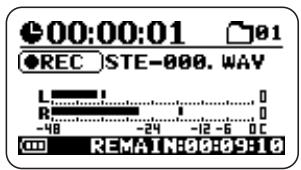
3. Stop recording.
To stop recording, press the (REC) key. The [PLAY/REC] indicator goes out. When you stop recording, the counter of the H2 returns to the beginning, and you can start playback from that point.
4. Check the recording.
To check the recorded content, press the () (PLAY/PAUSE) key. During playback, the [PLAY/REC] indicator is lit in green. Press the key once more to stop playback.
Power-off
Use the following procedure to turn the H2 off.
- Turn the volume of the monitor system down.
2. Turn power off in the order monitor system H2.
After verifying that the monitor system is off, turn the H2 off by sliding the [POWER] switch into the OFF position.
The indication "GoodBye See You!" is shown briefly on the display before the unit goes off. All settings and other information are automatically stored on the SD card at this point.
NOTE
Always use the [POWER] switch to turn the H2 on and off. Never disconnect the AC adapter while power is on because this can lead to data loss.
Stereo Mode Recording
This section explains in detail how to record in stereo mode.
About the stereo mode
In stereo mode, the signal from the built-in mics, an external mic, a CD player or other external component is recorded on two channels as a stereo signal. When the H2 is in stereo mode, the operation steps are as follows.
- Recording the signal from the built-in mics
Select a mic pattern (recording direction and angle) other than SURROUND 4CH. (For details on mic patterns, see page 21.) To do this, use the l (MIC PATTERN) keys to cause an indicator other than SURROUND 4CH to light up.
- Recording the signal from an external mic or an external component
Connect the device to the [EXT MIC IN] jack or [LINE IN] jack. When a cable is plugged into one of these jacks, the built-in mics are turned off.
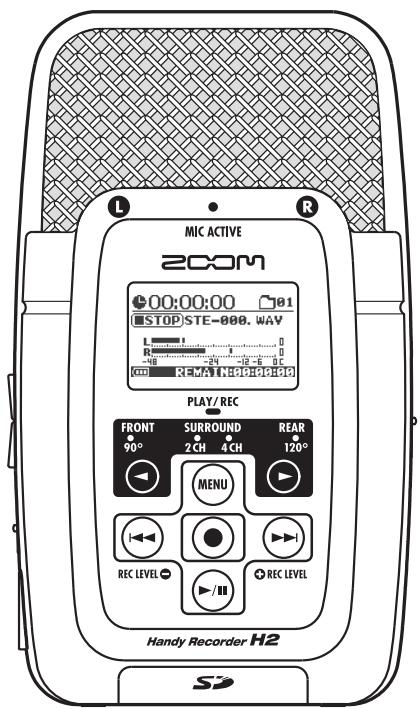
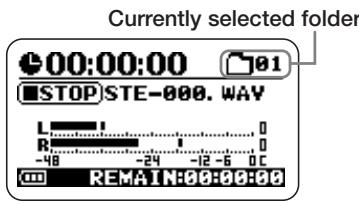
The illustration shows the stereo mode top screen. The screen gives access to the information explained below.
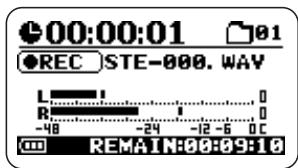
Counter
Shows the playback time of the current file or the recording time in hours/minutes/seconds.
Recorder status
Shows the current operation status of the recorder. There are five different indications for playback, pause, stop, recording standby, and recording.
Level meters
Indicate the current input level or output level. At the rightmost end of the scale is a clip indicator which lights up when signal clipping (leading to distortion and sound breakup) occurs. If clipping has occurred at least once during playback or recording, the clip indicator remains lit until the end of playback/recording.
Option function symbol
When repeat playback or auto record is active, the respective symbol is shown here.
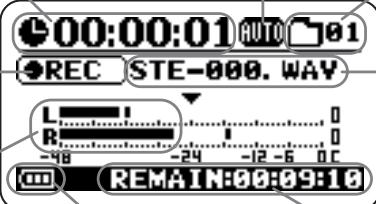
Battery indicator
Shows the battery status.
Folder number
The folder (hierarchical unit) used for storing recorded files is shown here (01 - 10).
File name
Normally, the name of the file that is played back is shown here. During recording standby and recording, the name of the file used for recording is shown.
Remaining recording time
Indicates the available time for recording, according to the currently selected recording mode (file format, quantization, sampling frequency).
Setup example (1): Built-in mics
When using the built-in mics to record in stereo mode, a sound source located in the front or rear direction of the H2 can be recorded. By selecting the respective mic pattern, the directivity angle is set to 90 or 120 degrees ( p. 21). It is also possible to place the H2 in the center and record sound from the front and back directions.
To perform stereo recording of sound from the front or rear direction, the respective panel of the H2 should normally face the sound source.
The supplied desktop stand can be used to place the H2 on a table or other flat surface. Alternatively, the supplied mic clip adapter is convenient to mount the H2 on a mic stand. Directly placing the H2 on the floor or on a table should be avoided, because footsteps or undesired vibrations can be transmitted to the unit.
■ Recording solo vocals or a single instrument
The mic pattern setting also determines the directivity angle. Selecting "FRONT 90" and using the front side mics may be preferable in order to focus on the source and exclude unwanted sounds. The distance between sound source and H2 should be about 10 to 30 cm for on-mic recordings and 50 cm to 1.5 meters for off-mic recordings.

Recording a live band or making field recordings
Selecting "REAR 120" and using the rear side mics may be preferable in order to cover a wider area and capture the ambience of the location.
NOTE
- If you hold the H2 in your hand during field recording, scratching noises may occur which will detract from the recording. To avoid this, mount the H2 on the supplied mic clip adapter and grasp the adapter using a glove.
- If wind hitting the mics is causing pop noise, attach the supplied windscreen.
Recording front and back simultaneously
By positioning the H2 upright, it is possible to record sound coming both from the front and back of the unit. This is useful for example to record a conversation between two people or an instrument and a singer facing each other.
Setup example (2): External mic
To use an external mic for recording, connect the mic to the [EXT MIC IN] jack. If a mono mic is used, only the left channel signal will be recorded.
Setup example (3): External component
To record the signal of an external source component such as a CD player, connect the output of the component to the [LINE IN] jack. Use the supplied Y cable or a cable with a stereo mini phone plug at both ends. Note that direct input of the signal from instruments such as an electric guitar or bass is not supported.
HINT
- If anything is plugged into the [EXT MIC IN] jack or [LINE IN] jack, the built-in mics are deactivated.
- If equipment is connected both to the [EXT MIC IN] jack and [LINE IN] jack, the [LINE IN] jack has priority.
Glossary
On-mic/Off-mic
On-mic refers to recordings made with the microphone close to the sound source, while off-mic is a recording technique that puts more distance between sound source and microphone, to capture ambience and room reverberations as well.
Selecting the mic pattern for the built-in mics
When making a recording with the built-in mics of the H2, sound is not simply picked up from all directions. Rather, you can control the direction and the angle from which sound is picked up. This is called a "mic pattern". The H2 offers a choice of 4 mic patterns. 3 of these can be used in stereo mode.
To select a mic pattern, proceed as follows.
1. Verify that nothing is connected to the [EXT MIC IN] jack or [LINE IN] jack.
If anything is plugged into these jacks, the built-in mics will not operate, and the mic pattern cannot be selected.
2. Verify that the top screen is shown on the display.
If another screen is shown, the mic pattern cannot be selected. Press the (MENU) key repeatedly until the top screen appears.
3. Select the mic pattern.
Use the / (MIC PATTERN) keys to cause the indicator for the desired pattern to light. When a pattern is selected, its name is briefly shown on the display as well. According to the selected mic pattern, the recording mode will also change (stereo mode
or 4-channel mode).
Available patterns and corresponding modes are as follows.
FRONT 90^ (stereo mode)
Sources located within a 90-degree angle on the front side of the unit are recorded in stereo.
SURROUND 2CH (stereo mode)
Sound from the front side and the rear side of the unit is recorded in 2 channels.

- SURROUND 4CH (4-channel mode) Stereo sound from the front side and ster sound from the rear side of the unit is record in 4 channels. The H2 switches to 4-chan mode ( p.27) .

REAR 120^ (stereo mode)
Sources located within a 120-degree angle on the rear side of the unit are recorded in stereo.

Which set of mics is currently active is indicated by the [MIC ACTIVE] indicator on the front panel and rear panel of the H2.

When you select SURROUND 2CH or 4CH, both the front and rear panel [MIC ACTIVE] indicator will be lit.
NOTE
- The mic pattern setting only applies to the built-in mics. It has no effect when an external mic is used.
- When anything is plugged into the [EXT MIC IN] jack or [LINE IN] jack, the built-in mics are deactivated and all mic pattern indicators are out.
- While the H2 is in the playback, recording, or recording standby condition, the mic pattern setting cannot be changed.
Recording
To record in stereo mode, proceed as follows.
HINT
In the initial condition, the H2 is set up to record stereo WAV files (16 bit quantization, sampling frequency 44.1 kHz) in stereo mode. The settings for file format, quantization, and sampling frequency can be changed ( p. 35).
1. Bring up the stereo mode top screen.
2. Activate the source to record.
The H2 can record from the built-in mics, from an external mic connected to the [EXT MIC IN] jack or from an external component connected to the [LINE IN] jack.
Recording from the built-in mics
Verify that nothing is connected to the [EXT MIC IN] jack or [LINE IN] jack. If anything is plugged into these jacks, the built-in mics will not operate.
- Recording from an external mic or external component
Connect the external mic to the [EXT MIC IN] jack or the external component to the [LINE IN] jack. Note that the [LINE IN] jack has priority if equipment is connected both to the [EXT MIC IN] jack and [LINE IN] jack.
3. Adjust the input sensitivity.
When using the built-in mics or an external mic connected to the [EXT MIC IN] jack, set the input sensitivity to a suitable value using the [MIC GAIN] switch.
Make the setting so that the [MIC ACTIVE]
indicator on the front panel or rear panel does not flash when the volume of the sound source is at maximum. For information on recommended [MIC GAIN] switch settings, see page 15.
HINT
Keep in mind that the recorded content will be distorted if the [MIC ACTIVE] indicator is flashing.
4. Set the H2 to the recording standby condition.
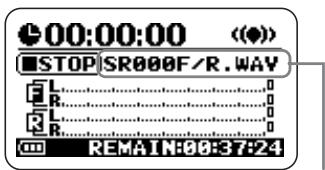
Press the (REC) key so that [PLAY/REC] indicator on the front panel flashes in red. The current input level is indicated by the level meters, and the input signal can be monitored via the [PHONES/LINE OUT] jack. The name of the file that will be created is also shown on the display.
Input signal level
File created by this recording operation
HINT
- By changing a setting of the H2, it is possible to always monitor the input signal, also while the unit is not in the recording standby condition ( p. 79).
- In stereo mode, a new file is created for every recording operation, and a file name is automatically assigned, using the pattern "STE-xxx.WAV" or "STE-xxx.MP3" (where xxx is a number from 000 to 999). The file name can be changed later ( p. 50).
5. Adjust the recording level.
To adjust the recording level, use the (REW)/(FF) keys. When you press one of these keys once, the current recording level setting is shown on the display. Pressing the key further will change the setting.
Set the level as high as possible but so that the meter indication on the display does not exceed 0 (dB) during the loudest passages. The setting range is 0 - 127 .
To record the signal from an external component such as a CD player connected to the [LINE IN] jack, control the recording level by adjusting the volume setting at the external component.
HINT
To cancel the recording standby condition, press the (PLAY/PAUSE) key.
6. Start recording.
When you press the (REC) key once more in the recording standby condition, the [PLAY/REC] indicator on the front panel stays constantly lit in red. The current position
in the recording is indicated by the counter.
HINT
- Recording always starts at the beginning of a new file. It is not possible to resume recording from part way into a file.
- By pressing the (PLAY/PAUSE) key while a recording is in progress, you can set a BWF compatible cue point. When you press the (PLAY/PAUSE) key, the indication "MARKxx" (where xx is a number from 1 to 99) appears on the display, and a mark (cue point) with the corresponding number is created.
- You can check the time (hours:minutes: seconds) of marks that have been set ( p.59) .
7. Stop the recording.
To terminate the recording, press the (REC) key once more so that the [PLAY/REC] indicator goes out. When the recording is stopped, the counter returns to the beginning and the file is ready for playback.
8. Check the recording.
To play the recorded content, press the (PLAY/PAUSE) key. To stop playback, press the (PLAY/PAUSE) key once more.
If you redo the recording, the old file will not be overwritten. Rather, a new file is created each time. For information on how to delete files that are no longer needed, see page 52.
Glossary
BWF (Broadcast Wave Format)
An extended WAV file format used primarily in broadcasting applications. Information about the file creation date and cue points are embedded in the file.
Playback
This section explains how to play back a file recorded in stereo mode.
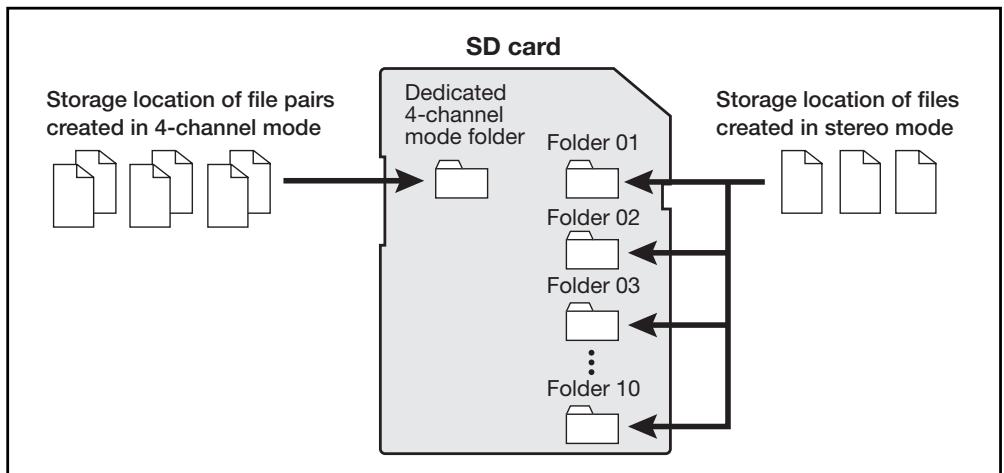
In stereo mode, each recording operation will result in one stereo file (WAV or MP3 format). These files are stored in the currently selected folder (01 - 10) on the inserted SD card. To select a recorded stereo file for playback, proceed as follows.
1. Bring up the stereo mode top screen on the display.
The file whose name is shown in the center of the display is the one that will be played back. Only files located in the currently selected folder can be selected for playback.
Number of currently selected folder
Name of currently selected file
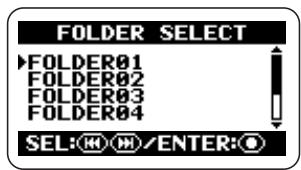
2. Select the folder which contains the file to play.
To select a folder, press the (MENU) (MENU) key to bring up the following screen.
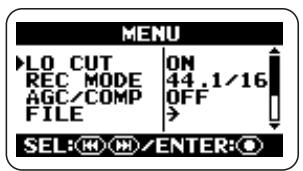
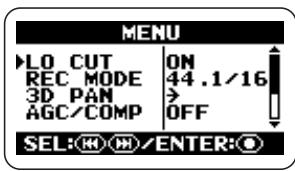
This screen is the main menu which gives access to various setting menus.
At the main menu screen, use the (REW)/FF) keys to move the cursor (symbol) to the desired item and press the (REC) key to open the setting screen for that item. By pressing the (MENU) key once more, you can return to the top screen.
In this example, use the (REW)/(FF) keys repeatedly to move the cursor to "FOLDER" and then press the (REC) key to bring up the folder selection screen.
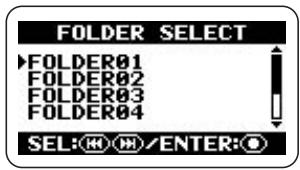
Next, use the (REW)/(FF) keys to move the cursor to the desired folder and press the (REC) key to confirm the selection.
After selecting the folder, press the (MENU) (MENU) key repeatedly to return to the stereo mode top screen.
HINT
If the folder that holds the file you want to play is already selected, the above procedure is not necessary.
3. Select the file to play.
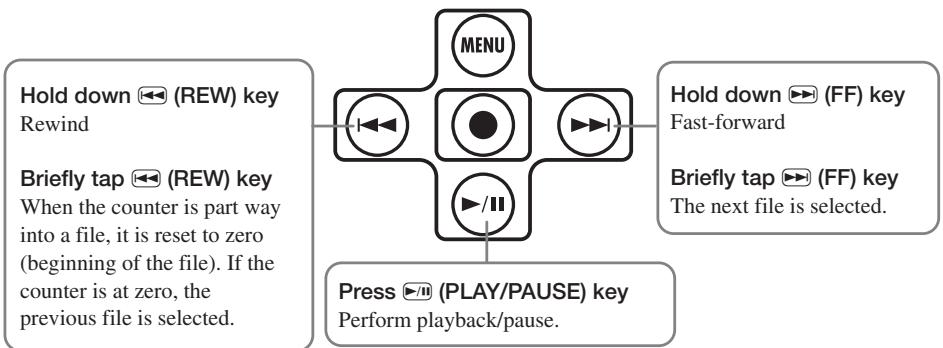
Briefly tap the (FF) key to skip to the next file in the currently selected folder. To skip back by one file, press the (REW) key once to return the counter to zero, and then tap the key again.
HINT
If the currently selected folder does not contain any files, the indication "NO DATA" is shown.
HINT
The order in which files are displayed in the folder is determined by the file name (characters and numbers). The sequence is as follows.
(space)! # $ % & '() +, -0 123456789
; = @
ABCDEFGHIJKLMNOPQRSTUVWXYZ[ ]^ _
a b c d e f g h i j k l m n o p q r s t u v w x y z
{~}
4. Play the selected file.
To play the selected file, press the (PLAY/ PAUSE) key. During playback, the [PLAY/ REC] indicator on the front panel is lit in green. To pause playback, press the (PLAY/PAUSE) key once more.
In stereo mode, the keys of the unit operate as shown below.
4-Channel Mode Recording
This section explains in detail how to record in 4-channel mode.
About the 4-channel mode
In 4-channel mode, the built-in mics record stereo sound coming from the front panel direction and the rear panel direction. The result is saved as a pair of two stereo WAV files providing four channels of information.
For example, you could place the H2 in the center of a band to record a practice session, or you could record both the target sound and the ambient sound during field recording. In a live venue, you can record the performers and the audience reaction. For playback, the front and rear signals are mixed into a two-channel (stereo) signal. It is also possible to adjust the front/rear and left/right balance after the fact or convert the recorded information into a stereo WAV file.
Using the two WAV files produced in 4-channel mode as source material for a surround sound encoder allows the creation of 5.1 channel audio for playback on a home entertainment surround sound system.
To switch the H2 to 4-channel mode, simply select "SURROUND 4CH" as mic pattern. (For details on mic patterns, see page 21.) Use the (MIC PATTERN) keys on the front panel so that the "SURROUND 4CH" mic pattern indicator is lit.
When you want to use the H2 in 4-channel mode, nothing may be connected to the [EXT MIC IN] jack or [LINE IN] jack.
NOTE
When you select a mic pattern other than SURROUND 4CH, the H2 switches back to stereo mode. (For information on other mic patterns, see page 21.)
The illustration on the next page shows the 4-channel mode top screen. The screen gives access to the information explained below.
Counter
Shows the playback time of the current file or the recording time in hours/minutes/seconds.
Recorder status
Shows the current operation status of the recorder. There are five different indications for playback, pause, stop, recording standby, and recording.
Level meters
Indicate the current input level or output level. At the rightmost end of the scale is a clip indicator which lights up when signal clipping (leading to distortion and sound breakup) occurs. If clipping has occurred at least once during playback or recording, the clip indicator remains lit until the end of playback/recording.
Option function symbol
When repeat playback or auto record is active, the respective symbol is shown here.
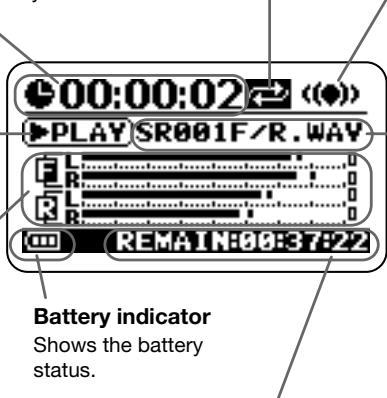
Battery indicator
Shows the battery status.
Remaining recording time
Indicates the available time for recording, according to the currently selected recording mode (file format, quantization, sampling frequency).
4-channel mode symbol
Shows that the H2 is operating in 4-channel mode.
File name
Normally, the name of the file pair that is played back is shown here. During recording standby and recording, the name of the file pair used for recording is shown.
In 4-channel mode, two WAV format files (one each for front and rear) are handled as a set. The indication "SRxxxF/R.WAV" (where xxx is a number from 000 to 499) refers to the front stereo file "SRxxxF.WAV" and rear stereo file "SRxxxR.WAV" pair.
Setup examples
The recommended placement when using the H2 in 4-channel mode is shown below.
Recording a band rehearsal
When the members of the band are facing each other, the H2 can be placed in the middle to record sound coming from the front and rear.

HINT
The front/rear/left/right balance can easily be adjusted after a recording was made in 4-channel mode.
Field recording
Position the H2 upright and have the front panel face the main sound source.
NOTE
If you hold the H2 in your hand during field recording, scratching noises may occur which will detract from the recording. To avoid this, mount the H2 on the supplied mic clip adapter and grasp the adapter using a glove.
Recording
To record in 4-channel mode, proceed as follows.
HINT
- In the initial condition, the H2 in 4-channel mode is set up to record two stereo WAV files (16 bit quantization, sampling frequency 44.1kHz ). The settings for quantization and sampling frequency can be changed ( p. 35).
After recording in 4-channel mode, you can adjust the front/back/left/right balance and convert the result into a single WAV file ( p. 57).
1. Bring up the 4-channel mode top screen.
2. Adjust the input sensitivity.
In 4-channel mode, only the built-in mics can be used. Set the input sensitivity to a suitable value using the [MIC GAIN] switch.
Select the position of the [MIC GAIN] switch so that the [MIC ACTIVE] indicator on the front panel or rear panel does not flash when the volume of the sound source is at maximum. For information on recommended [MIC GAIN] switch settings, see page 15.
3. Set the H2 to the recording standby condition.
Press the (REC) key so that [PLAY/REC] indicator on the front panel flashes in red. The current input level is indicated by the level meters, and the input signal can be monitored via the [PHONES/LINE OUT] jack. The name of the file pair that will be created is also shown on the display.
4. Adjust the recording level.
To adjust the recording level, use the (REW)/(FF) keys. When you press one of these keys once, the current recording level setting is shown on the display. Pressing the key further will change the setting.
Set the level as high as possible but so that the meter indication on the display does not exceed 0 (dB) during the loudest passages. The setting range is 0 - 127 .
NOTE
It is not possible to adjust the front and rear recording level separately.
HINT
To cancel the recording standby condition, press the >10 (PLAY/PAUSE) key.
5. Start recording.
When you press the (REC) key once more in the recording standby condition, the [PLAY/REC] indicator on the front panel stays constantly lit in red and recording starts. The current position in the recording is indicated by the counter.
HINT
- Recording always starts at the beginning of a new file. It is not possible to resume recording from part way into a file.
- By pressing the (PLAY/PAUSE) key while a recording is in progress, you can set a BWF compatible cue point ( p.24). When you press the (PLAY/PAUSE) key, the indication "MARKxx" (where xx is a number from 1 to 99) appears on the display.
6. Stop the recording.
To stop recording, press the (REC) key. The [PLAY/REC] indicator goes out. When the recording is stopped, the counter returns to the beginning and the file is ready for playback.
HINT
The files created by recording in 4-channel mode are stored in a dedicated folder for 4-channel mode.
7. Check the recording.
To play the recorded content, press the () (PLAY/PAUSE) key. The front and rear signals are mixed and played back in stereo (2-channel). To stop playback, press the () (PLAY/PAUSE) key once more.
Playback
In 4-channel mode, each recording operation will result in a pair of stereo files (WAV format) being stored in a dedicated folder for 4-channel mode. This section explains how to play back such a 4-channel mode file pair.
1. Bring up the 4-channel mode top screen on the display.
The file pair whose name is shown in the center of the display is the one that will be played back. The indication "SRxxxxF/ R.WAV" (where xxx is a number from 000 to 499) refers to the pair consisting of the front stereo file "SRxxxxF.WAV" and rear stereo file "SRxxxxR.WAV".
Name of currently selected file pair
2. Select the file pair to play.
Briefly tap the (FF) key to skip to the next file pair. To skip back by one file pair, press the (REW) key once to return the counter to zero, and then tap the key again.
HINT
- All 4-channel mode files are stored in the same dedicated folder. It is therefore not necessary to select the folder.
- If no 4-channel mode files have been recorded, the indication "NO DATA" is shown.
NOTE
The names of files created in 4-channel mode cannot be changed.
3. Play the selected file pair.
To play the selected file pair, press the () (PLAY/PAUSE) key. The [PLAY/REC] indicator lights up in green, and the front and rear signals are mixed and played back as a stereo (2-channel) file.
To pause playback, press the / (PLAY/ PAUSE) key once more.
The play/pause and fast-forward/rewind functions are the same as for stereo mode ( p. 26).
Adjusting the front/rear/ left/right balance (3D panning)
This section explains how to use the so-called 3D panning function which allows you to adjust the front/rear/left/right balance of a file pair recorded in 4-channel mode.
1. With the H2 in 4-channel mode, select the file pair whose balance you want to adjust.
2. Bring up the 4-channel mode main menu screen.
The main menu gives access to various 4-channel mode setting menus. The menu differs from the main menu for the stereo mode. To call up this screen, press the (MENU) key at the 4-channel mode top screen.
3. Bring up the 3D PAN menu.
Repeatedly press the (REW)/FF) keys to move the cursor to "3D PAN" and press the (REC) key. The 3D PAN menu for accessing 3D panning functions appears.
The 3D PAN menu contains the following items.
PREVIEW
Controls whether the currently selected file pair should be monitored via the [PHONES/ LINE OUT] jack while making 3D panning settings.
- INPUT
Controls whether the input signal from the built-in mics should be monitored via the [PHONES/LINE OUT] jack while making 3D panning settings.
GO
When you move the cursor to this position and press the (REC) key, the 3D panning adjustment screen appears.
- RESET
When you move the cursor to this position and press the (REC) key, 3D panning is reset to the default condition.
4. Select the signal to monitor during 3D panning adjustment.
To select the signal, move the cursor to "PREVIEW" or "INPUT" on the above screen and press the () (REC) key.
If "PREVIEW" was selected, the 3D PAN PREVIEW screen appears.

If "INPUT" was selected, the 3D PAN INPUT screen appears.

On the respective screen, move the cursor to ON and press the (REC) key to monitor the respective signal. When the setting is made, the display returns to the 3D PAN menu.
HINT
The "PREVIEW" setting is suitable to perform 3D panning of recorded data, and the "INPUT" setting to perform 3D panning of the signal from the built-in mics. It is also possible to set both items to ON.
If "INPUT" was set to ON, the input signal will be monitored while reflecting the 3D panning setting, but the recorded result will not reflect the setting. Consequently, even if you focus on a certain direction using the 3D panning setting, the actual recording will be made using standard level balance.
5. Bring up the 3D panning screen.
To bring up the 3D panning screen, move the cursor to the "GO" item and press the (REC) key. If "PREVIEW" was set to ON in
step 4, the currently selected file pair will automatically start to play when the 3D panning screen comes up.

The 3D panning screen shows a graph with FRONT/REAR and LEFT/RIGHT directions. The symbol inside the graph indicates the current 3D panning setting (Front L/Front R and Rear L/Rear R level balance).
When you move the symbol in a given direction, the level of sound from that direction will increase. Conversely, moving the symbol away from a direction will decrease the sound from that direction.
6. Adjust the 3D panning setting.
To move the symbol up or down, use the (MENU) key and (PLAY/PAUSE) key. To move the symbol left or right, use the (REW) key and (FF) key. To accept the current position (balance setting), press the () (REC) key. The 3D PAN menu appears again.
To return to the 4-channel mode top screen, press the (MENU) key repeatedly.
HINT
After making 3D panning adjustments using a pair of stereo files recorded in 4-channel mode, you can save the result as a single stereo file ( p.57).
NOTE
- The 3D panning setting is not stored individually for each file. Rather, there is only one setting that applies to all files. Keep in mind that even if you select a different file pair, the 3D panning setting will not change.
To return the 3D panning setting to the default condition, move the cursor to "RESET" on the 3D PAN menu and press the (REC) key.
Convenient Recording Functions
This section describes various functions of the H2 that will come in handy during recording.
Selecting the recording mode
The H2 lets you choose from a number of recording modes (with different settings for file format, sampling frequency, quantization), allowing you to get the most out of the H2 in various recording situations.
NOTE
The settings described here cannot be changed while the recorder is operating. Stop recording or playback before carrying out these steps.
1. Bring up the main menu screen.
At the stereo mode or 4-channel mode top screen, press the (MENU) (MENU) key.
HINT
The available selections for the recording mode differ in stereo mode and 4-channel mode.
2. Bring up the REC MODE screen.
Repeatedly press the (REW)/FF) keys to move the cursor to "REC MODE" and press the () (REC) key. The REC MODE screen appears.
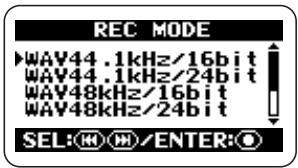
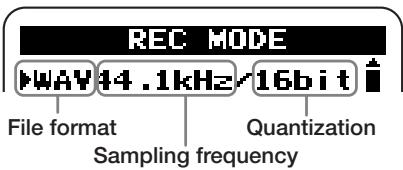
Here you can select the recording mode. The settings available for file format, sampling frequency, and quantization are listed below.
Selections available in stereo mode/4-channel mode are as follows.
[Stereo mode]
| Display | File format |
| WAV44.1kHz/16bit | WAV |
| WAV44.1kHz/24bit | |
| WAV48kHz/16bit | |
| WAV48kHz/24bit | |
| WAV96kHz/16bit | |
| WAV96kHz/24bit | |
| MP3 48k, 56k, 64k, 80k, 96k, 112k, 128k,160k, 192k, 224k, 256k, 320kbps | MP3 |
| MP3 VBR |
VBR (Variable Bit Rate): The number of quantization bits is automatically adjusted according to the amount of information in the input source.
[4-channel mode]
| Display | File format |
| WAV44.1kHz/16bit | WAV |
| WAV44.1kHz/24bit | |
| WAV48kHz/16bit | |
| WAV48kHz/24bit |
3. Select the recording mode.
Repeatedly press the (REW)/FF) keys to move the cursor to the desired setting and press the (REC) key. The change is accepted and the main menu appears again.
HINT
If you press the (MENU) key instead of the (REC) key, the selection is canceled and the main menu appears again.
4. Return to the top screen.
Repeatedly press the (MENU) key until the stereo mode or 4-channel mode top screen appears again.
HINT
Making use of the flexibility of the H2, you can record in stereo mode using the WAV file format first and convert to MP3 format later ( p. 55).
Glossary
File format
This refers to the format of the file as stored on the SD card inserted in the H2. The H2 gives you a choice between the uncompressed WAV format and compressed MP3 format.
Sampling frequency
This is a number that specifies how many times per second the analog signal is examined (sampled) for conversion into digital form. A higher setting will allow higher frequencies to be reproduced, but the resulting files will be bigger and therefore consume more space on the SD card.
Quantization
This is a number that specifies how many bits are used to express the dynamics of the analog signal in digital form. A higher quantization setting will result in better dynamic range, but the resulting files will be bigger and therefore consume more space on the SD card.
Using the AGC/compressor/ limiter function
When recording the live performance of a band or a similar event where volume levels are hard to predict, the AGC/compressor/ limiter function will come in handy to optimize the recording level.
AGC (Auto Gain Control) is a function that automatically adjusts the level during recording. Low-level signals will be boosted and high-level signals will be attenuated, resulting in a recording that has low noise and distortion.
NOTE
When the AGC function is active, the [MIC GAIN] switch setting has no effect.
The compressor boosts low-level signals and attenuates high-level signals. In this regard, it is similar to AGC, but it more actively shapes the dynamics of the input signal.
The limiter serves to prevent distortion during recording by attenuating only signals that exceed a certain level.
1. Bring up the main menu screen.
At the stereo mode or 4-channel mode top screen, press the (MENU) (MENU) key.
2. Bring up the AGC/COMP screen.
Repeatedly press the (REW)/FF) keys to move the cursor to "AGC/COMP" and press the (REC) key.

3. Select the function from the AGC/compressor/limiter options.
The AGC/compressor/limiter has multiple options for each basic function, as listed below.
OFF
The AGC/compressor/limiter is turned off.
AGC1 (GENERAL)
This is the standard AGC setting.
AGC2 (SPEECH)
This is an AGC setting suitable for recording speech and narration.
COMP1 (GENERAL)
This is the standard compressor setting.
COMP2 (VOCAL)
This is a compressor setting suitable for recording vocals.
COMP3 (DRUM)
This is a compressor setting suitable for recording drums and percussion.
LIMIT1 (GENERAL)
This is the standard limiter setting.
LIMIT2 (CONCERT)
This is a limiter setting suitable for recording a live event.
LIMIT3 (STUDIO)
This is a limiter setting suitable for studio recording.
Use the (REW)/FF) keys to move the cursor to the desired setting, and press the (REC) key. The setting is accepted and the display returns to the main menu.
To cancel the setting and return to the main menu, simply press the (MENU) key.
4. Return to the top screen.
Repeatedly press the (MENU) key until the stereo mode or 4-channel mode top screen appears again.
Attenuating the low frequencies
The H2 incorporates a low-cut filter that is effective in removing wind noise during outdoor recording or pop noise when recording a vocalist. To activate the filter, proceed as follows.
1. Bring up the main menu screen.
At the stereo mode or 4-channel mode top screen, press the (MEN) (MEN) key.
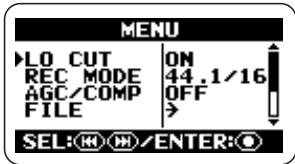
2. Bring up the LO CUT screen.
Repeatedly press the (REW)/(FF) keys to move the cursor to "LO CUT" and press the (REC) key.

3. Activate the low-cut filter.
Use the (REW)/FF) keys to move the cursor to "ON" and press the (REC) key. The setting is accepted and the display returns to the main menu.
To cancel the setting and return to the main menu, press the (MENU) (MENU) key.
4. Return to the top screen.
Repeatedly press the (MENU) key until the stereo mode or 4-channel mode top screen appears again.
Using the auto record function
The auto record function makes it possible to have the H2 start and stop recording automatically, according to the input signal level. When the level exceeds a certain threshold, recording starts, and when it remains below the threshold for a given length of time, recording stops. This is convenient to collect ideas while composing a music piece, or to record spoken comments at a meeting or conference.
NOTE
The settings described here cannot be made while the recorder is operating. Stop recording or playback before carrying out these steps.
1. Bring up the main menu screen.
At the stereo mode or 4-channel mode top screen, press the (MENU) (MENU) key.
2. Bring up the AUTO REC screen.
Repeatedly press the (REW)/FF) keys to move the cursor to "AUTO REC" and press the (REC) key.
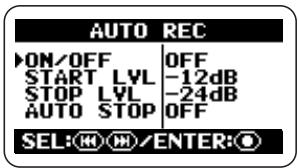
3. Set the various parameters for the auto record function.
Use the (REW)/FF) keys to move the cursor to the parameter, and press the (REC) key to bring up the setting screen for that parameter.
Parameter accessible from the AUTO REC screen are as follows.
ON/OFF
Turns the auto record function on or off.
START LVL (Start level)
Sets the threshold level for starting to record.
STOP LVL (Stop level)
Sets the threshold level for stopping to record.
- AUTO STOP
Controls the auto stop on/off setting and the number of seconds until actual recording stops. When the signal drops below the specified stop level, recording will stop after the number of seconds set here.
4. Set the auto record function to ON and set the start level.
Move the cursor to the ON/OFF section and press the (REC) key. The following screen appears.
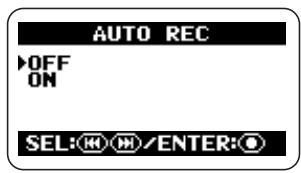
To turn the auto record function on, move the cursor to ON and press the (REC) key. The AUTO REC screen appears again. Next, move the cursor to START LVL on the AUTO REC screen and press the (REC) key. The display changes as follows.
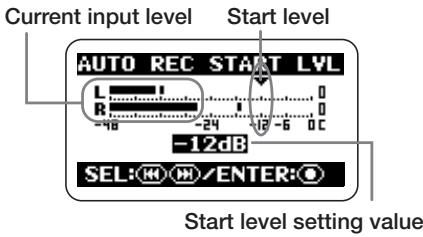
At this screen, you can set the start level (the threshold above which recording will start). While checking the current actual sound level using the input level indication on the screen, use the () / () (FF) keys to move the start level indicator to a suitable point. When the setting is complete, press the ()(REC) key to return to the AUTO REC screen.
HINT
In 4-channel mode, the front and rear signals are mixed for level indication.
5. If you want the recording to also stop automatically, set the auto stop function to ON and specify the stop level.
To activate the auto stop function, move the cursor on the AUTO REC screen to AUTO STOP and press the () (REC) key. The AUTO REC STOP screen appears.
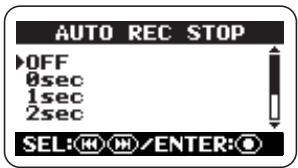
At this screen, you can set the number of seconds by which the stop of recording is delayed after the input level drops below the threshold level. Use the (REW)/FF) keys to select the setting (0 - 5 sec) and then press the (REC) key to return to the AUTO REC screen.
Next, set the stop level. On the AUTO REC screen, move the cursor to STOP LVL and press the (REC) key. The AUTO REC STOP LVL screen comes up.
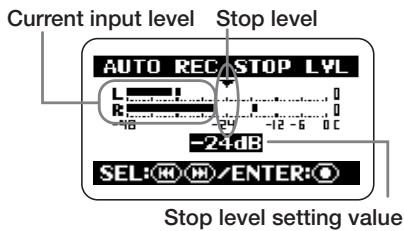
While checking the current actual sound level using the input level indication on the screen, use the (REW)/(FF) keys to move the stop level indicator to a suitable
point.
When the setting is complete, press the (REC) key to return to the AUTO REC screen. Then press the (MENU) key repeatedly to return to the main menu screen.
HINT
In 4-channel mode, the front and rear signals are mixed for level indication.
6. Use the auto record function.
At the top screen, press the (REC) key once. The H2 goes into the recording standby condition, and the indication "Wait For Signal..." appears on the display.
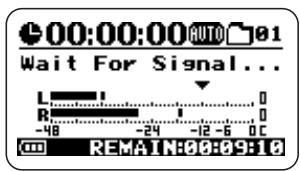
When the input signal exceeds the start level in this condition, recording starts.
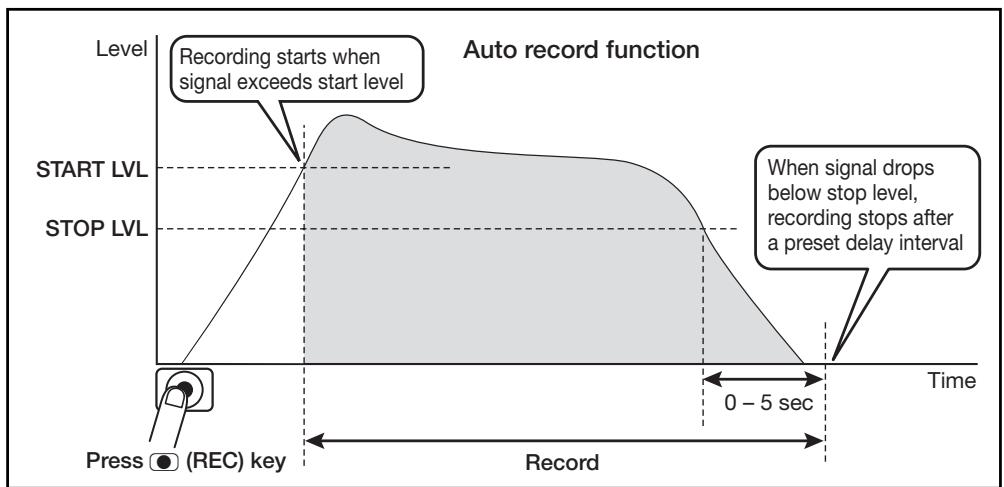
If the auto stop function is also enabled, recording will stop automatically a number of seconds after the signal level has dropped below the stop level.
Even when the auto record/auto stop functions are on, recording will start immediately if you press the (REC) key once more while the H2 is in the recording standby condition.
By pressing the (REC) key while a recording is in progress, the recording can be stopped at any time.
Using the pre-record function
When the pre-record function is active, the H2 constantly stores the input signal in standby mode for a certain interval. When the user starts actual recording, the recording will include sound from up to two seconds before that point. This is useful for live recordings in situations where sound may occur suddenly. With pre-recording, the beginning will not be cut off in such a case.
1. Bring up the main menu screen.
At the top screen, press the (MENU) (MENU) key.
2. Bring up the PRE REC screen.
Repeatedly press the (REW)/FF) keys to move the cursor to "PRE REC" and press the (REC) key.
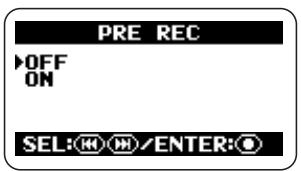
3. Activate pre-recording.
Use the (REW) / (FF) keys to move the cursor to "ON" and press the () (REC) key. The setting is accepted and the display returns to the main menu.
When the setting is complete, return to the top screen by repeatedly pressing the (MENU) (MENU) key.
NOTE
The pre-record function and auto record
function cannot be used together. If you set one of these functions to ON while the other is already ON, the earlier function will automatically be turned OFF.
4. Carry out recording.
Press the (REC) key to set the H2 to the recording standby condition. When you then press the (REC) key again to begin recording, the pre-recorded part from immediately before that point will also be included.
The duration of the pre-recorded part depends on the operation mode, file format and sampling frequency, as shown below.
Stereo mode
| File format/Sampling frequency | Time |
| WAV 44.1 kHz | 2 seconds |
| WAV 48 kHz | |
| WAV 96 kHz | 1 second |
| MP3 | 2 second |
4-channel mode
| File format/Sampling frequency | Time |
| 44.1 kHz | 1 second |
| 48 kHz |
Recording a stereo signal in mono (stereo mode only)
The H2 allows you to record a signal from the internal or external mics or from an external component in mono. This can be useful for example for narration or effect sounds, where handling the material in mono may be preferable.
NOTE
- The steps described below will cause the stereo channel signals of the internal or external mics or an external component to be mixed. The result is then recorded as a stereo file where the L and R channels have the same content.
- This function is available in stereo mode only.
1. Bring up the main menu screen.
At the stereo mode or 4-channel mode top screen, press the (MEN) (MENU) key.
2. Bring up the MONO MIX screen.
Repeatedly press the (REW)/FF) keys to move the cursor to "MONO MIX" and press the (REC) key.

3. Set the MONO MIX function to ON.
Use the (REW) / (FF) keys to move the cursor to "ON", and press the (REC) key.
The setting is accepted and the display returns to the main menu.
When the setting is complete, return to the top screen by repeatedly pressing the (MENU) (MENU) key.
4. Perform the steps for recording.
The stereo signal from the internal mics, a stereo mic connected to the [EXT MIC IN] jack or a component connected to the [LINE IN] jack is mixed and the result is recorded as a stereo file with identical signals in the L and R channels.
HINT
Files created as described above will be named "MONO-xxx.wav" or "MONO-xxx.mp3" (where xxx is a number from 000 to 999) and stored in the currently selected stereo mode folder.

ConvenientPlayback Functions
This section describes various functions of the H2 that will come in handy during playback.
Selecting the play mode
In the default condition, when you play a recorded file (or a file pair recorded in 4-channel mode), the H2 will continue to play all files in the same folder and then stop. You can change this behavior by selecting a different play mode.
1. Bring up the main menu screen.
At the stereo mode or 4-channel mode top screen, press the (MENU) (MENU) key.
2. Bring up the PLAY MODE screen.
Repeatedly press the (REW) / (FF) keys to move the cursor to "PLAY MODE" and press the () (REC) key. The PLAY MODE screen appears.

Here you can select the play mode. The following settings are available.
PLAY ALL (default)
Starting from the currently selected file (or file pair for 4-channel mode; also below), all files in the current folder are played in alphabetical order of file name. (For information on character sequence, see page 26.) Playback
stops when all files have been played once.
- PLAY ONE
Playback stops when the currently selected file has been played.
- REPEAT ALL
Starting from the currently selected file, all files in the current folder are played in alphabetical order of file name. This process is repeated until stopped by the user.
- REPEAT ONE
The currently selected file is played repeatedly, until stopped by the user.
3. Select the play mode.
Use the (REW)/FF) keys to move the cursor to the desired mode and press the (REC) key. The setting is accepted and the display returns to the main menu.
HINT
To cancel the setting and return to the main menu, press the (MENU) (MENU) key without pressing the (REC) key.
4. Return to the top screen.
Repeatedly press the (MENU) key until the stereo mode or 4-channel mode top screen appears again.
Using the A-B repeat function
The A-B repeat function lets you specify two points (A and B) in a file (or file pair for 4-channel mode) and automatically repeat the section between these points. To use this function, proceed as follows.
NOTE
The settings described here cannot be made while the recorder is operating. Stop recording or playback before carrying out these steps.
1. Bring up the main menu screen.
At the stereo mode or 4-channel mode top screen, press the (MENU) (MENU) key.
2. Bring up the A-B REPEAT screen.
Repeatedly press the (重) (REW)/FF keys to move the cursor to "A-B REPEAT" and press the () (REC) key.
The screen for specifying point A appears.
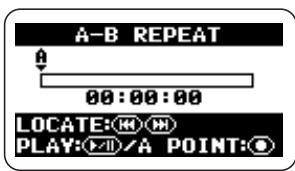
3. Specify point A.
Use the (REW)/FF) keys to move the counter to the point where you want the repeated section to start (point A). Then press the (REC) key.
The screen for specifying point B appears.
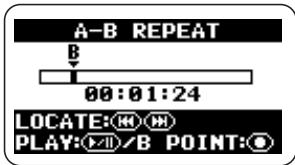
4. Specify point B.
Using the (REW)/FF) keys to move the counter to the point where you want the repeated section to end (point B). Then press the (REC) key.
HINT
- The A/B point setting can be made also while in playback mode.
- You can also set point B at an earlier location than point A. In that case, the section from B to A is repeated.
5. Perform repeat playback.
When the A/B points have been set, press the / n (PLAY/PAUSE) key. The section A B (or B A ) is played back repeatedly.
6. Cancel repeat playback.
When you press the (REC) key once more, repeat playback is canceled and the A/B point settings are cleared.
7. Return to the top screen.
Repeatedly press the (MENU) key until the top screen appears again.
File Operations
Content recorded in a session by the H2 is stored on the SD card as a file (or a pair of files in 4-channel mode). This section explains various file related operations.
Files and folders
Where recorded files are stored depends on the operation mode of the H2.
When the H2 is in 4-channel mode, the recorded files are always stored in a dedicated folder. Consequently there is no need to select the folder in 4-channel mode.
In stereo mode, the recorded files are stored in the currently selected folder (01 - 10). During playback, files in the currently selected folder
are played.
The name (number) of the currently selected folder is displayed on the top screen of stereo mode.
Selecting a folder (stereo mode only)
To switch the folder in stereo mode, proceed as follows.
1. Bring up the stereo mode main menu screen.
At the stereo mode top screen, press the (MENU) (MENU) key.
2. Bring up the FOLDER SELECT screen.
Repeatedly press the ()(REW) / ()(FF) keys to move the cursor to "FOLDER" and press the () (REC) key.
3. Select the folder.
Use the (REW)/FF) keys to move the cursor to the desired folder and press the (REC) key.
The setting is accepted and the display returns to the main menu.
4. Return to the top screen.
Repeatedly press the (MENU) (MENU) key until the stereo mode top screen appears again.
Selecting a file
To perform a file operation, you must first select a file in the current folder, as described below.
NOTE
The steps described here cannot be performed while the recorder is operating.
Stop recording or playback before carrying out these steps.
1. Bring up the main menu screen.
At the stereo mode or 4-channel mode top screen, press the (MEN) (MEN) key.
2. Bring up the FILE MENU screen.
Repeatedly press the ()(REW) / ()(FF) keys to move the cursor to "FILE" and press the () (REC) key. A list of files (or file pairs for 4-channel mode; also below) in the current folder appears. The file indicated by the cursor is the one that will be used for the file operation.
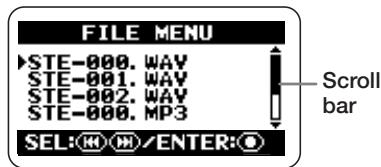
Stereo mode FILE MENU screen
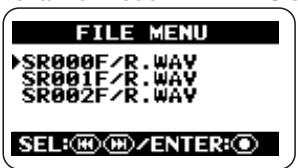
4-channel mode FILE MENU screen
HINT
- If the folder contains more than four files, a scroll bar indicating the current cursor position appears at the right of the screen.
- In 4-channel mode, the indication "SRxxxF/R.WAV" (where xxx is a number from 000 to 499) refers to the pair consisting of the front stereo file "SRxxxF.WAV" and rear stereo file "SRxxxR.WAV".
3. Select the file.
Use the () (REW)/FF keys to move the cursor to the file and press the () (REC) key. The name of the currently selected file is shown at the top of the screen. Available file operations are listed in the lower part of the screen.
4. Choose "SELECT".
Use the (REW)/(FF) keys to move the cursor to "SELECT" and press the (REC) key. The top screen appears again, with that file selected.
HINT
File selection is also possible at the stereo mode top screen ( p. 25) or 4-channel mode top screen ( p. 31).
Viewing file information
You can view various information items about a file (file name, recording date, file format, file size etc.).
NOTE
The steps described here cannot be performed while the recorder is operating. Stop recording or playback before carrying out these steps.
1. Bring up the main menu screen.
At the stereo mode or 4-channel mode top screen, press the (MENU) (MENU) key.
2. Bring up the FILE MENU screen.
Repeatedly press the (REW)/FF) keys to move the cursor to "FILE" and press the (REC) key.
3. Select the file whose information you want to check.
Use the (REW)/FF) keys to move the cursor to the file and press the (REC) key. The name of the currently selected file is shown at the top of the screen. Available file operations are listed in the lower part of the screen.
4. Bring up the FILE INFORMATION screen.
Use the (REW)/FF) keys to move the cursor to "INFORMATION" and press the (REC) key.
The FILE INFORMATION screen comes up.
This screen provides the following information. To view parts that are currently hidden, use the (REW)/(FF) keys to
scroll the screen.
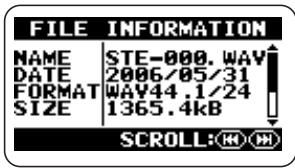
Stereo mode
| NAME | File name (including extension) |
| DATE | Recording date |
| FORMAT | File format / Sampling frequency / Quantization |
| SIZE | Size in kB or MB units |
| TIME | Recording time (Hours:Minutes:Seconds) |
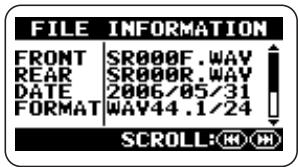
4-channel mode
| FRONT | Front stereo file name (including extension) |
| REAR | Rear stereo file name (including extension) |
| DATE | Recording date |
| FORMAT | File format / Sampling frequency / Quantization |
| SIZE | Size in kB or MB units |
| TIME | Recording time (Hours:Minutes:Seconds) |
5. Return to the top screen.
Repeatedly press the (MENU) key until the stereo mode or 4-channel mode top screen appears again.
Assigning a name to a file (stereo mode only)
For files recorded in stereo mode, a name is automatically assigned, using the pattern "STE-xxx.WAV" or "STE-xxx.MP3" (where xxx is a number from 000 to 999). The file name can be changed as follows.
NOTE
- The steps described here cannot be performed while the recorder is operating. Stop recording or playback before carrying out these steps.
- The names of files created in 4-channel mode cannot be changed.
1. Bring up the stereo mode main menu screen.
At the stereo mode top screen, press the (MENU) (MENU) key.
2. Bring up the FILE MENU screen.
Repeatedly press the (REW)/(FF) keys to move the cursor to "FILE" and press the (REC) key.
3. Select the file whose name you want to change.
Use the () (REW)/FF keys to move the cursor to the file and press the () (REC) key. The name of the currently selected file is shown at the top of the screen. Available file operations are listed in the lower part of the screen.
4. Bring up the FILE RENAME screen.
Use the (REW)/FF) keys to move the
cursor to "RENAME" and press the (REC) key. The display changes as follows. On this screen, the underline symbol functions as a cursor.
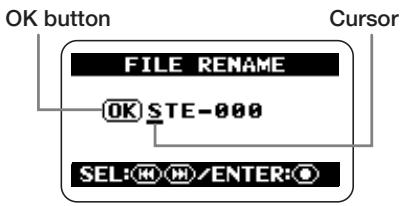
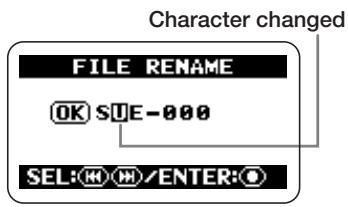
5. Edit the file name.
Use the (REW)/(FF) keys to move the cursor to the character to change, and press the (REC) key so that it is shown in reverse. This indicates that the character can be edited.
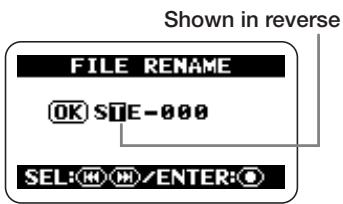
Use the (REW)/FF) keys to change the character and press the (REC) key to accept the change.
Available characters are as follows:
$$ \begin{aligned} & \text {(space)!} # \ & \text { $ \%} \& ^{\prime} () + , - 0123456789 \ & ; = @ \end{aligned} $$
$$ \begin{array}{l} A B C D E F G H I J K L M N O P Q R S T U \ V W X Y Z [ ] ^ {\wedge} _ {-} \end{array} $$
$$ \begin{array}{l} \text {a b c d e f g h i j k l m n o p q r s t u v w x y} \ z {} \end{array} $$
HINT
The extension (.WAV or .MP3) cannot be changed.
6. When the file name is as you want it, confirm the change.
Repeatedly press the (REW) key to move the cursor to the OK button, so that the button is shown in reverse.
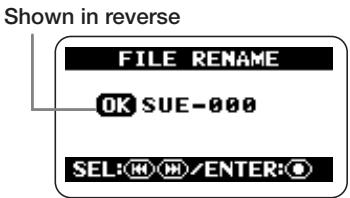
To accept the new file name, press the (REC) key.
The display returns to the condition of step 3.
HINT
To cancel the file name edit and return to the previous screen without making a change, press the (MENU) key instead of the (REC) key.
7. Return to the top screen.
Repeatedly press the (MENU) (MENU) key until the stereo mode top screen appears again.
Deleting a file
When recording is carried out with the H2, the unit always creates a new file and does not overwrite the previous or any other existing files. To delete files that are no longer needed, proceed as follows.
NOTE
- Once deleted, a recorded file cannot be restored. Use this function with care.
- The steps described here cannot be performed while the recorder is operating. Stop recording or playback before carrying out these steps.
1. Bring up the main menu screen.
At the stereo mode or 4-channel mode top screen, press the (MENU) (MENU) key.
2. Bring up the FILE MENU screen.
Repeatedly press the (REW)/(FF) keys to move the cursor to "FILE" and press the (REC) key.
3. Select the file to delete.
Use the ()(REW) / ()(FF) keys to move the cursor to the file and press the (REC) key. The name of the currently selected file is shown at the top of the screen. Available file operations are listed in the lower part of the screen.
4. Bring up the FILE DELETE screen.
Use the (REW)/FF) keys to move the cursor to "DELETE" and press the (REC) key. The display changes as follows.

5. Perform the file delete process.
Use the (REW)/FF) keys to move the cursor to "YES" and press the (REC) key. The file is deleted and the display returns to the condition of step 3.
HINT
To cancel the deletion and return to the previous screen, press the (MENU) (MENU) key without pressing the (REC) key.
6. Return to the top screen.
Repeatedly press the (MENU) key until the stereo mode or 4-channel mode top screen appears again.
Dividing a file (stereo mode only)
You can split an existing file into two parts at any specified point. If you have recorded a live performance, this lets you create separate files for each song.
NOTE
The steps described here cannot be performed while the recorder is operating. Stop recording or playback before carrying out these steps.
1. Bring up the main menu screen.
At the top screen, press the (MENU) key.
2. Bring up the FILE MENU screen.
Repeatedly press the (REW)/FF) keys to move the cursor to "FILE" and press the (REC) key.
3. Select the file to divide.
Use the () (REW)/FF keys to move the cursor to the file and press the () (REC) key. The name of the currently selected file is shown at the top of the screen. Available file operations are listed in the lower part of the screen.
4. Bring up the FILE DIVIDE screen.
Use the (REW)/FF) keys to move the cursor to "DIVIDE" and press the (REC) key.
The FILE DIVIDE screen for specifying the division point comes up. The currently selected division point is shown in the center of the screen.
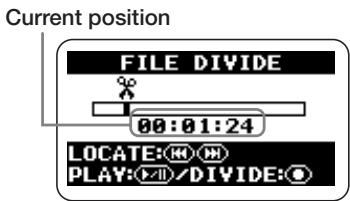
5. Move the counter to the point where you want to divide the file.
At the FILE DIVIDE screen, pressing the (REW) key or (FF) key moves the current position backwards or forwards in steps of 1 second. By pressing the (PLAY/PAUSE) key, you can carry out playback/pause from the current position. Use these keys to locate the desired file division point.
6. Perform the file division process.
When the file division point has been decided, press the (REC) key. A confirmation screen appears.

To go ahead with the file division, move the cursor to "YES" and press the (REC) key.
Two new files will be created in the currently selected folder, with "A" and "B" appended to the original file name.
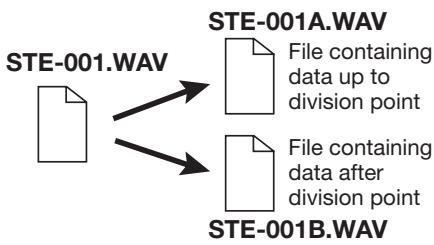
HINT
To cancel the division and return to the previous screen, press the (MENU) (MENU) key without pressing the (REC) key.
If a file with the same name already exists in the folder, a file name change confirmation screen appears.

Move the cursor to "RENAME" and press the (REC) key to change the file name ( p.50), or move the cursor to "CANCEL" and press the (REC) key to cancel the division procedure.
7. Return to the top screen.
Repeatedly press the (MENU) key until the top screen appears again.
Raising the overall file level (normalize function)
Normalizing refers to an operation whereby the overall volume level of a file is raised so that the maximum level is 0 dB (maximum level possible without distortion). This is useful if you have finished a recording but find that the volume level is low.
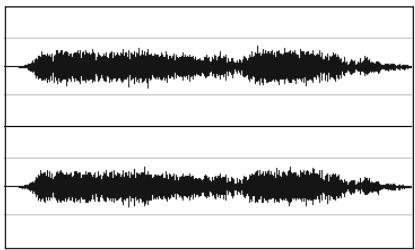
Normalize
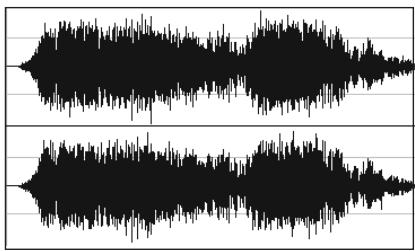
NOTE
The steps described here cannot be performed while the recorder is operating. Stop recording or playback before carrying out these steps.
1. Bring up the main menu screen.
At the top screen, press the (MENU) key.
2. Bring up the FILE MENU screen.
Repeatedly press the (REW)/FF)
keys to move the cursor to "FILE" and press the () (REC) key.
3. Select the file whose level you want to normalize.
Use the () (REW)/FF keys to move the cursor to the file and press the () (REC) key. The name of the currently selected file is shown at the top of the screen. Available file operations are listed in the lower part of the screen.
4. Bring up the FILE NORMALIZE screen.
Use the (REW)/FF) keys to move the cursor to "NORMALIZE" and press the (REC) key.
A confirmation screen for the normalizing operation comes up.

To go ahead with the normalizing operation, move the cursor to "YES" and press the (REC) key.
After the operation is completed, the display returns to the condition of step 3.
HINT
To cancel the normalizing operation and return to the previous screen, press the (MENU) key without pressing the (REC) key.
5. Return to the top screen.
Repeatedly press the (MENU) key until the top screen appears again.
Converting a WAV file into an MP3 file (stereo mode only)
You can convert a WAV file recorded in stereo mode into an MP3 file. Compared to a WAV file, the file size of an MP3 is smaller by a factor of up to ten, because the content is compressed. This is convenient to place recorded content on a web site or send it by e-mail.
1. Bring up the stereo mode main menu screen.
At the stereo mode top screen, press the (MENU) (MENU) key.
2. Bring up the FILE MENU screen.
Repeatedly press the (REW)/FF) keys to move the cursor to "FILE" and press the (REC) key.
3. Select the WAV file for conversion to MP3 format.
Use the (REW)/FF) keys to move the cursor to the WAV file and press the (REC) key.
The name of the currently selected file is shown at the top of the screen. Available file operations are listed in the lower part of the screen.
4. Bring up the FILE MP3 ENCODE screen.
Use the (REW)/FF) keys to move the cursor to "MP3 ENCODE" and press the (REC) key. The display changes as follows.
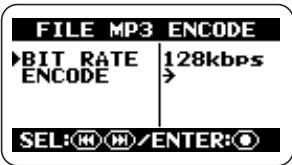
5. Select the bit rate for the MP3 file.
The bit rate determines the amount of information that is contained in the MP3 file for every second. Higher numbers will result in less data compression, allowing higher frequencies to be reproduced, but the file size will be correspondingly larger. When a low bit rate is selected, file size is smaller but the limit for high-frequency reproduction becomes lower.
To change the bit rate, move the cursor to "BIT RATE" and press the (REC) key.
Then move the cursor to the desired bit rate and press the (REC) key. The bit rate is set, and the display returns to the condition of the previous step.
HINT
If you press the (MENU) key instead of the (REC) key, the bit rate is not changed, and the display returns to the condition of the previous step.
In principle, the sound quality obtained with a bit rate setting of 128 kbps is about on a par with FM radio, while a bit rate of 256 kbps gives CD quality. (Higher bit rate settings will not result in a significant change in sound quality.)
However, actual results will differ according
to the type of music, the playback environment, and other factors.
We recommend that you experiment with various settings. Check the resulting file sizes and play back the converted files to find the optimum setting for your needs.
6. Perform the MP3 conversion.
To go ahead with the MP3 conversion process, move the cursor to "ENCODE" and press the (REC) key. The source file will remain unchanged, and an additional file called xxxxxxxx.MP3 (where xxxxxxxx is the original file name) will be created in the same folder. The display then returns to the condition of step 3.
If a file with the same name already exists in the folder, a file name change confirmation screen appears.

Move the cursor to "RENAME" and press the (REC) key to change the file name ( p 50), or move the cursor to "CANCEL" and press the (REC) key to cancel the conversion procedure.
7. Return to the top screen.
Repeatedly press the (MENU) (MENU) key until the stereo mode top screen appears again.
Converting a 4-channel file pair to a stereo file (4-channel mode only)
You can convert a pair of stereo WAV files recorded in 4-channel mode into a single stereo WAV file.
This lets you adjust the front/rear/left/right level balance using the 3D panning function and then create a file that can be copied to a computer and burned onto an audio CD.
NOTE
- When converting a pair of stereo WAV files in this way, the quantization and sampling frequency settings of the resulting file will be the same as for the original files.
- For burning onto an audio CD, the source normally needs to be a WAV file with 44.1 kHz sampling frequency and 16 bit quantization. Therefore you should select the 44.1 kHz/16bit recording mode when making recordings that you want to ultimately burn onto CD ( p. 35).
1. Bring up the 4-channel mode main menu screen.
At the 4-channel mode top screen, press the (MENU) key.
HINT
When converting to a stereo file, you can have the 3D panning settings reflected in the result. Make sure that the settings are as you want them before starting the conversion procedure ( p. 32).
2. Bring up the FILE MENU screen.
Repeatedly press the (REW)/(FF) keys to move the cursor to "FILE" and press the (REC) key.
3. Select the file pair for conversion to a stereo WAV file.
Use the (REW)/FF) keys to move the cursor to the desired file pair and press the (REC) key.
The name of the currently selected file pair is shown at the top of the screen. Available file operations are listed in the lower part of the screen.
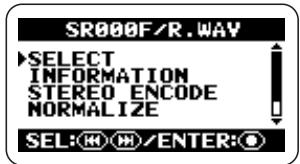
4. Bring up the FILE STEREO ENCODE screen.
Use the (REW)/(FF) keys to move the cursor to "STEREO ENCODE" and press the (REC) key. The display changes as follows.
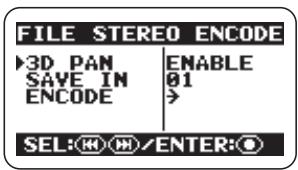
5. Select whether the 3D panning settings should be reflected in the resulting file.
You can have the current 3D panning settings (front/rear/left/right level balance) reflected in the stereo file after conversion. To do this, move the cursor to "3D PAN" and press the (REC) key. The display changes as follows.

To use the 3D panning settings, move the cursor to "ENABLE" and press the (REC) key. The setting is accepted, and the display returns to the condition of the previous step.
HINT
- If the "DISABLE" setting is selected, the current 3D panning settings have no effect, and the two stereo files will be mixed into the target file using a 1:1 ratio.
- If you press the MENU (MENU) key instead of the (REC) key, the setting is not changed, and the display returns to the condition of the previous step.
6. Select the store target folder.
If necessary, you can specify the folder where the resulting file should be stored. To do this, move the cursor in step 4 to "SAVE IN" and press the (REC) key. A screen for selecting the target folder appears.
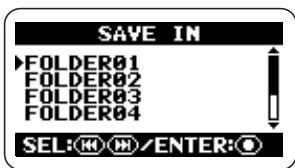
Move the cursor to the target folder (FOLDER 01 - 10) and press the (REC) key. The setting is accepted and the display returns to the condition of the previous step.
HINT
If you press the (MENU) (MENU) key instead of the (REC) key, the setting is not changed, and the display returns to the condition of the previous step.
7. Perform the stereo file conversion.
To go ahead with the conversion process, move the cursor to "ENCODE" and press the (REC) key. A new WAV file with the name "SRxxxxFR.WAV" (where xxx is a number from 000 to 499) will be created in the specified folder. The display then returns to the condition of step 3.
If a file with the same name already exists in the folder, a file name change confirmation screen appears.

Move the cursor to "RENAME" and press the (REC) key to change the file name ( p 50), or move the cursor to "CANCEL" and press the (REC) key to cancel the conversion procedure.
8. Return to the top screen.
Repeatedly press the (MENU) key until the 4-channel mode top screen appears again.
Checking the mark list
Whenever you press the (PLAY/PAUSE) key while a recording is in progress, the indication "MARKxx" (where xx is a number from 1 to 99) appears on the display and a mark is set. These marks can be used as BWF compatible cue points ( p. 24). A mark is also automatically set when a dropout error occurs during recording. To bring up a list of all marks along with an indication of the time (hours:minutes:seconds), proceed as follows.
1. Bring up the main menu screen.
At the stereo mode or 4-channel mode top screen, press the (MEN) (MEN) key.

2. Bring up the FILE MENU screen.
Repeatedly press the (REW)/FF) keys to move the cursor to "FILE", and press the (REC) key.
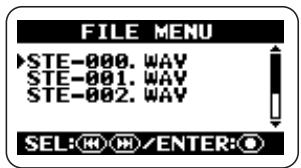
3. Select the file whose mark list you want to check.
Use the (REW)/FF) keys to move the cursor to the file, and press the (REC) key.
The name of the currently selected file appears at the top of the display, and a list of available files is shown.
4. Bring up the MARK LIST screen.
Use the (REW)/FF) keys to move the cursor to "MARK LIST", and press the (REC) key.

A normal mark is indicated by the symbol . A mark that was set because a dropout error occurred is indicated by . To scroll to mark information not currently visible on the display, use the ()/() keys.
NOTE
- The indication on this screen is for information only. The mark number or time cannot be changed.
- If 99 marks have already been set and a dropout error occurs, only the indication "Data Write Error" is shown but no mark is set.
5. Return to the top screen.
Repeatedly press the (MENU) key until the stereo mode or 4-channel mode top screen appears again.
SD Card Operations
This section explains various operations related to the SD card inserted in the H2.
Checking the remaining time on the card
You can check how much recording capacity the inserted card has left, in megabytes and in recording time. The indication is based on the currently selected operation mode (stereo mode or 4-channel mode) and recording mode (file format, sampling frequency, quantization).
NOTE
The steps described here cannot be performed while the recorder is operating. Stop recording or playback before carrying out these steps.
1. Bring up the main menu screen.
At the stereo mode or 4-channel mode top screen, press the (MENU) (MENU) key.
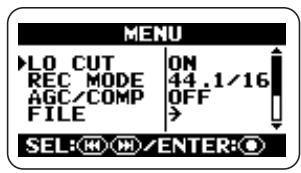
2. Bring up the SD CARD screen.
Repeatedly press the (REW)/(FF) keys to move the cursor to "SD CARD" and press the (REC) key.
The SD CARD screen that gives access to various SD card related functions appears.

3. Bring up the CARD REMAIN screen.
Use the (REW)/FF) keys to move the cursor to "REMAIN" and press the (REC) key. The CARD REMAIN screen shows an approximate indication of remaining capacity as a bar graph. The indication also shows megabytes and recording time.
Bar graph shows approximate remaining capacity
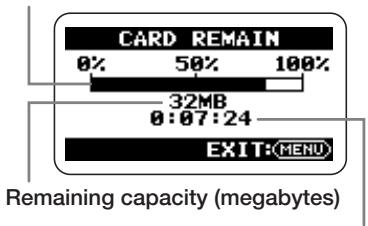
Remaining capacity (hours:minutes:seconds)
4. Return to the top screen.
Repeatedly press the (MENU) key until the stereo mode or 4-channel mode top screen appears again.
Formatting a card
Before using an off-the-shelf SD card or an SD card that was formatted in another computer, you must format the card in the H2.
Normally, when you insert such a card into the H2, a screen asking you to format the card will come up. Simply follow the on-screen instructions in such a case. If the indication "NO CARD" appears although you have inserted an SD card, format it according to the steps described below.
NOTE
- When you format a card, all data which were stored on the card up to that point are erased and cannot be restored. Take care not to accidentally delete any data that you want to keep.
- The steps described here cannot be performed while the recorder is operating. Stop recording or playback before carrying out these steps.
1. Bring up the main menu screen.
At the stereo mode or 4-channel mode top screen, press the (MEN) (MEN) key.
2. Bring up the SD CARD screen.
Repeatedly press the (REW)/(FF) keys to move the cursor to "SD CARD" and press the (REC) key.
The SD CARD screen that gives access to various SD card related functions appears.
3. Bring up the CARD FORMAT screen.
Use the (REW)/FF) keys to move the
cursor to "FORMAT" and press the (REC) key.

To go ahead with the formatting operation, move the cursor to "YES" and press the (REC) key.
After the operation is completed, the display returns to the top screen.
HINT
To cancel the formatting operation and return to the previous screen, press the (MENU) (MENU) key without pressing the (REC) key.
SD card dropout errors
Depending on the combination of operation mode and recording mode, data transfer to the SD card during recording may momentarily not be able to keep up with the data stream, leading to a brief sound dropout (skipping). When this occurs, the indication "Data write Error" is shown on the display during recording and after recording is finished. The likelihood for dropouts increases when the processing load on the H2 is heavy. If dropout errors occur, change the recording mode and redo the recording.
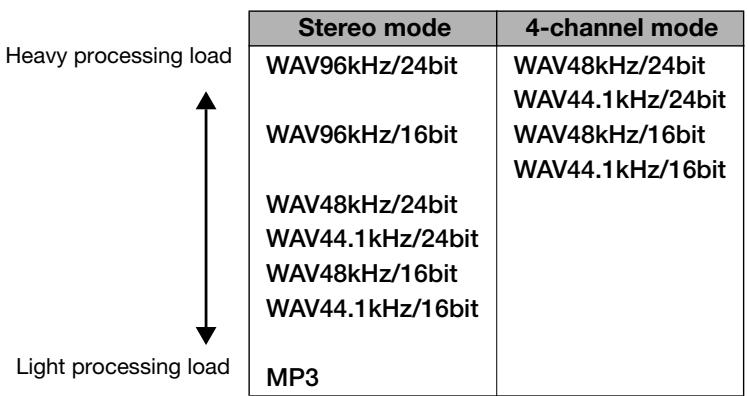
HINT
When a dropout error occurs during recording, a mark is created automatically at that point. You can view time information (hours:minutes:seconds) about these marks p.59).
Tuning an Instrument
The H2 incorporates a toner function that allows tuning based on the input signal from the built-in mics, the [EXT MIC IN] jack, or the [LINE IN] jack.
Available tuning modes include chromatic tuning where pitch is automatically detected in semitone steps, standard guitar/bass tuning, and other special tuning functions.
Using the chromatic tuner
The chromatic tuner automatically detects the pitch of the input signal in semitone steps, and displays the difference to the closest note. This type of tuning can be used for all instruments as well as for checking a vocal pitch.
NOTE
- The steps described here cannot be performed while the recorder is operating. Stop recording or playback before carrying out these steps.
- Before starting the operation below, make sure that the correct signal source for the instrument to tune is selected. When using the built-in mics for tuning, make sure that a suitable mic pattern is selected.
1. Bring up the main menu screen.
At the stereo mode or 4-channel mode top screen, press the (MENU) (MENU) key.
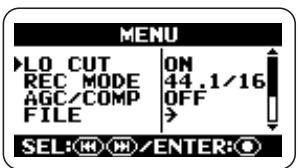
2. Bring up the TUNER screen.
Repeatedly press the (REW)/FF) keys to move the cursor to "TUNER" and press the (REC) key. The screen for making tuner settings comes up.
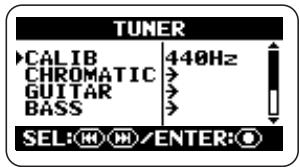
3. Bring up the CHROMATIC TUNER screen.
Move the cursor to "CHROMATIC" and press the (REC) key. The chromatic tuner mode is selected and the display changes as follows.

4. Perform tuning.
Play the note that you want to tune.
The pitch is automatically detected, and the display shows the nearest note name (C, C#, D, D#, E...). The display also indicates by how much the current pitch is different from the correct pitch.
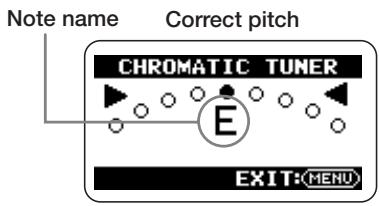


Watch the indication on the screen while tuning the instrument.
NOTE
If the display does not respond to the playing of the instrument, check the input source selection ( p 18), mic pattern selection ( p 21), and input sensitivity/recording level setting ( p 23).
5. Return to the top screen.
Repeatedly press the (MENU) key until the stereo mode or 4-channel mode top screen appears again.
Using the dedicated guitar/ bass tuner
By selecting a tuner mode other than "CHROMATIC", you can perform tuning that is tailored to special requirements for guitar or bass. For these tuner modes, you specify each string for tuning separately.
7-string guitar, 5-string bass and other unconventional tunings are also supported.
NOTE
- The steps described here cannot be performed while the recorder is operating. Stop recording or playback before carrying out these steps.
- Before starting the operation below, make sure that the correct signal source for the instrument to tune is selected. When using the built-in mics for tuning, make sure that a suitable mic pattern is selected.
1. Bring up the main menu screen.
At the stereo mode or 4-channel mode top screen, press the (MENU) (MENU) key.
2. Bring up the TUNER screen.
Repeatedly press the (REW)/FF) keys to move the cursor to "TUNER" and press the (REC) key. The screen for making tuner settings comes up.
3. Select the desired tuner mode.
Move the cursor to a mode other than "CHROMATIC" and press the () (REC) key.
You can select "GUITAR" (standard guitar tuning), "BASS" (standard bass tuning), or special guitar tuning.
In tuner modes other than "CHROMATIC",
the number of the string for tuning and note name for that string are displayed. For example, when you have selected "GUITAR", the display changes as follows.
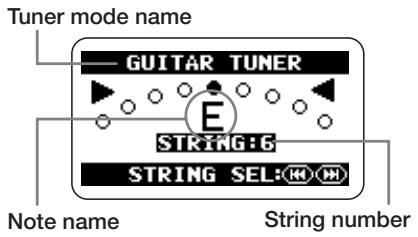
4. Perform tuning.
Use the (REW)/(FF) keys to specify the number of the string to tune (the note name also changes accordingly), and play the indicated string as an open string.
The pitch shift is shown on the display. Tune the string while watching the display.
Tune other strings in the same way.
| Tuner mode | GUITAR | BASS | OPEN A | OPEN D | OPEN E | OPEN G | DADGAD | |
| String number/ note name | 1 | E | G | E | D | E | D | D |
| 2 | B | D | C# | A | B | B | A | |
| 3 | G | A | A | F# | G# | G | G | |
| 4 | D | E | E | D | E | D | D | |
| 5 | A | B | A | A | B | G | A | |
| 6 | E | E | D | E | D | D | ||
| 7 | B | |||||||
5. Return to the top screen.
Repeatedly press the (MENU) key until the stereo mode or 4-channel mode top screen appears again.
Adjusting the reference pitch of the tuner
When the H2 is in the default condition, the tuner reference pitch is set to center A = 440Hz . You can adjust the reference pitch over the following range: center A = 435 - 445Hz
NOTE
The steps described here cannot be performed while the recorder is operating. Stop recording or playback before carrying out these steps.
1. Bring up the main menu screen.
At the stereo mode or 4-channel mode top screen, press the (MENU) (MENU) key.
2. Bring up the TUNER screen.
Repeatedly press the ()(REW) / ()(FF) keys to move the cursor to "TUNER" and press the () (REC) key. The screen for making tuner settings comes up.
3. Bring up the TUNER CALIB screen.
Move the cursor to "CALIB" and press the (REC) key. The TUNER CALIB screen for adjusting the reference pitch of the tuner comes up.

4. Select the reference pitch.
Use the (REW)/(FF) keys to select a setting in the range from 435 (center A = 435 Hz) to 445 (center A = 445 Hz), and press the (REC) key. The setting is made and the TUNER screen appears again.
The setting made here applies to all files and operation modes. The setting is stored also when the unit is turned off.
5. Return to the top screen.
Repeatedly press the (MENU) key until the stereo mode or 4-channel mode top screen appears again.
Using the Metronome Function
The H2 has a built-in metronome that can be used as a guide rhythm during recording. You can have the metronome operate only during recording and turn it off during playback, or you can use it to provide a pre-count before recording.
Switching the metronome/ pre-count on and off
The steps for turning the record/playback metronome sound and pre-count sound on and off and for setting the tempo are described below.
NOTE
The steps for turning the metronome sound and pre-count sound on and off cannot be performed while the recorder is operating. Stop recording or playback before carrying out these steps.
1. Bring up the main menu screen.
At the stereo mode or 4-channel mode top screen, press the (MEN) (MEN) key.
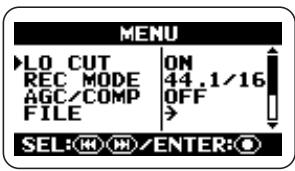
2. Bring up the METRONOME screen.
Repeatedly press the (REW)/FF) keys to move the cursor to "METRONOME" and press the (REC) key. The screen for making metronome settings comes up.
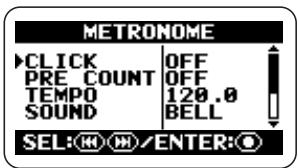
3. Switch the metronome sounds on or off.
Move the cursor to "CLICK" and press the (REC) key to bring up the METRONOME CLICK screen.

At this screen, you can specify how the metronome works: "OFF" (always off), "●/▶" (on during recording and playback), "●" (on during recording only), and "▶" (on during playback only)
Move the cursor to an item and press the (REC) key to select the setting. The setting is accepted and the METRONOME screen appears again.
4. Switch the pre-count on or off.
At the METRONOME screen, move the cursor to "PRECOUNT" and press the (REC) key. The METRONOME PRECOUNT
screen comes up.

At this screen, you can specify whether to play a pre-count before recording or playback. The following settings are available.
OFF
No pre-count.
1-8
Play the specified number of beats as a precount.
SPECIAL
Play a special pre-count pattern as shown below.

Move the cursor to one of the items and press the (REC) key. The change is accepted and the METRONOME screen appears again.
HINT
- The pre-count can be used also when the metronome is set to OFF.
- When the auto record or pre-record function is set to ON, pre-count settings cannot be made.
5. Specify the metronome tempo.
On the METRONOME screen, move the cursor to "TEMPO" and press the (REC) key to bring up the METRONOME TEMPO screen.

This screen lets you set the tempo of the metronome in the range from 40.0 to 250.0 (BPM), in steps of 0.1 units.
Use the ()(REW) / ()(FF) keys to select the tempo value and then press the () (REC) key. The setting is accepted and the METRONOME screen appears again.
HINT
- For any item, you can return to the METRONOME screen without making a setting by pressing the (MENU) (MENU) key instead of the (REC) key.
- If you start the playback before step 1, you can set the tempo while listening to the metronome sound. However, turning the metronome on or off is not possible while the recorder is operating, therefore you must turn the metronome on first from the top screen.
6. Return to the top screen.
Repeatedly press the (MENU) key until the stereo mode or 4-channel mode top screen appears again.
Glossary
BPM (Beats per Minute)
Indicates the number of quarter notes that are played in one minute.
Making metronome/ pre-count optional settings
You can control the type of click sound, dynamic pattern, and volume level for the metronome/pre-count function.
HINT
If you start the playback function before carrying out the steps below, you can select the sound and pattern while listening to the actual metronome sound.
1. Bring up the main menu screen.
At the stereo mode or 4-channel mode top screen, press the (MEN) (MEN) key.
2. Bring up the METRONOME screen.
Repeatedly press the (REW)/FF) keys to move the cursor to "METRONOME" and press the (REC) key. The screen for making metronome settings comes up.
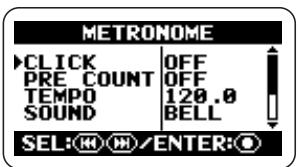
3. Select the sound for the metronome/pre-count.
Move the cursor to "SOUND" and press the (REC) key to bring up the METRONOME SOUND screen.
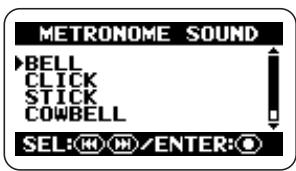
At this screen, you can select the metronome/ pre-count sound from the following choices.
BELL
Normal metronome sound (combination of bell sound and click sound)
- CLICK
Click sound
- STICK
Stick beating sound
COWBELL
Cowbell sound
HI-Q
Synthesizer type click sound
Move the cursor to the desired item and press the (REC) key. The setting is accepted and the METRONOME screen appears again.
4. Select the metronome dynamic pattern.
Move the cursor to "PATTERN" and press the (REC) key to bring up the "METRONOME PATTERN" screen.

At this screen, you can select the beat pattern from 0/4 to 8/4 or 6/8 (0/4 results in unaccented sound).
Move the cursor to the desired item and press the (REC) key. The setting is accepted and the METRONOME screen appears again.
5. Set the volume level for the metronome/pre-count.
Move the cursor to "LEVEL" and press the (REC) key to bring up the "METRONOME LEVEL" screen.

At this screen, you can select the metronome volume in the range from 0 - 10.
Use the (REW)/(FF) keys to set the volume and press the (REC) key. The setting is accepted and the METRONOME screen appears again.
HINT
For any item, you can return to the METRONOME screen without making a setting by pressing the (MENU) key instead of the (REC) key.
6. Return to the top screen.
Repeatedly press the (MENU) key until the stereo mode or 4-channel mode top screen appears again.
Connecting the H2 to a Computer
Connecting the [USB] port of the H2 to a computer allows use of the H2 as a card reader or audio interface.
When used as a card reader, the SD card inserted in the H2 can be accessed directly from the computer.
When used as an audio interface, the input signal of the H2 can be recorded directly by the computer, or an output signal from the computer can be played back via the H2.
Using the H2 as a card reader
When you connect the [USB] port of the H2 to a computer, the H2 will be recognized as card reader, and the SD card inserted in the H2 can be accessed directly from the computer. This lets you easily copy your recordings to the computer for further editing or burning to an audio CD.
The environment requirements for using the H2 as a card reader are as follows.
Supported operating systems
- Windows XP
Windows Vista
MacOS X (10.2 or later)
1. Connect the H2 and the computer.
Connect the [USB] port (Mini USB) of the H2 to a USB port on the computer, using a USB cable. If you connect the [USB] port to the computer while the H2 is off, the H2 can be started on USB bus power. In this case the USB menu of step 3 comes up automatically and you can skip steps 2 and 3.
2. Bring up the main menu screen.
At the stereo mode or 4-channel mode top screen, press the (MENU) (MENU) key.
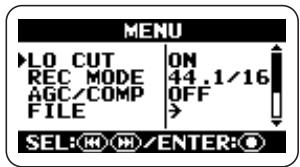
3. Bring up the USB screen.
Repeatedly press the (REW)/(FF) keys to move the cursor to "USB" and press the (REC) key.
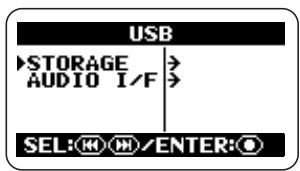
4. Have the H2 recognized by the computer.
To have the H2 recognized as a card reader by the computer, move the cursor to "STORAGE" and press the (REC) key.
The computer and the H2 go into the online condition and the display changes as follows.

An icon for the SD card in the H2 will appear on the desktop of the computer, and the card can be accessed from the computer.
The contents of the folders on the SD card are as follows.
SYS
Contains files with various system settings of the H2.
FOLDER01 - FOLDER10
Contains audio files recorded in stereo mode.
4CH
Contains audio files recorded in 4-channel mode.
NOTE
Never change or delete the content of the SYS folder. Otherwise the H2 will not operate normally.
5. You can now exchange files between the computer and the H2.
To copy audio files from the H2 to the computer, double-click on the H2 icon shown on the computer, and access one of the FOLDER01 - FOLDER10 folders or the 4CH folder. Then drag & drop the desired file(s) to the computer.
To copy audio files from the computer to the H2, drag & drop the desired file(s) to one of the FOLDER01 - FOLDER10 folders or the 4CH folder.
NOTE
- Before you copy files from the computer to the H2, make sure that the file format, sampling frequency, and quantization of the files to be copied are supported by the H2. If you copy unsupported files, playback is not possible.
- If you change the names of files in the 4CH folder, these will no longer be recognized by the H2. If you copy such files to the computer and back again to the H2, do not change the file names.
- In 4-channel mode, a pair of stereo files for front and rear is always handled together. When trimming or otherwise editing such files on a computer, process both files together.
NOTE
- The H2 will only recognize file names consisting of alphanumeric characters.
- If you change file names using a generic SD card reader/writer, the files may no longer be recognized by the H2.
6. Cancel the connection between H2 and computer.
To terminate the connection, cancel the online condition at the computer.
- When using Windows
Click the "safely remove hardware" icon in the task tray and select the H2 as the device to remove.
- When using a Macintosh
Select the H2 icon and drag-and-drop it into the trash.
7. Return to the top screen.
Repeatedly press the (MENU) key until the stereo mode or 4-channel mode top screen appears again.
NOTE
- When the unit was started on USB power, you cannot return to the screen before step 4. To return to the top screen, disconnect the USB cable to turn power off, and then set the [POWER] switch of the H2 to ON to start it up normally.
- If you press the (MEN) (MENU) key instead of terminating the connection at the computer, the connection will also be interrupted, and an error indication will appear at the computer. To prevent the possibility of file damage, be sure to cancel the connection at the computer first.
Using the H2 as an audio interface
This section describes how to use the H2 as an audio interface for the computer.
About the audio interface functions
The environment requirements for using the H2 as an audio interface are as follows.
Supported operating systems
- Windows XP
-Windows Vista - MacOS X (10.2 or later)
Quantization
16 bit
Sampling frequencies
44.1 kHz or 48 kHz
When the H2 has been recognized as an audio interface by the computer, the input signal to the H2 can be recorded directly on the computer, and the output signal of the computer is available at the [PHONES/LINE OUT] jack of the H2.
To perform recording and playback on the computer, separate dedicated software is
Glossary
Audio interface
A device that allows importing an audio signal into the computer as data, and output of audio data from the computer as an audio signal.
USB bus power
A function for powering external devices connected to a computer via a USB cable.
required. For details on operation, refer to the documentation of the software.
HINT
- The H2 will be recognized as a 2-channel input/output enabled audio interface.
- Also while using the H2 as an audio interface, the low-cut filter, AGC/compressor/limiter, tuner, and other functions can be used.
Preparations for connection
This section explains the settings that are required to use the H2 as an audio interface.
1. Connect the [USB] port of the H2 to a USB port on the computer, using a USB cable.
If you connect the [USB] port to the computer while the H2 is off, the H2 can be started on USB bus power. In this case the USB menu of step 3 comes up automatically and you can skip steps 2 and 3.
2. Bring up the main menu screen.
At the stereo mode or 4-channel mode top screen, press the (MENU) (MENU) key.
3. Bring up the USB screen.
Repeatedly press the (REW)/(FF) keys to move the cursor to "USB" and press the (REC) key.
4. Bring up the USB AUDIO I/F screen.
Use the (REW)/FF) keys to move the cursor to "AUDIO I/F" and press the (REC) key.
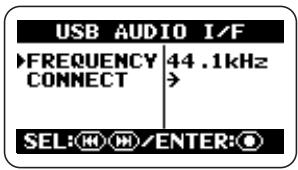
At this screen, the following settings are possible.
FREQUENCY
Sets the sampling frequency to use when the H2 operates as an audio interface.
- CONNECT
When you move the cursor to this item and press the (REC) key, the H2 will be recognized as an audio interface by the computer.
5. Select the sampling frequency.
To change the sampling frequency setting, move the cursor to "FREQUENCY" and press the (REC) key.
The FREQUENCY screen appears.

At this screen, use the (REW)/(FF) keys to select the sampling frequency (44.1 kHz or 48 kHz) and press the (REC) key to accept the setting.
The USB AUDIO I/F screen appears again.
HINT
To cancel the setting and return to the previous screen, press the (MENU) (MENU) key without pressing the (REC) key.
NOTE
Be sure to set the sampling frequency of the H2 to the same value as used by the computer. If the setting is different, communication with the computer cannot be carried out normally.
6. Return to the top screen.
Repeatedly press the (MENU) key until the stereo mode or 4-channel mode top screen appears again.
NOTE
When the unit was started on USB power, you cannot return to the screen before the AUDIO I/F screen of step 4. To return to the top screen, disconnect the USB cable to turn power off, and then set the [POWER] switch of the H2 to ON to start it up normally.
Enabling audio interface functions
To use the H2 as an audio interface, proceed as follows.
1. Connect the [USB] port of the H2 to a USB port on the computer, using a USB cable.
If you connect the [USB] port to the computer while the H2 is off, the H2 can be started on USB bus power. In this case the USB menu of step 3 comes up automatically and you can skip steps 2 and 3.
2. Bring up the main menu screen.
At the stereo mode or 4-channel mode top screen, press the (MENU) (MENU) key.
3. Bring up the USB screen.
Repeatedly press the (REW)/(FF) keys to move the cursor to "USB" and press the (REC) key.
4. Bring up the USB AUDIO I/F screen.
Use the (一) (REW)/FF) keys to move the cursor to "AUDIO I/F" and press the () (REC) key.
5. Have the H2 recognized by the computer.
Use the (REW) / (FF) keys to move the cursor to "CONNECT" and press the (REC) key. The USB AUDIO I/F screen appears.
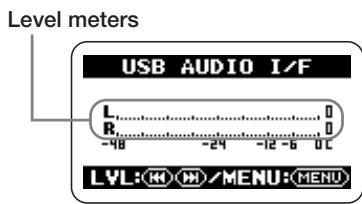
When this screen is shown, the H2 has been recognized as an audio interface by the computer. The level meters in the center of the screen show the input level during recording and the output level during playback.
HINT
To perform audio signal input/output via the H2, you must also make an appropriate audio interface selection at the computer.
For details, refer to the software used on the computer.
6. Select the input source and make settings for input sensitivity and recording level.
- Input source selection
Select the input source in the same way as when using the H2 as a recorder ( p.18) . However, when using the built-in mics, the SURROUND 4CH mic pattern cannot be selected.
- Input sensitivity setting
When using the built-in mics or an external mic connected to the [EXT MIC IN] jack, set the [MIC GAIN] switch to an appropriate position. The procedure is the same as when using the H2 as a recorder ( p. 15).
Recording level setting
When the above screen is shown, you can use the (REW)/(FF) keys to set the recording level. The procedure is the same as when using the H2 as a recorder ( p. 16).
7. Bring up the USB AUDIO I/F MENU screen.
While the USB AUDIO I/F screen is shown, pressing the (MENU) (MENU) key brings up the USB AUDIO I/F MENU screen. Each press of the (MENU) (MENU) key toggles between these two screens.
When the H2 operates as an audio interface, the USB AUDIO I/F MENU screen gives access to the following functions.
- LO CUT
Lets you switch the low-cut filter on and off. Operation is the same as when using the H2 as a recorder ( p. 38).
AGC/COMP
Lets you select the AGC/compressor/limiter function and option. Operation is the same as when using the H2 as a recorder ( p. 37).
TUNER
Lets you use the built-in tuner. Operation is the same as when using the H2 as a recorder ( p. 63).
- PLUG-IN
Lets you switch plug-in power on and off. Operation is the same as when using the H2 as a recorder ( p. 80).
- INPUT
Lets you switch the input signal on and off. To do this, move the cursor to "INPUT" and press the (REC) key. Then move the cursor to "ON" or "OFF" on the screen and press the (REC) key. When the INPUT is switched off, the input signal is disabled and only the output from the computer is active.
8. Cancel the connection to the computer.
To cancel the connection to the computer, move the cursor on the USB AUDIO I/F MENU screen to "EXIT" and press the (REC) key.
When the connection to the computer is
canceled, the USB screen appears again.

HINT
If the unit was started on USB power, settings are saved when you move the cursor to "EXIT" and press the (REC) key to cancel the connection.
9. Return to the top screen.
Repeatedly press the (MENU) key until the stereo mode or 4-channel mode top screen appears again.
NOTE
When the unit was started on USB power, you cannot return to the screen before the AUDIO I/F screen of step 4. To return to the top screen, disconnect the USB cable to turn power off, and then set the [POWER] switch of the H2 to ON to start it up normally.
Other Functions
This section explains some additional functions and features of the H2.
Setting the date and time
You can set the internal clock and calendar of the H2. The setting is used for time stamping the files created during recording.
1. Bring up the main menu screen.
At the stereo mode or 4-channel mode top screen, press the (MENU) (MENU) key.
2. Bring up the DATE/TIME screen.
Repeatedly press the (REW)/(FF) keys to move the cursor to "DATE/TIME" and press the (REC) key.
On this screen, the underline symbol functions as a cursor.
3. Set the date and time.
Use the (REW)/(FF) keys to move the cursor to number you want to change and press the (REC) key. The number where the cursor is located is shown in reverse. This indicates that the number can be edited.
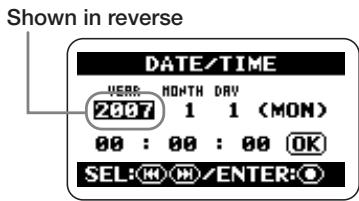
Use the (REW)/FF) keys to change the number indication, and press the (REC) key to accept the setting.
Change other numbers in the same way.
4. Confirm the date and time setting.
Use the (REW)/(FF) keys to move the cursor to the OK button, so that the button is shown in reverse. Then press the (REC) key. The setting is accepted and the display returns to the menu screen.
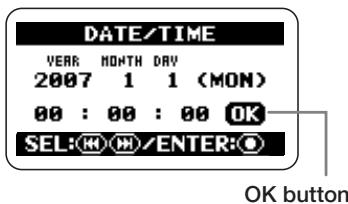
5. Return to the top screen.
Repeatedly press the (MENU) key until the stereo mode or 4-channel mode top screen appears again.
NOTE
If you remove the batteries while no AC adapter is connected to the H2, the date and time setting of the internal clock will be reset after about 1 to 2 minutes. When you turn on the H2 the next time, a reminder message will inform you of this.
Using the monitor function
When the H2 is in the default condition, the unit must be set to the recording standby or recording condition to enable input signal level monitoring.
If required, the H2 can be set up to always monitor the input signal.
1. Bring up the main menu screen.
At the stereo mode or 4-channel mode top screen, press the (MEN) (MENU) key.
2. Bring up the MONITOR screen.
Repeatedly press the (REW)/(FF) keys to move the cursor to "MONITOR" and press the (REC) key.

At this screen, you can turn input signal monitoring on and off.
ON
The input signal is always monitored.
OFF
The input signal is monitored only during recording standby and recording.
3. Select the desired setting.
Use the ()(REW) / ()(FF) keys to select the setting and press the (REC) key. The setting is accepted and the main menu appears again.
HINT
To cancel the change and return to the previous screen, press the (MENU) (MENU) key without pressing the (REC) key.
4. Return to the top screen.
Repeatedly press the (MENU) key until the stereo mode or 4-channel mode top screen appears again.
Supplying power to an external mic (stereo mode only)
When you connect a plug-in power type external mic to the [EXT MIC IN] jack of the H2, the H2 can supply power (2.5 V DC) to the mic. To switch plug-in power on and off, proceed as follows.
NOTE
This operation is possible in stereo mode only.
1. Bring up the main menu screen.
At the stereo mode top screen, press the (MENU) (MENU) key.
2. Bring up the PLUG-IN POWER screen.
Repeatedly press the (重) (REW)/FF) keys to move the cursor to "PLUG-IN" and press the () (REC) key.

3. Switch plug-in power on or off.
Use the (REW) / (FF) keys to select "ON" or "OFF" and press the () (REC) key. The setting is accepted and the display returns to the main menu screen.
HINT
To cancel the change and return to the preceding screen, press the (MENU) (MENU) key without pressing the (REC) key.
4. Return to the top screen.
Repeatedly press the (MENU) (MENU) key until the stereo mode top screen appears again.
Adjusting the display contrast
To adjust the contrast of the display, proceed as follows.
1. Bring up the main menu screen.
At the stereo mode or 4-channel mode top screen, press the (MENU) (MENU) key.
2. Bring up the CONTRAST screen.
Repeatedly press the () / () keys to move the cursor to "CONTRAST" and press the (REC) key. The current contrast setting (1 - 8) appears.
3. Adjust the contrast.
Use the (REW)/(FF) keys to change the contrast setting and press the (REC) key. The setting is accepted and the display returns to the main menu screen.
HINT
To cancel the change and return to the preceding screen, press the (MENU) key without pressing the (REC) key.
4. Return to the top screen.
Repeatedly press the (MENU) key until the stereo mode or 4-channel mode top screen appears again.
Controlling the backlight on/off setting
When the H2 is in the default condition, the display backlight turns itself off automatically after 15 seconds when no key is operated. You can increase this interval or set the backlight to be permanently on or off.
1. Bring up the main menu screen.
At the stereo mode or 4-channel mode top screen, press the (MENU) (MENU) key.
2. Bring up the LIGHT screen.
Repeatedly press the (REW)/(FF) keys to move the cursor to "LIGHT" and press the (REC) key.

This screen lets you select the backlight operation. The following settings are available.
15sec(default)
The backlight turns itself off 15 seconds after the last keystress.
30sec
The backlight turns itself off 30 seconds after the last keystress.
ON
The backlight is always on.
OFF
The backlight is always off.
3. Select the backlight setting.
Use the (REW)/FF) keys to select the setting and press the (REC) key. The setting is accepted and the display returns to the main menu screen.
HINT
To cancel the change and return to the preceding screen, press the (MENU) (MENU) key without pressing the (REC) key.
4. Return to the top screen.
Repeatedly press the (MENU) (MENU) key until the stereo mode or 4-channel mode top screen appears again.
Specifying the battery type
The H2 shows the remaining battery capacity using a segment indicator on the display. The accuracy of this indicator can be increased by specifying the battery type as described below.
1. Bring up the main menu screen.
At the stereo mode or 4-channel mode top screen, press the (MENU) (MENU) key.
2. Bring up the BATTERY TYPE screen.
Repeatedly press the (REW)/FF) keys to move the cursor to "BATTERY" and press the (REC) key.

The following settings are available.
- ALKALI (default)
Select this when using alkaline or oxyride batteries.
Ni-MH
Select this when using rechargeable nickel-hydride batteries.
3. Select the battery type setting.
Use the ()(REW) / ()(FF) keys to select the setting and press the (REC) key. The setting is accepted and the display returns to the main menu screen.
HINT
To cancel the change and return to the preceding screen, press the (MENU) key without pressing the (REC) key.
4. Return to the top screen.
Repeatedly press the (MENU) key until the stereo mode or 4-channel mode top screen appears again.
Making settings for the key hold function
To prevent changing settings by mistake while recording, the H2 incorporates a function that locks almost all controls. This is called the key hold function. To enable the function, proceed as follows.
1. Set the H2 to the playback or recording condition.
When the key hold function is enabled, almost all controls do not operate. Therefore the selected operation mode will be maintained.
2. Enable the key hold function.
Press and hold the (MENU) key until the indication "Key Hold" appears on the display.
When the key hold function is enabled, all controls except the [POWER] switch, [MIC GAIN] switch, and (MENU) (MENU) key have no effect. If any key is pressed, the indication shown below will appear for 2 seconds on the display.

3. Disable the key hold function.
Press the (MENU) key and hold it until the indication "Released" appears on the display.
Updating the system software
Using an SD card and a computer, it is possible for the user to update the system software of the H2. To do this, proceed as follows.
- Download the latest system software (firmware) from the ZOOM web site (http:// www.zoom.co.jp).
2. Copy the system software from the computer to the SD card.
For information on connecting the H2 to a computer, see the section "Using the H2 as a card reader" on page 71.
3. Bring up the VERSION UP screen.
Insert the SD card of step 2 into the H2. Then turn power on while holding down the = / (PLAY/PAUSE) key.
The following screen appears.
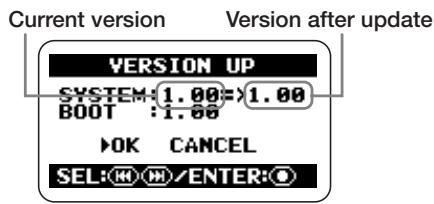
4. Execute the version upgrading process.
Use the (REW)/(FF) keys to move the cursor to "OK" and press the (REC) key.
The display changes as follows and the upgrading process begins.

When the upgrading process is finished, the indication "Complete" appears on the display. After you turn the H2 off and on again, it will start up with the new version.
Specifications
| Recorder | Stereo mode | 4CH mode |
| Tracks | 2 | 4 |
| Maximum number of simultaneous recording tracks | 2 | 4 |
| Maximum number of simultaneous playback tracks | 2 | 4 |
Recording time 4GB (SDHC)
Approx. 380 minutes (converted to WAV 44.1kHz / 16 bit stereo track)
Approx. 68 hours (converted to MP3 44.1kHz/128kbps stereo track)
- Recording times are approximations. Actual times may differ according to recording conditions.
Maximum recording file size 2 GB
Locate function Hours/Minutes/Seconds
Audio file editing functions
Time Stamp check, Rename, Delete, Size check, Devide,Normalize
Other functions
MP3 post-encode, A-B repeat, Lo-cut filter, AGC/compressor/limiter, Marker,
Tuner
Chromatic, Guitar, Bass, Open A/D/E/G, DADGAD
Metronome
Sound sources 5
Beat 0/4 - 8/4, 6/8
Tempo 40.0~250.0 BPM
A/D conversion 24 bit
128 times oversampling
D/A conversion 24 bit
128 times oversampling
Recording media SD memory card (16MB - 2GB), SDHC memory card (4GB)
Data type
Format WAV
Quantization 16/24bit
Sampling frequency
44.1kHz, 48kHz, 96kHz (Stereo mode)
44.1kHz, 48kHz (4CH mode)
Format MP3 (Stereo mode)
Bit rate 48,56,64,80,96,112,128,160,192,224,256
320 kbps, VBR
Sampling frequency
44.1kHz
Bit rate 32,40,48,56,64,80,96,112,128,160,192,224, 256,320kbps,VBR
Sampling frequency
44.1kHz, 48kHz
Display 128x64 dots
Full-dot LCD (with backlight)
Inputs LINE IN
Mini stereo phone jack
Input impedance 10kilohms
Input level -10dBm
EXT MIC IN Mini stereo phone jack (Plug-in powered 2.5V)
Input impedance 20kilohms
Input level L -20dBm
M -30dBm
H -40dBm
Built-in stereo mic
W-XY stereo microphone
MIC GAIN L +1.5dB
M +17dB
H +27dB
Output PHONES/LINE OUT
Mini stereo phone jack
Output load impedance 10 kilohms or more
Rated output level -10 dBm
PHONES
15mW + 15mW (into 32-ohm load)
USB USB 2.0 full speed
Mass storage class operation, Audio interface operation(16bit 44.1kHz/48kHz)
Bus-powered operation
Power requirements
9 V DC, 300mA from AC adapter (ZOOM AD-0006)
Batteries IEC R6 (size AA) x 2
Continuous recording time 4 hours
Continuous playback time 4.5 hours
Dimensions 63.5(W) x 110(D) x 32(H)
Weight 110g
^*0dBm = 0.775Vrms
Troubleshooting
If there are problems during operation of the H2, check the following points first.
Problems during recording/ playback
No sound, or sound is very weak.
- Check the connections to your monitor system, and the volume setting of the system.
- Check whether the volume setting of the H2 is low.
Cannot hear recorded sound, or sound is very weak.
- When using the built-in mics, check whether the selected mic pattern and the mic orientation are suitable ( p. 21).
- Check the setting of the [MIC GAIN] switch ( p. 15).
- Check whether the recording level setting is appropriate ( p.16)
- If a CD player or similar device is connected to the [LINE IN] jack, try increasing the output level setting of the device.
Cannot use built-in mics/external mic, cannot select mic pattern.
-
If anything is connected to the [EXT MIC IN] jack or [LINE IN] jack, the built-in mics do not operate and the mic pattern cannot be selected. Disconnect all other equipment.
-
If something is connected to the [LINE IN] jack, the [EXT MIC IN] jack is disabled.
Cannot record.
-
Verify that an SD card is inserted in the card slot.
-
If the indication "Key Hold" is shown on the display, the key hold function is active. Disable the key hold function ( p. 84).
Level balance of material recorded in 4-channel mode is strange.
- Check the 3D panning settings and reset them if necessary ( p. 32).
Other problems
Unit is not recognized although [USB] port is connected to computer.
- Check whether operating system of computer is supported ( p. 71).
To make the computer recognize the H2, the connection must be initiated from the H2 ( p. 71).
Error Messages
| Card related messages | Cause | Remedy |
| No Card | No SD card is inserted. | Insert SD card and turn power on. |
| No File | A valid file was not found. | |
| Card Format Error! | SD card formatting process failed, or card was not recognized normally. | * |
| Card Full! | Card became full during recording | |
| File name exists! | File name change was attempted, but file with same name already exists. | Specify a different file name. |
| Stop Recorder! | User attempted to access a menu not available during playback or recording. | Stop the recorder operation first. |
| Card Protected | The SD card is write-protected. | Change setting of card's write-protect switch. |
| Format Card? | SD card with incorrect format was inserted. | When you select "YES" at this screen and then press the (REC) key, all data are erased and initialization is carried out. |
| Now Recording! | User attempted to access a menu not available during recording or recording standby. | Stop recording first. |
| File Create Error! | The file could not be created at start of recording. | * |
| Card Error! | A card error has occurred. | |
| File Protected | User attempted to write to a read-only file from the file menu. | Change the read-only file attribute using a computer. |
| File Rename Error! | A blank or invalid file name was specified during file name editing. | Do not use invalid characters. |
| Card Write Error | Shown when an error occurs during file write other than recording. | * |
| Card Read Error! | Shown when an error occurs when opening a file. | |
| Data Write Error | Shown when data transfer to SD card cannot keep up with data stream during recording. | Reduce sampling frequency and/or number of bits. |
- If card related error messages occur frequently, the SD card may be defective.
| Other messages | Cause | Remedy |
| RESET DATE/TIME | The internal clock was reset because battery backup was interrupted. | Set the date and time again. The internal clock requires batteries to be inserted. |
| Low Battery! | Battery voltage is low. | Replace batteries. |
| Please Power Off | Shutdown procedure is complete. | Set power switch to OFF. |
| Please pull out external input | When external mic or component is connected, mic pattern cannot be selected. | Disconnect any external mic or component connected to [EXT MIC IN] or [LINE IN] jack. |
| Only Built-in MIC is active | External mic or component is connected, although only built-in mic is active in 4-channel mode. | |
| Invalid File! | An invalid file was specified. | Select a valid file. |
Index
3D panning 32
4-channel mode 6,27
Balance adjustment (3D panning) 32
Converting to stereo file 57
Mic pattern selection 27
Playback 31
Recording 29
Recording mode selection. 35
Setup examples. 29
[A]
A-B repeat 46
AGC (Auto Gain Control).. 37
Audio interface. 73
Auto record function.....39
[B]
Backlight on/off. 82
Batteries Inserting batteries.....11
Specifying battery type 83
Built-in mics.....5,6,19,29
BWF. 24
[C]
Connections. 10
Cue point (Marker)......24
[D]
Date/time setting 78
Display contrast. 81
[E]
External mic .5, 10, 20
Plug-in power on/off 80
External source recording 6,10,20
[F]
File format. 36
Files. 47
Change name. 50
Delete 52
Divide. 53
Info display. 49
Normalize. 54
Select. 48
Folder selection. 48
1
Input sensitivity...15, 23, 29
[K]
Key hold function.....84
[L]
Limiter. 37
Low-cut filter 38
[M]
MARK. 24,59
Mark list. 59
Metronome function.....67
[MIC ACTIVE] indicator 22
Mic pattern 21
Monitoring method selection 79
MP3. 35
Recording mode selection 35
WAV file MP3 file conversion. 55
[N]
Normalize function 54
[O]
Off-mic. 20
On-mic 20
Operation mode. 14
[P]
Play mode 45
Playback
4-channel mode..... 31
Stereo mode 25
[PLAY/REC] indicator
16, 17, 23, 30
Plug-in power on/off.....80
Pre-record function. 42
[Q]
Quantization. 36
[R]
Recording angle.... 5, 19, 21
Recording level... 15, 24, 30
Recording mode. 35
File format 36
Quantization. 36
Sampling frequency 36
Recording
4-channel mode.....29
Stereo mode 23
[S]
Sampling frequency.....36
SD card. 11,47
Dropout errors. 62
Folder contents 72
Initializing (formatting) 61
Remaining capacity
indication 60
Setup. 12
Setup examples
4-channel mode 29
Stereo mode.....19,20
Stereo mode. 5,18
Mic pattern selection 21
Playback 25
Recording 23
Recording mode selection. 35
Setup examples... 19,20
Surround 6
System software update 84
[T]
Top screen 4-channel mode.....28
Stereo mode. 18
Tuner function 63
Reference pitch. 66
[U]
USB bus power. 73
USB Use as audio interface 73
Use as card reader.... 71
[W]
WAV 36
WAV file MP3 file conversion 55
The FCC regulation warning (for U.S.A.)
This equipment has been tested and found to comply with the limits for a Class B digital device, pursuant to Part 15 of the FCC Rules. These limits are designed to provide reasonable protection against harmful interference in a residential installation. This equipment generates, uses, and can radiate radio frequency energy and, if not installed and used in accordance with the instructions, may cause harmful interference to radio communications. However, there is no guarantee that interference will not occur in a particular installation. If this equipment does cause harmful interference to radio or television reception, which can be determined by turning the equipment off and on, the user is encouraged to try to correct the interference by one or more of the following measures:
- Reorient or relocate the receiving antenna.
- Increase the separation between the equipment and receiver.
- Connect the equipment into an outlet on a circuit different from that to which the receiver is connected.
- Consult the dealer or an experienced radio/TV technician for help.

Disposal of Old Electrical & Electronic Equipment (Applicable in European countries with separate collection systems)
This symbol on the product or on its packaging indicates that this product shall not be treated as household waste. Instead it shall be handed over to the applicable collection point for the recycling of electrical and electronic equipment. By ensuring this product is disposed of correctly, you will help prevent potential negative consequences for the environment and human health, which could otherwise be caused by inappropriate waste handling of this product. The recycling of materials will help to conserve natural resources. For more detailed information about recycling of this product, please contact your local city office, your household waste disposal service or the shop where you purchased the product.

ZOOM CORPORATION
ITOHPIA Iwamotocho 2chome Bldg. 2F, 2-11-2, Iwamoto-cho,
Chiyoda-ku, Tokyo 101-0032, Japan
Web Site: http://wwwzoomo.co.jp
ZOOM H2 Simple Recording Guide
1 Turn power to H2 on
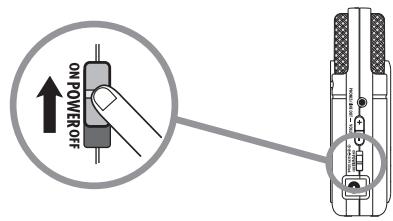
Set [POWER] switch ON.
Press (REC) key to set H2 to recording mode
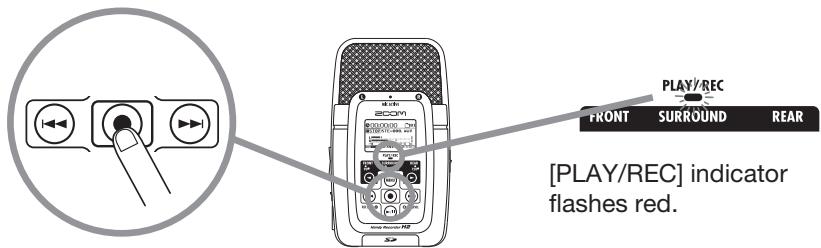
3 Adjust sensitivity with [MIC GAIN] switch
![ZOOM H2 - Adjust sensitivity with [MIC GAIN] switch - 1](/content/2025/01/152219/images/6a38dc8340dbc9d916532d1cee13d1db4bbba3747ef3755ac301326d76877f9d.jpg)
![ZOOM H2 - Adjust sensitivity with [MIC GAIN] switch - 2](/content/2025/01/152219/images/580754765bf33e08fb65fd9870810fe800398ec8b76a2867a7e76294541ad782.jpg)
You can monitor the input level.
Press (REC) key once more to start recording
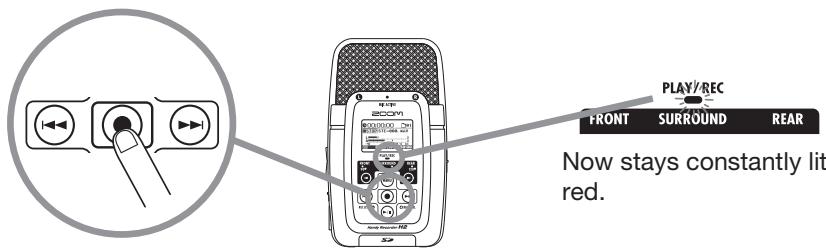
Press (REC) key to stop recording
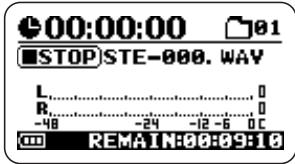
Unit returns to the start of the recorded file.
Tips for Mic pattern setting
Switching mic pattern by object or situation is effective for your recording.
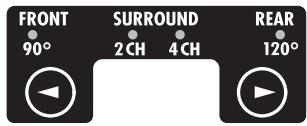

FRONT 90
For recording solo vocal or a musical instrument.
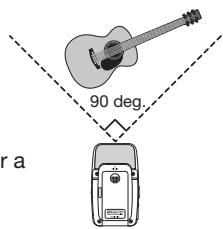

REAR 120
For stereo recording widely with room ambience.
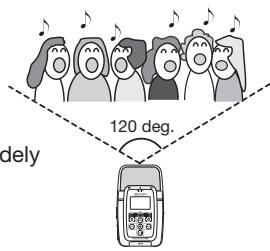
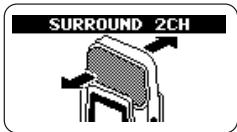
SURROUND

For recording band rehearsal etc.
It is possible to pick up the sound from front and rear side of H2 at once.
Use windscreen on mic of H2 when outdoor recording.

Press (PLAY/PAUSE) key to play the recorded file
Return counter zero or select previous file. Fast-rewind by holding down.
When using the H2 at default position for stereo / surround recording, left/right positioning is determined by the sound source/user facing the H2. If the H2 is pointed at a sound source on the opposite side than the user, the left/right positioning as perceived by the user during recording and the left/right positioning of the recorded content will be reversed.
H2 is facing a sound source on the same side as the user

Left/right positioning as seen from user and left/right positioning of recording will be identical.
L


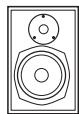
R
If required, it is possible to make the above panning position into left-right reversal. (Ver1.10 or later)
H2 is facing a sound source on the opposite side from the user
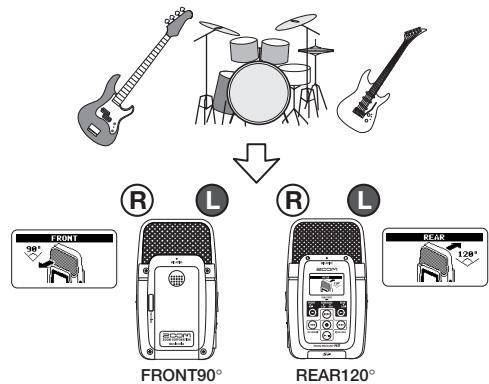
Left/right positioning as seen from user and left/right positioning of recording will be reversed.
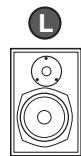
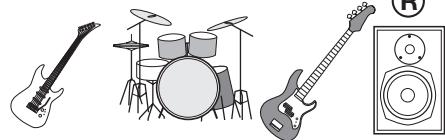
(1) In order to do that, perform the following steps, before recording: After pushed (MENU) KEY, point the cursor to L/R POSI and push (REC) KEY.
(2) With (REW) / (FF KEY, change the setting from PLAYER (Panning from player side) to LISTENER (Panning from listener side), then push (REC) KEY.
- Handy Recorder
- H2
- Operation Manual
- 200m
- SAFETY PRECAUTIONS / Usage Precautions
- SAFETY PRECAUTIONS
- Power requirements
- [AC adapter operation]
- [Battery operation]
- Environment
- Handling
- Connecting cables and input and output jacks
- Alterations
- Volume
- Usage Precautions
- Electrical interference
- Cleaning
- Contents
- What the H2 Can Do
- Stereo mode recording (→ p. 12, p. 18)
- Using the built-in mics
- - Solo vocals or a single instrument
- - Recording a band or capturing sounds in the field
- Recording front and back simultaneously
- Using an external mic
- ■Recording other external sources
- 4-channel mode recording (→ p.27)
- Recording a band rehearsal
- Field recording
- Metronome function (→ p. 67)
- Tuner function (→ p. 63)
- Exchanging audio files between a computer and the H2 (→ p. 71)
- Use as audio interface (→ p. 73)
- File operations (→ p. 47)
- SD card operations (→ p. 60)
- Parts of the H2
- Internal clock date/time setting
- Getting Connected
- NOTE
- Operation on Battery Power
- Open the battery compartment cover.
- Insert two IEC R6 (size AA) batteries.
- HINT
- Close the battery compartment cover.
- About SD Cards
- Recording
- Setup
- Power-on
- Insert a SD card into the H2.
- Turn power on in the order H2 → monitor system.
- Selecting the operation mode
- Verify that the top screen is being shown.
- Select the mic pattern.
- Setting the input sensitivity and recording level
- Set the sensitivity of the built-in mics.
- Set the H2 to the recording standby condition and adjust the recording level.
- Cancel the recording standby condition.
- Recording and playback
- Set the H2 to the recording standby condition.
- Start recording.
- Stop recording.
- Check the recording.
- Power-off
- Turn power off in the order monitor system → H2.
- Stereo Mode Recording
- About the stereo mode
- - Recording the signal from the built-in mics
- - Recording the signal from an external mic or an external component
- Counter
- Recorder status
- Level meters
- Option function symbol
- Battery indicator
- Folder number
- File name
- Remaining recording time
- Setup example (1): Built-in mics
- ■ Recording solo vocals or a single instrument
- Recording a live band or making field recordings
- Recording front and back simultaneously
- Setup example (2): External mic
- Setup example (3): External component
- Glossary
- On-mic/Off-mic
- Selecting the mic pattern for the built-in mics
- Verify that nothing is connected to the [EXT MIC IN] jack or [LINE IN] jack.
- Verify that the top screen is shown on the display.
- Select the mic pattern.
- FRONT 90° (stereo mode)
- SURROUND 2CH (stereo mode)
- REAR 120° (stereo mode)
- Bring up the stereo mode top screen.
- Activate the source to record.
- Recording from the built-in mics
- - Recording from an external mic or external component
- Adjust the input sensitivity.
- Set the H2 to the recording standby condition.
- Adjust the recording level.
- Start recording.
- Stop the recording.
- Check the recording.
- Playback
- Bring up the stereo mode top screen on the display.
- Select the folder which contains the file to play.
- Select the file to play.
- Play the selected file.
- 4-Channel Mode Recording
- About the 4-channel mode
- 4-channel mode symbol
- Setup examples
- Bring up the 4-channel mode top screen.
- Adjust the input sensitivity.
- Set the H2 to the recording standby condition.
- Adjust the recording level.
- Start recording.
- Stop the recording.
- Check the recording.
- Bring up the 4-channel mode top screen on the display.
- Select the file pair to play.
- Play the selected file pair.
- Adjusting the front/rear/ left/right balance (3D panning)
- With the H2 in 4-channel mode, select the file pair whose balance you want to adjust.
- Bring up the 4-channel mode main menu screen.
- Bring up the 3D PAN menu.
- PREVIEW
- - INPUT
- GO
- - RESET
- Select the signal to monitor during 3D panning adjustment.
- Bring up the 3D panning screen.
- Adjust the 3D panning setting.
- Convenient Recording Functions
- Selecting the recording mode
- Bring up the main menu screen.
- Bring up the REC MODE screen.
- Select the recording mode.
- Return to the top screen.
- File format
- Sampling frequency
- Quantization
- Using the AGC/compressor/ limiter function
- Bring up the AGC/COMP screen.
- Select the function from the AGC/compressor/limiter options.
- OFF
- AGC1 (GENERAL)
- AGC2 (SPEECH)
- COMP1 (GENERAL)
- COMP2 (VOCAL)
- COMP3 (DRUM)
- LIMIT1 (GENERAL)
- LIMIT2 (CONCERT)
- LIMIT3 (STUDIO)
- Attenuating the low frequencies
- Bring up the LO CUT screen.
- Activate the low-cut filter.
- Using the auto record function
- Bring up the AUTO REC screen.
- Set the various parameters for the auto record function.
- ON/OFF
- START LVL (Start level)
- STOP LVL (Stop level)
- - AUTO STOP
- Set the auto record function to ON and set the start level.
- If you want the recording to also stop automatically, set the auto stop function to ON and specify the stop level.
- Use the auto record function.
- Using the pre-record function
- Bring up the PRE REC screen.
- Activate pre-recording.
- Carry out recording.
- Recording a stereo signal in mono (stereo mode only)
- Bring up the MONO MIX screen.
- Set the MONO MIX function to ON.
- Perform the steps for recording.
- ConvenientPlayback Functions
- Selecting the play mode
- Bring up the PLAY MODE screen.
- PLAY ALL (default)
- - PLAY ONE
- - REPEAT ALL
- - REPEAT ONE
- Select the play mode.
- Using the A-B repeat function
- Bring up the A-B REPEAT screen.
- Specify point A.
- Specify point B.
- Perform repeat playback.
- Cancel repeat playback.
- Return to the top screen.
- File Operations
- Files and folders
- Selecting a folder (stereo mode only)
- Bring up the stereo mode main menu screen.
- Bring up the FOLDER SELECT screen.
- Select the folder.
- Selecting a file
- Bring up the FILE MENU screen.
- Select the file.
- Choose "SELECT".
- Viewing file information
- Select the file whose information you want to check.
- Bring up the FILE INFORMATION screen.
- Return to the top screen.
- Assigning a name to a file (stereo mode only)
- Select the file whose name you want to change.
- Bring up the FILE RENAME screen.
- Edit the file name.
- When the file name is as you want it, confirm the change.
- Deleting a file
- Select the file to delete.
- Bring up the FILE DELETE screen.
- Perform the file delete process.
- Return to the top screen.
- Dividing a file (stereo mode only)
- Select the file to divide.
- Bring up the FILE DIVIDE screen.
- Move the counter to the point where you want to divide the file.
- Perform the file division process.
- Raising the overall file level (normalize function)
- Select the file whose level you want to normalize.
- Bring up the FILE NORMALIZE screen.
- Converting a WAV file into an MP3 file (stereo mode only)
- Select the WAV file for conversion to MP3 format.
- Bring up the FILE MP3 ENCODE screen.
- Select the bit rate for the MP3 file.
- Perform the MP3 conversion.
- Converting a 4-channel file pair to a stereo file (4-channel mode only)
- Bring up the 4-channel mode main menu screen.
- Select the file pair for conversion to a stereo WAV file.
- Bring up the FILE STEREO ENCODE screen.
- Select whether the 3D panning settings should be reflected in the resulting file.
- Select the store target folder.
- Perform the stereo file conversion.
- Return to the top screen.
- Checking the mark list
- Select the file whose mark list you want to check.
- Bring up the MARK LIST screen.
- SD Card Operations
- Checking the remaining time on the card
- Bring up the SD CARD screen.
- Bring up the CARD REMAIN screen.
- Formatting a card
- Bring up the CARD FORMAT screen.
- SD card dropout errors
- Tuning an Instrument
- Using the chromatic tuner
- Bring up the TUNER screen.
- Bring up the CHROMATIC TUNER screen.
- Perform tuning.
- Using the dedicated guitar/ bass tuner
- Select the desired tuner mode.
- Adjusting the reference pitch of the tuner
- Bring up the TUNER CALIB screen.
- Select the reference pitch.
- Using the Metronome Function
- Switching the metronome/ pre-count on and off
- Bring up the METRONOME screen.
- Switch the metronome sounds on or off.
- Switch the pre-count on or off.
- 1-8
- SPECIAL
- Specify the metronome tempo.
- Making metronome/ pre-count optional settings
- Select the sound for the metronome/pre-count.
- BELL
- - CLICK
- - STICK
- COWBELL
- HI-Q
- Select the metronome dynamic pattern.
- Set the volume level for the metronome/pre-count.
- Connecting the H2 to a Computer
- Using the H2 as a card reader
- Supported operating systems
- Connect the H2 and the computer.
- Bring up the main menu screen.
- Bring up the USB screen.
- Have the H2 recognized by the computer.
- SYS
- FOLDER01 - FOLDER10
- 4CH
- You can now exchange files between the computer and the H2.
- Cancel the connection between H2 and computer.
- - When using Windows
- - When using a Macintosh
- Using the H2 as an audio interface
- About the audio interface functions
- Sampling frequencies
- Audio interface
- USB bus power
- Preparations for connection
- Connect the [USB] port of the H2 to a USB port on the computer, using a USB cable.
- Bring up the USB AUDIO I/F screen.
- FREQUENCY
- - CONNECT
- Select the sampling frequency.
- Enabling audio interface functions
- Have the H2 recognized by the computer.
- Select the input source and make settings for input sensitivity and recording level.
- - Input source selection
- - Input sensitivity setting
- Recording level setting
- Bring up the USB AUDIO I/F MENU screen.
- - LO CUT
- AGC/COMP
- TUNER
- - PLUG-IN
- Cancel the connection to the computer.
- Return to the top screen.
- Other Functions
- Setting the date and time
- Bring up the DATE/TIME screen.
- Set the date and time.
- Confirm the date and time setting.
- Using the monitor function
- Bring up the MONITOR screen.
- ON
- Select the desired setting.
- Supplying power to an external mic (stereo mode only)
- Bring up the PLUG-IN POWER screen.
- Switch plug-in power on or off.
- Adjusting the display contrast
- Bring up the CONTRAST screen.
- Adjust the contrast.
- Controlling the backlight on/off setting
- Bring up the LIGHT screen.
- 15sec(default)
- 30sec
- Select the backlight setting.
- Specifying the battery type
- Bring up the BATTERY TYPE screen.
- - ALKALI (default)
- Ni-MH
- Select the battery type setting.
- Making settings for the key hold function
- Set the H2 to the playback or recording condition.
- Enable the key hold function.
- Disable the key hold function.
- Updating the system software
- Copy the system software from the computer to the SD card.
- Bring up the VERSION UP screen.
- Execute the version upgrading process.
- Specifications
- Troubleshooting
- Problems during recording/ playback
- No sound, or sound is very weak.
- Cannot hear recorded sound, or sound is very weak.
- Cannot use built-in mics/external mic, cannot select mic pattern.
- Cannot record.
- Level balance of material recorded in 4-channel mode is strange.
- Other problems
- Unit is not recognized although [USB] port is connected to computer.
- Error Messages
- Index
- [A]
- [B]
- [C]
- [D]
- [E]
- [F]
- 1
- [K]
- [L]
- [M]
- [N]
- [O]
- [P]
- [Q]
- [R]
- [S]
- [T]
- [U]
- [W]
- The FCC regulation warning (for U.S.A.)
- Disposal of Old Electrical & Electronic Equipment (Applicable in European countries with separate collection systems)
- ZOOM CORPORATION
- ZOOM H2 Simple Recording Guide
- Turn power to H2 on
- Press (REC) key to set H2 to recording mode
- Adjust sensitivity with [MIC GAIN] switch
- Press (REC) key once more to start recording
- Press (REC) key to stop recording
- Tips for Mic pattern setting
- Press (PLAY/PAUSE) key to play the recorded file
- H2 is facing a sound source on the same side as the user
- H2 is facing a sound source on the opposite side from the user
Marque : ZOOM
Modèle : H2
Catégorie : Enregistreur audio portable