5620D - Scie circulaire MAKITA - Notice d'utilisation et mode d'emploi gratuit
Retrouvez gratuitement la notice de l'appareil 5620D MAKITA au format PDF.

| Intitulé | Valeur / Description |
|---|---|
| Type de produit | Scie circulaire sans fil |
| Caractéristiques techniques principales | Scie à main avec moteur puissant et lame de 165 mm |
| Alimentation électrique | Batterie Li-ion 18V |
| Dimensions approximatives | Longueur : 350 mm, Hauteur : 250 mm |
| Poids | 3,4 kg |
| Compatibilités | Compatible avec les batteries Makita 18V |
| Type de batterie | Batterie Lithium-ion |
| Tension | 18 Volts |
| Puissance | Max 3700 tr/min |
| Fonctions principales | Coupe précise dans divers matériaux, réglage de profondeur de coupe |
| Entretien et nettoyage | Nettoyer régulièrement la lame et le boîtier, vérifier l'état de la batterie |
| Pièces détachées et réparabilité | Disponibilité de pièces détachées chez les revendeurs agréés |
| Sécurité | Utiliser des lunettes de protection, vérifier la lame avant chaque utilisation |
| Informations générales | Idéale pour les travaux de menuiserie et de bricolage, légère et maniable |
FOIRE AUX QUESTIONS - 5620D MAKITA
Questions des utilisateurs sur 5620D MAKITA
0 question sur cet appareil. Repondez a celles que vous connaissez ou posez la votre.
Poser une nouvelle question sur cet appareil
Téléchargez la notice de votre Scie circulaire au format PDF gratuitement ! Retrouvez votre notice 5620D - MAKITA et reprennez votre appareil électronique en main. Sur cette page sont publiés tous les documents nécessaires à l'utilisation de votre appareil 5620D de la marque MAKITA.
MODE D'EMPLOI 5620D MAKITA
Cordless Circular Saw
MODEL 5620D
001320
INSTRUCTION MANUAL
WARNING:
For your personal safety, READ and UNDERSTAND before using.
SAVE THESE INSTRUCTIONS FOR FUTURE REFERENCE.
SPECIFICATIONS
| Model | 5620D | |
| Blade diameter | 165 mm | |
| Max. Cutting depth | at 90° | 54 mm |
| at 45° | 38 mm | |
| No load speed (min-1) | 2,600 | |
| Overall length | 364 mm | |
| Net weight | 3.4 kg | |
| Rated voltage | D.C. 18V | |
- Due to our continuing programme of research and development, the specifications herein are subject to change without notice.
Note: Specifications may differ from country to country.
Intended use
The tool is intended for performing lengthways and crossways straight cuts and mitre cuts with angles in wood while in firm contact with the workpiece.
WARNING:
When using battery operated tools basic safety precautions, including the following, should be followed to reduce the risk of fire, leaking batteries and personal injury: Read these instructions before operating this product and save these instructions.
For safe operations:
- Keep work area clean.
Cluttered areas and benches invite injuries.
- Consider the work environment.
Do not expose the tool to rain. Keep work area well lit. Do not use tools in the presence of flammable liquids or gases.
- Keep children away.
Do not let visitors touch the tool. Keep visitors away from work area.
- Store batteries or idle tools.
When not in use, tools and batteries should be stored separately in a dry, high or locked up place, out of reach of children.
Ensure that battery terminals cannot be shorted by other metal parts such as screws, nails, etc.
- Do not force the tool.
It will do the job better and safer at the rate for which it was intended.
- Use the right tool.
Do not force small tools or attachments to do the job of a heavy duty tool. Do not use tools for purposes not intended.
- Dress properly.
Do not wear loose clothing or jewellery, they can be caught in moving parts. Non-skid footwear is recommended when working outdoors. Wear protecting hair covering to contain long hair.
- Use protective equipment.
Use safety glasses and if the cutting operation is dusty, a face or dust mask.
- Connect dust extraction equipment.
If devices are provided for the connection of dust extraction and collection ensure these are connected and properly used.
- Do not abuse the supply cord (if fitted).
Never carry the tool by the cord or yank it to disconnect from the socket. Keep the cord away from heat, oil and sharp edges.
- Secure the work.
Use clamps or a vice to hold the work. It is safer than using your hand and it frees both hands to operate the tool.
- Do not over-reach.
Keep proper footing and balance at all times.
- Maintain tools with care.
Keep cutting tools sharp and clean for better and safer performance. Follow instructions for lubrication and changing accessories. Inspect tool cords periodically and if damaged have repaired by an authorized service facility.
- Disconnect tools.
Where the design permits, disconnect the tool from its battery pack when not in use, before servicing and when changing accessories such as blades, bits and cutters.
- Remove adjusting keys and wrenches.
Form the habit of checking to see that keys and adjusting wrenches are removed from the tool before turning it on.
- Avoid unintentional starting.
Do not carry the tool with a finger on the switch.
- Stay alert.
Watch what you are doing. Use common sense. Do not operate the tool when you are tired.
- Check damaged parts.
Before further use of the tool, a guard or other part that is damaged should be carefully checked to determine that it will operate properly and perform its intended function. Check for alignment of moving parts, free running of moving parts, breakage of parts, mounting and any other condition that may affect its operation. A guard or other part that is damaged should be properly repaired or replaced by an authorized service facility unless otherwise indicated in this instruction manual. Have defective switches replaced by an authorized service facility. Do not use the tool if the switch does not turn it on and off.
- Warning.
The use of any accessory or attachment, other than recommended in this instruction manual or the catalog, may present a risk of personal injury.
Ensure that the battery pack is correct for the tool. Ensure that the outside surface of battery pack or tool is clean and dry before plugging into charger.
Ensure that batteries are charged using the correct charger recommended by the manufacturer. Incorrect use may result in a risk of electric shock, overheating or leakage of corrosive liquid from the battery.
- Have your tool repaired by a qualified person.
This tool is constructed in accordance with the relevant safety requirements. Repairs should only be carried out by qualified persons using original spare parts, otherwise this may result in considerable danger to the user.
- Disposal of battery.
Ensure battery is disposed of safely as instructed by the manufacturer.
- Be aware that this tool is always in an operating condition, because it does not have to be plugged into an electrical outlet.
- Wear hearing protection.
- Keep Guards In Place and In Working Order. Never wedge or tie lower guard open. Check operation of lower guard before each use. Don't use if lower guard does not close briskly over saw blade.
CAUTION:
If saw is dropped, lower guard may be bent, restricting full return.
- Do not use blades which are deformed or cracked.
- Do not use blades made of high speed steel.
- Do not stop the blades by lateral pressure on the saw blade.
- Keep Blades Clean and Sharp.
Sharp blades minimize stalling and kickback.
- DANGER:
Keep Hands Away From Cutting Area.
Keep hands away from blades. Don't reach underneath work while blade is rotating. Don't attempt to remove cut material when blade is moving.
CAUTION: Blades coast after turn off.
- Support Large Panels (Fig. 1 & 2).
Large panels must be supported as shown in Fig. 1 to minimize the risk of blade pinching and kickback.
When cutting operation requires the resting of the saw on the workpiece, the saw shall be rested on the larger portion and the smaller piece cut off.
Fig. 1
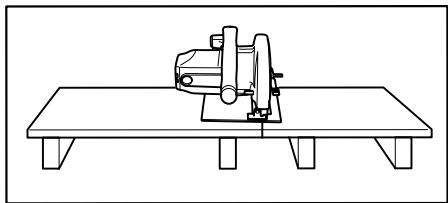
To avoid kickback, do support board or panel near the cut.

Fig. 2
Do not support board or panel away from the cut.
- Use Rip Fence.
Always use a fence or straight edge guide when ripping.
- Guard Against Kickback. (Fig. 1 & 3)
Kickback occurs when the saw stalls rapidly and is driven back towards the operator. Release switch immediately if blade binds or saw stalls. Keep blades sharp. Support large panels as shown in Fig. 1.
Use fence or straight edge guide when ripping. Don't force tool. Stay alert-exercise control. Don't remove saw from work during a cut while the blade is moving.
NEVER place your hand or fingers behind the saw. If kickback occurs, the saw could easily jump backwards over your hand, possibly causing severe injury.
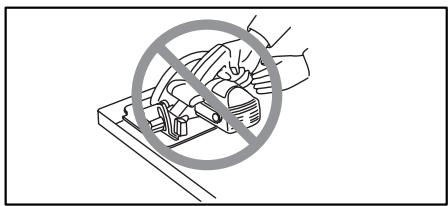
Fig. 3
- Lower guard should be retracted manually only for special cuts such as "Compound Cuts". Raise lower guard by Retracting Lever. As soon as blade enters the material, lower guard must be released. For all other sawing, the lower guard should operate automatically.
- Adjustments.
Before cutting be sure depth and bevel adjustments are tight.
- Use Only Correct Blades In Mounting.
Don't use blades with incorrect size holes.
Never use defective or incorrect blade washers or bolts.
- Avoid Cutting Nails.
Inspect for and remove all nails from lumber before cutting.
- Operate with proper hand support and proper workpiece support.
WARNING:
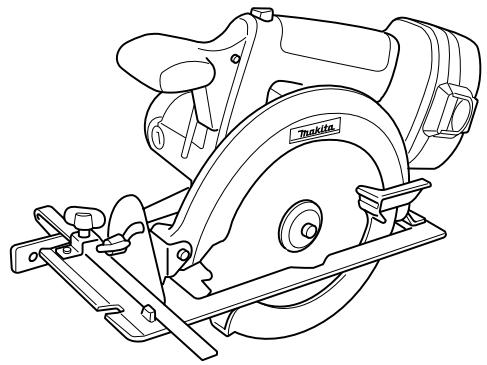
It is important to support the workpiece properly and to hold the saw firmly to prevent loss of control which could cause personal injury. Fig. 4 illustrates typical hand support of the saw.
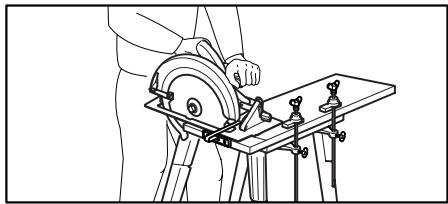
Fig. 4
A typical illustration of proper hand support and workpiece support.
- Place the wider portion of the saw base on that part of the workpiece which is solidly supported, not on the section that will fall off when the cut is made.
As example, Fig. 5 illustrates the RIGHT way to cut off the end of a board, and Fig. 6 the WRONG way. If the workpiece is short or small, clamp it down. DON'T TRY TO HOLD SHORT PIECES BY HAND! (Fig. 6)
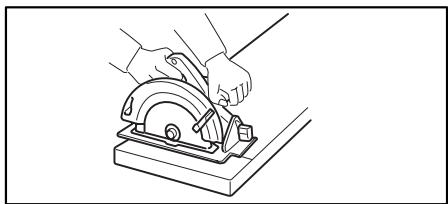
Fig. 5
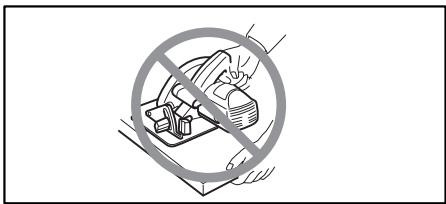
Fig. 6
- Never attempt to saw with the circular saw held upside down in a vise. This is extremely dangerous and can lead to serious accidents. (Fig. 7)
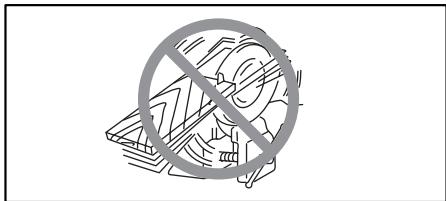
Fig. 7
-
Before setting the tool down after completing a cut, be sure that the lower (telescoping) guard has closed and the blade has come to a complete stop.
-
Using manufacturer data
-
Ensure that the diameter, thickness and other characteristics of the saw blade are suitable for the tool.
-
Ensure that the saw blade is suitable for the spindle speed of the tool.
-
Do not use any abrasive wheel.
SAVE THESE INSTRUCTION
IMPORTANT SAFETY INSTRUCTIONS FOR
BATTERY CARTRIDGE
ENC004-1
- Before using battery cartridge, read all instructions and cautionary markings on (1) battery charger, (2) battery, and (3) product using battery.
- Do not disassemble battery cartridge.
- If operating time has become excessively shorter, stop operating immediately. It may result in a risk of overheating, possible burns and even an explosion.
- If electrolyte gets into your eyes, rinse them out with clear water and seek medical attention right away. It may result in loss of your eyesight.
- Always cover the battery terminals with the battery cover when the battery cartridge is not used.
- Do not short the battery cartridge:
(1) Do not touch the terminals with any conductive material.
(2) Avoid storing battery cartridge in a container with other metal objects such as nails, coins, etc.
(3) Do not expose battery cartridge to water or rain.
A battery short can cause a large current flow, overheating, possible burns and even a breakdown.
- Do not store the tool and battery cartridge in locations where the temperature may reach or exceed 50^ (122°F).
- Do not incinerate the battery cartridge even if it is severely damaged or is completely worn out. The battery cartridge can explode in a fire.
- Be careful not to drop or strike battery.
SAVE THESE INSTRUCTIONS
Tips for maintaining maximum battery life
- Charge the battery cartridge before completely discharged.
Always stop tool operation and charge the battery cartridge when you notice less tool power. - Never recharge a fully charged battery cartridge. Overcharging shortens the battery service life.
- Charge the battery cartridge with room temperature at 10^ - 40^ (50^ - 104^) . Let a hot battery cartridge cool down before charging it.
- Charge the Nickel Metal Hydride battery cartridge when you do not use it for more than six months.
FUNCTIONAL DESCRIPTION
- Battery cartridge
- Button
- Lever

- Clamping screw
- Bevel scale plate
- Base
- Cutting line
CAUTION:
- Always be sure that the tool is switched off and the battery cartridge is removed before adjusting or checking function on the tool.
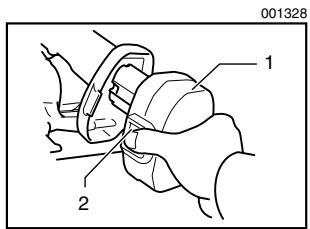
Installing or removing battery cartridge
- Always switch off the tool before insertion or removal of the battery cartridge.
- To remove the battery cartridge, withdraw it from the tool while pressing the buttons on both sides of the cartridge.
- To insert the battery cartridge, align the tongue on the battery cartridge with the groove in the housing and slip it into place. Always insert it all the way until it locks in place with a little click. If not, it may accidentally fall out of the tool, causing injury to you or someone around you.
- Do not use force when inserting the battery cartridge. If the cartridge does not slide in easily, it is not being inserted correctly.
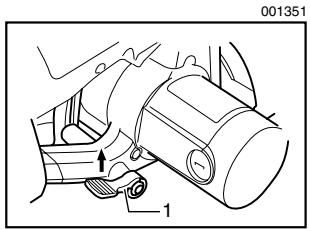
Adjusting depth of cut
CAUTION:
After adjusting the depth of cut, always tighten the lever securely.
Loosen the lever on the side of the rear handle and move the base up or down. At the desired depth of cut, secure the base by tightening the lever.
For cleaner, safer cuts, set cut depth so that no more than one blade tooth projects below workpiece. Using proper cut depth helps to reduce potential for dangerous KICKBACKS which can cause personal injury.
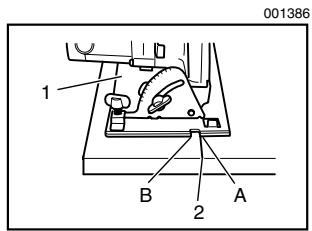
Bevel cutting
Loosen the clamping screw on the bevel scale plate on the front of the base. Set for the desired angle (0^ - 50^) by tilting accordingly, then tighten the clamping screw securely.
Sighting
For straight cuts, align the A position on the front of the base with your cutting line. For 45^ bevel cuts, align the B position with it.
- Lock-off button
- Switch trigger
ASSEMBLY
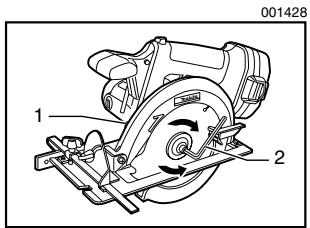
- Shaft lock
- Hex wrench
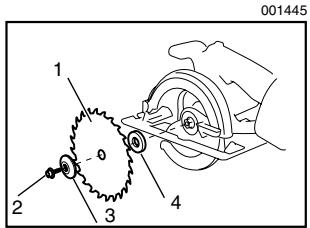
- Saw blade
- Hex bolt
- Outer flange
- Inner flange
Switch action
CAUTION:
- Before inserting the battery cartridge into the tool, always check to see that the switch trigger actuates properly and returns to the "OFF" position when released.
To prevent the switch trigger from being accidentally pulled, a lock-off button is provided. To start the tool, push in the lock-off button and pull the switch trigger. Release the switch trigger to stop.
CAUTION:
Always be sure that the tool is switched off and the battery cartridge is removed before carrying out any work on the tool.
Removing or installing saw blade
CAUTION:
- Be sure the blade is installed with teeth pointing up at the front of the tool.
- Use only the Makita wrench to install or remove the blade.
To remove the blade, press the shaft lock so that the blade cannot revolve and use the wrench to loosen the hex bolt clockwise. Then remove the hex bolt, outer flange and blade.
To install the blade, follow the removal procedure in reverse. BE SURE TO TIGHTEN THE HEX BOLT COUNTERCLOCKWISE SECURELY.
When changing blade, make sure to also clean upper and lower blade guards of accumulated sawdust. Such efforts do not, however, replace the need to check lower guard operation before each use.
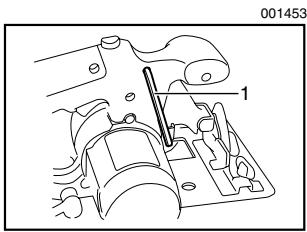
1. Hex wrench
OPERATION
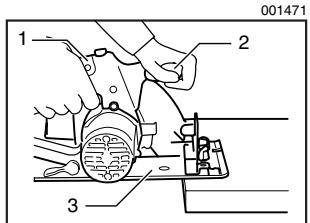
1. Rear handle
2. Front grip
3. Base
1. Clamp screw
2. Rip fence (Guide rule)
Hex wrench storage
When not in use, store the hex wrench as shown in the figure to keep it from being lost.
CAUTION:
- Be sure to move the tool forward in a straight line gently. Forcing or twisting the tool will result in overheating the motor and dangerous kickback, possibly causing severe injury.
- If the tool is operated continuously until the battery cartridge has discharged, allow the tool to rest for 15 minutes before proceeding with a fresh battery.
Hold the tool firmly. The tool is provided with both a front grip and rear handle. Use both to best grasp the tool. If both hands are holding saw, they cannot be cut by the blade. Set the base on the workpiece to be cut without the blade making any contact. Then turn the tool on and wait until the blade attains full speed. Now simply move the tool forward over the workpiece surface, keeping it flat and advancing smoothly until the sawing is completed.
To get clean cuts, keep your sawing line straight and your speed of advance uniform. If the cut fails to properly follow your intended cut line, do not attempt to turn or force the tool back to the cut line. Doing so may bind the blade and lead to dangerous kickback and possible serious injury. Release switch, wait for blade to stop and then withdraw tool. Realign tool on new cut line, and start cut again. Attempt to avoid positioning which exposes operator to chips and wood dust being ejected from saw. Use eye protection to help avoid injury.
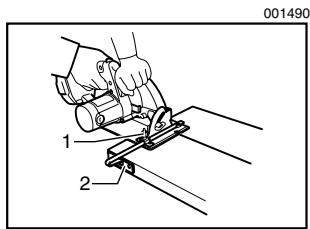
Rip fence (Guide rule)
The handy rip fence allows you to do extra-accurate straight cuts. Simply slide the rip fence up snugly against the side of the workpiece and secure it in position with the screw on the front of the base. It also makes repeated cuts of uniform width possible.
MAINTENANCE
CAUTION:
- Always be sure that the tool is switched off and the battery cartridge is removed before attempting to perform inspection or maintenance.
-
Adjusting screw
-
Base
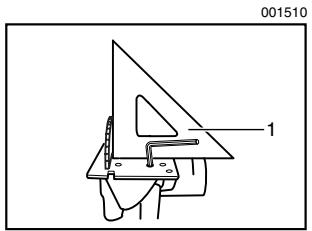
- Triangular rule
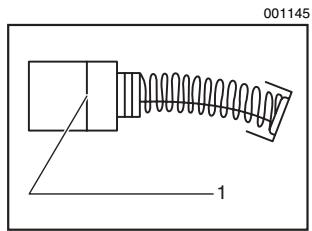
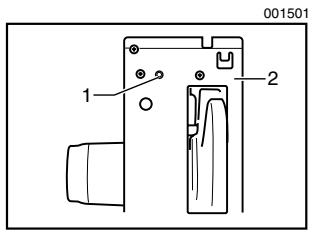
- Limit mark
- Brush holder cap
- Screwdriver
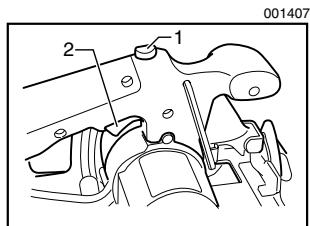
Adjusting for accuracy of 90^ cut (vertical cut)
This adjustment has been made at the factory. But if it is off, adjust the adjusting screw with a hex wrench while squaring the blade with the base using a triangular rule, try square, etc.
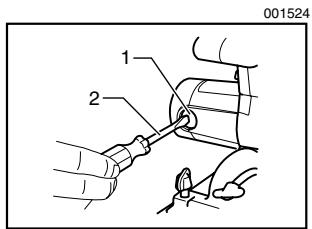
Replacing carbon brushes
Remove and check the carbon brushes regularly. Replace when they wear down to the limit mark. Keep the carbon brushes clean and free to slip in the holders. Both carbon brushes should be replaced at the same time. Use only identical carbon brushes.
Use a screwdriver to remove the brush holder caps. Take out the worn carbon brushes, insert the new ones and secure the brush holder caps.
To maintain product SAFETY and RELIABILITY, repairs, any other maintenance or adjustment should be performed by Makita Authorized Service Centers, always using Makita replacement parts.
ACCESSORIES
CAUTION:
These accessories or attachments are recommended for use with your Makita tool specified in this manual. The use of any other accessories or attachments might present a risk of injury to persons. Only use accessory or attachment for its stated purpose.
If you need any assistance for more details regarding these accessories, ask your local Makita service center.
-
Saw blades
-
Various type of Makita genuine batteries and chargers
Makita Corporation Anjo, Aichi, Japan