
KH 2306 - Chaîne Hi-Fi SILVERCREST - Notice d'utilisation et mode d'emploi gratuit
Retrouvez gratuitement la notice de l'appareil KH 2306 SILVERCREST au format PDF.


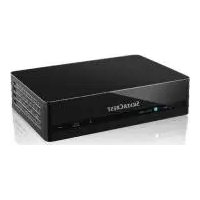
| Type de produit | Micro-chaîne Hi-Fi (Micro Stereo System) |
| Marque | SILVERCREST |
| Modèle | KH 2306 |
| Dimensions du micro système (L × P × H) | 160 × 222 × 183 mm |
| Dimensions des enceintes (L × P × H) | 135 × 180 × 183 mm |
| Poids du micro système | environ 1590 g |
| Poids des enceintes (par paire) | environ 1600 g |
| Alimentation | CA 230-240 V ~ 50 Hz |
| Consommation électrique | 20 W (fonctionnement), ≈ 2 W (veille) |
| Puissance de sortie | 2 × 1,5 W (10% THD) |
| Plage de température de fonctionnement | +5°C à +35°C |
| Humidité de fonctionnement | 5 – 90% (sans condensation) |
| Connectique | Entrée AUX (3,5 mm jack stéréo), sortie casque (3,5 mm jack stéréo) |
| Radio | AM (PO) : 522 – 1620 kHz, FM : 87,5 – 108 MHz |
| Lecteur CD | CD, CD-R, CD-RW |
| Classe laser | 1 |
| Fonctions de lecture | Programmation (20 plages CD, 99 plages MP3), répétition, saut, recherche avant/arrière |
| Affichage | Écran LCD multifonction |
| Télécommande | Oui (piles AA fournies) |
| Piles de sauvegarde horloge | 3 × AAA (non fournies) |
| Entretien et nettoyage | Chiffon sec et doux ; ne pas utiliser de produits liquides à l'intérieur |
| Garantie | 3 ans (défauts matériels et de fabrication) |
| Service après-vente | Hotline téléphonique, adresse : KOMPERNASS GMBH, Allemagne |
FOIRE AUX QUESTIONS - KH 2306 SILVERCREST
Questions des utilisateurs sur KH 2306 SILVERCREST
0 question sur cet appareil. Repondez a celles que vous connaissez ou posez la votre.
Poser une nouvelle question sur cet appareil
Téléchargez la notice de votre Chaîne Hi-Fi au format PDF gratuitement ! Retrouvez votre notice KH 2306 - SILVERCREST et reprennez votre appareil électronique en main. Sur cette page sont publiés tous les documents nécessaires à l'utilisation de votre appareil KH 2306 de la marque SILVERCREST.
MODE D'EMPLOI KH 2306 SILVERCREST
■ MICRO STEREO SYSTEM
natural_image
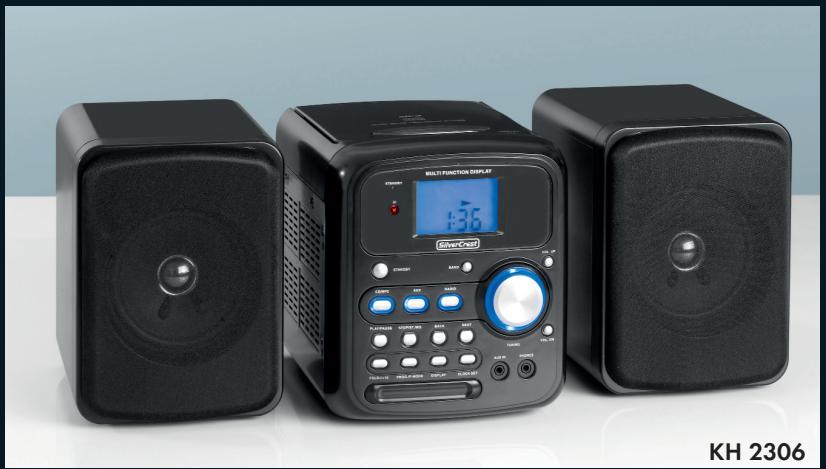
Three black audio synthesizer units (TV, audio, and audio recording) with a digital display and control panel, labeled KH 2306 (no visible text on devices beyond branding)GB MICRO STEREO SYSTEM
IE
CY Operating instructions
A
B
C
D
natural_image
Black rectangular electronic device with circular lens and central hub (no visible text or symbols)Intended Use 2
Technical data 2
Safety instructions 2
Operating Elements 4
Start-up 5
Inserting the back-up batteries....5
Inserting batteries into the remote control....5
Connecting the loudspeaker ....6
Additional audio device ....6
Preparing the antenna reception ....6
Connecting the Headset....6
Power supply....6
Setting the time ....7
Utilisation 7
Switching the device on and off....7
Adjusting the volume....7
Selecting the sound source....7
Radio functions 7
Setting the radio frequency....7
CD/MP3 Functions 8
Inserting a CD....8
Removing the CD....8
Playback functions....8
Repeated playback (REPEAT) 9
Programming the playing order....9
Cleaning 10
Disposal 10
Warranty and Service 11
Importer 11
Read these operating instructions carefully before using the device for the first time and preserve this booklet for later reference. Pass this booklet on to whoever might acquire the device at a future date.
MICRO STEREO SYSTEM KH2306
Intended Use
This device is intended for the reception of FM/AM radio stations, the playback of Audio and MP3-CDs, as well as the playback of audio signals of external devices. This device is intended for use only in domestic settings. It is not suitable for use in commercial or industrial applications.
Technical data
This consumer electronics device, being in conformity with their fundamental requirements and directions, complies with the relevant regulations of both the EMC Guidelines 2004/108/EC and the Guidelines for Low Voltage devices 2006/95/EC.
| Power supply: | AC 230 V - 240 V ~ 50 Hz |
| Power consumption: | 20 Watts |
| Output level: | 2 x 1,5 Watt at 10% THD |
| Standby: | approx. 2 W |
| Operating temperature range: | +5° - +35°C |
| Humidity: | 5 – 90%(no condensation) |
Micro System Dimensions
(without consoles mounted)
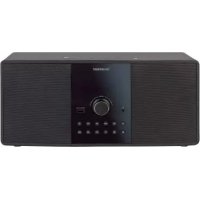
(L × W × H): 160 × 222 × 183 mm
Loudspeaker Dimensions
(L × W × H): 135 × 180 × 183 mm
Micro System Weight: approx. 1590 g
Loudspeaker Weight: approx. 1600 g
Protection class: II/☐
AUX input
3.5 mm Stereo jack
Headset output
3.5 mm Stereo jack
Max. Output Voltage 40-60 mV
CD player
Playback formats: CD, CD-R, CD-RW
Radio frequency ranges:
MW (AM): 522 - 1620 KHz
UKW (FM): 87.5 - 108 MHz
The technical details of the device allow for an adjustable frequency range of MW (AM) 522-1620 kHz, and/or UKW (FM) 87,5-108 MHz. In some countries, different national regulations may apply to the assigned radio frequency ranges. Please note that information received outside of the assigned radio frequency ranges may not be used, passed on to third parties or otherwise misused.
Safety instructions
- This device is not intended for use by individuals (including children) with restricted physical, physiological or intellectual abilities or deficiencies in experience and/or knowledge, unless they are supervised by a person responsible for their safety or receive from this person instruction in how the device is to be used.
- Children should be supervised to ensure that they do not play with the device.
- Keep batteries away from children. Children can put batteries into their mouths and swallow them. If a battery is swallowed, medical assistance must be sought immediately.
⚠️ To avoid potentially fatal electric shocks:
- Connect the device only to correctly installed and earthed mains sockets. Ensure that the rating of the local power supply complies with the details given on the rating plate of the device.
- Ensure that the power cable never becomes wet or damp during operation. Lay the cable so that it cannot be trapped or otherwise damaged.
- Arrange for defective power plugs and/or cables to be replaced at once by qualified technicians or our Customer Service Department.
- Get customer service to repair or replace connecting cables and/or devices that are not functioning properly or have been damaged.
- Only use the device in dry rooms.

NEVER submerse the device in water. Wipe it only with a slightly damp cloth.
- Make sure that liquids or objects are never able to enter into the device.
- Do not place water-filled receptacles (e.g. flower vases) on the device.
- Position the device close to an electrical wall socket. Make sure that the wall socket is easily accessible
- To avoid trip hazards, do not use an extension cable. In the event of danger, the plug must be quickly and easily accessible.
- Do not open the housing or attempt to repair the device yourself. Should you do so, device safety can no longer be assured and the warranty will become void.
Repairs are to be carried out exclusively by a specialist firm or the service centre.

Notice regarding separation from mains-power
The STANDBY switch of this device does not completely disconnect the unit from the power network. Additionally, the device consumes power when in standby-mode. To completely separate the device from mains-power, the power plug MUST be removed from the wall socket.

Information regarding the handling of batteries
The remote control requires batteries. In addition, the device requires batteries in order to store the time. For the handling of batteries please observe the following:

Risk of explosion!
Do not throw batteries into a fire. Do not recharge batteries.
- NEVER open batteries, NEVER solder or weld batteries.
The risk of explosions and injuries exists! - Regularly check the condition of the batteries. Leaking batteries can cause damage to the device.
- If you do not intend to use the device for an extended period, remove the batteries.
- In the event of the batteries leaking acids, wear protective gloves when removing the batteries.
- Clean the battery compartment and the battery contacts with a dry cloth.

To avoid the risks of fire or injury:
- Do not place candles or other open fire sources on the device.
- Do not use the device near hot surfaces.
- Do not place the device in locations exposed to direct sunlight. If you do, it may overheat and become irreparably damaged.
- To prevent heat build-up, place the device at a location with adequate ventilation.
• Never cover the ventilation openings! - Avoid any additional heat build-up, e.g. direct sunlight, heaters, other devices, etc.
- Keep children away from the connecting cable and the device. Children frequently underestimate the danger from electrical devices.
- Provide for a safe location for the device.
- Do not operate the device after it sustained damage or after it has been dropped. Arrange for the device to be checked and/or repaired by qualified technicians.
- Keep batteries away from children. Children can put batteries into their mouths and swallow them. Should a battery be swallowed, seek medical assistance IMMEDIATELY.
⚠️ In case of thunder and/or lightning!
Before a storm and/or a thunderstorm with a risk of lightning, please separate the device from the electrical power source!
⚠️ Notice regarding electrical power surges (EFT / electrical fast transient) and electrostatic discharges:
In case of malfunction due to an electrical fast transient (power surge) and/or electrostatic discharge, the device must be returned to default settings in order to re-establish normal operation. Possibly, the power supply must be separated and then reconnected.
(i) Note:
This device is equipped with non-slip rubber pads. As furniture surfaces may be made of a variety of materials and are treated with many different types of cleaning agents, it cannot be completely ruled out that some substances contain ingredients which may corrode the rubber rests and soften them. If possible place an anti-slip material under the pads of the device.
⚠️ Danger - Laser Beams!
This device is fitted with a "Class 1 Laser".
- Never open the device.
- Never attempt to repair the device. There is invisible laser radiation inside the device.
- Avoid all direct optical contact with the laser beam, it could lead to serious eye injuries.
Operating Elements
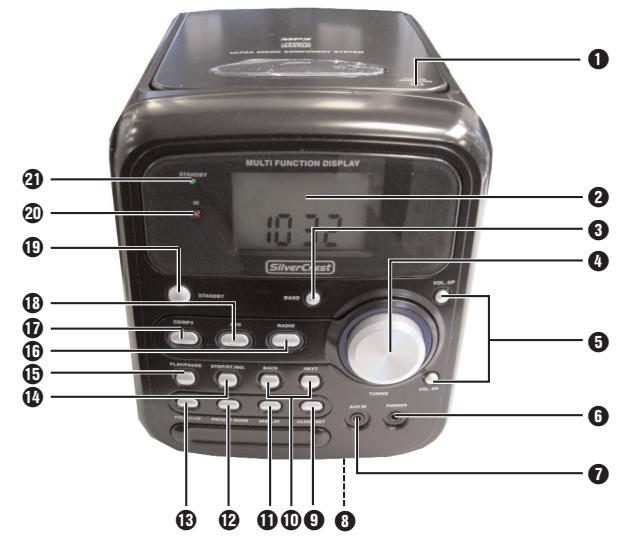
A Front
① OPEN/CLOSE: Button for opening the CD compartment cover
② LCD Display
3 BAND: Select the frequency range
4 TUNING: Frequency control button
⑤ VOL UP/DOWN: Adjusting the volume
6 PHONES: Headset connection (3.5 mm stereo jack)
⑦ AUX IN: Audio input for external device (3.5 mm stereo jack)
8 Battery compartment for backup batteries
9 CLOCK SET: Setting the time
10 BACK/NEXT: Previous/next song, search reverse/forward
11 DISPLAY: Switch display
12 PROG./P-MODE: Programming/playback functions
13 FOLD+/+10: Select next folder/ forward 10 songs
14 STOP/ST./MO.: Stop playback, in radio mode stereo / mono playback
15 PLAY/PAUSE: Start/Suspend playback
16 RADIO: Select radio mode
17 CD/MP3: Select CD-/MP3 mode
18 AUX: Select audio input
19 STANDBY: Switch device on / into standby
20 IR: Infrared sensor for the remote control
21 STANDBY: Standby LED, illuminates green if in standby
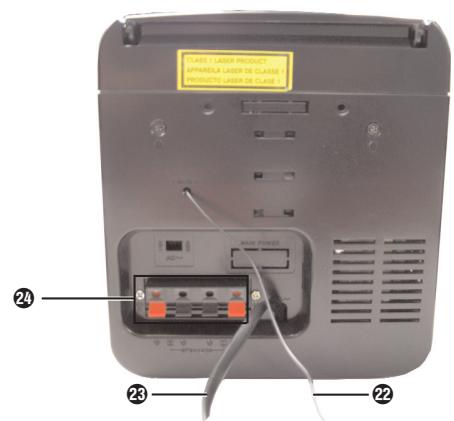
B Rear
22 Wire aerial
23 Power cable
24 Speaker connections
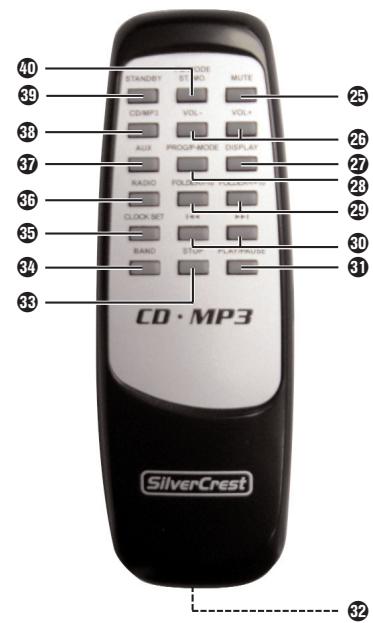
C Remote control
25 MUTE: Switch off sound
26 VOL-/+: Adjusting the volume.
27 DISPLAY: Switch the display
28 PROG/P-MODE: Programming / playback function
29 FOLDER-/-10,
FOLDER+/+10: Select previous folder / reverse 10 songs, select next folder / 10 songs forward
30 |◀ ▶: Previous/next song, reverse/forward search
31 PLAY/PAUSE: Start/Suspend playback
32 Battery compartment
33 STOP: Stop playback
34 BAND: Select frequency range
35 CLOCK SET: Setting the time
36 RADIO: Select radio mode
37 AUX: Select audio input
38 CD/MP3: Select CD-/MP3 mode
39 STANDBY: Switch device on / into standby
40 FM MODE ST./MO.: In radio mode stereo / mono playback
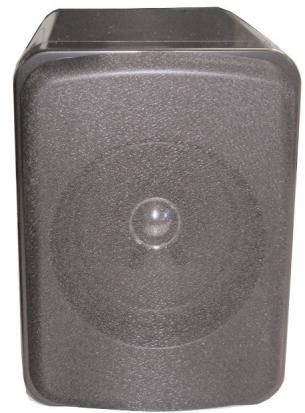
D Loudspeaker (2)
Start-up
Unpacking the device
Remove all packing material. Remove also the transport restraint from the CD tray.
⚠️ Important!
Do not permit small children to play with the plastic packaging. There is a risk of suffocation!
Check the items supplied
Whilst unpacking, check that all of the following items are available to you:
- Micro System
- Remote Control
- 2 1.5 V Batteries, Type "AA/Mignon/R06"
- 2 Loudspeakers
Placement
- Place the Micro System and the loudspeakers on a level and horizontal surface.
Place the speakers to the right and left of the Micro System. Please ensure to run the speaker cables without creating a tripping hazard.
Inserting the back-up batteries
The backup batteries will ensure a continuous time display, even during a power failure
For this, you require three 1.5 V Micro AAA/R03 batteries (not included).
-
Open the cover of the battery compartment at the underside of the Micro System.
-
Insert the batteries. Make sure the polarities are correct.
-
Replace the battery compartment cover. A clicking sound must be audible when latching in the cover.
Inserting batteries into the remote control
In order to activate the remote control, please insert both 1.5 V Mignon AA/R06.batteries (supplied)
-
Open the battery compartment on the rear of the remote control.
-
Insert the batteries, ensuring their positioning complies with the polarity markings shown in the battery compartment.
-
Carefully close the battery compartment lid until it clicks into place.
i Interaction with batteries
Leaking batteries can cause damage to the device.
- If you do not intend to use the device for an extended period, remove the batteries.
• Always change all batteries at the same time and always use batteries of the same type. - Should the batteries leak, wear protective gloves and clean the battery compartment with a dry cloth.
Connecting the loudspeaker
⚠️ Important!
Prior to connecting the speakers, please ensure the Micro System is turned off.
Do not plug the Micro System into the mains power until all connections have been made.
- Connect the speaker cable of the Micro System's right loudspeaker by plugging it into the double jack marked "R".
Please ensure to connect the black wire to the black negative jack and the red wire to the red positive jacks.
Keep the clamp of the respective speaker jack depressed while inserting the wire.
- Connect the speaker cable of the Micro System's left loudspeaker by plugging it into the double jack marked "L". Continue by following the same procedure as explained for the right loudspeaker.
Additional audio device
You can connect additional audio devices, e.g., a television, to the Micro System for playback over the Micro System.
- Connect the stereo plug of the audio device with the jack AUX IN at the front of the Micro System.
Preparing the antenna reception
For receiving AM transmissions, there is an in-built reception antenna. In radio operation, turn the whole appliance to a position where the best radio reception is obtained.
For receiving FM transmissions, the Micro System is equipped with a small wire aerial in the back of the unit.
- In order to ensure excellent reception with your Micro System, carefully pull out the wire aerial completely.
(i) Note:
Should FM radio reception be inadequate, change the position of the wire antenna.
Connecting the Headset
You can connect stereo headphones to the Micro System with a 3.5 mm jack plug. The jacks for the headset PHONES are located at the front of the Micro System. When headphones are connected, the loudspeakers are switched off and you will only hear sound via the headphones.
- Insert the jack plug on the headset into the headset socket.

Warning:
Listening to music with headset for long periods and at high volume levels can lead to hearing damage!
Power supply
- When all of the required connections have been made, insert the plug on the power cable into a wall power socket. The device is now in standby mode and the green stand-by LED is illuminated. While in standby mode, the time is displayed. If the time has not been set yet, the display will show: 0:00. In order to set the time, please read the following instructions.
Setting the time
- While in standby mode, depress the button CLOCK SET for more than two seconds. The time display will start to flash.
- Within the next 10 seconds use the pushbutton BACK and NEXT (◀◀ and ▶▶ on the remote control) to set the time in either 24-hour or 12-hour mode. In the 12-hour mode the morning hours are displayed as AM.
- Press the pushbutton CLOCK SET to acknowledge this setting. The hour-display now blinks.
- Within the next 10 seconds use the pushbutton BACK and NEXT (◀◀ and ▶▶ on the remote control) to set the hour of the day.
- Press the pushbutton CLOCK SET to acknowledge this setting. The minute-display now blinks.
- Within the next 10 seconds use the pushbutton BACK and NEXT (◀◀ and ▶▶ on the remote control) to set the minutes.
- Press the pushbutton CLOCK SET to acknowledge this setting. The time display is now programmed. In order to ensure a continuous display of the clock, even after a power failure or after the mains cable has been removed, please insert the back-up batteries.
Utilisation
① Operating the pushbuttons on the device and on the remote control
Most functions can be activated by pushing the buttons on the device itself or on the remote control. These instructions only describe the pushbuttons of the device. Any reference to the pushbuttons on the remote control will be specifically highlighted.
Switching the device on and off
- To turn the Micro System on, please push the STANDBY button, either on the device itself or on the remote control unit.
The green standby LED extinguishes and the display is being illuminated.
- To switch the device back into the standby mode, press the button STANDBY again.
- If you would like to completely shut off the device, remove the power cable from the mains.
Adjusting the volume.
- In order to increase the volume, press the pushbutton VOL. UP on the device (VOL+ on the remote control unit).
- Press the pushbutton VOL. DN on the device (VOL- on the remote control), in order to reduce the volume.
Switching off the sound
- To switch the sound completely off, press the button MUTE on the remote control.
- To turn the sound back on, press the button MUTE again or press the the button VOL. UP/VOL. DN (VOL+/- on the remote control).
Selecting the sound source
After you turned on the device, use the button CD/MP3, AUX or RADIO to select the sound source you would like to play back:
CD/MP3: Audio-/MP3-Disc playback
AUX : External sound source
RADIO: Radio operation
Radio functions
- Set the reception range (AM/FM) by using the button BAND. The respective reception range together with the frequency will be displayed for approximately 5 seconds. Subsequently, the time is displayed again.
- In order to switch between frequency and time display press the pushbutton DISPLAY.
Setting the radio frequency
- Set the desired radio station by rotating the tuning knob. The frequency will be shown in the display.
Setting FM stereo reception
- During FM reception press the button STOP/ST./MO (FM MODE ST.MO. on the remote control) in order to turn on the stereo playback. If the radio programme is received at full strength in stereo, the display STEREO will be shown.
(i) Note:
If the FM stereo signal is too weak, you might be able to improve the reception by pressing the button STOP/ST./MO again. The display STEREO will be extinguished. In this setting, the sound will be played back in mono.
CD/MP3 Functions
- Press the button CD/MP3 in order to switch to Audio-/ MP3-Disc playback.
- The display briefly shows the message "Cd", if no disc is inserted into the disc compartment, NOd, will be displayed.
After approximately five seconds, the time is displayed again.
- In order to switch between disc and time display press the pushbutton DISPLAY.
Inserting a CD
- Push down on the cover of the disc compartment marked "PUSH TO OPEN/CLOSE" and quickly release it. The flap of the CD compartment opens upwards. OP will be displayed.
- Insert the CD into the centre of the CD compartment with the printed side facing up. Please ensure that the CD is perfectly centered on the turntable.
- To close the disc compartment, press down on "PUSH TO OPEN/CLOSE" until it latches. After a short flash „--“ on the display, the number of titles on the CD is displayed. If a MP3 CD is used, the additional message MP3 will be displayed.
Removing the CD
Push the button STOP/ST./MO (STOP on the remote control) and wait until the CD stops turning.
(i) Note:
The CD should no longer be spinning when you open the CD compartment. It could be irreparably damaged.
- Push down on the cover of the disc compartment marked "PUSH TO OPEN/CLOSE" and quickly release it. The flap of the CD compartment opens upwards. OP will be displayed.
- Remove the CD.
Playback functions
Starting playback
- Press the button PLAY/PAUSE. In the display ▶ is shown and the first song is played. After that, the actual title number is indicated.
Stopping the play function
Press the button STOP/ST./MO (STOP on the remote control).
Interrupting/continuing playback
In the display the symbol ▶ and the title are flashing.
- To continue playback, press the button PLAY/PAUSE once again.
Next/previous title
- In order to play back one of the next CD's songs, keep pressing the button NEXT (▶▶ on the remote control) until the number of the desired title appears.
- In order to play back one of the previous CD's songs, keep pressing the button BACK (◀ on the remote control) until the number of the desired title appears.
For MP3 CDs: 10 Title replay
- When using a MP3-CD the button FOLDER-/10 or FOLDER+/+10 on the remote control (on the device only FOLD+/+10) may be used to skip back or move a head 10 titles.
For MP3 CDs: File search
- If a MP3-CD contains folders, the folder may be searched forward or in reverse order while pressing and holding the button FOLDER/-10 or FOLDER+/+10 on the remote control (on the device only FOLD+/+10). The display may show F01 for the first folder.
Title fast forward/reverse
- Press and hold during the playback the button BACK or NEXT (◀◀ and ▶▶ on the remote control), until the desired part of the song is located.
Repeated playback (REPEAT)
Audio CDs:
• PROG./P-MODE press once:
REPEAT appears in the display. The current title is repeated.
• PROG./P-MODE press twice:
REPEAT ALL is displayed. The whole CD is repeated.
• PROG./P-MODE press three times:
REPEAT ALL extinguishes. The repeated playback is finished.
MP3 CDs:
• PROG./P-MODE press once:
REPEAT appears in the display. The current title is repeated.
• PROG./P-MODE press twice:
REPEAT FOLDER is displayed. The current folder is repeated.
• PROG./P-MODE press three times:
REPEAT ALL is displayed. The whole CD is repeated.
• PROG./P-MODE press four times:
REPEAT ALL extinguishes. The repeated playback is finished.
Programming the playing order
You may programme the playback sequence for up to 20 titles for CDs and 99 titles for MP3-CDs, during which the titles are displayed. However, this is only possible if the play function has been stopped
-
PRESS THE BUTTON PROG./P-MODE. PROG is displayed and the message P01 appears in the display for the position in the programme whose title will be played first on the playback.
-
Use the buttons BACK and NEXT (◀◀ and ▶▶ on the remote control) in order to select the title which should appear in position 1 of the programme.
-
To save the selection, press the button PROG./P-MODE. PROG is displayed and the message P02 for the next programme position appears in the display.
-
To programme in further titles, repeat the steps described above. When all programme positions are occupied, the entry "P01" appears in the display
-
Start the playback of the programmed title by pressing the button PLAY/PAUSE. In the display PROG as well as the number of the title will be shown.
The programmed sequence of titles will be deleted, if you...
- press the button STOP twice during the playback. The display "PROG" is extinguished.
- open the CD compartment.
- switch off the device and then back on.
Query programmed playing order
- Press the button STOP/ST./MO (STOP on the remote control) during the programmed playback mode.
- Press the button BACK and NEXT (◀◀ and ▶▶ on the remote) several times, in order to display the programmed titles one after the other. After the last title the first programmed title is shown once again.
Cleaning
- Clean the housing only with a slightly damp cloth and a mild detergent. Ensure that moisture cannot permeate into the device during cleaning!
- If necessary, clean the inside of the disc tray exclusively with a clean dry brush (e.g. a lens brush, available at your local photo shop). NEVER use a wet or damp cloth to clean the inside of the CD compartment!
Warning!
Moisture penetrating into the device creates the risk of electric shock! Additionally, the device could become irreparably damaged!
Disposal

Do not dispose of the device in your normal domestic waste. This product is subject to the provisions of European Directive 2002/96/EC.
Dispose of the device through an approved disposal centre or at your community waste facility.
Observe the currently applicable regulations. In case of doubt, please contact your waste disposal centre.
Disposal of batteries/cells
Used batteries/rechargeable batteries may not be disposed of in household waste. Every consumer is legally obliged to dispose of batteries at a collection site of his/her community / city district or at a retail store.
The purpose of this obligation is to ensure that batteries are disposed of in a non-polluting manner. Only dispose of batteries when they are fully discharged.

Dispose of all packaging materials in an environmentally friendly manner.
Warranty and Service
A 3-year warranty applies to this device, starting with the date of purchase. Should you, in spite of our high quality standards, are not satisfied with the product, please contact our Service Hotline.
In the event that our hotline cannot assist you over the phone at the time of your complaint, the technicain will provide you with:
• a processing number (RMA-Number) as well as
- an address to which you can send your product for warranty processing.
In the case of a mail-in shipment please enclose a copy of the purchase receipt (the sales slip). The device must be securely packed and rhe RMA number clearly visible. Products received without the RMA number cannot be processed.
i Notice
The warranty provisions cover only material or manufacturing defects.
Warranty does not apply to;
- wearing parts
- damage to breakable parts like switches or rechargeable batteries.
This product is for private use only and is not intended for commercial applications. The warranty shall be null and void in the case of abusive and improper handling, use of force or any other work not carried out by our authorized service branch.
Your statutory warranty claims are not restricted by this warranty.
Importer
KOMPERNASS GMBH
BURGSTRASSE 21
44867 BOCHUM, GERMANY
www.kompernass.com
SilverCrest
Warranty
MICRO STEREO SYSTEM KH 2306
For all warranty repairs (free of charge), please contact our service department hotline. Please ensure to have your sales receipt available.
Please print clearly:
Last name
First name
Street
Postal/Zio Code/Place
Country
Telephone
Date/Signature
GB DES Ltd
Tel.: 0870/787-6177
Fax: 0870/787-6168
e-mail: support.uk@kompernass.com
IE Irish Connection
Tel: 00353 (0) 87 99 62 077
Fax: 00353 18398056
e-mail: support.ie@kompernass.com
www.mysilvercrest.de
Description of the defect:
- ■ MICRO STEREO SYSTEM
- Intended Use 2
- Technical data 2
- Safety instructions 2
- Operating Elements 4
- Start-up 5
- Utilisation 7
- Radio functions 7
- CD/MP3 Functions 8
- Cleaning 10
- Disposal 10
- Warranty and Service 11
- Importer 11
- MICRO STEREO SYSTEM KH2306
- Intended Use
- Technical data
- AUX input
- Headset output
- CD player
- Radio frequency ranges:
- Safety instructions
- ⚠️ To avoid potentially fatal electric shocks:
- Notice regarding separation from mains-power
- Information regarding the handling of batteries
- Risk of explosion!
- To avoid the risks of fire or injury:
- ⚠️ In case of thunder and/or lightning!
- ⚠️ Notice regarding electrical power surges (EFT / electrical fast transient) and electrostatic discharges:
- Note:
- ⚠️ Danger - Laser Beams!
- Operating Elements
- A Front
- B Rear
- C Remote control
- D Loudspeaker (2)
- Start-up
- Unpacking the device
- ⚠️ Important!
- Check the items supplied
- Placement
- Inserting the back-up batteries
- Inserting batteries into the remote control
- i Interaction with batteries
- Connecting the loudspeaker
- Additional audio device
- Preparing the antenna reception
- Connecting the Headset
- Warning:
- Power supply
- Setting the time
- Utilisation
- ① Operating the pushbuttons on the device and on the remote control
- Switching the device on and off
- Adjusting the volume.
- Switching off the sound
- Selecting the sound source
- Radio functions
- Setting the radio frequency
- Setting FM stereo reception
- CD/MP3 Functions
- Inserting a CD
- Removing the CD
- Playback functions
- Starting playback
- Stopping the play function
- Interrupting/continuing playback
- Next/previous title
- For MP3 CDs: 10 Title replay
- For MP3 CDs: File search
- Title fast forward/reverse
- Repeated playback (REPEAT)
- Audio CDs:
- MP3 CDs:
- Programming the playing order
- The programmed sequence of titles will be deleted, if you...
- Query programmed playing order
- Cleaning
- Warning!
- Disposal
- Disposal of batteries/cells
- Warranty and Service
- i Notice
- Importer
- SilverCrest
- Warranty
- MICRO STEREO SYSTEM KH 2306
Marque : SILVERCREST
Modèle : KH 2306
Catégorie : Chaîne Hi-Fi