
OptiPlex GX280 - Desktop computer DELL - Free user manual and instructions
Find the device manual for free OptiPlex GX280 DELL in PDF.


| Product Type | Desktop Computer |
| Brand | Dell |
| Model | OptiPlex GX280 |
| Form Factor | Mid Tower |
| Processor | Intel Pentium 4 (up to 3.2 GHz) |
| Memory | Up to 4 GB DDR SDRAM |
| Storage | Up to 160 GB SATA HDD |
| Optical Drive | CD-RW/DVD-ROM combo |
| Dimensions (H x W x D) | 17.7 x 7.0 x 17.5 inches (449 x 178 x 445 mm) |
| Weight | Approximately 28.6 lbs (13 kg) |
| Power Supply | 250 Watt |
| Operating System | Windows XP Professional |
| Main Functions | Business computing, productivity, web browsing, office applications |
| Care and Cleaning | Use a soft, dry cloth to clean exterior. Avoid liquids and abrasive cleaners. |
| Safety | Ensure proper ventilation; do not block air vents. Use only certified power cord. |
| Spare Parts & Repairability | DIMM modules, hard drives, power supply, optical drive, fans, and CMOS battery are user-replaceable. |
| General Information | Released in 2004; supports up to 4 USB 2.0 ports, integrated Intel graphics, and audio. |
Frequently Asked Questions - OptiPlex GX280 DELL
User questions about OptiPlex GX280 DELL
0 question about this device. Answer the ones you know or ask your own.
Ask a new question about this device
Download the instructions for your Desktop computer in PDF format for free! Find your manual OptiPlex GX280 - DELL and take your electronic device back in hand. On this page are published all the documents necessary for the use of your device. OptiPlex GX280 by DELL.
USER MANUAL OptiPlex GX280 DELL
Notes, Notices, and Cautions

NOTE: A NOTE indicates important information that helps you make better use of your computer.

NOTICE: A NOTICE indicates either potential damage to hardware or loss of data and tells you how to avoid the problem.

CAUTION: A CAUTION indicates a potential for property damage, personal injury, or death.
If you purchased a Dell ^™ n Series computer, any references in this document to Microsoft ^® Windows ^® operating systems are not applicable.
The Quick Reference Guide, Drivers and Utilities CD, and operating system media are optional and may not ship with all computers.
Information in this document is subject to change without notice. © 2004 Dell Inc. All rights reserved.
Reproduction in any manner whatsoever without the written permission of Dell Inc. is strictly forbidden.
Trademarks used in this text: Dell, OptiPlex, and the DELL logo are trademarks of Dell Inc.; Microsoft and Windows are registered trademarks of Microsoft Corporation.
Other trademarks and trade names may be used in this document to refer to either the entities claiming the marks and names or their products. Dell Inc. disclaims any proprietary interest in trademarks and trade names other than its own.
September 2004 P/N N7133 Rev. A00
Contents
Finding Information for Your Computer 5
Front and Back Views 7
Small Form-Factor Computer. 7
Small Desktop Computer 8
Desktop Computer 9
Small Mini-Tower Computer 10
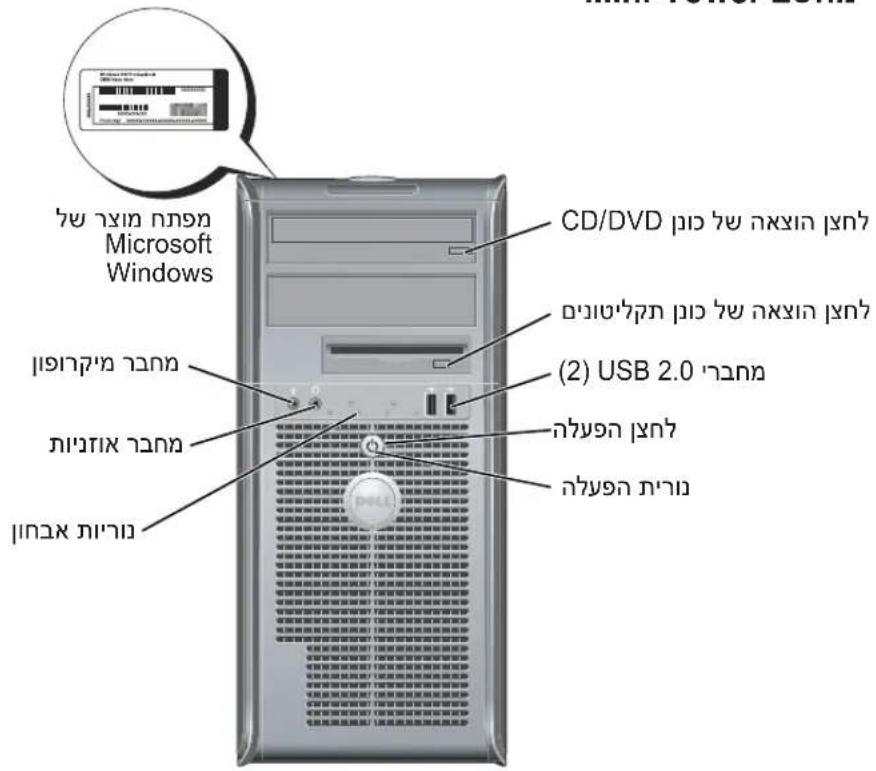
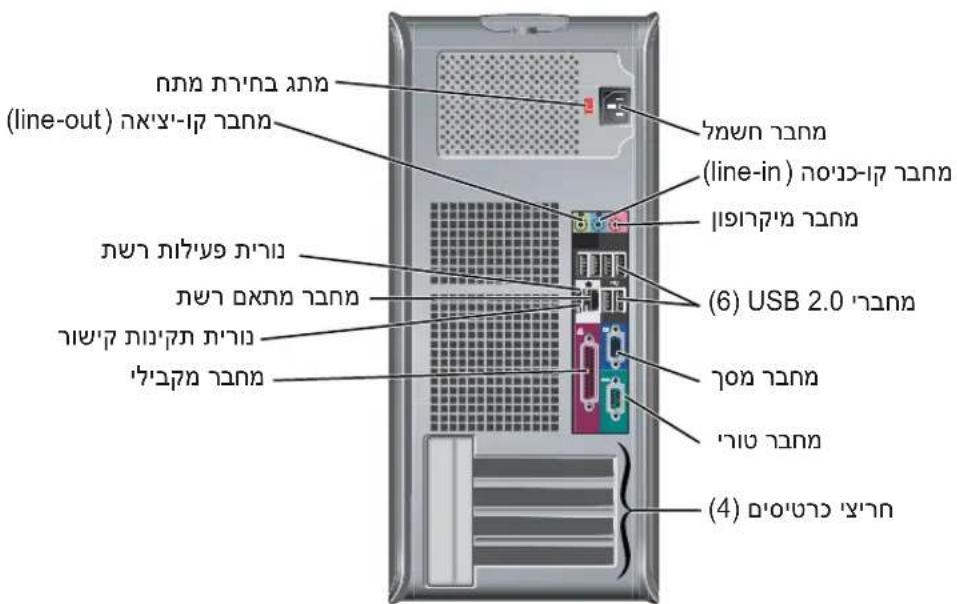
Mini-Tower Computer 12
Opening the Computer Cover 13
Small Form-Factor, Small Desktop, and Small Mini-Tower Computers 13
Desktop and Mini-Tower Computers 13
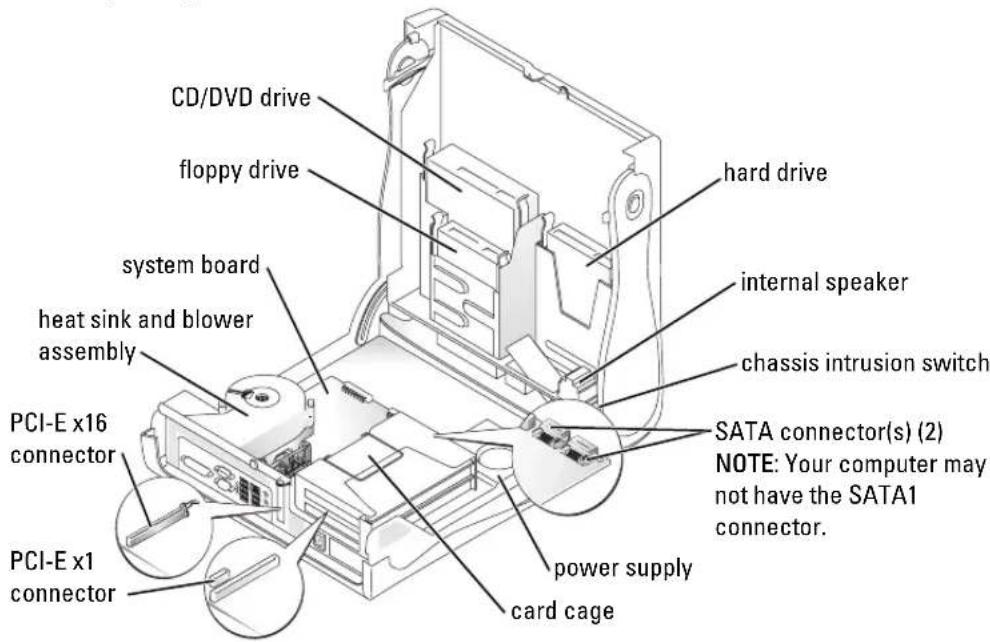
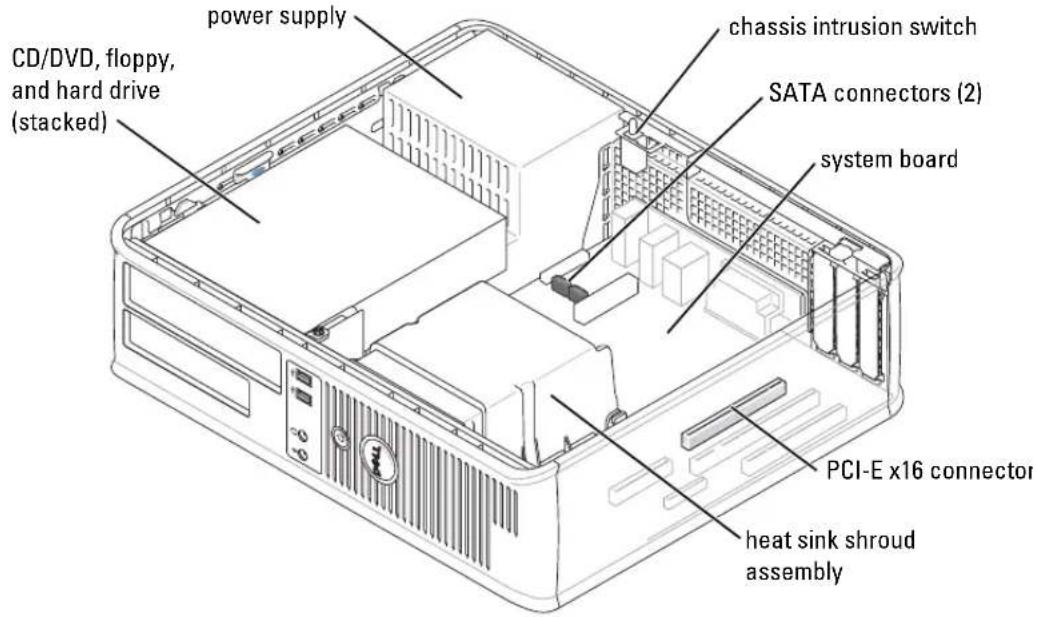
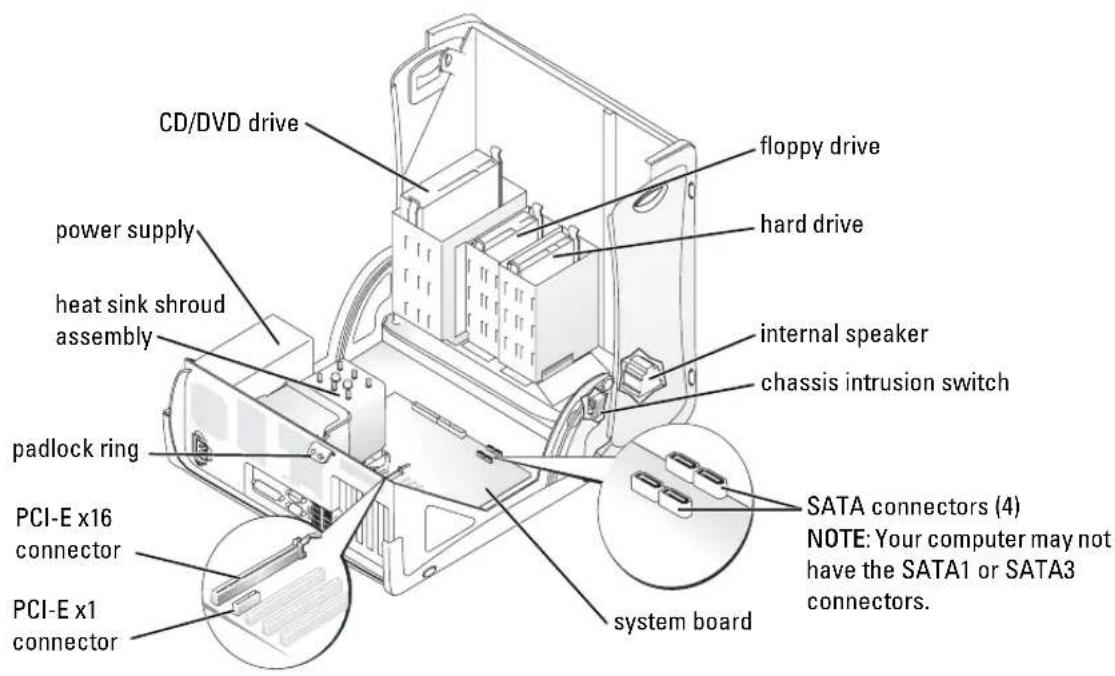
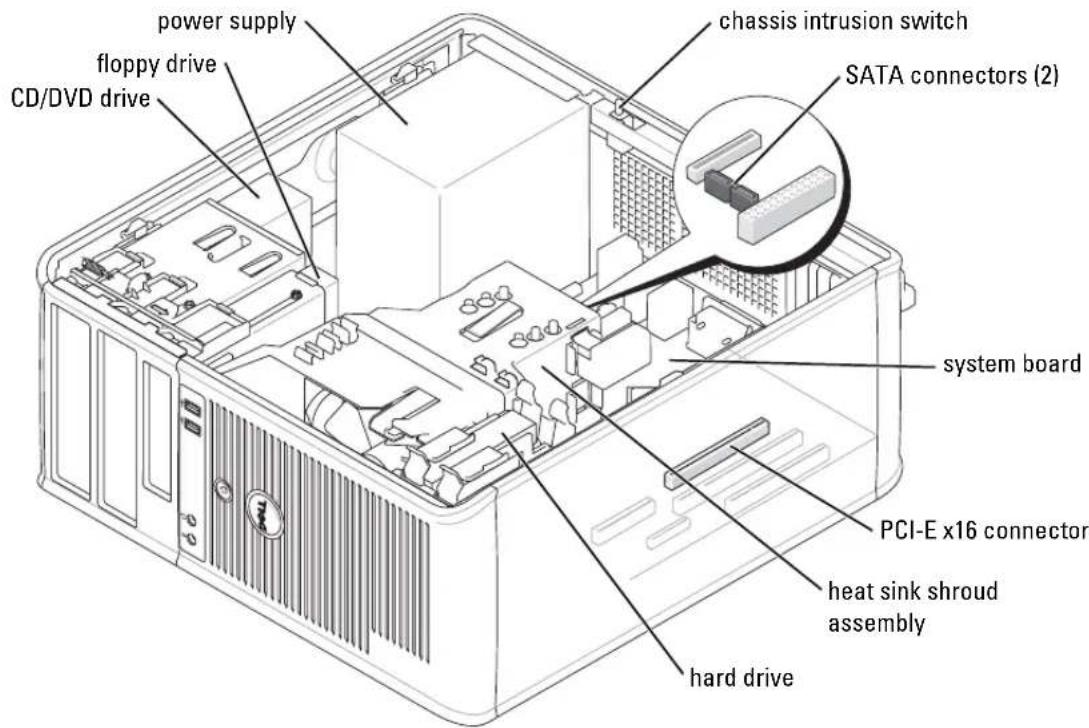
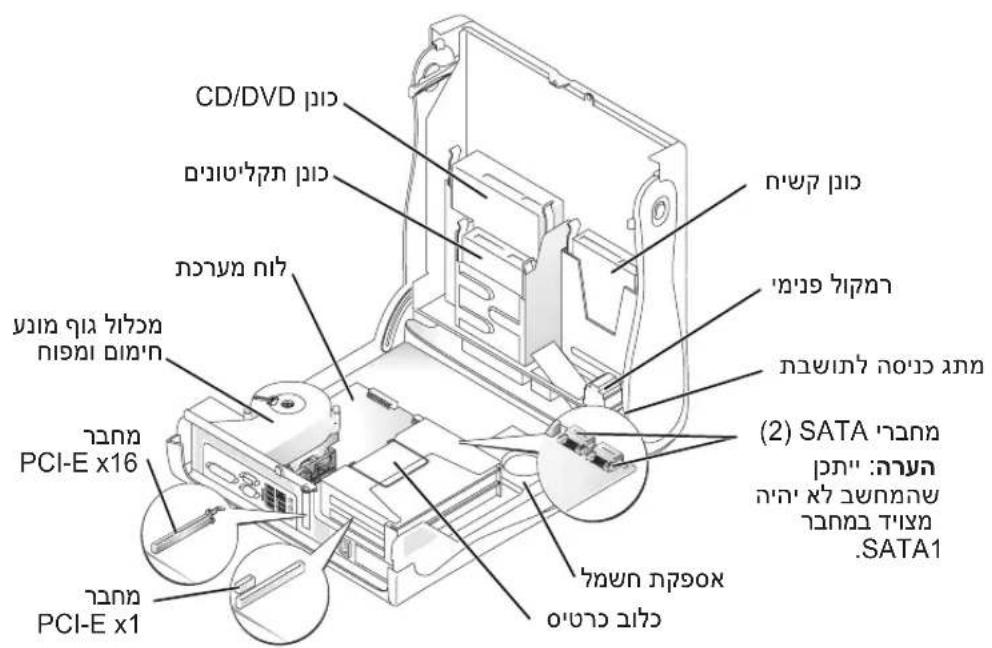
Inside Your Computer 14
Small Form-factor Computer 14
Small Desktop Computer 14
Desktop Computer 15
Small Mini-Tower Computer 15
Mini-Tower Computer 16
Setting Up Your Computer 16
Solving Problems 19
Dell Diagnostics. 19
System Lights 21
Diagnostic Lights 23
Beep Codes. 26
Running the Dell™ IDE Hard Drive Diagnostics 27
Resolving Software and Hardware Incompatibilities 27
Using Microsoft® Windows® XP System Restore . . . . . . . . . . . . 28
Reinstalling Microsoft ^® Windows ^® XP 30
Using the Drivers and Utilities CD 32
Index 35
Finding Information for Your Computer
What Are You Looking For? Find It Here
| A diagnostic program for my computerDrivers for my computerMy computer documentationMy device documentationDesktop System Software (DSS) | Drivers and Utilities CD (also known as the ResourceCD) | Documentation and drivers are already installed on your computer. You can use the CD to reinstall drivers, run the Dell Diagnostics, or access your documentation.NOTE: The Drivers and Utilities CD is optional and may not ship with all computers.Readme files may be included on your CD to provide last-minute updates about technical changes to your computer or advanced technical-reference material for technicians or experienced users. |
| Operating system updates and patches | Desktop System Software (DSS)Located on the Drivers and Utilities CD and the Dell Support website at support.dell.com. | |
| Terms and ConditionsWarranty informationSafety instructionsRegulatory informationErgonomics informationEnd User License Agreement | Product Information Guide | |
| How to remove and replace partsTechnical specificationsHow to configure system settingsHow to troubleshoot and solve problems | DellTM OptiPlexTM User's GuideMicrosoft® Windows® XP Help and Support Center1 Click the Start button and click Help and Support.2 Click User's and system guides and click User's guides. | |
| Service Tag and Express Service CodeMicrosoft Windows License Label | 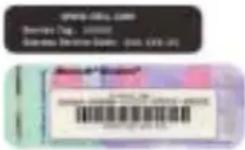 | Service Tag and Microsoft Windows LicenseThese labels are located on your computer.Use the Service Tag to identify your computer when you use support.dell.com or contact technical support.Enter the Express Service Code to direct your call when contacting technical support. The Express Service Code is not available in all countries. |
What Are You Looking For? Find It Here
| Latest drivers for my computerAnswers to technical service and support questionsOnline discussions with other users and technical supportDocumentation for my computer | Dell Support Website — support.dell.comNOTE: Select your region to view the appropriate support site.The Dell Support website provides several online tools, including:Troubleshooting — Hints and tips, articles from technicians, and online coursesUpgrades — Upgrade information for components, such as memory, the hard drive, and the operating systemServices and Warranties — Contact information, order status, warranty, and repair informationDownloads — Drivers, patches, and software updatesUser Guides — Computer documentation and product specifications |
| Service call status and support historyTop technical issues for my computerFrequently asked questionsFile downloadsDetails on my computer configurationService contract for my computer | Dell Premier Support Website — premiersupport.dell.comThe Dell Premier Support website is customized for corporate, government, and education customers. This website may not be available in all regions. |
| How to use Windows XPDocumentation for my computerDocumentation for devices (such as a modem) | Windows Help and Support Center1 Click the Start button and click Help and Support.2 Type a word or phrase that describes your problem and click the arrow icon.3 Click the topic that describes your problem.4 Follow the instructions on the screen. |
| How to reinstall my operating system | Operating System CDThe operating system is already installed on your computer. To reinstall your operating system, use the Operating System CD. See your OptiPlex User's Guide for instructions.NOTE: The operating system media is optional and may not ship with all computers. After you reinstall your operating system, use the Drivers and Utilities CD (optional) to reinstall drivers for the devices that came with your computer.Your operating system product key label is located on your computer.NOTE: The color of your CD varies based on the operating system you ordered. After you reinstall your operating system, use the Drivers and Utilities CD (optional) to reinstall drivers for the devices that came with your computer.Your operating system product key label is located on your computer.NOTE: The color of your CD varies based on the operating system you ordered. |
| Regulatory model information and chassis type | DIIP — Small form-factor chassisDHS — Small desktop chassisDCSM — Desktop chassisDIIM — Small mini-tower chassisDCNE — Mini-Tower chassis |
Front and Back Views
Small Form-Factor Computer
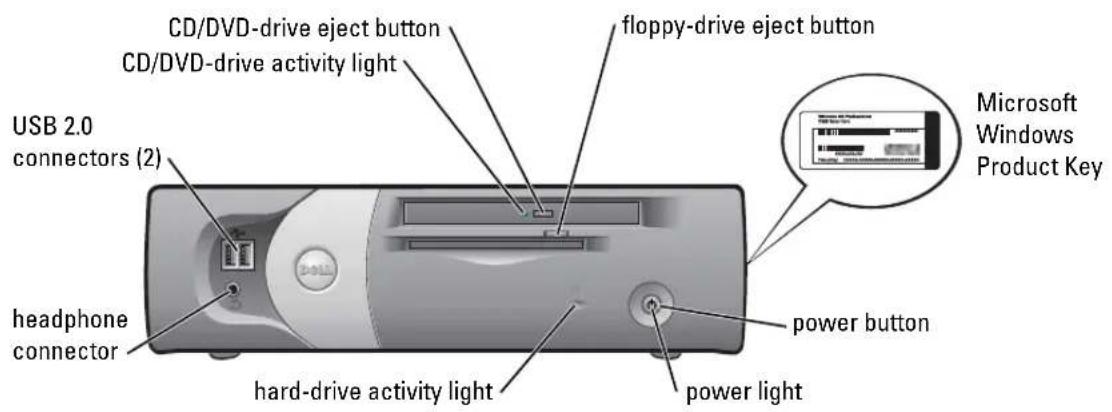
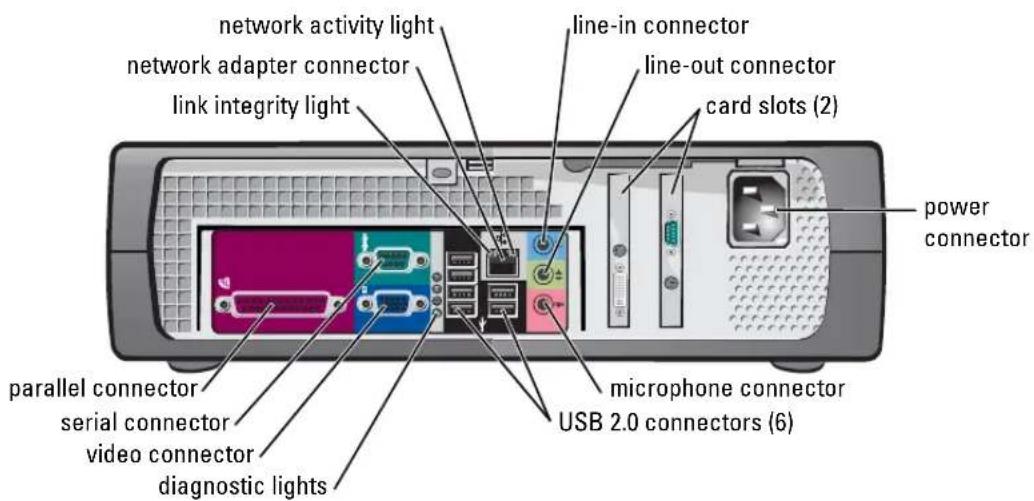
Small Desktop Computer
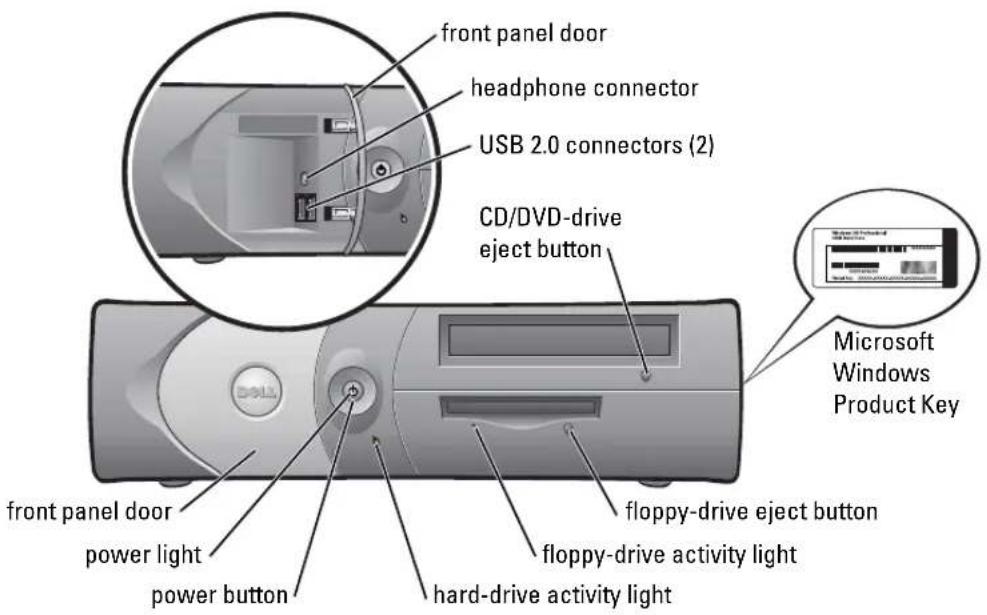
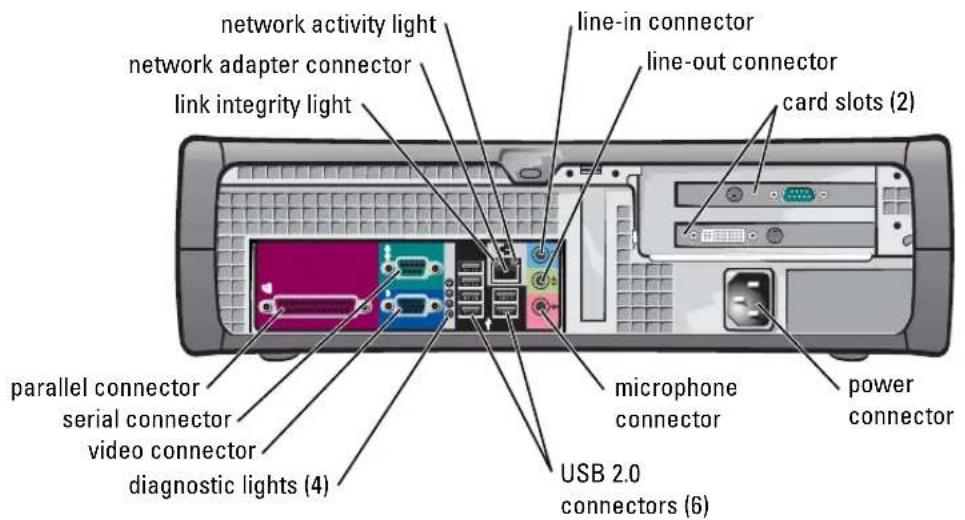
Desktop Computer
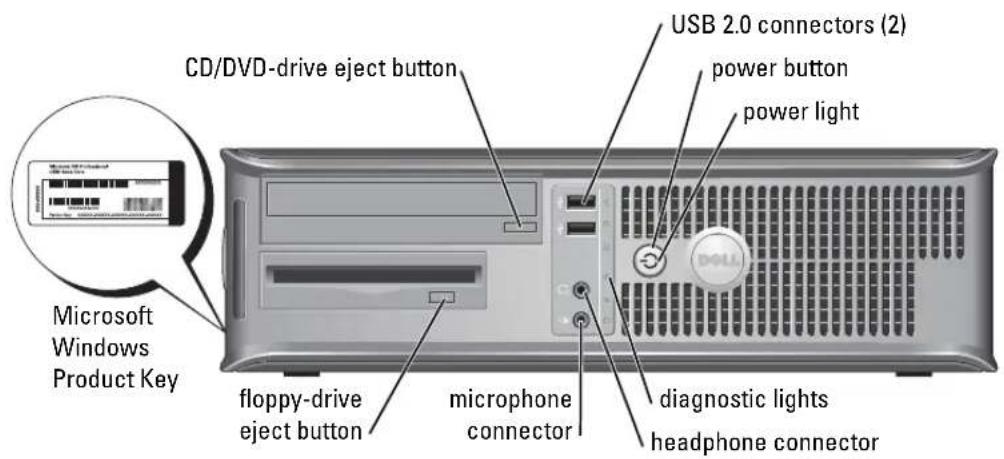
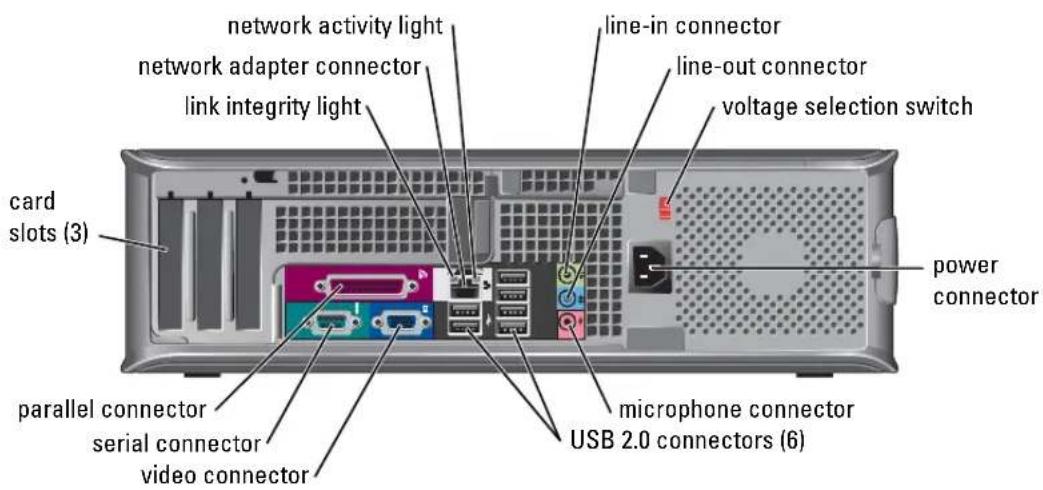
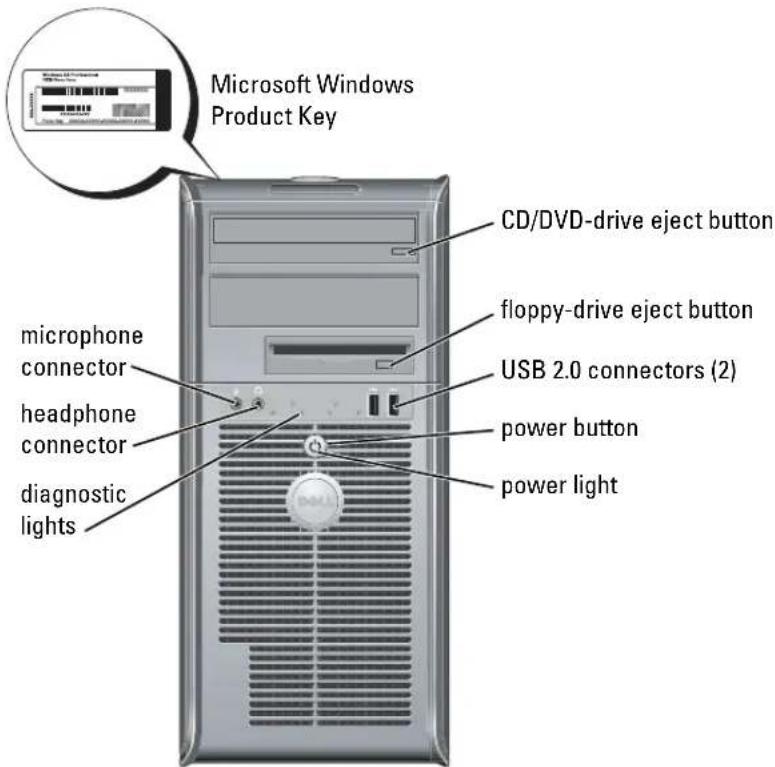
Small Mini-Tower Computer
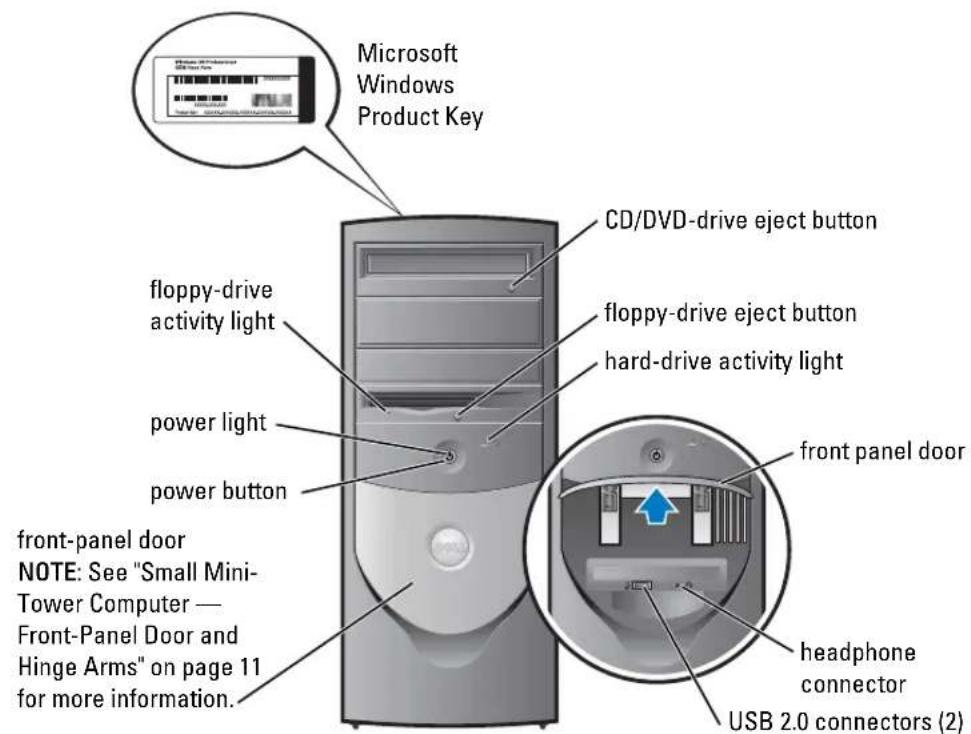
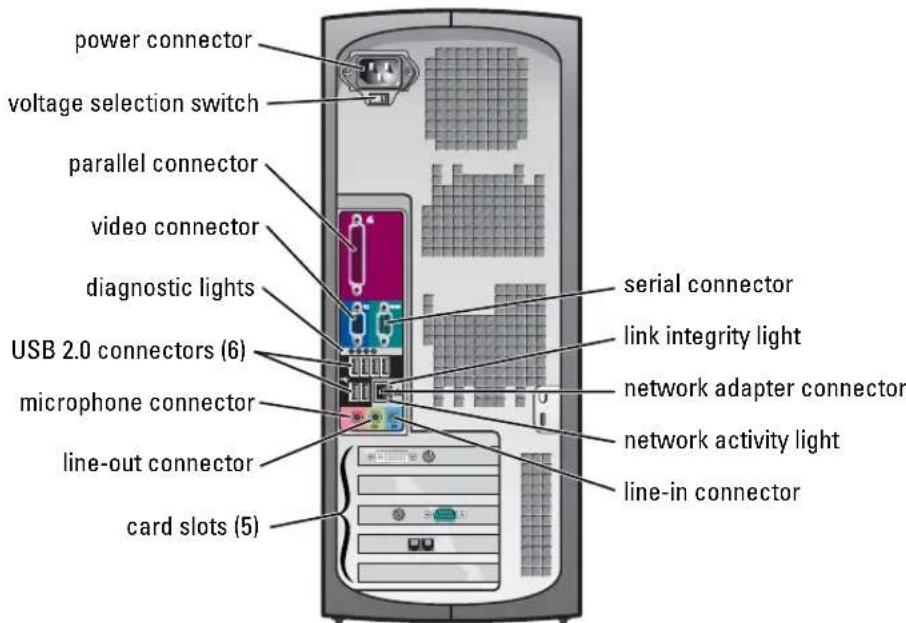
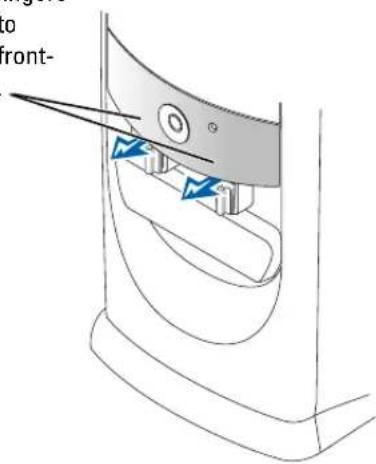
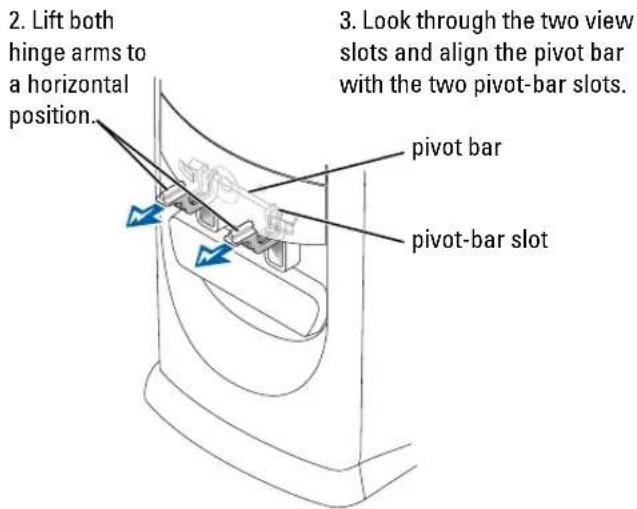
Small Mini-Tower Computer — Front-Panel Door and Hinge Arms
To prevent damage to your computer, the front-panel door is designed to "break away" if it is lifted up or pushed down too far.

CAUTION: Before you begin any of the procedures in this section, follow the safety instructions in the Product Information Guide.
To reattach the front-panel door:
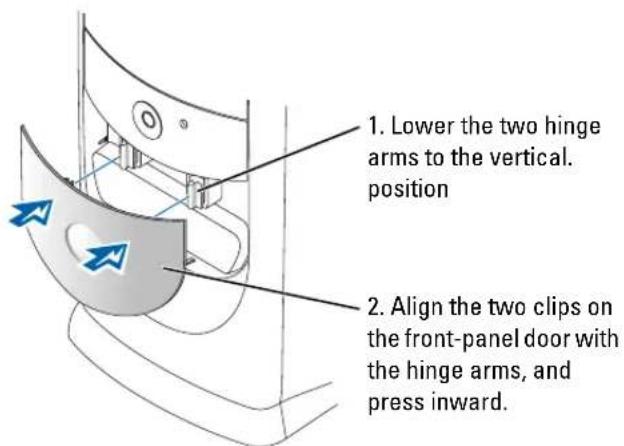
To reattach the hinge arms, first remove the front-panel door by gently snapping it off the two hinge arms:
- Use your fingers to pull here to remove the front-panel insert.
- Lift both hinge arms to a horizontal position.
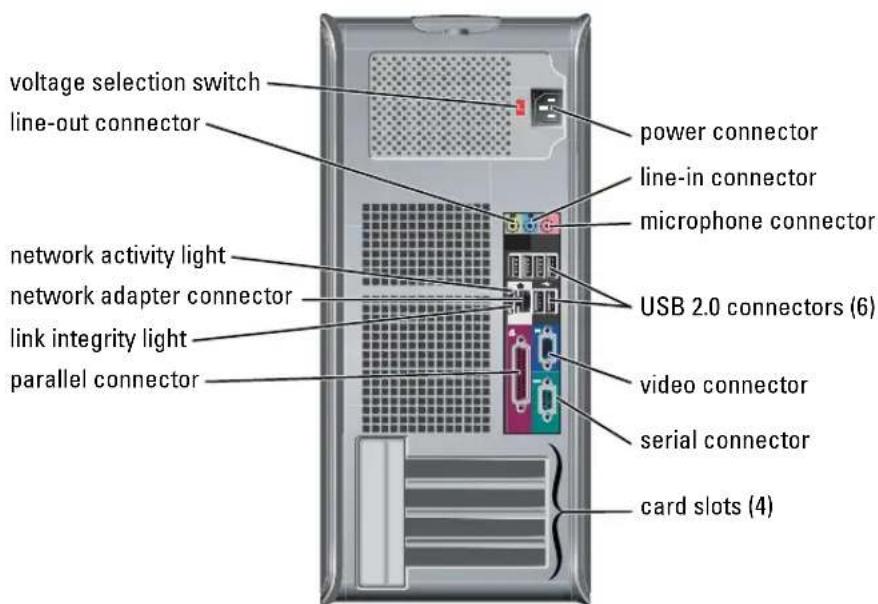
Mini-Tower Computer
Opening the Computer Cover

CAUTION: Before you begin any of the procedures in this section, follow the safety instructions in the Product Information Guide.

CAUTION: To guard against electrical shock, always unplug your computer from the electrical outlet before opening the cover.
Before opening the cover, remove the lock if a lock is installed on the back of the computer.
Small Form-Factor, Small Desktop, and Small Mini-Tower Computers

NOTICE: Ensure that there is sufficient space to support the open cover—at least 30 cm (1 ft) of desk top space.
1 Remove the computer stand, if one is attached.
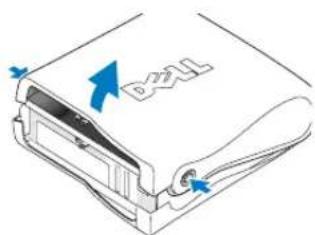
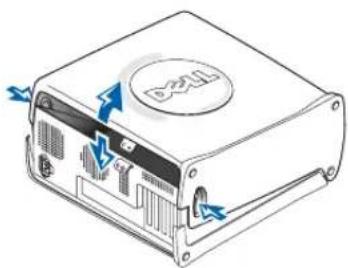
2 Locate the two release buttons shown in the figure. Then press the two release buttons as you lift the cover.

NOTICE: Open the cover slowly to ensure that you do not damage any cables.
3 Raise the back of the cover, and pivot it toward the front of the computer.

NOTE: When opening the small mini-tower computer, first press the release button on the right side of the computer with one hand while pulling up on the top of the cover with the other hand, and then press the release button on the left side of the computer with one hand while pulling up on the top of the cover with the other hand.
natural_image
Illustration of a computer case with ventilation slots and an DXL logo (no text or symbols on the device itself)Desktop and Mini-Tower Computers
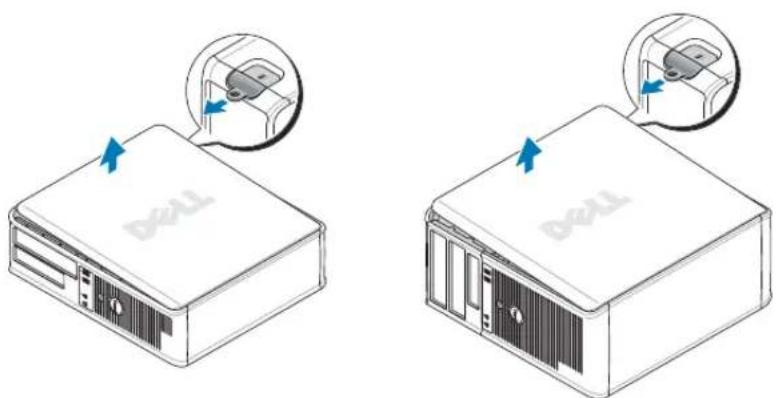
Locate the cover release lever on the back of the computer, and press the lever to release the cover.
natural_image
Two technical illustrations of a Dell desktop computer case with labeled ports and arrows indicating ports (no text or symbols beyond branding)Inside Your Computer
Small Form-factor Computer
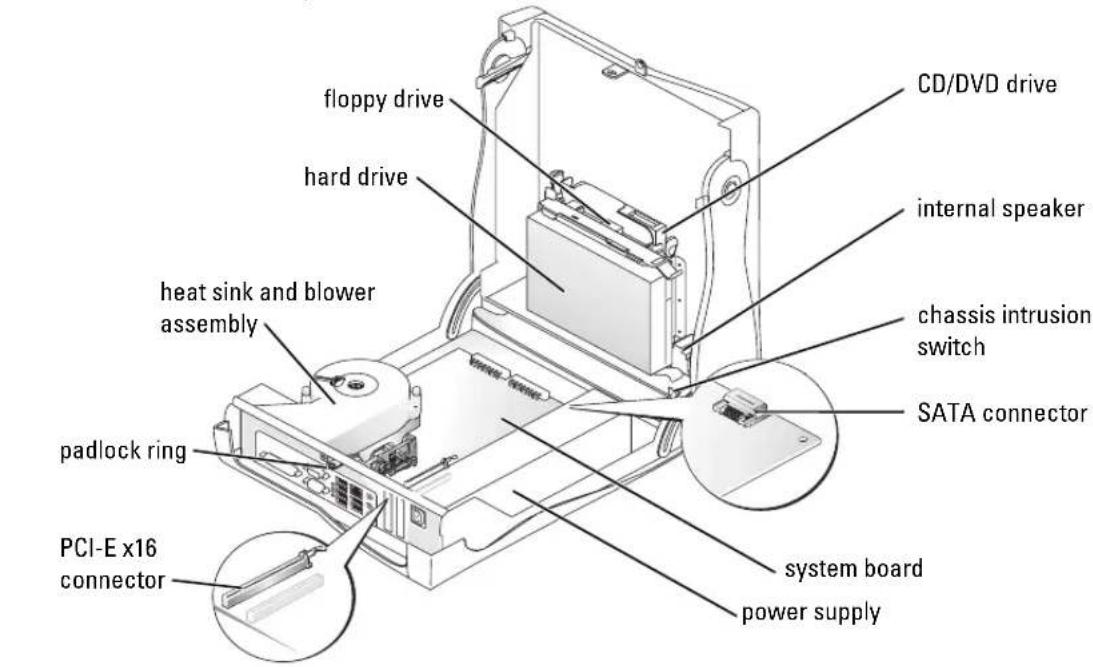
Small Desktop Computer
Desktop Computer
Small Mini-Tower Computer
Mini-Tower Computer
Setting Up Your Computer
CAUTION: Before performing any of the procedures in this section, follow the safety instructions in Product Information Guide.
NOTICE: If your computer has an expansion card installed (such as a modem card), connect the appropriate cable to the card, not to the connector on the back panel.
You must complete all the steps to properly set up your computer. See the appropriate figures that follow the instructions.
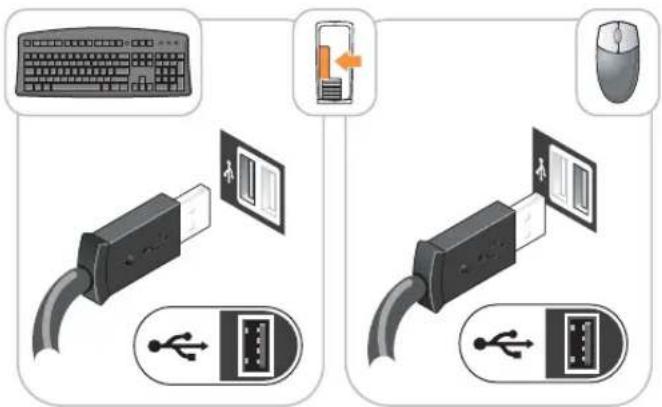
1 Connect the keyboard and mouse.
NOTICE: Do not attempt to operate a PS/2 mouse and a USB mouse simultaneously.
2 Connect the modem or network cable.
Insert the network cable, not the telephone line, into the network connector. If you have an optional modem, connect the telephone line to the modem.
NOTICE: Do not connect a modem cable to the network adapter. Voltage from telephone communications can cause damage to the network adapter.
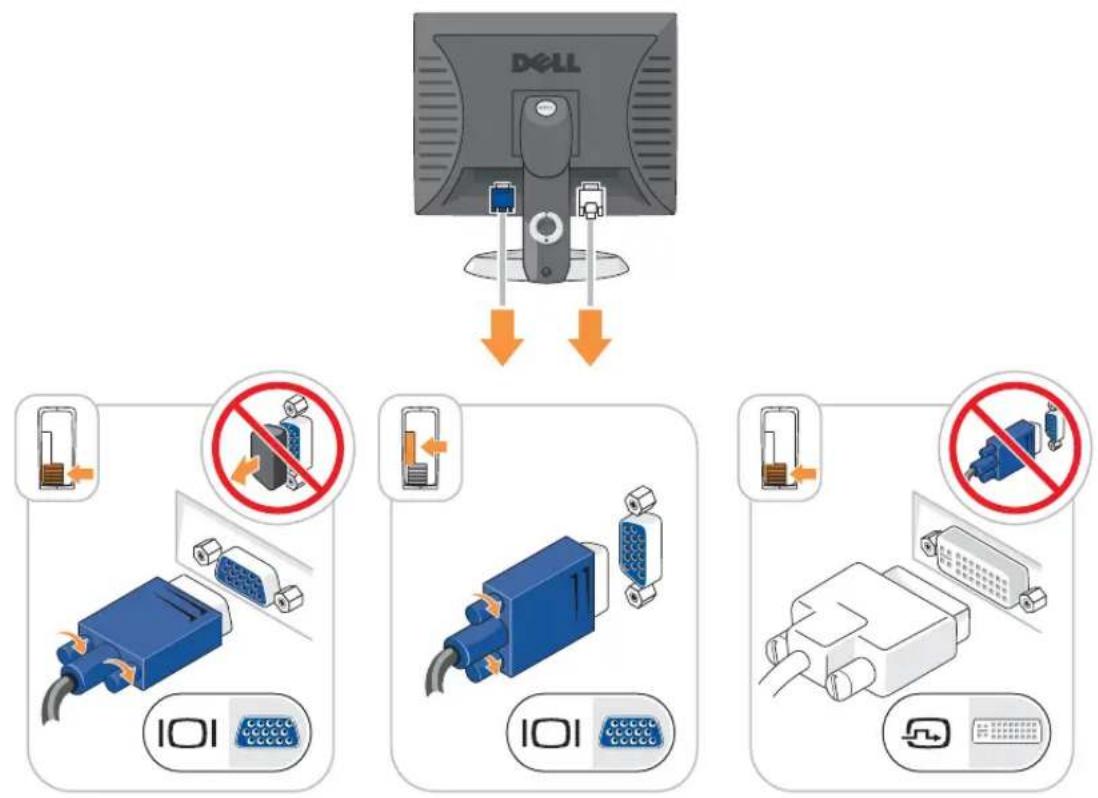
3 Connect the monitor.
Align and gently insert the monitor cable to avoid bending connector pins. Tighten the thumbscrews on the cable connectors.

NOTE: Some monitors have the video connector underneath the back of the screen. See the documentation that came with your monitor for its connector locations.
4 Connect the speakers.
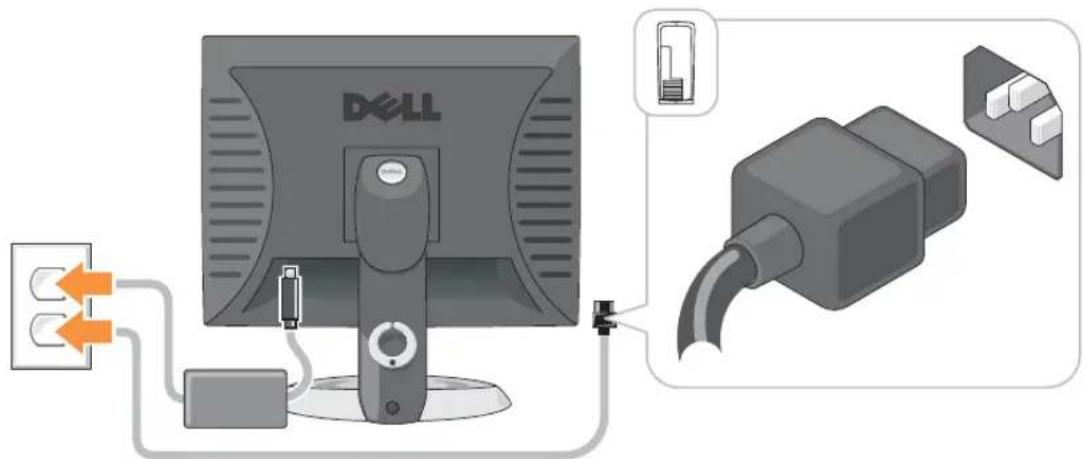
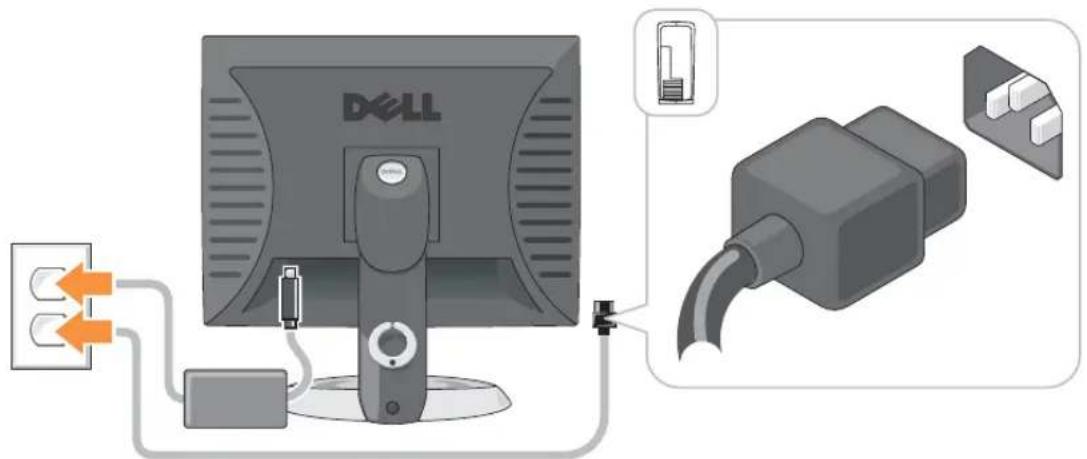
5 Connect power cables to the computer, monitor, and devices and insert the other ends of the power cables to electrical outlets.
6 Verify that the voltage selection switch is set correctly for your location.
Your computer has a manual voltage selection switch. Computers with a voltage selection switch on the back panel must be manually set to operate at the correct operating voltage.

NOTICE: To help avoid damaging a computer with a manual voltage selection switch, set the switch for the voltage that most closely matches the AC power available in your location.

NOTE: Before you install any devices or software that did not ship with your computer, read the documentation that came with the device or software, or contact the vendor to verify that the device or software is compatible with your computer and operating system.

NOTE: Your computer may vary slightly from the following setup figures.
Set Up Your Keyboard and Mouse
Set Up Your Monitor
Power Connections
Solving Problems
Dell provides a number of tools to help you if your computer does not perform as expected. For the latest troubleshooting information available for your computer, see the Dell Support website at support.dell.com.
If computer problems occur that require help from Dell, write a detailed description of the error, beep codes, or diagnostics light patterns; record your Express Service Code and Service Tag below; and then contact Dell from the same location as your computer.
See "Finding Information for Your Computer" on page 5 for an example of the Express Service Code and Service Tag.
Express Service Code:
Service Tag: ____
Dell Diagnostics

CAUTION: Before you begin any of the procedures in this section, follow the safety instructions in the Product Information Guide.

NOTE: The Drivers and Utilities CD (ResourceCD) is optional and therefore may not ship with all computers.
When to Use the Dell Diagnostics
If you experience a problem with your computer, perform the checks in "Solving Problems" of your online User's Guide and run the Dell Diagnostics before you contact Dell for technical assistance.

NOTICE: The Dell Diagnostics works only on Dell™ computers.
Enter system setup, review your computer's configuration information, and ensure that the device you want to test displays in system setup and is active.
Start the Dell Diagnostics from either your hard drive or from the optional Drivers and Utilities CD (also known as the ResourceCD).
Starting the Dell Diagnostics From Your Hard Drive
1 Turn on (or restart) your computer.
2 When the DELL ^™ logo appears, press

NOTE: If you see a message stating that no diagnostics utility partition has been found, run the Dell Diagnostics from your Drivers and Utilities CD (optional).
If you wait too long and the operating system logo appears, continue to wait until you see the Microsoft ^® Windows ^® desktop. Then shut down your computer and try again.
3 When the boot device list appears, highlight Boot to Utility Partition and press
4 When the Dell Diagnostics Main Menu appears, select the test you want to run.
Starting the Dell Diagnostics From the Drivers and Utilities CD
NOTE: The Drivers and Utilities CD (ResourceCD) is optional and therefore may not ship with all computers.
1 Insert the Drivers and Utilities CD.
2 Shut down and restart the computer.
When the DELL logo appears, press
If you wait too long and the Windows logo appears, continue to wait until you see the Windows desktop. Then shut down your computer and try again.
NOTE: The next steps change the boot sequence for one time only. On the next start-up, the computer boots according to the devices specified in system setup.
3 When the boot device list appears, highlight IDE CD-ROM Device and press
4 Select the IDE CD-ROM Device option from the CD boot menu.
5 Select the Boot from CD-ROM option from the menu that appears.
6 Type 1 to start the ResourceCD menu.
7 Type 2 to start the Dell Diagnostics.
8 Select Run the 32 Bit Dell Diagnostics from the numbered list. If multiple versions are listed, select the version appropriate for your computer.
9 When the Dell Diagnostics Main Menu appears, select the test you want to run.
Dell Diagnostics Main Menu
1 After the Dell Diagnostics loads and the Main Menu screen appears, click the button for the option you want.
| Option Function | |
| Express Test Performs a quick test of devices. This test typically takes 10 to 20 minutes and requires no interaction on your part. Run Express 'Test first to increase the possibility of tracing the problem quickly. | |
| Extended Test | Performs a thorough check of devices. This test typically takes an hour or more and requires you to answer questions periodically. |
| Custom Test Tests a specific device. You can customize the tests you want to run. | |
| Symptom Tree Lists the most common symptoms encountered and allows you to select a test based on the symptom of the problem you are having. | |
2 If a problem is encountered during a test, a message appears with an error code and a description of the problem. Write down the error code and problem description and follow the instructions on the screen.
If you cannot resolve the error condition, contact Dell.

NOTE: The Service Tag for your computer is located at the top of each test screen. If you contact Dell, technical support will ask for your Service Tag.
3 If you run a test from the Custom Test or Symptom Treeoption, click the applicable tab described in the following table for more information.
Tab Function
| Results | Displays the results of the test and any error conditions encountered. |
| Errors Displays error conditions encountered, error codes, and the problem description. | |
| Help Describes the test and may indicate requirements for running the test. | |
| Configuration Displays your hardware configuration for the selected device.The Dell Diagnostics obtains configuration information for all devices from system setup, memory, and various internal tests, and it displays the information in the device list in the left pane of the screen. The device list may not display the names of all the components installed on your computer or all devices attached to your computer. | |
| Parameters Allows you to customize the test by changing the test settings. | |
4 When the tests are completed, if you are running the Dell Diagnostics from the Drivers and Utilities CD (optional), remove the CD.
5 Close the test screen to return to the Main Menu screen. To exit the Dell Diagnostics and restart the computer, close the Main Menu screen.
System Lights
Your power light may indicate a computer problem.
Power Light Problem Description Suggested Resolution
| Solid green Power is on, and the computer is operating normally. | No corrective action is required. |
| Blinking green The computer is in the suspended state (Microsoft® Windows® 2000 and Windows XP). | Press the power button, move the mouse, or press a key on the keyboard to wake the computer. |
| Blinks green several times and then turns offA configuration error exists. | Check "Diagnostic Lights" on page 23 to see if the specific problem is identified. |
| Power Light Problem Description Suggested Resolution | ||
| Solid yellow The Dell Diagnostics is running a test, or a device on the system board may be faulty or incorrectly installed. | If the Dell Diagnostics is running, allow the testing to complete.Check "Diagnostic Lights" on page 23 to see if the specific problem is identified.If the computer does not boot, contact Dell for technical assistance. For information on contacting Dell, see your online User's Guide. | |
| Blinking yellow A power supply or system board failure has occurred. | Check "Diagnostic Lights" on page 23 to see if the specific problem is identified. See "Power Problems" in your online User's Guide. | |
| Solid green and a beep code during POST | A problem was detected while the BIOS was executing. | See "Beep Codes" on page 26 for instructions on diagnosing the beep code. Also, check "Diagnostic Lights" on page 23 to see if the specific problem is identified. |
| Solid green power light, no beep code and no video during POST | The monitor or the graphics card may be faulty or incorrectly installed. | Check "Diagnostic Lights" on page 23 to see if the specific problem is identified. |
| Solid green power light and no beep code but the computer locks up during POST | An integrated system board device may be faulty. | Check "Diagnostic Lights" on page 23 to see if the specific problem is identified. If the problem is not identified, contact Dell for technical assistance. For information on contacting Dell, see your online User's Guide. |
Diagnostic Lights

CAUTION: Before you begin any of the procedures in this section, follow the safety instructions in the Product Information Guide.
To help you troubleshoot a problem, your small form factor, small desktop, and small mini-tower computers have four lights labeled "A," "B," "C," and "D" on the back panel. The lights can be yellow or green. When the computer starts normally, the patterns or codes on the lights change as the boot process completes. If the POST portion of system boot completes successfully, all four lights display solid green. If the computer malfunctions during the POST process, the pattern displayed on the LEDs may help identify where in the process the computer halted.

NOTE: The orientation of the diagnostic lights may vary depending on the system type. The diagnostic lights can appear in either a vertical or horizontal orientation.
Y = Yellow
G = Green
Light Pattern Problem Description Suggested Resolution
| off off off off | The computer is in a normal "off" condition or a possible pre-BIOS failure has occurred. | Plug the computer into a working electrical outlet and press the power button. |
| A possible BIOS failure has occurred; the computer is in the recovery mode. | Run the BIOS Recovery utility, wait for recovery completion, and then restart the computer. | |
 | A possible processor failure has occurred. | Reinstall the processor and restart the computer. For information on reinstalling the processor, see your online User's |
| Light Pattern Problem Description Suggested Resolution | |
| A Y B C D G | Memory modules are detected, but a memory failure has occurred. |
| A Y B C D Y Y | A possible expansion card failure has occurred. |
Light Pattern Problem Description Suggested Resolution
| A possible graphics card failure has occurred. | ·If the computer has a graphics card, remove the card, reinstall it, and then restart the computer.·If the problem still exists, install a graphics card that you know works and restart the computer.·If the problem persists or the computer has integrated graphics, contact Dell. For information on contacting Dell, see your online User's Guide. |
| A possible floppy or hard drive failure has occurred. | Reseat all power and data cables and restart the computer. |
| A possible USB failure has occurred. Reinstall all USB devices, check cable connections, and then restart the computer. | |
| No memory modules are detected. | ·If you have one memory module installed, reinstall it and restart the computer. For information on reinstalling memory modules, see your online User's Guide.·If you have two or more memory modules installed, remove the modules, reinstall one module, and then restart the computer. If the computer starts normally, reinstall an additional module. Continue until you have identified a faulty module or reinstalled all modules without error.·If available, install properly working memory modules of the same type into your computer.·If the problem persists, contact Dell. For information on contacting Dell, see your online User's Guide. |
| Light Pattern | Problem Description | Suggested Resolution |
| G Y G Y | Memory modules are detected, but a memory configuration or compatibility error exists. | ·Ensure that no special memory module or memory connector placement requirements exist.·Verify that the memory modules that you are installing are compatible with your computer.·If the problem persists, contact Dell. For information on contacting Dell, see your online User's Guide. |
| G G G Y | Other failure has occurred. | ·Ensure that the cables are properly connected to the system board from the hard drive, CD drive, and DVD drive.·Check the computer message that appears on your monitor screen.·If the problem persists, contact Dell. For information on contacting Dell, see your online User's Guide. |
| G G G G | The computer is in a normal operating condition after POST. | None. |
Beep Codes
Your computer might emit a series of beeps during start-up if the monitor cannot display errors or problems. This series of beeps, called a beep code, identifies a problem. One possible beep code (code 1-3-1) consists of one beep, a burst of three beeps, and then one beep. This beep code tells you that the computer encountered a memory problem.
If your computer beeps during start-up:
1 Write down the beep code.
2 See "Dell Diagnostics" on page 19 to identify a more serious cause.
3 Contact Dell for technical assistance. For information on contacting Dell, see your online User's Guide.
Code Cause Code Cause
| 1-1-2 Microprocessor register failure 3-1-4 Slave interrupt mask register failure |
| 1-1-3 NVRAM read/write failure 3-2-2 Interrupt vector loading failure |
| 1-1-4 ROM BIOS checksum failure 3-2-4 Keyboard Controller Test failure |
| 1-2-1 Programmable interval timer failure 3-3-1 NVRAM power loss |
| Code | Cause | Code | Cause |
| 1-2-2 DMA initialization failure 3-3-2 Invalid NVRAM configuration | |||
| 1-2-3 DMA page register read/write failure 3-3-4 Video Memory Test failure | |||
| 1-3 Video Memory Test failure 3-4-1 Screen initialization failure | |||
| 1-3-1 through 2-4-4 Memory not being properly identified or used | 3-4-2 Screen retrace failure | ||
| 3-1-1 Slave DMA register failure 3-4-3 Search for video ROM failure | |||
| 3-1-2 Master DMA register failure 4-2-1 No timer tick | |||
| 3-1-3 Master interrupt mask register failure 4-2-2 Shutdown failure | |||
| 4-2-3 Gate A20 failure | 4-4-1 Serial or parallel port test failure | ||
| 4-2-4 Unexpected interrupt in protected mode | 4-4-2 Failure to decompress code to shadowed memory | ||
| 4-3-1 Memory failure above address 0FFFFh | 4-4-3 Math-coprocessor test failure | ||
| 4-3-3 Timer-chip counter 2 failure | 4-4-4 Cache test failure | ||
| 4-3-4 Time-of-day clock stopped | |||
Running the Dell™ IDE Hard Drive Diagnostics
The Dell IDE Hard Drive Diagnostics is a utility that tests the hard drive to troubleshoot or confirm a hard drive failure.
1 Turn on your computer (if your computer is already on, restart it).
2 When F2= Setup appears in the upper-right corner of the screen, press
3 Follow the instructions on the screen.
If a failure is reported, see "Hard Drive Problems" in the "Solving Problems" section of the online User's Guide.
Resolving Software and Hardware Incompatibilities
If a device is either not detected during the operating system setup or is detected but incorrectly configured, you can use the Hardware Troubleshooter to resolve the incompatibility. In the Microsoft® Windows® 2000 operating system, you can also use Device Manager to resolve incompatibilities.
Windows XP
To resolve incompatibilities using the Hardware Troubleshooter:
1 Click the Start button and click Help and Support.
2 Type hardware troubleshooter in the Search field and click the arrow to start the search.
3 Click Hardware Troubleshooter in the Search Results list.
4 In the Hardware Troubleshooter list, click I need to resolve a hardware conflict on my computer, and click Next.
Windows 2000
To resolve incompatibilities using Device Manager:
1 Click the Start button, point to Settings, and then click Control Panel.
2 In the Control Panel window, double-click System.
3 Click the Hardware tab.
4 Click Device Manager.
5 Click View and click Resources by connection.
6 Double-click Interrupt request (IRQ).
Incorrectly configured devices are indicated by a yellow exclamation point (!) or a red x if the device has been disabled.
7 Double-click any device marked with an exclamation point to display the Properties window. The Device status area in the Properties window reports the cards or devices that need to be reconfigured.
8 Reconfigure the devices or remove the devices from the Device Manager. See the documentation that came with the device for information on configuring the device.
To resolve incompatibilities using the Hardware Troubleshooter:
1 Click the Start button and click Help.
2 Click Troubleshooting and Maintenance on the Contents tab, click Windows 2000 troubleshooters, and then click Hardware.
In the Hardware Troubleshooter list, click I need to resolve a hardware conflict on my computer and click Next.
Using Microsoft ^® Windows ^® XP System Restore
The Microsoft ^® Windows ^® XP operating system provides System Restore to allow you to return your computer to an earlier operating state (without affecting data files) if changes to the hardware, software, or other system settings have left the computer in an undesirable operating state. See the Windows Help and Support Center for information on using System Restore.

NOTICE: Make regular backups of your data files. System Restore does not monitor your data files or recover them.
Creating a Restore Point
1 Click the Start button and click Help and Support.
2 Click System Restore.
3 Follow the instructions on the screen.
Restoring the Computer to an Earlier Operating State

NOTICE: Before you restore the computer to an earlier operating state, save and close any open files and exit any open programs. Do not alter, open, or delete any files or programs until the system restoration is complete.
1 Click the Start button, point to All Programs→Accessories→System Tools, and then click System Restore
2 Ensure that Restore my computer to an earlier time is selected and click Next.
3 Click a calendar date to which you want to restore your computer.
The Select a Restore Point screen provides a calendar that allows you to see and select restore points. All calendar dates with available restore points appear in boldface type.
4 Select a restore point and click Next.
If a calendar date has only one restore point, then that restore point is automatically selected. If two or more restore points are available, click the restore point that you prefer.
5 Click Next.
The Restoration Complete screen appears after System Restore finishes collecting data and then the computer restarts.
6 After the computer restarts, click OK.
To change the restore point, you can either repeat the steps using a different restore point, or you can undo the restoration.
Undoing the Last System Restore

NOTICE: Before you undo the last system restore, save and close all open files and exit any open programs. Do not alter, open, or delete any files or programs until the system restoration is complete.
1 Click the Start button, point to All Programs→Accessories→System Tools, and then click System Restore.
2 Click Undo my last restoration and click Next.
3 Click Next.
The System Restore screen appears and the computer restarts.
4 After the computer restarts, click OK.
Enabling System Restore
If you reinstall Windows XP with less than 200 MB of free hard-disk space available, System Restore is automatically disabled. To see if System Restore is enabled:
1 Click the Start button and click Control Panel.
2 Click Performance and Maintenance.
3 Click System.
4 Click the System Restore tab.
5 Ensure that Turn off System Restore is unchecked.
Reinstalling Microsoft® Windows® XP
Before You Begin
If you are considering reinstalling the Windows XP operating system to correct a problem with a newly installed driver, first try using Windows XP Device Driver Rollback. If Device Driver Rollback does not resolve the problem, then use System Restore to return your operating system to the operating state it was in before you installed the new device driver.
NOTICE: Before performing the installation, back up all data files on your primary hard drive. For conventional hard drive configurations, the primary hard drive is the first drive detected by the computer.
To reinstall Windows XP, you need the following items:
- Dell™ Operating System CD
• D Driversland Utilities CD
NOTE: The Drivers and Utilities CD contains drivers that were installed during assembly of the computer. Use the Drivers and Utilities CD to load any required drivers, including the drivers required if your computer has a RAID controller.
Reinstalling Windows XP
NOTICE: You must use Windows XP Service Pack 1 or later when you reinstall Windows XP.
To reinstall Windows XP, perform all the steps in the following sections in the order in which they are listed.
The reinstallation process can take 1 to 2 hours to complete. After you reinstall the operating system, you must also reinstall the device drivers, virus protection program, and other software.
NOTICE: The Operating System CD provides options for reinstalling Windows XP. The options can overwrite files and possibly affect programs installed on your hard drive. Therefore, do not reinstall Windows XP unless a Dell technical support representative instructs you to do so.
NOTICE: To prevent conflicts with Windows XP, disable any virus protection software installed on your computer before you reinstall Windows XP. See the documentation that came with the software for instructions.
Booting From the Operating System CD
1 Save and close any open files and exit any open programs.
2 Insert the Operating System CD. Click Exit if Install Windows XP message appears.
3 Restart the computer.
4 Press
If the operating system logo appears, wait until you see the Windows desktop, and then shut down the computer and try again.
5 Press the arrow keys to select CD-ROM, and press
6 When the Press any key to boot from CD message appears, press any key.
Windows XP Setup
1 When the Windows XP Setup screen appears, press
2 Read the information on the Microsoft Windows Licensing Agreement screen, and press
3 If your computer already has Windows XP installed and you want to recover your current Windows XP data, type r to select the repair option, and remove the CD.
4 If you want to install a new copy of Windows XP, press
5 Press
The Windows XP Setup screen appears, and the operating system begins to copy files and install the devices. The computer automatically restarts multiple times.

NOTE: The time required to complete the setup depends on the size of the hard drive and the speed of your computer.

NOTICE: Do not press any key when the following message appears: Press any key to boot from the CD.
6 When the Regional and Language Options screen appears, select the settings for your location and click Next.
7 Enter your name and organization (optional) in the Personalize Your Softwarescreen, and click Next.
8 At the Computer Name and Administrator Password window, enter a name for your computer (or accept the one provided) and a password, and click Next.
9 If the Modem Dialing Information screen appears, enter the requested information and click Next
10 Enter the date, time, and time zone in the Date and Time Settings window, and clickNext.
11 If the Networking Settings screen appears, click Typical and click Next.
12 If you are reinstalling Windows XP Professional and you are prompted to provide further information regarding your network configuration, enter your selections. If you are unsure of your settings, accept the default selections.
Windows XP installs the operating system components and configures the computer. The computer automatically restarts.
NOTICE: Do not press any key when the following message appears: Press any key to boot from the CD.
13 When the Welcome to Microsoft screen appears, click Next.
14 When the How will this computer connect to the Internet? message appears, click Skip.
15 When the Ready to register with Microsoft? screen appears, select No, not at this time and click Next.
16 When the Who will use this computer? screen appears, you can enter up to five users.
17 Click Next.
18 Click Finish to complete the setup, and remove the CD.
19 Reinstall the appropriate drivers with the Drivers and Utilities CD.
20 Reinstall your virus protection software.
21 Reinstall your programs.
NOTE: To reinstall and activate your Microsoft Office or Microsoft Works Suite programs, you need the Product Key number located on the back of the Microsoft Office or Microsoft Works Suite CD sleeve.
Using the Drivers and Utilities CD
NOTE: The Drivers and Utilities CD (ResourceCD) is optional and therefore may not ship with all computers.
To use the Drivers and Utilities CD (also known as the ResourceCD) while you are running the Windows operating system:
NOTE: To access device drivers and user documentation, you must use the Drivers and Utilities CD while you are running Windows.
1 Turn on the computer and allow it to boot to the Windows desktop.
2 Insert the Drivers and Utilities CD into the CD drive.
1 Turn on the computer and allow it to boot to the Windows desktop. 2 Insert the Drivers and Utilities CD into the CD drive.
If you are using the Drivers and Utilities CD for the first time on this computer, the ResourceCD Installation window opens to inform you that the Drivers and Utilities CD is about to begin installation.
3 Click OK to continue.
To complete the installation, respond to the prompts offered by the installation program.
4 Click Next at the Welcome Dell System Owner screen.
5 Select the appropriate System Model, Operating System, Device Type, and Topic.
Drivers for Your Computer
To display a list of device drivers for your computer:
1 Click My Drivers in the Topic drop-down menu.
The Drivers and Utilities CD (optional) scans your computer's hardware and operating system, and then a list of device drivers for your system configuration is displayed on the screen.
2 Click the appropriate driver and follow the instructions to download the driver to your computer.
To view all available drivers for your computer, clickDrivers from the Topic drop-down menu.
Index
B
beep codes, 26
C
CD
operating system, 6
computer
beep codes, 26
restore to previous operating state, 28
conflicts
software and hardware incompatibilities, 27
cover
opening, 13
D
Dell
Premier Support website, 6 support site, 6
Dell Diagnostics, 19
Device Manager, 28
diagnostic lights, 22
diagnostics
beep codes, 26
Dell, 19
Drivers and Utilities CD, 5
lights, 22
documentation
device, 5
finding, 5
online, 6
Quick Reference, 5
ResourceCD, 5
User's Guide, 5
door
reattaching, 11
drivers
reinstalling, 5
Drivers and Utilities CD, 5
E
error messages
beep codes, 26
diagnostic lights, 22
F
front door
reattaching, 11
H
hardware
beep codes, 26
conflicts, 27
Dell Diagnostics, 19
Hardware Troubleshooter, 27
Help and Support Center, 6
|
IRQ conflicts, 27
L
labels
Microsoft Windows, 5
Service Tag, 5
light, 22
lights
diagnostic, 22
front of computer, 22
power button, 22
system, 22
M
Microsoft Windows label, 5
0
operating system
CD, 6
Installation Guide, 6
reinstalling Windows XP, 30
Operating System CD, 6
P
power light, 22
problems
beep codes, 26
conflicts, 27
Dell Diagnostics, 19
diagnostic lights, 22
restore computer to previous operating state, 28
Hardware Troubleshooter, 27
Help and Support Center, 6
restore computer to previous operating state, 28
U
User's Guide, 5
R
reinstalling
drivers, 5
Windows XP, 30
ResourceCD
Dell Diagnostics, 19
W
Windows 2000
Device Manager, 28
Hardware Troubleshooter, 28
Windows XP
Hardware Troubleshooter, 27
Help and Support Center, 6 reinstalling, 30
System Restore, 28
s
Service Tag, 5
software
conflicts, 27
system lights, 22
System Restore, 28
T
troubleshooting
conflicts, 27
Dell Diagnostics, 19
diagnostic lights, 22
Dell ^TM OptiPlex ^TM GX280
natural_image
Diagram of a device handle with blue arrows indicating movement or force, no text or symbols presentnatural_image
Illustration of a computer drive chassis with blue directional arrows indicating ports and components (no text or symbols)Instalace monitoru
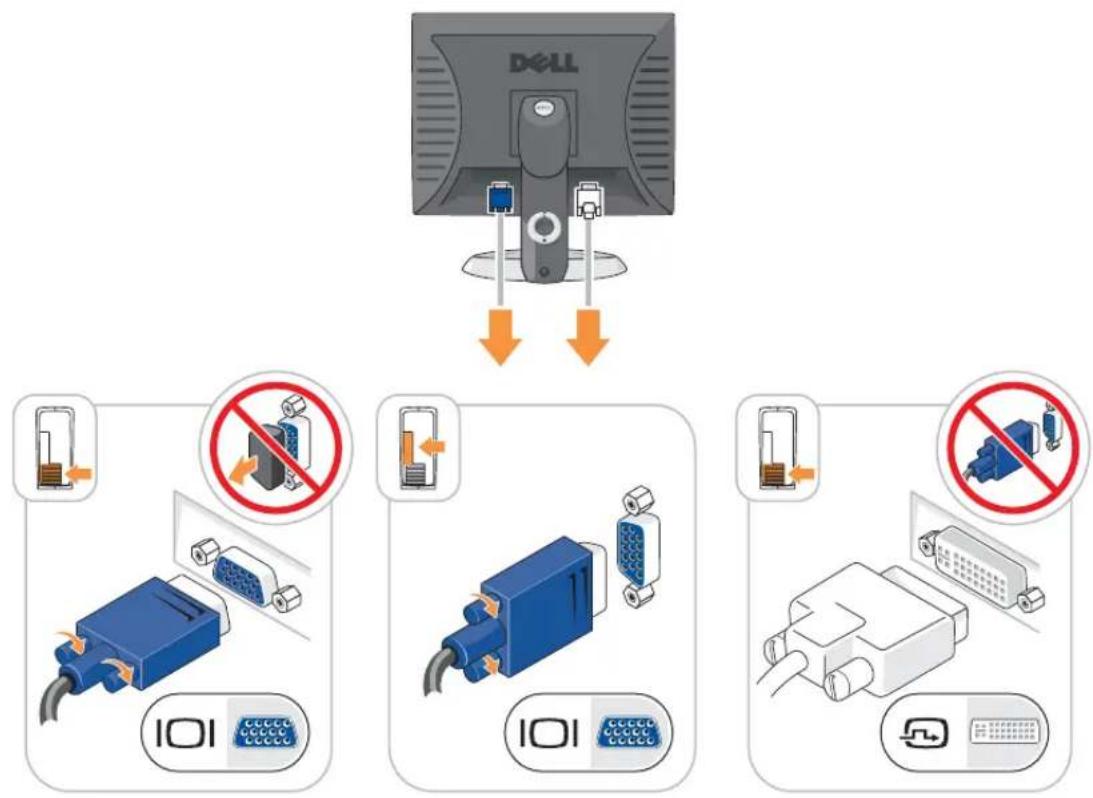
Připojení napájení
Diagnosticky program Dell Diagnostics, 5 5
diagnosticky program Dell Diagnostics, 5 5
September 2004 P/N N7133 Rev. A00
Inhoud
natural_image
Diagram of a mechanical component with directional arrows indicating movement or force (no text or symbols present)natural_image
Diagram of a computer case with ventilation ducts and ventilation slots, no text or symbols presentDesktop- en minitowercomputers
Problemen oplossen
Dell Premier Support-website, 78 support-website, 78
Dell Diagnostics (Dell-diagnostiek), 92
Device Manager (Apparaatbeheer), 101
natural_image
Technical diagram of a mechanical component with directional arrows indicating movement or force (no text or symbols present)natural_image
Diagram of a device's internal components with arrows indicating movement or force (no text or symbols)natural_image
Diagram of a Dell drive with blue directional arrows indicating compression or movement (no text or symbols present)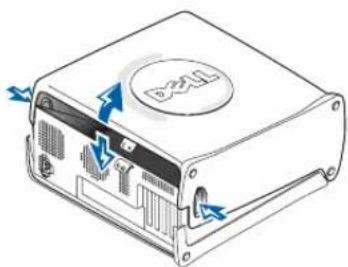
natural_image
Diagram of a computer case with ventilation slots and a circular logo (no text or symbols)natural_image
Two technical illustrations of a Dell desktop computer case with blue arrows indicating ports, no text or symbols present.Επίλυση Προβλημάτων
To reinstall Windows XP, you need the following items:
natural_image
Technical diagram of a mechanical component with directional arrows indicating movement or force (no text or symbols present)natural_image
Diagram of a sewing machine needle insertion into the jaw (no text or labels)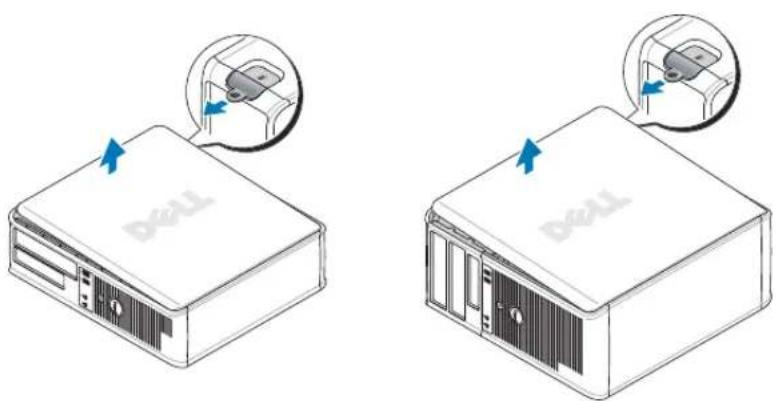
natural_image
Diagram showing two views of a Dell computer case with labeled ports and arrows indicating assembly or installation (no text beyond labels)Problémák megoldása
natural_image
Technical diagram of a mechanical component with directional arrows indicating movement or force (no text or symbols present)natural_image
Two technical illustrations of a Dell desktop computer case with labeled ports and arrows indicating internal components (no text or symbols beyond branding)Wewnątrz komputera
(בַרְהָה) Drivers and Utilities
(בַרְהָה) Drivers and Utilities
. drivers and Utilities 2
ResourceCD Drivers and Utilities Windows installation
- Ⓟ, Ⓟ, Ⓟ, Ⓟ, Ⓟ, Ⓟ, Ⓟ, Ⓟ, Ⓟ, Ⓟ, Ⓟ, Ⓟ, Ⓟ, Ⓟ, Ⓟ, Ⓟ, Ⓟ, Ⓟ, Ⓟ, Ⓟ, Ⓟ, Ⓟ, Ⓟ, Ⓟ, Ⓟ, Ⓟ
19 (הכלהה) Drivers and Utilities
,Microsoft Works Suite in Microsoft Office is not to be a form that it is not to be a form that it is not to be a form that it is not to be a form that it is not to be a form that it is not to be a form that it is not to be a form that it is not to be a form that it is not to be a form that it is not to be a form that it is not to be a form that it is not to be a form that it is not to be a form that it is not to

.(הכלהה) Performance and Maintenance 2
.(תְבָרִי) System 3
.(הכלהה) System Restore 4
Dell (הכלהה) Drivers and Utilities
הכלה (הכלה) – (הכלה) – (הכלה) – (הכלה) – (הכלה) – (הכלה) – (הכלה) – (הכלה) – (הכלה) – (הכלה) – (הכלה) – (הכלה) – (הכלה) – (הכלה) – (הכchia) – (הכchia) – (הכchia) – (הכchia) – (הכchia) – (הכchia) – (הכchia) – (הכchia) – (הכchia) – (הכchia) – (הכchia) – (הכchia) – (הכchia) – (הכchia) – (הכchia) – (הכchia) – (הכchia) – (NAVI),

Windows XP 76-77-78-79-80
in Windows XP Service Pack 1 -הכלה,Windows XP כרִים:בְרַעָה.

.(הכלהה) Help and Support (הכלהה) Start 1
.(הכלהה) Help and Support (הכלהה) Start 1
I need to resolve a בַבְרָה, (בַבְרָה לַעֹרִי) Hardware Troubleshooter 4
.(אָהַע) Next 7v
| הכלהה | הכלהה | הכלהה |
| •,הכלהה•,הכלהה•,הכלהה•,Dell•,Dell• | •,הכלהה•,הכלהה•,Dell• |  |
| •,הכלהה•,Dell•,Dell• | •,הכלהה•,Dell• |  |
| •,הכלהה•,Dell•,Dell• | •,Dell•,Dell• | |
| •,Dell•,Dell• | •,Dell•,Dell• | |
| •,Dell•,Dell• | •,Dell•,Dell• | |
| •,Dell•,Dell• | •,Dell•,Dell• | |
| •,Dell•,Dell• | •,• | |
Symptom Tree is Custom Test.
3
| הכלה | |
| .הכלההכלההכלההכלההכלההכלההכלההכלההכלההכלההכלההכלההכלההכלההכלההכלההכלההכלההכלההכלההכלההכלההכלההכלההכלההכלההכלההכלההכלההכלההכלההכלההכלההכלה | |
| .הכלההכלההכלההכלההכלההכלההכלההכלההכלההכלההכלההכלההכלההכלההכלההכלההכלההכלההכלההכלההכלההכלההכלההכלההכלההכלההכלההכלההכלההכלההכלההכchia | |
| .הכchiaהכchiaהכchiaהכchiaהכchiaהכchiaהכchiaהכchiaהכchiaהכchiaהכchiaהכchiaהכchiaהכchiaהכchiaהכchiaהכchiaהכchiaהכchiaהכchiaהכchiaהכchiaהכchiaהכchiaהכchiaהכchiaהכchiaהכchiaהכchiaהכchiaהכchiaהכchiaהכchiaהכchia | |
| .הכchiaהכchiaהכchiaהכchiaהכchiaהכchiaהכchiaהכchiaהכchiaהכchiaהכchiaהכchiaהכchiaהכchiaהכchiaהכchiaהכchiaהכchiaהכchiaהכchiaהכchiaהכchiaהכchiaהכchiaהכchiaהכchiaהכchiaהכchiaהכchiaהכchiaה | |
Drivers and Utilities Dell
.(הכלההוּרָהוּרָהוּרָהוּרָהוּרָהוּרָהוּרָהוּרָהוּרָהוּרָהוּרָהוּרָהוּרָהוּרָהוּרָה) Drivers and Utilities
. אַרְשָׁוֹת אַרְשָׁוֹת
3
Mini-Tower 100
בַרְשָׁה בַרְשָׁה
Mini-Tower Form-Factor
D'107
natural_image
Illustration of a closed hard drive with blue arrows indicating fasteners (no text or symbols)natural_image
Illustration of a device casing with blue arrows indicating directional flow or movement, no text or symbols present.natural_image
Illustration of a Dell desktop computer with an inset showing a device being inserted (no text or symbols present)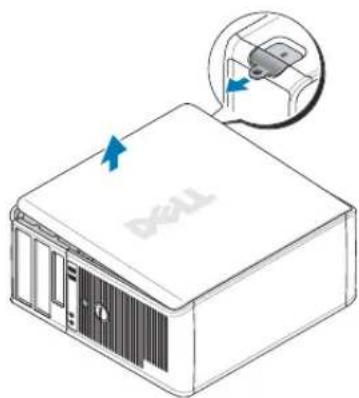
natural_image
Diagram of a device with a labeled 'TCL' on the cover, showing a close-up of its internal structure (no text or symbols beyond label)Mini-Tower 100
natural_image
Technical diagram of a mechanical component with directional arrows indicating movement or force (no text or symbols present)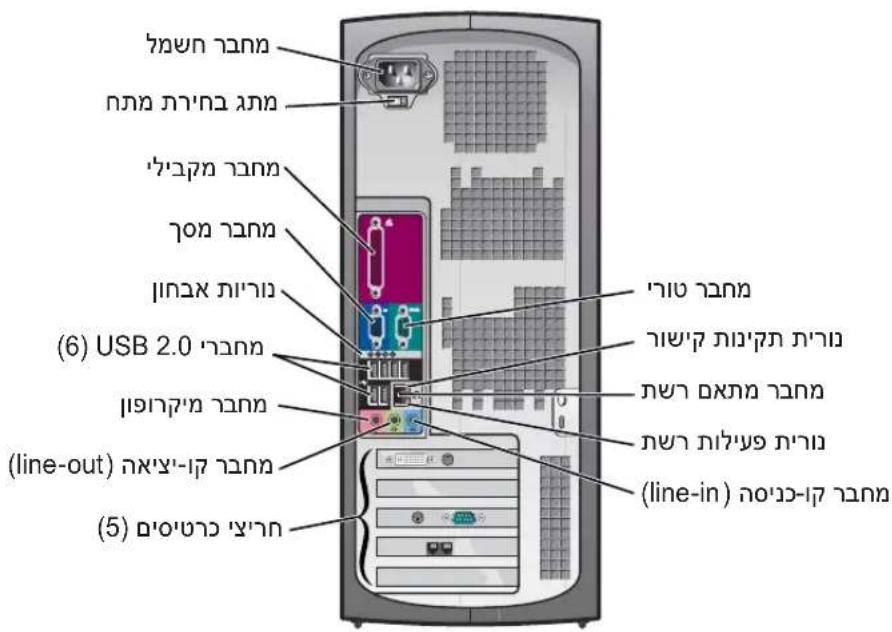
תְבָרִי אַעֹה
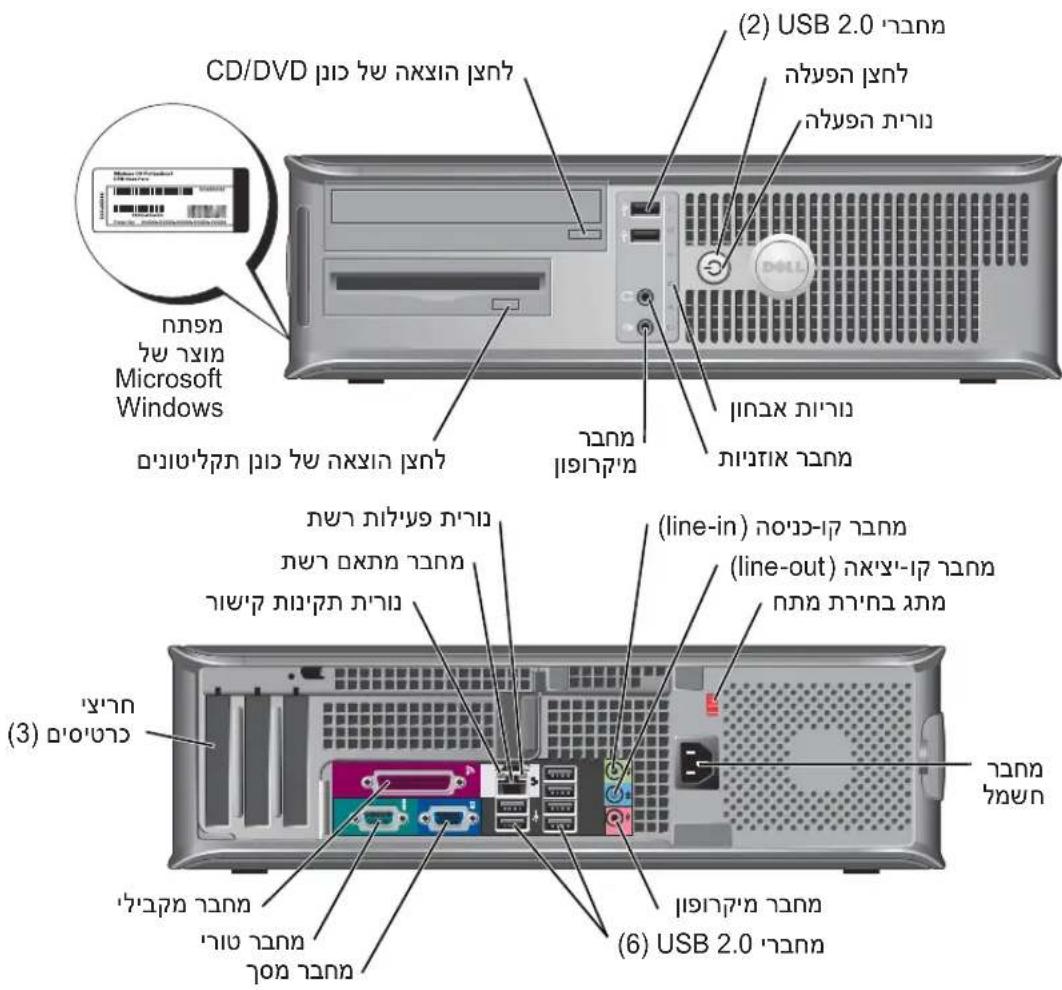
Form-Factor Form-Form
- Mini-Tower
237 Tower
238.
238 Form-factor
238.
239
- 107 Mini-Tower 200
240 Mini-Tower window
240.
243
- Dell 76, 10:00:00
246.
247.
250......91897
251 ..... Dell™ IDE אַרְׁתָה אַרְׁתָה
251.
252 . . . . Microsoft® Windows® XP 76
254 ..... Microsoft® Windows® XP 76 77 78 79
256.
259 O7T1'X
- Notes, Notices, and Cautions
- Contents
- Finding Information for Your Computer 5
- Front and Back Views 7
- Opening the Computer Cover 13
- Inside Your Computer 14
- Setting Up Your Computer 16
- Solving Problems 19
- Diagnostic Lights 23
- Using the Drivers and Utilities CD 32
- Index 35
- Finding Information for Your Computer
- Front and Back Views
- Small Mini-Tower Computer — Front-Panel Door and Hinge Arms
- CAUTION: Before you begin any of the procedures in this section, follow the safety instructions in the Product Information Guide.
- Mini-Tower Computer
- Opening the Computer Cover
- Small Form-Factor, Small Desktop, and Small Mini-Tower Computers
- Desktop and Mini-Tower Computers
- Inside Your Computer
- Setting Up Your Computer
- Set Up Your Keyboard and Mouse
- Solving Problems
- Dell Diagnostics
- When to Use the Dell Diagnostics
- Starting the Dell Diagnostics From Your Hard Drive
- Starting the Dell Diagnostics From the Drivers and Utilities CD
- Dell Diagnostics Main Menu
- System Lights
- Diagnostic Lights
- Beep Codes
- Running the Dell™ IDE Hard Drive Diagnostics
- Resolving Software and Hardware Incompatibilities
- Windows XP
- Windows 2000
- Using Microsoft ® Windows ® XP System Restore
- Creating a Restore Point
- Restoring the Computer to an Earlier Operating State
- Undoing the Last System Restore
- Enabling System Restore
- Reinstalling Microsoft® Windows® XP
- Before You Begin
- Reinstalling Windows XP
- Booting From the Operating System CD
- Windows XP Setup
- Using the Drivers and Utilities CD
- Drivers for Your Computer
- Index
- B
- C
- D
- E
- F
- H
- |
- L
- M
- 0
- P
- U
- R
- W
- s
- T
- Inhoud
- Desktop- en minitowercomputers
- Problemen oplossen
- Επίλυση Προβλημάτων
- Problémák megoldása
- Wewnątrz komputera
- Windows XP 76-77-78-79-80
- Drivers and Utilities Dell
- Mini-Tower 100
- בַרְשָׁה בַרְשָׁה
- Mini-Tower Form-Factor
- 238.
- 240.
- 243
- 247.
- 256.
- O7T1'X
Brand : DELL
Model : OptiPlex GX280
Category : Desktop computer