SC-CM33021 - Coffee maker Scarlett - Free user manual and instructions
Find the device manual for free SC-CM33021 Scarlett in PDF.


| Product Type | Coffee Maker |
| Brand | Scarlett |
| Model | SC-CM33021 |
| Power Consumption | 1150 W |
| Voltage | 220-240 V ~ 50 Hz |
| Weight (gross) | 3.9 kg |
| Suitable For | 2 cups |
| Water Tank | Removable |
| Drip Tray | Removable |
| Steam Pipe | Yes, for milk frothing |
| Filter Type | Ground coffee filter with handle and lock |
| Control Panel | Power button and regulator dial |
| Auto-Off | Yes, after 15 minutes |
| Steam Function | Yes |
| Hot Water Function | Yes |
| Descaling Interval | Every 2-3 months |
| Safety Features | Auto shut-off, do not immerse |
| Maintenance | Wash removable parts with warm soapy water |
| Usage | Domestic use only |
| Included Accessories | Measuring spoon, filter handle, filter |
| Color | Black and silver |
Frequently Asked Questions - SC-CM33021 Scarlett
User questions about SC-CM33021 Scarlett
0 question about this device. Answer the ones you know or ask your own.
Ask a new question about this device
Download the instructions for your Coffee maker in PDF format for free! Find your manual SC-CM33021 - Scarlett and take your electronic device back in hand. On this page are published all the documents necessary for the use of your device. SC-CM33021 by Scarlett.
USER MANUAL SC-CM33021 Scarlett
natural_image
Black and silver SCARLETT coffee maker with black handle and control panel (no visible text or symbols)www.scarlett.ru
www.scarlett-europe.com
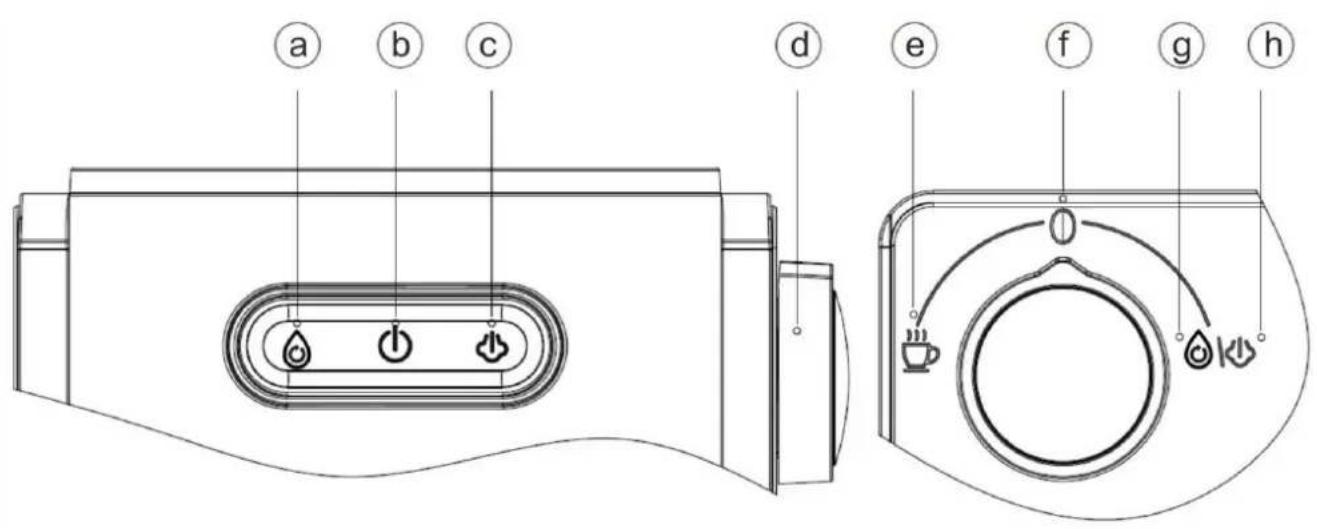
GB DESCRIPTION
- Removable water tank
- Steam pipe
- Removable drip tray
- Filter
- Filter handle
- Filter lock
- Measuring spoon
- Seal of spoon
- Coffee serving holes
- Control panel
- Regulator
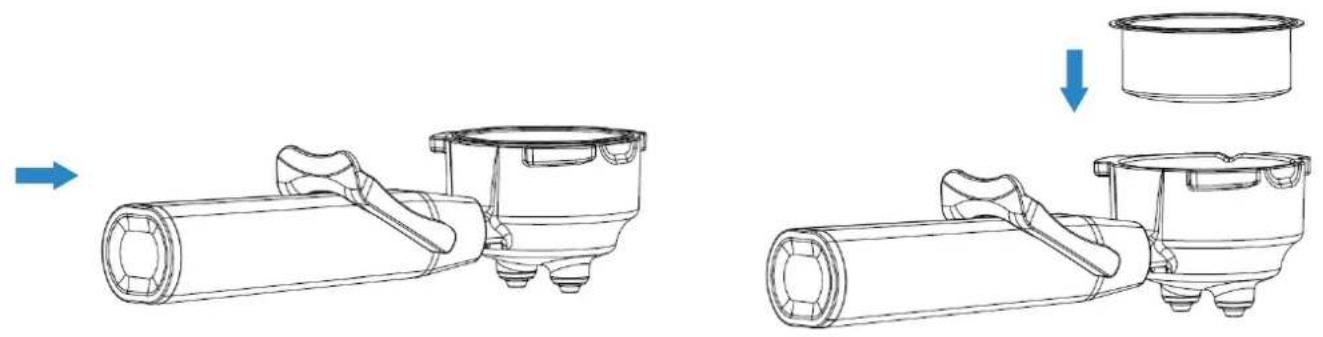
natural_image
Technical line drawing of a mechanical assembly showing two stages of tool manipulation (no text or symbols)Рис. 1
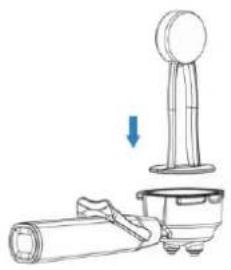
natural_image
Diagram of a robotic arm with a rotating head and base, showing motion direction (no text or symbols)Рис. 2
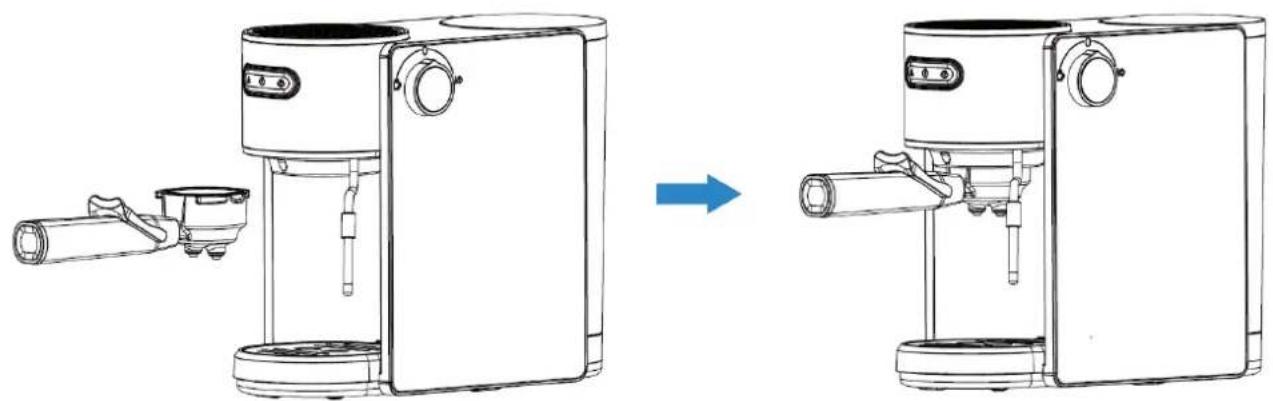
natural_image
Line drawing of a modern coffee maker with two side views showing internal components and a blue arrow indicating transformation (no text or symbols present)Рис. 3
| 220-240V ~ 50 Hz | 1150 W | 3.03 / 3.9 kg | 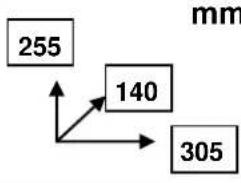 |
GB INSTRUCTION MANUAL IMPORTANT SAFEGUARDS
- Please read these operating instructions carefully before connecting your kettle to the power supply, in order to avoid damage due to incorrect use.
- Before switching on the appliance for the first time please check if the technical specifications indicated on the unit correspond to the mains parameters.
- Incorrect operation and improper handling can lead to malfunction of the appliance and injuries to the user.
- The appliance is intended for use only in domestic aims. The unit is not intended for industrial and commercial use, and also for use in:
- kitchen area for the stuff of shops, offices and the other industrial places
- farm houses
– hotels, motels, rest homes and other similar places by residents.
- Do not use outdoors or in high humidity conditions.
- Do not allow liquid to get on the plug of the power cord.
• Always unplug the appliance from the power supply when not in use.
- Do not immerse the unit, cord or plug in water or other liquids. If it has happened, remove the plug from the wall socket immediately and have the unit checked by an expert before using it again.
- The appliance is not intended for use for physically, sensory or mental disabled person (including children) or for person with lack of life experience or knowledge, if only they are under supervision or have been instructed about the use of the unit by responsible person.
- This appliance can be used by children aged from 8 years and above and persons with reduced physical, sensory or mental capabilities or lack of experience and knowledge if they have been given supervision or instruction concerning use of the appliance in a safe way and understand the hazards involved. Cleaning and user maintenance shall not be made by children
unless they are older than 8 and supervised. Keep the appliance and its cord out of reach of children aged less than 8 years.
• Children must be under control in order not to be allowed to play with the appliance.
• To avoid any danger, if power cord was damaged, it should be replacement by the manufacture or service department or the other high-skill person.
- Ensure that the cord does not hang over sharp edges and keep it away from hot surfaces.
- To disconnect the appliance from the power supply pull it out by the plug only, not by the cord.
- Place the appliance on a dry stable non-hot surface, away from hot objects (e.g. hotplates); do not place it under curtains and shelves.
- Do not place the appliance in the cabinet during operation.
• Do not leave the appliance, when it use.
• Do not touch hot surface.
- The use of accessory attachments not recommended by the appliance manufacturer may result in fire, electric shock or injury to users.
• For making coffee use only cold water.
- Do not attempt to repair, adjust or replace parts in the appliance. Repair the malfunctioning appliance in the nearest service center.
- ATTENTION: Reservoir aperture must not be open during work of the appliance.
- Before cleaning turn off the device and unplug it from the socket. Let the device cool off completely (the heating element remains hot for some time after use).
- If the product has been exposed to temperatures below 0^ for some time it should be kept at room temperature for at least 2 hours before turning it on.
- The manufacturer reserves the right to introduce minor changes into the product design without prior notice, unless such changes influence significantly the product safety, performance, and functions.
- Manufacturing date is indicated on the unit and/or on packing as well as in accompanying documents in the following format XX.XXXX where first two figures XX is the month of production, and following four figures XXXX is the year of production.
PREPARING TO WORK
• The appliance is designed for making coffee.
- Unpack the appliance and place it on a flat surface.
- Wash all removable parts with warm water.
• To ensure excellent taste of coffee, perform 2-3 operations without pouring coffee into filter
OPERATION
- Remove the water tank from the base.
- Fill the water tank with water no higher than the maximum mark. Do not add warm or hot water to the tank! The water temperature should not exceed 40 degrees.
- Suitable for 2 cups of coffee concurrent.
- ATTENTION: Always unplug the appliance when filling it with water.
- ATTENTION: Do not switch the coffee maker on without water.
- ATTENTION! Do not remove the tank during operation.
- Put the water tank on the base
- Place filter into the basket of filter handle. (Pic. 1)
- Put fresh ground espresso powder into a filter. With the end of the coffee spoon, gently press the coffee powder to level with the edge of the filter. Remove excess coffee powder from the rim of the filter cup. (Pic. 2)
- ATTENTION: During the operation until the high-pressure water vapor passes through the ground coffee, do not remove the filter.
- Place the filter handle on the housing (Fig. 3).
- Place the filter, align the handle with the ▼ lock icon on the product, and put it into the groove.

- Slowly turn the filter handle to the right until it aligns with the lock icon on the product.
- Place one or two cups on the drip tray. Make sure the lid opening is aligned with the basket spout
- Plug the coffee maker
TURNING ON THE DEVICE
- Press the power button on the control panel.
- During heating, the power indicator on the control panel is always on, the hot water Ⓗ and steam indicator are flashing until the water temperature reaches, and the three indicators are always on -- the product is in standby mode.
- The device is equipped with an auto-off function. When the device is turned on, the button indicator will light for 15 minutes, and then the device will turn off. Press the button again to turn on the device.
- Turn the regulator from position ⏻ to position 📁, coffee will start flowing from the filter to the cup for 45 seconds (during this time, the device will produce approximately 140 ml of the drink). After 45 seconds, the auto-off function will activate.
• NOTÉ!

- If you want to interrupt the coffee preparation process, turn the knob from position ☐ to position Ⓐ.
- After completing the coffee preparation process, turn the knob from position ♦ to position ⬇.

STEAM FUNCTION
- When all three indicators on the control panel are lighting (⑥①⑤), pour the required amount of milk into a cup, but not more than half of the cup. The mug must be large enough as the internal volume of the milk will increase after the end of the frothing cycle.
- Press the button
- Place the cup under the steam pipe.
- ATTENTION! You cannot use the steam pipe and turn on the steam mode without immersing the steam pipe in milk or water. The steam coming out of the steam nozzle can burn your hand.
- Turn the knob to the position 🏠️ where steam will start to escape from the steam pipe.
- NOTE! If you need to stop the steam process (if you understand that the temperature of the milk is acceptable for you, and the milk foam is quite lush), move the regulator to position Ⓓ
- To completely exit steam mode, move the regulator from position ⏻ to position Ⓗ, press the button ⏻ on the control panel.
- NOTE! It is recommended to wipe the steam pipe with a damp cloth to remove any remaining milk after each cooking cycle, so that the milk does not dry up inside.
CLEANING AND MAINTENANCE
- Do not forget to unplug the appliance from the power supply before cleaning.
- Let the appliance cool down, and then wipe outside with a soft dry cloth. Do not use detergent or abrasives.
- Wash all detachable parts with hot soapy water, then rinse and dry before fitting to place.
CLEANING THE STEAM PIPE
- When all three indicators (💡) are light on the control panel, press the button 🔊.
- Place the cup under the steam pipe.
- Turn the knob to the position 🔍 🔍 🔍. Hot water will start flowing from the steam pipe.
- NOTE! If it is necessary to stop dispensing hot water, turn the regulator from 🔒 🔒 to position ⏻.
- To exit the hot water mode, move the regulator from position 🔒 to position ⏻, press the button on the control panel 🔒
DESCALING
- Regularly descale the coffee maker.
- To remove scale, use 2-3% citric acid solution or special products that can be purchased in the store, and strictly follow the instructions on their packaging.
- Perform cleaning at least once every 2-3 months and when using" hard» water more often.
-
Fill the tank with water or descaling agent no higher than the maximum mark.
-
Install the filter handle as described in the instructions above.
-
Place one cup under the coffee feedholes and the other under the steam pipe.
-
Turn the regulator from position to position - the solution will start to flow from the filter for 45 seconds. After 45 seconds, the auto-off function will activate. The cycle should be repeated 2-3 times.
STORAGE
- Complete all requirements of chapter CLEANING AND MAINTENANCE.
- Store the appliance in a cool, dry place.
| Anomaly | Possible cause | Solutions |
| No coffee runs through. | No water in the water reservoir.Water reservoir not correctly assembled.Operating dial set is wrong.Group filter may be blocked.The filter is blocked, the coffee grounds are too fine or tamped down too hard. | Fill reservoir with water.Press down on the water reservoir to ensure it is correctly positioned.Ensure the operating dial is in the brewing position.See“Care and Clean”and“Descaling”Empty out the filter and rinse under water to |
IM022
| clean. Wipe the group head with a cloth.Repack the filter and tamp down coffee lightly with compactor. | ||
| Coffee runs down the side of the filter handle | Filter handle not attached correctly, or has not been tightened sufficiently.Edge of filter insert is not free of coffee granules.The group head is dirty.The group head is defective.Group head silicone seal is damaged, or warn. | Ensure the handle is firmly positioned onto the group head.Clean around the top and bottom edge of the filter and wipe the group head clean of coffee. 3.Wipe group head with a damp cloth.Contact your repair center.Contact your repair center. |
| Coffee pours out in drops. | Coffee grind is too fine or are too compacted.Machine blocked by scale build up. | Ensure you are using an evenly ground coffee and do not compact the grounds so firmly.Conduct descaling. |
| Espresso does not have any Crema. | Coffee is old or dry.Coffee not compacted firmly enough. | Use fresh coffee and once you open the coffee be sure to store it in an airtight container.Compact coffee grounds more firmly. |
| Espresso does not have any Crema. | Coffee too coarse. | Grind the coffee to a finer texture or change brands of espresso coffee to a finer grind. |
| Handle comes off during group. | Coffee tamped too hard.Coffee grind is too fine.Filter handle is not attached correctly, or has not been tightened sufficiently.Top/bottom edge of filter is not free of coffee granules.The group head is dirty.The group head is defective.Group head silicone seal is warn or damaged. | Tamp the coffee grounds lighter.Change to a coarser grind of coffee.Ensure the handle is firmly positioned onto the group head.Clean around the edge of the filter and wipe the group head clean of coffee.Wipe group head with a damp cloth.Contact your service center.Contact your service center. |

The symbol on the unit, packing materials and/or documentations means used electrical and electronic units and should not be toss in the garbage with ordinary household garbage. These units should be pass to special receiving point.
For additional information about actual system of the garbage collection address to the local authority.
Valid utilization will help to save valuable resources and avoid negative work on the public health and environment which happens with incorrect using garbage.
Brand : Scarlett
Model : SC-CM33021
Category : Coffee maker