
Nico - Car seat Lionelo - Free user manual and instructions
Find the device manual for free Nico Lionelo in PDF.


| Product type | Car seat |
| Brand | Lionelo |
| Model | Nico |
| Category | Group 0+/1 (0-18 kg) |
| Dimensions (L x W x H) | 44 x 40 x 65 cm (approximate) |
| Seat weight | 5 kg (approximate) |
| Materials | Polyester, EPS foam, polypropylene |
| Child weight | 0-18 kg |
| Recommended age | From birth to approximately 4 years |
| Installation | Securing with seat belt or ISOFIX (depending on version) |
| Harness | 5-point harness adjustable in height |
| Side protection | Yes, reinforced shell and side headrest |
| Recline | Multiple adjustable positions |
| Cleaning | Removable cover machine washable at 30°C |
| Standards | Compliant with ECE R44/04 standard |
| Spare parts | Available (covers, buckles, etc.) |
| Warranty | 2 years |
Frequently Asked Questions - Nico Lionelo
User questions about Nico Lionelo
0 question about this device. Answer the ones you know or ask your own.
Ask a new question about this device
Download the instructions for your Car seat in PDF format for free! Find your manual Nico - Lionelo and take your electronic device back in hand. On this page are published all the documents necessary for the use of your device. Nico by Lionelo.
USER MANUAL Nico Lionelo
natural_image
Blue and gray baby car seat with lioneio branding (no text or symbols on body)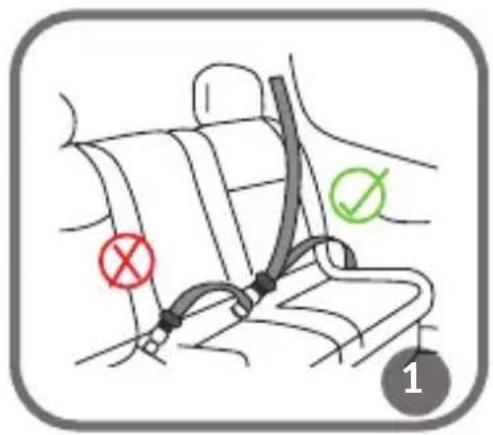
natural_image
Line drawing of a car seat with no text or symbols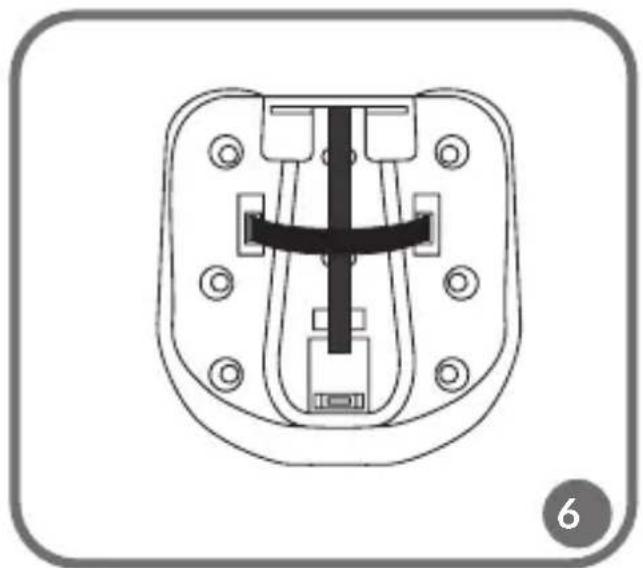
natural_image
Technical line drawing of a mechanical component with mounting holes and internal structure (no text or symbols)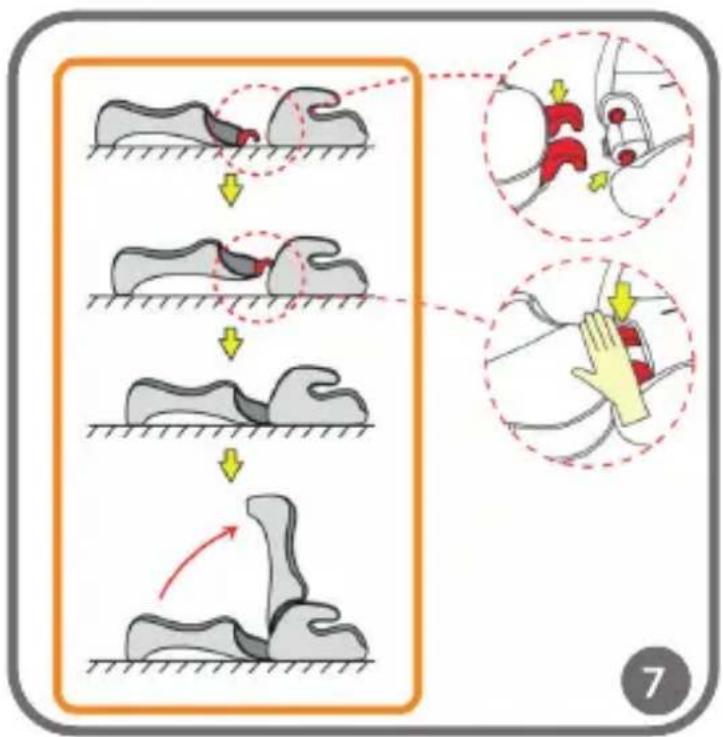
natural_image
Line drawing of a person wearing a seatbelt, viewed from the side (no text or symbols)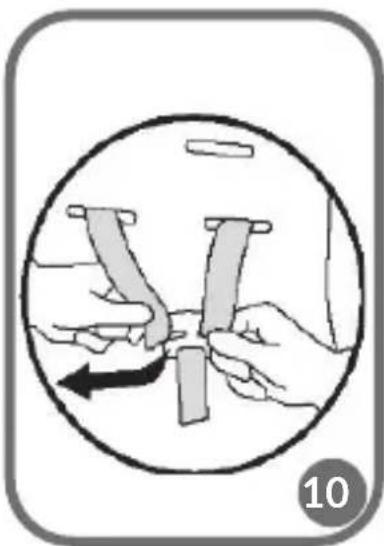
natural_image
Illustration of hands holding a tool or device with an arrow indicating rotation (no text or symbols)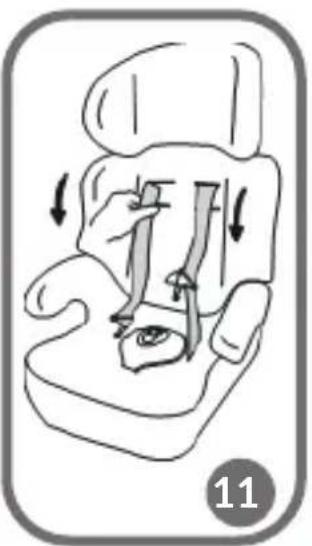
natural_image
Illustration of a car seat with arrows indicating seat movement (no text or symbols)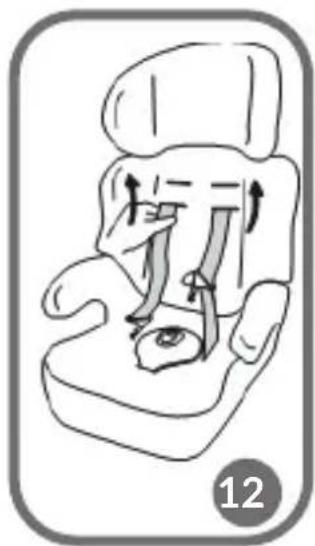
natural_image
Illustration of a car seat with arrows indicating movement or force direction (no text or symbols)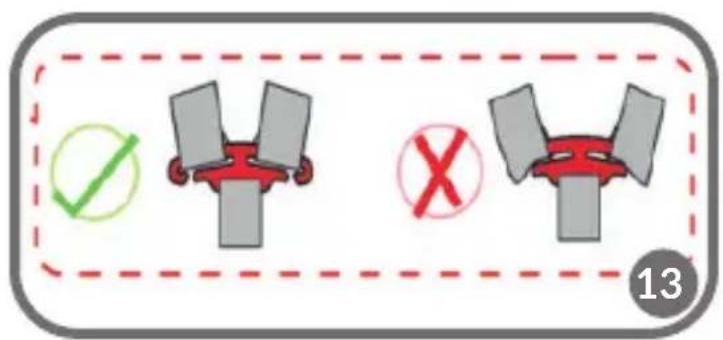
natural_image
Line drawing of a car seat with a belt switch and seatbelt, no text or symbols present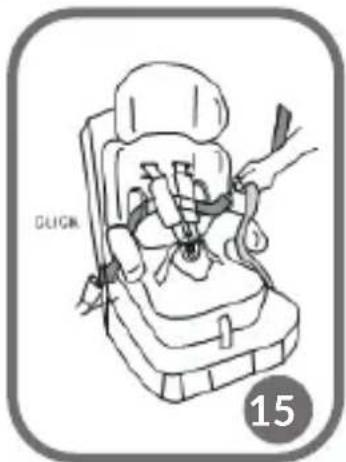
natural_image
Line drawing of a baby car seat with a hand adjusting the seatbelt (no text or symbols)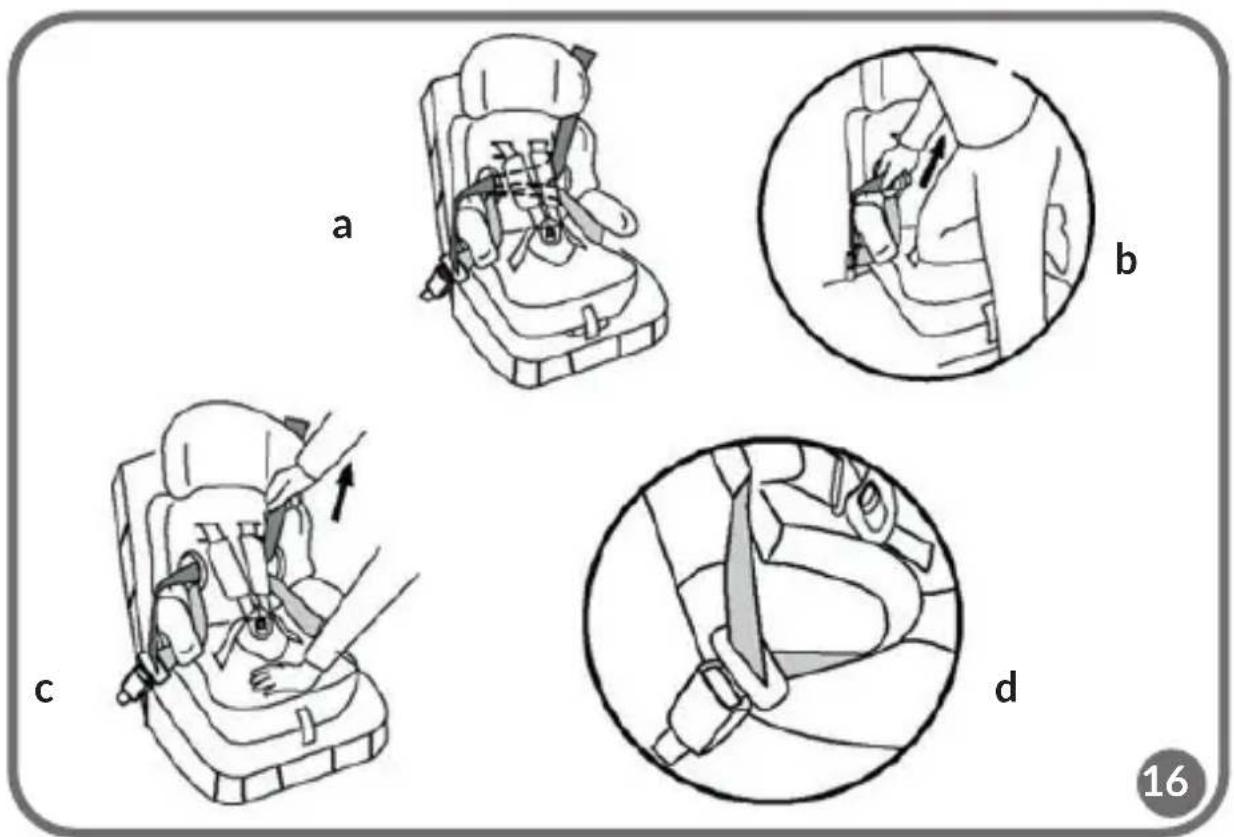
natural_image
Illustration of a child in a baby car seatbelt with a hand adjusting the seatbelt (no text or symbols)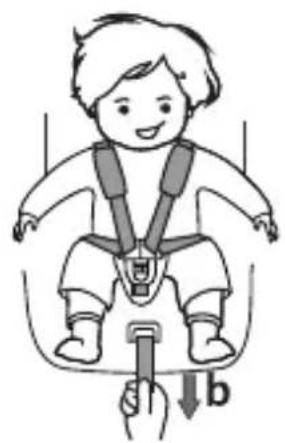
natural_image
Illustration of a baby wearing a full-body seatbelt with a hand holding a belt, showing no text or symbols.17
18
natural_image
Illustration of hands holding a tool inside a circular frame, with an arrow indicating direction (no text or symbols)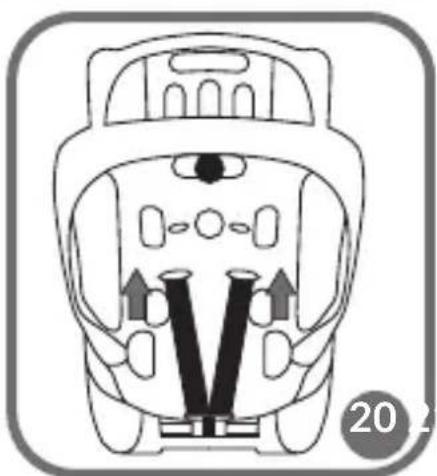
natural_image
Diagram of a car seatbelt with directional arrows indicating movement or force (no text or symbols)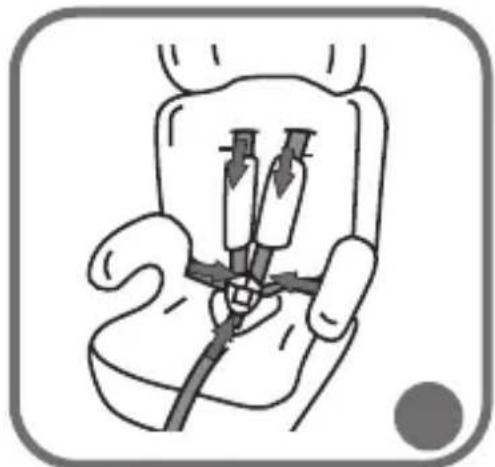
natural_image
Medical illustration of a catheter insertion into a patient's seat (no text or labels)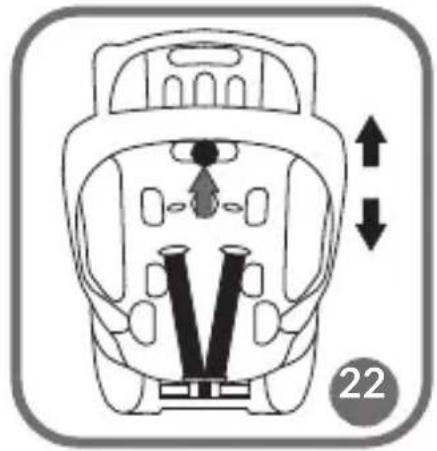
natural_image
Diagram of a car seatbelt with directional arrows indicating movement or force (no text or symbols)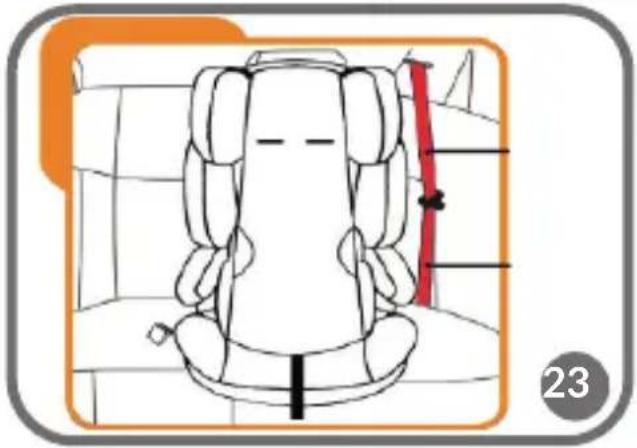
natural_image
Top-down line drawing of a car seat with orange frame and red vertical stripe, no text or symbols present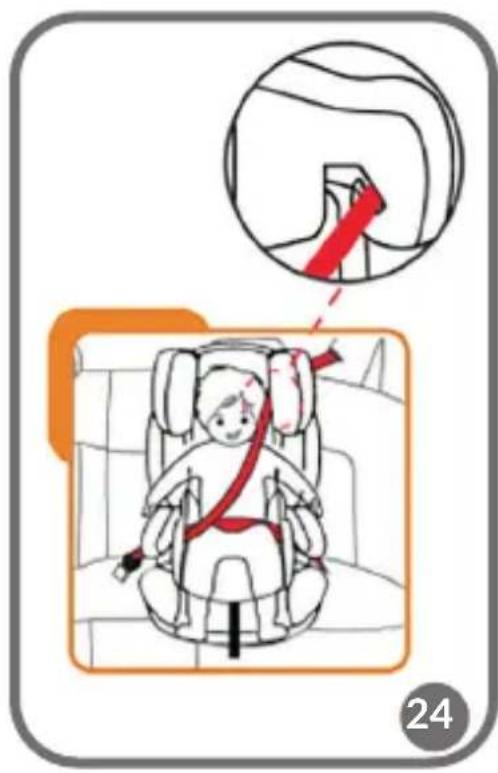
Info WARNING!
This is a “universal” child restraint. Approved in accordance with UN Regulation on No. 44, series of amendments 04, for general vehicle use and suitable for mounting on most car seats.
A correct installation is possible if the vehicle manufacturer has declared in the vehicle's manual that the vehicle is capable of accepting a “universal” child restraint for this age group.
This child restraint has been classified as “universal” under more stringent conditions as those applied to earlier designs, which do not carry this notice. In case of any questions, please contact either the manufacturer or the retailer of the device.
NOTE! Suitable for installati on only if type-approved vehicles are equipped with three-point retractor seat belts that have been approved in accordance with UN Regulati on No. 16 or other equivalent standards.
natural_image
Front view icon of a car inside a dark circular frame (no text or symbols)The product is compliant with ECE R44/04 as a car safety seat suitable for I + II + III mass groups, that is for children between 9 and 36 kg of weight. Only when used correctly can the safety seat protect your child the most effectively. Failure to comply with the provisions in the manual can result in an accident. In order to protect your child, always install
and use LO-Nico as described in this manual.
Dear Customer!
In case of any questions or comments on the purchased product, please contact us:
help@lionelo.com
Producer:
BrandLine Group Sp. z o. o.
This safety seat is designed for the I, II and III mass group (category), that is for
children weighing: 9 - 36 kg (aged from about 9 months to 11 years).
I mass group: 9kg - 18kg
II mass group: 15kg - 25kg
III mass group: 22kg - 36kg
Children from group I must use the 5-point safety harness (included with the safety seat). The safety seat itself is attached to the vehicle's seat using a 3-point seat belt of the car.
In case of children from groups II and III (15 - 36 kg) the 5-point safety harness is removed and a child is secured with a 3-point seat belt of the car.
2. Using the safety seat in a car
Do not use the safety seat in a car equipped with 2-point seat belts (fig. 1).

Proper place

Improper place
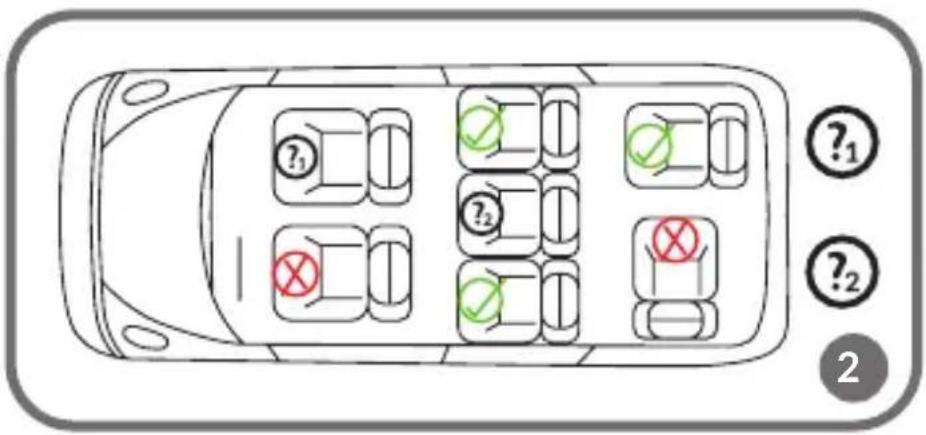
Position in the car (fig. 2).
?1 – The installation is only possible when the airbag of the passenger seat is inactive.
?2 - The installation is only possible if the seat is equipped with 3-point safety-belts.
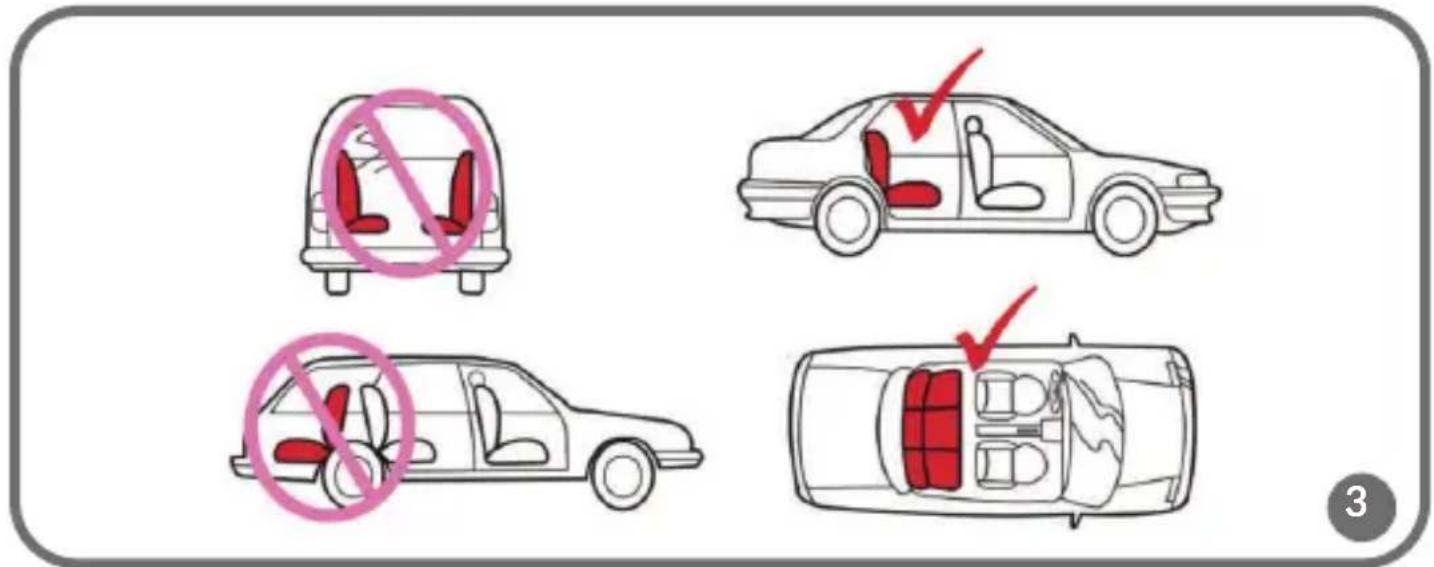
Proper and improper installation of the safety seat (fig. 3)
Do not mount the safety seat in a front car seat with an airbag, unless it is disabled. Otherwise it can cause death or a serious injury of the child. Please check the manual of your vehicle to find the information regarding the installation of a child safety seat. As far as children aged 0-12 are concerned, vehicle's back seats are the safest place to mount the safety seat. This safety seat has to be installed in a forward-facing position. Do not mount it sideways or in a rear-facing way. In case of any doubts regarding installation of the safety seat, please contact your vehicle dealer.
WARNINGS:
- The safety seat is only suitable for children weighing from 9 to 36 kg.
- The safety seat can only be used in vehicles equipped with a 3-point safety belt.
- The safety seat must be installed according to the instructions given in this manual or on the stickers.
- This safety seat must only be installed in a forward-facing position.
-
Before every journey, make sure that the child safety seat is correctly attached. The straps securing the restraint to the vehicle must be tensioned.
-
Only the correct use of the safety belts ensures maximum protection of the child during an accident.
- Do not use other fixing points than the ones indicated in the manual.
- Do not install the safety seat on an unlocked folding car seat. Unlocked car seats may affect the safety of the child during an accident or heavy breaking.
- Do not modify the product in any way.
- Never leave the child unattended in the safety seat.
- In case of emergency it is important to be able to quickly remove the child from the safety seat. Since the buckle is not entirely immune to manipulation, please instruct children to never play with it.
- If the child unfastens the safety belt, please stop immediately and fasten it back.
- Do not allow the safety seat to be exposed to direct sunlight. Otherwise it may become hot and cause harm to the child's skin.
- Please ensure that all the parts of the safety seat have been properly attached to the fixed, non-adjustable parts of the car.
- Luggage and any other loose items in the car should be properly secured so as not to cause damage to the child and other people in the car in the event of an accident.
- During travel, the safety seat must be securely attached to the vehicle seat with a car seat belt, even if there is no child in it.
- Do not use the safety seat without the original cover. Do not replace the cover with the one that is not recommended by the manufacturer. It is an integral part of the product and it contributes to the safety of the child.
- If it is necessary to replace it, the original cover can only be replaced with an equivalent recommended by the manufacturer.
- Please check the seat belts periodically paying particular attention to fixing points, seams and adjustable parts.
- The flat surface of the backrest of the safety seat must rest tightly against the vehicle seat. If necessary, correct the position of the car headrest.
- During an accident the safety seat is subjected to large forces that may seriously damage its construction. Therefore, it is not recommended to continue using the safety seat after the accident. In that case it is recommended to replace the safety seat with a new one.
- During a serious accident the safety of the passengers depends mainly on the structure of the vehicle. The safety seat alone cannot fully protect the child from all harm. Nevertheless, the correct installation and use of the safety seat
provides a better chance of their survival. Make sure that all the users can properly install and use the safety seat.
- It is recommended to install the safety seat on a backseat of a car.
- The child restraint straps must be adapted to the child's physique. They cannot be twisted. It is important that the lap belts run low so that the pelvis is held firmly.
- Keep this manual for future reference.
Note:
Do not install the safety seat on a car seat with an active airbag. Otherwise it may cause permanent damage to health or death.
Rigid items and plastic parts of a child restraint must be located and installed in such a way so that, under normal operating conditions of the vehicle, they cannot be trapped or jamme by a sliding seat, a door, etc.
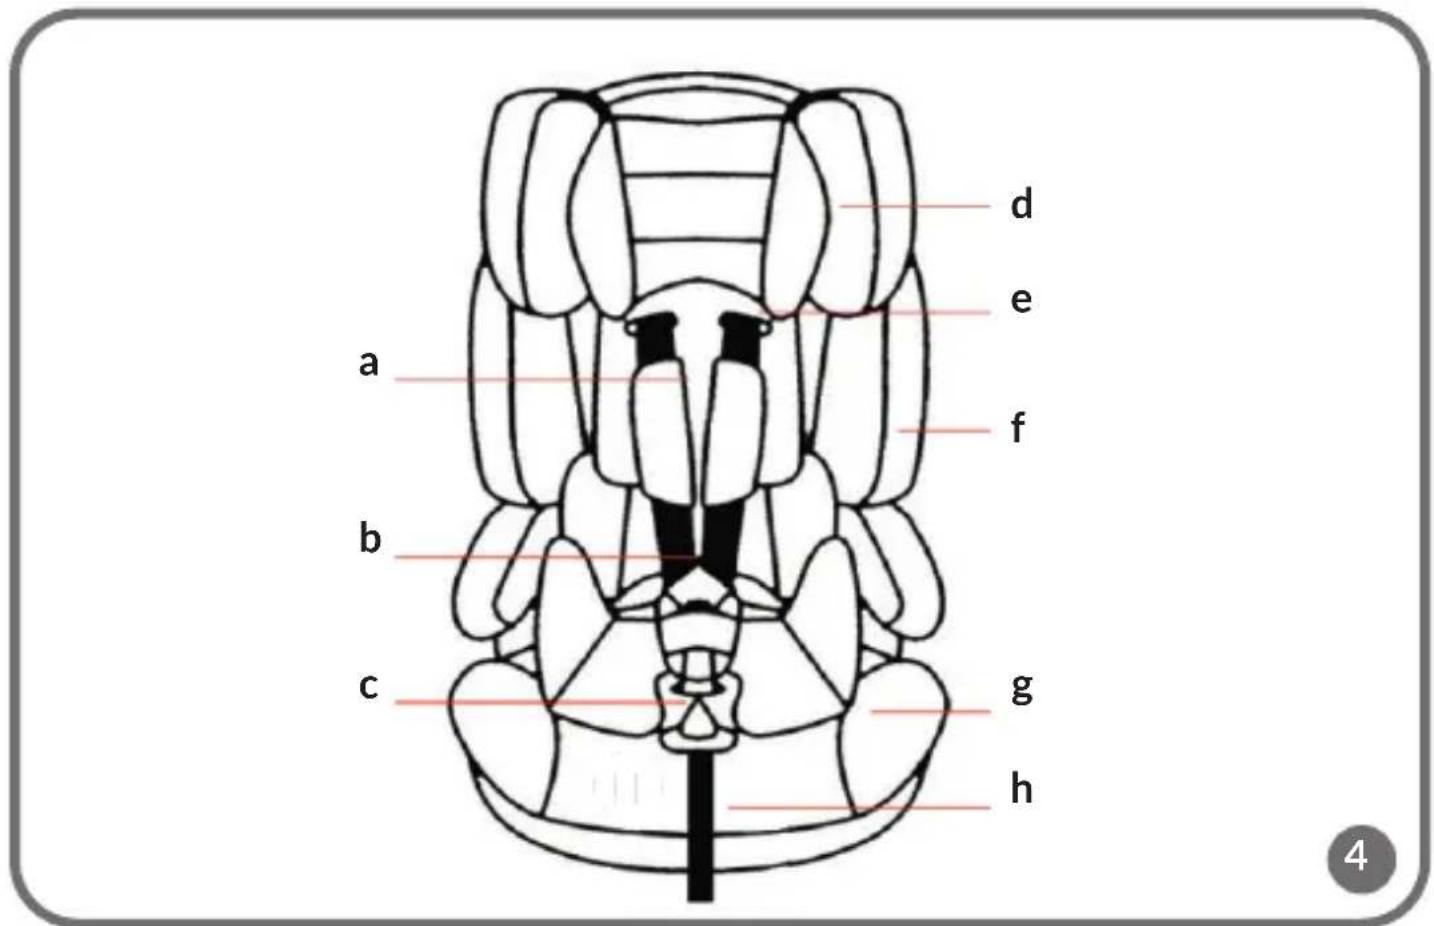
3. Description fig. 4
a. Harness
b. Buckle
c. Harness adjustment button (under the fabric)
d. Headrest
e. Harness
f. Backrest
g. Seat
h. Harness adjustment strap
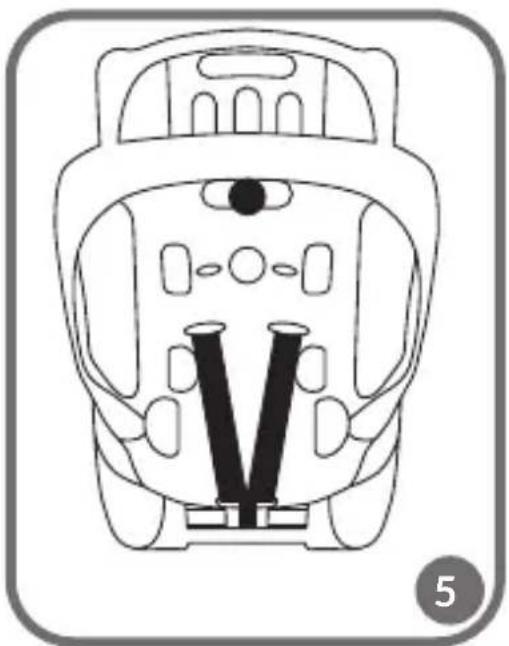
fig. 5 Seat belts
fig. 6 Strap inlets
3.1 Attaching the seat to the backrest (fig. 7):
- Place the seat and the backrest on a flat surface.
- Connect the backrest hooks with the seat mounts. Push the hooks so that they lock firmly on the mounts.
- Lift the backrest until the angle between it and the seat is 90^ .
To disconnect the backrest from the seat, please follow the above steps in reverse order
4. Usage method for group I
The 5-point safety harness is dedicated strictly for children from the first mass group that is those weighing from 9 to 18kg (aged from about 9 months to 4 years).
4.1 Shoulder straps height adjustment (group I)
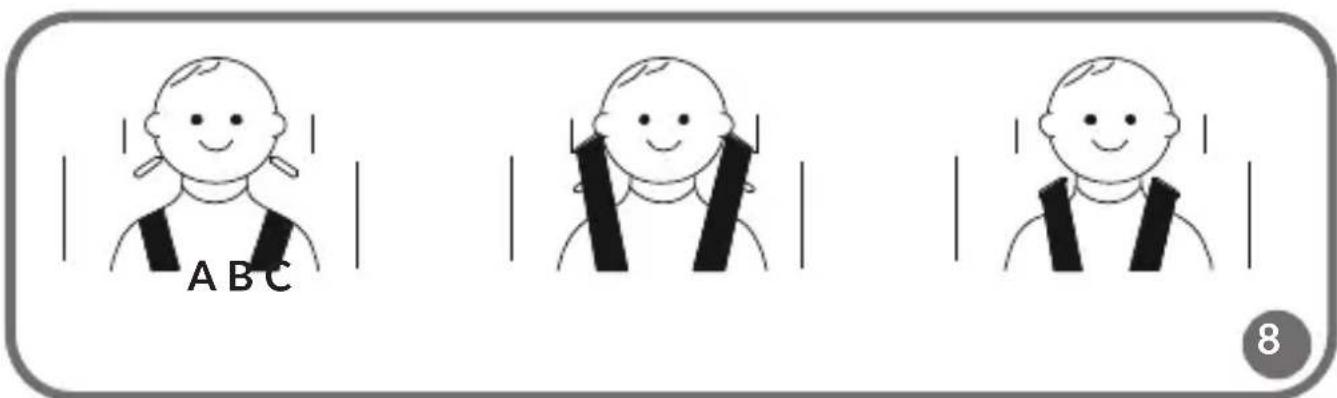
Make sure the position of the shoulder straps is suitable for your child. Straps should be passed through the slots at the level of child's shoulders or slightly above (fig. 8).
A. INCORRECT - too low
B. INCORRECT - too high
C. Correct
If the position of the straps is not correct, adjust it by following the steps below:
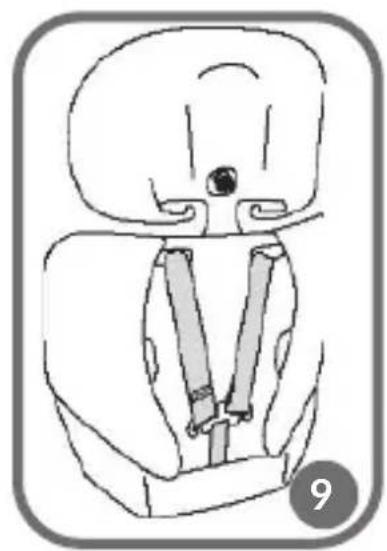
Step 1: Loosen the straps (see section 4.3). Turn the seat so as to get access to the rear part (fig. 9).
Step 2: Pull the both straps out of the strap connector (fig. 10).
Step 3: Turn the seat so that you can see the front and carefully pull the two straps (and their pads) towards you so as to remove them completely from the slots in the backrest of the seat (fig. 11).
Step 4: Then carry the straps back through the slots in the backrest located at the level appropriate for your child (fig. 12).
Step 5: Turn the seat again, so that you can see its rear, and attach the two straps to the strap connector.
Make sure the height of the shoulder straps is correct, they are not twisted and that they are properly locked in metal mounts (fig. 13).
4.2 Installation of the safety seat in a car (group I)
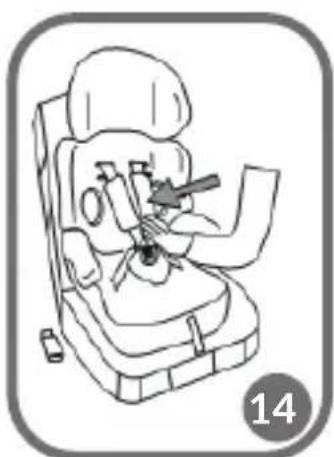
Step 1: In a car equipped with 3-point seat belts, place the safety seat on the car seat in a way so that the flat surface of the backrest of the safety seat rest tightly against the vehicle seat (fig. 14).
Step2: Carry the car seat belt connector (along with the entire belt) through the nearest guide (from the front to the back), then behind the backrest of the safety seat and through another guide (from the back to the front) located on the side of the car seat belt buckle. Insert the car seat belt connector to the car seat belt buckle. You should hear „the click sound” indicating that the belt has been properly fastened (fig. 15).
Step 3: Make sure that the lap belt is carried under the arm rest.
Note: Make sure that the belts are not twisted (fig. 16a).
Step 4: Use your knee to push the safety seat tightly to the seat of the car and tighten the shoulder belt in a direction shown in the Figure 16b. Make sure the belt is not loose. The shoulder belt should be tightened as tightly as possible (fig. 16c).
The Figure 16d shows the correct position of the seat belt buckle in relation to the safety seat. In case of any questions concerning the installation method, please contact the seat manufacturer.
To remove the safety seat from the car, please follow the above steps in reverse order. Make sure the belts are tight and not twisted, and that the seat pad in no way blocks their proper arrangement.
The installation method for children from group I mustn't involve the headrest guides. They are used in the installation method for children from groups II and III.
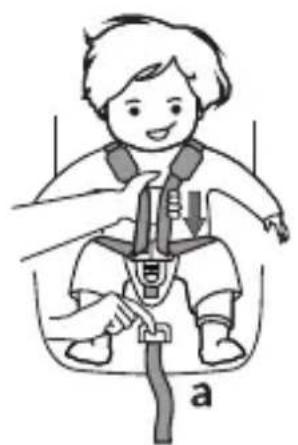
4.3 Loosening the safety harness (fig. 17a)
- The straps can be loosened by pushing the lever (under the pad of the seat) at the front of the baby seat.
- Use one hand to press the button and the second one to grasp both shoulder straps. Then pull them together so as to loosen the straps (see the figure on the right).
4.4 securing a child in the safety seat (fig. 17b)
- First, adjust the height of the shoulder straps to your child (see section 4.1). In order to do so:
- Loosen the straps (see section 4.3), loosen the harness buckle (4.4.1) and leave the straps freely at the sides of the seat.
- Place your child in the safety seat. Then place the shoulder straps on the shoulders of the child and fasten the harness buckle (4.4.1).
- Pull the straps upwards in order to remove any slack in the lap section, and then pull the harness adjustment strap until they are properly tightened.
- The shoulder straps should be neither too tight nor too loose so as not to cause discomfort to a child.
- Nevertheless, too loose harness may adversely affect the safety of the child. Please check whether the harness fits your child and correct the tension of the straps each time you place them in the seat.
Make sure the lap strap is not twisted and is run low enough, in order to support the pelvis.
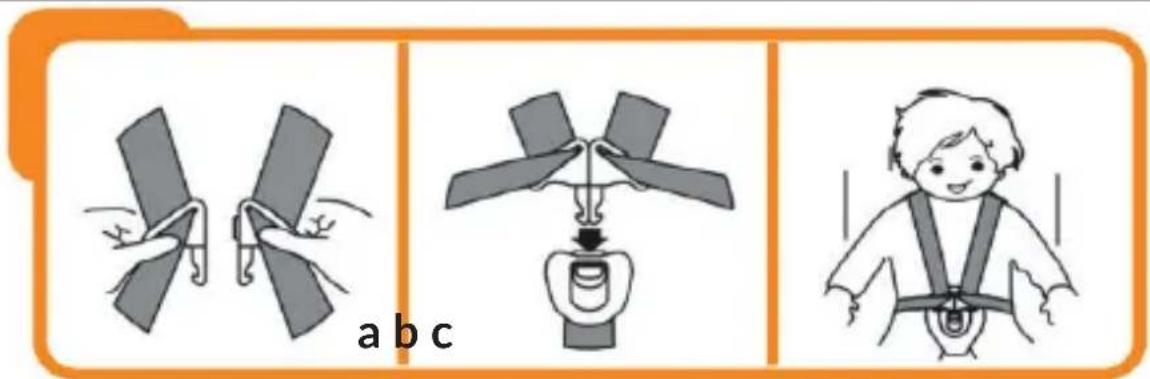
4.4.1 Fastening and unfastening the buckle
- Put the two metal connectors together forming a clamp (fig. 18a).
- Insert the clamp into the slot at the top of the buckle. You will hear a „click” indicating that the buckle has been properly locked (fig. 18b).
- Make sure the harness is properly secured by pulling the shoulder straps upright (fig. 18c).
- To unfasten the safety harness, press the red buckle button.
5. Usage method for groups II and III
In case of children from groups II and III (15 - 36 kg) they are secured with a 3-point seat belt of the car only. Therefore, the 5-point safety harness must be removed (see section 5.1).
5.1 Removing the 5-point safety harness
- Loosen the straps (see section 4.3) and turn the seat so as to get access to the rear part.
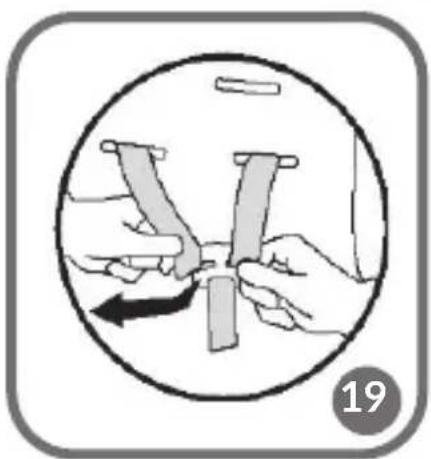
- Pull the both straps out of the strap connector (fig. 19).
- Then pull the seat belts from the front of the seat until they come out of the seats at the back of the seat and from underneath (fig. 20).
- Now, you can remove the straps and the buckle by pulling them upwards (fig. 21).
- If you want to install the 5-point safety harness, please follow the above steps in reverse order.
- All the removed parts of the safety harness should be stored for future purposes.
5.2 Headrest adjustment
Please check regularly whether the height of the headrest is suitable for your child. It is true when the baby's head rests comfortably in the middle of the headrest.
In order to adjust the height of the headrest please complete the following steps (fig. 22):
- Turn the seat so as to get access to the rear part.
- Push and hold the headrest adjustment button. Now you can pull the headrest out or push it inside.
- Release the headrest adjustment button. Now, the headrest is properly locked. Each time you adjust the height of the headrest make sure it has been properly secured (locked).
5.3 Installation of the safety seat in a car using a 3-point seat belt
Step 1: Place the safety seat on the car seat in a way so that it rests tightly against the vehicle backseat (fig. 23).
Step 2: Place your child in the safety seat (fig. 24).
Step 3: Fasten the 3-point car seat belt in a way so that the clasp is in the car buckle on the other side of the safety seat.
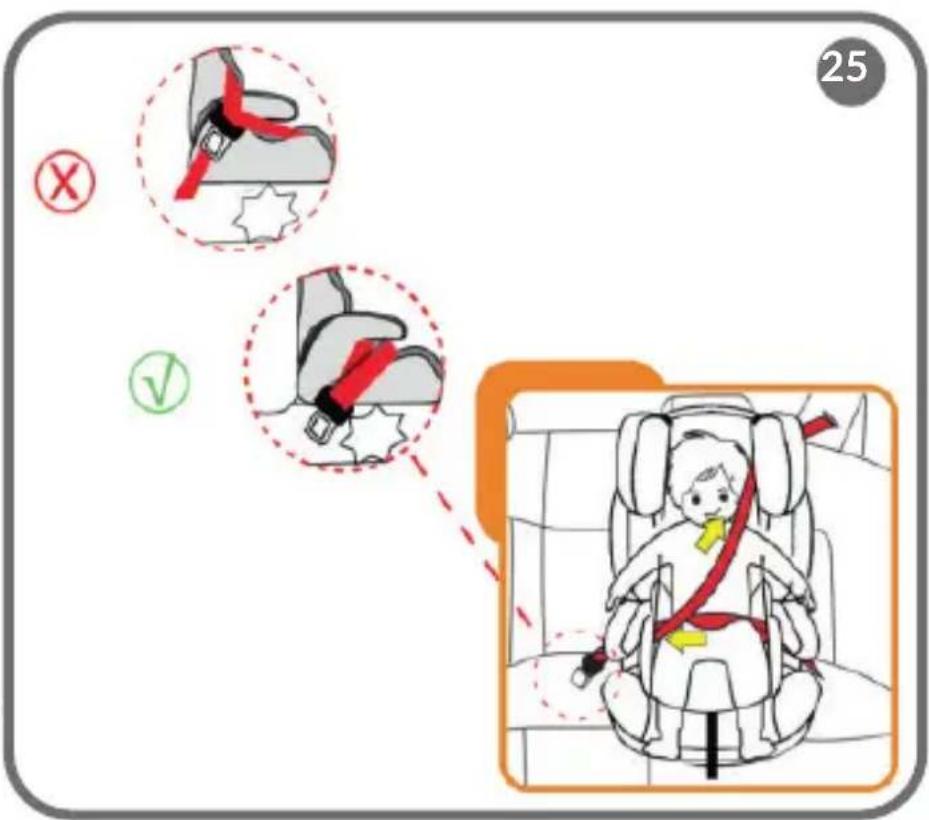
Run the lap belt so that it passes under both armrests. Make sure it is not twisted and runs low enough, in order to support the pelvis.
When inserting the clasp in the buckle you will hear a „click“ sound.
Step 4: Run the shoulder belt through the guide on the side of the headrest. Ensure that it is not twisted. Tighten the shoulder belt (in the direction of the auto-roll) (fig. 25).
In case of any questions concerning the installation method, please contact the seat manufacturer.
5.4 Installation of the safety seat in a car using a 3-point car seat belt
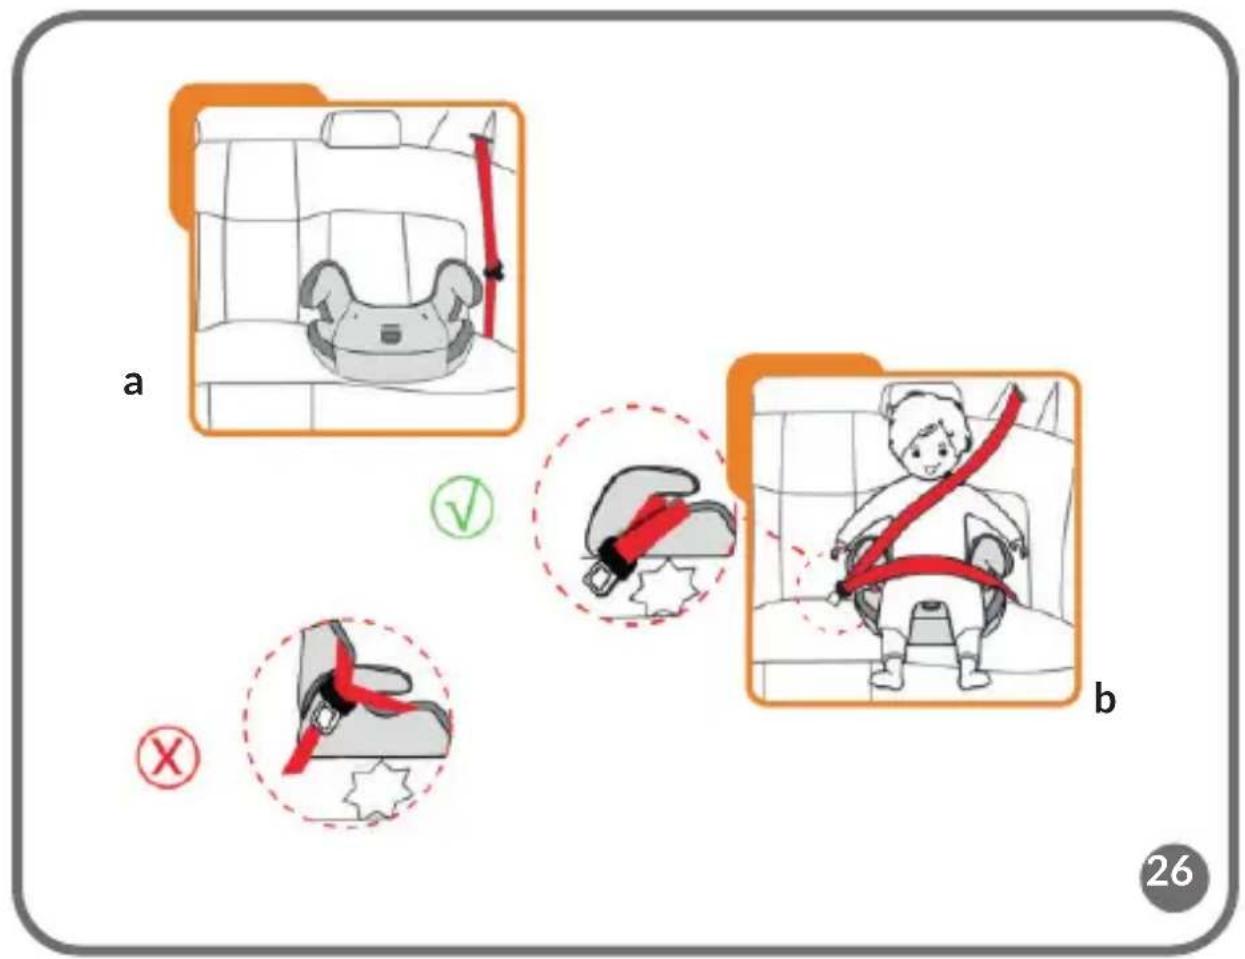
Installation of the seat base alone is only suitable for Group III (22 - 36kg).
Therefore, you must first remove the 5-point safety harness (see section 5.1) and the backrest (see section 3.1).
Step 1: Place the base of the safety seat on the car seat in a way so that it rests tightly against the vehicle backseat (fig. 26a).
Step 2: Place your child in the safety seat (fig. 26b).
Step 3: Fasten the 3-point car seat belt in a way so that the clasp is in the car buckle on the other side of the safety seat.
Run the lap belt so that it passes across the child's chest. Make sure it is not twisted and runs low enough, in order to support the pelvis.
When inserting the clasp in the buckle you will hear a „click“ sound.
6. Maintenance
6.1 Pad installation / removal
- Remove the 5-point safety harness (see section 5.1).
- Tilt the backrest backwards so that it lays flat on the floor.
- Now you can remove the backrest.
- It is also possible to remove the pad of the headrest and (after loosening it) the pad of the backrest.
- After completion of the above steps you can remove the seat upholstery (by pulling it forward). To install back all the parts of the pad please follow the above steps in reverse order.
6.2 Cleaning the pad
When cleaning the pad (upholstery) use only neutral detergents and warm water. Do not wash it in the washing machine, spin or tumble dry.
7. After an accident
An accident can cause damage to the safety seat. Therefore replace it immediately with a new unit.
The pictures in this manual are for illustrative purposes only. Therefore, they may differ from the actual product.
Informacja UWAGA!
natural_image
Front view icon of a car inside a circular frame (no text or symbols)natural_image
Front view icon of a car inside a circular frame (no text or symbols)natural_image
Front view icon of a car inside a circular frame (no text or symbols)natural_image
Front view icon of a car inside a circular frame (no text or symbols)natural_image
Front view icon of a car inside a circular frame (no text or symbols)natural_image
Front view icon of a car inside a circular frame (no text or symbols)natural_image
Front view icon of a car inside a circular frame (no text or symbols)natural_image
Front view icon of a car inside a circular frame (no text or symbols)natural_image
Front view icon of a car inside a circular frame (no text or symbols)natural_image
Front view icon of a car inside a circular frame (no text or symbols)natural_image
Front view icon of a car inside a circular frame (no text or symbols)Detailed warranty conditions are available on the website:
Thank you for purchasing our product
- Info WARNING!
- Dear Customer!
- Producer:
- Using the safety seat in a car
- Position in the car (fig. 2).
- Proper and improper installation of the safety seat (fig. 3)
- WARNINGS:
- Note:
- Description fig. 4
- Attaching the seat to the backrest (fig. 7):
- Usage method for group I
- Shoulder straps height adjustment (group I)
- Installation of the safety seat in a car (group I)
- Loosening the safety harness (fig. 17a)
- securing a child in the safety seat (fig. 17b)
- Fastening and unfastening the buckle
- Usage method for groups II and III
- Removing the 5-point safety harness
- Headrest adjustment
- Installation of the safety seat in a car using a 3-point seat belt
- Installation of the safety seat in a car using a 3-point car seat belt
- Maintenance
- Pad installation / removal
- Cleaning the pad
- After an accident
- Informacja UWAGA!
Brand : Lionelo
Model : Nico
Category : Car seat