
L40 - Audio Amplifier NAD - Free user manual and instructions
Find the device manual for free L40 NAD in PDF.
| Product Type | Integrated audio amplifier with CD player and FM tuner |
| Brand | NAD |
| Model | L40 |
| Color | Black |
| Power Supply | 230 V AC, 50/60 Hz |
| Standby Consumption | Very low (few watts) |
| Speaker Impedance | 4 ohms or more |
| Audio Inputs | CD, Aux, Tape, Tuner |
| Audio Outputs | Speakers, Headphones (6.35 mm jack), Pre-out, Tape Out, NAD Link |
| FM Tuner | FM stereo with RDS, memory for 30 stations |
| CD Player | Audio CD, compatible CD-R/RW, random play, repeat, programming |
| Remote Control | Infrared, AAA batteries, basic and advanced functions |
| Motorized Volume | Motorized rotary control, remote controllable |
| Bass EQ | Active for improving bass response |
| Tone Defeat | Bypasses tone controls for a flat response |
| Mono Function | Reduces noise on weak FM signals |
| FM Search and Tuning | Automatic (Search) and manual (Tune) step by step |
| Headphone Jack | 6.35 mm stereo jack, cuts speakers |
| Care and Cleaning | Soft dry cloth; do not use solvents; clean CD tray regularly |
| Safety | Do not open the device; unplug before cleaning; do not expose to moisture |
Frequently Asked Questions - L40 NAD
User questions about L40 NAD
0 question about this device. Answer the ones you know or ask your own.
Ask a new question about this device
Download the instructions for your Audio Amplifier in PDF format for free! Find your manual L40 - NAD and take your electronic device back in hand. On this page are published all the documents necessary for the use of your device. L40 by NAD.
USER MANUAL L40 NAD
IMPORTANT SAFETY INSTRUCTIONS

CAUTION
RISK OF ELECTRIC SHOCK DO NOT OPEN
ATTENTION:
RISQUE DE CHOC ELECTRIQUE NE PAS OUVRIR

CAUTION: TO REDUCE THE RISK OF ELECTRIC SHOCK, DO NOT REMOVE COVER (OR BACK). NO USER SERVICEABLE PARTS INSIDE. REFER SERVICING TO QUALIFIER SERVICE PERSONNEL
Warning: To reduce the risk of fire or electric shock, do not expose this unit to rain or moisture.
The lightning flash with an arrowhead symbol within an equilateral triangle is intended to alert the user to the presence of uninsulated “dangerous voltage” within the product’s enclosure that may be of sufficient magnitude to constitute a risk of electric shock to persons.

The exclamation point within an equilateral triangle is intended to alert the user to the presence of important operating and maintenance (servicing) instructions in the literature accompanying the product.

Do not place this unit on an unstable cart, stand or tripod, bracket or table. The unit may fall, causing serious injury to a child or adult and serious damage to the unit. Use only with a cart, stand, tripod, bracket or table recommended by the manufacturer or sold with the unit. Any mounting of the device on a wall or ceiling should follow the manufacturer's instructions and should use a mounting accessory recommended by the manufacturer.
An appliance and cart combination should be moved with care. Quick stops, excessive force and uneven surfaces may cause the appliance and cart combination to overturn.
Read and follow all the safety and operating instructions before connecting or using this unit. Retain this notice and the owner's manual for future reference.
All warnings on the unit and in it's operating instructions should be adhered to.
Do not use this unit near water; for example, near a bath tub, washbowl, kitchen sink, laundry tub, in a wet basement or near a swimming pool.
The unit should be installed so that its location or position does not interfere with its proper ventilation. For example, it should not be situated on a bed, sofa, rug or similar surface that may block the ventilation openings; or placed in a built-in installation, such as a bookcase or cabinet, that may impede the flow of air through its ventilation openings.
The unit should be situated from heat sources such as radiators, heat registers, stoves or other devices (including amplifiers) that produce heat.
The unit should be connected to a power supply outlet only of the voltage and frequency marked on its rear panel.
The power supply cord should be routed so that it is not likely to be walked on or pinched, especially near the plug, convenience receptacles, or where the cord exits from the unit.
Unplug the unit from the wall outlet before cleaning. Never use benzine, thinner or other solvents for cleaning. Use only a soft damp cloth.
The power supply cord of the unit should be unplugged from the wall outlet when it is to be unused for a long period of time.
Care should be taken so that objects do not fall, and liquids are not spilled into the enclosure through any openings.
This unit should be serviced by qualified service personnel when:
A. The power cord or the plug has been damaged; or
B. Objects have fallen, or liquid has been spilled into the unit; or
C. The unit has been exposed to rain or liquids of any kind; or
D. The unit does not appear to operate normally or exhibits a marked change in performance; or
E. The device has been dropped or the enclosure damaged.
DO NOT ATTEMPT SERVICING OF THIS UNIT YOURSELF. REFER SERVICING TO QUALIFIED SERVICE PERSONNEL.
Upon completion of any servicing or repairs, request the service shop's assurance that only Factory Authorized Replacement Parts with the same characteristics as the original parts have been used, and that the routine safety checks have been performed to guarantee that the equipment is in safe operating condition.
REPLACEMENT WITH UNAUTHORIZED PARTS MAY RESULT IN FIRE, ELECTRIC SHOCK OR OTHER HAZARDS.
ATTENTION
POUR ÉVITER LES CHOC ELECTRIQUES, INTRODUIRE LA LAME LA PLUS LARGE DE LA FICHE DANS LA BORNE CORRESPONDANTE DE LA PRISE ET POUSSER JUSQU'AU FOND.
CAUTION
TO PREVENT ELECTRIC SHOCK MATCH WIDE BLADE OF PLUG TO WIDE SLOT FULLY INSERT.
If an indoor antenna is used (either built into the set or installed separately), never allow any part of the antenna to touch the metal parts of other electrical appliances such as a lamp, TV set etc.
CAUTION
POWER LINES
Any outdoor antenna must be located away from all power lines.
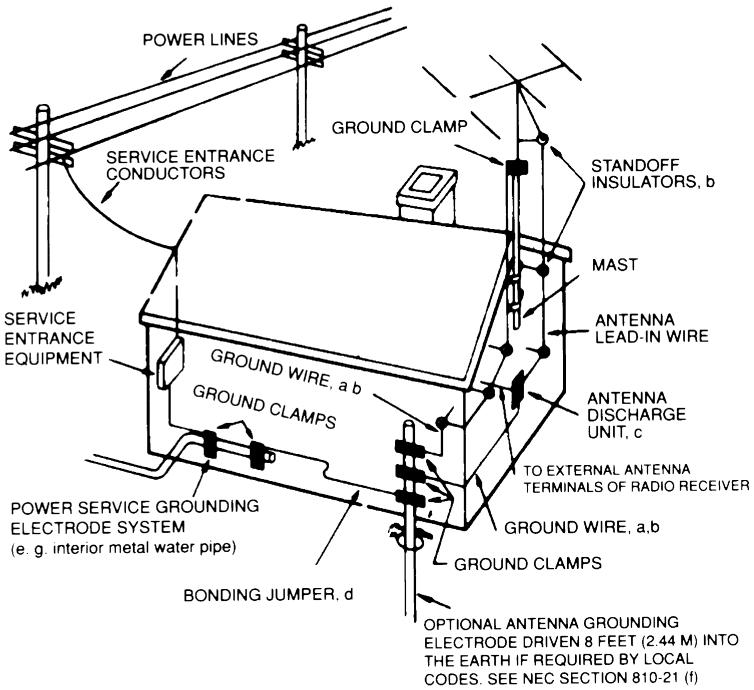
OUTDOOR ANTENNA GROUNDING
If an outside antenna is connected to your tuner or tuner-preamplifier, be sure the antenna system is grounded so as to provide some protection against voltage surges and built-up static charges. Section 810 of the National Electrical Code, ANSI/NFPA No. 70-1984, provides information with respect to proper grounding of the mast and supporting structure, grounding of the lead-in wire to an antenna discharge unit, size of grounding conductors, location of antenna discharge unit, connection to grounding electrodes and requirements for the grounding electrode.
a. Use No. 10 AWG (5.3mm2) copper, No. 8 AWG (8.4mm2) aluminium, No. 17 AWG (1.0mm2) copper-clad steel or bronze wire, or larger, as a ground wire.
b. Secure antenna lead-in and ground wires to house with stand-off insulators spaced from 4-6 feet (1.22 - 1.83 m) apart.
c. Mount antenna discharge unit as close as possible to where lead-in enters house.
d. Use jumper wire not smaller than No.6 AWG (13.3mm2) copper, or the equivalent, when a separate antenna-grounding electrode is used. see NEC Section 810-21 (j).
EXAMPLE OF ANTENNA GROUNDING AS PER NATIONAL ELECTRICAL CODE INSTRUCTIONS CONTAINED IN ARTICLE 810 - RADIO AND TELEVISION EQUIPMENT.
NOTE TO CATV SYSTEM INSTALLER: This reminder is provided to call the CATV system installer's attention to Article 820-22 of the National Electrical Code that provides guidelines for proper grounding and, in particular, specifies that the ground cable ground shall be connected to the grounding system of the building, as close to the point of cable entry as practical.
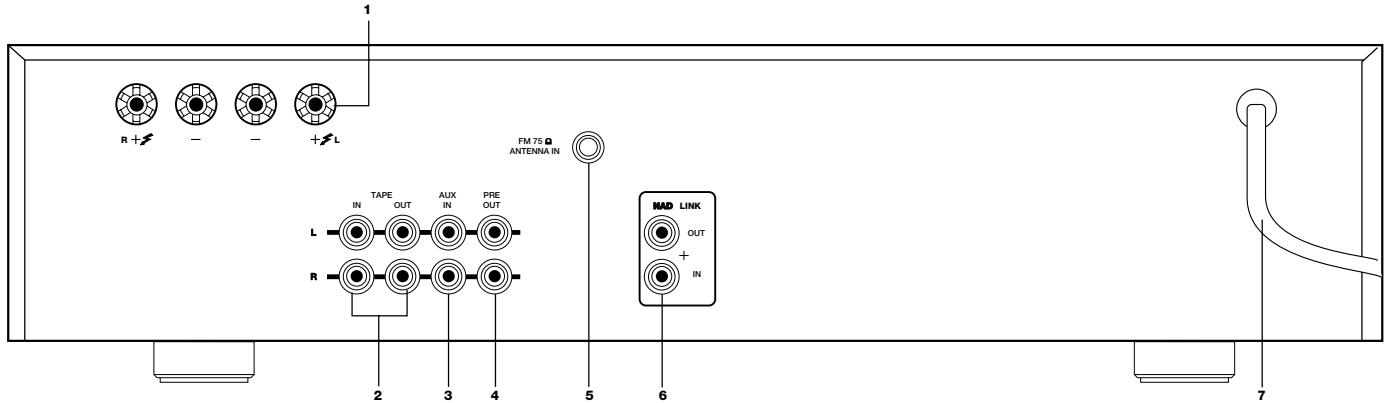
REAR PANEL CONNECTIONS (Figure 1.)
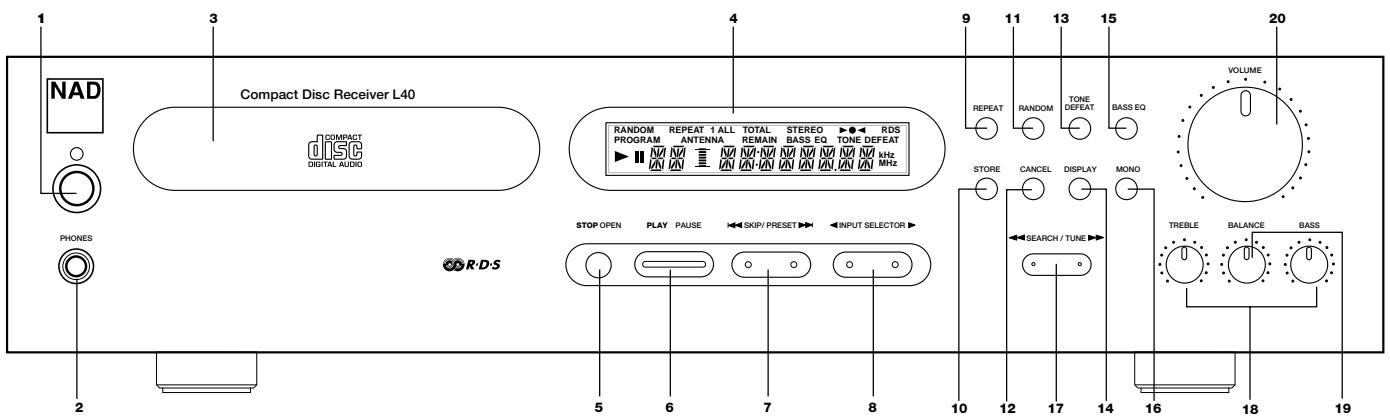
FRONT PANEL CONTROLS (Figure 2.)
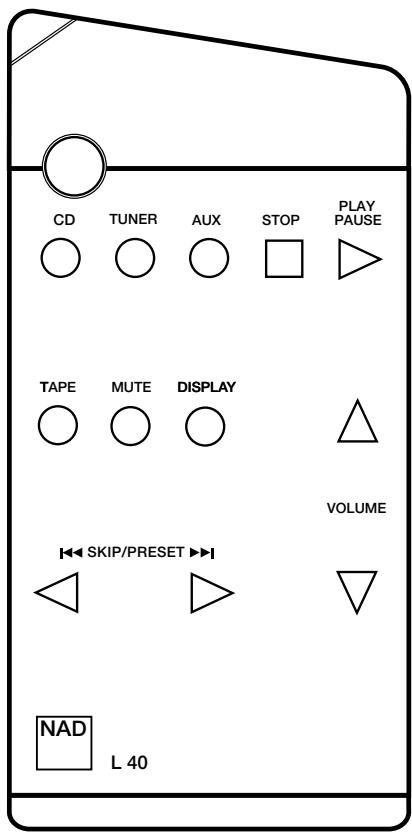
REMOTE CONTROL

natural_image
Warning triangle with a black starburst symbol inside, no text or numbers presentTHIS DIGITAL APPARATUS DOES NOT EXCEED THE CLASS B LIMITS FOR RADIO NOISE EMISSIONS FROM DIGITAL APPARATUS AS SET OUT IN THE RADIO INTERFERENCE REGULATIONS OF THE CANADIAN DEPARTMENT OF COMMUNICATIONS.
LE PRESENT APPAREIL NUMVERIQUE N'EMENT PAS DE BRUITS RADIOELECTRIQUES DEPASSANT LES LIMITES APPLICABLES AUX APPAREILS NUMERIQUES DE LA CALSSE B PRESCRITES DANS LE REGLEMENT SUR LE BROUILLAGE RADIO ELECTRIQUE EDICTE PAR LE MINISTERE DES COMMUNICATIONS DU CANADA.
WARNING - INVISIBLE LASER RADIATION WHEN OPEN AND INTERLOCKS DEFEATED. AVOID EXPOSURE TO BEAM.
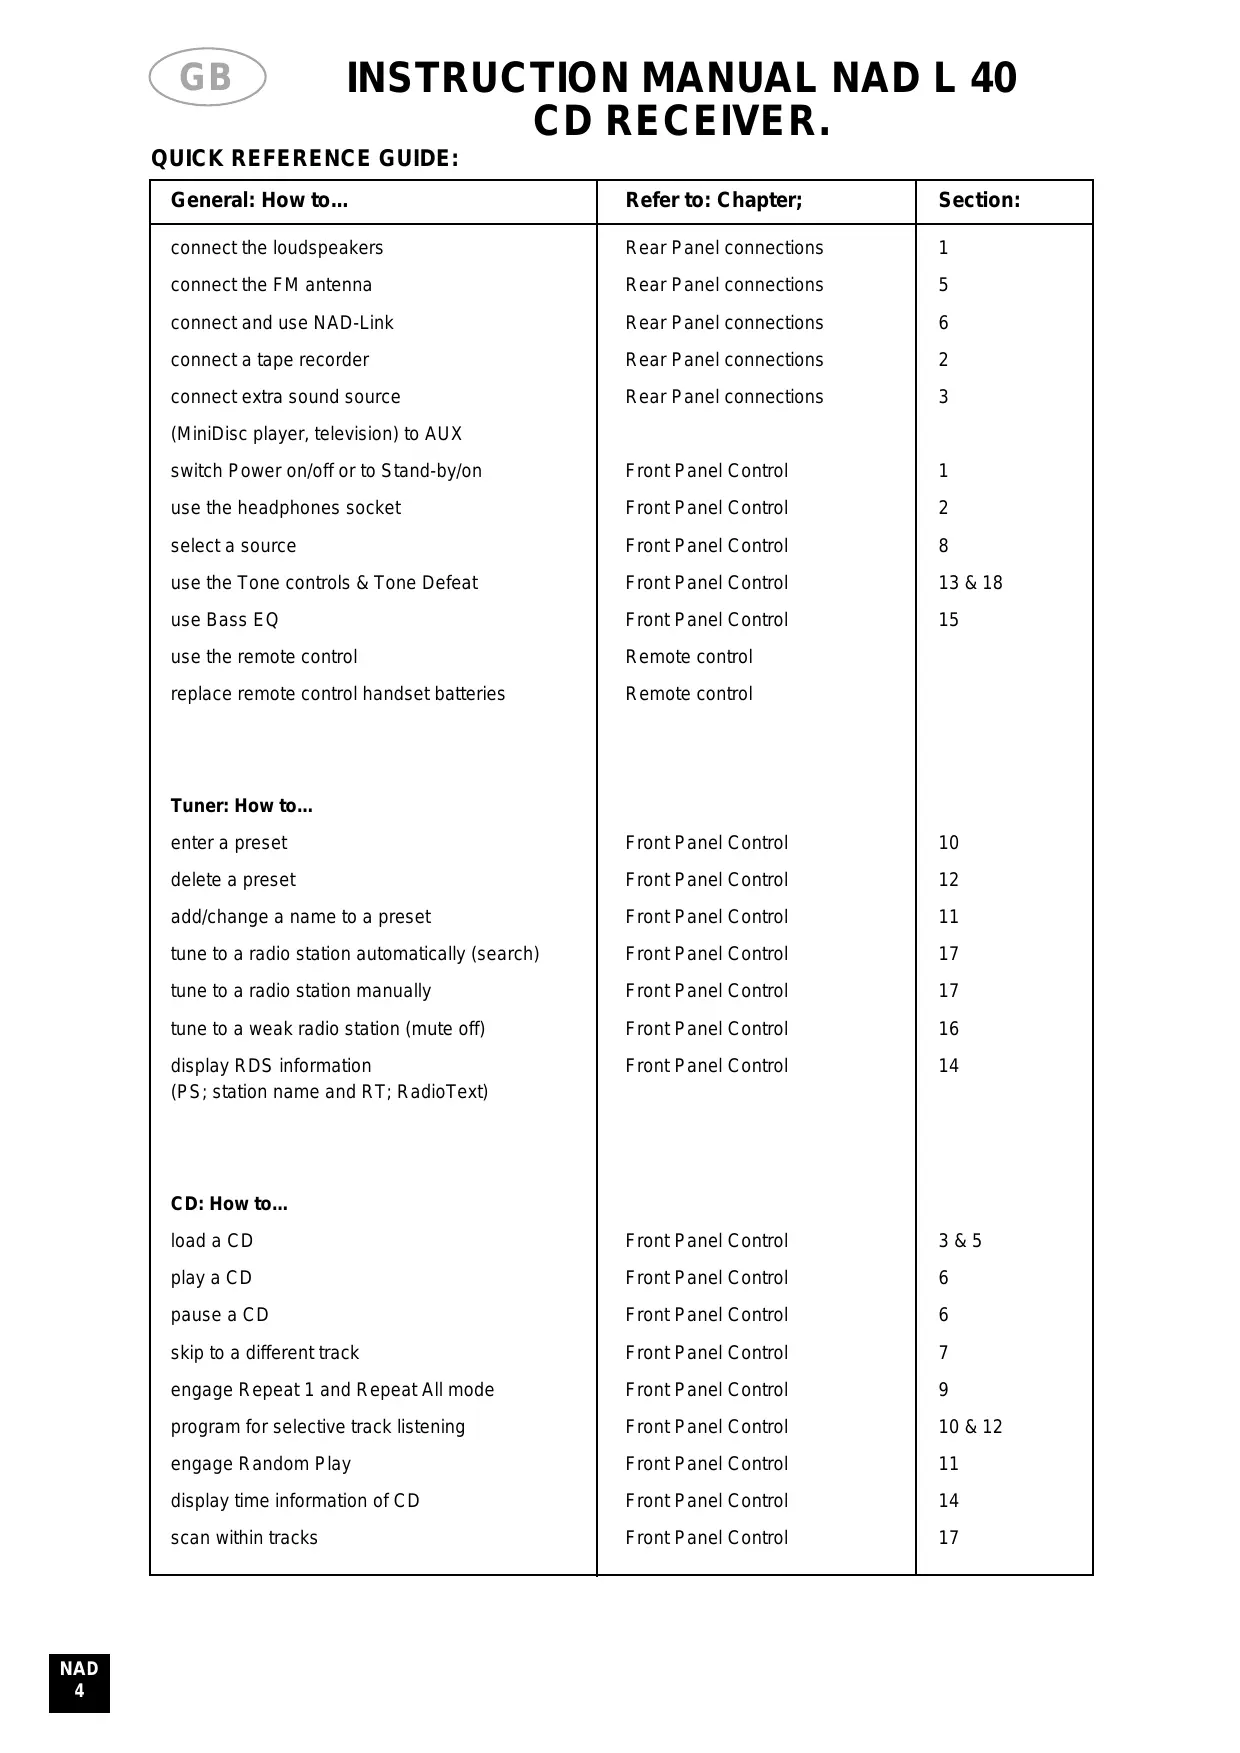
INSTRUCTION MANUAL NAD L 40
CD RECEIVER.
QUICK REFERENCE GUIDE:
| General: How to... | Refer to: Chapter; | Section: |
| connect the loudspeakers | Rear Panel connections | 1 |
| connect the FM antenna | Rear Panel connections | 5 |
| connect and use NAD-Link | Rear Panel connections | 6 |
| connect a tape recorder | Rear Panel connections | 2 |
| connect extra sound source(MiniDisc player, television) to AUX | Rear Panel connections | 3 |
| switch Power on/off or to Stand-by/on | Front Panel Control | 1 |
| use the headphones socket | Front Panel Control | 2 |
| select a source | Front Panel Control | 8 |
| use the Tone controls & Tone Defeat | Front Panel Control | 13 & 18 |
| use Bass EQ | Front Panel Control | 15 |
| use the remote control | Remote control | |
| replace remote control handset batteries | Remote control | |
| Tuner: How to... | ||
| enter a preset | Front Panel Control | 10 |
| delete a preset | Front Panel Control | 12 |
| add/change a name to a preset | Front Panel Control | 11 |
| tune to a radio station automatically (search) | Front Panel Control | 17 |
| tune to a radio station manually | Front Panel Control | 17 |
| tune to a weak radio station (mute off) | Front Panel Control | 16 |
| display RDS information(PS; station name and RT; RadioText) | Front Panel Control | 14 |
| CD: How to... | ||
| load a CD | Front Panel Control | 3 & 5 |
| play a CD | Front Panel Control | 6 |
| pause a CD | Front Panel Control | 6 |
| skip to a different track | Front Panel Control | 7 |
| engage Repeat 1 and Repeat All mode | Front Panel Control | 9 |
| program for selective track listening | Front Panel Control | 10 & 12 |
| engage Random Play | Front Panel Control | 11 |
| display time information of CD | Front Panel Control | 14 |
| scan within tracks | Front Panel Control | 17 |
NOTES ON INSTALLATION
Your L 40 should be placed on a firm, level surface. Avoid placing the unit in direct sunlight or near sources of heat and damp.
Allow adequate ventilation. Do not place the unit on a soft surface like a carpet. Do not put it in an enclosed position such as a bookcase or cabinet that may impede air-flow through the ventilation slots.
Switch the unit off before making any connections.
Use high quality RCA leads and connectors for optimum performance and reliability. Ensure that leads and connectors are not damaged in any way and all connectors are firmly plugged. The RCA connectors on your L 40 are colour coded red for Right audio and white for Left audio.
For the best performance, use quality speaker leads of 16 gauge thickness or more.
If the unit will not be used for some time, disconnect the plug from the AC socket.
Should water get into your L 40, shut off the power to the unit and remove the plug from the AC socket. Have the unit inspected by a qualified service technician before attempting to use it again.
Do not remove the cover, there are no user-serviceable parts inside.
Use a dry soft cloth to clean the unit. If necessary, lightly dampen the cloth with soapy water. Do not use solutions containing benzol or other volatile agents.
REAR PANEL CONNECTIONS
1. SPEAKERS
Outputs for speakers with an impedance of 4 ohm or more.
The 'RIGHT+' terminal should be connected to the '+' terminal on your right-hand loudspeaker and the 'RIGHT-' connected to the loudspeaker's '-' terminal.
Connect to the left-hand speaker the terminals marked 'LEFT+' and 'LEFT-' in the same way.
Heavy duty stranded wire or specialised speaker cables to connect the loudspeakers to your L 40 is recommended.
The high-current binding post terminals can be used as a screw terminal for cables terminated within spades or pin connectors, or for cables with bare wire ends.
SPADE CONNECTORS
These should be slotted under the terminal's screw bushings, which are then fully tightened. Ensure the connectors are tightly secured and there is no danger of bare metal from spade connectors touching the back panel or another connectors, as this may cause damage.
BARE WIRES AND PIN CONNECTORS
Bare wires and pin connectors should be inserted into the hole in the shaft of the speaker terminals. Unscrew the speaker terminal's plastic bushing until the hole in the screw shaft is revealed. Insert the pin or bare cable end into the hole and secure by tightening down the terminal's bushing.
Avoid any bare metal from speaker cables touching the back panel or another connector. Ensure that there is only 1/2" (1cm) of bare cable or pin and no loose strands of speaker wire.
2. TAPE IN, OUT
Connections for analogue recording and playback to an audio tape recorder of any type. Using a twin RCA-to-RCA lead, connect the left and right output (often labelled as “playback”, “Line out”, “Output”, “Analogue Output”) of the tape machine to the TAPE IN connectors of the L 40 for playback. Connect the left and right input (often labelled as “Record”, “Line in”, “Input”, “Analogue Input”) of the tape machine to the TAPE OUT connectors of the L 40 for recording.
3. AUX INPUT
Input for additional line level input signals such as a minidisc player. Use a twin RCA-to-RCA lead to connect the auxiliary unit's left and right line level outputs (often labelled as "Line out", "Output", "Analogue output") to this input.
4. PRE OUT
Connections to an external power amplifier.
5. FM ANTENNA
A ribbon wire FM antenna is included and should be connected to the FM ANTENNA connector at the rear of the unit using the 'balun' adapter supplied. The ribbon aerial should be mounted on a vertical surface and placed so that it forms a 'T'.
Experiment with placement of the antenna to find the position that gives the best signal strength and lowest background noise.
An inadequate FM signal normally results in high level of hiss, especially with stereo reception, and interference from external electrical sources. The performance of tuner section can be improved by using an externally mounted FM antenna. A qualified aerial installer will be able to advise and fit a recommended aerial for your reception conditions.
6. NAD-LINK IN, OUT
The NAD-Link connectors are used to pass commands from the remote control to and from other units fitted with NAD-Link connectors. This allows centralised control of a complete system or gives system control from more than one room and remote control operation of NAD units that are not remote controllable on their own.
To function with other units, connect the L 40's NAD-LINK OUT to the NAD-LINK IN on the other unit. NAD-LINK connectors can be daisy-chained, IN to OUT, so that a whole system can be controlled from the remote control facilities of one unit.
7. AC POWER CORD
Connect the AC Power cord to a suitable AC outlet socket.
FRONT PANEL CONTROL
1. POWER
Press the POWER button to switch unit ON. The display and volume control LED will illuminate.
Pressing the POWER switch again will turn the unit OFF completely. The L 40 uses a memory back-up system to store preset station information for the tuner. This information is retained for several weeks, even the unit is switched off completely or unplugged.
REMOTE CONTROL:
STAND-BY button (green):
Press this button to switch the unit from operating to the Stand-by mode and vice versa: Press this button again to switch the unit on from Stand-by.
NOTE:
Stand-by mode is indicated by the amber light just over the green POWER button on the front panel (No. 1)
In Stand-by mode, the L 40 uses very little power. However, it is recommended that you switch the unit totally off if it is not going to be used for more than a couple of days. Switch off completely by pressing the POWER button on the front panel (No. 1), all lights will extinguish.
2. PHONES
A 1/4" stereo jack socket is supplied for headphone listening and will work with conventional headphones of any impedance. Inserting a headphone jack into this socket automatically switches off the loudspeakers. The volume, tone and balance controls are operative for headphones listening. Use a suitable adapter to connect headphones with other types of connectors, which have 3.5mm stereo 'personal stereo' jack plug.
NOTE:
Make sure the volume control is turned to minimum (fully anti-clockwise) before connecting headphones.
Listening at high levels can damage your hearing.
3. DISC DRAWER
To load a disc, press the STOP/OPEN (No. 5) button to open the disc drawer. Place the CD within the large circular recess in the drawer, with its transparent playing surface facing down. The label must face up.
Press OPEN again to close the drawer or press PLAY/PAUSE to close the drawer and start playback.
CD-3 discs (3-inch CD 'singles') can be played without the aid of an adapter. Place the disc in the drawer, centred in the smaller circular recess, with its label facing up.
NOTE:
This player is not designed to accommodate a 'damping disc' placed on a CD, nor two CDs stacked together. It plays audio CDs, but not discs identified as CD-V, DVD, CD-I, CD-ROM, or PHOTO CD.
4. DISPLAY (LCD)
The LCD display provides information on the selected input and status of the CD and Tuner.
IN CD MODE:
TRACK NUMBER. Each disc is segmented into numbered tracks when the recording is made; typically each numbered track will correspond to a different song, symphonic movement, etc.
These track numbers are identified on the CD package and are encoded in the disc by its manufacturer.
Normally the alpha-numeric section of the display shows the time elapsed since the beginning of the current track. Using the DISPLAY button (No. 14) you can switch the display to show the playing time remaining to the end of the disc.
A right-pointing arrowhead ▶, located near the left edge of the display, lights up during play. Two vertical bars ■ indicate that the player is in pause.
In stop mode the display reverts to showing the number of tracks and total playing time of the disc.
“NO DISC” is indicated in the display when there is no disc in the drawer or when you load a disc that cannot be read (because it is dirty or is upside-down).
"REPEAT 1" lights up in the upper-left corner during repeat-play of a single track.
"REPEAT ALL" lights up during repeat play of the entire CD or all pre-programmed tracks.
Both “REPEAT 1” and “REPEAT ALL” can be engaged by pressing button No. 9.
"TOTAL REMAIN" lights up in the centre area of the display if you have pressed the DISPLAY button to show the remaining time in the disc.
"RANDOM." When the L 40 is in random mode "RANDOM" will be shown in the display panel.
"PROGRAM" lights up when the CD player is being programmed to play a specific selection of tracks (using the STORE and CANCEL buttons; No's. 10 + 12). PROGRAM also lights up during pre-programmed play-back of a CD.
IN TUNER MODE:
The alpha numeric section of the display will normally show the preset number and station name if an RDS station is received, or the programmed name. If no name was programmed or it is a radio station without RDS, the reception frequency in Mega Hertz (MHz) will be displayed.
“ANTENNA”, and the horizontal bars directly underneath light up in the display to indicate the signal strength of the radio station received. The more bars are lit, the stronger the signal.
Centre Tune, as indicated by a dot directly over the “TONE DEFEAT” indicator lights up if the tuner is tuned exactly on the centre frequency of the radio station. Centre Tune also lights up when the unit receives a remote command.
“RDS”, in the top right hand corner, lights up when a radio station transmitting RDS information is received.
NOTE:
The RDS feature is totally dependent on the capability of the radio broadcast. Many stations do not yet broadcast in RDS. NAD can make no guarantee about local RDS availability. Please check with your local broadcasters.
GENERAL:
"BASS EQ" lights up in the display if BASS EQ has been selected (No. 15)
“TONE DEFEAT” lights up in the display if TONE DEFEAT has been selected (No. 13).
REMOTE RECEIVER. An infrared sensor, located at the left-hand portion of the display window, receives commands from the remote control. There must be a clear line-of-sight path from the remote control to this window; if that path is obstructed, the remote control may not work. When the unit receives a command from the remote control, this is indicated in the display by a blinking dot.
5. STOP/OPEN
Pressing this button once stops the CD playback, cancels any repeat-play cycle, and re-sets the pickup to the beginning of the disc. The display reverts to showing the number of tracks and total playing time on the disc.
Press this button again to open the disc drawer, press it again to close the drawer.
When the drawer is closed, the player scans the disc's 'table of contents' and displays the number of tracks and total playing time on the disc. If you press PLAY to close the drawer this information is skipped, and unit starts playing the CD at Track 1.
NOTE:
The disc drawer is opened and closed by an internal motor. Do not close the drawer by hand when the unit is powered off.
REMOTE:
On the remote control handset there is also a STOP button which performs almost the same function as the button on the front panel of the L 40, however this button does not open or close the tray door.
6. PLAY/PAUSE
Press the PLAY/PAUSE button to start playback of a CD, the PLAY mode is identified by a right-pointing arrowhead ▶ in the display.
Press PLAY/PAUSE again to momentarily stop playback (the CD player is now in "Pause" mode, identified by two vertical bars ■ in the display.
To resume playback at the exact point where it was paused, press PLAY/PAUSE again. If you don't want to resume play at the same point, you may use the SKIP/PRESET (No.7) or SEARCH/TUNE (No. 17) controls to cue the pickup to a different starting point before pressing PLAY again.
On the remote control there is also a PLAY/PAUSE button. This button performs the same actions as the button on the front panel.
7. SKIP/PRESET
The SKIP/PRESET control actually operates two buttons either side of the control, indicated by little raised pips. To operate, press either one of the desired pips; the left one for SKIP BACK ◀◀◀ , the right one for SKIP FORWARD ▶▶I .
IN CD MODE:
SKIP BACK
The SKIP ◄◀ button causes the laser to jump backwards to the beginning of each numbered track on the disc. The first press skips back to the beginning of the current track. Press SKIP ◄◀ twice in rapid succession to skip back to the preceding track. Continuous pressure will cause the player to jump to preceding tracks repeatedly until the button is released.
SKIP FORWARD ▶▶▶
During play, pressing SKIP ▶▶I will cause the laser to jump to the beginning of the next track and start play back there. Thus, to sample each song on a disc, press PLAY and then tap SKIP ▶▶I after you've heard a few seconds of each track. Continuous pressure will cause to player to jump to the higher numbered tracks repeatedly until the button is released.
IN TUNER MODE:
PRESET
Press PRESET up or down to select one of the FM Preset stations. Each time these buttons are pressed, the display panel will show the preset number and the preset frequency, or station name if it is an RDS radio.
NOTE:
The RDS feature is totally dependent on the capability of the radio broadcast. Many stations do not yet broadcast in RDS. NAD can make no guarantee about local RDS availability. Please check with your local broadcasters.
On the remote control there are also a SKIP/PRESET buttons. These buttons perform the same actions as the buttons on the front panel.
8. INPUT SELECTOR
The INPUT SELECTOR control actually operates two buttons either side of the control, indicated by little raised pips. To operate, press either one of the desired pips.
Pressing the right side of the control causes L 40 to scroll through its inputs in the following sequence:
$$ \mathrm{CD} > \text { Aux } > \text { Tape } > \text { Tuner } > \mathrm{CD}. $$
Pressing the left side of the control causes the L 40 to scroll through its inputs in reversed order:
$$ \mathrm{CD} > \text {Tuner} > \text {Tape} > \text {Aux} > \mathrm{CD}. $$
Press either button repeatedly until the desired source is shown in the display.
REMOTE CONTROL:
The remote control has separate buttons for each input. Press the corresponding button for the desired input.
9. REPEAT
This button engages an endless-repeat cycle. Press the REPEAT button once to select the REPEAT 1 mode, which repeats only the current track over and over again.
Pressing the REPEAT button once again selects the REPEAT ALL mode, in which mode the entire disc or a pre-programmed selection of tracks is played from beginning to end, over and over again. Press the Repeat button a third time to cancel the repeat cycle and return to normal operation.
10. STORE
IN CD MODE:
The L 40 CD receiver allows you to pre-program the CD player to skip the tracks of a CD you do not want to hear (negative programming). Programming the CD player can only be done with a CD present in the tray and in Stop mode.
To engage Program mode, press STORE. Use the SKIP/PRESET buttons to choose the track you do not want to play; the track number is blinking in the display. Press CANCEL (No. 12) to confirm the track you wish to delete. The display confirms this first track cancellation by indicating "P--01".
Select the next track you want to skip and press CANCEL again; the display indicates "P--02". repeat this procedure until all the track you do not want to play have been selected.
After you have selected all tracks you do not wish to play, press the PLAY button to start playback of all remaining tracks. During Program Play, "PROGRAM" will be lit in the display.
NOTE:
Pressing STOP/OPEN (No. 5) will delete a program and disengage the Program mode. Changing to a different source (such as tuner, for example) will also delete any program and disengage Program mode.
IN TUNER MODE:
The L 40 CD Receiver allows you to store up to 30 radio stations (presets) in its memory.
To store a station as a preset, first tune to the desired radio station using the SEARCH/TUNE control buttons (No. 17).
Press the STORE button. The display panel will show the lowest available preset number for approximately 6 seconds.
Within these 6 seconds, press STORE again to store the station under this preset number.
If you wish to use a different preset number, use the SKIP/PRESET control buttons (No. 7) to select the desired number before pressing store again. Note that only empty preset numbers will be shown; should you wish to use a preset number already in use, you will have to clear that first (refer to section CANCEL, No. 12)
NOTE:
Apart from the radio station itself, the L 40 will also remember if Mono (No. 16) was selected. This is particularly useful if you wish to listen frequently to a weak station. The procedure is the same as described above, but after having selected the desired preset number, select MONO (No.16); "STEREO" will extinguish in the display. Press STORE.
NOTE:
The Store mode will automatically cancel itself after approximately 5 seconds if no other buttons are pressed.
11. RANDOM
IN CD MODE:
Pressing the RANDOM button will engage playback of all tracks on the CD in a random order. Press RANDOM either from the Stop or the Play mode and the L 40 will start to play the tracks on the CD in random order until all the tracks have been played.
Press the RANDOM button again to cancel random play and return the L 40 to the normal Play mode.
While the L 40 is in random mode 'RANDOM' will be shown in the Display.
RANDOM can be used together with the REPEAT ALL mode. The L 40 will continue with another cycle of random playback after completing a cycle of random playback.
NOTE:
RANDOM can not be used together with “Program Play” (refer to section No. 10).
IN TUNER MODE:
Many people find it difficult to remember which radio station belongs to what frequency. To avoid such confusion, you can give each preset a name of up to 8 characters. When calling up that preset, the name instead of the frequency will be displayed. For instance, 91.30 corresponds to BBC Radio 3; in this case the preset can be programmed to display “BBC R3” whenever it is called up.
There are two ways to name a preset; name and store the station in a preset at the same time, or name an already occupied preset.
TO NAME AND STORE A PRESET
Tune into the desired radio station using the SEARCH/TUNE control buttons (No. 17). Press the REPEAT button, apart from a flashing line, the display will go blank. Within the default time of 10 seconds you can now enter the first desired character.
Select the character using either one of the SKIP/PRESET control buttons (No. 7). Pressing the right SKIP/PRESET control button will scroll through the available characters in numeric and alphabetic order: (blank space) > 0 > 1 > 2 > 3 through to 9 > A > B > C through to Z > (blank space) > 0 > 1 > 2 > and so on. Press the left SKIP/PRESET control button to scroll through the characters in reverse order: Z > Y > X through to A > 9 through to 3 > 2 > 1 > 0 > (blank space) > Z > Y > X > and so on.
Use the right SEARCH/TUNE (No. 17) control button to move to the next position on the right to enter the second character and repeat selecting a character as described above.
Enter all the other characters using the SKIP/PRESET and SEARCH/TUNE control buttons as described above.
Once all characters have correctly been entered, press STORE (No. 10).
Press STORE again to assign a preset number (refer to section 10)
TO NAME AN ALREADY USED PRESET
Call up the preset you wish to name. Press the REPEAT button, apart from a flashing line, the display will go blank. Within the default time of 10 seconds you can now enter the first desired character.
Select the character using either one of the SKIP/PRESET control buttons (No. 7). Pressing the right SKIP/PRESET control button will scroll through the available characters in numeric and alphabetic order: (blank space) > 0 > 1 > 2 > 3 through to 9 > A > B > C through to Z > (blank space) > 0 > 1 > 2 > and so on. Press the left SKIP/PRESET control button to scroll through the characters in reverse order: Z > Y > X through to A > 9 through to 3 > 2 > 1 > 0 > (blank space) > Z > Y > X > and so on.
Use the right SEARCH/TUNE (No. 17) control button to move to the next position on the right to enter the second character and repeat selecting a character as described above.
Enter all the other characters using the SKIP/PRESET and SEARCH/TUNE control buttons as described above.
Once all characters have correctly been entered, press STORE (No. 10). The preset has now been named.
NOTE:
It is always possible to change a name. Use the same procedure as described under “To name an already stored preset”. Instead of a blank line, the first character will start to blink in the display upon pressing REPEAT; you can simply “overwrite” by selecting a new character.
NOTE:
It is not possible to rename an RDS radio station; the transmitted name (PS) will be stored and displayed automatically.
12. CANCEL
IN CD MODE:
The CANCEL button works in conjunction with the STORE button (No. 10) which will allow you to delete tracks you do not wish to hear.
Refer to the section STORE (No. 10) on how to program and engage Program Play.
IN TUNER MODE:
To delete a specific preset, select the preset and press CANCEL; the preset number in the display starts blinking. Within the default time of 6 seconds, press CANCEL again. To confirm that this preset number is now empty, the display will give the message: "PRESET CLEAR".
13. TONE DEFEAT
The TONE DEFEAT button by-passes the tone control section of the L 40. If you normally leave the tone controls in the 12 o'clock position, then it is advisable to switch out the tone control section altogether by pressing the TONE DEFEAT button. To indicate that TONE DEFEAT is engaged, "TONE DEFEAT" will light up in the display. By-passing the tone control electronics ensures a slightly improved audio quality and unaltered frequency response.
14. DISPLAY
IN CD MODE:
The DISPLAY button has three modes, as follows:
TIME: The elapsed time in minutes and seconds since the beginning of the current track. (This is the 'default' setting, selected automatically when the player is turned on.)
REMAIN: The total playing time that remains until the end of the disc and the total number of remaining tracks (including the current track), or the remaining number of tracks and time during program Play.
TOTAL: the total number of tracks and playing time of the disc.
IN TUNER MODE:
When receiving an RDS radio station, the DISPLAY button scrolls through three modes:
As the default, when tuned to an RDS radio station, the station name will be displayed (RDS PS).
Press the DISPLAY button once to show any Radio Text (RDS RT). Radio text information can consist of the program or presenter's name, what song is playing, etc. The text scrolls continuously over the display. If the station doesn't transmit any RadioText the display will show this by indicating "NO TEXT".
Press the button again to show the station frequency and signal strength.
Press the button once more to revert back to the default display with the radio station name (RDS PS).
Pressing the DISPLAY button when tuned to a radio station without RDS the display will give the message "NO RDS" for 5 seconds before reverting back to the normal display again.
NOTE:
The RDS feature is totally dependent on the capability of the radio broadcast. Many stations do not yet broadcast in RDS. NAD can make no guarantee about local RDS availability. Please check with your local broadcasters.
15. BASS EQ
Small speakers typically are less capable of producing deep bass because of their physical limitations. The BASS EQ feature compensates for this roll-off, extending the useful response of the speakers significantly. Of course very low frequencies are not found in all music or recordings so the effect of BASS EQ won't always be obvious. With music that contains a lot of deep bass information the effect will prove to be an obvious and dramatic improvement.
Press the BASS EQ button to engage; "BASS EQ" lights up in the display.
Press the BASS EQ button again to disengage.
NOTE:
The BASS EQ circuit also incorporates an infrasonic filter that rolls off the response below 25Hz to prevent inappropriate amplification of non-musical signals below the audio range. With music with extreme deep bass it is possible to overdrive either the L 40's amplifier or speakers. This is noticeable as distortion; in such a case disengage BASS EQ and/or lower the volume level until the sound is undistorted again.
16. MONO
If a strong stereo FM signal is being received, your NAD L 40 will automatically switch to Stereo FM operation, which is shown by the STEREO indicator in the display, and the tuner will mute when searching between stations.
Weak stereo signals however, may have a high level of background hiss. Switching to Mono mode by depressing the MONO button will cancel most or all of this background noise. Press the MONO button again to return to Auto Stereo FM operation.
It is possible to add the MONO status to a preset. This way, if you listen frequently to a weak station you don't need to set MONO manually every time. Refer to section STORE (No. 10) for more information.
NOTE:
MONO works only on the tuner section of the L 40. With CD, Tape or Aux selected, the MONO button is inoperative.
17. SEARCH/TUNE
IN CD MODE:
SEARCH BACK ◀◀
The SEARCH ◀◀ button causes the optical pick-up of the CD player to scan backwards through the recording at high speed. This button works only while the player is in PLAY or PAUSE. After a STOP command, or after loading a new disc, you must press PLAY before the scan circuit will work.
If the scan is initiated while the player is in PAUSE the scan is silent and is approximately 15-20 times faster than normal playing speed. If Scan is initiated during PLAY the music will be heard in fragmentary form as the player scans through it. Use this 'audible scan' to cue the player precisely to the spot where you want to resume play.
If you scan back to the beginning of the disc while playing Track 1, the player automatically reverts to normal playback.
SEARCH FORWARD ▶▶
The SEARCH ▶▶ button causes the optical pick-up to scan rapidly forwards through the music. The behaviour of this function is similar to SEARCH ◀◀.
If you scan forward to the end of the disc while playing the final track, the scan will stop and the display will show the table of contents. (There is no 'wrap-around' mode.)
IN TUNER MODE:
The L 40 allows you to tune to a radio station in two modes, manually or search automatically. To automatically search: Press either the ◀◀ or ▶▶ button on the SEARCH/TUNE control for over 1 second and release to respectively tune down or up the frequency band. The tuner will automatically search down or up the FM band to find the first station that is being received with a reasonably strong signal. Once it has found a reasonably strong signal it will stop and accurately tune itself to the radio station. The Centre Tune indicator (a single dot in the display) will light up when a station is correctly tuned.
To manually tune in to a radio station:
Press either ◀◀ or ▶▶ button on the SEARCH/TUNE control to respectively tune down or up the frequency band. The tuner will start to automatically search down or up the FM band. Once in the proximity of the desired frequency briefly press the other side of the SEARCH/TUNE control to stop searching.
With every repeated brief push of either one of the ◀◀ or ▶▶ SEARCH/TUNE buttons briefly, the tuner will take a small tuning step of 0.025MHz.
The Centre Tune indicator (a single dot in the display) will light up to indicate that the radio station has accurately been tuned to.
NOTE:
Sometimes a radio station is so weak that its signal level falls below the muting threshold level (the muting circuits mutes the noise normally heard between radio stations) so that the radio station can't be heard, even if it has been tuned to the exact frequency. In such a case press the MONO button (No. 16) to turn the muting circuit off.
18. BASS & TREBLE CONTROLS
The BASS and TREBLE tone controls adjust the tonal balance of your system.
The 12 o'clock position is 'flat' with no boost or cut and a detent indicates this position. Rotate the controls clockwise to increase, or anti-clockwise to decrease, the amount of Bass or Treble.
The Tone controls will not affect recordings made from the Tape outputs but will affect the signal going to the Pre-amp output (Pre Out).
NOTE:
Make sure that TONE DEFEAT (No. 13) is not engaged as the tone controls will not work (if it is, "TONE DEFEAT" lights up in display).
19. BALANCE
The BALANCE control adjusts the relative levels of the left and right speakers. The 12 o'clock position provides equal level to the left and right channels. A detent indicates this position.
Rotating the control clockwise moves the balance towards the right. Rotating the control anti-clockwise moves the balance to the left.
The BALANCE control does not affect recordings made from the Tape outputs but will affect the signal going to the Pre-amp output (Pre Out).
20. VOLUME
The VOLUME control adjusts the overall loudness of the signals being fed to the loudspeakers.
On the remote control handset there are two buttons for volume. Press the UP button to increase the volume level; press the DOWN button to decrease the volume level. When using either the DOWN or UP volume control button on the remote control handset, the display will indicate respectively "VOL DOWN" or "VOL UP". The motorised volume control knob on the front panel will move down or up at the same time.
NOTE:
The volume control does not affect recordings made from the Tape output but will affect the signal going to the Pre-amp output (Pre Out).
REMOTE CONTROL HANDSET INSTALLING AND REPLACING BATTERIES
The remote control requires two 1.5-volt AAA-size (i.e. UM-4 or IEC RO3) cells. Alkaline cells are recommended, to obtain maximum operating life.
To open the battery compartment, place your fingertip in the recess on the rear of the remote control, push against the flexible edge of the battery cover and lift the cover upwards. Install fresh cells, orienting them as shown on the diagram within the compartment. The coil springs should contact the (-) end of each cell. Push the battery compartment cover back and press gently until it latches.
In some cases, poor operation may be caused by corrosion or fingerprint oil on the battery contacts. Remove both cells, rub the metal contacts at both ends of each cell with a clean cloth or a pencil eraser, and re-install the cells, being careful to orient them correctly.
STAND-BY button (green):
Press this button to switch the unit from operating to the Stand-by mode and vice versa: Press this button again to switch to unit on from Stand-by.
NOTE:
Stand-by mode is indicated by the amber light just over the green POWER button on the front panel (No. 1). In Stand-by mode the L 40 uses very little power.
However, it is recommended that you switch the unit totally off if it is not going to be used for more than a couple of days. Switch off completely by pressing the POWER button on the front panel (No. 1), all lights will extinguish.
VOLUME UP and DOWN buttons:
On the remote control handset there are two buttons for volume. Press the UP button to increase the volume level; press the DOWN button to decrease the volume level. When using either the DOWN or UP volume control button on the remote control handset, the display will indicate respectively "VOL DOWN" or "VOL UP". The motorised volume control knob on the front panel will move down or up at the same time.
MUTE button:
By pressing this button the overall volume level is significantly reduced (by 20dB). This can be useful to quickly lower the volume level to answer a telephone call, for instance. When the unit is muted, the display indicates "MUTE", in whatever mode it is in.
Press MUTE again to restore the original volume level.
STOP button:
Press this button to stop CD playback or to clear "Program Play". On the front panel there is also a STOP button which performs almost the same function as the button on the remote control handset, however this button also opens or closes the CD tray door.
CD, TUNER, AUX and TAPE buttons:
Unlike the front panel, the remote control handset has separate buttons for each input. Press the corresponding button for the desired input.
The PLAY/PAUSE, SKIP/PRESET, and DISPLAY buttons function in the same manner as those with the same name on the front panel of the unit (respectively No's. 6, 7 and 14 on front panel drawing).
MAINTENANCE
At periodic intervals, open the disc drawer and wipe with a damp cloth to remove any loose dust.
HANDLING COMPACT DISCS
Handle Compact Discs with care. The playback of a disc will not be impaired by small dust particles, a few light fingerprints, or slight scratches. But large scratches, or a thick layer of oily fingerprints, can prevent the player from tracking the disc. (Incidentally, although the tracking laser 'plays' the disc through its clear side, the actual data surface is embedded directly beneath the label, protected only by a very thin coating of lacquer. So a scratch that cuts through the label may damage the disc more than a similar scratch on the transparent 'playing' surface. Thus you should treat both surfaces of the disc with care.)
Severe scratches or fingerprints may cause the player to mis-track (skipping ahead, or repeating the same passage). Less severe damage may produce very brief bursts of high-frequency noise. The tracking and error-correction circuits of this NAD CD Receiver are unusually sophisticated, providing secure tracking of flawed discs that are not playable on some other players. Nevertheless, the discs should not be abused or handled carelessly.
For best results, grasp the disc only by its edges. Another safe method is to put a finger in the centre hole, using the thumb at the edge to hold the disc steady.
Each disc should be kept in its protective storage case when not in use. To open the standard Philips-type plastic CD case, grasp the top and bottom of the case with the fingers and thumb of the left hand; then grasp the left and right edges of the case with the fingers and thumb of the right hand, and pull the case open with the right thumb.
The disc is held in place within the case by an expansion hub in its center hole. To remove the disc, press the hub with a finger to release the disc, then lift it out by gripping its edges between the fingers and thumb. To replace the disc in the case, simply align its center hole with the hub and press the disc onto the hub.
CLEANING DISCS
Soiled discs may be cleaned by wiping with a soft cloth, either dry or moistened with water. Do NOT use conventional LP record-cleaning products (cleaning solutions, sprays, treated cloths, or anti-static preparations), nor any kind of chemical solvent (alcohol, benzene, etc). A severely soiled disc may be washed in a warm-water spray, possibly with a small amount of a mild kitchen detergent added, and then wiped dry with a clean, soft towel.
When cleaning the disc, use only RADIAL strokes (from center to edge). Never use a circular wiping motion like that used for cleaning ordinary LP records, because in wiping the disc there is a risk of scratching it. A radial scratch will do the least harm because it affects only a small portion of each circular data track, which can be fully compensated by the player's error-correction circuits. But a circular scratch that follows a data track may damage such a long continuous segment of data that it cannot be corrected.
ABOUT THE LASER
The CD Receiver uses a solid-state semiconductor diode laser, mounted on a tracking servo mechanism, to play the disc. The laser illuminates the track of microscopic pits representing the digital data bits, while photo-diodes detect the reflected illumination from the disc and convert it into an electronic signal which is then decoded to recover the musical waveform in each stereo channel.
You cannot see the laser operating, because it operates at wavelength of 7800 Angstroms, which is in the infrared region and thus invisible to the human eye.
The CD Receiver is completely safe for children to use. The laser operates at very low power and is concealed within the player mechanism. Even when the player is disassembled, the laser remains sealed within an optical system that causes its light to focus only 1 millimetre from the lens and then diverge rapidly, reducing its intensity to negligible levels.
TROUBLESHOOTING
| SYMPTOM | POSSIBLE CAUSE | CORRECTION |
| No Power when the POWER button is set to ON. | Poor or no power plug connection at the AC outlet.Power not switched on. | Insert power plug firmly into the AC outlet. |
| Disc play does not start. | The disc is loaded upside down.The disc is too dirty. | Reload the disc with the label side UP.Clean the disc. |
| No Sound. | Incorrect audio cable connections.Station not selected or weak signal. | Check inputs and speakers connection to L 40.Re-tune. |
| Thermal cut out operated. | Switch off and reduce volume setting. | Switch on after the unit has cooled down.Internal fuse blown; consult dealer. |
| No sound in one channel. | Volume Control balance not even.Input lead disconnected or damaged. | Reset balance Control to centre detent position.Check leads and connections. |
| Sound skips. | The L 40 is subject to vibration or physical shock from external sources. | Change the installation location. |
| Remote control does not work. | Batteries in Remote Control have expired.Object obscuring remote sensor on the player. | Replace batteries.Remove any objects directly in front of the display window. |
| A humming noise can be heard. | Loose cable connection. | Check cable connections. |
| Weak bass; diffuse stereo image. | Speakers connected to the power amplifier wired out of phase. | Check the "+" and "-" connections to both speakers. |
| Noisy, reception,hiss. | Weak signal. | Check station tuning.Adjust or replace antenna. |
| Reception distorted. | Multi-path or interference from another station. | Check station tuning.Adjust or replace antenna. |
| Reception with whistling, buzzing noises. | Interference from other computers, games consoles. | Check station tuning.Switch off or move the source of electrical noise. |
| No station found in Search Mode. | Insufficient aerial signal. | Check aerial connection.Adjust position of ribbon antenna. |
MANUEL D'EXPLOITATION POUR RECEPTEUR CD NAD L 40.
NOTICE DE CONSULTATION RAPIDE:
6. "Lecture/Pause" [PLAY/PAUSE]
5. Stopp/Öffnen (STOP/OPEN)
Taste "STAND-BY" (grün):
"REPEAT 1" (repetir 1)
"TOTAL REMAIN" (total restante)
6. "NAD LINK IN/OUT"
2. "PHONES" (CUFFIA)
5. STOP/OPEN (ARRESTO/APERTURA)
9. REPEAT (repetering)
6. NAD-LINK IN, OUT (ENTRADA/SAÍDA NAD-LINK)
5. STOP/OPEN (PARAGEM/ABRIR)
Power Amplifier Section
| Continuous average output power into 8 ohms(Min. power per channel, 20Hz-20kHz, both channels driven, with no more than rated distortion) | 20W (13dBW) | |
| Rated distortion (THD 1kHz) | 0.05% | |
| Clipping power (maximum continuous power per channel) | 25W | |
| IHF dynamic headroom at 8 ohms | +3dB | |
| IHF dynamic power | 8 ohms: | 40W (16dBW) |
| (maximum short term power per channel) | 4 ohms: | 60W (17.8dBW) |
| 2 ohms: | 80W (19dBW) | |
| Damping factor (ref. 8 ohms 50Hz) | >100 | |
| THD + SMPTE + IHF I.M. (from 250mV to rated output) | <0.05% | |
| Frequency response | 20Hz-20kHz | +/-0.3dB |
| -3dB at 10Hz/70kHz | ||
Line Level Inputs (Tape, Aux)
| Input impedance (R and C) | 80k ohms + 220pF |
| Input sensitivity (for rated output into 8 ohms) | 210mV |
| Frequency response, 20Hz-20kHz | +/-0.5dB |
Controls
| Bass | +/- 8dB at 100Hz |
| Treble | +/- 7dB at 10kHz |
| Bass EQ | +7dB at 35Hz |
FM Tuner Section
| Input sensitivity; Mono,(-30dB THD+N) | 11.3dBf (1.0uV) | |
| Mono, 50dB S/N | 15dBf (1.5uV) | |
| Stereo, 50dB S/N | 37dBf (20uV) | |
| Stereo, 60dB S/N | 47dBf (60uV) | |
| Capture ratio (45 to 65dBf) | <1.6dB | |
| Selectivity | 58dB | |
| Image rejection | >80dB | |
| I.F. rejection | 60dB | |
| Subcarrier suppression (19 and 38kHz) | 55 dB | |
| THD at 100% modulation; | Mono, 1kHz | <0.15% |
| 100Hz-6kHz | <0.25% | |
| Stereo, 1kHz | <0.2% | |
| 100Hz-6kHz | <0.3% | |
| Signal/Noise ratio (at 65dBf, IHF weight); | Mono | >70dB |
| Stereo | >62dB | |
| Frequency response; | 30Hz-15kHz | +/-1dB |
| Stereo separation | @ 1kHz | >35dB |
| 30Hz-10kHz | >30dB |
CD Player Section
| Decoding | Delta Sigma |
| Digital filter | 8 times oversampled |
| Analog filter | 2 pole active |
| Frequency response; 20Hz-20kHz | +/-0.5dB |
| De-Emphasis error | +/-0.3dB |
| THD (at 0dB, 1kHz) | 0.009% | |
| Intermodulation distortion (19+20kHz) | <-100dB | |
| Dynamic range | 96dB | |
| Linearity | +/-0.5dB to 80dB | |
| Signal/Noise ratio A-Weight; | de-emphasis off | 96dB |
| de-emphasis on | 96dB | |
| Channel separation; | 1kHz | >80dB |
| 10kHz | >72dB | |
| Wow and flutter | Unmeasurable(Quartz Crystal Accuracy) | |
| Digital error correction | CIRC with doubleerror correction in C1&C2 | |
| Remote control unit | Yes |
Physical Specifications
Dimensions in mm (Width x Height x Dept) 435 x95 x 285
Net Weight 6.4kg
Shipping Weight 8.0kg
NAD ELECTRONICS
(NEW ACOUSTIC DIMENSION)
LONDON
- IMPORTANT SAFETY INSTRUCTIONS
- DO NOT ATTEMPT SERVICING OF THIS UNIT YOURSELF. REFER SERVICING TO QUALIFIED SERVICE PERSONNEL.
- ATTENTION
- CAUTION
- POWER LINES
- OUTDOOR ANTENNA GROUNDING
- INSTRUCTION MANUAL NAD L 40
- CD RECEIVER.
- NOTES ON INSTALLATION
- REAR PANEL CONNECTIONS
- SPEAKERS
- SPADE CONNECTORS
- BARE WIRES AND PIN CONNECTORS
- TAPE IN, OUT
- AUX INPUT
- PRE OUT
- FM ANTENNA
- NAD-LINK IN, OUT
- AC POWER CORD
- FRONT PANEL CONTROL
- POWER
- REMOTE CONTROL:
- STAND-BY button (green):
- NOTE:
- PHONES
- DISC DRAWER
- DISPLAY (LCD)
- IN CD MODE:
- IN TUNER MODE:
- GENERAL:
- STOP/OPEN
- REMOTE:
- PLAY/PAUSE
- SKIP/PRESET
- SKIP BACK
- SKIP FORWARD ▶▶▶
- PRESET
- INPUT SELECTOR
- REPEAT
- STORE
- RANDOM
- TO NAME AND STORE A PRESET
- TO NAME AN ALREADY USED PRESET
- CANCEL
- TONE DEFEAT
- DISPLAY
- BASS EQ
- MONO
- SEARCH/TUNE
- SEARCH BACK ◀◀
- SEARCH FORWARD ▶▶
- To manually tune in to a radio station:
- BASS & TREBLE CONTROLS
- BALANCE
- VOLUME
- REMOTE CONTROL HANDSET INSTALLING AND REPLACING BATTERIES
- VOLUME UP and DOWN buttons:
- MUTE button:
- STOP button:
- CD, TUNER, AUX and TAPE buttons:
- MAINTENANCE
- HANDLING COMPACT DISCS
- CLEANING DISCS
- ABOUT THE LASER
- MANUEL D'EXPLOITATION POUR RECEPTEUR CD NAD L 40.
- "Lecture/Pause" [PLAY/PAUSE]
- Stopp/Öffnen (STOP/OPEN)
- Taste "STAND-BY" (grün):
- "REPEAT 1" (repetir 1)
- "TOTAL REMAIN" (total restante)
- "NAD LINK IN/OUT"
- "PHONES" (CUFFIA)
- STOP/OPEN (ARRESTO/APERTURA)
- REPEAT (repetering)
- NAD-LINK IN, OUT (ENTRADA/SAÍDA NAD-LINK)
- STOP/OPEN (PARAGEM/ABRIR)
- Physical Specifications
- NAD ELECTRONICS
Brand : NAD
Model : L40
Category : Audio Amplifier