
HTR2 - Remote control NAD - Free user manual and instructions
Find the device manual for free HTR2 NAD in PDF.
| Product Type | Programmable Universal Remote Control |
| Number of controllable devices | Up to 8 devices |
| Number of keys | 44 function keys + 8 device selection keys |
| Learning capacity | Up to 352 commands |
| Macros | Up to 44 macros, each capable of up to 64 commands |
| Key backlight | Programmable timeout from 0 to 9 seconds |
| Preprogrammed library | NAD codes for amplifiers, receivers, DVD, CD, tuner, tape deck |
| Power supply | 4 AAA batteries (not included) |
| Infrared range | Approximately 10 meters (estimated) |
| Maintenance | Clean with a soft, dry cloth. Do not use abrasive products. |
| Safety | Do not expose to moisture, extreme temperatures, or direct sunlight. |
| Repairability | Contains no user-serviceable parts. In case of malfunction, contact an authorized service center. |
Frequently Asked Questions - HTR2 NAD
User questions about HTR2 NAD
0 question about this device. Answer the ones you know or ask your own.
Ask a new question about this device
Download the instructions for your Remote control in PDF format for free! Find your manual HTR2 - NAD and take your electronic device back in hand. On this page are published all the documents necessary for the use of your device. HTR2 by NAD.
USER MANUAL HTR2 NAD
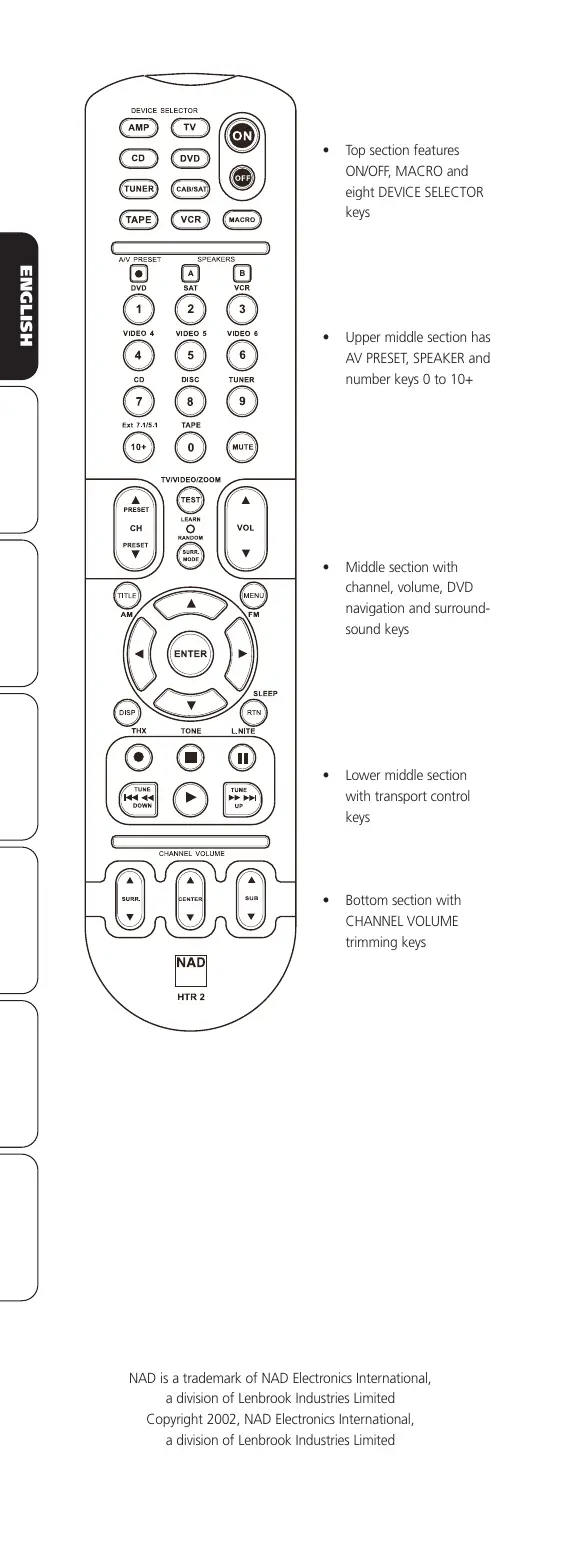
- Top section features ON/OFF, MACRO and eight DEVICE SELECTOR keys
• Upper middle section has AV PRESET, SPEAKER and number keys 0 to 10+ - Middle section with channel, volume, DVD navigation and surround-sound keys
- Lower middle section with transport control keys
• Bottom section with CHANNEL VOLUME trimming keys
OVERVIEW OF THE HTR 2
• Controls up to 8 devices.
• 44 function keys.
- Learns up to 352 commands.
- Records up to 44 macros with a maximum of 64 commands each.
- Configurable punch-through function.
• Key illumination with programmable time-out.
- Contains pre-programmed library of NAD remote codes.
The NAD HTR 2 is ready to operate NAD components right out of the box, but it is really eight remotes in one. Each of the 8 Device Selector keys at the top of the handset can call up a new "page" of remote-control codes to be transmitted by the remaining 44 keys. The HTR 2 can "learn" codes from virtually any infrared-remote-controlled component, regardless of brand, to any or all of these Device Selector keys. When setting up the HTR 2 to operate your entire Home Theatre system, the most logical approach is to teach the codes from your DVD player to the [DVD] Device Selector key, your television's codes to the [TV] key, and so on. But there is no required scheme: You may load any commands to any key on any page (see "Learning Codes From Other Remotes," below).
The HTR 2 is already preprogrammed with a full complement of NAD commands on its [AMP] Device Selector page, and with library commands to operate most NAD DVD, CD, TUNER, or TAPE components on the corresponding Device Selector keys. These default commands are permanent: Even if you teach the HTR 2 new commands to take their place, the underlying library commands remain in place and can easily be recalled should you add an NAD component to your system later (see "Delete Mode," below).
GETTING FAMILIAR WITH THE HTR 2
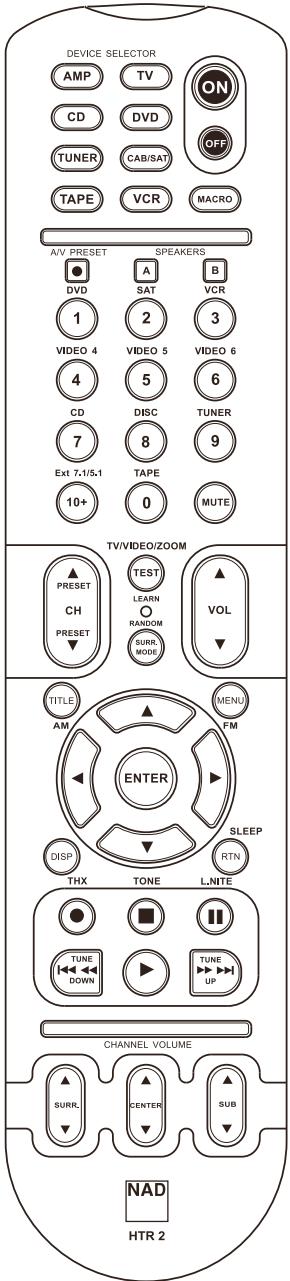
The HTR 2 is divided into two main sections. The Device Selector section at the top of the handset, and the remaining 44 Control keys.
Eight Device Selector keys at the top-[AMP], [DVD,] [TV,] and so on - determine which component the remaining 44 control keys will operate. A DEVICE SELECTOR key determines only what component the HTR 2 will command; it does not perform any function on the receiver. The Device Selector keys are organized into two vertical rows of 4 buttons each; the row on the left are all Audio devices, the row on the right are all Video devices.
The control keys are function keys that can "learn" control codes from virtually any infrared remote controller, allowing you to teach the codes of your equipment, regardless of brand, to the HTR 2. All of the Control keys on the [AMP] Device Selector are preprogrammed to control NAD amps, preamps, and receivers. (The HTR 2 can also command many other NAD components, from its [DVD,] [CD,] [TUNER,] and [TAPE] pages.)
Since HTR 2 Control keys can perform different functions, depending on the selected Device Selector key, the HTR 2 uses color coding to indicate the function of the Control keys when different Device keys are chosen. Thus, the color of the Device Selector key-labeling corresponds to the labelling of the function keys (similar to a scientific calculator). For example, the red-orange [AMP] Device Selector key label corresponds to the red-orange input-select labelling adjacent to the numeric keys: When the HTR 2's [AMP] Device Selector page is active, these keys select the amp or receiver inputs. Similarly, the purple [DVD] Device Selector key label corresponds to several purple labels, the green [TV] Device key to green labels, and so on.
LEARNING CODES FROM OTHER REMOTES
Begin by positioning the HTR 2 “nose-to-nose” with the source remote so the two devices’ infrared windows are about 2 inches apart.
- Enter Learning Mode: On the HTR 2, simultaneously press-and-hold for 3 seconds both a Device Selector key and the [•] "record" key (just below the [DISP] key), until the Learn LED at the center of the HTR 2 turns steady green.
- Press the HTR 2's Control key you wish to teach a command; the Learn LED will turn amber.
- Press-and-hold the control function key on the source remote: The HTR 2's Learn LED will flicker amber for a second or two, then turn solid green. The command is learned. Repeat this process for all commands you wish to learn under the selected Device Selector key.
- Press the HTR 2's Device Selector key again to exit the learning mode after you have completed learning all commands for that Device.
NOTE
If the Learn LED does not flicker amber you may need to vary the distance between the remotes or try fresh batteries in both remotes. If the Learn LED turns red rather than green, that particular command of that source remote command has not been learned. Try again. In rare instances there may be some IR format that is not compatible with the HTR 2.
CANCEL OPERATION
You can cancel configuring a key, by pressing the active Device Selector key before the learn is complete; the Learn LED will turn red.
Example: Learning "DVD Pause":
- Position the HTR 2 and your DVD player's remote as described above.
- On the HTR 2, simultaneously press-and-hold [DVD] and [●]; the Learn LED turns steady green.
- Press the HTR 2's [ II ] (pause) key; the Learn LED turns amber.
- Press-and-hold the DVD player's remote's pause key; the HTR 2's Learn LED flickers amber and then turns solid green. The command is learned.
- Press [DVD] again to exit the learning mode.
LIBRARY MODE
To enter the library mode, press and hold a device selector key and the Preset key for 3 seconds until the status LED turns green. While in Library mode you can cycle through and test the different pre-programmed tables in the remote to find if there is an appropriate table for your device. The several ways of navigating the Library tables are described below. The Learn LED will flash twice when all available tables have been transmitted.
DIGIT KEYS
The digit keys (0 - 9) can be used to directly select one of the tables. Enter the 3 digit table number. After pressing the third digit the HTR 2 will automatically transmit the Power Off command as a test to be sure you have selected the correct table.
CURSOR UP / CURSOR DOWN
The Cursor Up / Cursor Down keys can be used to cycle through the available tables. The HTR 2 will transmit a test (Power Off) command after each press of the Cursor key. Holding down one of the Cursor keys will cycle through all the available library tables at the rate of two per second, allowing you to quickly find the correct table from the available tables.
NOTE
You can change the command transmitted for the test. If you press a key that is not used for anything else in library mode, that command will be transmitted. Any subsequent test commands resulting from changing tables will then use that command which you last pressed. This can be helpful with some devices that do not have a standby mode, in which case the code searches do not work. For example some CD players may not have a power off command, and you may want to use Play as your test command instead.
ENTER
Press the enter key when in the Library Mode will make the currently selected table become active and will exit the Library Mode.
NOTE
Making a table active will deactivate any currently learned commands and active Punch-through functions. Deactivated learned commands can be restored again (without having to relearn them) as described in the Copy Mode section of this manual.
DISPLAY
The Display key can be used to determine the reference number for the table you have currently selected. After pressing the Display key, the table number will be displayed by flashing the Tape, VCR, and Macro keys, corresponding to the first, second, and third digits of the command table. For example: if the table number is 103, then the TAPE key would flash once, followed by the Macro key flashing three times.
PUNCH-THROUGH
The HTR 2's "punch-through" function allows you to retain a function key from one Device Select "page" on another, so that, for example, the AMP [SURR MODE] function might still control the T 752 when the DVD Device Selector page is active
NOTE
The HTR 2's [VOL] and [MUTE] keys are pre-programmed as "punched-through" for all Device Select pages (except TV): [VOL] and [MUTE] will operate the NAD's master-volume regardless of the currently selected device. The [SURR.] [CENTER,] and [SUB] Channel Volume controls similarly are pre-programmed as punched-through for all devices.
To set a punch through, after entering the Learning Mode, and pressing the desired key to be punched-through, simply press the device key twice of the device to punch through to. The status LED will turn green; press the Device Selector key again to exit Learning Mode.
Example: Punch-through to the DVD "page" from the AMP [SURR MODE] key:
- On the HTR 2, simultaneously press-and-hold [DVD] and [•] (record); the Learn LED turns steady green.
- Press [SURR MODE]; the Learn LED turns amber.
- Press [AMP] twice; the Learn LED turns green.
- Press [DVD] again to exit the learning mode.
COPY A COMMAND FROM ANOTHER KEY
You may copy a command from any HTR 2 key to any other. To copy a Control key function, after entering the Learning Mode, and pressing the desired key to be copied to, simply press the device key from which you wish to copy, having first pressed its Device Selector key if it resides under another Device key. The status LED will turn green; press the Device Selector key again to exit Learning Mode.
Example: Copy the pause command from the CD key to the AMP [ II ] key:
- On the HTR 2, simultaneously press-and-hold [AMP] and [•] (record); the Learn LED turns steady green.
- Press [ II ] (pause); the Learn LED turns amber.
- Press [CD]; press [ II ] (pause); the Learn LED turns green.
- Press [AMP] again to exit the learning mode.
NOTE
The copy and punch-through functions are similar. However, if you copy a command and then subsequently delete, or over-write the original (source-key) command, the copied-to key's command remains unchanged. If you punch-through to a command and then delete or over-write the original key, the punched-through functions also change accordingly.
If the source function, and destination function are the same, the HTR-2 will restore a previously deleted learned command if one exists. So, if you accidentally deleted a learned command or loaded a library table over learned commands, this is a quick way to restore them without having to relearn them.
MACRO COMMANDS
A “macro” command is a series of two or more (up to 64) remote codes issued automatically from a simple two key-press procedure. You might use a macro to automate a simple command sequence, such as, “Turn on the DVD player and then press ‘play.’ Or you might compile an elaborate macro to power up an entire system, select a source, choose a Listening Mode, and begin playback-again, all from a single key-press. The HTR 2 can store one macro on each of its function keys (these exclude the Device Selector keys).
NOTE
Macros are independent of the currently selected device.
RECORDING MACROS
To record a macro, simultaneously press-and-hold for 3 seconds both the [MACRO] key and the HTR 2 function key to which you wish to assign the macro; the status LED turns green. The macro button will also light up. Now, press the sequence of Control function keys to be recorded into the macro, being sure to first press the requisite Device Selector key for each function (you may switch devices while recording the macro as many times as necessary). This allows you to create a macro containing commands from more than one Device. When you have finished entering the desired command sequence, press [MACRO] again to store the macro; the Learn LED and [MACRO] key illumination will turn off.
NOTE
Each macro can store a maximum of 64 command steps. If you exceed this number, the macro will be stored automatically after the 64th command is added.
Example: Record a Macro to the [0] key to Turn on the NAD receiver, turn on the DVD player, select the DVD input, and commence playback:
- On the HTR 2, simultaneously press-and-hold [MACRO] and [0] (numeric zero); the Learn LED turns steady green.
- Press [AMP]; press [ON]; press [DVD]; press [ON]; press [AMP]; press [1] (red "DVD"); press [DVD]; press [play] (the Device Key blinks as each step is added).
- Press [MACRO] again to exit the macro-record mode.
To clear a macro, perform the above steps without entering any functions.
EXECUTING MACROS
To execute a macro, press and release [MACRO]; its key illumination lights for 5 seconds. While it remains lit, press an HTR 2 key to which a macro has previously been stored ([0] as in the case illustrated above). The corresponding macro will run; as each step executes, its "parent" Device Selector's key flashes lights briefly; when execution is finished, the [MACRO] key illumination goes out. Pressing any other HTR 2 key while a macro is executing will abort the macro. Remember that you must hold the HTR 2 so that its infrared emitter can activate the target components.
NOTE
When a macro executes, a 1 second delay is automatically inserted between its commands. If you need more than a 1 second delay between particular commands-for example, to permit a component to power up completely-you can record "empty" steps into the macro. For example, if the [TITLE] key is not used for your CD player, you could record that command into the macro to insert a delay.
KEY-ILLUMINATION TIME-OUT
The HTR 2's key-illumination can be set to remain lit for 0-9 seconds. The default value is 5 seconds.
To set the illumination time-out, simultaneously press-and-hold for 3 seconds both the HTR 2's [DISP] and the [0-9] key, with the digit corresponding to the desired time-out duration; the Learn LED will flash twice to confirm the new setting. When set to zero, the illumination will not turn on at all.
NOTE
Key illumination is the biggest drain on the HTR 2's batteries. A short key-illumination time-out will extend battery life appreciably; turning it off altogether (set it to 0 seconds) will lengthen it still further.
FACTORY RESET
The HTR 2 can be reset to its factory state, deleting all learned commands, copied and punched-through keys, macros, and other setup information, reverting all keys to their pre-programmed library commands. To perform a factory reset simultaneously press-and-hold for 10 seconds the HTR 2's [ON] and [RTN] keys; the Learn LED will start to flash green. Release [ON] and [RTN] before the second flash is complete; the Learn LED will turn red, indicate the remote has been reset.
NOTE
You must release [ON] and [RTN] before the second flash goes out, otherwise the unit will not reset; should this occur, repeat the full procedure.
DELETE MODE
The HTR 2 can store learned, copied, and "default library" commands on any single key. (The default library commands are the pre-programmed NAD codes, such as the native NAD receiver commands on the [AMP] "page.") You can delete commands by layers back "down" to the default library command on any key, removing learned commands, punched-through functions, and copied keys.
NOTE
The default library commands cannot be deleted, so you need not worry that using Delete Mode might cause irreparable changes.
To enter Delete Mode, simultaneously press-and-hold for 3 seconds both the desired key's Device Selector key and the [RTN] key, until the Learn LED turns green. Press the function key whose command you wish to delete; the Learn LED flashes; the number of times indicates which type of function has become active-see the table below. Press the active Device Selector key again to exit Delete Mode.
| Flashes | Command Type |
| 1 | Default Library Command |
| 2 | Copied Library Command |
| 3 | Learned Command |
SUMMARY OF FUNCTIONS
| Function | Keys To Press (for 3 seconds) |
| Learn/Copy/Punch Through | Device Key + Record Key |
| Library Mode | Device Key + A/V Preset Key |
| Delete Mode | Device Key + Return Key |
| Macro Record | Macro Key + Function Key |
| Back Light Time-out | Display Key + Digit Key |
| Factory Reset | (see section on Factory Reset) |
HTR 2 TABLES
| Table | Description |
| 100 | Receiver with Discrete On/Off |
| 101 | Receiver with Toggle On/Off |
| 102 | S170 |
| 103 | L75 |
| 104 | 2nd Zone |
| 200 | CD Player |
| 201 | CD Player (old) |
| 300 | Tuner |
| 301 | L75 Tuner |
| 400 | Tape Deck B |
| 401 | Tape Deck A |
| 500 | TV 270 |
| 501 | MR13 |
| 502 | MR20 |
| 600 | T562 |
| 601 | T550, L55 |
| 602 | T531, T571 |
text_image
DEVICE SELECTOR AMP TV ON CD DVD OFF TUNER CAB/SAT TAPE VCR MACRO A/V PRESET SPEAKERS DVD A B 1 2 3 VIDEO 4 VIDEO 5 VIDEO 6 4 5 6 CD DISC TUNER 7 8 9 Ext 7.1/5.1 TAPE MUTE 10+ 0 TV/VIDEO/ZOOM PRESET TEST CH LEARN VOL PRESET RANDOM SURK MODE TITLE AM ENTER MENU F M SLEEP DISP RTN THX TONE L.NITE TUNE UP DOWN TUNE CHANNEL VOLUME SURRL CENTER SUB NAD HTR 2CURSOR UP / CURSOR DOWN (CURSOR ARRIBA / CURSOR ABAJO)
CURSOR UP / CURSOR DOWN
CURSOR UP / CURSOR DOWN (CURSOR PARA CIMA / CURSOR PARA BAIXO)
You must release [ON] and [RTN] before the second flash goes out, otherwise the unit will not reset; should this occur, repeat the full procedure.
RADERINGSLÄGE
www.NADelectronics.com