
116 - Audio Amplifier NAD - Free user manual and instructions
Find the device manual for free 116 NAD in PDF.


User questions about 116 NAD
0 question about this device. Answer the ones you know or ask your own.
Ask a new question about this device
Download the instructions for your Audio Amplifier in PDF format for free! Find your manual 116 - NAD and take your electronic device back in hand. On this page are published all the documents necessary for the use of your device. 116 by NAD.
USER MANUAL 116 NAD
text_image
NAD = 116GB • OWNER'S MANUAL
F • MANUEL D'INSTALLATION
D • BEDIENUNGSANLEITUNG
E • MANUAL DEL USUARIO
I • MANUALE DELLE ISTRUZIONI
P • MANUAL DO PROPRIETÁRIO
S • BRUKSANVISNING
IMPORTANT SAFETY INSTRUCTIONS

CAUTION
RISK OF ELECTRIC
SHOCK DO NOT OPE
ATTENTION:
RISQUE DE CHOC ELECTRIQUE
NE PAS OUVRIR

CAUTION: TO REDUCE THE RISK OF ELECTRIC SHOCK, DO NOT REMOVE COVER (OR BACK). NO USER SERVICEABLE PARTS INSIDE. REFER SERVICING TO QUALIFIED SERVICE PERSONNEL.
Warning: To reduce the risk of fire or electric shock, do not expose this unit to rain or moisture.
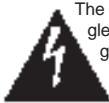
The lightning flash with an arrowhead symbol within an equilateral triangle, is intended to alert the user to the presence of uninsulated “dangerous voltage” within the product’s enclosure that may be of sufficient magnitude to constitute a risk of electric shock to persons.
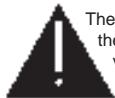
The exclamation point within an equilateral triangle is intended to alert the user to the presence of important operating and maintenance (servicing) instructions in the literature accompanying the product.

Do not place this unit on an unstable cart, stand or tripod, bracket or table. The unit may fall, causing serious injury to a child or adult and serious damage to the unit. Use only with a cart, stand, tripod, bracket or table recommended by the manufacturer or sold with the unit. Any mounting of the device on a wall or ceiling should follow the manufacturer's instructions and should use a mounting accessory recommended by the manufacturer.
An appliance and cart combination should be moved with care. Quick stops, excessive force and uneven surfaces may cause the appliance and cart combination to overturn.
Read and follow all the safety and operating instructions before connecting or using this unit. Retain this notice and the owner's manual for future reference.
All warnings on the unit and in it's operating instructions should be adhered to.
Do not use this unit near water; for example, near a bath tub, washbowl, kitchen sink, laundry tub, in a wet basement or near a swimming pool.
The unit should be installed so that its location or position does not interfere with its proper ventilation. For example, it should not be situated on a bed, sofa, rug or similar surface that may block the ventilation openings; or placed in a built-in installation, such as a bookcase or cabinet, that may impede the flow of air through its ventilation openings.
The unit should be situated from heat sources such as radiators, heat registers, stoves or other devices (including amplifiers) that produce heat.
The unit should be connected to a power supply outlet only of the voltage and frequency marked on its rear panel.
The power supply cord should be routed so that it is not likely to be walked on or pinched, especially near the plug, convenience receptacles, or where the cord exits from the unit.
Unplug the unit from the wall outlet before cleaning. Never use benzine, thinner or other solvents for cleaning. Use only a soft damp cloth.
The power supply cord of the unit should be unplugged from the wall outlet when it is to be unused for a long period of time.
Care should be taken so that objects do not fall, and liquids are not spilled into the enclosure through any openings.
This unit should be serviced by qualified service personnel when:
A. The power cord or the plug has been damaged; or
B. Objects have fallen, or liquid has been spilled into the unit; or
C. The unit has been exposed to rain or liquids of any kind; or
D. The unit does not appear to operate normally or exhibits a marked change in performance; or
E. The device has been dropped or the enclosure damaged.
DO NOT ATTEMPT SERVICING OF THIS UNIT YOURSELF. REFER SERVICING TO QUALIFIED SERVICE PERSONNEL.
Upon completion of any servicing or repairs, request the service shop's assurance that only Factory Authorized Replacement Parts with the same characteristics as the original parts have been used, and that the routine safety checks have been performed to guarantee that the equipment is in safe operating condition.
REPLACEMENT WITH UNAUTHORIZED PARTS MAY RESULT IN FIRE, ELECTRIC SHOCK OR OTHER HAZARDS.
ATTENTION
POUR ÉVITER LES CHOC ELECTRIQUES, INTRODUIRE LA LAME LA PLUS LARGE DE LA FICHE DANS LA BORNE CORRESPONDANTE DE LA PRISE ET POUSSER JUSQU'AU FOND.
CAUTION
TO PREVENT ELECTRIC SHOCK MATCH WIDE BLADE OF PLUG TO WIDE SLOT FULLy INSERT.
If an indoor antenna is used (either built into the set or installed separately), never allow any part of the antenna to touch the metal parts of other electrical appliances such as a lamp, TV set etc.
CAUTION
POWER LINES
Any outdoor antenna must be located away from all power lines.
OUTDOOR ANTENNA GROUNDING
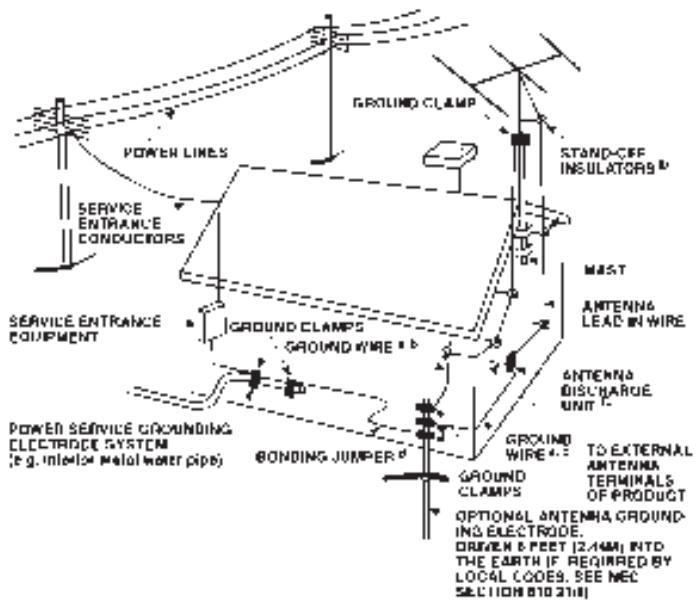
If an outside antenna is connected to your tuner or tuner-preamplifier, be sure the antenna system is grounded so as to provide some protection against voltage surges and built-up static charges. Section 810 of the National Electrical Code, ANSI/NFPA No. 70-1984, provides information with respect to proper grounding of the mast and supporting structure, grounding of the lead-in wire to an antenna discharge unit, size of grounding conductors, location of antenna discharge unit, connection to grounding electrodes and requirements for the grounding electrode.
a. Use No. 10 AWG (5.3mm2) copper, No. 8 AWG (8.4mm2) aluminium, No. 17 AWG (1.0mm2) copper-clad steel or bronze wire, or larger, as a ground wire.
b. Secure antenna lead-in and ground wires to house with stand-off insulators spaced from 4-6 feet (1.22 - 1.83 m) apart.
c. Mount antenna discharge unit as close as possible to where lead-in enters house.
d. Use jumper wire not smaller than No.6 AWG (13.3mm2) copper, or the equivalent, when a separate antenna-grounding electrode is used. see NEC Section 810-21 (j).
EXAMPLE OF ANTENNA GROUNDING AS PER NATIONAL ELECTRICAL CODE INSTRUCTIONS CONTAINED IN ARTICLE 810 - RADIO AND TELEVISION EQUIPMENT.
text_image
POWER LINES SERVICE ENTRANCE CONDUCTORS SERVICE ENTRANCE EQUIPMENT GROUND CLAMPS GROUND WIRE BONDING JUMPER GROUND CLAMPS GROUND WIRE STAND-CFF INSULATORS MAST ANTENNA LEAD IN WIRE ANTENNA DISCHARGE UNIT POWER SERVICE GROUNDING ELECTRODE SYSTEM (e.g. interior metal water pipe) OPTIONAL ANTENHA GROUNDING ELECTRODE. DRAWN 5 FEET (2.4mm) INTO THE EARTH IF REQUIRED BY LOCAL CODES. SEE NEC SECTION 810-3710)NOTE TO CATV SYSTEM INSTALLER: This reminder is provided to call the CATV system installer's attention to Article 820-22 of the
National Electrical Code that provides guidelines for proper grounding and, in particular, specifies that the ground cable ground shall be connected to the grounding system of the building, as close to the point of cable entry as practical.
REAR PANEL CONNECTIONS
text_image
1 2 3 4 5 6 7 8 9 10 11 12 13 14©1996. 116. NAD ELECTRONICS LTD.
FRONT PANEL CONTROLS
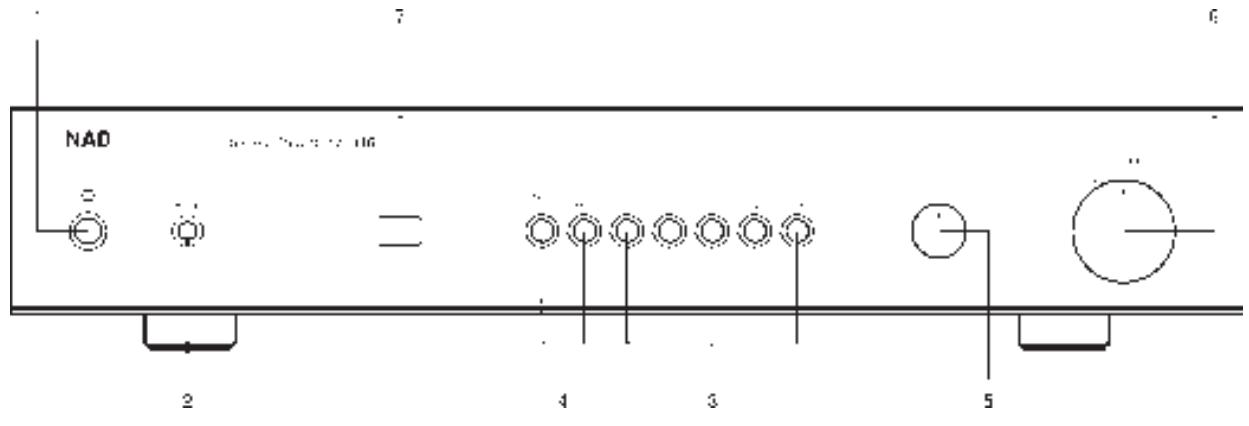
text_image
NAD 2 4 3 5REMOTE CONTROL
NL
Batterij niet
weggooien, maar
inleveren als KCA

QUICK START.
- Connect the RCA or XLR outputs to a power amplifier.
- Plug in the AC power cord.
- Press the POWER button to turn the NAD 116 on.
- Press the required input selector.
NOTES ON INSTALLATION.
Your NAD 116 should be placed on a firm, level surface. Avoid placing the unit in direct sunlight or near sources of heat and damp.
Allow adequate ventilation. Do not place the unit on a soft surface like a carpet. Do not place it in an enclosed position such as a bookcase or cabinet that may impede the air-flow through the ventilation slots.
Switch the unit off before making any connections. Some RCA connectors on your NAD 116 rear panel are colour coded i.e. yellow for NAD-Link.
The NAD 116 comes with RCA leads for basic connections. Where additional leads are required, use high quality leads and connectors for optimum performance and reliability. Ensure that leads and connectors are not damaged in any way and all connectors are firmly pushed home.
For best performance, connect your power amplifier to the speakers with good quality speaker leads of 16 gauge thickness or more.
If the unit is not going to be used for some time, disconnect the plug from the AC socket.
Should water get into your NAD 116, shut off the power to the unit and remove the plug from the AC socket. Have the unit inspected by a qualified service technician before attempting to use it again.
Do not remove the cover, there are no user-serviceable parts inside.
Use a dry soft cloth to clean the unit. If necessary, lightly dampened the cloth with soapy water. Do not use solutions containing benzol or other volatile agents.
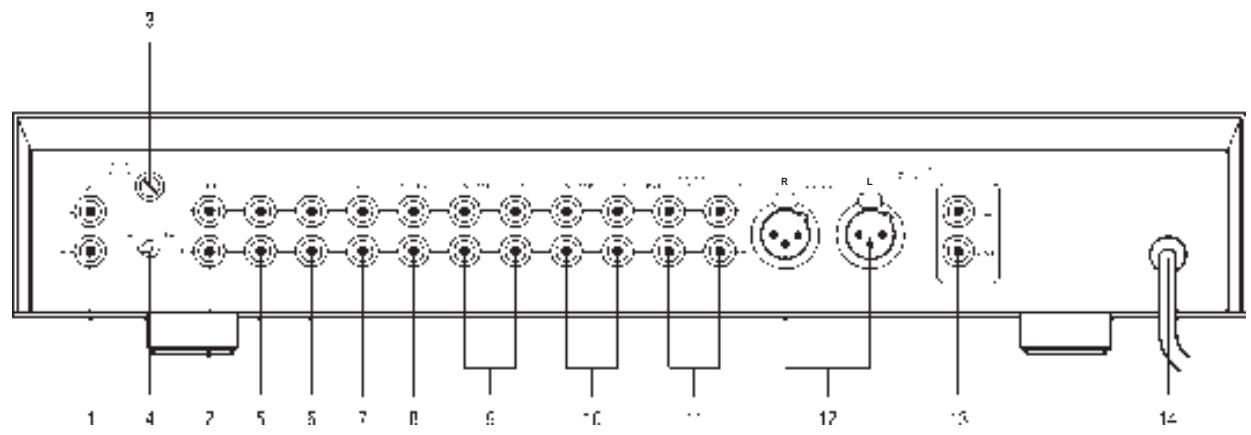
REAR PANEL CONNECTIONS.
1. MC INPUT
Input for a Moving Coil phono cartridge. Connect the twin RCA lead from your turntable to this input if you are using a Moving Coil cartridge.
2. MM INPUT
Input for a Moving Magnet phono cartridge. Connect the twin RCA lead from your turntable to this input if you are using a Moving Magnet cartridge.
3. PHONO (GROUND) CONNECTOR
The twin RCA lead from your turntable should also include a single wire earth lead. Connect this to the NAD 116 phono (ground) connector.
4. MC-MM SWITCH
Use this switch to select the phono input you are using.
5. CD INPUT
Input for a CD or other line-level signal source. Use a twin RCA-to-RCA lead to connect the CD player left and right 'Audio Outputs' to this input. The NAD 116 only accepts analogue signals from your CD player.
6. VIDEO INPUT
Input for the audio signal from a stereo VCR (or stereo TV/Satellite/Cable receiver) or other line-level audio source. Using twin RCA-to-RCA leads, connect to the left and right 'Audio Out' of the unit to these inputs. Note: These are audio inputs only.
7. AUX INPUT
Input for additional line level input signals such as another CD player. Use a twin RCA-to-RCA lead to connect the auxiliary unit's left and right 'Audio Outputs' to this input.
8. TUNER INPUT
Input for a Tuner or other line-level signal source. Use a twin RCA-to-RCA lead to connect the Tuner left and right 'Audio Outputs' to this input.
9. TAPE 1 IN, OUT
Connections for analogue recording and playback to an audio tape recorder of any type. Using twin RCA-to-RCA leads, connect to the left and right 'Audio Output' of the tape machine to the TAPE 1 IN connectors for playback and tape monitoring. Connect the left and right 'Audio Input' of the tape machine to the TAPE 1 OUT connectors for recording.
10. TAPE 2 IN, OUT
Connections for analogue recording and playback to a secondary audio tape recorder of any type. Using twin RCA-to-RCA leads, connect to the left and right 'Audio Output' of the tape machine to the TAPE 2 IN connectors for playback. Connect the left and right 'Audio Input' of the tape machine to the TAPE 2 OUT connectors for recording.
11. PRE 1, 2 OUT
Connections to an external power amplifier or processor, such as a surround-sound decoder. Use a twin RCA-to-RCA lead to connect to the left and right 'Audio Input' of the Power amp or processor to the Pre Out connectors.
The Pre-Out output signal is controlled by the NAD 116's volume and balance control settings
These sockets provide connections to amplifiers and processors requiring an unbalanced RCA connections.
12. BALANCED OUTPUTS
Connections to an external power amplifier or processor that uses balanced XLR connectors.
These actively driven XLR outputs are suitable to drive most balanced hi-fi and professional amplifiers.
The wiring standard used for these connectors is:
Pin 1 Chassis Earth (Ground)
Pin 2 Hot (Live)
Pin 3 Signal Ground (Return)
13. NAD-LINK IN, OUT
The NAD-Link connector is used to pass commands from the remote control to and from other units fitted with NAD-Link connectors. This allows centralised control of a complete system or gives system control from more than one room. To function with other units, connect the NAD 116's NAD-Link OUT to the NAD-Link IN on the other unit. NAD-Link connectors can be daisy-chained, IN to OUT, so that a whole system can be controlled from the remote control facilities of one unit.
A single NAD-Link connection from a hi-fi system in a second room will allow remote control of Multi Room systems.
14. AC POWER CORD
After you complete all connections to the preamplifier, plug the AC line cord into a "live" AC socket.
FRONT PANEL CONTROLS.
POWER AND HEADPHONE FUNCTIONS.
1. POWER
Pressing the POWER switch turns the unit On and after a few seconds the Power indicator LED will illuminate green. Pressing the POWER switch again will turn the amplifier Off.
When the NAD 116 is switched On, pressing the Standby button on the remote handset will put the NAD 116 into Standby mode and the Power indicator will turn amber. The amber Standby indicator shows that power is being supplied to the NAD 116, but the system is currently in the Standby Mode.
CAUTION: When in Standby, power is still supplied to your NAD 116. You should switch it off using the front panel Power switch when it is not being used for long periods of time.
2. HEADPHONE SOCKET
A 1/4" stereo jack socket is supplied for headphone listening and will work with conventional headphones of any impedance. Inserting a headphone jack into this socket automatically switches off the loudspeakers. The volume and tone and balance controls are operative for headphone listening. Use a suitable adapter to connect headphones with other types of connectors, such as 3.5mm stereo 'personal stereo' jack plugs.
WARNING: Make certain that the volume control is turned to minimum (fully anti-clockwise) before connecting headphones.
Listening at high levels can damage your hearing.
INPUT SELECTORS.
3. INPUT SELECTORS
These buttons select the active input to the NAD 116 and the signal sent to the amplifier, the Tape outputs and the PRE OUT sockets.
LED's inside each button will indicate which input is currently selected.
TUNER: Selects the tuner (or other line-level source) connected to the Tuner sockets as the active input.
AUX: Selects a line-level source connected to the AUX sockets as the active input.
VIDEO: Selects the VCR (or stereo TV/Satellite/Cable receiver) connected to the VCR sockets as the active input.
CD: Selects the CD (or other line-level source) connected to the CD sockets, as the active input.
PHONO: Selects the turntable Phono cartridge connected to either the MM or MC sockets as the active input.
TAPE FUNCTIONS.
4. TAPE 1
Selects the output from a tape recorder when playing back tapes or monitoring recordings being made through the Tape 1 sockets. Press the Tape 1 button once to select it and again to return to the normal input selection.
Tape 1 is a tape Monitor function which does not override the current input selection. For example, if the CD is the active input when TAPE 1 is selected, then the CD signal will continue to be selected and sent to both the TAPE 1, and TAPE 2 OUTPUT sockets, but it is the sound from recorder connected to Tape 1 that will be heard on the loudspeakers.
To show which Input is active in when in Tape Monitor mode, its indicator light will stay lit.
TAPE 2: Selects Tape 2 as the active input.
TO MAKE A RECORDING
When any source is selected, its signal is also fed directly to any tape machine connected to the TAPE 1 or TAPE 2 OUTPUTS for recording.
TAPE TO TAPE COPYING
You can copy between two tape machines connected to your NAD 116. Put the source tape in the recorder connected to Tape 2 and the blank tape into the recorder connected to Tape 1. By selecting TAPE 2 Input you can now record from Tape 2 to Tape 1 and monitor the signal coming from the original tape.
Also you can use Tape 1 as the source and copy to Tape 2 but Tape 1 monitor input has to be selected for the duration of the recording.
CAUTION: WHEN TAPE 2 IS SELECTED, ONLY ONE TAPE MACHINE SHOULD BE SET IN
GB
RECORD MODE. IF BOTH ARE SET IN RECORD MODE, WITH TAPE 2 SELECTED, A FEEDBACK LOOP RESULTS WHICH MAY CAUSE A LOUD "WHISTLE OR HOWL", POTENTIALLY DAMAGING YOUR AMPLIFIER OR LOUDSPEAKERS.
BALANCE AND VOLUME.
5. BALANCE
The BALANCE control adjusts the relative levels of the left and right outputs. The 12 o'clock position provides equal level to the left and right channels. A detent indicates this position.
Rotating the control clockwise moves the balance towards the right. Rotating the control anti-clockwise moves the balance to the left. The BALANCE control does not affect recordings made using the Tape outputs.
6. VOLUME
The VOLUME control adjusts the overall loudness of the signals being fed to the loudspeakers. It is motor driven and can be adjusted from the remote control handset. The VOLUME control does not affect recordings made using the Tape outputs.
REMOTE SENSOR.
7. SENSOR
Sensor for receiving the infra-red signals from your remote handset. An LED in the Power On/Off button will light when a signal is being received from the remote handset.
REMOTE CONTROL.
The Remote Control handset handles all the key functions of the NAD 116 and has additional controls to remotely operate NAD Tuners, Cassette and CD machines. It will operate up to a distance of 16ft (5m).
Alkaline batteries are recommended for maximum operating life. Two AA (R6) batteries should be fitted in the battery compartment at the rear of the Remote Control. When replacing batteries, check that they have been put in the right way round, as indicated on the base of the battery compartment.
Please refer to previous sections of the manual for a full description of individual functions.
Note: The remote control handset supplied is the NAD universal remote and can be used on any remote controllable NAD system. Not every function on it may be available on your particular unit.
STANDBY Switches the NAD 116 between On and Standby modes. (Caution: Switch the NAD 116 off using the front panel Power switch when it is not being used for long periods of time.)
MUTE Press the MUTE Button to temporarily switch off the sound to the speakers and headphones. Mute mode is indicated by the volume control LED flashing. Press MUTE again to restore sound.
LD Inoperative for the NAD 116.
VCR1 Selects VIDEO as the active input.
AUX Selects the Aux as the active input.
PHONO Selects the Phono as the active input.
CD Selects CD as the active input.
TUNER AM Selects Tuner input on the NAD 116 and the AM waveband on a separate NAD Tuner.
TUNER FM Selects the Tuner input of the NAD 116 and the FM waveband on a separate NAD Tuner.
TAPE 2 Selects Tape 2 as the active input.
TAPE 1 Selects Tape 1 (Monitor) as the active input.
VOLUME ▲▼ Increases or decreases the Volume setting using the motorised front panel Volume control.
TUNER CONTROL (for use with NAD Tuner).
BANK. Selects a bank of preset stations.
PRESET ▲▼ Selects preset stations.
TUNE ▲▼ Operates the Manual Tune function.
SEARCH ▲▼ Starts the Tuner Search function.
CD PLAYER CONTROL (for use with NAD CD Player).
|| Pause
■ Stop
▶ Play
Skip back. Press once to return to start of track, press several times to skip back to previous tracks.
▶▶ Skip forward to next track(s).
DISC Go to next disc (for NAD CD changers).
CASSETTE DECK CONTROL (For use with single (A) or double transport (A and B) NAD Cassette Decks).
▶ Forward Play or Reverse Play.
- /| Record Pause. Press to put cassette deck into record-pause. Press Play to start recording.
■ Stops Play or Recording.
Rewind.
▶▶ Fast Forward.
TROUBLESHOOTING.
NO SOUND
Power AC lead unplugged or power not switched on.
Tape 1,2 Monitor selected.
Mute on.
Connector to power amp not fitted correctly.
Internal fuse blown.
Check AC lead.
De-select Monitor mode.
Switch off Mute.
Check connections.
Consult dealer.
NO SOUND ONE CHANNEL
Balance control not centered.
Connector to power amp not fitted correctly.
Input lead disconnected or damaged.
Center Balance control.
Check connections.
Check leads and connections.
PROBLEM ON PHONO INPUT ONLY
No signal
Hum on Phono input.
Weak or Distorted signal.
Check MM-MC switch set correctly
Check phono earth lead is connected
Check the turntable is connected to the correct
MM or MC phono input
WEAK BASS/ DIFFUSE STEREO IMAGE
Speakers connected to power amplifier wired out of phase.
Check connections to all speakers in the system.
REMOTE CONTROL NOT WORKING
Batteries flat, or incorrectly inserted.
IR transmitter or receiver windows obstructed.
Check or replace batteries.
Remove obstruction.
MISE EN ROUTE RAPIDE
7. [AUX INPUT [ENTREE AUX]
Broche 2 Chaud (Signal)
Broche 3 Masse (Retour Signal)
13. NAD-LINK OUT[SORTIE LIAISON-NAD]
GRAVES FAIBLES / IMAGE STEREO DIFFUSE
Retirer les obstructions.
SCHNELLANSCHLUSS
9. TAPE 1 IN, OUT (NASTRO 1 IN, OUT)
10. TAPE 2 IN, OUT (NASTRO 2 IN, OUT)
13. "NAD LINK IN/OUT"
9. TAPE 1 IN, OUT (ENTRADA/SAÍDA DE/PARA TAPE1)
10. TAPE 2 IN, OUT (ENTRADA/SAÍDA DE/PARA TAPE 2)
| Input impedance (R and C) | MM | 47 k + 200 pF |
| MC | 100 Ohms + 1000pF | |
| Input sensitivity | MM | 1.2mV ref.0.5V |
| 5mV ref. 2V | ||
| MC | 56μV ref. 0.5V out | |
| 240μVfor 2V out | ||
| Input overload at 20Hz/1kHz/20kHz | 20mV/200 mV/2000 mV | |
| MM | 1.2mV/12 mV/90mV | |
| MC | 78 dB ref. 0.5mV (cartidge connected) | |
| Signal/Noise ratio (A-weighted) | MM | 78 dB ref. 0.5mV (100 load) |
| MC | 82dB with shorted input | |
| THD (20Hz-20kHz) and IM dist. | <0.02% | |
| RIAA response accuracy | ±0.3dB | |
Line Level Inputs
| (CD,Video,Tuner,Tape 1, Tape 2, Aux) | ||
| Input impedance (R and C) | 20 k + 450 pF | |
| Input sensitivity | ref.0.5V | 80 mV |
| ref. 2V | 300mV | |
| Signal/Noise ratio, A-weighted | ref. 0.5V | 98dB |
| ref. 2V | 108dB | |
| Frequency response, 20Hz-20kHz | ±0.3dB | |
| Voltage gain | 16dB | |
| THD + SMPTE + IHF I.M. | <0.02% | |
Line Level Outputs
| Output impedance | Pre out | 220 |
| Tape | Source Z + 2k | |
| Headphones | 120 | |
| Maximum output level | Pre out | >12V |
| Tape | >10V | |
| Phones | >8V into 600 | |
| >250mV into 8 | ||
| Physical Specifications | ||
| Dimensions in mm (Width x Height x Depth) | 435 x 80 x 280 | |
| Net Weight | 4.2kg | |
| Shipping Weight | 5.5kg | |
NAD ELECTRONICS
(NEW ACOUSTIC DIMENSION)
LONDON