
BAR 289 - Weather Station OREGON SCIENTIFIC - Free user manual and instructions
Find the device manual for free BAR 289 OREGON SCIENTIFIC in PDF.


| Product type | Weather station |
| Brand | Oregon Scientific |
| Model | BAR 289 |
| Main unit dimensions | 120 x 100 x 30 mm |
| Main unit weight | 200 g (without batteries) |
| Main unit power supply | 2 AA (LR6) 1.5 V batteries |
| Outdoor sensor power supply | 2 AAA (LR03) 1.5 V batteries |
| Indoor temperature | Range: 0°C to 50°C, resolution 0.1°C |
| Outdoor temperature | Range: -20°C to 60°C, resolution 0.1°C |
| Indoor humidity | Range: 25% to 95%, resolution 1% |
| Outdoor humidity | Range: 25% to 95%, resolution 1% |
| Radio-controlled clock | Signal DCF-77 (Germany) or MSF (United Kingdom) |
| Weather forecast | Icons: sunny, partly cloudy, cloudy, rainy |
| Barometric trend | Trend indicator (rising, steady, falling) |
| Display | LCD with backlight |
| Outdoor sensor range | Up to 30 meters (without obstacles) |
| Number of supported sensors | Up to 3 sensors (one included) |
| Care and cleaning | Wipe with a soft dry cloth. Do not use solvents. |
| Safety | Do not immerse in water. For indoor use only. |
| Spare parts and repairability | Outdoor sensor available as optional. No user repair. |
Frequently Asked Questions - BAR 289 OREGON SCIENTIFIC
User questions about BAR 289 OREGON SCIENTIFIC
0 question about this device. Answer the ones you know or ask your own.
Ask a new question about this device
Download the instructions for your Weather Station in PDF format for free! Find your manual BAR 289 - OREGON SCIENTIFIC and take your electronic device back in hand. On this page are published all the documents necessary for the use of your device. BAR 289 by OREGON SCIENTIFIC.
USER MANUAL BAR 289 OREGON SCIENTIFIC
Jumbo Weather Station with Remote Control Model: BAR289
User Manual
CONTENTS
Contents ...... 1
Introduction 1
Product Overview 2
Front View.... 2
Back View 2
LCD Display 3
Remote Control (RE289) - Front View 3
Remote Control (RE289) - Back View 4
Remote Sensor (RTHR328N) - Front View ...... 4
Remote Sensor (RTHR328N) - Back View ..... 4
Remote Sensor (RTHR328N) - LCD Display ..... 4
Getting Started 5
Batteries 5
Remote Sensor (RTHR328N) 5
Sensor Set Up 5
Sensor Data Transmission 6
Select Sensor Channel 6
Search for Sensor 6
Clock and Calendar 6
Radio-Controlled Clock 6
Turn Radio-Controlled Clock ON / OFF 6
Set Clock 6
Switch Clock Display 7
Hourly Chime 7
Alarm 7
View Alarm Settings 7
Set Alarm 7
Activate Alarm 7
Silence Alarm 7
Weather Forecast 8
Weather Forecast Icons 8
Temperature 8
Maximum / Minimum Records 8
Select Measurement Unit 8
Backlight 8
Reset System 8
Remote Control (RE289) 8
Safety and Care 9
Warnings 9
Troubleshooting 9
Specifications 9
About Oregon Scientific 10
EC-Declaration of Conformity 10
INTRODUCTION
Thank you for selecting the Oregon Scientific™ Jumbo Weather Station with Remote Control (BAR289). This powerful device bundles time keeping, weather forecast, indoor and outdoor temperature, with remote control facility, into a single tool you can use from the convenience of your home.
In this box, you will find:
- Main unit (BAR289)
- Remote control (RE289)
- Remote sensor (RTHR328N)
- Main unit batteries, 4 x UM-3 (AA) 1.5V
- Remote control batteries, 2 x UM-4 (AAA) 1.5V
- Remote sensor batteries, 2 x UM-3 (AA) 1.5V
NOTE The THGR328N (5-Channel) and THR228N (3-Channel) remote sensors are also compatible with this weather station. If you purchase the THGR328N sensor, the humidity reading will not show on the BAR289. Additional sensors are sold separately. Please contact your local stockist for more information.
Keep this manual handy as you use your new product. It contains practical step-by-step instructions, as well as technical specifications and warnings you should know.
FRONT VIEW
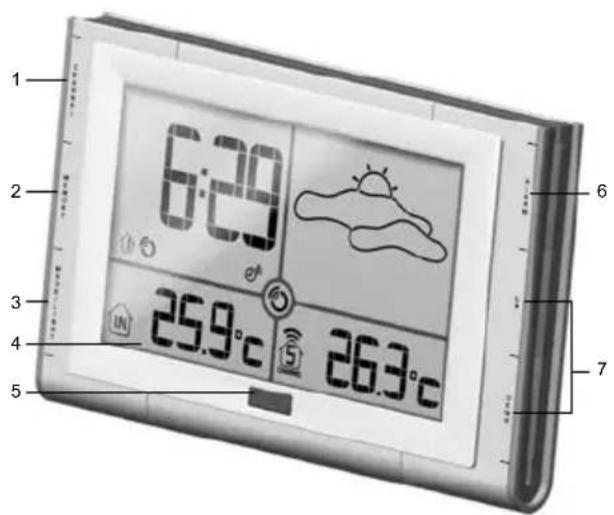
- CHANNEL: Switch remote sensor display
- MEMORY: View current, maximum and minimum temperature readings
- MODE / LIGHT: Change settings / display; activate backlight
- LCD display
- Infrared window
- ALARM: View alarm status; set alarm
- UP / DOWN: Increase / decrease setting; activate / deactivate radio-controlled clock
BACK VIEW
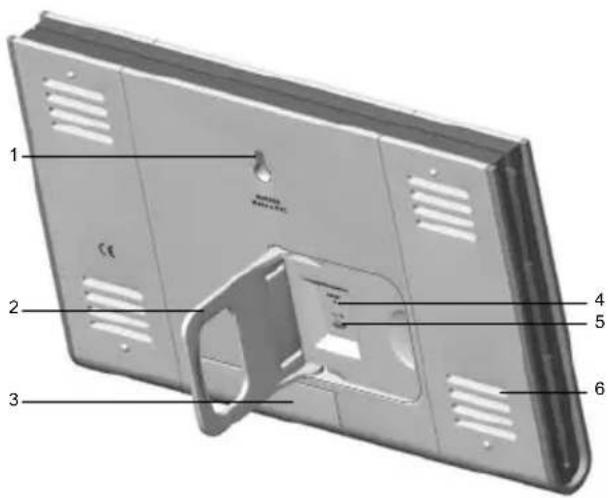
- Wall mount
- Table stand
- Battery compartment: Uses 4 x UM-3 (AA) 1.5V
- RESET hole
- °C / °F button
- Ventilation holes
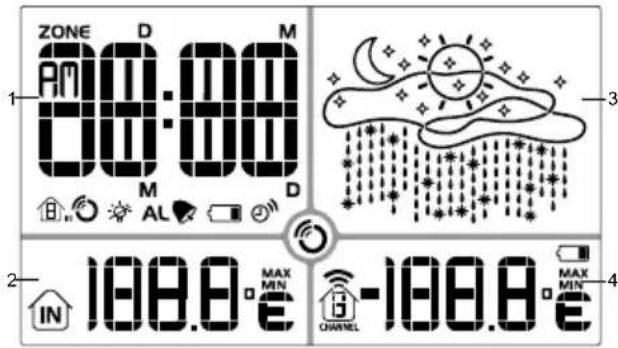
- Clock / Alarm / Calendar Area: Radio-controlled clock; alarm; calendar
- Indoor Temperature Area: Maximum, minimum, and current readings
- Weather Forecast Area: Animated weather forecast
- Outdoor Temperature Area: Maximum, minimum, and current readings; sensor channel number
Clock / Alarm / Calendar Area
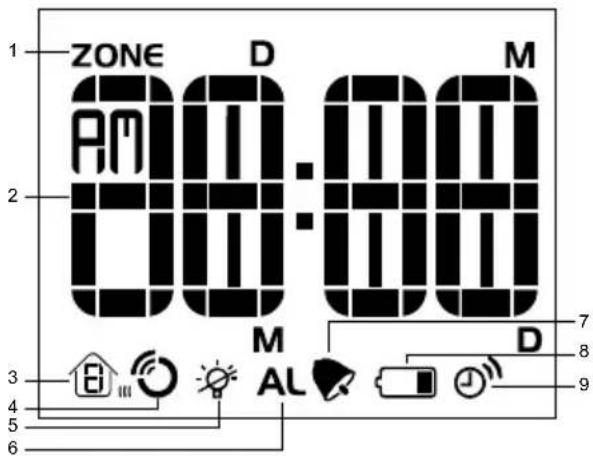
- Time Zone Hour Offset
- Time / date / calendar
- Channel number 1-5
- RF clock reception
- Backlight function is deactivated (under low battery condition)
- Alarm setting display
- Alarm is activated
- Low battery icon for main unit
- Hourly chime icon
Indoor Temperature Area
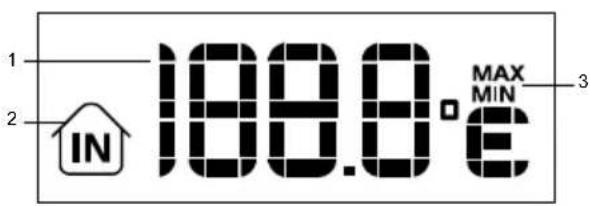
- Indoor temperature - °C / °F
- Indoor icon
- MAX / MIN temperature
Outdoor Temperature Area
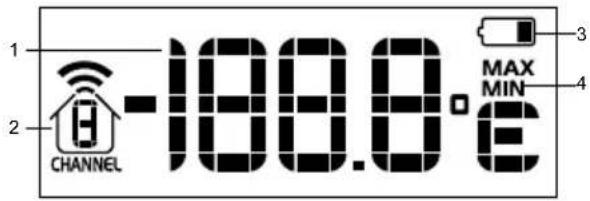
- Outdoor temperature - °C / °F
- Channel number (1-5) / reception status
- Low battery icon for remote sensor
- MAX / MIN temperature
REMOTE CONTROL (RE289) - FRONT VIEW
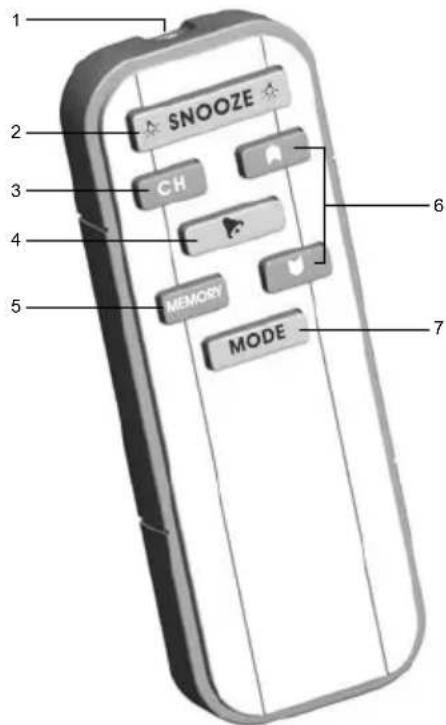
- Infrared signal transmitter
- ☐ SNOOZE ☐: Activates snooze and backlight on the main unit
- CHANNEL: Switch remote sensor display
- ▶: View alarm status; set alarm
- MEMORY: View current, maximum and minimum temperature readings
- ▲ / ▼: Increase / decrease setting; activate / deactivate radio-controlled clock
- MODE: Change settings / display
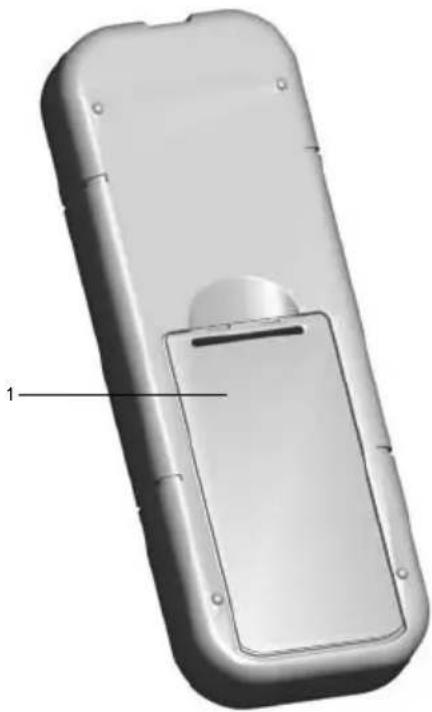
natural_image
3D model of a mobile phone casing with a labeled component (no text or symbols on the device itself)- Battery compartment: Uses 2 x UM-4 (AAA) 1.5V
REMOTE SENSOR (RTHR328N) - FRONT VIEW
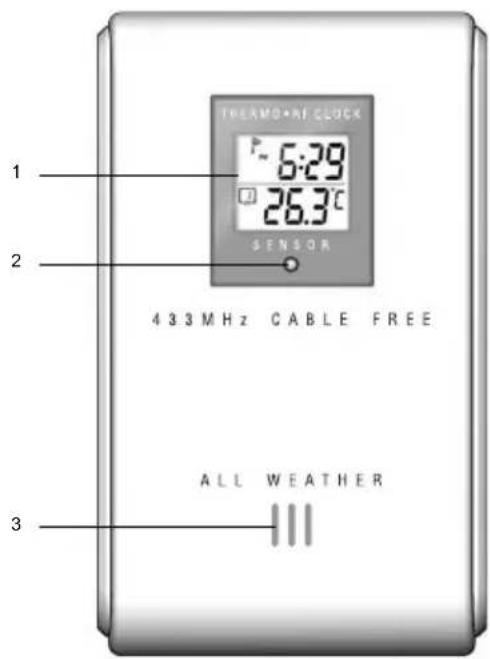
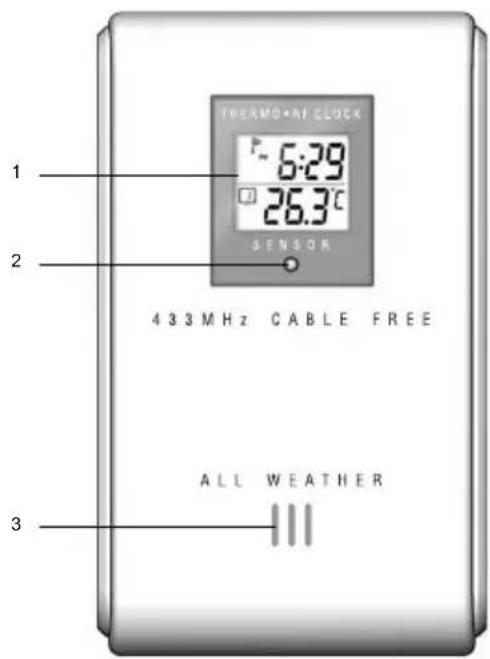
- LCD display
- LED status indicator
- Ventilation duct
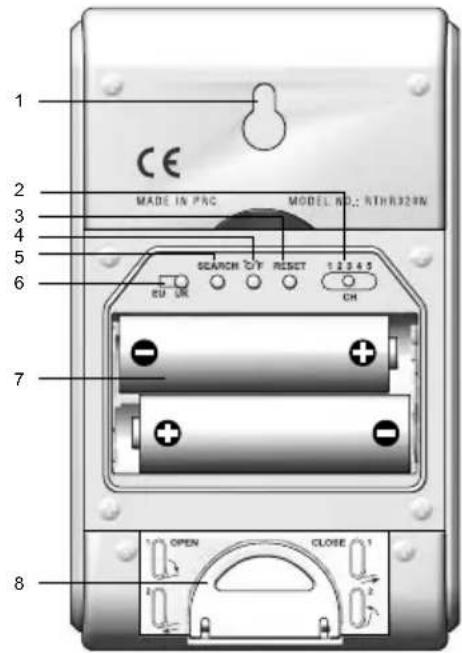
- Wall mount
- CHANNEL switch (1-5)
- RESET
- °C / °F
- SEARCH
- EU / UK radio signal format switch
- Battery compartment
- Fold-out stand
REMOTE SENSOR (RTHR328N) - LCD DISPLAY
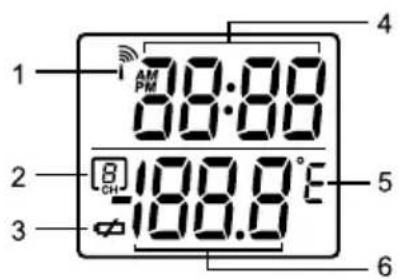
- Reception
- Channel number (1-5)
- Low battery indicator
- Time
- Temperature - °C or °F
- Temperature reading
GETTING STARTED
BATTERIES
Batteries are supplied with this product:
- Main unit 4 x UM-3 (AA) 1.5V
- Remote control 2 x UM-4 (AAA) 1.5V
- Remote sensor 2 x UM-3 (AA) 1.5V
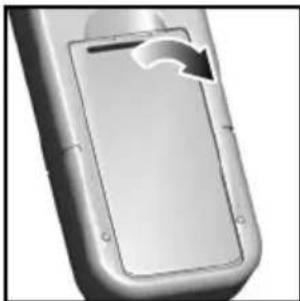
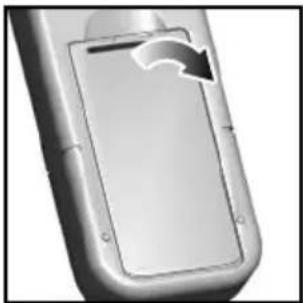
Insert batteries before first use, matching the polarity as shown in the battery compartment. For best results, install batteries in the remote sensor before the main unit. Press RESET after each battery change.
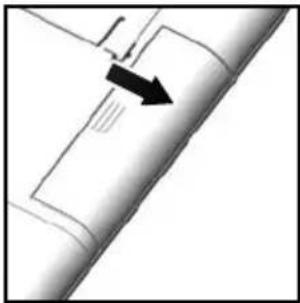
To install the main unit batteries:
natural_image
Pure technical diagram showing a pipe or duct with an arrow indicating direction (no text or symbols)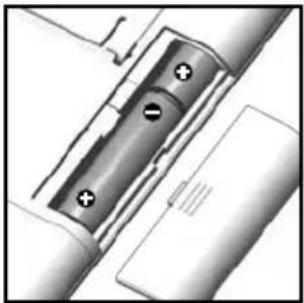
natural_image
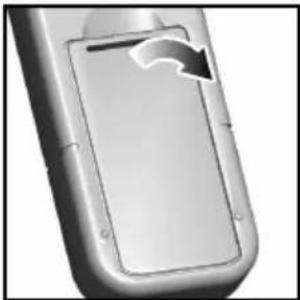
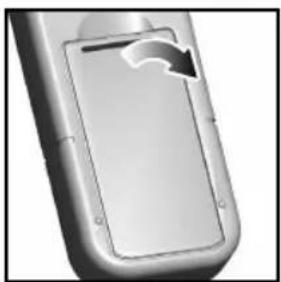
Pure mechanical diagram showing a cylindrical component with two circular holes and a base, without any text, numbers, or symbols.To install the remote control batteries:
natural_image
Close-up of a metallic electronic device casing with a curved arrow indicating a component (no text or symbols visible)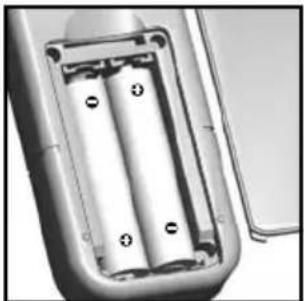
natural_image
Close-up of a cylindrical battery with two internal components and mounting holes (no visible text or symbols)NOTE Do not use rechargeable batteries.

shows when batteries are low.
| UNIT | LOCATION |
| Main Clock / Alarm / Calendar Area | |
| Remote Sensor | Outdoor Temperature Area |
NOTE It is recommended that you use alkaline batteries with this product for longer performance.
REMOTE SENSOR (RTHR328N)
This product is shipped with the RTHR328N Remote Sensor. The main unit can collect data from up to 5 sensors.
The THGR328N and THR228N sensors are also compatible with this weather station. (Additional sensors are sold separately. Contact your local stockist for more information.)
The RTHR328N sensor collects temperature readings and signals from official time-keeping organizations for the radio-controlled clock.
SENSOR SET UP
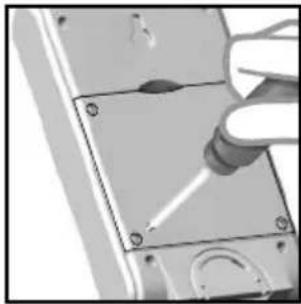
- Open the battery compartment with a small Phillips screwdriver and insert the batteries matching the polarity (+ and -) as shown below.
natural_image
Close-up of a hand using a screwdriver to insert or install a component on a flat surface (no text or symbols visible)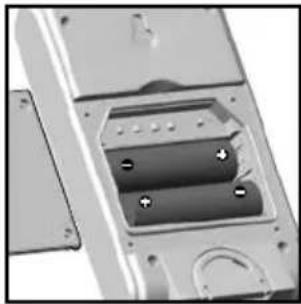
natural_image
Close-up of a mechanical component with internal battery and mounting holes (no visible text or symbols)- Set the channel by pressing the CHANNEL button to the required number. If you are using more than one sensor, select a different channel for each sensor.
- Slide the EU / UK switch to the setting which best suits your location.
- Press RESET.
- Place the sensor near the main unit.
- Press SEARCH to manually initiate signal sending between the sensor and the main unit. The reception icon on the main unit will blink for approximately 3 minutes while it is searching for the sensor. (Refer to the "Sensor Data Transmission" section for more information.)
- Press the °C / °F button to select the setting you want.
- Close the remote sensor battery compartment.
- Secure the sensor in the desired location using the wall mount or table stand.
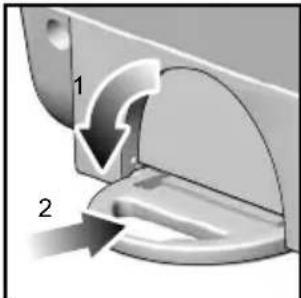
To fold out the stand:
natural_image
Mechanical component diagram showing a curved arrow and labeled parts (no text or symbols present)For best results:
- Insert the batteries and select the unit, channel, and radio signal format before you mount the sensor.
- Place the sensor out of direct sunlight and moisture.
- Do not place the sensor more than 30 metres (100 feet) from the main (indoor) unit.
- Position the sensor so that it faces the main (indoor) unit, minimizing obstructions such as doors, walls, and furniture.
- Place the sensor in a location with a clear view to the sky, away from metallic or electronic objects.
- Position the sensor close to the main unit during cold winter months as below-freezing temperatures may affect battery performance and signal transmission.
NOTE The transmission range may vary and is subject to the receiving range of the main unit.
You may need to experiment with various locations to get the best results.
SENSOR DATA TRANSMISSION
Data is sent from the sensor(s) every 60 Seconds. The reception icon shown in the Outdoor Temperature Area indicates the status.
| ICON DESCRIPTION | |
| Main unit is searching for sensors. | |
| At least 1 channel has been found. | |
| Sensor 1 is sending data. (The number shows which sensor is selected.) | |
| --- shows in Temp Area | The selected sensor cannot be found. Search for the sensor or check batteries. |
SELECT SENSOR CHANNEL
Press CHANNEL on the main unit, to switch between sensors 1-5.

The house icon shows the selected remote sensor.
To auto-scan between sensors, press and hold CHANNEL for 2 seconds. Each sensor's data will be displayed for 3 seconds.
To end auto-scan, press CHANNEL or MEMORY.
SEARCH FOR SENSOR
To search for a Thermo sensor, simultaneously press and hold CHANNEL and MEMORY for 2 seconds.
NOTE If the sensor is still not found, check the batteries.
CLOCK AND CALENDAR
This product tracks the time and date based on radio-controlled signals from the RTHR328N remote sensor, or manual settings that you enter.
RADIO-CONTROLLED CLOCK
The time and date are automatically updated by radio-controlled clock signals from official time-keeping organizations in Frankfurt (Germany) and Rugby (England) unless you disable this feature. The signals are collected by the remote sensor (RTHR328N) whenever it is within 1500 km (932 miles) of a signal.
Initial reception takes 2-10 minutes, and is initiated when you first set up the unit, and whenever you press RESET. Once complete, the reception icon will stop blinking.
The reception icon 📋 shown in the Clock Area indicates 2 factors:
- Connection between the main unit and the sensor that collects RF signals ( III )
- RF signal reception ( Ⓞ )
How these signals work together:
| ICON MEANING | |
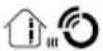 | The unit has contact with the remote sensor and has synchronized the time. |
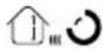 | The unit has contact with the remote sensor but the time has not been synchronized. |
 | The unit has lost contact with the remote sensor but the time is synchronized. |
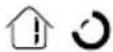 | The unit has lost contact with the remote sensor and the time is not synchronized. |
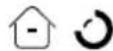 | The unit cannot reach the remote sensor. |
NOTE To force a manual search for the RF clock reception, press and hold SEARCH on the sensor (RTHR328N).
TURN RADIO-CONTROLLED CLOCK ON / OFF
If you wish to manually set the clock, you must first disable the radio-controlled feature. To do this, make sure you are not in Setting Mode, then press and hold DOWN on the main unit for 2 seconds. To enable it, hold UP for 2 seconds.
- When the RF clock is enabled this icon appear on the display.
will - When the RF clock is disabled this icon NOT appear on the display.
will
SET CLOCK
You only need to do this if you have disabled the radio-controlled clock, or if you are too far from a RF signal.
- Press and hold MODE / LIGHT for 2 seconds to enter Setting Mode.
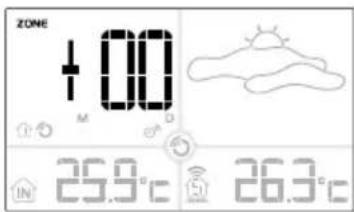
- The setting will blink to indicate it can now be changed.
- Press UP or DOWN to change the setting.
- Press MODE / LIGHT to confirm the setting and move to the next one. The order of the settings is: time zone hour offset (+ / -23 hours), 12 / 24 hour format, hour, minute, year, date / month format, month, date, display language and hourly chime (ON / OFF).
You can select 1 of the 5 following languages:
| SYMBOL | LANGUAGE |
| E | English |
| U | German |
| F | French |
| I | Italian |
| S | Spanish |
SWITCH CLOCK DISPLAY
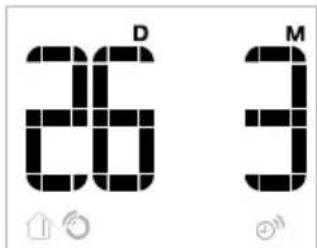
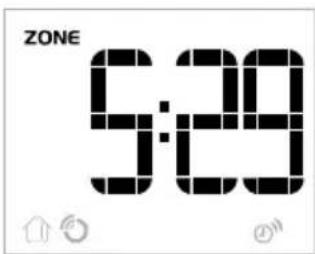
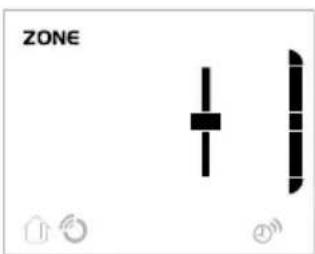
Press MODE / LIGHT to toggle between the following clock displays:
• RF time with hour-offset time (HH:MM)
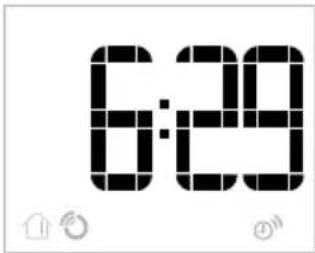
• Day of the week
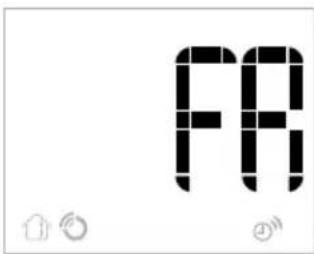
- Calendar
• RF time without offset
• Time-zone hour-offset setting
Each display will be backlit for 5 seconds and will return to the main screen display after 10 seconds.
HOURLY CHIME
The hourly chime function when set to ON will beep once at the beginning of every hour, and the chime icon will show on the display.
ALARM
This product is equipped with a 2-minute crescendo alarm.
VIEW ALARM SETTINGS
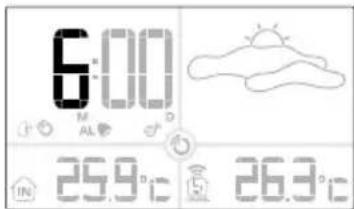
Press ALARM. The alarm time and status will show in the Clock Area.
SET ALARM
- Press ALARM to switch to alarm display.
-
Press and hold ALARM again, for 2 seconds. The alarm settings will blink.
-
Select the hour and minute. Press UP or DOWN to change settings. Press ALARM to confirm. The alarm will be activated automatically.
ACTIVATE ALARM
Press ALARM twice to start toggling between alarm ON and alarm OFF.
shows in the Clock / Alarm Area when the alarm is activated.
NOTE Press MODE, or wait 1 minute to return to clock display.
SILENCE ALARM
When the alarm time is reached, the crescendo alarm will sound for 2 minutes and the backlight will turn on for 5 seconds. To silence the alarm:
- Press ✪ SNOOZE ✪ on the remote control to silence it for 8 minutes.
OR
- Press any key on the main unit or remote control except ✿ SNOOZE ✿ to mute the alarm and activate it again after 24 hours.
If no button is pressed, the alarm will automatically silence after 2 minutes.
WEATHER FORECAST
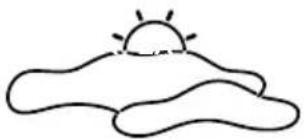
This product forecasts the next 12 to 24 hours of weather within a 30-50 km (19-31 mile) radius. The forecast is based on barometric pressure trend readings.
natural_image
Simple line drawing of a sun rising over a cloud (no text or symbols)The LCD display shows an animated icon indicating the forecasted weather.
WEATHER FORECAST ICONS
| ICON DESCRIPTION | |
| Day / Night | Clear |
| Day / Night | Partly cloudy |
| Cloudy | |
| Rainy | |
| Snowy | |
NOTE The night time icon displays from 6 PM to 6 AM.
TEMPERATURE
This product can display maximum, minimum and current temperatures collected by the remote sensors and main (indoor) unit.
- Press MEMORY to toggle between maximum (MAX), minimum (MIN) and current records.
• To clear the records, press and hold MEMORY for 2 seconds. A beep will sound to confirm that the memory has been cleared.
SELECT MEASUREMENT UNIT
Press the °C / °F button to choose the setting you want.
The display can show indoor temperatures ranging from -5^ to +50^ ( 23^ to +122^ ).
BACKLIGHT
To turn on the backlight for 5 seconds:
- Press MODE / LIGHT on the main unit.
OR
- Press 🧑 SNOOZE 🔒 on the remote control.
NOTE When ✦ appears, the backlight function is deactivated due to low-battery power. Replace with new batteries to operate this function again.
RESET SYSTEM
Insert a thin blunt instrument into the hole below RESET to return to the default settings.
NOTE When you press RESET, all settings will return to default value, and you will lose all stored information.
REMOTE CONTROL (RE289)
The remote control interacts with the main unit using infrared technology.
The buttons on the remote control complete the same functions as the buttons on the front of the main unit. Refer to the following list of functions and see the relevant section headings for further information:
- Manually view 1 of 5 sensor channel's data or view each channel for 3 seconds using auto-scan - see "Select Sensor Channel".
- Force a manual search for the RF clock reception - see "Radio-Controlled Clock".
- Enable / disable the radio-controlled clock - see "Turn Radio-Controlled Clock On / Off".
- Manually set the clock, calendar and day of the week language - see "Set Clock".
- View the 5 different clock displays - see "Switch Clock Display".
- View the alarm settings, set the alarm, activate the alarm and silence the alarm - see all of "Alarm" section.
- View temperature records - see "Maximum / Minimum Records".
NOTE The sensor auto-search function cannot be operated by the remote control.
NOTE The main unit must be no more than 4 metres (13 feet) from the remote control for a successful connection to take place. Point the remote control directly at the infrared window on the main unit for optimal performance. The remote control cannot perform when there is an obstacle between the 2 units.
SAFETY AND CARE
Clean the product with a slightly damp cloth and alcohol-free, mild detergent. Avoid dropping the product or placing it in a high-traffic location.
WARNINGS
This product is designed to give you years of service if handled properly. Oregon Scientific will not be responsible for any deviations in the usage of the device from those specified in the user instructions or any unapproved alterations or repairs of the product. Observe the following guidelines:
- Never immerse the product in water. This can cause electrical shock and damage the product.
- Do not subject the main unit to extreme force, shock, or fluctuations in temperature or humidity.
- Do not tamper with the internal components.
- Do not mix new and old batteries or batteries of different types.
- Do not use rechargeable batteries with this product.
- Remove the batteries if storing this product for a long period of time.
- Do not scratch the LCD display.
NOTE The technical specification of this product and contents of this user manual are subject to change without notice. Images not drawn to scale.
TROUBLESHOOTING
| PROBLEM | SYMPTOM | REMEDY |
| Calendar | Strange date / month | Change language (→6) |
| Clock | Cannot adjust clock | Disable radio-controlled clock (→6) |
| Cannot auto-synch | 1. Adjust batteries (→5)2. Press RESET (→8)3. Manually activate radio-controlled clock (→6) | |
| Temp | Shows "LLL" or "HHH" | Temperature is out-of-range |
| Remote sensor | Cannot locate remote sensor | Check batteries (→5) |
SPECIFICATIONS
Main Unit Dimensions
L x W x H 225 x 24 x 141 mm (8.86 x 0.94 x 5.55 inches)
Weight 542 grams (1.19 lbs) without battery
Remote Control Dimensions
L x W x H 108 x 17 x 39 mm (4.25 x 0.67 x 1.54 inches) Weight 34 grams (0.08 lbs) without battery
Remote Sensor Dimensions
L x W x H 70 x 24.5 x 116 mm (2.76 x 0.96 x 4.57 inches) Weight 108 grams (0.24 lbs) without battery
Temperature
Unit °C or °F Indoor Range -5°C to 50°C (23°F to 122°F) Outdoor Range -20°C to 60°C (-4°F to 140°F)
Resolution 0.1°C (0.2°F)
Memory Min / Max
Weather Forecast
Display Sunny (day / night), partly cloudy (day / night), cloudy, rainy, snowy
Remote Unit (RTHR328N)
RF frequency 433 MHz Range Up to 30 metres (100 feet) with no obstructions Transmission Approx. every 1 minute Channel No. 1, 2, 3, 4 or 5 Unit °C or °F
Radio-Controlled Clock
Synchronization Auto or disabled Clock display HH:MM Hour format 12hr AM / PM (MSF format) 24hr (DCF format) Calendar DD / MM or MM / DD; Day of the week in 1 of 5 languages (E, G, F, I, S) Alarm Daily with 2-minute crescendo Snooze 8-minute snooze (operated by remote control only)
Power
Main unit
Batteries 4 x UM-3 (AA) 1.5V
Remote Control
Batteries 2 x UM-4 (AAA) 1.5V
Remote Sensor
Batteries 2 x UM-3 (AA) 1.5V
NOTE It is recommended that you use alkaline batteries with this product for longer performance.
ABOUT OREGON SCIENTIFIC
Visit our website (www.oregonscientific.com) to learn more about Oregon Scientific products such as digital cameras; MP3 players; children's electronic learning products and games; projection clocks; health and fitness gear; weather stations; and digital and conference phones. The website also includes contact information for our customer care department in case you need to reach us, as well as frequently asked questions and customer downloads.
We hope you will find all the information you need on our website, however if you'd like to contact the Oregon Scientific Customer Care department directly, please visit: www2.oregonscientific.com/service/support
OR
Call 949-608-2848 in the US.
For international enquiries, please visit: www2.oregonscientific.com/about/international/default.asp
EC-DECLARATION OF CONFORMITY
This product contains the approved transmitter module that complies with the essential requirements of Article 3 of the R&TTE 1999 / 5 / EC Directive, if used as intended and the following standards have been applied:
Safety of information technology equipment
(Article 3.1.a of the R&TTE Directive)
Applied Standard EN 60950: 2000
Electromagnetic compatibility
(Article 3.1.b of the R&TTE Directive)
Applied Standards
ETSI EN 301 489-1-3 (Ver.1.4.1): 2002-08
Efficient use of radio frequency spectrum
(Article 3.2 of the R&TTE Directive)
Applied Standards
ETSI EN 300 220-3 (Ver1.1.1): 2000-09
Additional information:
The product herewith complies with the requirements of the Low Voltage Directive 73 / 23 / EC, the EMC Directive 89 / 336 / EC and carries the CE marking accordingly.
Carmelo Cubito
Agrate Brianza (MI) / Italy January 2004
Manufacturer's EU R&TTE Representative

COUNTRIES RTTE APPROVAL COMPLIED
All EC countries, Switzerland

and Norway

natural_image
3D model of a mobile phone casing with a labeled component (no text or symbols on the device itself)- Vano batterie: accoglie 2 batterie UM-4 (AAA) da 1,5 V
SENSORE REMOTO (RTHR328N) - VISTA ANTERIORE
natural_image
Pure technical diagram showing a curved pipe or duct with an arrow indicating direction (no text or symbols)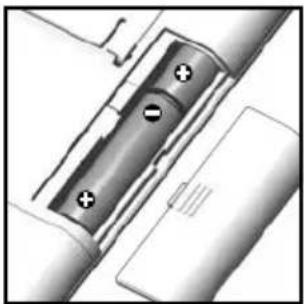
natural_image
Pure mechanical diagram showing a pipe with two circular holes and a central circle, without any text, numbers, or symbols.natural_image
Close-up of a metallic electronic device with a curved arrow indicating rotation or change (no text or symbols visible)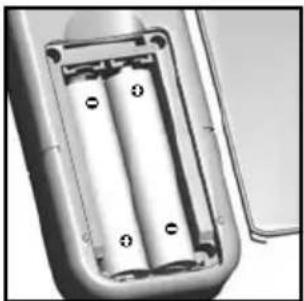
natural_image
Close-up of a cylindrical battery or motor casing with visible internal components and mounting holes (no text or symbols)natural_image
Close-up of a hand using a screwdriver to insert or install a rectangular electronic device (no visible text or symbols)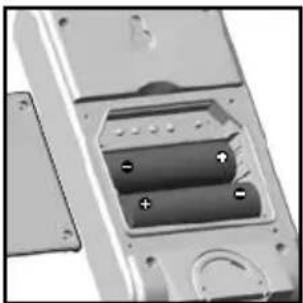
natural_image
Close-up of a mechanical component with internal components and mounting holes (no visible text or symbols)natural_image
Simple line drawing of a sun partially behind a cloud (no text or symbols)Agrate Brianza (MI) / Italia January 2004
natural_image
3D model of a mobile phone casing with a labeled component (no text or symbols on the device itself)natural_image
Pure technical diagram showing a curved pipe or duct with an arrow indicating direction (no text or symbols)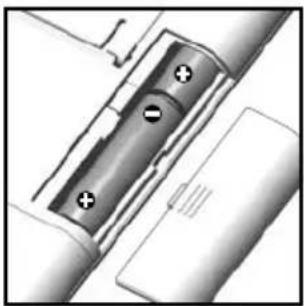
natural_image
Pure mechanical component diagram without any text, numbers, or symbolsnatural_image
Close-up of a metallic electronic device with a curved arrow indicating a component or feature (no text or symbols visible)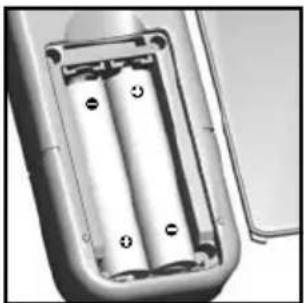
natural_image
Close-up of a cylindrical battery with internal components and mounting holes (no visible text or symbols)natural_image
Close-up of a hand using a screwdriver to insert or install a component on a flat surface (no text or symbols visible)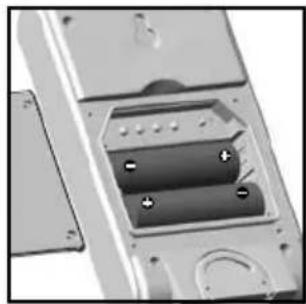
natural_image
Close-up of a mechanical or electronic component with internal components and mounting holes (no visible text or symbols)natural_image
Mechanical component diagram showing a curved arrow and labeled parts (no text or symbols present)natural_image
Simple line drawing of a sun partially behind a cloud (no text or symbols)Agrate Brianza (MI) / Italie January 2004
natural_image
3D model of a mobile phone casing with labeled component (no text or symbols on body)natural_image
Pure technical diagram of a pipe joint with an arrow indicating direction (no text or symbols)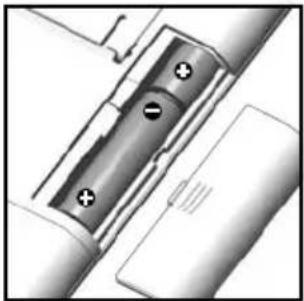
natural_image
Pure mechanical diagram showing a cylindrical component with mounting holes and a base plate (no text or symbols)natural_image
Close-up of a metallic electronic device casing with a curved arrow indicating a directional change (no text or symbols visible)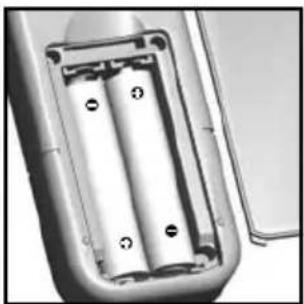
natural_image
Close-up of a cylindrical battery pack with four terminals and mounting holes (no visible text or symbols)natural_image
Close-up of a hand using a screwdriver to insert or install a component on a flat surface (no text or symbols visible)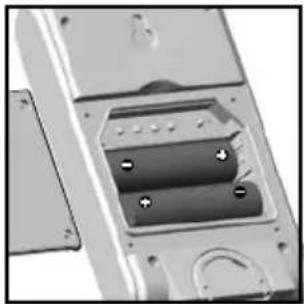
natural_image
Close-up of a mechanical or electronic component with internal components and mounting holes (no visible text or symbols)natural_image
Mechanical component diagram showing a curved bracket with two directional arrows labeled 1 and 2 (no text or symbols present)natural_image
Simple line drawing of a sun partially covered by clouds (no text or symbols)natural_image
3D model of a mobile phone casing with a labeled component (no text or symbols on the device itself)natural_image
Pure mechanical diagram showing a curved pipe or pipe section with an arrow indicating direction (no text or symbols)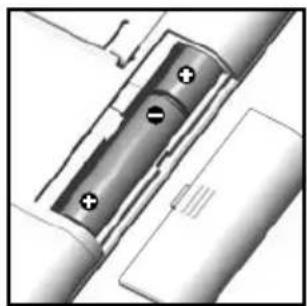
natural_image
Pure mechanical component diagram without any text, numbers, or symbolsnatural_image
Close-up of a metallic electronic device with a curved arrow indicating a component (no text or symbols visible)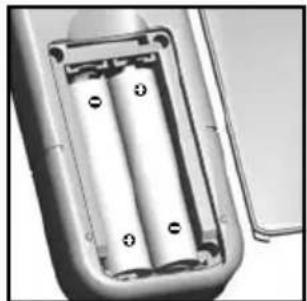
natural_image
Close-up of a cylindrical battery with two internal components and mounting holes (no visible text or symbols)NOTA No use pilas recargables
natural_image
Close-up of a hand using a screwdriver to insert or install a component on a device (no visible text or symbols)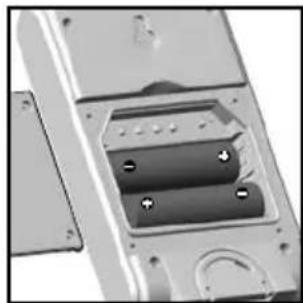
natural_image
Close-up of a metallic electronic device casing with internal components and mounting holes (no visible text or symbols)natural_image
Mechanical component diagram showing a curved arrow and labeled parts (no text or symbols present)natural_image
Simple line drawing of a sun partially covered by clouds (no text or symbols)Rango Hasta 30 metros (100 pies)
sin obstrucciones
Agrate Brianza (MI) / Italia January 2004
natural_image
3D model of a mobile phone casing with a labeled component (no text or symbols on the device itself)natural_image
Pure diagram of a pipe or duct with an arrow indicating direction, no text or symbols present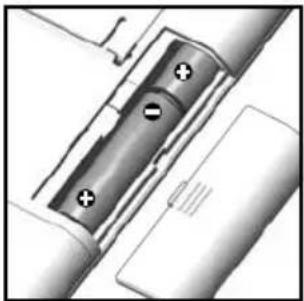
natural_image
Pure mechanical diagram showing a cylindrical component with two circular holes and a shaft, without any text or symbols.Para instalar as pilhas do controle remoto:
natural_image
Close-up of a metallic electronic device with a curved arrow indicating rotation or movement (no text or symbols visible)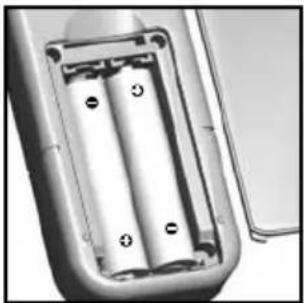
natural_image
Close-up of a cylindrical battery with two internal compartments and mounting holes (no visible text or symbols)natural_image
Close-up of a hand using a screwdriver to insert or install a component on a flat surface (no visible text or symbols)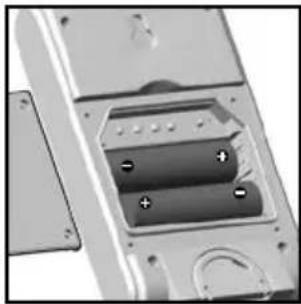
natural_image
Close-up of a mechanical component with internal components and mounting holes (no visible text or symbols)natural_image
Mechanical component diagram showing a curved arrow and labeled parts (no text or symbols present)natural_image
Simple line drawing of a sun partially behind a cloud (no text or symbols)Agrate Brianza (MI) / Itália January 2004
natural_image
3D model of a mobile phone casing with a labeled component (no text or symbols on the device itself)natural_image
Pure technical diagram showing a pipe or pipe joint with an arrow indicating direction (no text or symbols)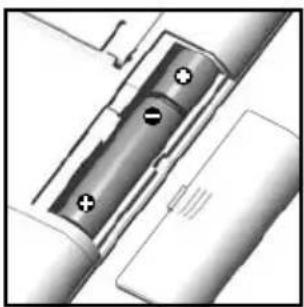
natural_image
Pure mechanical assembly diagram showing a cylindrical component with mounting holes and a shaft (no text or symbols)natural_image
Close-up of a metallic electronic device with a curved arrow indicating a component or action (no text or symbols visible)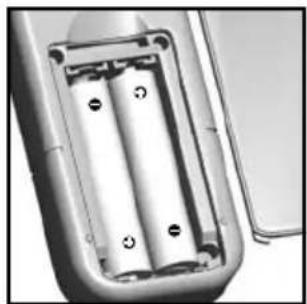
natural_image
Close-up of a cylindrical battery with four pins, showing internal structure and casing (no text or symbols visible)natural_image
Close-up of a hand using a screwdriver to insert or install a component on a device (no visible text or symbols)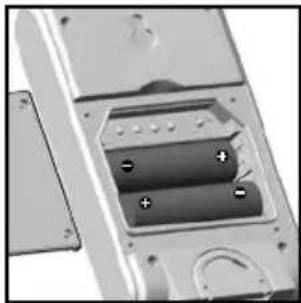
natural_image
Close-up of a mechanical or electronic component with internal components and mounting holes (no visible text or symbols)natural_image
Mechanical component diagram showing a curved arrow and labeled parts (no text or symbols present)DE WEKKER INSCHAKELEN
natural_image
Simple line drawing of a sun rising over a cloud (no text or symbols)natural_image
3D model of a mobile phone casing with a labeled component (no text or symbols on the device itself)natural_image
Pure technical diagram showing a pipe joint with an arrow indicating direction (no text or symbols)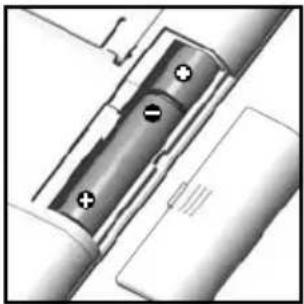
natural_image
Pure mechanical diagram showing a cylindrical component with two circular holes and a rectangular housing (no text or symbols)natural_image
Close-up of a metallic electronic device with a curved arrow indicating a directional change (no text or symbols visible)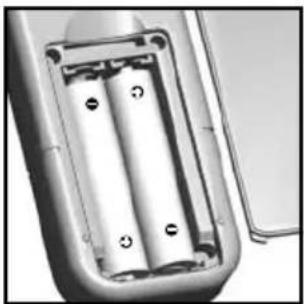
natural_image
Close-up of a cylindrical battery with two internal components and mounting holes (no visible text or symbols)natural_image
Close-up of a hand using a screwdriver to insert or install a component on a flat surface (no text or symbols visible)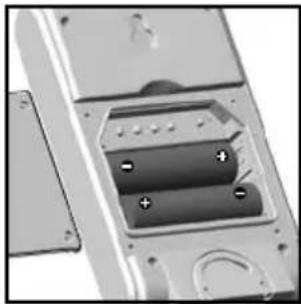
natural_image
Close-up of a mechanical or electronic component with internal components and mounting holes (no visible text or symbols)natural_image
Mechanical component diagram showing a curved arrow and labeled parts (1 and 2), no readable text or symbols present.För bästa resultat:
natural_image
Simple line drawing of a sun rising over a cloud (no text or symbols)natural_image
3D model of a mobile phone casing with a labeled component (no text or symbols on the device itself)natural_image
Pure diagram of a pipe or duct with an arrow indicating direction, no text or symbols present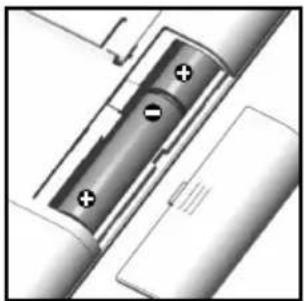
natural_image
Pure mechanical diagram showing a cylindrical component with two circular holes and a shaft, without any text or symbols.遙控器電池的安裝方法:
natural_image
Close-up of a metallic electronic device casing with a curved arrow indicating a component (no text or symbols visible)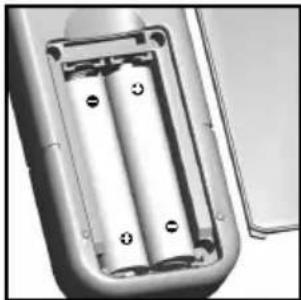
natural_image
Close-up of a cylindrical battery housing with two internal compartments and mounting holes (no visible text or symbols)注意 不要使用充電電池。
電池電量不足時會顯示
natural_image
Close-up of a hand using a screwdriver to insert or install a rectangular electronic component (no visible text or symbols)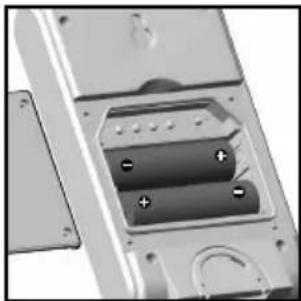
natural_image
Close-up of a mechanical component with internal components and mounting holes (no visible text or symbols)natural_image
Mechanical component diagram showing a curved arrow and labeled parts (1 and 2), no readable text or symbols present.要取得更好的效果,請:
natural_image
Simple line drawing of a sun above a cloud (no text or symbols)natural_image
3D model of a remote control device with labeled component (no text or symbols beyond label)natural_image
Pure diagram of a mechanical component with an arrow indicating direction, no text or symbols present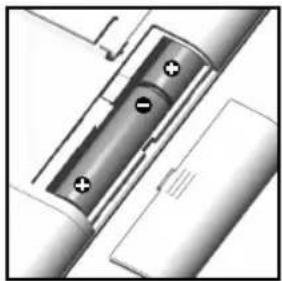
natural_image
Pure mechanical diagram showing a cylindrical component with four mounting holes and a base plate (no text or symbols)遥控器电池的安装方法:
natural_image
Close-up of a metallic mobile phone with a curved arrow indicating a scroll or action (no text or symbols visible)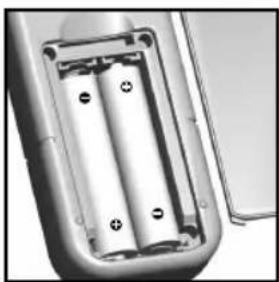
natural_image
Close-up of a cylindrical battery housing with two internal compartments and mounting holes (no text or symbols visible)注意 不要使用充电电池。
电池电量不足时会显示
natural_image
Close-up of a hand using a screwdriver to insert or install a component on a metal plate (no visible text or symbols)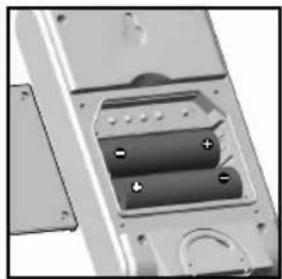
natural_image
Close-up of a metallic electronic device casing with internal components and mounting holes (no visible text or symbols)natural_image
Mechanical component diagram showing a curved arrow and labeled parts (1 and 2), no readable text or symbols present.要取得更好的效果,请:
·不带偏差的无线电频率时间
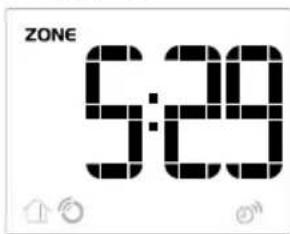
- 时区小时偏差设置
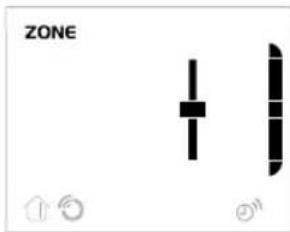
Oregon Scientific Inc.
Tualatin, Oregon USA
欧西亚中国授权制造商
展科电子(深圳)有限公司
制造地:中国深圳宝安臣田工业区
CE
- Jumbo Weather Station with Remote Control Model: BAR289
- CONTENTS
- INTRODUCTION
- FRONT VIEW
- BACK VIEW
- GETTING STARTED
- BATTERIES
- REMOTE SENSOR (RTHR328N)
- SENSOR SET UP
- SENSOR DATA TRANSMISSION
- SELECT SENSOR CHANNEL
- SEARCH FOR SENSOR
- CLOCK AND CALENDAR
- RADIO-CONTROLLED CLOCK
- TURN RADIO-CONTROLLED CLOCK ON / OFF
- SET CLOCK
- SWITCH CLOCK DISPLAY
- HOURLY CHIME
- ALARM
- VIEW ALARM SETTINGS
- SET ALARM
- ACTIVATE ALARM
- SILENCE ALARM
- WEATHER FORECAST
- TEMPERATURE
- SELECT MEASUREMENT UNIT
- BACKLIGHT
- RESET SYSTEM
- REMOTE CONTROL (RE289)
- SAFETY AND CARE
- WARNINGS
- SPECIFICATIONS
- Remote Control Dimensions
- Remote Sensor Dimensions
- Remote Unit (RTHR328N)
- Power
- Remote Control
- Remote Sensor
- ABOUT OREGON SCIENTIFIC
- EC-DECLARATION OF CONFORMITY
- Safety of information technology equipment
- Electromagnetic compatibility
- Efficient use of radio frequency spectrum
- COUNTRIES RTTE APPROVAL COMPLIED
- DE WEKKER INSCHAKELEN
Brand : OREGON SCIENTIFIC
Model : BAR 289
Category : Weather Station