DS32920 - TV SANYO - Free user manual and instructions
Find the device manual for free DS32920 SANYO in PDF.


User questions about DS32920 SANYO
0 question about this device. Answer the ones you know or ask your own.
Ask a new question about this device
Download the instructions for your TV in PDF format for free! Find your manual DS32920 - SANYO and take your electronic device back in hand. On this page are published all the documents necessary for the use of your device. DS32920 by SANYO.
USER MANUAL DS32920 SANYO
Welcome to the World of Sanyo
Thank you for purchasing a Sanyo Color Television. You made an excellent choice for Performance, Styling, Reliability, and Value. The TV is designed with easy on-screen set-up instructions and operating features. To meet the growing needs of our customers, this television has a “V-Chip” for parental controlled viewing. “Read this manual before assembling (or using) this product.” Need assistance? Visit our Web site at www.sanyoctv.com or call toll free 1-800-877-5032.
CONTENTS
Important Safety Tips 2
Features 3
Specifications 3
Basic Setup 3
Basic Hookup Methods 4
Rear Panel 5
Universal/Multimedia Remote Control .. 5 \~ 9
TV Adjustment and Setup ..... 10 \~ 12
Resetting the TV 13
Using Audio Out Jacks 13
Using Rear Audio/Video In Jacks ..... 14
Using Component Audio/Video In Jacks . 15
Setting the Sleep Timer 15
V-Guide Information 16
V-Guide Operation (Parental Control) .. 16 \~ 17
Closed-Captioning 18
Troubleshooting 19 \~ 21
Care and Cleaning 21
Warranty (Mexico) 22
Warranty (U.S.A. and Canada) 23
Child Safety Matters .... Back cover
FRANÇAIS 24 - 44
"As an ENERGY STAR® Partner, Sanyo Manufacturing Corporation has determined that this product meets the ENERGY STAR® guidelines for energy efficiency."
Importado Por :
Col. Santa Cruz Acayucan
THIS SYMBOL INDICATES THAT THERE ARE IMPORTANT OPERATING AND MAINTENANCE INSTRUCTIONS IN THE LITERATURE ACCOMPANYING THIS UNIT.
WARNING: TO REDUCE THE RISK OF FIRE OR ELECTRIC SHOCK, DO NOT EXPOSE THIS APPLIANCE TO RAIN OR MOISTURE.
IMPORTANT SAFETY INSTRUCTIONS
CAUTION: PLEASE ADHERE TO ALL WARNINGS ON THE PRODUCT AND IN THE OPERATING INSTRUCTIONS. BEFORE OPERATING THE PRODUCT, PLEASE READ ALL OF THE SAFETY AND OPERATING INSTRUCTIONS. RETAIN THIS LITERATURE FOR REFERENCE. Follow all instructions...
Positioning the appliance
- Do not place your appliance on an unstable cart, stand, shelf or table. Serious injury to an individual, and damage to the appliance, may result if it should fall. Your salesperson can recommend approved carts and
stands or shelf and wall mounting instructions. An appliance and cart combination should be moved with care. Quick stops, excessive force, and uneven surfaces may cause the appliance and cart combination to overturn.

- Slots and openings in the cabinet and in the back or bottom are provided for ventilation. To ensure reliable operation of the appliance and to protect it from overheating, these openings must not be blocked or covered. The openings should never be covered with a cloth or other material, and the bottom openings should not be blocked by placing the unit on a bed, sofa, rug, or other similar surface. This appliance should never be placed near or over a radiator or heat register. This appliance should not be placed in a built-in installation such as a bookcase unless proper ventilation is provided.
- Do not expose the appliance to rain or use near water . . . for example, near a bathtub, swimming pool, kitchen sink, in a wet basement, etc.
Hooking Up Outdoor Antenna
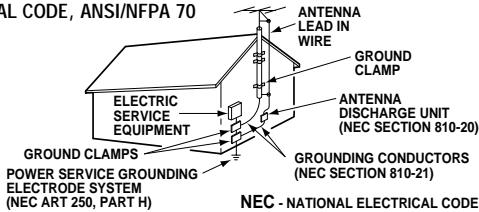
LIGHTNING PROTECTION FOR YOUR ANTENNA AND SET AS PER NATIONAL ELECTRICAL CODE INSTRUCTIONS.
EXAMPLE OF ANTENNA GROUNDING ACCORDING TO NATIONAL ELECTRICAL CODE, ANSI/NFPA 70 ANTENNA
text_image
AL CODE, ANSI/NFPA 70 ELECTRIC SERVICE EQUIPMENT GROUNDS CLAMPS POWER SERVICE GROUNDING ELECTRODE SYSTEM (NEC ART 250, PART H) ANTENNA LEAD IN WIRE GROUND CLAMP ANTENNA DISCHARGE UNIT (NEC SECTION 810-20) GROUNDING CONDUCTORS (NEC SECTION 810-21) NEC - NATIONAL ELECTRICAL CODE"Note to CATV system installer:
This reminder is provided to call the CATV system installer's attention to Article 820-40 of the NEC that provides guidelines for proper grounding and, in particular, specifies that the cable ground shall be connected to the grounding system of the building, as close to the point of cable entry as practical."
- If an outside antenna is connected to the receiver, be sure the antenna system is grounded so as to provide some protection against voltage surges and built up static charges. Article 810 of the National Electrical Code, ANSI/NFPA 70, provides information with respect to proper grounding of the mast and supporting structure, grounding of the lead in wire to an antenna discharge unit, size of grounding conductors, location of antenna discharge unit, connection to grounding electrodes, and requirements for the grounding electrode.
An outside antenna system should not be located in the vicinity of overhead power lines or other electric light or power circuits, or where it can fall into such power lines or circuits. When installing an outside antenna system extreme care should be taken to keep from touching such power lines or circuits as contact with them might be fatal.
Plug in the power cord
- This product should be operated only from the type of power source indicated on the marking label. If you are not sure of the type of power supply to your home, consult your product dealer or local power company. This product is equipped with a polarized alternating current line plug (a plug having one blade wider than the other). This plug will fit into the power outlet only one way. This is a safety feature. If you are unable to insert the plug fully into the outlet, try reversing the plug. If the plug should still fail to fit, contact your electrician to replace your obsolete outlet. Do not defeat the safety purpose of this polarized plug. Do not overload wall outlets, extension cords, or integral convenience receptacles as this can result in a risk of fire or electric shock.
- Power-supply cords should be routed so that they are not likely to be walked on or pinched by items placed upon or against them, paying particular attention to cords at plugs, convenience receptacles, and the point where they exit from the product.
Cleaning
- Before cleaning, unplug the unit from the wall outlet. Do not apply liquid cleaners or aerosol cleaners directly to the unit. Use a dry cloth for cleaning.
Service & Repair
- Unplug the appliance from the wall outlet and refer servicing to qualified service personnel under the following conditions:
A. If the power cord or plug is damaged or frayed.
B. If liquid has been spilled into the appliance.
C. If the appliance has been exposed to rain or water.
D. If the appliance has been dropped or the cabinet has been damaged.
E. If the appliance exhibits a distinct change in performance.
F. If the appliance does not operate normally by following the operating instructions, adjust only those controls that are covered in the operating instructions. Improper adjustment of other controls may result in damage and will often require extensive work by a qualified technician to restore the appliance to normal operation.
-
Upon completion of any service or repair, request the service technician's assurance that only Factory Authorized Replacement Parts that have the same characteristics as the original parts were used, and that routine safety checks have been performed to determine that the appliance is in safe operating condition. Unauthorized substitutions may result in fire, electrical shock, or other hazards.
-
Never add accessories that have not been specifically designed for use with this appliance as they may cause hazards.
- For added protection during a lightning storm, or when the set is left unattended and unused for long periods of time, unplug it from the wall outlet and disconnect the antenna. This will prevent damage to the set due to lightning or power line surges.
- Never push objects of any kind into this product through openings as they may touch dangerous voltage points or short-out parts that could result in a fire or electric shock. Never spill liquid of any kind on the product.
FEATURES
◆ Trilingual On-Screen Menu
◆ Automatic Channel Search
◆ Auto Shut Off
◆ Closed-Captioning/QuikCap
◆ 3-Line Digital Comb Filter
◆ Velocity Modulator
◆ Digital picture controls with on-screen display
◆MTS stereo/dbx®/SAP Decoder
◆ Color Enhancer
◆ Auto Flesh Tone
◆ XDS (Extended data service) station call letters, title of show, ratings
◆ Factory preset adjustments for picture/sound
◆ Initial Channel
◆ Bass/Treble
◆ Front Surround Sound
◆ Audio/Video Input Jacks (2 sets-R/L)
◆ S-Video Input Jack (2 sets)
◆ Audio Output Jacks
◆ Component A/V Input Jacks
◆ V-Guide (Parental Control)
◆ Auto Clock
◆ Sleep Timer (3 hours)
◆ TV Reset
181 Channel Tuning System
VHF Channels 2-13
UHF Channels 14-69
Cable TV (CATV) 1, 14-125
Automatic Fine Tuning
VHF and Cable Channels
Backlit Universal/Multimedia Remote Control
VCR/TV/CABLE/DVD/SAT/AUX,
Large Glow-in-the-Dark basic operating keys
Numbered Channel
Selection
Channel Scanning
Volume Mute
Power Enter
Recall Display
Sleep Caption
Reset Menu
VCR keys V-Guide
Input
dbx ^® is a registered trademark of
Carillon Electronics Corporation
SPECIFICATIONS
PICTURE TUBE SIZE
(Measured Diagonally) ..... 32-inch True Flat screen
PICTURE RESOLUTION 330 Lines
Video Input 700 Lines
Component Video Input ..... 800 Lines
ANTENNA INPUT ..... UHF/VHF/CATV 75Ω
POWER REQUIREMENT ..... 120VAC 60Hz
POWER 115 watts
HORIZONTAL DIM. (Width) ..... 30.2 in. (768mm)
VERTICAL DIM. (Height) ..... 28.8 in. (732mm)
DEPTH DIM. (Thickness) 22.7 in. (577mm)
WEIGHT (Approx.) 136.6 lbs. (62.0 Kg.)
SOUND 2 Speakers, Size 10 cm
AMPLIFIER .... Built-in with 3.0W
A/V INPUT JACKS ...... Video Input and Audio Input
(2 sets-R/L),
S-Video Input (2 sets)
COMPONENT A/V INPUT JACKS ..... Digital Input (Y, Pb, Pr-R/L)
AUDIO OUTPUT JACKS ..... Audio Output (R/L-Fixed and
Variable) (RCA Connectors)
CAUTION: FCC Regulations state that improper modifications or unauthorized changes to this unit may void the user's authority to operate the unit.
BASIC SETUP
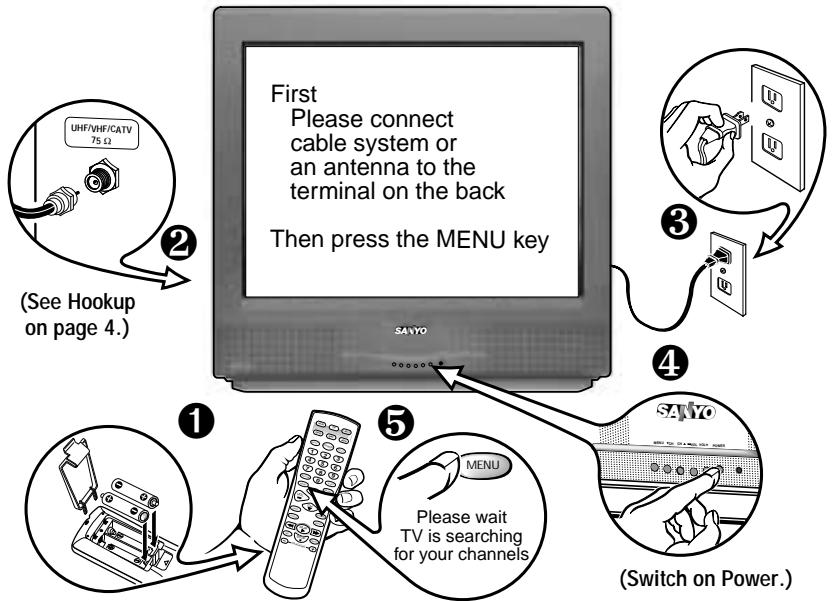
flowchart
graph TD
    A["First<br>Please connect cable system or an antenna to the terminal on the back<br>Then press the MENU key"] --> B["①"]
    B --> C["② (See Hookup on page 4.)"]
    B --> D["③"]
    D --> E["④ (Switch on Power.)"]
    E --> F["⑤<br>Please wait TV is searching for your channels"]
(Install batteries, see page 5.)

Quick Tips
■ Do not position the TV in a confined area. Allow normal air circulation for electronic parts.
■ Position your TV at least 2 feet from stereo speakers. The magnets in the speakers may affect the picture quality.
■ The TV will automatically select the correct Antenna mode for the type of signal you connect.
Need help?
Visit our Web site at
www.sanyoctv.com
or Call 1-800-877-5032

Quick Tips
■ The TV will automatically select the correct Antenna mode for the type of signal you connect.
■ TV will switch off automatically after 15 minutes if there is no signal reception (cable out or station not broadcasting).
Exception—When the Video mode is selected, the TV will not automatically switch off when signal reception has stopped for 15 minutes.
Need help?
Visit our Web site at
www.sanyoctv.com
or Call 1-800-877-5032
CATV FRANCHISE NOTE: Cable companies, like public utilities, are franchised by local government authorities. To receive cable programs, even with equipment which is capable of receiving cable channels, the consumer must subscribe to the cable company's service.
BASIC HOOKUP METHODS
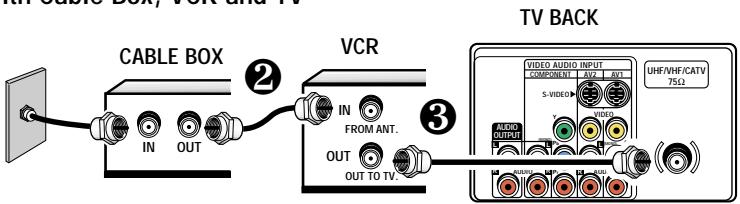
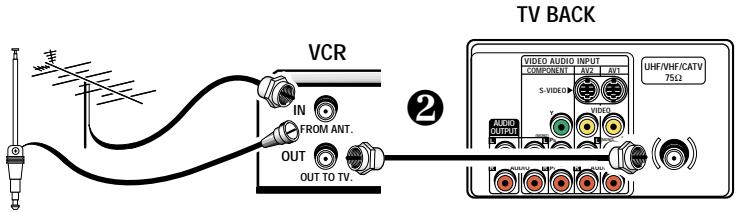
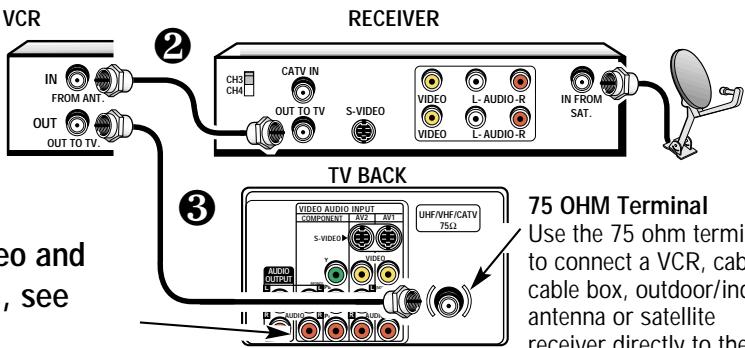
Use one of these methods to connect a signal to your TV. Select 1a—if you have cable service and a VCR, 1b—if you have a cable box and a VCR, 1c—if you have an outdoor or indoor antenna and a VCR, or 1d—if you have a satellite dish and a VCR. Connect your cable or antenna directly to the TV if you don’t have any optional accessories.
1a Cable with VCR and TV
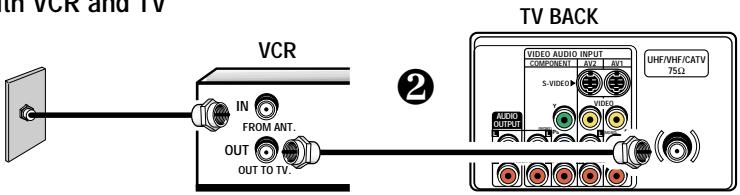
text_image
TV VCR and TV VCR IN FROM ANT. OUT OUT TO TV. ② TV BACK VIDEO AUDIO INPUT COMPONENT AV2 AV3 S-VIDEO VIDEO UHFR/WHF/CATV 75Ω AUDIO OUTPUT1b Cable with Cable Box, VCR and TV
text_image
CABLE BOX VCR IN OUT IN FROM ANT. OUT OUT TO TV. TV BACK VIDEO AUDIO INPUT COMPONENTLY 10Ω 2Ω 3Ω 5-VIDEO VIDEO AUDIO OUTPUT UHF/NHF/CATV 75Ω1c Outdoor or Indoor Antenna with VCR and TV
text_image
VCR IN FROM ANT.. OUT OUT TO TV. 2 TV BACK VIDEO AUDIO INPUT COMPONENT AVI AVI S-VIDEO VIDEO UHF/VHF/CAV 75Ω AUDIO OUTPUT1d Satellite Dish with Receiver, VCR and TV
text_image
VCR IN FROM ANT. OUT OUT TO TV ② RECEIVER CH3 CH4 CATV IN OUT TO TV S-VIDEO VIDEO L-AUDIO-R VIDEO L-AUDIO-R IN FROM SAT. ③ TV BACK VIDEO AUDIO INPUT COMPONENT 1.2V 1.0V S-VIDEO VIDEO AUDIO UHF/VHF/CATV 75Ω Audio OUTPUT II Audi Audio 75 OHM Terminal Use the 75 ohm termini to connect a VCR, cab cable box, outdoor/inc antenna or satellite receiver directly to theUsing the Audio/Video and Components In jacks, see pages 14\~15.
REAR PANEL
text_image
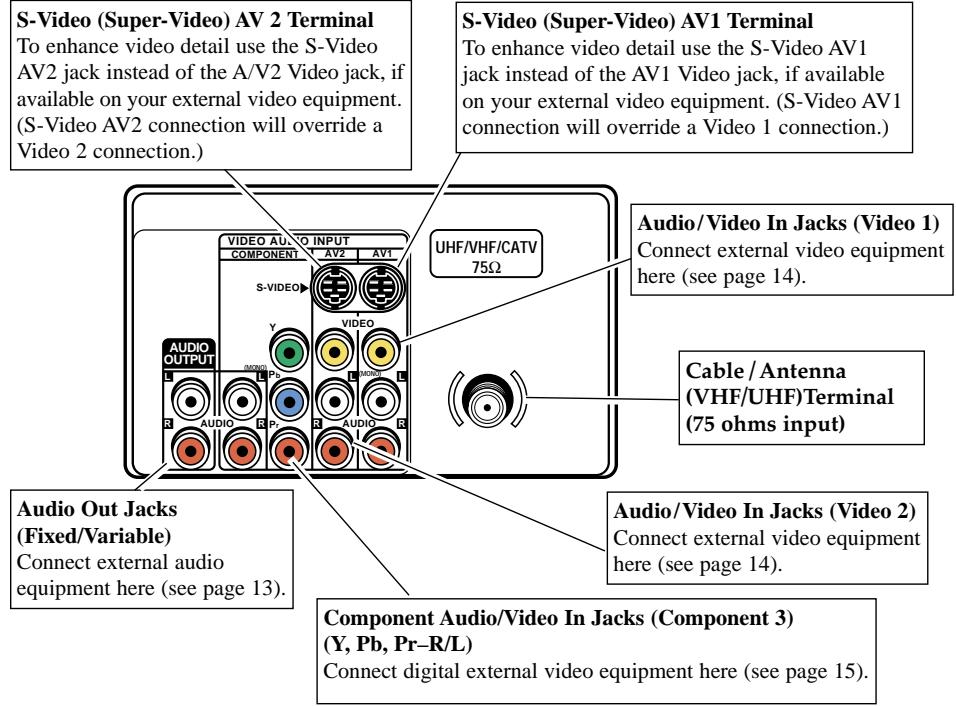
S-Video (Super-Video) AV 2 Terminal To enhance video detail use the S-Video AV2 jack instead of the A/V2 Video jack, if available on your external video equipment. (S-Video AV2 connection will override a Video 2 connection.) S-Video (Super-Video) AV1 Terminal To enhance video detail use the S-Video AV1 jack instead of the AV1 Video jack, if available on your external video equipment. (S-Video AV1 connection will override a Video 1 connection.) Audio/Video In Jacks (Video 1) Connect external video equipment here (see page 14). Cable / Antenna (VHF/UHF)Terminal (75 ohms input) Audio/Video In Jacks (Video 2) Connect external video equipment here (see page 14). Component Audio/Video In Jacks (Component 3) (Y, Pb, Pr–R/L) Connect digital external video equipment here (see page 15)UNIVERSAL/MULTIMEDIA REMOTE CONTROL
Operates your TV, VCR, Cable Converter Box, DVD, and Satellite Receiver. Simply program it according to the directions on pages 7\~9. Then press the proper function key (VCR, TV, CABLE, DVD, SAT, or AUX) to set the remote control to operate each product. The AUX mode can be programmed to operate a VCR, Cable Box, DVD, or Satellite Receiver. Also, this remote offers large Channel, Volume, and Power keys that glow-in-the-dark.
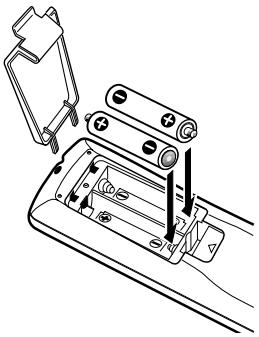
INSTALLING BATTERIES (2 AA not included)
-
Remove the battery cover by pressing the tab and tilting the cover upward. Insert batteries. Make sure you match
⊕ / ⊖ signs on the batteries with marks inside the remote control. -
Replace battery cover. The remote control is ready!
Notes:
- Do not mix old batteries with new ones or mix different types of batteries together.
- Remove the batteries if the remote control will not be used for a month or more. Weak batteries may leak and cause damage.
natural_image
Line drawing of a mechanical device with battery housing and internal components (no text or symbols)
Quick Tips
■ Make sure all cable connectors are fully seated on jacks. See pages 13 \~ 15 before connecting external audio/video equipment.
■ Cables are not supplied for connecting your external equipment.
■ A solid Blue screen with the word Video1, Video2, or Component 3 displayed means that the Video mode is selected, but no signal is being detected at the Video jack. Check connection, and turn on external equipment.
■ Be sure batteries are installed correctly.
■ Point the remote control toward the equipment you want to operate. Objects between the remote control and the equipment may cause misoperation of the remote control function.
Need help?
Visit our Web site at
www.sanyoctv.com
or Call 1-800-877-5032
IMPORTANT NOTE: Spent or discharged batteries must be recycled or disposed of properly in compliance with all applicable laws. For detailed information, contact your local County Solid Waste Authority.
flowchart
graph TD
    A["Point towards TV"] --> B["VCR"]
    A --> C["TV"]
    A --> D["CABLE"]
    A --> E["DVD"]
    A --> F["SAT"]
    A --> G["AUX"]
    B --> H["INPUT POWER RESET"]
    C --> I["1 2 3"]
    D --> J["4 5 6"]
    E --> K["7 8 9"]
    F --> L["CAPTION 0 SLEEP"]
    G --> M["MENU RECALL"]
    H --> N["CH VOL + VOUT"]
    I --> N
    J --> N
    K --> N
    L --> O["MUTE DISPLAY"]
    M --> P["V-GUIDE ENTER"]
    N --> Q["PLAY STOP PAUSE TRACKING"]
    O --> R["RECAV"]
    P --> S["ENTER"]
    Q --> T["TRACKING"]
    style A fill:#f9f,stroke:#333
    style B fill:#ccf,stroke:#333
    style C fill:#ccf,stroke:#333
    style D fill:#ccf,stroke:#333
    style E fill:#ccf,stroke:#333
    style F fill:#ccf,stroke:#333
    style G fill:#ccf,stroke:#333
    style H fill:#cfc,stroke:#333
    style I fill:#cfc,stroke:#333
    style J fill:#cfc,stroke:#333
    style K fill:#cfc,stroke:#333
    style L fill:#cfc,stroke:#333
    style M fill:#cfc,stroke:#333
    style N fill:#cfc,stroke:#333
    style O fill:#cfc,stroke:#333
    style P fill:#cfc,stroke:#333
    style Q fill:#cfc,stroke:#333
    style R fill:#cfc,stroke:#333
    style S fill:#cfc,stroke:#333
    style T fill:#cfc,stroke:#333
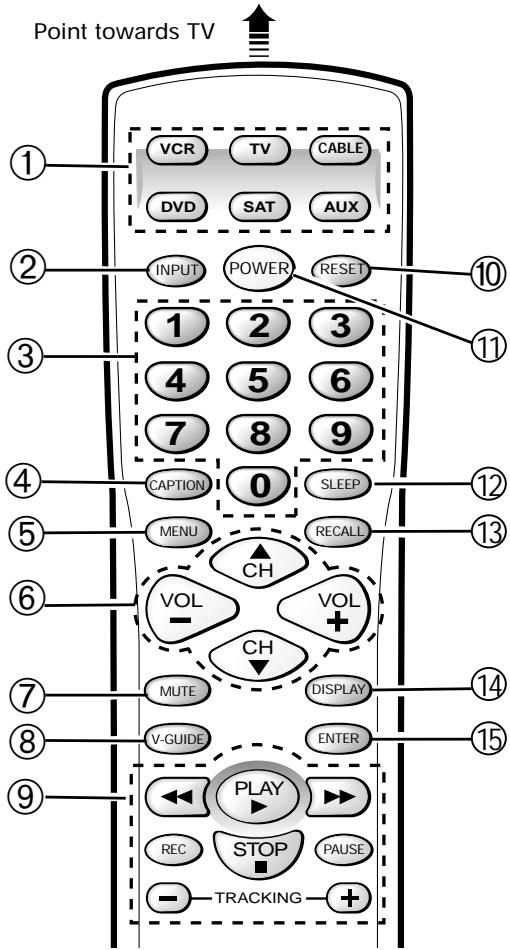
① Mode Keys
Use these keys to program the remote control and to select the operating mode (VCR, TV, CABLE, DVD, SAT, or AUX).
② Input Key—In the TV, DVD, Cable, and Satellite modes, this key selects the program source to display on the screen (TV signal or signal from equipment connected to the A/V jacks). In the VCR mode, this key functions as a VCR’s TV/VCR key.
③ Number Keys
Two keys must be pressed to select a channel.
Example: Press 0 then 6 to select channel 6. For cable channels 100 through 125, press and hold the 1 key until C1-- appears. Then press the other two numbers.
④ Caption Key (See page 18.)
⑤ Menu Key—Use this key with the VOL / VOL and CH / CH keys to navigate and adjust features of the on-screen menu system (see pages 10 \~ 12). Use it to display the Satellite Guide in the Satellite mode.
⑥ Channel (CH) Scanning ( / ) and Volume ( ) Keys
Press to scan through the channels in memory and to adjust the volume.
⑦Mute Key
Press once to turn off the volume. Press again to restore.
Note: When using the audio out jacks this key will not mute the sound in the fixed mode, but will mute the sound in the variable mode.
⑧ V-Guide Key (See pages 16 \~ 17.)
⑨ VCR/DVD Keys
These keys control VCR and/or DVD functions for Fast Forward (◀◀), Rewind (▶▶), Play (▶), Record (Rec), Stop (■), Tracking (−/ +), and Pause.
⑩Reset Key
Press this key twice to restore factory settings. The TV will automatically start Channel Search and clear all customized settings. (See page 13.)
⑪ Power Key
Press to turn TV on or off.
⑫ Sleep Key
Use this key with the “0” key to set the Sleep Timer (see page 15).
⑬ Recall Key
Select a channel then select another channel using the number keys. Press Recall to switch between the channels.
⑭ Display Key
Press once to display the channel number and time. Press twice to display the channel number continuously. Press again to remove the display.
⑮ Enter Key—Satellite operation only.
PROGRAMMING THE UNIVERSAL/MULTIMEDIA REMOTE CONTROL
Find your code. It is next to the brand name of your equipment in the chart below or on page 8.
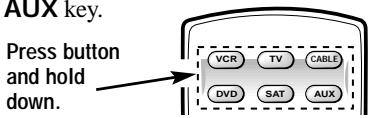
① Press and hold VCR, CABLE, DVD, SAT or AUX key.
text_image
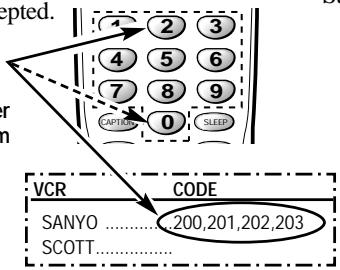
AUX key. Press button and hold down.② Using the NUMBER keys on the remote, enter the three-digit code number for your VCR, DVD, Cable Box, or Satellite. The key will flash 5 times when released if the code was accepted. ||i(1) (2) (3) ||
Enter Code: Example: For a Sanyo VCR, Enter code "200" (from chart below).
text_image
epted. CAPITICS 0 SLEEP VCR CODE SANYO ....200,201,202,203 SCOTT......③ Press the POWER and CHANNEL or PLAY keys to check programming. If they operate properly, programming is completed. If not, use another code, if available and repeat steps.
To Operate Your...
VCR—Press the VCR key.
Television—Press the TV key.
Cable Box—Press the CABLE key.
DVD Player—Press the DVD key.
Satellite—Press the SAT key.

Quick Tips
■ Special key functions: The INPUT key functions as the VCR's TV/VCR key when the Remote Control is in the VCR mode.
■ The VCR, Cable, DVD, and SAT modes will only accept each mode's specific code type.
■ The AUX mode will accept all codes types, but only one at a time.
Need help?
Visit our Web site at
www.sanyoctv.com
or Call 1-800-877-5032
VCR Codes Chart
| BRAND NAME | CODE NO. | BRAND NAME | CODE NO. | BRAND NAME | CODE NO. |
| ADMIRAL | 234,239,243,247,224,229,222,215 | HUGHES | 221 | QUARTZ | 200 |
| ADVENTURA | 228 | JBL | 237 | QUASAR | 245,232,236,223,216 |
| AIKO | 240,205 | JENSEN | 209 | RADIO SHACK | 228,245,223 |
| AIWA | 228,217 | JVC | 220,225,238,226,203,209,221 | RCA | 221,241,246,230,232,236,239,224 |
| AKAI | 209,215 | KEC | 240,205 | 226,229,222,201,207,208,210,216 | |
| AMERICA ACTION | 205 | KENWOOD | 226,238,220,201,203,209 | REALISTIC | 232,239,223,224,228,229,200,201 |
| AMERICA HIGH | 232 | KODAK | 232 | 202,203,206,208,216,217,240 | |
| BELL & HOWELL | 203 | LLOYD'S | 228 | SAMSUNG | 208,233,211,217,222,248 |
| BROKSONIC | 234,243,247,227,204 | LOGIK | 235,219 | SAMTRON | 208 |
| CANDLE | 233,240,222,223,204,205,208 | LXI | 232,221,228,201,202,203,206 | SANKY | 239,229,224 |
| 211,216,217 | 211,217 | SANSUI | 243,226,228,209,219,220 | ||
| CANON | 232,216 | MAGNASONIC | 223,240,205,219 | SANYO | 200,201,202,203 |
| CCE | 240,205 | MAGNAVOX | 204,232,228,211,216,217,219,220 | SCOTT | 234,247,223,227,211 |
| CINERAL | 240,205 | MARTA | 206 | SEARS | 232,223,228,221,200,201 |
| CITIZEN | 233,240,222,205,211,216,217 | MATSUSHITA | 232,216 | 202,203,206,211,216,217 | |
| CRAIG | 223,202,219 | MEI | 232 | SEMP | 211 |
| CRAVER | 204 | MEMOREX | 232,239,243,245,223,224,227,228 | SHARP | 239,229,224 |
| CURTIS MATHES | 232,236,238,222,228,208,209 | 229,221,200,202,203,206,215 | SHINTOM | 219,227 | |
| 211,216,217 | MINOLTA | 221 | SIGNATURE | 217,239,229,228,224,200 | |
| DAEWOO | 205,240,211 | MITSUBISHI | 231,239,244,224,226,229,210,223 | SONY | 214,218,232,237,226,228 |
| DAYTRON | 240,205 | MOTOROLA | 232,239,229,224 | STS | 221 |
| DENON | 221 | MTC | 228,217,219 | SYLVANIA | 228,232,244,204,216,217 |
| DYNATECH | 228 | MULTITECH | 228,217 | SYMPHONIC | 217,228,233,226,202 |
| EMEREX | 214 | NEC | 238,208,223,226,203,206,209 | TATUNG | 226,209 |
| EMERSON | 234,236,240,243,247,223,227,228 | 215,217 | TEAC | 228,209,214,217 | |
| 203,204,205,206,210,211,217 | OLYMPUS | 232 | TECHNICS | 232 | |
| FISHER | 200,201,202,203,211 | OPTIMUS | 239,245,248,223,224,229,203,208 | TEKNIKA | 232,223,228,216,217 |
| FUJI | 232 | ORION | 243,227,234,205,206,210,211,240 | TOMAS | 228,217 |
| FUNAI | 228,233,217 | PANASONIC | 245,232,236,223,202,211,216,219 | TOSHIBA | 211,240,244,202,205,210 |
| GARRARD | 228 | PENNY | 230,232,221,223,208,211,216,219 | VECTOR | 211 |
| GE | 222,246,232,236,239,226 | PENTAX | 238,221 | VIDEO CONCEPT | 211 |
| 229,224,208,212,216 | PHILCO | 204,232,243,228,216,217 | WARDS | 230,232,239,223,224,228,229 | |
| GOLDSTAR | 223,238,226,206,208,215,217 | PHILIPS | 204,232,211,216,217,228 | 221,202,204,208,211,217 | |
| GO VIDEO | 248,249,208,212,219 | PIONEER | 242,204,207,220 | WHITE | |
| GRADIENTE | 228 | PROSCAN | 222,241,246,230,236,226 | WESTINGHOUSE | 240,243,205 |
| HARLEY DAVIDSON | 228 | PROTON | 219 | XR-1000 | 228,232 |
| HEADQUARTER | 200 | PULSAR | 233,240,205, 208,216,217 | YAMAHA | 238,226 |
| HITACHI | 230,246,226,228,221,222,209,217 | QUARTER | 200 | ZENITH | 215,206,237,243,223,225,228,222 |
Cable Converter Box Codes Chart
| BRAND NAME | CODE NO. | BRAND NAME | CODE NO. |
| ABC | 304,306,309,312 | PHILIPS | 325,329,301 |
| 313,314,318,321 | 313,314,322 | ||
| 322,324 | PIONEER | 333,312,317,327 | |
| AIM | 321 | PROSCAN | 327 |
| ARCHER | 334 | QUASAR | 302,307,317 |
| BELL & HOWELL | 313 | RADIO SHACK | 334 |
| CONTEC | 302,305,307,308 | RCA | 328,302,307 |
| 311,318,320,324 | REGAL | 330,307,320 | |
| CPI | 319 | REMBRANT | 305,309 |
| DIAMOND | 320 | SAMSUNG | 310,312 |
| EAGLE | 313 | SCIENTIFIC | |
| EMERSON | 334 | ATLANTA | 327,307,324 |
| GEMINI | 334 | SIGNAL | 310 |
| GENERAL | SIGNATURE | 300,309,321,322 | |
| INSTRUMENTS | 303,309,311,320 | SPRUCER | 302,307,316 |
| 321,322,323,300 | STARCOM | 332,309,311,321 | |
| GOLDSTAR | 312 | 322,323 | |
| GOODMIND | 334 | STARGATE | 309,310,311,321 |
| HAMLIN | 330,320 | 322,334 | |
| HITACHI | 309 | TELEVIEW | 310 |
| HYTEX | 318 | TOCOM | 300,303,304,305 |
| JERROLD | 303,308,309,311 | 306,307 | |
| 313,319,320,321 | TOSHIBA | 331,309,311 | |
| 322,323,300 | 316,322 | ||
| MAGNAVOX | 325,329,301 | UNIKA | 314 |
| 313,314,322 | UNITED ARTISTS | 318 | |
| MEMOREX | 332,313,314 | UNITED CABLE | 309 |
| MOVIE TIME | 306,310,314 | U.S. | |
| NORTHCOAST | 316 | ELECTRONICS | 309,322,324 |
| NSC | 305,306,314 | VIEWSTAR | 326,313,315 |
| OAK | 305,318,320 | WARDS | 321,322 |
| PANASONIC | 302,307,317,324 | WARNER | 312 |
| PARAGON | 313,314 | ZENITH | 331,316,322,324 |
Satellite Receiver Codes Chart
| BRAND NAME | CODE NO. | BRAND NAME | CODE NO. |
| ALPHASTAR...... | 431 | MEMOREX...... | 430 |
| CHAPARRAL...... | 424, 408, 414 | OPTIMUS...... | 430 |
| ECHOSTAR...... | 432, 410, | PANASONIC...... | 428, 400 |
| 413*, 416 | PHILIPS...... | 429, 430 | |
| 417* | PRIMESTAR...... | 411, 425, 427 | |
| EXPRESSVU...... | 432 | PROSCAN...... | 419, 426 |
| FUJITSU...... | 404 | RCA...... | 419, 433, |
| GE...... | 419 | 423, 426 | |
| GEN. | SONY...... | 420 | |
| INSTRUMENTS...... | 425, 427, 435 | STAR CHOICE...... | 435 |
| 403*,405, 415 | STS...... | 402 | |
| HITACHI...... | 407, 421 | TOSHIBA...... | 405, 422 |
| HTS...... | 432 | UNIDEN...... | 429, 430, 401, |
| HUGHES...... | 407 | 406, 409, 412 | |
| JANEIL...... | 404 | VIDEO PALL...... | 404 |
| JERROLD...... | 425, 427 | VIEWSTAR...... | 418 |
| JVC...... | 432 | ZENITH...... | 434, 404 |
| MAGNAVOX...... | 429, 430 | *Use Power key on Receiver. | |
DVD Player Codes Chart
| BRAND NAME | CODE NO. | BRAND NAME | CODE NO. |
| APEX | 523,525 | PANASONIC | 501,518 |
| DENON | 501,520 | PHILIPS | 508,502 |
| EMERSON | 521,524 | PIONEER | 511,505,518 |
| FISHER | 500 | PROSCAN | 504 |
| GE | 504 | RCA | 504 |
| HARMAN/KARDON | 513 | SAMSUNG | 512 |
| JVC | 510,515 | SANYO | 500,526 |
| KENWOOD | 507 | SHARP | 517 |
| MAGNAVOX | 508,502 | SHERWOOD | 519 |
| MARANTZ | 508 | SONY | 506 |
| MITSUBISHI | 503 | TECHNICS | 501 |
| ONKYO | 502,516 | THETA DIGITAL | 511 |
| OPTIMUS | 511 | TOSHIBA | 502,526 |
| ORION | 526 | YAMAHA | 501,509 |
| ORITRON | 522 | ZENITH | 514,502 |
REPLACING BATTERIES
The programming code numbers will remain in memory for 5 minutes as you replace the batteries.
Record your VCR, Cable Box, DVD Player, Satellite Receiver, and AUX codes for future reference.
| VCR Code: | |||
| Cable BoxCode: | |||
| DVD PlayerCode: | |||
| Satellite Code: | |||
| AUX ____LIST DEVICE HERE |
Universal/Multimedia Remote Control Keys Functions Chart
| KEYS | TV MODE | VCR MODE | DVD MODE | SATELLITE MODE | CABLE BOX MODE |
| NUMBER KEYS (0-9) | Use to Select Channels | Use to Select Channels | No Function | Use to Select Channels | Use to Select Channels |
| INPUT | Selects TV/Video Mode | Selects TV/VCR mode | Selects TV/Video Mode | Selects TV/Video Mode | Selects TV/Video Mode |
| ENTER | No Function | No Function | No Function | Makes Selection | No Function |
| RECALL | Selects Previous Channel | Selects Previous Channel | Selects Repeat Function | Selects Previous Channel | No Function |
| MENU | Displays Menu or OSD | No Function | No Function | Displays Guide Screen | No Function |
| CHANNEL (UP) | Selects Next Channel Up | Selects Next Channel Up | Next or Skip Forward | Moves Cursor Up | Selects Next Channel Up |
| CHANNEL (DN) | Selects Next Channel Dn | Selects Next Channel Dn | Previous or Skip Reverse | Moves Cursor Down | Selects Next Channel Dn |
| VOLUME / | Adjusts TV Sound | Adjusts TV Sound | Adjusts TV Sound | Moves Cursor Left/Right | Adjusts TV Sound |
| PLAY (▶) | Selects VCR Play Mode | Selects VCR Play Mode | Selects DVD Play Mode | Selects VCR Play Mode | Selects VCR Play Mode |
| STOP (■) | Selects VCR Stop | Selects VCR Stop | Selects DVD Stop | Selects VCR Stop | Selects VCR Stop |
| FAST FORWARD(▶) | Operates VCR | Operates VCR | Operates DVD | Operates VCR | Operates VCR |
| REWIND (◀◀) | Operates VCR | Operates VCR | Operates DVD | Operates VCR | Operates VCR |
| RECORD (REC) | Selects VCR Record Mode | Selects VCR Record Mode | No Function | Selects VCR Record Mode | Selects VCR Record Mode |
| PAUSE | Selects VCR Pause Mode | Selects VCR Pause Mode | Selects DVD Pause Mode | Selects VCR Pause Mode | Selects VCR Pause Mode |
| TRACKING +/- | Adjusts VCR Head Tracking | Adjusts VCR Head Tracking | Still Frame Step Fwd/Rev | Adjusts VCR Head Tracking | Adjusts VCR Head Tracking |
| RESET | Operates TV ONLY | No Function | No Function | No Function | No Function |
| CAPTION | Operates TV ONLY | No Function | No Function | No Function | No Function |
| SLEEP | Operates TV ONLY | No Function | No Function | No Function | No Function |
| V-GUIDE | Operates TV ONLY | No Function | No Function | No Function | No Function |
| MUTE | Operates TV ONLY | No Function | No Function | No Function | No Function |
| DISPLAY | Operates TV ONLY | No Function | No Function | No Function | No Function |
| MODE KEYS | Press these keys (VCR, TV, CABLE, DVD, SAT, and AUX) when programming the universal/multimedia remote control and to choose an operating mode. | ||||
The keys on this remote control operate functions similar to those of your original remote controls. Refer to your original owner's manuals for specific key and features operation.
Operating Tips
- The VCR and DVD modes are preprogrammed with Sanyo codes.
- The associated mode key lights when you press any operating key (channel, volume, etc.) to indicate which equipment is being controlled.
- Some manufacturers use different types of remote controls. If your brand has several codes listed, program the unit with different codes until you find the correct one. Larger numbers may represent newer models.
-
There may be VCRs, DVDs, Cable Boxes, and Satellite Receivers that this remote control cannot operate. Some models may operate only partially.
-
This remote control uses an invisible (infrared) light beam to operate the equipment. Objects between the equipment and the remote control can block this light beam. Therefore, the remote control must be pointed directly at the equipment you want to operate.
- This remote control cannot add features to your equipment. They must have been originally provided by your equipment's manufacturer.
- If the remote control fails to operate any of your equipment replace the batteries. Be sure batteries are installed correctly.

Quick Tips
■ Always follow on-screen instructions.
■ The menu will display on the screen for approximately 20 seconds. Press MENU again to redisplay.
■ All TV adjustments are controlled through the menu.
■ Use the CHANNEL CH / CH and VOLUME VOL / VOL
keys to navigate through the menus and to make selections from the menus.
■ Ⓤ To see the time of day after setting the clock, press the DISPLAY key.
■ Extended Data Service (XDS) signal may not be transmitted by all broadcasters.
■ Under weak stereo signal conditions, you may receive better quality sound in the “Mono” position.
Need help? Visit our Web site at www.sanyoctv.com or Call 1-800-877-5032
TV ADJUSTMENT AND SETUP
The on-screen menu provides the viewer with easy access to adjustments and settings. Just use the keys on the remote control and follow the instructions.
HOW TO MAKE ADJUSTMENTS
- Press MENU key.
- Use the / keys to highlight the desired feature.
- Use the / keys to choose desired option (indicates selected item).
- Press the MENU key to exit.
Items with submenus requires additional steps.
SETTING THE CLOCK
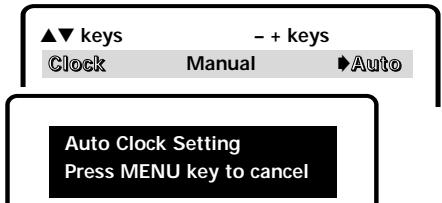
To use the Auto Clock feature, a local PBS station that is broadcasting an XDS signal must be received. The Auto Clock searches for the transmitted signal and automatically sets the clock.
To set the clock automatically:
- Press MENU key.
- Use the 🔊 key to activate Auto setting.
Notes: - The clock will be cleared after a power interruption. When power is restored, the TV will display the Auto Clock setup menu on the screen automatically.
- Cable Box users must set the clock manually.
To set the clock manually:
- Press the 🔊 key to choose Manual.
-
Press MENU key for adjustments.
-
Use the VOL key to set the hour and the VOL key to set the minutes.
| ▲▼ keys | - + keys | |
| Clock | ►Manual | Auto |
| Audio | ►Stereo | Mono SAP |
| Picture/Sound | ►Sports | Movie |
| Auto | Manual | |
| Initial Channel | OFF | ON C--- |
| Antenna | ►Cable | VHF/UHF |
| CH. Search | ►NO | Start |
| CH. Scan Memory | C 34 | Added |
| Aspect Ratio | ►4:3 | 16:9 |
| Scan Velocity | OFF | Low High |
| TV Speakers | ►ON | OFF |
| Audio Output | ►Fixed | Variable Espanol |
| Menu Language | ►English | Francais |
| Press MENU key for adjustment | ||
text_image
▲▼ keys - + keys Clock Manual Auto Auto Clock Setting Press MENU key to cancel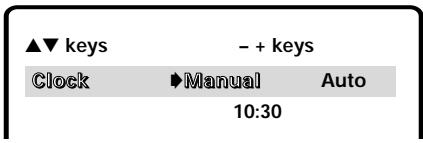
text_image
▲▼ keys - + keys Clock ►Manual Auto 10:30SETTING AUDIO MODE
Select desired sound setting, Stereo, Mono, or SAP (secondary audio program).
Note: Stereo and SAP must be part of the broadcast signal.
- Choose Stereo, Mono, or SAP from the Audio options.
Note: The TV will automatically reset to stereo if unplugged or a power interruption occurs.
| ▲▼ keys | - + keys | ||
| Clock | |||
| Audio | ►Stereo | Mono | SAP |
ADJUSTING PICTURE/SOUND
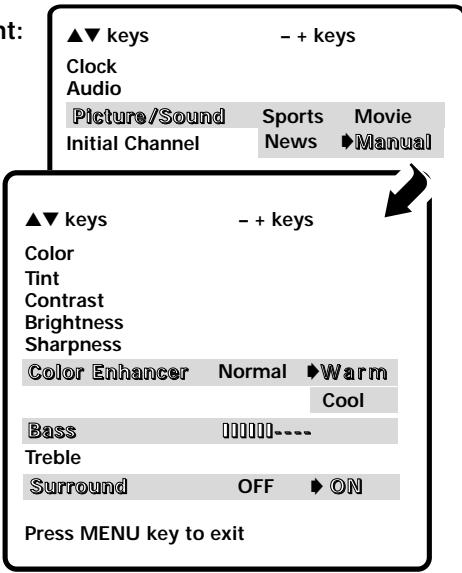
For automatic picture/sound adjustment:
Choose Sports, Movie, or News from the Picture/Sound options.
Adjust the picture/sound manually:
- Choose Manual from the Picture/Sound options.
- Press the MENU key to open the picture/sound settings submenu.
- Use the / keys to highlight the picture or sound setting you want to change.
- Use the VOL / VOL keys to adjust settings.
INITIAL CHANNEL SETUP
The TV can be programmed to tune to your favorite channel each time it is turned on, such as, a news or sports network, or the output of your VCR.
- Press MENU key.
- Use the / keys to highlight Initial Channel.
- Press the 🔊 key to choose ON. Select favorite channel (example): C03. To select cable channels above 99, press and hold the 1 key until C1-- appears.
RESETTING THE ANTENNA/CABLE MODE AND CHANNEL SEARCH
Resetting the Antenna/Cable Mode or CH. (Channel) Search is required only if additional channels become available, such as moving to another city or having a cable service installed.
- Choose Start from the Ch. Search menu options.
text_image
▲▼ keys Clock Audio Picture/Sound Initial Channel - + keys Sports News Movie ►Manual ▲▼ keys Color Tint Contrast Brightness Sharpness Color Enhancer Normal ▶Warm Cool Bass IIIIII--- Treble Surround OFF ▶ON Press MENU key to exit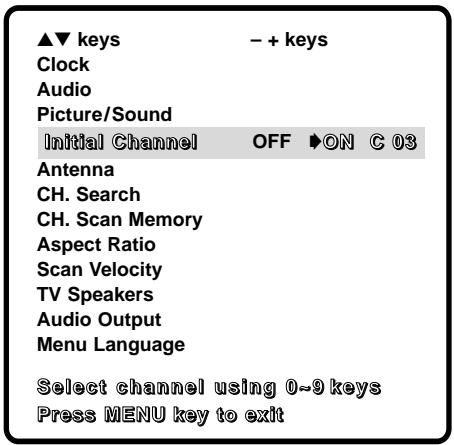
text_image
▲▼ keys - + keys Clock Audio Picture/Sound Initial Channel OFF ▶ON C 03 Antenna CH. Search CH. Scan Memory Aspect Ratio Scan Velocity TV Speakers Audio Output Menu Language Select channel using 0~9 keys Press MENU key to exit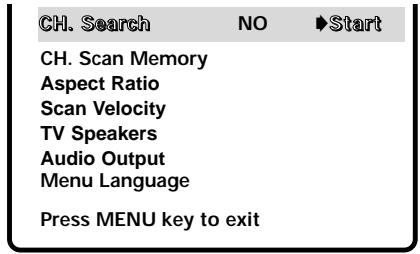
text_image
CH. Search NO Start CH. Scan Memory Aspect Ratio Scan Velocity TV Speakers Audio Output Menu Language Press MENU key to exit
Quick Tips
■ To expand your viewing experience select Sports, Movie, or News to match the program you are watching.
■ Use the color enhancer feature to highlight the picture flesh tones and color highlights. Selecting warm will deepen the picture red tints and cool will highlight the picture blue tints.
■ Surround sound will be automatically on when Sports or Movie is selected. Surround expands the sound effects while receiving MTS stereo signals.
■ When Initial Channel is set to OFF the TV will tune to the last channel selected when powered on.
■ When setting the Antenna mode, choose Cable if your TV is connected to a cable system, otherwise choose VHF/UHF.
Need help?
Visit our Web site at
www.sanyoctv.com
or Call 1-800-877-5032

Quick Tips
■ Channels deleted from scan memory can be selected with the number keys.
■ The channel number area must be highlighted before pressing the VOL + key to add or delete.
■ Restoring deleted channels, use the on-screen menu to manually add channels or start CH. (Channel) Search from the menu.
■ Press the RESET key twice to automatically start Channel Search and clear all customized settings.
■ To enhance the picture image, use the Scan Velocity feature to increase the picture sharpness.
Need help?
Visit our Web site at
www.sanyoctv.com
or Call 1-800-877-5032
ADDING OR DELETING CHANNELS
- Press MENU key.
- Use the / keys to highlight CH. Scan Memory.
- Press the VOL key to highlight the channel number entry area.
- Enter the channel number you want to add or delete (example): C34. For cable channels above 99, press and hold the 1 key until C1-- appears. Then enter the other two numbers.
- Press the key to change the present setting. Example: Added will change to Deleted.
Aspect Ratio
Scan Velocity
TV Speakers
Audio Output
Menu Language
CH. Scan Memory © 34 Deleted
Select channel using △▽, 0-9 keys
Press MENU key to exit
ASPECT RATIO
Use this feature when digital equipment is connected to the component input jacks. The: 4:3 is for normal viewing. The 16:9 setting changes the picture image to widescreen viewing with minimal portion of top and bottom compressed to fill screen.
- Press MENU key.
- Use the / keys to highlight Aspect Ratio.
- Press the VOL / VOL keys to select 4:3 or 16:9.
Aspect Ratio ▶4:3 16:9
Scan Velocity OFF ▶ Low
TV Speakers
Audio Output
Menu Language
Press MENU key to exit
TV SPEAKERS
- Press MENU key.
- Use the ▶/▼ keys to highlight TV Speakers.
- Press the / keys to turn the speakers ON or OFF.
Note: Sound will not be produced through your TV speakers if the OFF mode is selected.
TV Speakers ▶ON OFF
Audio Output
Menu Language
Press MENU key to exit
AUDIO OUTPUT
This convenient menu option enables you to select a fixed or variable audio signal.
- Press MENU key.
- Use the CH/CH keys to highlight Audio Output.
- Press the VOL / VOL + keys to select Fixed or Variable.
Fixed Mode (Constant audio output level from TV):
Use external equipment's volume control to adjust sound level.
TV Speakers
Audio Output Fixed Variable
Menu Language
Press MENU key to exit
Variable Mode (Output from TV varies with volume):
Use the TV and external equipment's volume controls to adjust the sound level.
RESET TING THE TV
Press the RESET key to automatically reset the television to factory settings. These features will automatically reset:
- Picture/Sound Adjustments: Color, Tint, Contrast, Brightness, Sharpness, Color Enhancer, Bass, Treble, and Surround Sound
- Channel Memory
- Audio to Stereo
- Initial Channel to OFF
- Caption to OFF
• V-Guide to OFF
• TV Speakers to ON
• Audio Output to FIXED - Aspect Ratio to 4:3 (normal)
- Scan Velocity to HIGH
- Language to English
- Auto Clock and Sleep Timer (if previously set)
If desired, personal settings can be made again using the menu options.
Press RESET key again to return factory preset and begin channel search
Auto Clock was cleared Begin setup procedures?
NO YES
Use -/+ keys to select Then press the MENU Key
USING THE AUDIO OUT JACKS
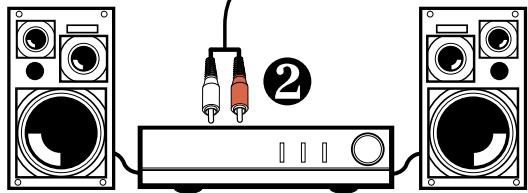
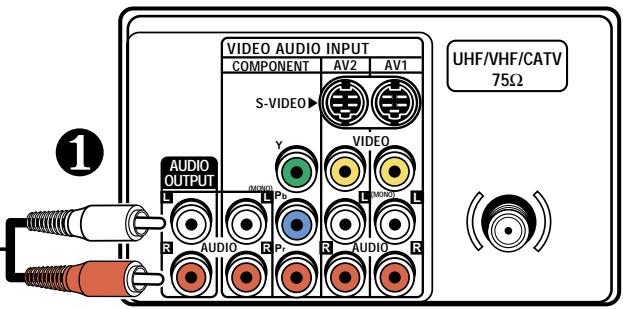
CONNECTING A STEREO AMPLIFIER TO AUDIO OUT JACKS
- Connect the TV Audio Output (R/L) ① to the Stereo Amplifier In (R/L) ②.
- Press POWER to turn on the TV. Turn on external equipment also.
- Use the AUDIO OUT on-screen menu options (see page 12) to select Fixed or Variable output signal.
Notes: When TV Speakers is in the ON mode, sound will be produced through your TV and external speakers.
When TV Speakers is in the OFF mode, sound will be produced only through external speakers.
natural_image
Diagram of audio equipment setup with two speakers, a audio router, and two connected audio dividers (no text or labels)Stereo Amplifier

Quick Tips
■ Make sure all cable connectors are fully seated on jacks.
■ Always match cables according to the colors; RED for right audio and WHITE for left audio.
■ Position your TV at least 2 feet from stereo speakers. The magnets in the speakers may affect the picture quality.
■ Do not connect external speakers directly to the TV.
Need help?
Visit our Web site at
www.sanyoctv.com
or Call 1-800-877-5032
text_image
VIDEO AUDIO INPUT COMPONENT AV2 AV1 S-VIDEO AUDIO OUTPUT R AUDIO R P L MOUT L R AUDIO R UHF/VHF/CATV 75ΩBack of TV

Quick Tips
■ Make sure all cable connectors are fully seated on jacks.
■ Always match cables according to the colors; RED for right audio, WHITE for left audio and YELLOW for video.
■ A/V1 and A/V2 jacks have identical functions. Any compatible video equipment can be connected to either set of jacks.
■ A solid Blue screen with the word Video1 or Video2 displayed means that the Video mode is selected, but no signal is being detected at the Video jack. Check connection, and turn on external equipment.
■ You may be able to use the remote control to operate your VCR, DVD, Cable Box, Satellite Receiver, and TV. (See pages 7\~9.)
Need help? Visit our Web site at www.sanyoctv.com or Call 1-800-877-5032
USING THE AUDIO/VIDEO IN JACKS
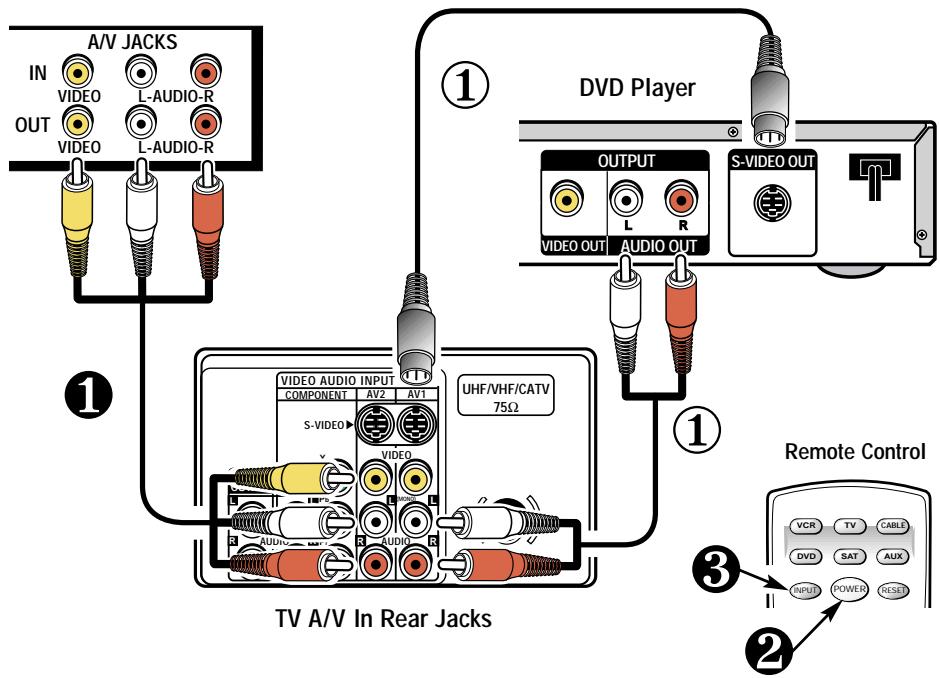
CONNECTING A VCR OR OTHER EXTERNAL EQUIPMENT
Switch off TV and external equipment before connecting cables. (Cables are not supplied.)
- Connect VCR, DVD, DSS, or other equipment's Audio Video Out to the TV Audio Video Input ①.
For Mono VCR (Single Audio Jack) connect VCR Audio Out to TV Audio (L) Input.
Follow the same procedure to connect other compatible video equipment to the second set of A/V jacks.
Optional
Connect VCR, DVD, or other equipment's S-Video Out to the TV S-Video In (AV1) Jack or S-Video In (AV2) Jack ①.
Note: Using the S-Video In (AV1) jack overrides the Video 1 jack, and using the S-Video In (AV2) jack overrides the Video 2 Input jack.
- Press POWER ② to turn on the TV. Turn on external equipment also.
- Press the INPUT key ③ to select program source: TV signal or signal from the equipment you have connected to the A/V1 or A/V2 jacks.
Back View of a VCR
text_image
IN A/V JACKS IN VIDEO L-AUDIO-R OUT VIDEO L-AUDIO-R ① DVD Player OUTPUT S-VIDEO OUT VIDEO OUT AUDIO OUT ① TV A/V In Rear Jacks VIDEO AUDIO INPUT COMPONENT AV2 AV1 UHF/VHF/CATV 75Ω S-VIDEO VIDEO AUDIO ② Remote Control VCR TV CABLE DVD SAT AUX INPUT POWER RESETUSING THE COMPONENT AUDIO/VIDEO IN JACKS
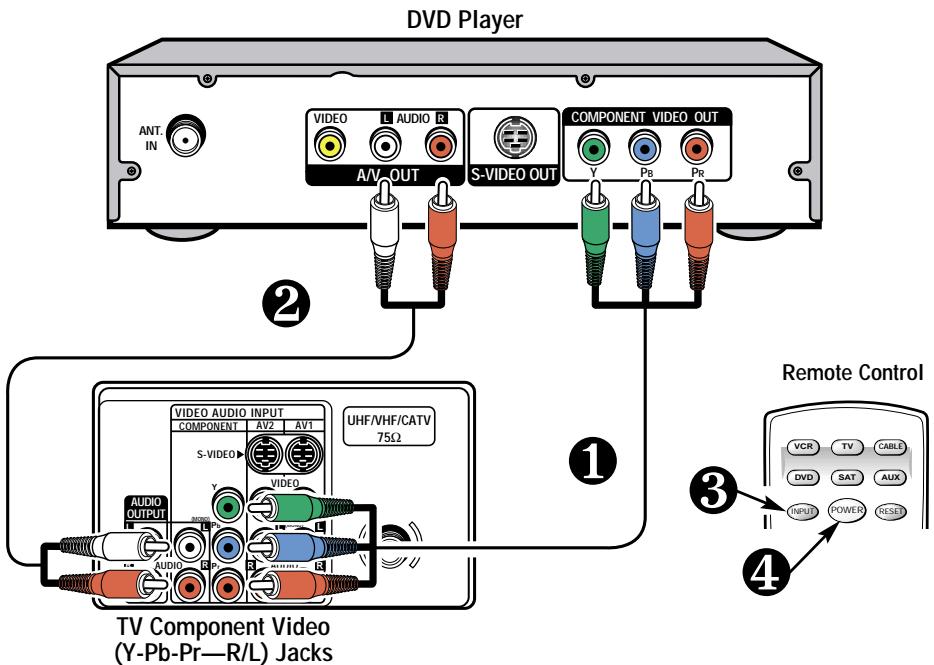
CONNECTING A DVD OR OTHER DIGITAL EXTERNAL EQUIPMENT
Switch off TV and external equipment before connecting cables. (Cables are not supplied.)
- Connect a DVD or other digital equipment's Component Video Out to the TV Component Video In (Y-Pb-Pr) Jacks ①.
- Connect the DVD's Audio Out to the TV Component Audio In (L/R) Jacks ②.
- Press POWER ③ to turn on the TV. Turn on external equipment also.
- Press the INPUT key to select program source: TV signal or signal from the equipment you have connected to the Component jacks ④.
text_image
DVD Player ANT. IN VIDEO L AUDIO R A/V-OUT S-VIDEO OUT COMPONENT VIDEO OUT Y Pb Pr 1 2 3 4 TV Component Video (Y-Pb-Pr—R/L) Jacks Remote Control VCR TV CABLE DVD SAT AUX INPUT POWER RESET
Quick Tips
■ Always match cables according to the colors.
■ You may be able to use the TV remote control to operate your DVD.
(See pages 7\~9.)
■ A solid Blue screen with the word Component 3 displayed means that the Video mode is selected, but no signal is being detected at the Component jack. Check connection, and turn on external equipment.
Need help?
Visit our Web site at
www.sanyoctv.com
or Call 1-800-877-5032
SETTING THE SLEEP TIMER
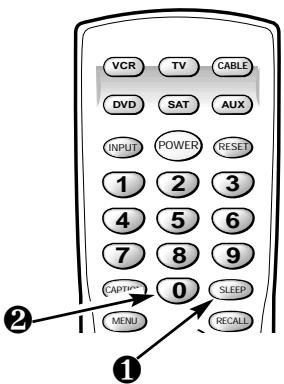
The Sleep Timer will switch off the TV automatically.
- Press the SLEEP key.
- Use the 0 key to select the desired time (from 30 minutes up to 3 hours).
Note: The Sleep Timer cancels when the TV is turned off or if a power failure occurs.
text_image
VCR TV CABLE DVD SAT AUX INPUT POWER RESET 1 2 3 4 5 6 7 8 9 CAPTV 0 SLEEP MENU RECALL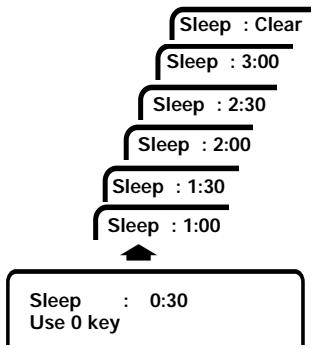
flowchart
graph TD
    A["Sleep : 0:30\nUse 0 key"] --> B["Sleep : 1:00"]
    B --> C["Sleep : 1:30"]
    C --> D["Sleep : 2:00"]
    D --> E["Sleep : 2:30"]
    E --> F["Sleep : 3:00"]
    F --> G["Sleep : Clear"]

Quick Tips
■ Use the CHANNEL CH / CH keys and the VOLUME VOL / VOL keys to navigate through the menus and to make selec- tions from the menus.
■ V-Guide feature is accessible only from the remote control.
■ The TV guidelines rating icon will generally appear in the upper left hand corner of your TV screen.
■ The V-Guide display remains on screen for approximately 20 seconds. If it disappears, press the V-GUIDE key.
Need help? Visit our Web site at www.sanyoctv.com or Call 1-800-877-5032

C 34 10:00
XYZ TITLE: THE SHOW Rating: TVPG-V
V-GUIDE INFORMATION
NOTE: THIS FEATURE IS DESIGNED TO COMPLY WITH THE UNITED STATES OF AMERICA'S FCC V-CHIP REGULATIONS. THEREFORE, IT MAY NOT FUNCTION WITH BROADCASTS THAT ORIGINATE IN OTHER COUNTRIES.
This Sanyo television is equipped with an electronic V-Chip to interpret MPAA and TV Parental Guidelines rating codes. When these codes are detected, the TV will automatically display or block the program, depending upon choices you make when setting up the V-Guide system.
ABOUT MPAA AND TV PARENTAL GUIDELINES
MPAA and TV Parental Guidelines are rating systems that provide advance cautionary information to parents about the content of movie and television programming.
MPAA is a voluntary rating system used by the movie industry. TV Parental Guidelines are modeled after the MPAA ratings and were designed to be simple to use, easy to understand, and easy to find.
TV Parental Guidelines contain both age-based and content-based information. This gives parents discretionary ways of choosing appropriate material for their children to view.
Content ratings are represented by the initials D (Suggestive Dialog), L (Adult Language), S (Sexual Situations), V (Violence), and FV (Fantasy Violence). When programming contains any or all of these conditions, these letters become part of the icon that is displayed on the TV screen.
A rating icon will generally appear in the upper left hand corner of the TV screen for fifteen seconds at the beginning of a program and should be repeated at the beginning of the second hour of a long program. It may also appear when returning from commercials. There may be other instances when these icons will be displayed as well. Parents are encouraged to become familiar with these icons and their meanings.
WHERE CAN I FIND ADVANCE NOTICE OF PROGRAM RATING
Publishers of programming guides have been asked to include these ratings along with other information they publish. You can expect to find this information in newspapers, magazines, and on-screen listings and guides.
TYPES OF PROGRAMS TO RECEIVE RATING
The TV Parental Guidelines will apply to various types of TV programming, including: specials, mini-series, and movies. Sports and news shows do not currently carry guidelines.
V-GUIDE OPERATION
Use this feature to supervise television viewing for young children. This television can be set to automatically block programs with content you deem as inappropriate for your children to view, including: suggestive dialog, adult language, sexual situations, violence, and fantasy violence.
The ability of the television to block the reception of specific programming content depends upon several conditions: 1) The program must be rated, 2) Networks must broadcast the rating code data, 3) Cable companies must transmit the rating code signal, and 4) The TV must be properly setup to decode the signal.
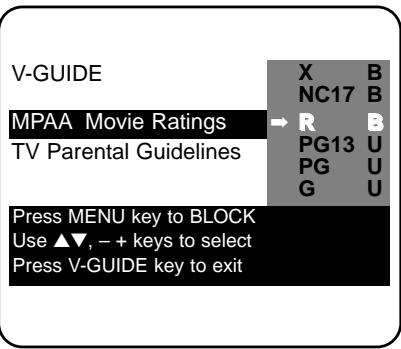
SETTING MPAA MOVIE RATING
- Press the V-GUIDE key on the remote control to display menu.
- Press the VOL + key to switch V-Guide ON.
- Press the VOL key again. Then use the CH/CH keys to highlight rating.
- Press the MENU key to Block (B) or Unblock (U) selected rating. (→ Arrow indicates selection.)
- Press the ⬆ key to return to the V-Guide Options menu.
SETTING AGE-BASED GUIDELINES
- Use the / keys to highlight TV Parental Guidelines.
- Press the VOL + key. Then use the CH / CH keys to highlight rating.
- Press the MENU key to Block (B) or Unblock (U) selected rating. (→ Arrow indicates selection.)
SETTING CONTENT-BASED GUIDELINES
- Follow steps 6 and 7. Use the / keys to highlight Content.
- Press the MENU key to display the Content Option menu.
- Use the ⬤/♥ keys to highlight a category (D-Suggestive Dialog, L-Adult Language, S-Sexual Situations, V-Violence, FV-Fantasy Violence).
- Press the VOL + key. Then use the CH / CH keys to highlight a rating.
- Press the MENU key to Block (B) or Unblock (U) selected rating. (→ Arrow indicates selection.)
- Press the V-GUIDE key to exit; or press the vol key to return to the Content Options menu.
- Repeat steps 11 through 13 to Block (B) or Unblock (U) additional content ratings, if desired.
TURNING OFF THE V-GUIDE
- Press the V-GUIDE key.
- Use the VOL / VOL + keys to select OFF.
text_image
V-GUIDE MPAA Movie Ratings TV Parental Guidelines Press MENU key to BLOCK Use ▲▼, - + keys to select Press V-GUIDE key to exit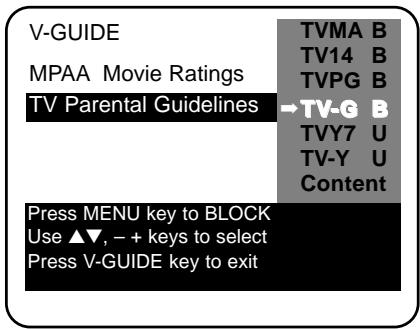
text_image
V-GUIDE MPAA Movie Ratings TV Parental Guidelines Press MENU key to BLOCK Use ▲▼, - + keys to select Press V-GUIDE key to exit TVMA B TV14 B TVPG B →TV-G B TVY7 U TV-Y U Content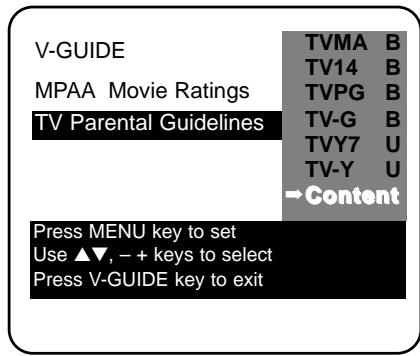
text_image
V-GUIDE MPAA Movie Ratings TV Parental Guidelines Press MENU key to set Use ▲▼, - + keys to select Press V-GUIDE key to exit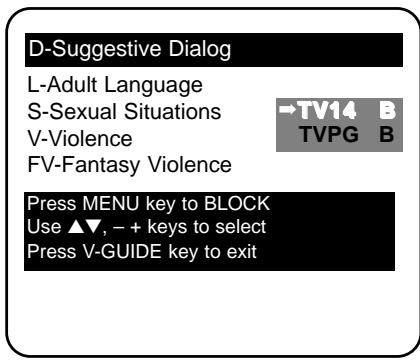
text_image
D-Suggestive Dialog L-Adult Language S-Sexual Situations V-Violence FV-Fantasy Violence →TV14 B TVPG B Press MENU key to BLOCK Use ▲▼, - + keys to select Press V-GUIDE key to exitNote: Networks and local stations may or may not include the content ratings portion of the TV Parental Guidelines.

Quick Tips
■ The TV will automatically block (B) ratings above or unblock (U) ratings below selection. For example, if you block rating R, NC17 and X will be blocked as well.
■ Blocking TVY7 does not block higher ratings.
■ You can block a content rating such as TVPG-V and still be able to watch TVPG programs with ratings of S-L-D provided TVPG is unblocked (U).
■ To view Blocked (B) programs, set V-GUIDE to OFF, or press the RESET key twice to clear all Blocked (B) ratings and customized settings.
■ When in the V-Guide menu system, the VOL / VOL keys allows you to navigate between the ratings and the options menu.
Need help?
Visit our Web site at
www.sanyoctv.com
or Call 1-800-877-5032

Quick Tips
■ If Caption Text mode is selected and no captioned text is broadcasted, a black box may appear and remain on the TV screen.
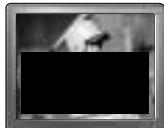
To remove this black box, set captioning to any mode other than Text1 or Text2 or press the RESET key to cancel captioning and customized settings.
■ Channel number continuous display mode is not available when captioning is on.
Need help? Visit our Web site at www.sanyoctv.com or Call 1-800-877-5032
CLOSED-CAPTIONING

Captioning is textual information transmitted along with the picture and sound so it can be displayed on the TV screen. Because different types of captions can be transmitted with the TV signal, separate captioning modes are provided. The captioning modes recognized by this model are: Caption1, Caption2, Text1, and Text2. Local broadcasters decide which caption signals to transmit. They may not choose to provide captions or may provide captions in one or all of the available modes.
Caption1: This is the main mode used for program captioning (words match the program you are watching). Almost all broadcasters will use Caption1 to transmit program captions. These captions are generally one or two lines.
Caption2: This is an alternative mode for program captioning. Caption2 may be used by the broadcaster to provide captions in another language, such as, Spanish or French.
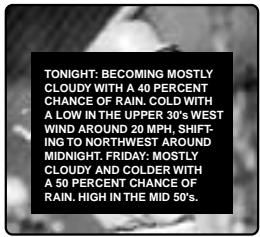
Text1: This mode is used to display large amounts of text. This text will appear within a black box that may be nearly as large as the TV screen. Text displayed in this manner does not generally relate to the program. These captions may be used by broadcasters to provide weather reports, community bulletins, stock quotes, etc.
Text2: This is an alternative mode used to display large amounts of text. The same types of information displayed in Text1 can be displayed in Text2.
Quikcap: Quikcap allows captions to toggle on and off with the Mute function. For example, the phone rings; you press the MUTE key on the remote control to block the TV sound; the captions display automatically. When you finish your conversation and press the MUTE key again to restore the sound, the captions will disappear.
Quikcap displays program captions in the Caption1 mode.
SETTING CAPTIONS
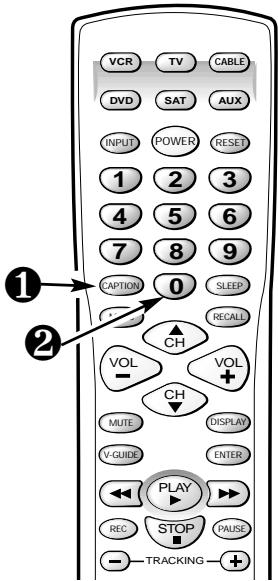
- Press the CAPTION key on the remote control.
- Use the 0 key to select OFF, Caption1, Caption2, Text1, Text2, or Quikcap.

text_image
TWO OUTS AND TWO STRIKESCaption1/ Caption2
text_image
TONIGHT: BECOMING MOSTLY CLOUDY WITH A 40 PERCENT CHANCE OF RAIN. COLD WITH A LOW IN THE UPPER 30'S WEST WIND AROUND 20 MPH. SHIFTING TO NORTHWEST AROUND MIDNIGHT. FRIDAY: MOSTLY CLOUDY AND COLDER WITH A 50 PERCENT CHANCE OF RAIN. HIGH IN THE MID 50's.Text1/Text2
text_image
VCR TV CABLE DVD SAT AUX INPUT POWER RESET 1 2 3 4 5 6 7 8 9 CAPTION 0 SLEEP RECALL CH VOL - VOL + CH MUTE DISPLAY V-GUIDE ENTER PLAY - REC STOP PAUSE - TRACKING +TROUBLESHOOTING
Before calling for assistance, please look for the condition that most closely resembles your problem in the following charts, then follow the instructions for that condition. Visit our Web site at www.sanyoctv.com or call toll free 1-800-877-5032.
TV Turns off by itself

text_image
Check antenna — Was the connector loose or disconnected? connection. Yes. Problem could be auto shutdown due to loss of signal. (See page 4.) No. — Press the POWER key. Did the TV come on? Yes. Sleep Timer may have been set. No. — Unplug the TV for a few seconds. Reconnect and press POWER.No Picture or Poor Picture
text_image
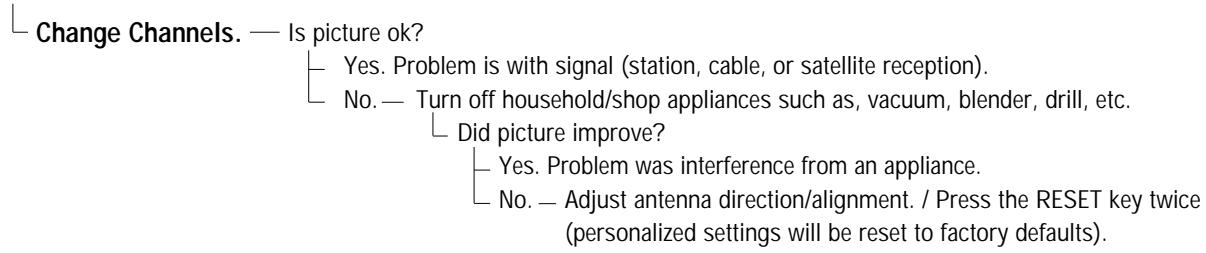
Change Channels. — Is picture ok? Yes. Problem is with signal (station, cable, or satellite reception). No. — Turn off household/shop appliances such as, vacuum, blender, drill, etc. Did picture improve? Yes. Problem was interference from an appliance. No. — Adjust antenna direction/alignment. / Press the RESET key twice (personalized settings will be reset to factory defaults).Poor color or no color

text_image
Change Channels. — Is color better? Yes. Problem is with program or signal (station, cable, or satellite reception). No. — Adjust antenna direction/alignment. Did color improve? Yes. Antenna was not adjusted properly for the channel you're watching. No. — Press the RESET key twice (personalized settings will be reset to factory defaults).My TV screen is solid blue

text_image
Press the INPUT — Did the Blue Screen disappear? key. Yes. The TV was in the Video mode. (A Blue Screen will appear when the Video mode is selected and there is no video signal being detected.) Your AV equipment may be turned off or unplugged.(Continued on next page.)
TROUBLESHOOTING (Continued)
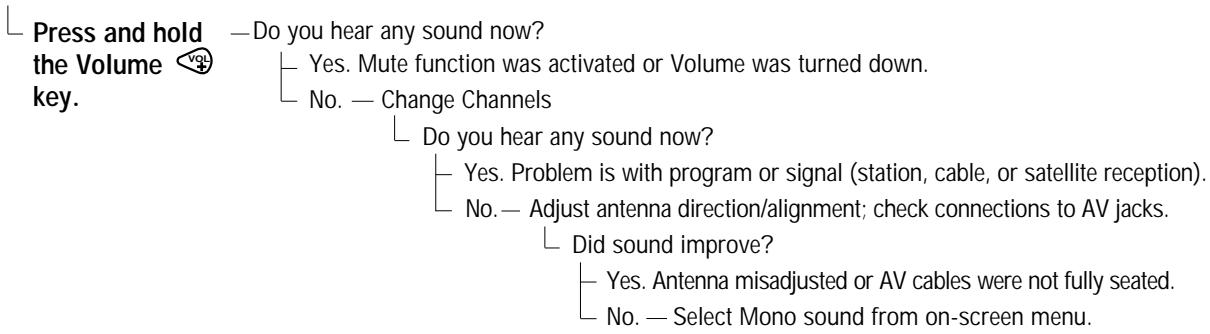
No sound, Poor Stereo sound
text_image
Press and hold the Volume vol key. —Do you hear any sound now? Yes. Mute function was activated or Volume was turned down. No. — Change Channels Do you hear any sound now? Yes. Problem is with program or signal (station, cable, or satellite reception). No. — Adjust antenna direction/alignment; check connections to AV jacks. Did sound improve? Yes. Antenna misadjusted or AV cables were not fully seated. No. — Select Mono sound from on-screen menu.No Captioning

text_image
Is the program you are watching closed-captioned? Yes. Set captioning on. Press the Caption key then press the 0 key to highlight Caption1. No.— Tune to a channel that is broadcasting a closed-captioned program.A Black box appears on the screen

text_image
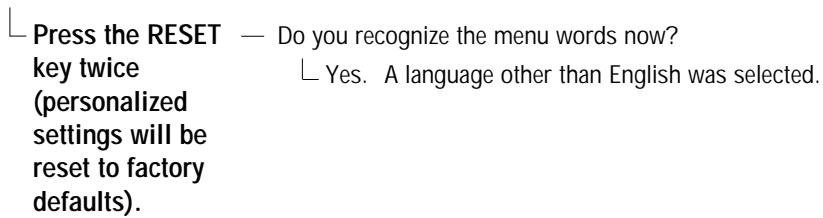
Change Channels. — Did the black box disappear or disappear briefly then reappear? Yes. TV station is broadcasting a Caption text signal without any textual data. Press the RESET key twice (customized settings will be reset to factory defaults). To retain customized settings, just turn captioning off (see page 18).I don't recognize words in the on-screen menu
text_image
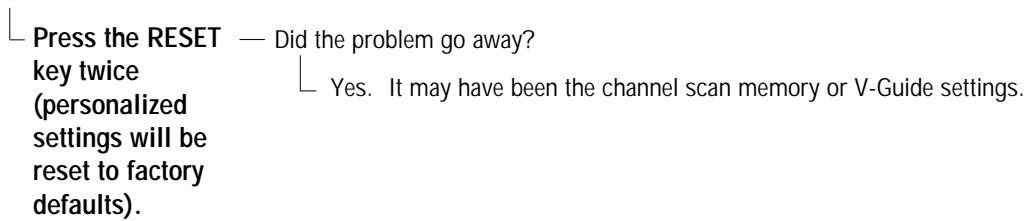
Press the RESET — Do you recognize the menu words now? key twice (personalized settings will be reset to factory defaults).Cannot select or scan some channels
text_image
Press the RESET — Did the problem go away? key twice (personalized settings will be reset to factory defaults).My remote control will not operate my Television
Press the TV key — Does the remote control work now?
on the Remote Control. Then try it again. Be sure to point the remote control at the TV.
Yes. Another mode was selected. Press the appropriate key to operate the different types of equipment. (Remote must be programmed. See pages 7\~9.)
No. — Replace the batteries or confirm that they are properly installed.
My remote control will not operate my VCR, Cable Box, DVD, or Satellite Receiver
Press the appropriate — Does the remote control operate the equipment now?
key: VCR, CABLE, DVD, or SAT key on the Remote Control. Then try it again. (Make sure the equipment is turned on.)
— Yes. Another mode was selected. Press the appropriate button to operate the different types of equipment. (Remote must be programmed. See pages 7\~9.) No. — Reprogram the remote control.
The cabinet makes a popping sound
This is a normal condition during the warm-up and cool down of the plastic cabinet parts.
CARE AND CLEANING
CLEANING THE CABINET:
The surface of the cabinet can be damaged if not properly maintained. Many common household aerosol sprays, cleaning
agents, solvents and polishes will cause permanent damage to the fine surface.
- Unplug the power cord before cleaning the television.
- Clean the cabinet with a soft dry cloth.
CLEANING THE TELEVISION SCREEN:
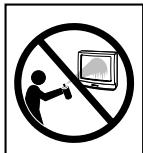
- Use a soft cloth moistened with a non-alkaline diluted soap solution. Gently rub surface until it is fully dry.
Notes: Never spray liquids on the screen because they can run down and drip onto
the chassis. This may cause component failure not covered under Warranty.
Never try to polish away any stain or other blemish, or use an abrasive material on the screen surface as this action may permanently damage the surface of the picture tube.

This symbol on the nameplate means the product is Listed by Underwriters' Laboratories Inc. It is designed and manufactured to meet rigid U.L. safety standards against risk of fire, casualty and electrical hazards.
MEXICO GUARANTEE
DESCRIPTION: Television
BRAND: SANYO
MODEL: DS32920
GUARANTEE
THIS APPARATUS THAT YOU HAVE ACQUIRED, HAS A ONE YEAR GUARANTEE FOR MANUFACTURING DEFECTS AND A ONE YEAR SERVICE WARRANTY FROM THE DATE OF PURCHASE GRANTED BY:
COMERCIALIZADORA MEXICO--AMERICANA, S. DE R.L. DE C.V.
UNDER THE FOLLOWING CONDITIONS:
- TO MAKE THE GUARANTEE EFFECTIVE, SIMPLY SHOW THIS POLICY FILLED OUT BY THE STORE OR SUPPLIER UNIT OR THIS SALES INVOICE, WITH THE APPARATUS IN ANY OF THE SERVICE CENTERS INDICATED ON THIS GUARANTEE.
- IF THE FAULT IS ATTRIBUTED TO A MANUFACTURING DEFECT, THE APPARATUS WILL BE FIXED WITH NO COST TO THE CONSUMER.
- REPAIR TIME WILL NEVER BE MORE THAN 30 DAYS. IF THIS TIME HAS ELAPSED, AND THE PRODUCT ISN'T REPAIRED, COMERCIALIZADORA MEXICO-AMERICANA, S. DE R.L. DE C.V. WILL PROCEED TO EFFECTUATE THE EXCHANGE FOR AN EQUIVALENT APPARATUS OR THE RETURN OF THE BUYING-SALE COST RESPECTIVELY.
THE GUARANTEE WILL BE NULL AND VOID IN THE FOLLOWING CIRCUMSTANCES:
A) IF THE APPARATUS HAS BEEN USED IN A MANNER INCONSISTENT WITH THE MANUFACTURERS INSTRUCTIONS.
B) IF THE APPARATUS HAS BEEN USED IN A MANNER INCONSISTENT WITH THE MANUFACTURERS WARNINGS OR PRECAUTIONS.
C) IF THE APPARATUS HAS BEEN EXPOSED TO SUDDEN CHANGES IN VOLTAGE.
D) IF THE APPARATUS HAS SUFFERED IRREPARABLE AND ESSENTIAL DETERIORATION DUE TO THE ACTIONS OF THE CONSUMER.
E) IF THE APPARATUS HAS BEEN OPENED OR SOMEONE OTHER THAN OURSELVES HAS ATTEMPTED TO REPAIR IT.
F) THIS POLICY IS NULL IF IT DOESN'T HAVE THE REQUIRED DATES BELOW AND THE STAMP OF THE STORE WHERE THE SALE TOOK PLACE.
G) THE TRANSPORTATION COSTS OF THE PRODUCT DERIVED FROM THE EFFECTUATION OF THIS POLICY WILL BE BILLED TO THE BUSINESS.
APPARATUS:____ SERIAL No.
CLIENT'S NAME:
DOMICILE:
CITY:
STATE:
DATE OF SALE:
TALLER DE SERVICIO Y VENTA DE
United States and Canada Warranty
ONE-YEAR LIMITED WARRANTY
THIS LIMITED WARRANTY IS VALID ONLY ON SANYO TELEVISIONS PURCHASED AND USED IN THE UNITED STATES OF AMERICA, CANADA, AND PUERTO RICO, EXCLUDING THE UNITED STATES' OTHER TERRITORIES AND PROTECTORATES. THIS LIMITED WARRANTY APPLIES ONLY TO THE ORIGINAL PURCHASER, AND DOES NOT APPLY TO PRODUCTS USED FOR INDUSTRIAL OR COMMERCIAL PURPOSES.
FOR ONE YEAR from the date of purchase, Sanyo Manufacturing Corporation will replace any defective TV without charge to the original purchaser.
To insure proper warranty exchange, keep the original sales receipt for evidence of purchase. Return the defective TV to the retailer along with the receipt and the included accessories, such as the remote control. The defective TV will be exchanged for the same model, or a replacement model of equal or greater value, if necessary. Replacement model will be contingent on availability and at the sole discretion of Sanyo Manufacturing Corporation.
THE FOREGOING WARRANTY IS EXCLUSIVE AND IN LIEU OF ALL OTHER WARRANTIES OF MERCHANTABILITY OR FITNESS FOR A PARTICULAR PURPOSE.
OBLIGATIONS
For one year from the date of purchase, Sanyo Manufacturing Corporation warrants this product to be free from defects in material and workmanship under normal use and conditions. Should replacement be necessary under this warranty for any reason due to manufacturing defect or malfunction during the first year from date of original purchase, Sanyo Manufacturing Corporation will provide a new TV via exchange at the retailer at no charge.
For customer assistance, whether during or out of the warranty period, call toll free 1-800-877-5032.
Weekdays 7:30 AM – 7:00 PM Central Time
Saturday 7:30 AM – 4:00 PM Central Time
This warranty expresses specific contractual rights; retail purchasers may have additional statutory rights which vary from state to state.
(EFFECTIVE: April 1, 2000)
For your protection in the event of theft or loss of this product, please fill in the information requested below and KEEP IN A SAFE PLACE FOR YOUR OWN PERSONAL RECORDS.
Model No.
Serial No.
(Located on back of unit)
Date of Purchase ____
Purchase Price ____
Where Purchased ____ ____

text_image
SANYOSanyo Manufacturing Corp. 3333 Sanyo Road, Forrest City, AR 72335
CONSOMMATION 115 watts
DIMENSION HORIZONTALE (LARGEUR) .. 30.2 in. (768mm)
DIMENSION VERTICALE (HAUTEUR) . . . 28.8 in. (732mm)
PROFONDEUR 22.7 in. (577mm)
POIDS APPROX. (KG/LB) 136.6 lbs. (62.0 Kg.)
INSTALLATION DES PILES (2 AA, non fournies)
natural_image
Technical line drawing of a car interior showing battery pack, switch, and internal compartments (no text or symbols)
Conseils
text_image
VCR TV CABLE DVD SAT AUXtext_image
Touches ▲▼ Touches - + Couleur Teinte Contraste Luminosite Nettete Enrichis Couleur Normal Chaud Frais Graves I I I I I I I I I I I I I I I I I I I I I I I I I I I I I I I I I I I I I I I I I Aigues Ambiophonie NON OUI Prss MENU pour sortirAuto Clock was cleared Begin setup procedures?
NO YES
Use -/+ keys to select Then press the MENU Key
UTILISATION DES PRISES DE SORTIE AUDIO
BRANCHEMENT D'UN AMPLIFICATEUR STÉRÉO DANS LES PRISES DE SORTIE AUDIO
GARANTIE LIMITÉE D'UN AN
LA PRÉSENTE GARANTIE LIMITÉE N'EST ACCORDÉE QU'AUX TÉLÉCOULEURS SANYO ACHETÉS ET UTILISÉS AU CANADA, AUX ÉTATS-UNIS ET À PORTO RICO, MAIS À L'EXCEPTION DES AUTRES TERRITOIRES ET PROTECTORATS DES ÉTATS-UNIS. CETTE GARANTIE LIMITÉE NE S'APPLIQUE QU'À L'ACHETEUR INITIAL; ELLE NE COUVRE PAS LES ARTICLES UTILISÉS À DES FINS INDUSTRIELLES OU COMMERCIALES.
Sanyo Manufacturing Corp.
3333 Sanyo Road, Forrest City, AR 72335
ESPAÑOL
PESO (APROX.) 136.6 lbs. (62.0 Kg.)
natural_image
Technical line drawing of a mechanical assembly with no visible text or symbols
Consejos Rápidos
text_image
VCR TV CABLE DVD SAT AUXtext_image
Diagram showing audio equipment setup with two speakers, a connected audio jack, and labeled connection number ②flowchart
graph TD
    A["Dorm. : Cancel"] --> B["Dorm. : 3:00"]
    B --> C["Dorm. : 2:30"]
    C --> D["Dorm. : 2:00"]
    D --> E["Dorm. : 1:30"]
    E --> F["Dorm. : 1:00"]
    F --> G["Dorm. : 0:30\nUse tecla 0"]

Consejos Rápidos
natural_image
Black and white photo of a person sitting on a bench (no visible text or symbols)text_image
Prohibition sign with prohibition symbol and computer screen icon, indicating no use or absence of a device.natural_image
Two baby babies sitting side by side, one covering face with hand on cheeks, the other smiling (no text or symbols visible)It Makes A Difference Where Your TV Stands
Congratulations on your purchase! As you enjoy your new product, please keep these safety tips in mind:
The Issue
☐ If you are like most Americans, you have a television in your home. Many homes, in fact, have more than one television.
The home theater entertainment experience is a growing trend, and larger televisions are popular purchases and are not always supported on the proper TV stands.
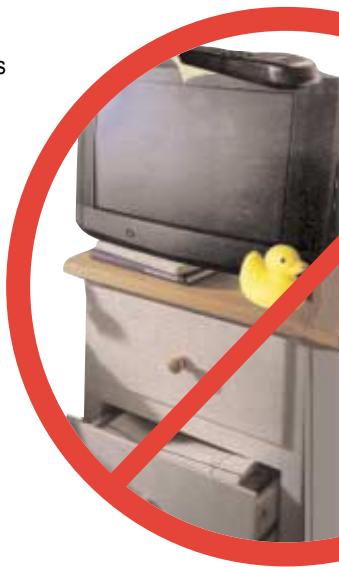
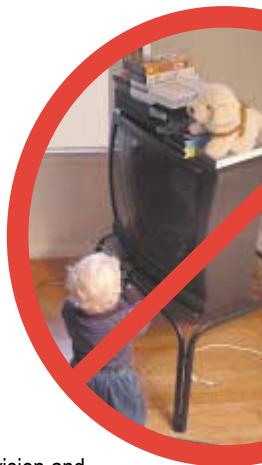
Sometimes televisions are improperly secured or inappropriately situated on dressers, bookcases, shelves, desks, audio speakers, chests, or carts. As a result, TV sets may fall over and may cause unnecessary injury.
natural_image
Interior scene showing a child near a kitchen counter with a red prohibition symbol (no text or symbols on the main subject)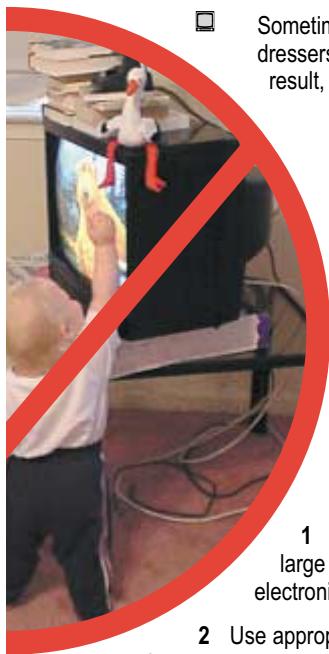
text_image
Something dressers result, 1 large electroni 2 Use appropSanyo Cares!
☐ The industry is committed to making home entertainment enjoyable and safe.
The Consumer Electronics Association formed the Home Entertainment Support Safety Committee comprised of television and consumer electronics furniture manufacturers to advocate children's safety and educate customers and their families about television safety.
Tune Into Safety
1 One size does NOT fit all. Use the appropriate furniture that is large enough to support the weight of your television (and other electronic components).
2 Use appropriate angle braces, straps, and anchors to secure your furniture to the wall (but never screw anything directly into the TV).
3 Carefully read and understand the other enclosed instructions for proper use of this product.
4 Don't allow children to climb on or play with furniture and television sets.
5 Avoid placing any items on top of TVs such as VCRs and remotes that may pique the children's curiosity.
6 Remember that children can become excited while watching a program and can potentially push or pull a TV over.
7 Share our safety message on this hidden hazard of the home with your family and friends. Thank you!