
Pure water UV WP3891 - Water filter PHILIPS - Free user manual and instructions
Find the device manual for free Pure water UV WP3891 PHILIPS in PDF.


| Product Type | UV Water Filter |
| Model | WP3891 |
| Brand | Philips |
| Filtration Technology | UV + Activated Carbon |
| Flow Rate | 1.5 L/min |
| Capacity | Up to 2000 L per filter set |
| Dimensions (W x D x H) | 120 x 100 x 350 mm |
| Weight | 1.2 kg |
| Power Supply | AC 220-240 V, 50/60 Hz |
| Power Consumption | 15 W (UV lamp) |
| UV Lamp Life | Approx. 9000 hours (1 year at typical use) |
| Filter Replacement Indicator | Yes, electronic indicator |
| Main Functions | Removes bacteria, viruses, chlorine, sediment, bad taste |
| Installation Type | Countertop or under-sink (with adapters) |
| Material | ABS plastic, food-grade materials |
| Safety Features | Automatic shut-off if UV lamp fails, water leakage protection |
| Maintenance | Replace UV lamp annually, replace carbon filter every 6 months |
| Spare Parts Available | UV lamp, carbon filter, pre-filter, O-rings |
| Certifications | CE, RoHS, NSF 55 (Class A) for UV |
| Warranty | 2 years |
Frequently Asked Questions - Pure water UV WP3891 PHILIPS
User questions about Pure water UV WP3891 PHILIPS
0 question about this device. Answer the ones you know or ask your own.
Ask a new question about this device
Download the instructions for your Water filter in PDF format for free! Find your manual Pure water UV WP3891 - PHILIPS and take your electronic device back in hand. On this page are published all the documents necessary for the use of your device. Pure water UV WP3891 by PHILIPS.
USER MANUAL Pure water UV WP3891 PHILIPS
natural_image
Exterior view of a Philips brand electronic device (no visible text or symbols beyond branding)WP3890
WP3891
EN User manual 3
Congratulations on your purchase and welcome to Philips! To fully benefit from the support that Philips offers, register your product at www.philips.com/welcome.
1.0.1 Pure water
Pure water is our life: it cleanses our body, enlivens our mind and rejuvenates our soul. Pure water, though a basic necessity, is within the reach of only a few. With a mission to help millions of people gain access to pure drinking water, Philips offers the ultimate pure water dispenser.
Water first passes through the macro filter where bigger particles are removed. Then it passes through the dual filter (sediment and activated carbon) where particulates, turbidity, chlorine, volatile organic compounds, single-celled parasites and larger microorganisms are removed. Finally the water passes through the UV chamber where the UV rays destroy bacteria and viruses, and give you absolutely safe and pure drinking water.
Our pure water dispenser combines the excellence of European technology with sleek, elegant styling and simple operation to offer you an enjoyable pure drinking water experience. We invite you and your family to live this pure water experience.
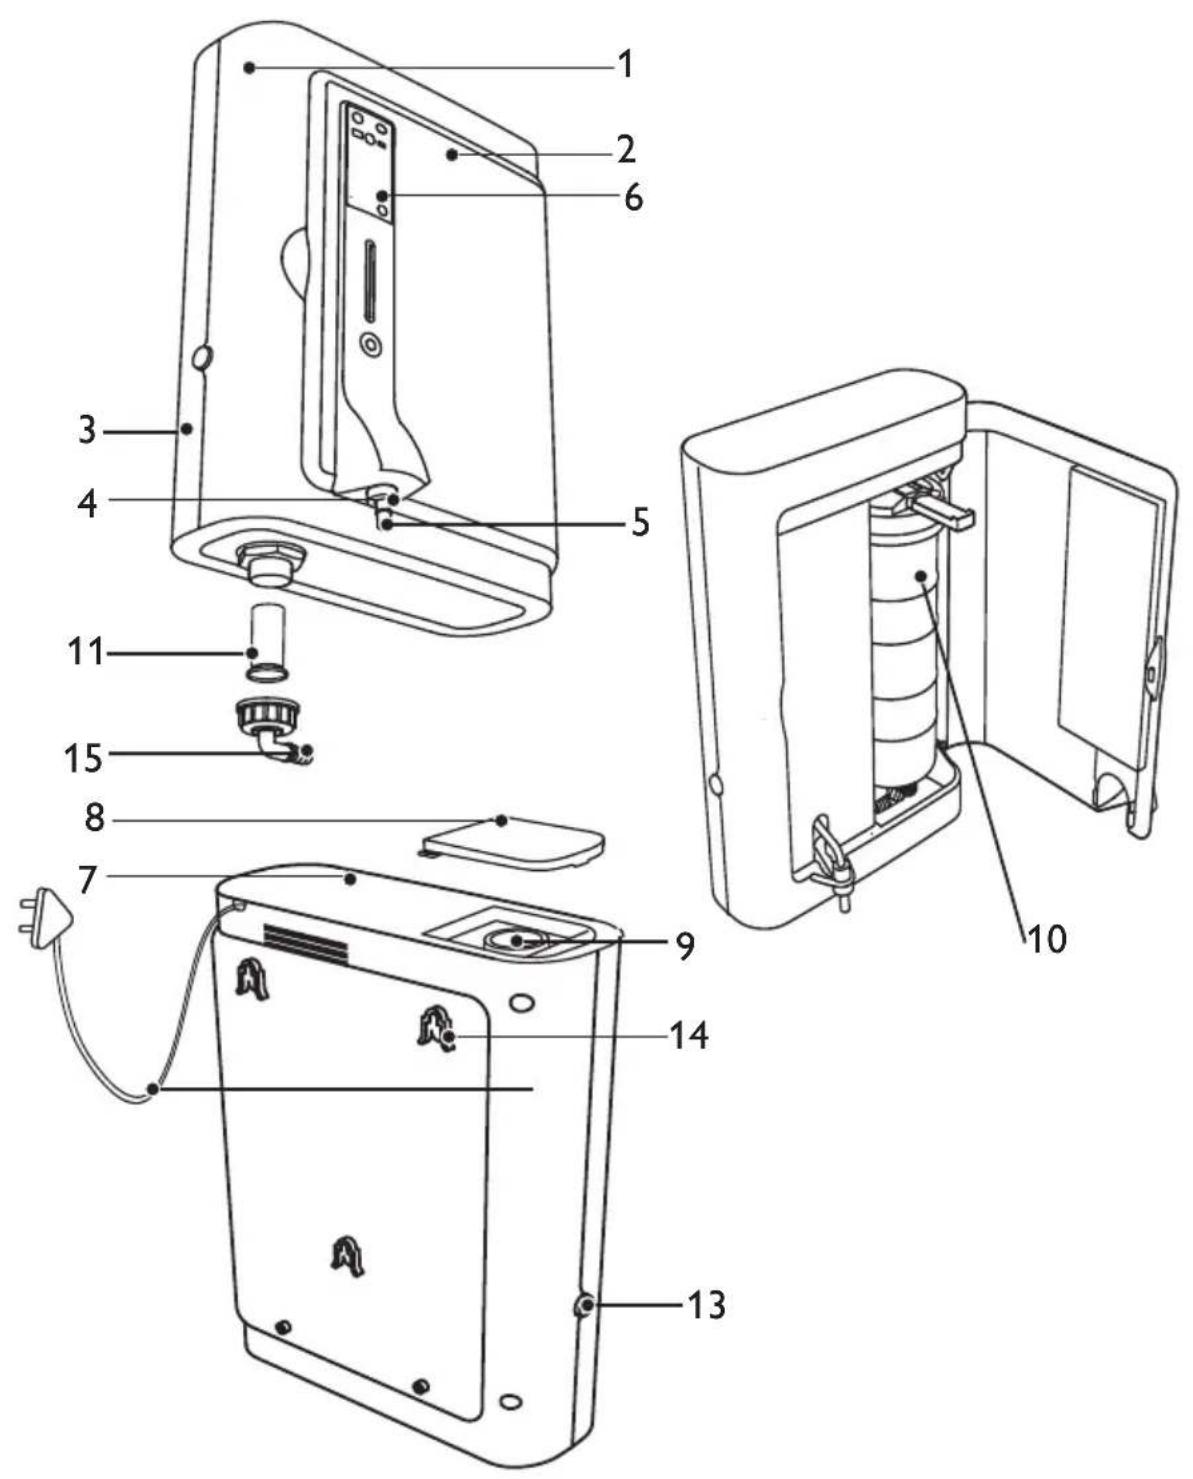
2 General description
1 Front panel
2 Appliance door
3 Back panel
4 Water outlet
5 Water outlet cap
6 Control panel with display
7 Top cover
8 Cover of UV chamber
9 UV chamber
10 Filter holder with dual filter (sediment and activated carbon)
11 Macro filter
12 Mains cord
13 Power on/off button
14 Mounting holes
15 Water inlet connector
3 Important
Read this user manual carefully before you use the appliance and save it for future reference.
3.0.1 Danger
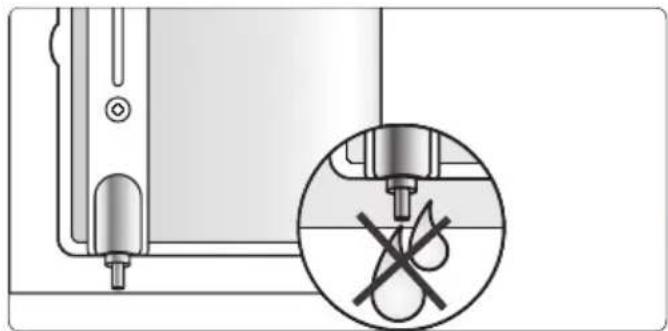
- Do not spill water or any other liquid onto the appliance.
3.0.2 Warning
- Check if the voltage indicated on the appliance corresponds to the local mains voltage before you connect the appliance.
- If the mains cord is damaged, you must have it replaced by Philips, a service centre authorised by Philips or similarly qualified persons in order to avoid a hazard.
- This appliance is not intended for use by persons (including children) with reduced physical, sensory or mental capabilities, or lack of experience and knowledge, unless they have been given supervision or instruction concerning use of the appliance by a person responsible for their safety.
• Children should be supervised to ensure that they do not play with the appliance.
3.0.3 Caution
• Make sure you mount the pure water dispenser properly according to the instructions in this user manual.
• Make sure the pure water dispenser is mounted stably in vertical position.
- Make sure you install the pure water dispenser in accordance with state and local regulations.
- Do not install the pure water dispenser in direct sunlight or in a hot location, e.g. close to a stove or over the cooker.
- Do not close the water outlet when the pure water dispenser is in operation or in waiting mode. This will create pressure on all internal components and can lead to leakage and a hazardous situation.
- Store the filtered water in properly closed and clean containers for not more than 48 hours.
- Do not store the water in a water pot (matkas) or a candle filter, as this can recontaminate the water.
• Always buy original Philips replacement filters. - Replace the filter according to the instructions in this user manual.
- Use the PureFlush function if the pure water dispenser has not been used for 2 days.
• Always handle the quartz tube carefully during cleaning. - Do not use an extension cord to supply power to the pure water dispenser.
- Do not connect the pure water dispenser to a hot water tap.
- Do not connect ordinary tubes or hoses to the water outlet to collect water from the pure water dispenser.
- Do not open the appliance door while you are collecting water from the pure water dispenser.
- Do not connect the pure water dispenser to a drain.
- Do not use an expired filter. An expired filter affects the performance of the pure water dispenser.
- Do not place anything on top of the pure water dispenser.
- Do not hang anything on the tube and mains cord of the appliance.
- Do not use any chemical to disinfect or clean the pure water dispenser externally or internally (tubes etc.).
- Do not clean any plastic parts in a dishwasher or boil them.
- Do not replace the Philips TUV PLS 9W lamp with any other ordinary or UV lamp. This will affect the microbiological performance of the pure water dispenser and make it ineffective.
- When you replace the UV lamp unit and/or clean the quartz tube, make sure you place
all parts back according to the instructions in this user manual.
- Do not forget to clamp the tube that connects the pure water dispenser to the tap. Improper clamping of the tube may lead to leakage.
3.0.4 Compliance with standards
This Philips pure water dispenser conforms to the highest standards for contaminant reduction, structural integrity and material safety. It thus ensures that pure water is made easy - always. The following certifications are a proof of that.
- This Philips appliance complies with all standards regarding electromagnetic fields (EMF). If handled properly and according to the instructions in this user manual, the appliance is safe to use based on scientific evidence available today.
- This Philips pure water dispenser conforms to NSF/ANSI 42 for removal of chlorine and particulates. It removes all classes of particulates from Class I until Class VI – particle size 0.5μm to 80 μm).
- This Philips pure water dispenser conforms to NSF/ANSI 53 for the removal of turbidity and volatile organic chemicals (VOCs) and cysts (single-celled parasites).
- This Philips pure water dispenser conforms to NSF/ANSI 55 Class A protocol (2004) for the disinfection of microbiologically contaminated water that meets all other public health standards. Tested by Kiwa Water Research, the Netherlands.
kiwa
Partner for progress
• This Philips pure water dispenser has been awarded the Gold Seal by the WQA (Water
Quality Association, USA) for products that meet or exceed industry standards for contaminant reduction, structural integrity and material safety.

4 Preparing for use
We advise you to have the pure water dispenser installed by trained service technicians.

Note:
If the water pressure in your area is lower than the specified minimum pressure (0.5 bar), we advise you to use a suitable domestic water pump.

Note:
If the water pressure in your area is higher than the specified maximum pressure (2.0 bar), the use of a pressure reducing valve is required.
4.1 Installation
1 Select a suitable location for the pure water dispenser.
• Install the pure water dispenser at a convenient and safe location where it poses no risk of injury.
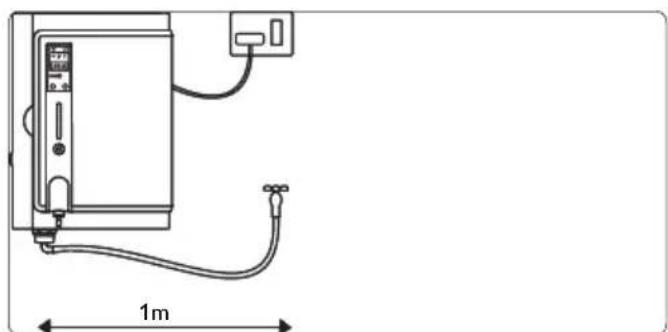
• Install the pure water dispenser 1m away from the tap.
natural_image
Line drawing of a wall-mounted electrical enclosure with attached tubing and a 1m height dimension (no text or symbols)• Install the pure water dispenser in vertical position. Do not install it at an angle or in horizontal position.
- Only connect the mains plug of the pure water dispenser to a socket located higher than the pure water dispenser.
• Make sure that the display is at eye level or slightly above eye level.
2 Drill 3 holes in the wall as shown in picture.
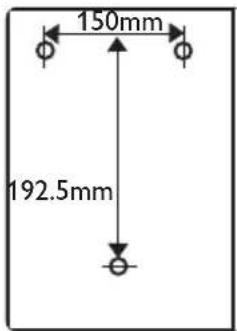
3 Screw 3 screws into the holes and place the pure water dispenser onto the screws.
4 Connect the water inlet hose to the tap.
5 Put the mains plug in the wall socket.
5 Features
5.0.1 Display panel description
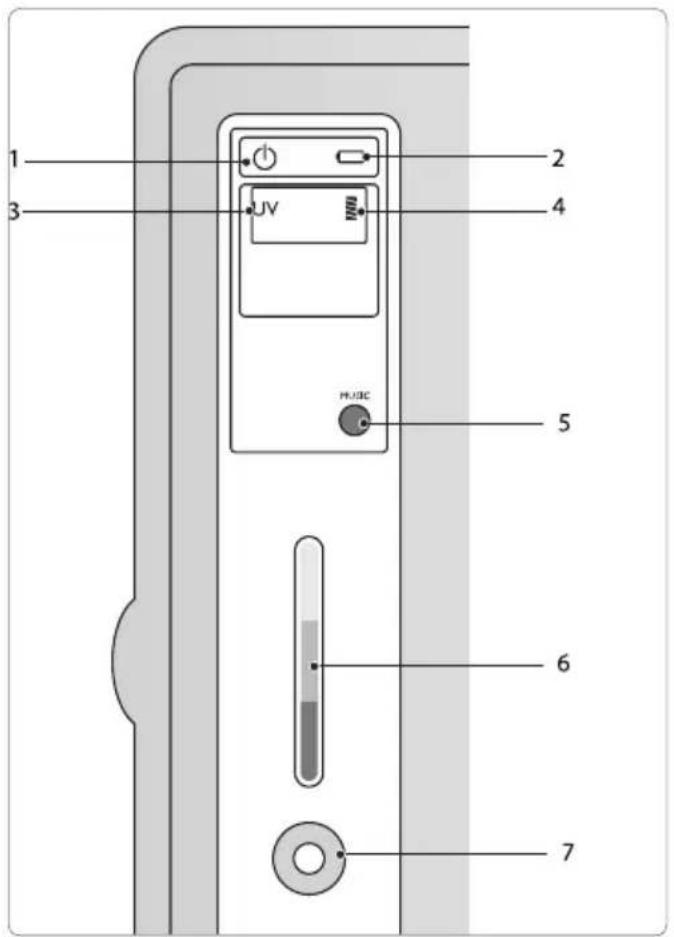
1 Power-on indicator
2 Battery indicator (type WP3891 only)
3 UV indicator
4 Filter indicator
5 Audio setting button
6 Purification stage indicator
7 Dispense button
1 Power UV+: uses advanced UV technology and activated carbon to purify water
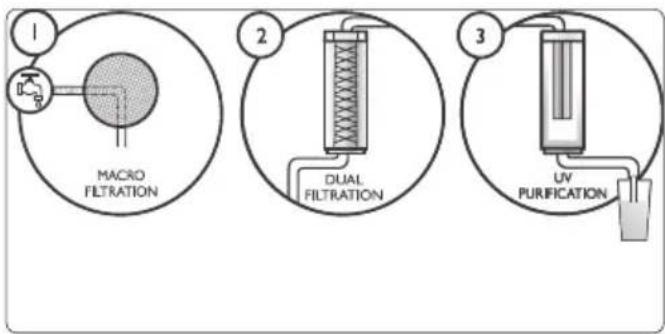
flowchart
graph TD
    A["1"] --> B["MACRO FILTRATION"]
    B --> C["2"]
    C --> D["DUAL FILTRATION"]
    D --> E["3"]
    E --> F["UV PURIFICATION"]
(1) The macro filter removes large particles. (2) The activated carbon and sediment filter improves taste and removes turbidity, chlorine, volatile organic chemicals (VOCs), cysts (single-celled parasites) and larger microorganisms. (3) Advanced state-of-the-art UV (PLS) technology destroys known waterborne viruses, bacteria, parasites and amoebae.
2 PureProtect Alert: warns you when the filter needs to be replaced
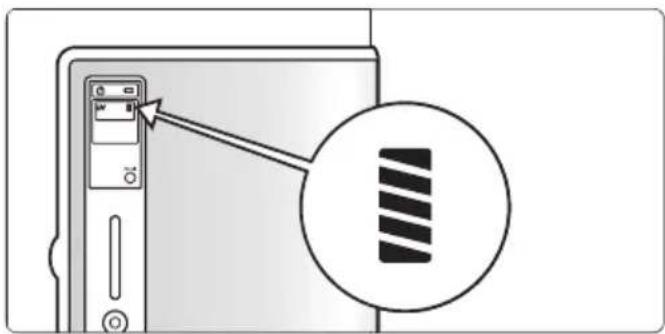
When 2700 litres of water have passed through the pure water dispenser, PureProtect Alert gives a signal that you need to replace the filter. After the signal, the filter still has enough capacity to purify another 300 litres of water.
3 PureProtect Lock: guarantees high-quality water
natural_image
Diagram showing a mechanical component with a magnified circular inset showing a crossed-out circle (no text or symbols)The PureProtect Lock guarantees that the water that is dispensed is always of high quality. If the filter is not replaced on time (within 300 litres of dispensed water after the PureProtect alert signal), the pure water dispenser locks itself so that no more water can be dispensed. If no filter is mounted, if it is not mounted properly or if the UV lamp fails, the pure water dispenser also locks itself.
4 Rechargeable Battery Back Up: Rechargeable battery ensures supply during power failure (only for model no. WP 3891)
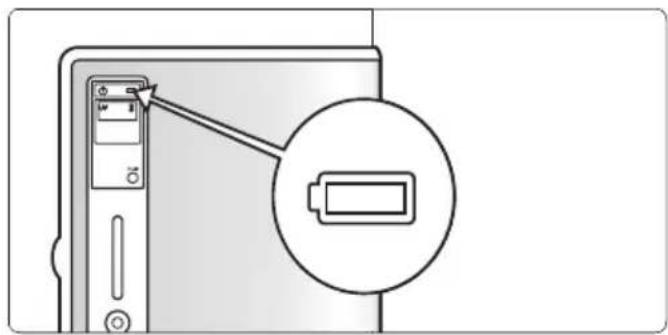
In the event of a mains power failure, the Pure Water Dispenser automatically switches over to the battery, making it possible to dispense 20 litres of safe drinking water. When mains supply is available, the battery is automatically recharged.
5 PureFlush: Flushes pipes and UV chamber
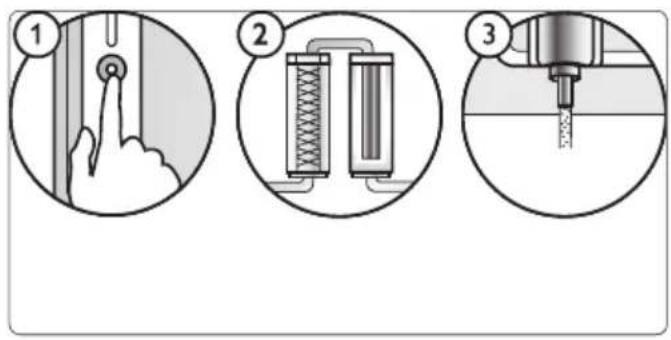
At the push of a button, PureFlush automatically flushes all internal pipes and the UV chamber of the pure water dispenser. Ideal for cleaning before first use, after every filter change and whenever the pure water dispenser has not been used for 2 days. Thanks to PureFlush, impure water is flushed out and you have pure water even if you have been away for a while.
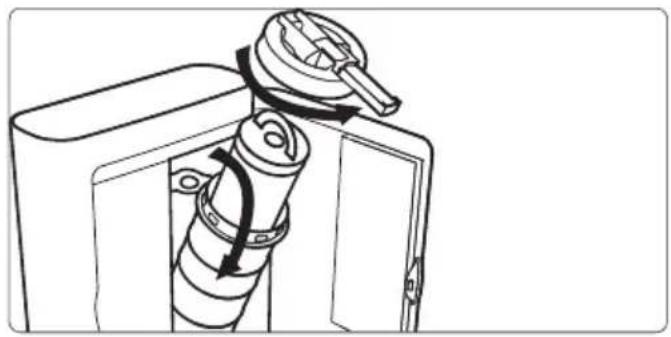
6 Tilt & Twist Filter change: mechanism for easy filter replacement.
natural_image
Line drawing of a robotic arm with a handle and scroll, no text or symbols presentReplacing the filter is something you can easily do yourself, thanks to the simple Tilt & Twist mechanism.
7 PowerSave: ensures low electricity consumption
This pure water dispenser has a low electricity consumption of 25W maximum. To make it even more energy efficient, the pure water dispenser switches to standby mode (the UV lamp goes out) when the pure water dispenser has not been used for 10 minutes.
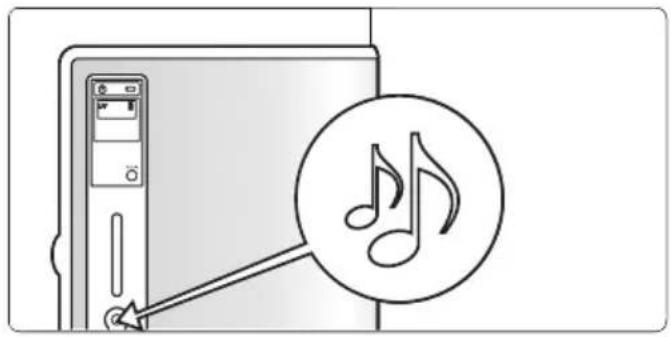
8 Audible signals: lets you know when the pure water dispenser is on
natural_image
Illustration of a computer monitor with an icon showing musical notes inside, no text or symbols presentWhile the pure water dispenser is dispensing water, an optional audible signal notifies you that the pure water dispenser is on.
6 Using the appliance
1 Open the tap connected to the pure water dispenser.
2 When you use the appliance for the first time or if you have not used the appliance for 2 days or more, use the PureFlush function. See section 'PureFlush' in this chapter.
6.0.1 Purifying in manual mode
1 Press the power-on button on the pure water dispenser
• All indicators flash on and off.
• The power-on indicator ⏻ goes on.
- Only for model WP3891, the Battery LED will be off, if the battery is fully charged and AC supply is available. If battery is being charged, it would blink red. If the Battery is at critical stage the battery LED would blink red, rapidly. In the absence of AC supply when the battery is in use, the Battery LED glows constant red.
- The pure water dispenser checks the water availability, the filter and the UV lamp.
- As the purification process proceeds, first the red segment of the purification stage indicator lights up, followed by the yellow segment. When the purification process is finished (after 30 seconds), the green segment lights up.
• The dispense button ● flashes.
2 Press the dispense button
- The pure water dispenser dispenses water and the dispense button lights up green.
3 To stop the water flow, press the dispense button ● again.
• The dispense button flashes and the appliance is ready to dispense again.
6.0.2 Charging the battery (type WP3891)
Charge the battery for 14 hours before you use the pure water dispenser for the first time. After this, it takes 12 hours to charge the battery fully.

Note:
Lead acid gel batteries lose capacity if they are not charged regularly. The performance and functionality of the battery depends directly on the charging pattern. Charge the battery regularly and always charge the battery fully.
1 Press the power-on button.
- During charging, the battery indicator □ flashes red.
- When the battery is fully charged, the battery indicator will switch off.

Note:
The pure water dispenser switches to standby (power saving) mode after 10 minutes but the battery continues to charge.
6.1 Other functions
6.1.1 Audio on/off
The pure water dispenser is equipped with an audible signal that reminds you that dispensing is in progress. The default setting for this audible signal is 'off'. If desired, you can switch on the audible signal.
1 Power on the Pure Water Dispenser.
Wait till the Dispense button LED starts flashing (Ready to dispense state - Manual mode).
2 Press the hold "MUSIC" button.
When you Press the “MUSIC” button te “During Dispense” audio will be turned ON. To Switch the audio OFF, press and hold the “MUSIC” button again.

Note:
- To perform this operation, make sure that the Pure Water Dispenser is in the Manual mode, and the Dispense button LED is flashing (Ready to dispense).
- The Audio ON/OFF setting will change to default (Factory setting – “AUDIO OFF”) when the Pure Water Dispenser is powered on next time.
6.1.2 PureFlush
Use the PureFlush function when you use the appliance for the first time. Also use the PureFlush function if you have not used the appliance for more than 2 days:
When you replace the filter, the pure water dispenser performs the Pure Flush function automatically. In this case, 10 litres of water flow out of the appliance (see chapter 'Cleaning and maintenance', section 'Replacement').

Warning:
Do not drink the water that comes out of the appliance during the PureFlush procedure.
1 Switch on the pure water dispenser.
Wait until the dispense button ● flashes (ready to dispense - manual mode).
2 Place a container with a capacity of at least 10 litres under the pure water dispenser.
3 Press and hold the dispense button ● for 4 seconds.
- The PureFlush procedure starts, during which 10 litres of water come out of the appliance.
- The dispense button lights up green to indicate that Pure Flush is in progress. All other indicators are off.

Note:
If you want to cancel the flushing procedure while it is in progress, press the power-on button ⏻ to switch off the pure water dispenser.
7 Cleaning and maintenance
7.0.1 Cleaning the pure water dispenser

Warning:
Never use scouring pads, abrasive cleaning agents or aggressive liquids such as petrol or acetone to clean the appliance.

Warning:
Do not pour water over the pure water dispenser.
1 Clean the outside of the pure water dispenser regularly with a damp (not wet) cloth.
2 If you have not used the appliance for 2 days or more, perform the PureFlush procedure (see chapter ‘Using the appliance’, section ‘PureFlush’).
7.0.2 Cleaning the macro filter
1 Switch off the pure water dispenser.
2 Turn off the water supply to the pure water dispenser.
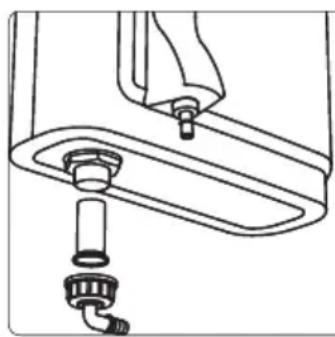
3 Unscrew the water inlet connector (hold it in vertical position to avoid water spillage) and pull out the macro filter.
natural_image
Technical line drawing of a mechanical assembly with no visible text or symbols4 Rinse the macro filter under a running tap. Remove the dirt from the mesh.
5 Put the macro filter back in its original position.
6 Reattach the water inlet connector.
7.0.3 Cleaning the quartz tube
We advise you to clean the quartz tube once every 6 months.
Warning:
Handle the quartz tube with care, as it might break and cause injury. Do not tamper with the quartz tube (apply glue, etc.).
1 Switch off the pure water dispenser.
2 Open the cover of the UV chamber.
3 To remove the UV lamp unit, follow steps 1 to 5 in section 'Replacing the UV lamp unit'.
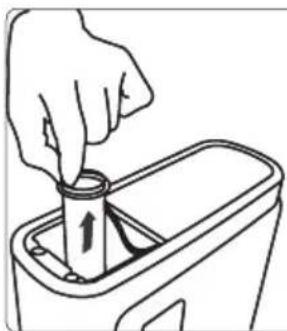
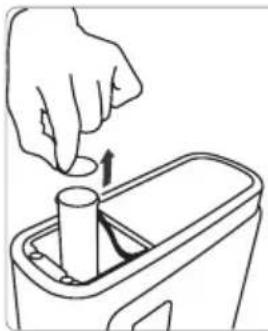
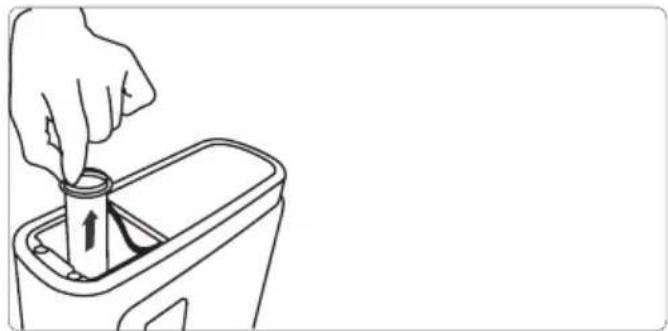
4 Pull out the quartz tube with the rubber ring.
natural_image
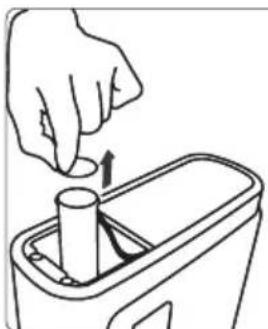
Line drawing of a hand pouring liquid into a container with an arrow indicating direction (no text or symbols)5 Remove the rubber ring.
natural_image
Line drawing of a hand pressing down on a cylindrical object into a container (no text or symbols)6 Clean the quartz tube with a clean moist cloth and dry it completely.
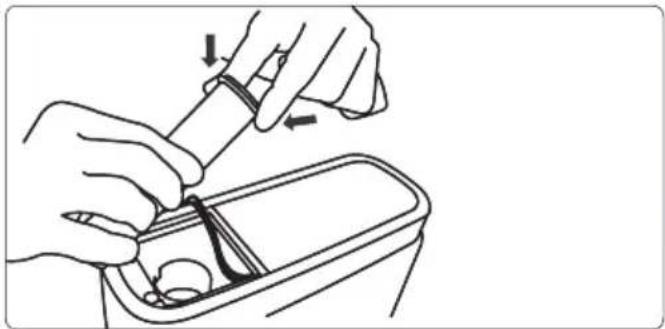
7 Reinsert the rubber ring to a depth of 2-3mm from the open end.
natural_image
Line drawing of hands using a tool to adjust or install a component inside a container (no text or symbols)8 Insert the tube with the rubber ring in the UV chamber.
Note:
Make sure you put the rubber ring and quartz tube in the correct position.
9 To reattach the UV lamp unit, follow steps 6 to 8 in section 'Replacing the UV lamp unit'.
10 Close the cover of the UV chamber.
7.0.4 Replacing the filter
Note:
Switch off the pure water dispenser before you replace the filter.
The filter has a capacity of up to 3000 litres. When 2700 litres have passed through the filter, the filter indicator starts flashing to indicate that you need to replace the filter. At this point, the appliance can still dispense another 300 litres of water, giving you time to arrange a new filter. The filter indicator keeps flashing until 3000 litres have passed through the filter. Then the filter indicator lights up red continuously and the pure water dispenser does not dispense water until you replace the filter.
Note:
We advise you to change the filter every 6 months, even though you might not have consumed 3000 litres. Filter life is subject to the actual level of impurities in your water supply. The filter may therefore expire before 3000 litres without any warning period.
1 Switch off the pure water dispenser.
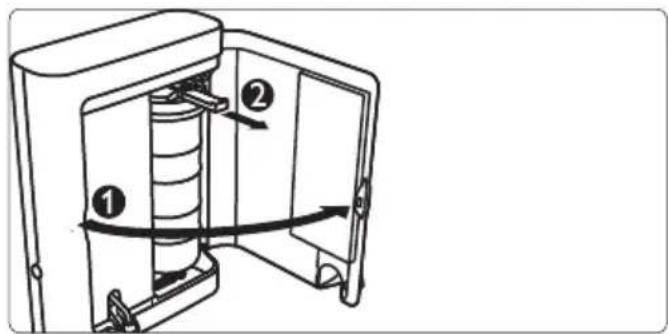
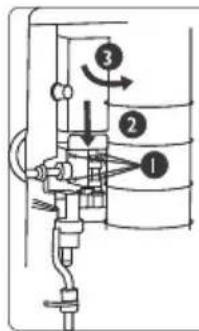
2 Open the appliance door (1). Pull the filter towards you with the lever (2) and slightly tilt the filter.
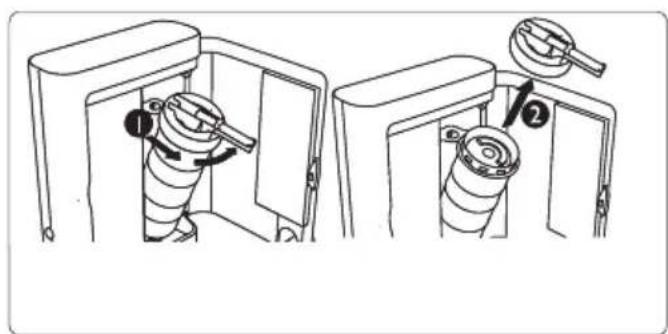
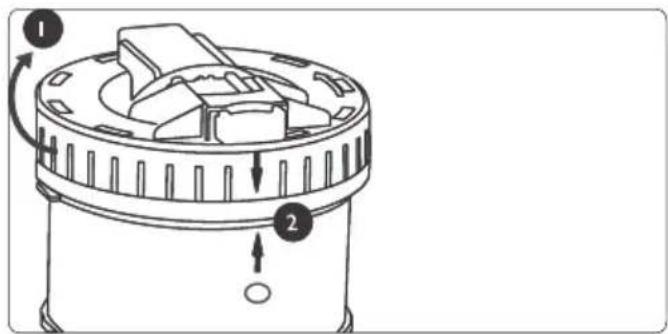
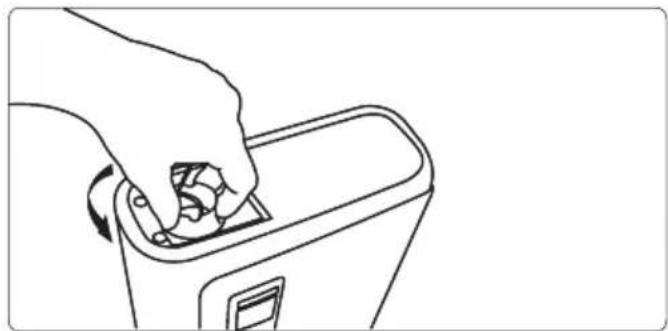
3 Turn the filter cap (1) and remove it (2).
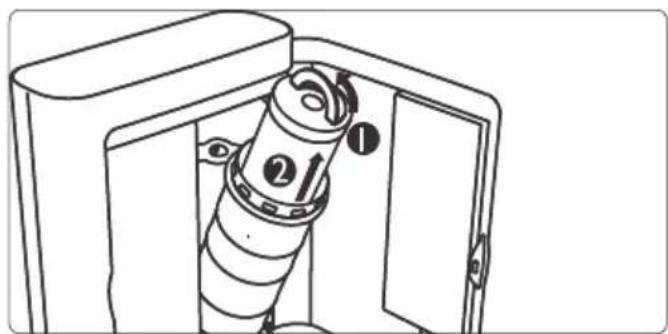
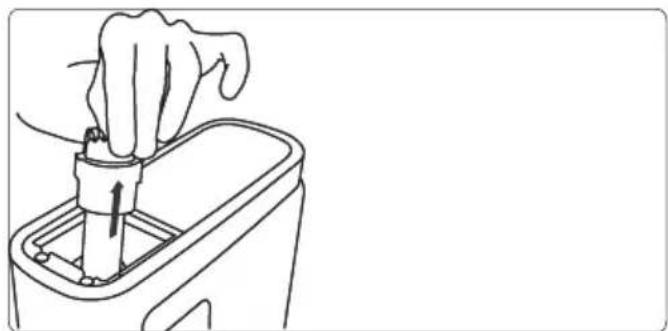
4 Grab the handle on top of the filter (1) and slowly pull the filter out of the holder (2).
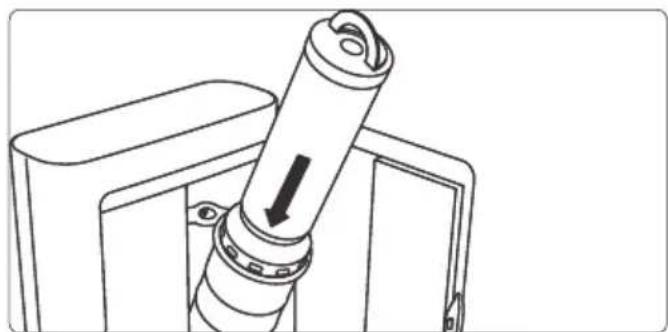
5 Put a new filter in the filter holder.
natural_image
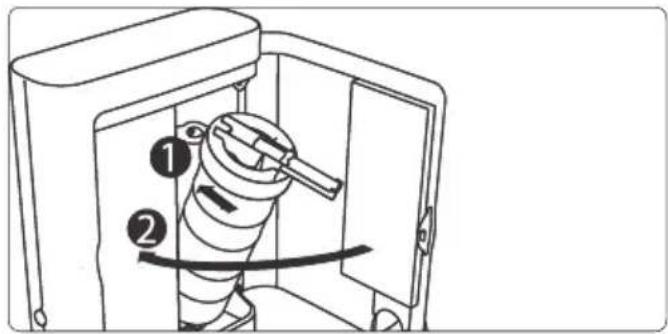
Technical line drawing of a mechanical lever assembly (no text or symbols)6 Align the arrow on the cap with the arrow on the filter housing and press the cap down firmly (1). Turn the cap clockwise to fix it (2).
7 Push the filter holder back into place (1) and close the appliance door (2).
Note:
Each time you replace the filter, make sure you also clean the macro filter (see section 'Cleaning the macro filter' above).
Once you have replaced the filter, you have to confirm replacement of the filter. The pure water dispenser only operates normally again after you confirm replacement of the filter.
7.0.5 Confirming filter replacement
1 Switch on the pure water dispenser.
- If you replaced the filter during the warning period (between 2700 and 3000 litres), the filter indicator ≡ flashes. Wait until the dispense button ● starts flashing (ready to dispense - manual mode).
• If you replaced the filter after filter expiry, the filter indicator lights up continuously.
2 Press and hold the MUSIC button and then press and hold the dispense
button. Keep both buttons pressed simultaneously for at least 4 seconds.
• The pure water dispenser now acknowledges the new filter.
• The filter indicator ≡ goes off.

Note:
If the filter warning still persists, repeat step 2.
3 Place a container with a capacity of at least 10 litres under the pure water dispenser.
- The pure water dispenser automatically performs the PureFlush procedure, during which 10 litres of water flow out of the appliance.
7.0.6 Replacing the UV lamp unit

Warning:
Always replace the UV lamp unit with an original Philips UV lamp (code no. 421530875020).
1 Switch off the pure water dispenser.
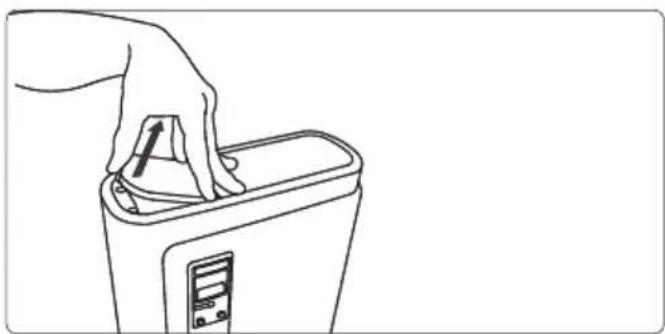
2 Remove the cover of the UV chamber.
natural_image
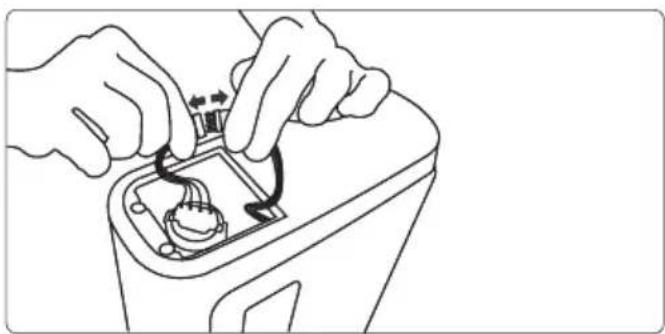
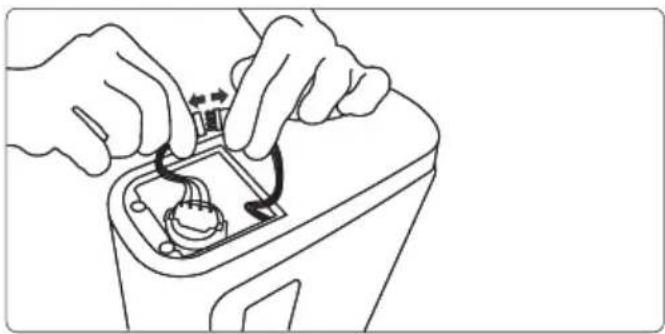
Line drawing of a hand placing a plastic bag into a computer tower (no text or symbols)3 Disconnect the UV lamp wire connectors.
natural_image
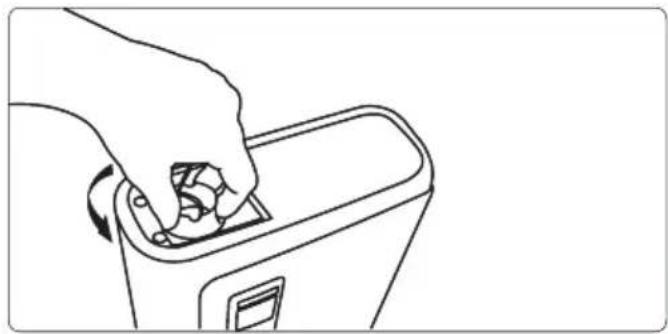
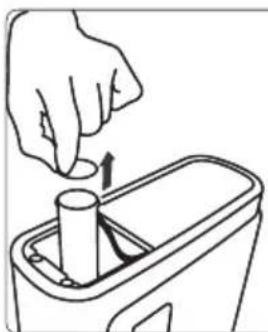
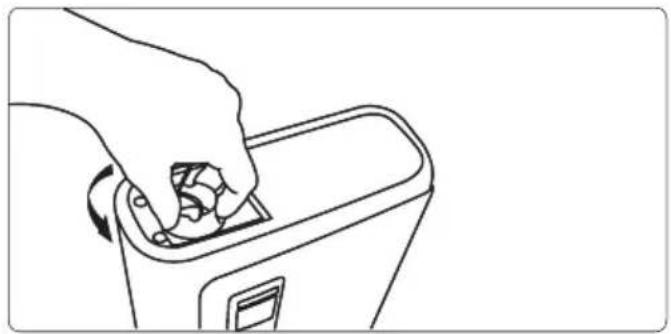
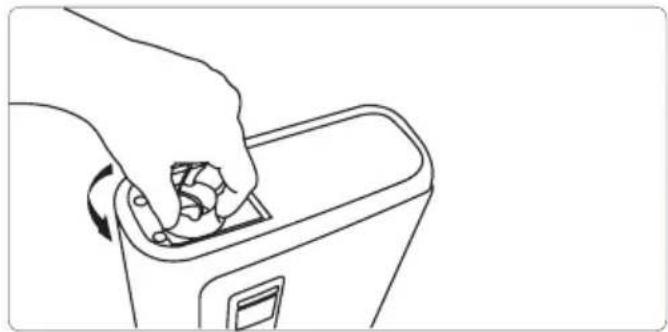
Line drawing of hands installing or adjusting a battery casing with a switch (no text or symbols)4 Unscrew the UV lamp retaining cap.
natural_image
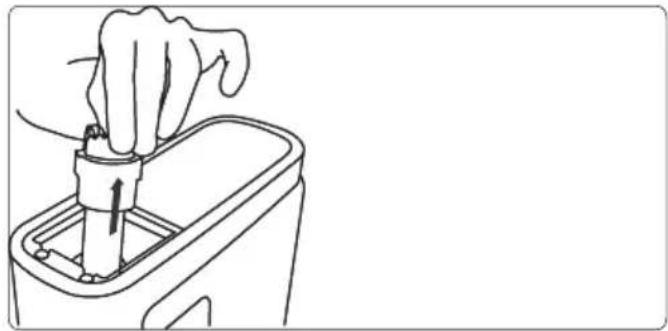
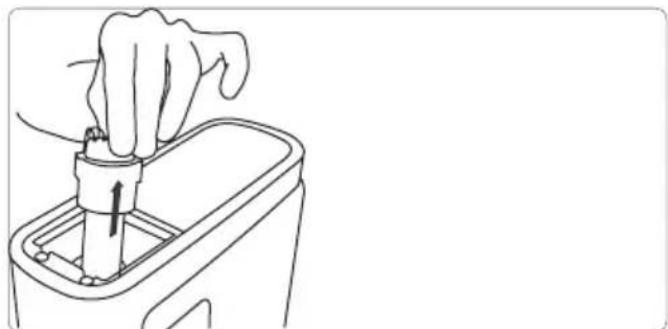
Line drawing of a hand inserting a circular component into a device (no text or symbols)5 Remove the UV lamp unit (lamp, rubber seal and lamp holder).
natural_image
Line drawing of a hand using a mechanical tool to press or install a component into a container (no text or symbols)6 Insert the new UV lamp unit.
7 Reattach the lamp retaining cap.
8 Reconnect the wire connectors.
9 Close the cover of the UV chamber.
7.0.7 Replacement items
If you have any difficulties obtaining replacement items for this appliance, please contact the Philips Customer Care Centre in your country or consult the worldwide guarantee leaflet.
Always replace the dual filter with an original Philips dual filter, type number WP3990.
Always replace the UV lamp unit with an original Philips UV lamp unit, code number 421530875020.
8 Disposal
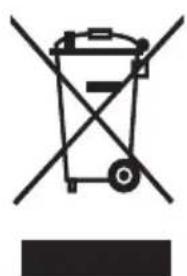
- Do not throw away the appliance with the normal household waste at the end of its life, but hand it in at an official collection point for recycling. By doing this, you help to preserve the environment.
natural_image
Symbol of a trash bin crossed with no visible text or labels- The built-in rechargeable battery contains substances that may pollute the environment. Always remove the battery before you discard and hand in the appliance at an official collection point. Dispose of the battery at an official collection point for batteries. If you have trouble removing the battery, you can also take the appliance to a Philips service centre. The staff of this centre will remove the battery for you and will dispose of it in an environmentally safe way.
8.0.1 Removing the rechargeable battery
Warning:
Do not connect the appliance to the mains again after you have removed the battery.
1 Open the door of the pure water dispenser (1). Use a crosshead screwdriver to remove the three screws on the component cover (2).
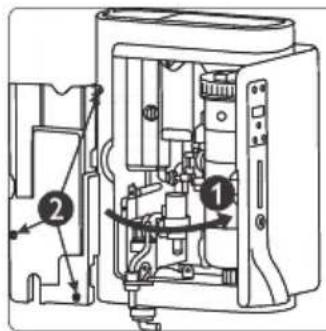
2 Remove the four screws on the battery bracket. 3 Remove the four screws on the battery bracket (1). Pull down the bracket that holds the battery (2). Disconnect the battery connections and remove the battery (3).
9 Guarantee and service
If you need information or if you have a problem, please visit the Philips website at www.philips.com or contact the Philips Customer Care Centre in your country (you find its phone number in the worldwide guarantee leaflet). If there is no Customer Care Centre in your country, go to your local Philips dealer or contact the Service Department of Philips Domestic Appliances and Personal Care BV.
9.0.1 Guarantee restrictions
1 The guarantee does not cover pure water dispenser parts that are subject to wear and tear, that can be considered as consumable parts by their nature or that are made of glass.
2 The dual filter (activated carbon and sediment) is not covered by the guarantee.
3 This guarantee does not extend to accessories (piping, clamps, adapter, seal etc.), if supplied with the pure water dispenser.
4 Philips DAP or authorised service personnel will be entitled to retain all defective parts replaced under guarantee
5 Inspection and test reports of the company will be final and binding under guarantee if repairs/modifications are carried out or as regards certifying working of the pure water dispenser.
6 The guarantee ceases/becomes invalid if the pure water dispenser is used for commercial purposes.
10 Technical data
1 UV lamp: TUV PLS, 9W
2 Power rating: 25W
3 Operating voltage: 220-240V, 50-60Hz
4 Water supply pressure
• Minimum: 0.5 bar
• Maximum: 2.0 bar
5 Water supply temperature
• Minimum: 5°C
• Maximum: 45°C
6 Dispensing flow rate: 1.2 ltrs/min (max)
7 Fuse: lamp, slow blow
11 Frequently asked questions
Can I use the Philips pure water dispenser to purify well/bore water?
Yes. The pure water dispenser was designed to purify drinkable water from e.g. municipal water sources, wells or bores. It is not intended to purify lake water, river water, sewage water or other types of untreated water. If you use well/bore water, we recommend that you have your water tested regularly.
Can treated water be stored?
Yes. To prevent treated water from becoming contaminated, store it in a clean container with a tight-fitting lid. If properly refrigerated in an airtight container, treated water can be stored for up to 48 hours.
Can ultraviolet light make the water radioactive?
No. Ultraviolet light is not radioactive. As a result, it is impossible for water treated with ultraviolet light to become radioactive.
Does the Philips pure water dispenser change the taste of water?
The taste of water depends on what is in the water. The pure water dispenser removes many substances such as particulates and chlorine, thus improving the taste, odour, and clarity of the water.
What is so special about the UV lamp?
Ultraviolet light is an effective way to destroy microorganisms without the use of chemicals. The UV lamp produces light in a specific wavelength that is destructive to microorganisms. The light needs to have the right intensity and the water must be exposed to the light for a specific amount of time for it to get the right dose of UV light.
12 Troubleshooting
The filter indicator flashes.
Filter life coming to an end. Buy and install new filter
The filter indicator lights up continuously.
You need to replace the filter. Replace the filter (see chapters 'Cleaning and maintenance' and 'Replacement').
The battery indicator flashes red.
The battery is almost empty. Switch on the appliance to let the battery charge.
The battery indicator lights up continuously red.
The battery is charging.
Water drips from the appliance.
One or more pipes inside the appliance are not connected properly. Check all connections. Contact your dealer or an authorised Philips service centre.
The UV indicator lights up continuously.
An error occurred in the UV chamber. Check if the cover of the UV chamber is closed. Clean the quartz tube (see chapter ‘Cleaning and maintenance’). If the problem persists, contact your dealer or an authorised Philips service centre.
The appliance does not dispense water, even though there are no error indications.
- WP3890 only: There is no mains power. Check if the power supply works and if the plug is inserted in the wall socket properly.
- The filter has not been placed properly. Place the filter properly
- You have not used an original Philips replacement filter. Always replace the filter with an original Philips filter, type WP3990.
- The fuse has blown due to voltage fluctuations. Contact your dealer or an authorised Philips service centre.
- The filter has expired before the appliance has purified 3000 litres of water. Replace the filter (see chapters ‘Cleaning and maintenance’ and ‘Replacement’).
The indicators do not flash after I press the power-on button.
The indicators are damaged, contact your dealer or an authorised Philips service centre.
| Description Signal Meaning | |
| ○ | Power-on indicator Continuous green Appliance switched on/standby |
| ○ | Power-on indicator Off Appliance switched off |
| □ | Battery indicator (WP3891 only) Off Fully charged |
| □ | Battery indicator (WP3891 only) Flashes Charging |
| □ | Battery indicator (WP3891 only) Continuous red Working on battery |
| UV | UV indicator Continuous red UV error |
| ≡ | Filter indicator Continuous red Filter expired |
| ● | Dispense button Continuous green Water is being dispensed |
| ● | Dispense button Flashes green Ready to dispense water |
| ↑ | Purification stage indicator Continuous red/yellow/green Purification in progress |
1 Pendahuluan
Partner for progress
natural_image
Line drawing of a wall-mounted electrical enclosure with cable and grounding, labeled 1m (no text or symbols beyond measurement)flowchart
graph TD
    A["1: Macro Filtration"] --> B["2: Dual Filtration"]
    B --> C["3: UV Purification"]
natural_image
Diagram showing a mechanical component with a magnified circular symbol containing a crossed-out tool (no text or labels present)natural_image
Diagram of a mechanical device with rotating components and directional arrows indicating motion (no text or symbols)natural_image
Illustration of a desktop computer with a note icon pointing to its right (no text or symbols present)natural_image
Technical line drawing of a mechanical assembly with no visible text or symbolsnatural_image
Line drawing of a hand pouring liquid into a container with an arrow indicating direction (no text or symbols)natural_image
Line drawing of a hand pressing down on a cylindrical object into a container (no text or symbols)natural_image
Line drawing of hands assembling a mechanical component into a container (no text or symbols)8 Masukkan tabung bersama gelang karetnya dalam ruang UV.
Catatan:
natural_image
Technical line drawing of a mechanical component with a cylindrical shaft and mounting bracket (no text or symbols)Catatan:
natural_image
Line drawing of a hand placing a button into a computer monitor (no text or symbols)3 Lepaskan konektor kabel lampu UV.
natural_image
Line drawing of hands installing or adjusting a device component with a switch (no text or symbols)4 Buka sekrup tutup penahan lampu UV.
natural_image
Line drawing of a hand inserting a small circular component into a device casing (no text or symbols)5 Lepaskan unit lampu UV (lampu, segel karet dan penahan lampu).
natural_image
Line drawing of a hand using a mechanical tool to press or install a device into a container (no text or symbols)natural_image
Symbol of a trash bin with crossed lines indicating no waste or restriction, and a solid black rectangle below (no text or labels)Indikator filter berkedip.
Partner for progress
4사용전준비
natural_image
Line drawing of a wall-mounted electrical enclosure with cable and power outlet, dimension标注 1m (no text or symbols on diagram)flowchart
graph TD
    A["1: Macro Filtration"] --> B["2: Dual Filtration"]
    B --> C["3: UV Purification"]
natural_image
Diagram showing a device with a cross symbol and a magnified circular view of a tool (no text or labels)natural_image
Diagram of a mechanical device with rotating components and directional arrows indicating motion (no text or symbols)natural_image
Illustration of a desktop computer with a note icon and playback button, no text or symbols presentnatural_image
Technical line drawing of a mechanical assembly with no visible text or symbolsnatural_image
Line drawing of a hand pouring liquid into a container with an arrow indicating direction (no text or symbols)5 고무 링을 제거합니다.
natural_image
Line drawing of a hand pressing down on a cylindrical object into a container (no text or symbols)natural_image
Line drawing of hands using a tool to adjust or install a component inside a container (no text or symbols)natural_image
Technical line drawing of a mechanical component with numbered parts (1 and 2), no readable text or symbols present.natural_image
Technical line drawing of a mechanical lever assembly (no text or symbols)참고:
natural_image
Line drawing of a hand placing a button into a computer monitor (no text or symbols)natural_image
Line drawing of hands installing or adjusting a component with a switch (no text or symbols)4 UV 래프 고정 마개를 품니다.
natural_image
Line drawing of a hand inserting a button into a device (no text or symbols)natural_image
Line drawing of a hand using a mechanical device to press or install a component (no text or symbols)natural_image
Symbol of a trash bin with crossed lines indicating no waste or restriction, accompanied by a blank rectangular bar below (no text or symbols present)9 품질 보증 및 서비스
Partner for progress
natural_image
Diagram of a device with cable and connector, labeled 1m (no text or symbols beyond measurement)natural_image
Diagram showing a mechanical component with a magnified circular inset showing a crossed-out tool (no text or symbols present)natural_image
Diagram of a mechanical device with rotating components and directional arrows indicating motion (no text or symbols)natural_image
Illustration of a desktop computer with a musical note icon, no text or symbols presentnatural_image
Technical line drawing of a mechanical assembly with no visible text or symbolsnatural_image
Line drawing of a hand pouring liquid into a container with an arrow indicating direction (no text or symbols)natural_image
Line drawing of a hand pressing down on a cylindrical object into a container (no text or symbols)natural_image
Line drawing of hands assembling a mechanical component into a container (no text or symbols)8 Masukkan tiub bersama gelung getah dalam ruang UV.
Note:
natural_image
Technical line drawing of a mechanical component with a vertical cylindrical assembly and a downward arrow indicating motion (no text or symbols)Note:
natural_image
Line drawing of a hand placing a button into a device casing (no text or symbols)natural_image
Line drawing of hands installing or adjusting a component on a battery casing (no text or symbols)4 Buka skru tukup pengekalan lampu UV.
natural_image
Line drawing of a hand inserting a small object into a device casing (no text or symbols)5 Keluarkan unit lampu UV (lampu, kedap getah dan pemegang lampu).
natural_image
Line drawing of a hand using a mechanical device to press or lift a cylindrical component (no text or symbols)natural_image
Symbol of a trash bin crossed with a diagonal line, representing waste sorting or disposal (no text or labels)Partner for progress
natural_image
Line drawing of a wall-mounted electrical enclosure with cable and grounding, labeled 1m (no text or symbols beyond basic diagram)flowchart
graph TD
    A["1: Macro Filtration"] --> B["2: Dual Filtration"]
    B --> C["3: UV Purification"]
natural_image
Diagram showing a mechanical component with a magnified circular inset depicting a crossed-out tool (no text or symbols present)natural_image
Diagram of a mechanical device with rotating components and directional arrows indicating motion (no text or symbols)natural_image
Illustration of a desktop computer with a musical note icon pointing to its right (no text or symbols present)natural_image
Technical line drawing of a mechanical assembly with no visible text or symbolsnatural_image
Line drawing of a hand pouring liquid into a container with arrows indicating flow direction (no text or symbols)5 ถอดยางรองออก
natural_image
Line drawing of a hand pressing down on a cylindrical object into a container (no text or symbols)natural_image
Line drawing of hands using a tool to adjust or install a component in a container (no text or symbols)
natural_image
Diagram showing two mechanical components with labeled parts, no text or symbols presentnatural_image
Technical line drawing of a mechanical component with a cylindrical shaft and mounting bracket (no text or symbols)
หมายเหตุ:
natural_image
Line drawing of a hand placing a button into a device (no text or symbols)natural_image
Line drawing of hands installing or adjusting a component on a battery casing (no text or symbols visible)natural_image
Line drawing of a hand pressing down on a device with a circular button (no text or symbols)natural_image
Line drawing of a hand pressing down on a mechanical component (no text or symbols)natural_image
Symbol of a trash bin with crossed lines indicating no waste or restriction, and a solid black rectangle below (no text or symbols)Partner for progress
natural_image
Line drawing of a device with a 1m height dimension and cable, no text or symbols presentnatural_image
Diagram showing a mechanical device with a magnified circular inset depicting a crossed-out tool (no text or symbols present)natural_image
Technical line drawing of a mechanical device with rotating components and a handle (no text or symbols)natural_image
Diagram showing a computer monitor with an icon of musical notes inside, no text or symbols present3 public health policy should be provided to the public health policy.
natural_image
Technical line drawing of a mechanical assembly with no visible text or symbols1 Tắt máy lọc nước tinh khiết.
2 Mở nắp khoang UV.
3 public sector public sector public sector public sector public sector public sector public sector public sector public sector public sector public sector public sector public sector public sector public sector public sector public sector public sector public sector public sector public sector public sector public sector public sector public sector public sector public sector public sector public sector public sector public sector public sector public sector public sector public sector public sector public sector public sector public sector public sector public sector public sector public sector public sector public sector public sector public sector public sector public sector public sector public Sector Public Sector Public Sector Public Sector Public Sector Public Sector Public Sector Public Sector Public Sector Public Sector Public Sector Public Sector Public Sector Public Sector Public Sector Public Sector Public Sector Public Sector Public Sector Public Sector Public Sector Public Sector Public Sector Public Sector Public Sector Public Sector Public Sector Public Sector Public Sector Public Sector Public Sector Public Sector Public Sector Public Sector Public Sector Public Sector Public Sector Public Sector Public Sector Public Sector Public Sector Public Sector Public Sector Public Sector Public Sector Public Sector Public Sector Public Sector Public Sector Public Sector Public Sector Private Sector Public Sector Public Sector Public Sector Public Sector Public Sector Public Sector Public Sector Public Sector Public Sector Public Sector Public Sector Public Sector Public Sector Public Sector Public Sector Public Sector Public Sector Public Sector Public Sector Public Sector Public Sector Public Sector Public Sector Public Sector Public Sector Public Sector Public Sector Public Sector Public Sector Public Sector Public Sector Public Sector Public Sector Public Sector Public Sector Public Sector Public Sector Public Sector Public Sector Public Sector Public Sector Public Sector Public Sector Public Sector Public Sector Public Sector Public Sector Public Sector Public Sector Primary Market Share and Other Market Share and Other Market Share in the United States.
4 Rút ông ông thạch anh ra bằng vòng cao su.
natural_image
Line drawing of a hand inserting a cylindrical object into a container with an arrow indicating direction (no text or symbols)
natural_image
Line drawing of a hand pressing down on a cylindrical object into a container (no text or symbols)natural_image
Line drawing of hands using a tool to adjust or install a component inside a container (no text or symbols)natural_image
Technical line drawing of a mechanical component with a downward arrow indicating force or direction (no text or symbols)
Luru ý:
natural_image
Line drawing of a hand placing a device into a trash bin (no text or symbols)natural_image
Line drawing of hands installing or adjusting a battery casing with a switch (no text or symbols)natural_image
Line drawing of a hand inserting a small object into a device (no text or symbols)natural_image
Line drawing of a hand using a mechanical device to press or lift a cylindrical component (no text or symbols)natural_image
Symbol of a waste bin with no accompanying text or labelsnatural_image
Line drawing of a hand placing a tray into a device with a monitor, no text or symbols presentnatural_image
Line drawing of hands installing or adjusting a component with a switch (no text or symbols)natural_image
Line drawing of a hand inserting a small object into a device (no text or symbols)natural_image
Line drawing of a hand using a mechanical device to press or install a component (no text or symbols present)natural_image
Symbol of a waste bin with crossed lines indicating no waste, and a solid black rectangle below (no text or labels)natural_image
Line drawing of a hand pouring liquid into a container with an arrow indicating flow (no text or symbols)natural_image
Line drawing of a hand pressing down on a cylindrical object into a container (no text or symbols)natural_image
Line drawing of hands using a tool to adjust or install a component inside a container (no text or symbols)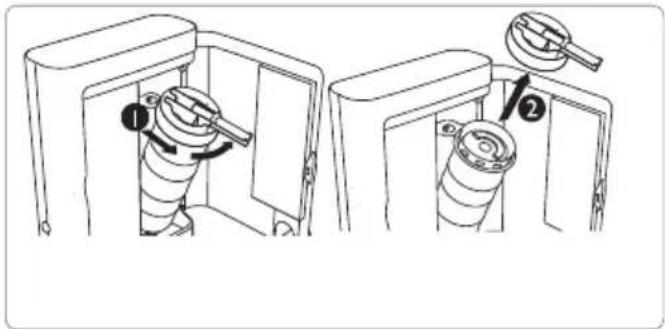
natural_image
Technical line drawing of a mechanical component with a vertical cylindrical assembly and an arrow indicating direction (no text or symbols)الصوتية هو "غلق". physics-Economics-1. "We know that the world's truth is a good thing."
flowchart
graph TD
    A["1: Macro Filtration"] --> B["2: Dual Filtration"]
    B --> C["3: UV Purification"]
natural_image
Diagram showing a device with a magnified circular inset showing a crossed-out tool (no text or symbols present)ه SMSات الميزة
natural_image
Diagram of a mechanical device with rotating components and directional arrows indicating motion (no text or symbols)natural_image
Illustration of a desktop computer with a musical note icon, no text or symbols presentPartner for progress
natural_image
Line drawing of a wall-mounted electrical enclosure with attached piping and a power outlet (no text or symbols)Canada (Sonicare toothbrush service)
1-800-682-7664
Chile
600-PHILIPS (744 54 77)
Ceská Republika
+420-233099330
Croatia
01 3033 754 / 3033 731
Danmark
3525 8759
Deutschland
0180 / 5 356 767 ((€ 0,12 pro Minut))
España
Republic of Kazakhstan
7-3272-506617
Korea
080-600 6600
Latvia
371-7-228 896
Lietuva
Luxembourg
40-6661 5644
Magyarország
+(36-1) 382 1700
Mexico
01 800 504 6200 ((CIC))
Middle east
971 4 3353 666
Morocco
+ 212 2 302 992
Nederland
0900 - 8407 ((€ 0,20 per minuut))
New Zealand
0800 273 845
Norge
2270 8111
Österreich
0820 901 114 ((€ 0,20 pro Minut))
Republica de panama
223-9544
United States (Sonicare toothbrush service)
1-800-682-7664
Uruguay
Republic of Uzbekistan
998 71 1206081
Venezuela
800-74454 (PHILI)
Zimbabwe
+263 4 486536

- Pure water
- General description
- Important
- Danger
- Warning
- Caution
- Compliance with standards
- kiwa
- Partner for progress
- Preparing for use
- Note:
- Installation
- Features
- Display panel description
- Using the appliance
- Purifying in manual mode
- Charging the battery (type WP3891)
- Other functions
- Audio on/off
- PureFlush
- Warning:
- Cleaning and maintenance
- Cleaning the pure water dispenser
- Cleaning the macro filter
- Cleaning the quartz tube
- Replacing the filter
- Confirming filter replacement
- Replacing the UV lamp unit
- Replacement items
- Disposal
- Removing the rechargeable battery
- Guarantee and service
- Guarantee restrictions
- Technical data
- Frequently asked questions
- Troubleshooting
- The indicators do not flash after I press the power-on button.
- Pendahuluan
- Catatan:
- 4사용전준비
- 품질 보증 및 서비스
- หมายเหตุ:
- public health policy should be provided to the public health policy.
- Luru ý:
- ه SMSات الميزة
Brand : PHILIPS
Model : Pure water UV WP3891
Category : Water filter