PureGuard WP3864 - Water filter PHILIPS - Free user manual and instructions
Find the device manual for free PureGuard WP3864 PHILIPS in PDF.

| Product Type | Water Filter |
| Brand | Philips |
| Model | PureGuard WP3864 |
| Dimensions (H x W x D) | 40 x 30 x 30 cm |
| Weight | 3 kg |
| Power Supply | None (gravity-fed) |
| Filtration Capacity | 2000 liters |
| Filtration Stages | Multi-stage: sediment, activated carbon, ion exchange |
| Reduces | Chlorine, limescale, heavy metals, sediment |
| Flow Rate | 2 L/min |
| Water Temperature | 5-38 °C |
| Water Pressure | 0.1-0.4 MPa |
| Filter Replacement | Every 6 months |
| Material | BPA-free plastic |
| Installation | Countertop, no plumbing needed |
| Maintenance | Wipe exterior with damp cloth; replace filter as scheduled |
| Safety Certification | CE, RoHS, WRAS |
| Spare Parts | Replacement filter cartridges available |
| Repairability | Replaceable filter; other parts not user-serviceable |
| Warranty | 2 years |
Frequently Asked Questions - PureGuard WP3864 PHILIPS
User questions about PureGuard WP3864 PHILIPS
0 question about this device. Answer the ones you know or ask your own.
Ask a new question about this device
Download the instructions for your Water filter in PDF format for free! Find your manual PureGuard WP3864 - PHILIPS and take your electronic device back in hand. On this page are published all the documents necessary for the use of your device. PureGuard WP3864 by PHILIPS.
USER MANUAL PureGuard WP3864 PHILIPS
Register your product and get support at
www.philips.com/welcome
WP3864, WP3863, WP3862, WP3843
natural_image
Exterior view of a modern water dispenser with transparent casing and decorative leaf patterns (no visible text or symbols)
natural_image
Modern white water dispenser with transparent glass casing and control panel (no visible text or symbols)
natural_image
Exterior view of a modern white water dispenser with bamboo decoration (no visible text or symbols)
natural_image
Simple line drawing of an open book with a grid on the left and a closed page on the right (no text or symbols)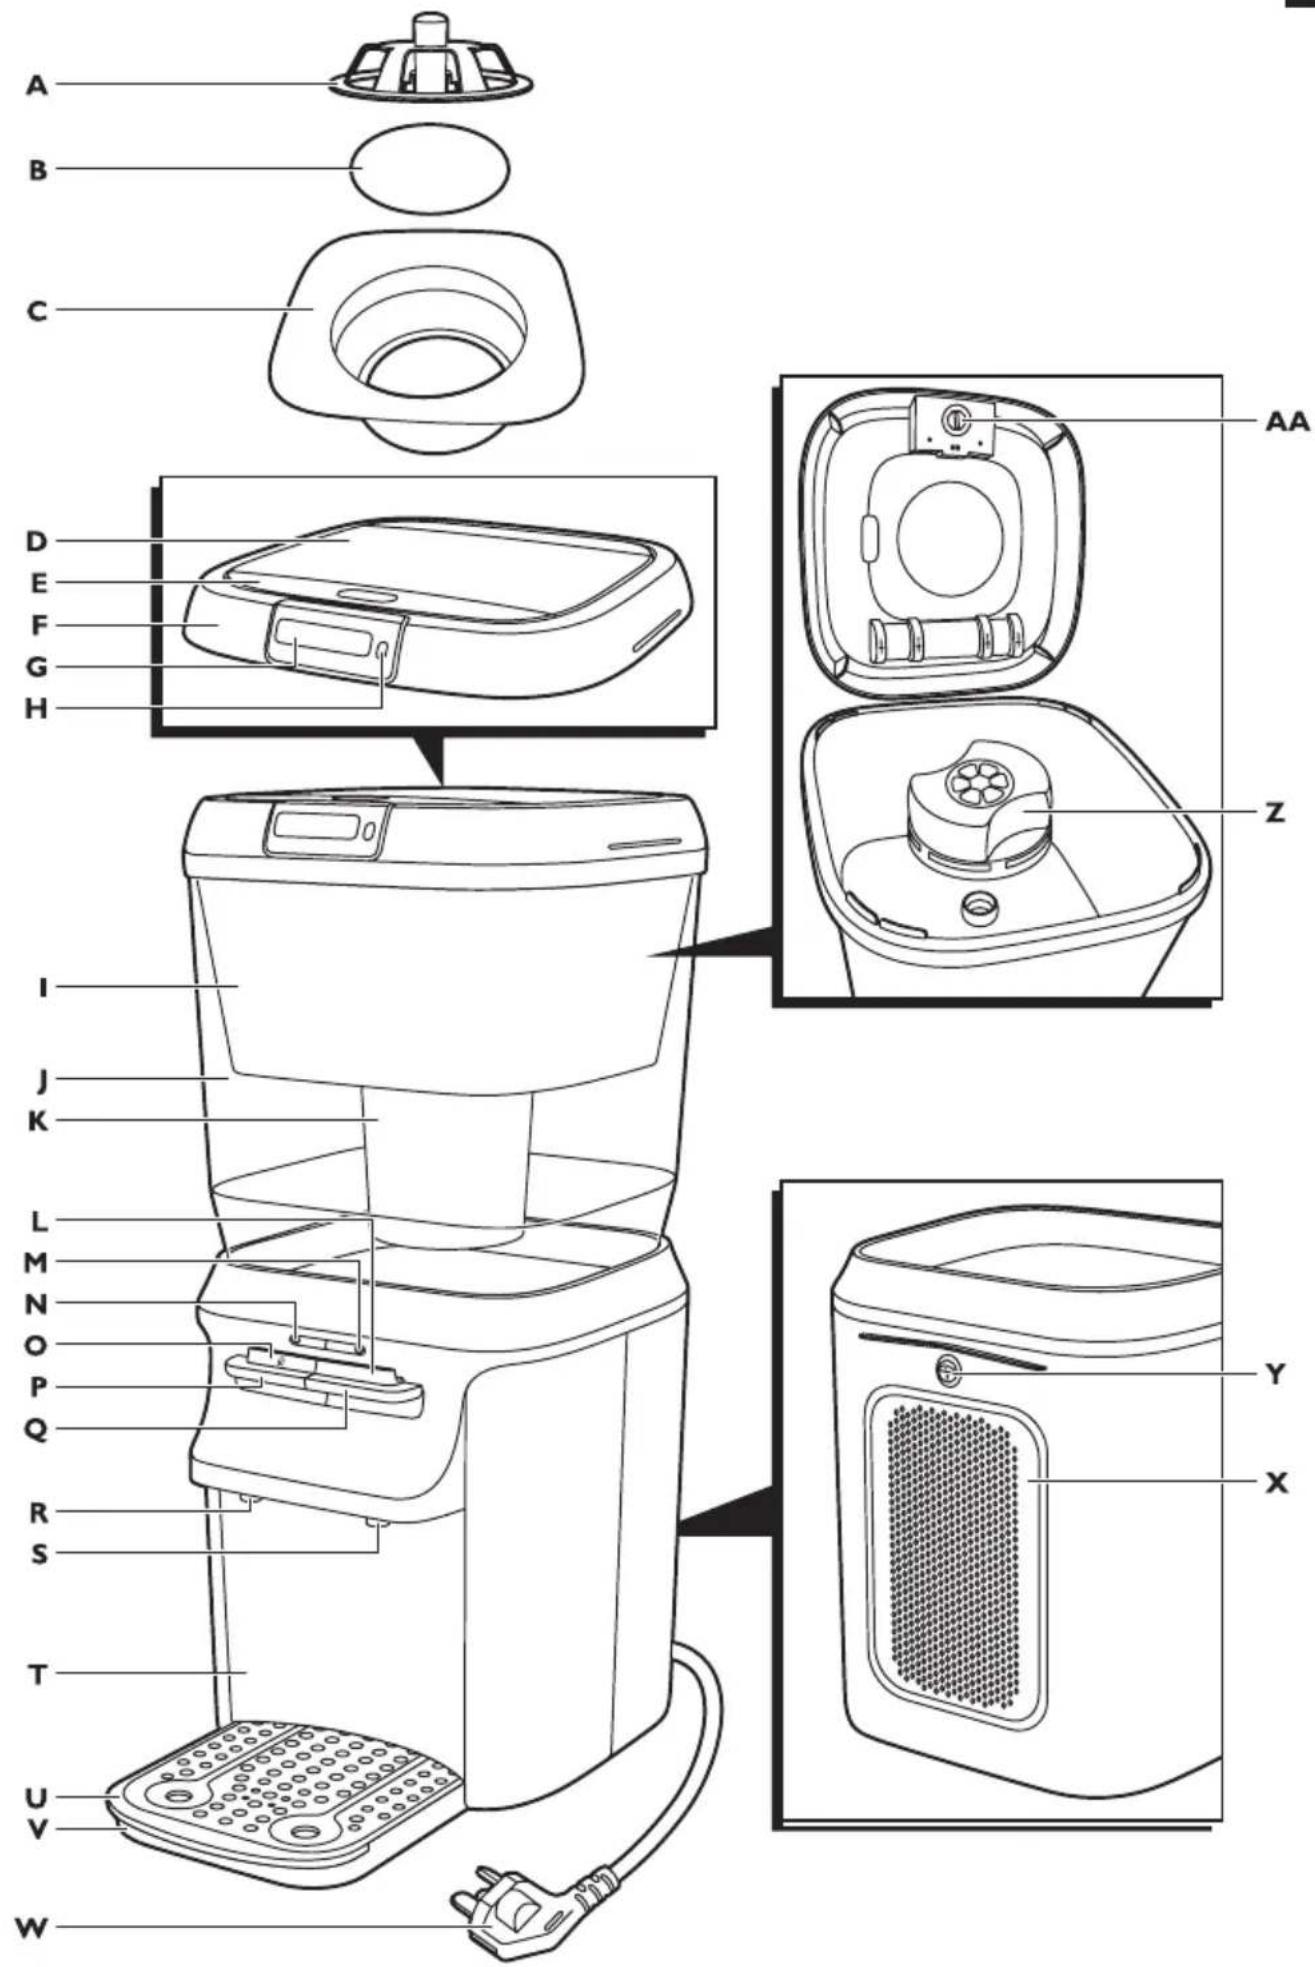
text_image
A B C D E F G H I J K L M N O P Q R S T U V W AA Z Y XENGLISH 6
繁體中文 30
简体中文 52
Introduction
Congratulations on your purchase and welcome to Philips!
To fully benefit from the support that Philips offers, register your product at
www.philips.com/welcome.
The Philips PureGuard barrel purifier is equipped with the unique multiguard control system that reduces bacteria, chlorine, taste and odour, ensuring you of deliciously purer water.
The washable rust & sediment pre-filter prevents dirt and insects from entering the system. Water flows into the clean water tank through the Long-life filter. Inside the Long-life filter, the Japanese HF micro-filtration membrane removes 99.9999%* of bacteria and as well as more than 99.95% of cysts**, and the activated carbon reduces industrial pollutants, pesticides and volatile organic chemicals (VOCs) of which the effects are possibly linked to cancer risk***. The Long-life filter lasts up to 1000 litres (approximately 6 months****) without the hassle of washing and maintenance.
WP3864 only: The Soft water booster uses ion exchange (IEX) technology to decrease water hardness, giving water with a superior purer taste***. If regenerated regularly, the Soft water booster lasts up to 6 months.
On the top front of the water tank, the Pure protect alert display gives clear feedback on the lifetime of the filter. Advanced electronics automatically warn you when the filter is almost full and when replacement is required. The water purifier is equipped with an integrated dirt-block system to guard against secondary contamination. Silver sieves in the water spouts provide extra safety at the last point before dispensing your filtered water. The fast and simple cleaning procedure allows you to reach all hard-to-reach areas and cleans the whole water purifier in one go.
* Results regarding bacteria obtained by independent test laboratory (BioVir Laboratories, Inc, USA, accredited laboratory of WQA).
** Results regarding cysts obtained from tests by WQA.
*** According to publications of World Health Organization, industrial pollutants, pesticides and VOCs of which the effects are possibly linked to cancer risk. VOC reduction and softening performance tested at and internal laboratory.
**** Calculation based on a 4-person family with a daily water consumption of 4-6 litres and using municipal and pretreated tap water that complies with GB5749-2006. The filtration capacity of the Long-life filter is up to 1000 litres.
- WQA Tested and Certified to NSF/ANSI 42/53 for the reduction of chlorine, taste and odour, Particulate Class I ( >/=0.5 m to <1 m ), cysts, and turbidity as verified and substantiated by test data. Tested to the US EPA Standard for Bacteria Reduction only.

text_image
TESTED AND CERTIFIED Water Quality. UNDER INDUSTRY STANDARDSGeneral description (Fig. 2)
A Rust & sediment pre-filter lock
B Rust & sediment pre-filter
C Rust & sediment pre-filter holder
D Top cover lid
E Lid release area
F Top cover
G Pure protect alert display
H Display activation/reset button
Raw water tank
J Clean water tank
K Long-life filter
L Continuous flow lock
M Power-on light (green)
N Heating-up light (red)
Child lock
P Hot water lever
Q Ambient water lever
R Hot water spout with silver sieve
S Ambient water spout with silver sieve
T Dispensing unit
U Drip tray cover
v Drip tray
W Mains cord with plug
X Ventilation grille
Y Power-on button
Z Soft water booster (WP3864 only)
[ Battery compartment (for one 3-volt CR2032 Lithium battery) with removable cover
Important
Read this user manual carefully before you use the appliance and save it for future reference.
Danger
- Never immerse the appliance in water or any other liquid, nor rinse it under the tap.
Warning
- Check if the voltage indicated on the bottom of the water purifier corresponds to the local mains voltage before you connect the appliance.
- Do not use the appliance if the plug, the mains cord or the appliance itself is damaged.
- If the mains cord is damaged, you must have it replaced by Philips, a service centre authorised by Philips or similarly qualified persons in order to avoid a hazard.
- This appliance is not intended for use by persons (including children) with reduced physical, sensory or mental capabilities, or lack of experience and knowledge, unless they have been given supervision or instruction concerning use of the appliance by a person responsible for their safety.
- Children should be supervised to ensure that they do not play with the appliance.
- Only use the water purifier to filter water that comes out of a tap in your house, as this is municipal pretreated water.
- Do not use the water purifier in combination with water that is microbiologically unsafe or of unknown quality without adequate disinfection before or after filtration.
- Always handle the filters very carefully, because they have delicate membranes. Do not modify the filters or drop them. Replace a filter if it has been modified, if the outside is damaged or if you have dropped it.
- This appliance is intended for household use only.
Caution
- Make sure you install the water purifier according to the instructions in this user manual and local regulations.
- Only connect the appliance to an earthed wall socket.
- Place the appliance on a stable, level and horizontal surface.
- Do not connect the appliance to an external switching device such as a timer and do not connect it to a circuit that is regularly switched on and off by the utility. This prevents a hazard that could be caused by inadvertent resetting of the thermal cut-out.
- Do not fill the water purifier with water hotter than 40^ C to prevent damage to the water tanks and filters.
- This water purifier is suitable for an environmental temperature of 5-38°C. Do not place the water purifier in a place exposed to direct sunlight, in a hot location (e.g. close to a cooker) or in a frosty location.
- Do not put any substance in the appliance other than water and the cleaning agent supplied.
- Always remove the filters when you clean the appliance.
- When you have filled the raw water tank with water, the air inside the Long-life filter first has to escape before the water starts to flow through it. Therefore it takes some time before filtered water starts to flow into the clean water tank. This is normal.
- Always use original Philips replacement filters.
- Replace the filters according to the instructions in this user manual. See chapter 'Replacement'.
- Fully drain the clean water tank if the water purifier has not been used for 2 days or more and throw away this filtered water.
- Do not place anything on top of the appliance.
- Do not use any chemicals other than the ones mentioned in chapter 'Cleaning and maintenance' to clean the inside of the clean water tank and the outside of the raw water tank.
- Only the drip tray cover can be cleaned in the dishwasher or with boiling water. Do not clean any other parts in the dishwasher or with boiling water.
- Do not tamper with the water purifier.
- Do not switch on the appliance with the power-on button at the back before the clean water tank is completely filled with water.
- Keep hot objects away from the water purifier to prevent damage.
- Do not lift or remove the clean water tank when there is water in it. Otherwise all water flows out of the tank.
- Always return the appliance to a service centre authorised by Philips for examination or repair. Do not attempt to repair the appliance yourself, otherwise the guarantee becomes invalid.
- Philips strongly advises you to clean this appliance every 3 months. If the appliance is not cleaned in time and according to the procedure described in chapter 'Cleaning and maintenance', this may lead to technical failures.
- Never use a descaling agent based on mineral acids such as sulphuric acid, hydrochloric acid, sulphamic acid and acetic acid (e.g. vinegar). These descaling agents may damage your water purifier.
- Systems certified for cyst reduction may be used on disinfected water that may contain filterable cysts.
Hygiene
This Philips water purifier gives you clean, safe drinking water that you can trust. However, if the water purifier is not used hygienically, it may pose a risk of disease to users because it could cause microbes to end up in the filtered water.
- Always wash your hands before you clean the water tanks.
- Always be aware of hygiene when you clean or touch surfaces that are in contact with either the unfiltered or the filtered water, such as the inside of the clean water tank and the filling opening of the raw water tank.
- Do not use a kitchen cloth or sponge to clean or dry the inside of the raw water tank and the clean water tank, as they are likely to contain bacteria. To clean the water tanks in a hygienic way, follow the cleaning instructions in chapter ‘Cleaning and maintenance’.
- Always use clean, disinfected cloths and cleaning equipment to clean the inside of the clean water tank and the outside of the raw water tank.
- Always disinfect cloths and cleaning equipment either by boiling them or by using a disinfectant to clean them. We advise you to soak a cloth or sponge for one minute in a solution of 10ml of household bleach (5% solution of sodium hypochlorite) added to 1 litre of water.
- Always wash your hands after handling cloths, sponges or other cleaning equipment.
Electromagnetic fields (EMF)
This Philips appliance complies with all standards regarding electromagnetic fields (EMF). If handled properly and according to the instructions in this user manual, the appliance is safe to use based on scientific evidence available today.
Before first use
1 Remove all packaging material from the appliance and the filters.
2 Clean the raw water tank and the clean water tank with hot water.
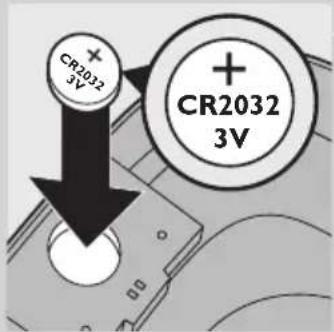
Inserting the Pure protect alert display battery

natural_image
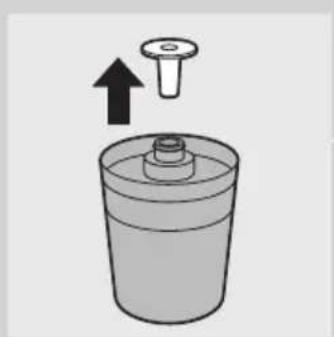
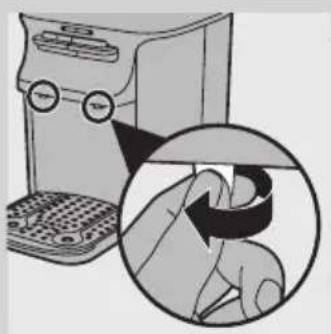
Illustration of a hand inserting a dollar sign into a device (no text or symbols present)1 Remove the battery compartment cover on the inside of the top cover with a coin.

text_image
CR2032 3V CR2032 3V2 Put the 3-volt CR2032 Lithium battery supplied in the battery compartment. You find this battery in the accessory bag.
Note: The Pure protect alert display works on this battery, not on mains power.
3 Put the cover back onto the battery compartment and tighten it with a coin.
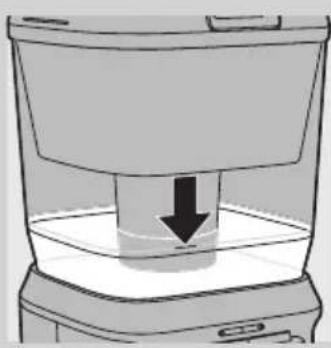
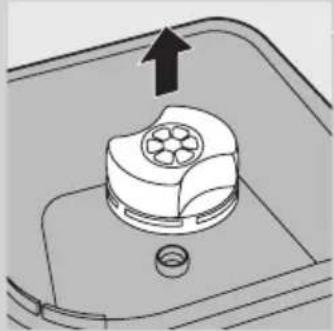
Installation
natural_image
Diagram of a mechanical component with an upward arrow indicating motion (no text or symbols)1 Place and use the appliance on a stable, level and horizontal surface.
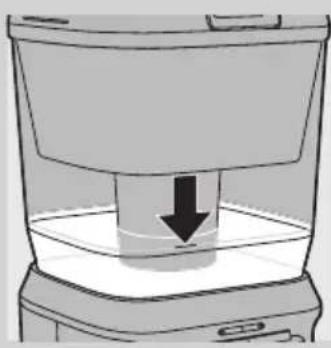
2 Place the clean water tank on top of the water dispensing unit.
3 Remove the protection cap from the Long-life filter.
Note: Be careful not to detach the sealing ring of the Long-life filter.
Note: Some carbon particles may come out of the Long-life filter and end up in the raw water tank. This is normal and does not pose any health risks. You can simply clean the raw water tank to remove the carbon particles.
text_image
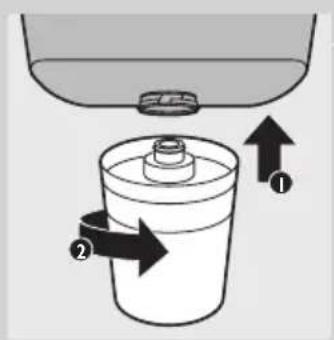
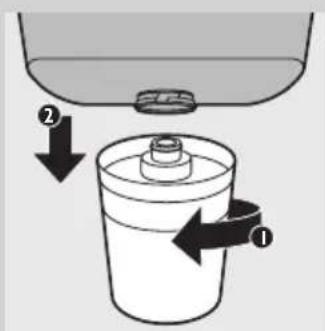
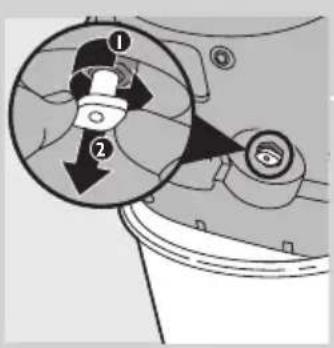
Diagram showing a container with two arrows labeled ① and ② indicating flow or movement from a top container to a lower container.4 Insert the top of the Long-life filter into the bottom of the raw water tank (1) and turn it to the right to fix it (2).
natural_image
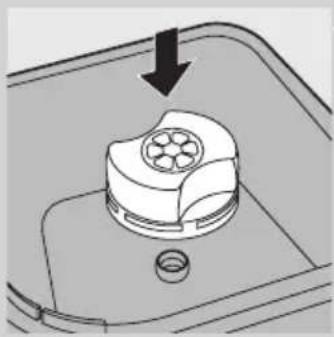
Diagram of a mechanical component with a downward arrow indicating force or direction (no text or symbols present)5 WP3864 only: Push the Soft water booster into the raw water tank ('click').
Note: The Soft water booster is moist when you unpack it. This is normal because the Soft water booster must be kept moist to ensure its effectiveness.
Note: The inside of the Soft water booster changes colour when it becomes wet. This is normal.
6 Place the raw water tank on the clean water tank.
Always make sure the Soft water booster (WP3864 only) and the Long-life filter are attached to the raw water tank.
7 Put the top cover on the raw water tank.
Note: The rust & sediment pre-filter, its lock and its holder are already present in the top cover when you unpack the appliance.
Flushing the appliance
natural_image
Simple line drawing of a container with a downward arrow indicating compression or lifting (no text or symbols)Do not switch on the appliance with the power-on button at the back before the boiler inside the water dispenser is completely filled with water, i.e. when you see water being stored in the clean water tank.
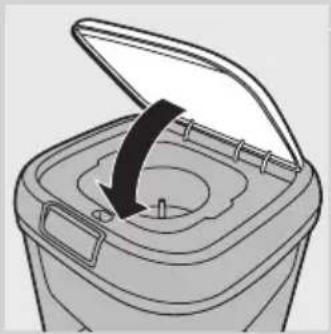
1 Press the lid release area to open the top cover lid.
The display lights up.

natural_image
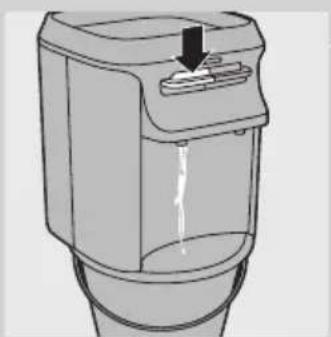
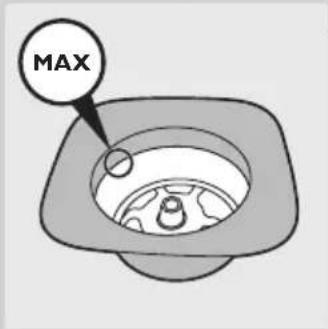
Illustration of a hand pouring liquid into a trash bin with an arrow indicating flow direction (no text or symbols)2 Use a large jug to fill the raw water tank completely.
The raw water tank has a capacity of 7 litres.
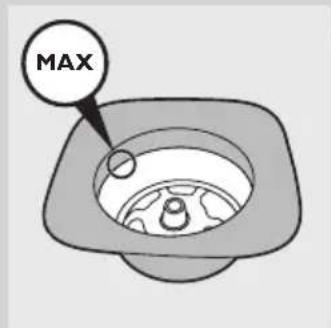
text_image
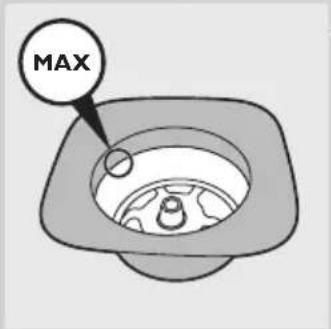
MAXNote: The maximum indication line for the raw water tank is on the rust & sediment pre-filter holder.
3 Close the lid.
The water flows into the boiler inside the dispenser first. When the boiler is full, water starts to be stored in the clean water tank.
Note: Unlock the child lock and press the hot water lever occasionally to let air escape from the boiler.
4 Wait until you see water being stored in the clean water tank before you proceed with the next steps.
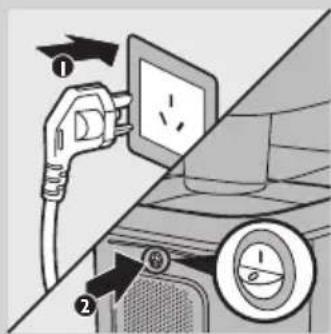
5 Put the mains plug in an earthed wall socket (1) and press the on/off button on the back of the appliance (2) to switch on the appliance.
text_image
Diagram showing car charging plug and fan with labeled parts and directional arrows
natural_image
Diagram of a ship's hull with star-shaped structural elements (no text or labels)The green power-on light and the red heating-up light go on to indicate that the water in the boiler is heating up.
6 Wait until the red heating-up light goes out before you proceed with the next steps.
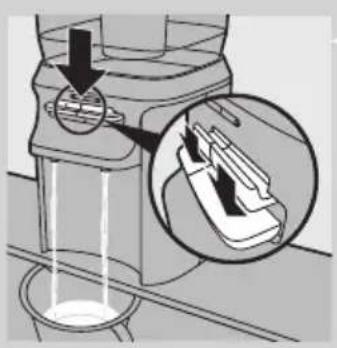
7 Place a large container (e.g. a bucket) under the water spouts.
natural_image
Diagram showing a device with liquid flow and an inset close-up of its internal structure (no text or symbols)8 Press down the hot water lever and the ambient water lever and let all the water in the clean water tank and in the boiler flow into the container.
Be careful, the water is hot.
Note: Unlock the child lock and press the hot water lever occasionally to let air escape from the boiler.
9 Throw away this filtered water.
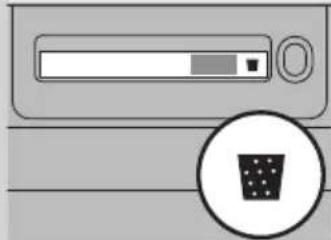
Using the appliance

natural_image
Illustration of a hand pouring liquid into a trash bin with an arrow indicating flow direction (no text or symbols)1 Press the lid release area to open the top cover lid.
▶The display lights up.
2 Use a large jug to fill the raw water tank.
text_image
MAXNote: The maximum indication line for the raw water tank is on the rust & sediment pre-filter holder.
Note: The counter bases its calculation on the assumption that you fill the water tank when it is completely empty and that you fill it with approx. 5 litres of water.
natural_image
Diagram of a trash bin with an open lid and arrow indicating rotation (no text or symbols)3 Close the lid.
4 Wait until all the water has flowed into the clean water tank. At first you do not see the clean water tank llling up, as the boiler inside the dispensing unit is llled with lltered water first.
Dispensing ambient water
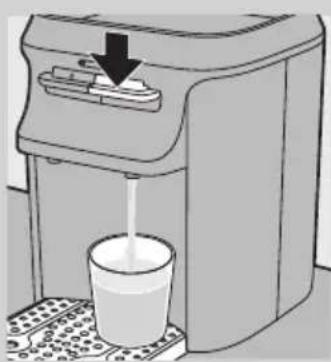
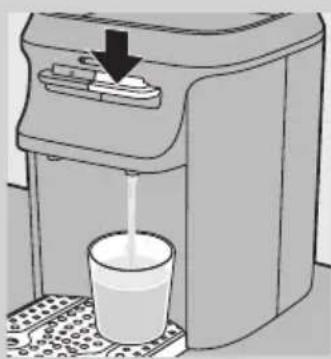
1 Place a cup or jar under the ambient water spout.
natural_image
Illustration of a water dispenser with a glass cup and arrow indicating action (no text or symbols)
text_image
Diagram showing a mechanical component with labeled parts ① and ②, indicating a step or section.2 Press down the ambient water lever.
3 Release the ambient water lever as soon as the cup or jar contains the desired amount of water.
Continuous flow lock
If you want to dispense a large amount of water, you can lock the ambient water lever so you do not have to push it down continuously.
1 Press down the ambient water lever (1) and then press the continuous flow lock inwards (2).
The appliance now dispenses ambient water continuously.
2 To release the continuous flow lock, simply press down the ambient water lever.
Dispensing hot water
natural_image
Diagram of a container with a downward arrow indicating liquid level (no text or symbols)
natural_image
Diagram of a ship's hull with multiple star-shaped poles and a central shaft (no text or labels)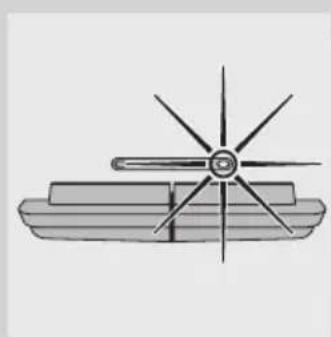
natural_image
Simple line drawing of a ship's hull with a star-shaped rotor and rectangular base (no text or symbols)Note: If you do not use the hot water function, make sure the on/of button at the back of the appliance is set to the off-position (O) to save energy.
1 Put the mains plug in an earthed wall socket and press the on/off button on the back of the appliance to switch on the appliance.
Note: You can only switch the on/off button at the back when there is enough water stored in the clean water tank.
The red heating-up light and the green power-on light go on.
When the red heating-up light goes out, the water has reached the right temperature and 4 cups (of 200ml) of hot water are available. The green power-on light stays on.
Note: When the red light goes on again after you dispensed the first cup, you still have 3 cups of hot water available (because the boiler has a large capacity).
2 Place a cup or jar under the hot water spout.
text_image
Diagram showing two mechanical components with labeled parts and directional arrows indicating motion or force directions.3 Unlock the child lock. To do so, push the child lock inwards and, at the same time, press down the hot water lever.
Note: The child lock prevents small children from being able to dispense hot water, as hot water could cause scalding.
4 Release the hot water lever as soon as the cup or jar contains the desired amount of water.
Pure protect alert display
Filter capacity indications
The Pure protect alert display provides feedback on when you have to replace the Long-life filter.
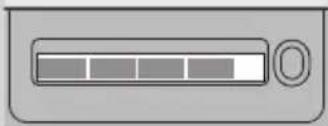
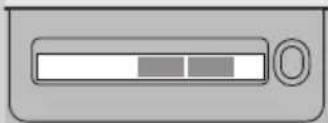
- When you first start using a Long-life filter, the display shows all 4 segments of the progress bar.
natural_image
Simple icon of a progress bar with control knob (no text or symbols)- The Pure protect alert display keeps track of the usage level of the Long-life filter. When 25% of the filter capacity has been used, the display shows 3 segments of the progress bar.
natural_image
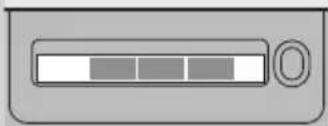
Simple grayscale icon of a progress bar with control knob (no text or symbols)- When 50% of the filter capacity has been used, the display shows 2 segments of the progress bar.
natural_image
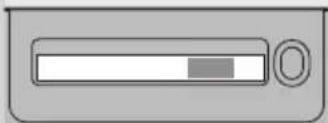
Simple grayscale icon of a progress bar with two segments and a handle (no text or symbols)- When 75% of the filter capacity has been used, the display shows 1 segment of the progress bar.
natural_image
Simple grayscale icon of a progress bar with a circular button (no text or symbols)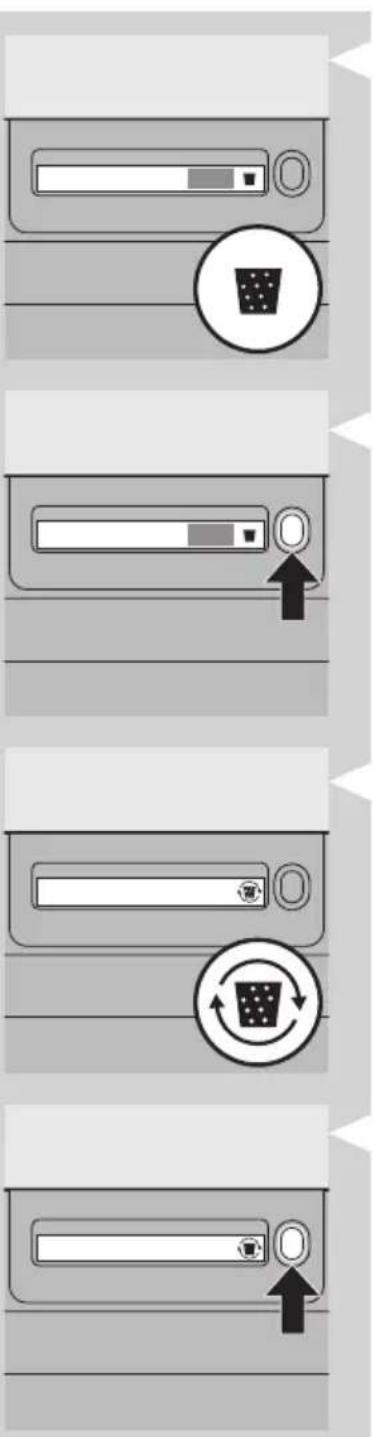
text_image
Diagram showing four steps of a computer monitor with progress indicators and icons, including a zoom and refresh symbol.- When 90% of the filter capacity has been used, the display shows 1 segment of the progress bar and the filter replacement symbol. Make sure you have a new Long-life filter available at this time. If you want, you can replace the Long-life filter with a new one and reset the display so that the filter capacity does not reach 0%.
Note: To reset the Pure protect alert display, press the display activation/reset button for 3 seconds. When the display has been reset successfully, the display flashes 3 times. Then the filter replacement symbol disappears and the display shows all segments of the progress bar again.
- When the filter capacity reaches 0%, the filter replacement symbol and two arrows flash. When this happens, you MUST replace the Long-life filter immediately. After you have replaced this filter, reset the display.
Note: To reset the Pure protect alert display, press the display activation/reset button for 3 seconds. When the display has been reset successfully, the display flashes 3 times. Then the filter replacement symbol disappears and the display shows all segments of the progress bar again.
How the Pure protect alert display works
The Pure protect alert display is equipped with a counter that calculates how much water you filter. The counter bases its calculation on the assumption that you fill the water tank when it is completely empty and that you fill it with approx. 5 litres of water. For extra health protection, the counter also counts the number of days you have used the Long-life filter. The progress bar decreases in length as time passes. The filter replacement symbol appears 163 days after the first day of use. It flashes with two arrows when the filter has been used for 182 days in total*.
*Calculation based on a 4-person family with a daily water consumption of 4-6 litres. The Long-life filter lasts up to 6 months with a maximum lifetime of 1000 litres.
natural_image
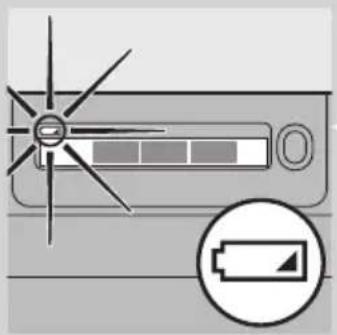
Diagram of a device with a battery icon and fan blade, no text or symbols present- To save energy, the Pure protect alert display automatically goes out 1 minute after you have closed the lid. It lights up automatically when you open the lid. Alternatively, you can also press the display activation/reset button once to activate the display.
- When the battery of the Pure protect alert display is almost empty, the battery symbol flashes on the display.
- When the display shows the battery symbol, you have to replace the old battery with a new 3-volt CR2032 Lithium battery. See section 'Replacing the battery of the Pure protect alert display' in chapter 'Replacement'.
Cleaning and maintenance
Only the outside of the appliance and the rust & sediment pre-filter can be cleaned with hot water. The Long-life filter cannot be cleaned but has to be replaced (see chapter 'Replacement'). The Soft water booster (WP3864 only) cannot be cleaned but has to be regenerated (see section 'Regenerating the Soft water booster (WP3864 only)' in this chapter) and ultimately replaced.
Never use scouring pads, detergents, abrasive cleaning agents or aggressive fluids such as thinner, alcohol, petrol or acetone to clean the outside of the water purifier. These substances may cause the material of the water purifier to crack, discolour or distort. Do not clean any part of the water purifier (except the drip tray cover) in a dishwasher or with boiling water.
Do not use a kitchen sponge or cloth to clean or dry the inside of the water tanks because they are likely to contain bacteria. To clean the water tanks in a hygienic way, follow the cleaning instructions below.
Do not immerse the top cover in water or any other liquid to prevent damage to the Pure protect alert system.
Cleaning the outside of the appliance
text_image
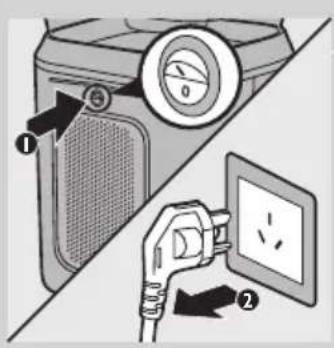
Diagram showing a hand inserting a plug into an electrical outlet, with labeled parts and directional arrows indicating action.1 Press the on/off button on the back of the appliance to switch off the appliance (1) and remove the mains plug from the earthed wall socket (2).
2 Wipe the outside of the appliance with a moist cloth.
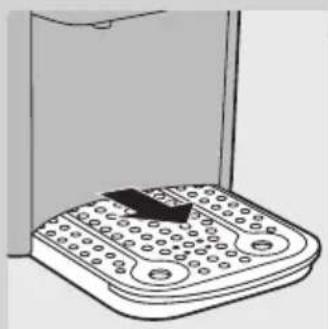
3 Pull the drip tray out of the appliance.
natural_image
Line drawing of a kitchen scale with a bag partially visible (no text or symbols)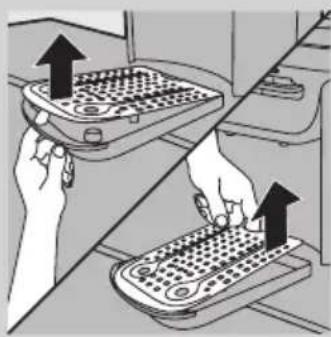
natural_image
Illustration of two hands operating a portable device with arrows indicating upward movement (no text or symbols)4 Put your finger through the hole in the edge of the drip tray to push the drip tray cover off the fixing pegs. Then grab the rear side of the drip tray cover and lift it off the drip tray.
natural_image
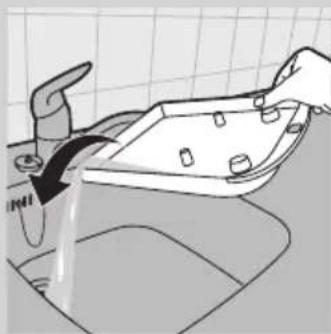
Illustration of a hand washing a kitchen sink with water flowing from the drain (no text or symbols)5 Empty the drip tray into the sink.

natural_image
Illustration of a portable electronic device with a black arrow pointing to its side panel (no text or symbols)6 Put the drip tray cover back onto the drip tray and slide the drip tray back into the appliance.
natural_image
Illustration of a kitchen appliance with a magnified inset showing hand holding a ring (no text or symbols)7 Unscrew the spouts from the dispensing unit.
8 Turn the spouts upside down and rinse the silver sieves in the spouts under the tap.
Note: Regular cleaning of the silver sieves is necessary to ensure a good flow of filtered water.
9 Screw the spouts back into the dispensing unit.
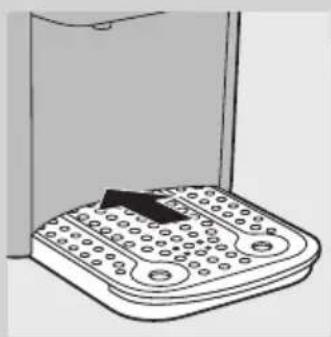
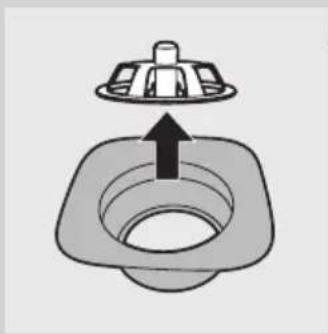
Cleaning the rust & sediment pre-filter
Clean the rust & sediment pre-filter every 2 weeks. You can find 1 spare rust & sediment pre-filter in the accessory bag.
1 Press the lid release area to open the top cover lid.
ENGLISH18
natural_image
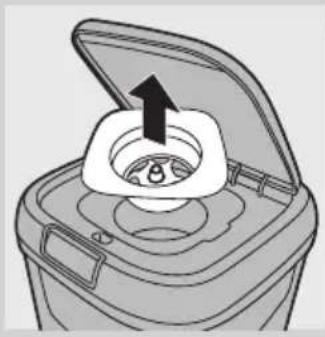
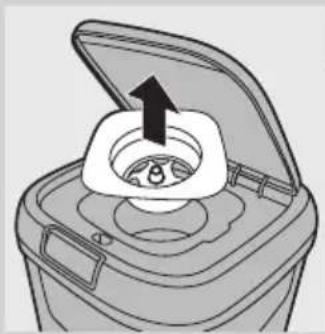
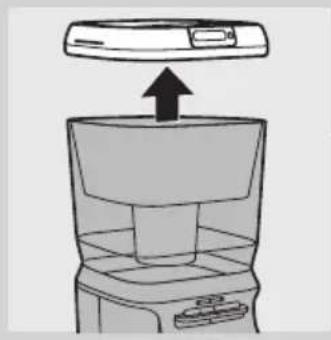
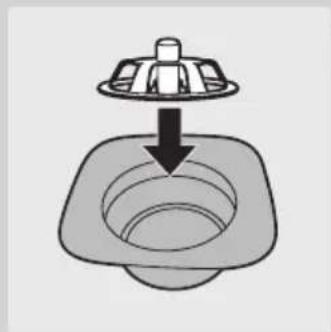
Diagram of a food storage container with an open lid and a black arrow indicating upward motion (no text or symbols)2 Take the holder out of the top cover.

natural_image
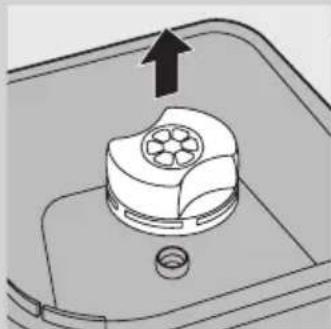
Simple line drawing of a square sink with a lid and arrow indicating upward motion (no text or symbols)3 Remove the lock from the holder.
natural_image
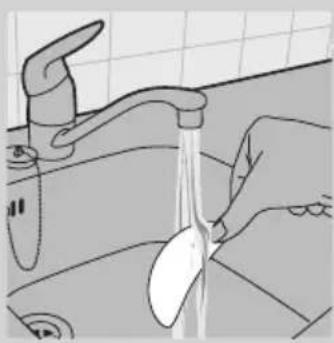
Line drawing of a hand washing a kitchen sink with a spoon (no text or symbols)4 Remove the rust & sediment pre-filter from the holder and rinse it with hot water.
natural_image
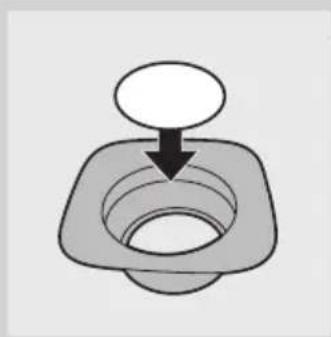
Simple line drawing of a mechanical component with a downward arrow indicating force or direction (no text or symbols)5 Put the rust & sediment pre-filter back into the holder.

natural_image
Simple line drawing of a square sink with a lid and arrow indicating downward flow (no text or symbols)6 Put the lock back into the holder ('click').
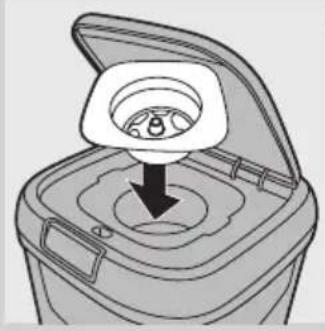
natural_image
Diagram of a hand inserting a circular object into a container with a handle, showing internal structure (no text or symbols)7 Put the holder back into the top cover.
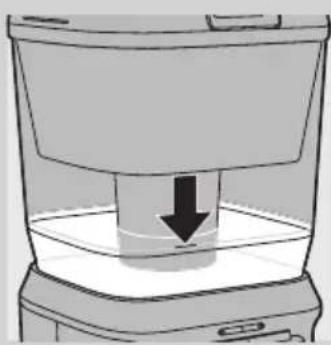
Cleaning and descaling the inside of the appliance with the fast and simple cleaning procedure
natural_image
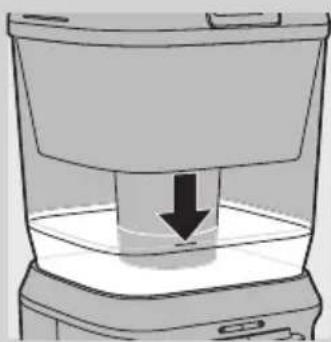
Diagram of a container with a downward arrow indicating a process or movement (no text or symbols present)The inside of the appliance has to be cleaned and descaled completely every 3 months with the fast and simple cleaning procedure described in this section.
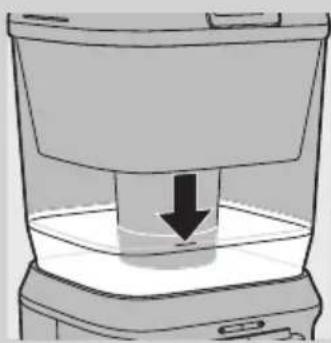
1 Make sure there is about 4 litres (a level slightly above the black line shown in the figure) of clean water in the clean water tank.
2 If the appliance is not switched on, switch on the appliance and wait until the red heating-up light goes out.
Note: Make sure the raw water tank is empty.
3 Remove the drip tray and the drip tray cover from the appliance.
4 Take the rust & sediment pre-filter holder out of the top cover. Then remove the top cover.
natural_image
Diagram of a food storage container with an open lid and a black arrow indicating upward motion (no text or symbols)5 WP3864 only: Pull the Soft water booster out of the raw water tank.
natural_image
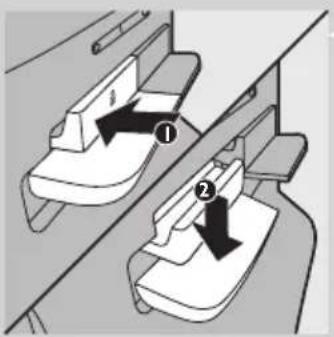
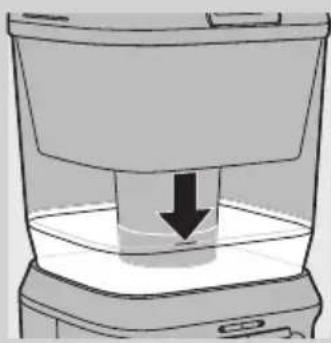
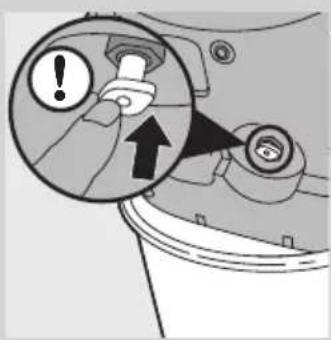
Diagram of a mechanical component with an arrow indicating upward motion (no text or symbols)6 Lift the raw water tank. To remove the Long-life filter, turn it to the left (1) and pull it out of the raw water tank (2).
text_image
Diagram showing a container with a side arm and a lid above it, labeled with arrows indicating process steps.
natural_image
Simple line drawing of a beaker pouring liquid from a container (no text or symbols)
text_image
Diagram showing a washing machine with labeled parts and a magnified inset showing internal components, likely illustrating a washing or cleaning process.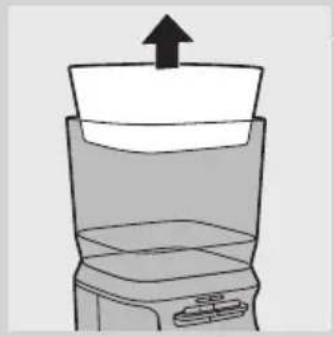
natural_image
Simple line drawing of a blender with an upward arrow indicating the top portion (no text or symbols)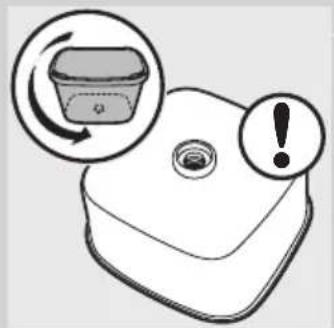
natural_image
Illustration of a plastic container with an arrow indicating rotation and an exclamation mark (no text or symbols)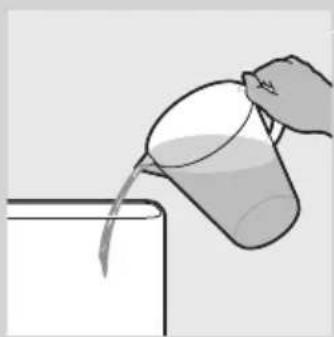
natural_image
Illustration of a hand pouring liquid from a cup into a container (no text or symbols)7 Empty one sachet with dedicated cleaning agent supplied with the appliance into a container.
8 Use the hot water lever to dispense 1 litre of hot water into the container.
Note: If the cleaning agent does not dissolve properly by itself, stir the water until all the cleaning agent has dissolved.
9 Before you continue, check if all filters have been removed.
10 Remove the raw water tank.
Make sure that the bottom of the raw water tank does not come into contact with dirty surfaces. If you want to put down the raw water tank, place it upside down.
Tip: You can clean the raw water tank with water and a mild cleaning agent. After cleaning, rinse the raw water tank thoroughly with clean boiled water.
11 Pour the cleaning solution in the clean water tank.
The cleaning solution flows into the boiler inside the dispensing unit.
The cleaning solution cleans and descales part of the clean water tank and the inside of the dispensing unit.
12 Place a large container (e.g. a bucket) under the water spouts. Push down the hot water lever until you have dispensed approx. 1 litre. Then push down the ambient water lever until you have dispensed approx. 1 litre. Finally, wait until the red heating-up light goes out and push down both levers to dispense the rest of the solution.
Always dispense water with both levers, to make sure both spouts are cleaned.
text_image
Diagram showing a mechanical component with numbered parts and directional arrows, likely illustrating a turning or assembly process.13 Switch off the appliance and remove the mains plug from the wall socket.
14 Remove the clean water tank, put the water dispensing unit on its side and pull out the drainage plug in the bottom.
Be careful, hot water may come out of the opening when you remove the drainage plug.
Note: Some water can drip off the top of the dispensing unit.

natural_image
Line drawing of a modern kitchen appliance with a cylindrical base (no text or symbols)15 Place the water dispensing unit on a bucket or above the sink.
natural_image
Diagram of a cylindrical water dispenser with a downward arrow indicating flow or movement (no text or symbols)16 Push down the hot water lever and dispense all water through the drainage hole and the hot water spout.
Now all water has been removed from the boiler.
text_image
Diagram showing a mechanical component with an exclamation mark and directional arrow, likely indicating a warning or alert mechanism.17 Put the drainage plug back into the bottom of the water dispensing unit.
Note: Make sure you insert the drainage plug properly, otherwise it is not possible to reassemble the drip tray and leakage may occur.
18 Clean the rust & sediment pre-filter, the raw water tank and the clean water tank with hot water.
Note: If you want to clean the top of the dispenser, do not touch the hole in the centre, as this hole is in contact with filtered water.
19 Wipe the top cover with a moist cloth.
Do not immerse the top cover in water.
20 Place the clean water tank on top of the water dispensing unit. Put the Soft water booster (WP3864 only) in the raw water tank and attach the Long-life filter to the raw water tank. Then put the raw water tank with its filters back onto the clean water tank. Place the top cover with the rust & sediment pre-filter back onto the raw water tank.
21 Fill the raw water tank with water and let the water flow into the clean water tank and the boiler inside the dispensing unit.
22 Throw away the first litre of filtered water from the ambient AND hot water spouts to get rid of any slight taste that may still be present.
Note: Unlock the child lock and press the hot water lever occasionally to let air escape from the boiler.
Regenerating the Soft water booster (WP3864 only)
The Soft water booster needs to be regenerated regularly. Depending on the hardness of the water supply in the area where you live, Philips suggests the following regeneration intervals:
First time After first time
Beijing, Shenyang, Tianjin 4wk 2wk
Wuhan, Nanjing, Chongqing, Shanghai, 8wk 4wk Chengdu, Guangzhou, Hangzhou
Qindao, Shenzhen 12wk 6wk
Other provinces 8wk 4wk
natural_image
Diagram of a kitchen appliance with an upward arrow indicating motion (no text or symbols)The Soft water booster has to be replaced every 6 months, see chapter 'Replacement'.
1 Make sure the raw water tank is empty.
2 Remove the top cover.
natural_image
Diagram of a mechanical component with an arrow indicating upward motion, no text or symbols present3 Pull the Soft water booster out of the raw water tank.
4 Take a large bowl in which the Soft water booster fits. Rinse this bowl to make sure it is clean. Do not put the Soft water booster in the bowl yet.
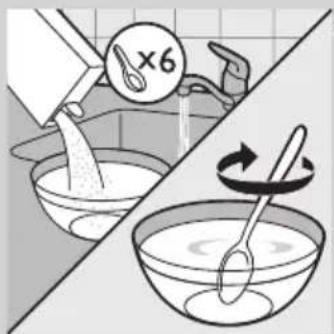
natural_image
Illustration showing a kitchen scene with a bowl being mixed, and a spoon lifting a spoon (no text or symbols)5 Fill the bowl with ambient water. Add 100g kitchen salt to each litre of water you put in the bowl. Stir the solution until all the salt has dissolved.
If you use a Chinese soup spoon, you have to add 6 spoons of salt to each litre of water.
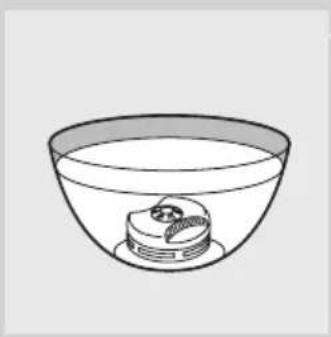
natural_image
Simple line drawing of a bowl containing a small object inside, no text or symbols present6 Put the Soft water booster in the bowl with the water/salt solution for at least 1 hour. Make sure the Soft water booster is completely submerged.
Note: The minimum submersion period is 1 hour. You can always submerge the Soft water booster longer.
natural_image
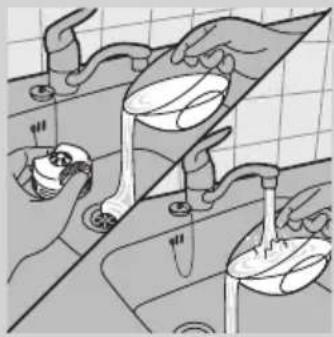
Illustration of kitchen sink with hand washing dishes and water splashing (no text or symbols)7 Take the Soft water booster out of the bowl. Throw away the water/salt solution and rinse the bowl.
natural_image
Line drawing of a bathroom sink with a faucet and bowl, no text or symbols present8 Fill the bowl with at least one litre of fresh ambient water again and put the Soft water booster in the bowl for 5 minutes. Make sure the Soft water booster is completely submerged.
natural_image
Diagram of a mechanical component with a circular top and central hub, showing a downward arrow (no text or symbols)9 Remove the Soft water booster and reattach it to the raw water tank.
10 Put the top cover back onto the appliance.
Storage
If you want to store the appliance, you have to empty all the water out of it, including the water that is in the boiler. To do this, follow the procedure below.
1 Switch off and unplug the appliance.
natural_image
Line drawing of a washing machine with an upward arrow indicating motion (no text or symbols)
text_image
Diagram showing mechanical component with numbered parts and directional arrows, likely illustrating a motion or assembly process.
natural_image
Line drawing of a portable washing machine with a cylindrical base (no text or symbols)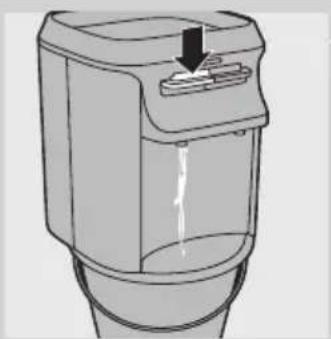
natural_image
Diagram of a cylindrical water dispenser with a downward arrow indicating flow or movement (no text or symbols)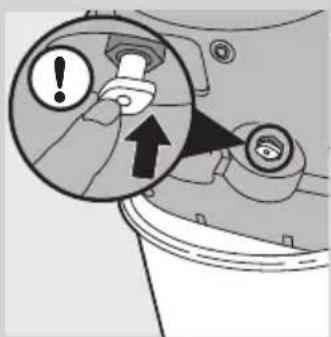
text_image
Diagram showing a mechanical component with warning and upward arrow, indicating a warning or alert mechanism.2 Remove the raw water tank and the clean water tank from the appliance.
3 Put the water dispensing unit on its side and pull out the drainage plug in the bottom.
Be careful, hot water may come out of the opening when you remove the drainage plug.
Note: Some water can drip off the top of the dispensing unit.
4 Place the water dispensing unit on a bucket or above the sink.
5 Push down the hot water lever and dispense all water through the drainage hole and the hot water spout.
Now all water has been removed from the boiler.
6 Put the drainage plug back into the bottom of the water dispensing unit.
Note: Make sure you insert the drainage plug properly, otherwise it is not possible to reassemble the drip tray and leakage may occur.
7 Reassemble the appliance and store it in a safe, dry place.
Storing the Long-life filter and rust & sediment pre-filter
Unpacked Long-life filters and rust & sediment pre-filters cannot be stored. If you do not intend to use the filters for quite some time, discard them.
Storing the Soft water booster (WP3864 only)
If you want to store the Soft water booster outside the appliance, you have to put it in a bowl filled with water. Make sure the Soft water booster is fully submerged.
Do not let the Soft water booster dry out.
Replacement
Replacing filters
- The Soft water booster has to be replaced every 6 months. New Soft water boosters are available from your Philips dealer or authorised Philips service centres under type number WP3963.
- The Long-life filter has to be replaced every 6 months or after having filtered 1000 litres of water. The Pure protect alert display shows the filter replacement symbol when you have to replace this filter. New Long-life filters are available from your Philips dealer or authorised Philips service centres under type number WP3962.
- Replace the rust & sediment pre-filter when you can no longer clean it properly. One extra rust & sediment pre-filter is supplied with the appliance.
Only replace the filters with original Philips filters.
For more information, please visit our website at www.philips.com/aqua or contact the Philips Consumer Care Centre in your country (China hotline: 4008 800 008).
Replacing the Pure protect alert display battery

natural_image
Illustration of a hand inserting a dollar sign into a device (no text or symbols visible)Under normal usage conditions, the battery lasts 2 years.
Replace the battery when the battery symbol flashes on the display.
1 Remove the battery compartment cover on the inside of the top cover with a coin.
2 Remove the non-rechargeable battery from the battery compartment.
3 Put a new 3-volt CR2032 Lithium battery in the battery compartment.
4 Put the cover back onto the battery compartment and tighten it with a coin.
Environment
natural_image
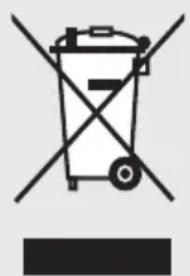
Symbol of a trash bin with crossed lines indicating no waste or restriction, and a solid black rectangle below (no text or symbols)- Do not throw away the appliance with the normal household waste at the end of its life, but hand it in at an official collection point for recycling. By doing this, you help to preserve the environment.
- Non-rechargeable batteries contain substances that may pollute the environment. Do not throw away non-rechargeable batteries with the normal household waste, but dispose of them at an official collection point for batteries. Always remove the non-rechargeable display batteries before you discard and hand in the appliance at an official collection point.
Removing the non-rechargeable display battery
Remove the non-rechargeable batteries from the battery compartment (see section 'Replacing the Pure protect alert display battery' in chapter 'Replacement').
Guarantee and service
Philips Consumer Lifestyle guarantees this product for a period of 2 years after the date of purchase. For detailed guarantee conditions, please refer to the separate guarantee leaflet included in the box. If you have questions about the product, you can either consult our on-line support at www.philips.com/aqua or call the Philips consumer care hotline (phone number 4008 800 008). We have put maximum effort in designing, developing, and testing this high-quality product. However, in the unfortunate case that your product needs repair, please call the Philips consumer care hotline to make an appointment for home repair. Our service technicians will ensure that hygiene is preserved during repair and that, after repair, the Philips water purifier gives you safe drinking water that you can trust.
Troubleshooting
This chapter summarises the most common problems you may encounter with your water purifier. If you are unable to solve the problem, contact the Consumer Care Centre in your country.
Problem Cause Solution
| I do not see any water coming out of the Long-life filter. | The hole in the Long-life filter is small to increase the lifetime of the filter. This hole may be clogged. | Make sure that the hole in the Long-life filter is open. If the hole is clogged, open it with a toothpick. |
| The filter replacement symbol flashes on the display. | You have used the Long-life filter to filter more than 1000 litres of water or you have used it longer than 6 months. | Replace the Long-life filter. After you have replaced the Long-life filter, press the display activation/reset button for 3 seconds to reset the progress bar. The display flashes 3 times. Then the filter replacement symbol disappears and the display shows all 4 segments of the progress bar again. |
| The water flows slowly. | There is air trapped inside the boiler. | Unlock the child lock and press the hot water lever occasionally to let air escape from the boiler. |
| This is normal because the appliance is gravity-based. | Because the water purifier is gravity-based, the water first flows fast and then flows more slowly. When the water is being filtered, it has to go through the extremely small pores of the micro-filtration membrane, which ensure that the water purifier removes 99.9999% of the bacteria in the water. Because of the small pores, the flow of the filtered water may not be as fast as a tap. It is normal that it takes the water purifier approx. 2 hours to filter a full raw water tank. | |
| Problem Cause | Solution | |
| The red heating-up light does not go on. | You have not put the mains plug in an earthed wall socket and/or you have not pressed the on/off button. | Put the mains plug in an earthed wall socket and/or press the on/off button. |
| The water in the boiler is at the right temperature. | The red heating-up light only goes on when the boiler is heating up. | |
| Perhaps you pressed the power-on button to switch on the hot water dispenser before there was water available in the boiler. | The boiler needs to be reset. After resetting, the appliance will work again. See ‘Resetting the boiler’ below for the correct resetting procedure. | |
| The water from the hot water dispenser is not hot enough (85°C). | Perhaps you pressed the power-on button to switch on the hot water dispenser before there was water available in the boiler. | The boiler needs to be reset. After resetting, the appliance will work again. See ‘Resetting the boiler’ below for the correct resetting procedure. |
| Water leaks out of the appliance. | You have put too much water in the appliance. | Do not fill the raw water tank beyond the maximum indication line in the rust & sediment pre-filter holder. |
| You have not inserted the drainage plug properly into the bottom of the dispensing unit. | Put the drainage plug properly back into the bottom of the water dispensing unit (see chapter ‘Storage’). | |
| I cannot open the lid. | You try to pull instead of press. | Press the lid release area to open the lid. |
| The flow of filtered water from the spouts decreases. | The sieves in the spouts are clogged. | Clean the sieves in the spouts. See section ‘Outside of the appliance’ in chapter ‘Cleaning and maintenance’. |
| The flow of filtered water from the Long-life filter decreases. | The filter is clogging up, because it has almost reached the end of its lifetime. | Replace the Long-life filter. After you have replaced the Long-life filter, press the display activation/reset button for 3 seconds to reset the progress bar. The display flashes 3 times. Then the filter replacement symbol disappears and the display only shows all 4 segments of the progress bar again. |
| I see black particles floating in the raw water tank. | Some carbon particles escape from the Long-life filter. This is normal and does not pose any health risks. | Clean the raw water tank regularly to remove these particles. |
Problem Cause Solution
| I dropped a filter and now I am not sure if it still works properly. | The filters are very delicate and have to be handled carefully. It is possible that a filter no longer works properly after you have dropped it. | Replace the filter you have dropped. Then reset the display after you have replaced this filter. Press the display activation/reset button for 3 seconds to reset the progress bar. The display flashes 3 times. Then the filter replacement symbol disappears and the display shows all 4 segments of the progress bar again. |
| I think the flow of filtered water from the Long-life filter is too slow and I want to make the hole in the filter bigger. | There is only a small hole in the Long-life filter to increase the lifetime of the filter. | Do not modify the Long-life filter! If you do, you could damage the filter and then it would no longer work properly. |
| I have just installed the appliance, but it does not dispense hot water. | After you have switched on the appliance, it takes some time before the boiler is filled completely and the water has been heated up to the right temperature. | After you have switched on the appliance, wait until the red heating-up light goes out before you dispense hot water. |
| The water in the clean water tank is boiling. | The appliance is malfunctioning. | Unplug the appliance immediately and take it to an authorised Philips service centre. |
| After I have dispensed the first cup of hot water, the red light goes on to indicate that no more hot water is available. | The red light goes on, but this does not mean that no more hot water is available. | The boiler has a capacity of 1 litre of hot water, which is enough to dispense 4 cups of hot water. Every time you dispense one cup of hot water, the red light goes on again. This does not indicate that no more hot water available, it only indicates that clean water is flowing into the boiler from the clean water tank. After you have dispensed 1 cup of hot water, there is still enough hot water available to dispense 3 more cups of hot water right away. |
| I am not sure if I can clean the filters | You can only clean the rust & sediment pre-filter. The Long-life filter can not be cleaned! The Soft water booster can only be regenerated with kitchen salt. Do not use cleaning agents or tools to clean the filters, as this may damage the filters. Damaged filters can lead to water that is not safe to drink. | |
| I do not know what kind of water I can filter in the water purifier. | Only use the water purifier to filter water from the tap in your house, as this is municipal pretreated water. Never put water hotter than 40°C in the water purifier. Water with a higher temperature than 40°C causes damage to the water tanks and filters. |
Problem Cause Solution
I do not know where to buy replacement filters
You can usually buy replacement filters at the shop where you bought your water purifier or at major retail outlets that sell Philips water purifiers. The rust and sediment pre-filter cannot be bought separately. One extra rust & sediment pre-filter in the provided in the package of the water purifier. After you have used this filter, 2 rust & sediment pre-filters are provided together with each Long-life filter you buy. You can call the Consumer Care Centre in your country to find a shop close to your home that sells replacement filters. Long-life filters are available under type number WP3962. Soft water boosters are available under type number WP3963.

text_image
Diagram showing installation steps of a device with labeled parts and directional arrows indicating process flow.Resetting the boiler
1 Switch off (1) and unplug (2) the appliance.
natural_image
Line drawing of a container with a downward arrow indicating a drop or compression process (no text or symbols)2 Fill the raw water tank. Make sure that there is at least 4 litres of water available in the clean water tank.
natural_image
Illustration of a water dispenser with liquid being poured into a cup (no text or symbols)3 Press down the hot water lever and dispense a little bit of hot water.
4 Wait at least 5 minutes (without dispensing water).
5 Insert the mains plug into the earthed wall socket again and press the on/off button to switch the appliance on again.
簡介

text_image
TESTED AND CERTIFIED Water Quality. UNDER INDUSTRY STANDARDSnatural_image
Illustration of a hand inserting a dollar coin into a device (no text or symbols)1 使用硬幣拆下頂蓋內側的電池槽蓋。
text_image
CR2032 3V CR2032 3Vnatural_image
Diagram of a mechanical component with an upward arrow indicating motion or force (no text or symbols)text_image
Diagram showing a container with two arrows labeled ① and ② indicating flow or movement from a top container to a lower container.natural_image
Diagram of a mechanical component with a downward arrow indicating force or direction (no text or symbols present)natural_image
Simple line drawing of a container with a downward arrow indicating compression or lifting (no text or symbols)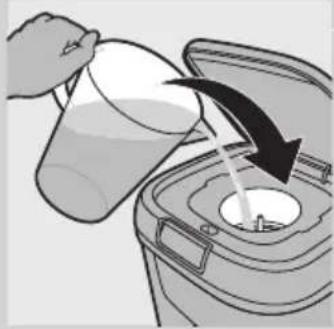
natural_image
Illustration of a hand pouring liquid into a trash bin with an arrow indicating flow (no text or symbols)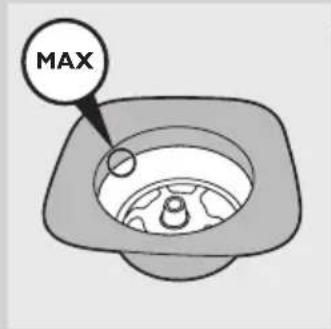
text_image
MAX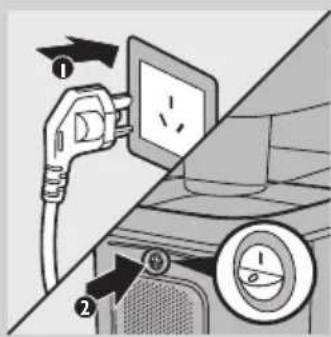
text_image
Diagram showing car charging plug and switch connected to a wall-mounted power socket, with numbered arrows indicating components.
natural_image
Diagram of a boat with star-shaped poles and hull, no text or symbols presentnatural_image
Diagram showing a device with liquid flow and an inset close-up of its internal components (no text or symbols)natural_image
Illustration of a hand pouring liquid into a trash bin with an arrow indicating flow direction (no text or symbols)1 按下開蓋區,打開頂蓋。
顯示器會亮起。
2 使用大水壺將生水箱裝滿。
text_image
MAXnatural_image
Diagram of a trash bin with an open lid and arrow indicating rotation (no text or symbols)3 蓋上蓋子。
4 等水流入淨水箱。
natural_image
Illustration of a water dispenser with a glass cup and arrow indicating action (no text or symbols)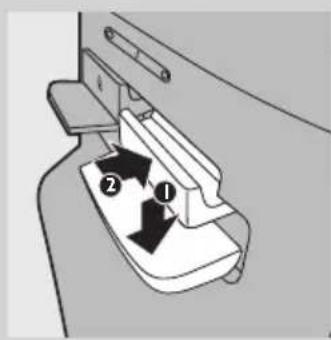
text_image
Diagram showing a mechanical component with labeled parts ① and ②, indicating a step or section.natural_image
Diagram of a container with a downward arrow indicating liquid level (no text or symbols)
natural_image
Diagram of a ship's hull with multiple star-shaped poles and a central shaft (no text or labels)
natural_image
Simple line drawing of a boat with a star-shaped sail (no text or symbols)text_image
Diagram showing two mechanical components with labeled arrows indicating motion or force directionsnatural_image
Simple icon of a progress bar with control knob (no text or symbols)natural_image
Simple grayscale icon of a progress bar with control knob (no text or symbols)natural_image
Simple grayscale icon of a progress bar with two segments and a handle (no text or symbols)natural_image
Simple grayscale icon of a progress bar with a circular button (no text or symbols)繁體中文38

natural_image
Diagram of a computer monitor with a progress bar and a circular icon showing a bin (no text or symbols)natural_image
Simple icon of a computer monitor with a scroll bar and an arrow pointing to it (no text or symbols)natural_image
Icon showing a device with a 'OK' button and a circular refresh symbol (no text or labels)natural_image
Simple line drawing of a device button with an arrow pointing to the bottom-right corner (no text or symbols)natural_image
Diagram of a device with a battery icon and fan blade, no text or symbols presenttext_image
Diagram showing a device with a dial indicator and plug, labeled with parts ① and ②, illustrating electrical or appliance installation steps.natural_image
Illustration of a handheld electronic device with a black arrow pointing to its side panel (no text or symbols)3 將滴盤自產品拉出。
繁體中文40

natural_image
Illustration of two hands operating a portable device with arrows indicating upward movement (no text or symbols)natural_image
Illustration of a hand pouring liquid from a basin into a sink (no text or symbols)5 將滴盤中的液體清空倒進水槽。
natural_image
Line drawing of a handheld electronic device with a black clip attached to the top panel (no text or symbols)natural_image
Illustration of a hand holding a keyboard next to a washing machine, with a magnified inset showing the mechanism (no text or symbols present)natural_image
Diagram of a food storage container with an open lid and a black arrow indicating upward motion (no text or symbols)2 將固定座從頂蓋取出。

natural_image
Simple line drawing of a square sink with a lid and arrow indicating upward motion (no text or symbols)3 將鎖從固定座中取出。

natural_image
Line drawing of a hand washing a kitchen sink with a spoon (no text or symbols)natural_image
Simple line drawing of a mechanical component with a downward arrow indicating force or direction (no text or symbols)5 將鐵鏽與沉澱前層濾芯放回固定座。
natural_image
Simple line drawing of a square sink with a lid and arrow indicating downward flow (no text or symbols)natural_image
Line drawing of a hand inserting a circular object into a trash bin (no text or symbols)7 將固定座放回頂蓋中。
natural_image
Diagram of a kitchen appliance with a downward arrow indicating compression or cooling process (no text or symbols)產品內部清潔與除垢的快速簡單清潔程序
natural_image
Diagram of a food item inside a trash bin with an upward arrow indicating the opening (no text or symbols)natural_image
Diagram of a mechanical component with an arrow indicating upward motion (no text or symbols)text_image
Diagram showing a container with a lid and two arrows labeled ① and ② indicating directional movement or process flow.
natural_image
Simple line drawing of a beaker pouring liquid from a container (no text or symbols)
text_image
Diagram showing a device with labeled parts and an arrow indicating a process, including a magnified inset of a device with 's' and number '11'.
natural_image
Simple line drawing of a blender with an upward arrow indicating the top portion (no text or symbols)
natural_image
Illustration of a plastic container with an arrow indicating rotation and an exclamation mark (no text or symbols)
natural_image
Illustration of a hand pouring liquid from a cup into a container (no text or symbols)text_image
Diagram showing a mechanical component with numbered parts and directional arrows, likely illustrating a turning or assembly process.natural_image
Line drawing of a portable kitchen appliance with a cylindrical base (no text or symbols)natural_image
Diagram of a cylindrical water dispenser with a downward arrow indicating flow or movement (no text or symbols)text_image
Diagram showing a mechanical component with an exclamation mark and an upward arrow, likely indicating a warning or alert mechanism.17 將導流塞裝回給水裝置的底部。
text_image
Illustration showing a kitchen appliance with three steps: adding a lid, adding a cake, and mixing ingredients in a bowl.natural_image
Simple line drawing of a bowl containing a small object inside, no text or symbols presentnatural_image
Illustration of kitchen sink with hand washing dishes and water splashing (no text or symbols)natural_image
Line drawing of a bathroom sink with a faucet and bowl, no text or symbols presentnatural_image
Diagram of a mechanical component with a circular top and central hub, showing a downward arrow (no text or symbols)natural_image
Line drawing of a washing machine with an upward arrow indicating motion (no text or symbols)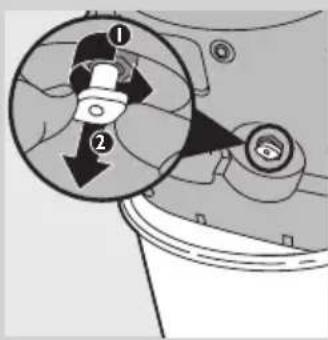
text_image
Diagram showing mechanical component with numbered parts and directional arrows, likely illustrating a motion or assembly process.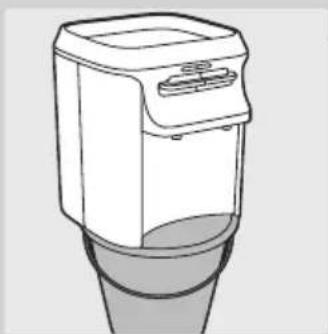
natural_image
Line drawing of a modern kitchen appliance with a lid and base (no text or symbols)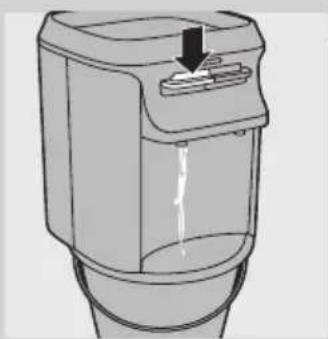
natural_image
Diagram of a water dispenser with a downward arrow indicating flow or movement (no text or symbols)
text_image
Diagram showing a mechanical component with warning and upward arrow, indicating a warning or alert mechanism.2 將生水箱及淨水箱自產品取下。
natural_image
Illustration of a hand inserting a dollar coin into a machine (no text or symbols)電池在正常使用狀況下能維持 2 年。
當顯示器上閃爍電池符號時,請更換電池。
natural_image
Symbol of a trash bin crossed with no text or numbers, representing waste sorting or disposal (no text present)text_image
Diagram showing installation of an electric vehicle air conditioner with labeled parts and directional arrows重新設定鍋爐
natural_image
Diagram of a container with a downward arrow indicating a process or movement (no text or symbols present)natural_image
Illustration of a water dispenser with a glass cup and a downward arrow indicating action (no text or symbols)text_image
TESTED AND CERTIFIED Water Quality. UNDER INDUSTRY STANDARDS一般说明 (图 2)
A 铁锈和沉淀物预过滤网锁装置
B 铁锈和沉淀物预过滤网
C 铁锈和沉淀物预过滤网架
D 上盖上的盖子
E 盖子开口区
F 上盖
G 纯净保护系统显示屏
H 显示屏激活/重置按钮
原水箱
J 净水箱
K 长效滤芯
L 持续出水锁定
M 电源指示灯(绿色)
N 加热指示灯(红色)
○ 儿童锁
P 热水控制杆
Q 常温水控制杆
R 带银滤网的热水出水管
s 带银滤网的常温水出水管
T 饮水机
U 水盘盖
v 水盘
w 带插头的电源线
X 通风栅格
Y 电源按钮
Z 水质软化器(仅限于 WP3864)
natural_image
Illustration of a hand inserting a dollar sign into a device (no text or symbols present)1 用硬币打开上盖内部的电池仓盖。

text_image
CR2032 3V CR2032 3Vnatural_image
Diagram of a mechanical component with an upward arrow indicating motion or force (no text or symbols)text_image
Diagram showing a container with two arrows labeled ① and ② indicating flow or movement from a top container to a lower container.natural_image
Diagram of a mechanical component with a downward arrow indicating force or direction (no text or symbols present)natural_image
Simple line drawing of a container with a downward arrow indicating liquid level (no text or symbols)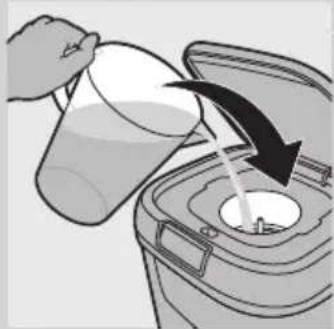
natural_image
Illustration of a hand pouring liquid into a trash bin with an arrow indicating flow (no text or symbols)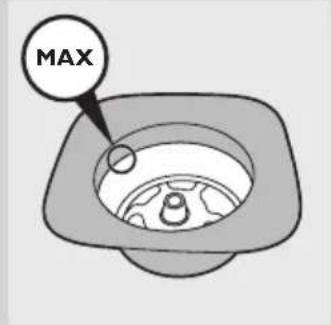
text_image
MAX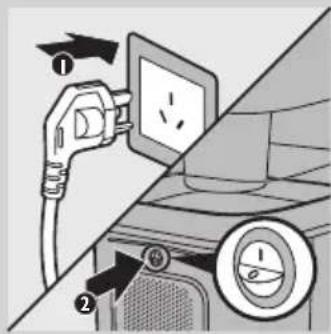
text_image
Diagram showing electric plug installation and power metering process with labeled parts ① and ②7 将上盖盖在原水箱上。
natural_image
Simple line drawing of a boat with four star-shaped poles and a central hull (no text or symbols)natural_image
Diagram showing a device with a lock and a magnified inset of its internal components (no text or symbols)natural_image
Illustration of a hand pouring liquid into a trash bin with an arrow indicating flow direction (no text or symbols)natural_image
Diagram of a trash bin with an open lid and arrow indicating rotation (no text or symbols)natural_image
Illustration of a water dispenser with a cup and a downward arrow indicating action (no text or symbols)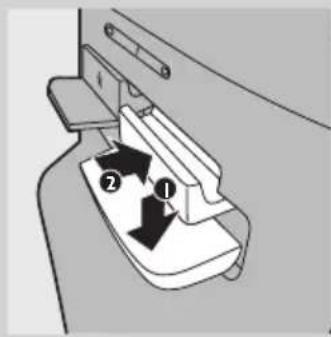
text_image
Diagram showing a device with labeled parts, including numbered arrows indicating movement or flow.natural_image
Line drawing of a kitchen appliance with a downward arrow indicating compression or cooling process (no text or symbols)
natural_image
Diagram of a boat with multiple star-shaped poles and hull markings (no text or symbols)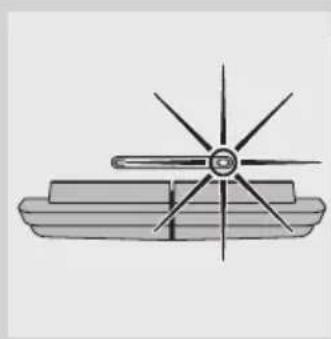
natural_image
Simple line drawing of a ship's propeller with four blades and a central hub (no text or symbols)text_image
Diagram showing two mechanical components with labeled arrows indicating motion or force directionsnatural_image
Simple icon of a progress bar with control knob (no text or symbols)natural_image
Simple grayscale icon of a progress bar with control knob (no text or symbols)natural_image
Simple grayscale icon of a progress bar with two segments and a handle (no text or symbols)natural_image
Simple grayscale icon of a progress bar with a circular button (no text or symbols)简体中文60
natural_image
Simple line drawing of a computer monitor with a progress bar and a circular icon showing a bin (no text or symbols)natural_image
Simple icon of a computer monitor with a scroll bar and an arrow pointing to it (no text or symbols)natural_image
Icon showing a server with a login and a recycling symbol (no text or labels)natural_image
Simple line drawing of a device button with an arrow pointing to the bottom-right corner (no text or symbols)natural_image
Diagram of a device with a battery icon and fan blade, no text or symbols presenttext_image
Diagram showing installation steps of a power plug and switch, with labeled parts ① and ②natural_image
Illustration of a small electronic device with a black arrow pointing to its side panel (no text or symbols)3 将水盘从产品中拉出。
简体中文62

natural_image
Illustration of two hands operating a portable device with arrows indicating motion (no text or symbols)natural_image
Illustration of a hand pouring liquid from a basin into a sink (no text or symbols)5 将水盘中的水全部倒入水池。

natural_image
Line drawing of a handheld electronic device with a black clip attached to the top panel (no text or symbols)natural_image
Illustration of a hand holding a rotary knob next to a kitchen appliance (no text or symbols)natural_image
Diagram of a food storage container with an open lid and a black arrow indicating upward motion (no text or symbols)2 从上盖中取出滤芯架。
natural_image
Simple line drawing of a square sink with a lid and arrow indicating upward motion (no text or symbols)3 从滤芯架取出锁装置。

natural_image
Line drawing of a hand washing a kitchen sink with a spoon (no text or symbols)natural_image
Simple line drawing of a mechanical component with a downward arrow indicating force or direction (no text or symbols)5 将铁锈和沉淀物预过滤网装回滤芯架。

natural_image
Simple line drawing of a square sink with a lid and arrow indicating downward flow (no text or symbols)natural_image
Diagram of a trash bin with an open lid and internal circular structure, showing a downward arrow (no text or symbols)7 将滤芯架装回上盖。
natural_image
Simple line drawing of a container with a downward arrow indicating a process (no text or symbols)natural_image
Diagram of a food item inside a trash bin with an upward arrow indicating the opening (no text or symbols)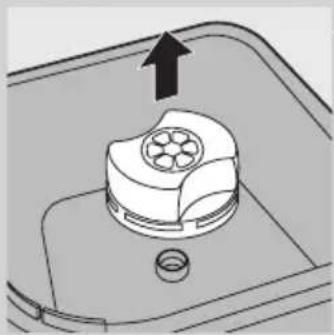
natural_image
Diagram of a mechanical component with an arrow indicating upward motion, no text or symbols presenttext_image
Diagram showing a container with a side panel and two arrows indicating flow or movement, labeled ① and ②.natural_image
Simple line drawing of a beaker pouring liquid from a container (no text or symbols)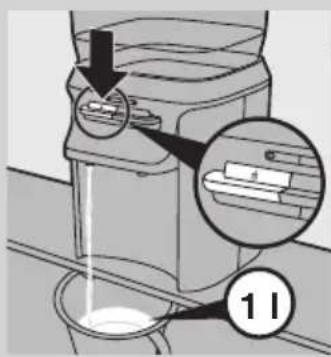
text_image
Diagram showing a device with a magnified inset highlighting a component labeled '11'
natural_image
Simple line drawing of a blender with an upward arrow indicating the top portion (no text or symbols)
natural_image
Illustration of a plastic container with an arrow indicating rotation and an exclamation mark (no text or symbols)
natural_image
Illustration of a hand pouring liquid from a cup into a container (no text or symbols)text_image
Diagram showing a mechanical component with numbered parts and directional arrows, likely illustrating a turning or assembly process.natural_image
Line drawing of a portable kitchen appliance with a cylindrical base (no text or symbols)15 将饮水机放在水桶或水槽上。

natural_image
Diagram of a water dispenser with a downward arrow indicating flow or movement (no text or symbols)text_image
Diagram showing a mechanical component with an exclamation mark and an upward arrow, likely indicating a warning or alert mechanism.17 将排水塞塞回出水装置的底部。
text_image
Illustration showing a kitchen appliance with three steps: adding a lid, adding a cake, and mixing ingredients in a bowl.natural_image
Line drawing of a washing machine with an upward arrow indicating motion (no text or symbols)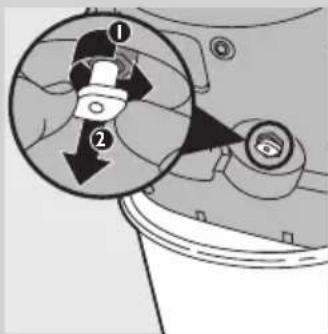
text_image
Diagram showing a mechanical component with numbered parts and directional arrows, likely illustrating a motion or assembly process.
natural_image
Line drawing of a portable kitchen appliance with a lid and base (no text or symbols)
natural_image
Diagram of a water dispenser with a downward arrow indicating flow or discharge (no text or symbols present)
text_image
Diagram showing a mechanical component with warning and upward arrow, indicating a warning or alert mechanism.2 从产品中卸下原水水箱和净水水箱。
natural_image
Illustration of a person holding a dollar sign, viewed through a circular frame (no text or symbols)在正常使用条件下,电池可使用 2 年。