
RS 6 - Wireless Headphones SENNHEISER - Free user manual and instructions
Find the device manual for free RS 6 SENNHEISER in PDF.
| Brand | SENNHEISER |
| Model | RS 6 |
| Product type | Wireless headphones |
| Transmission frequency | 433.40 - 434.50 MHz (European version) / 925 - 927.2 MHz (North American version) |
| Number of channels | 3 switchable channels |
| Range | Up to 100 m (in open field) |
| Frequency response | 20 - 20,000 Hz |
| Harmonic distortion | < 0.8 % |
| Transmitter power supply | 12 V DC via power supply unit (230 V, 120 V or 240 V depending on version) |
| Transmitter power consumption | Approx. 1 VA |
| Receiver battery life | Approx. 3 h 30 with BA 150 rechargeable battery |
| Transmitter dimensions | 130 x 140 x 40 mm |
| Transmitter weight | Approx. 90 g (without power supply unit) |
| Receiver dimensions | 150 x 80 x 200 mm |
| Receiver weight | Approx. 160 g (with battery) |
| Main features | Wireless stereo transmission, individual volume adjustment on headphones, manual tuning, battery charging in transmitter, automatic power-on with standby |
| Maintenance and cleaning | Clean transmitter and receiver with a slightly damp cloth; do not use detergents or cleaning products |
| Safety | Do not open the device, keep away from heat sources, do not expose to moisture, use only the provided power supply unit, listen at moderate volume to protect your hearing |
| Spare parts and accessories | Replacement battery BA 150, charger L 150, additional receivers HDR 6 / HDR 6-9 |
| General information | Approval: DGPT (France) agreement no. 96 0347 PPL 0; authorized use under RSS 210 conditions |
Frequently Asked Questions - RS 6 SENNHEISER
User questions about RS 6 SENNHEISER
0 question about this device. Answer the ones you know or ask your own.
Ask a new question about this device
Download the instructions for your Wireless Headphones in PDF format for free! Find your manual RS 6 - SENNHEISER and take your electronic device back in hand. On this page are published all the documents necessary for the use of your device. RS 6 by SENNHEISER.
USER MANUAL RS 6 SENNHEISER
natural_image
Line drawing of a Sennheiser ear with attached connector (no text or symbols)Instructions for use 13
Notice d'emploi 23
natural_image
Technical line drawing of a mechanical clamp or hook component (no text or symbols)
natural_image
Isometric line drawing of a multi-level building layout with trees, pathways, and lighting equipment (no text or symbols)text_image
Diagram showing hands holding a tool interacting with a device, with Chinese text labels and an arrow indicating direction.
text_image
SENSHIEERFederal Approvals Office For Telecommunications Of The Federal Republic Of Germany

natural_image
Technical line drawing of a mechanical clamp or hook component (no text or symbols)
Thank you for choosing Sennheiser! You have made an excellent choice. This product will give you reliable and cost-effective ease of operation over many years. All of Sennheiser's professional expertise and more than fifty years of experience have gone into the creation of this state-of-the-art product.
Please take a few moments to read these instructions carefully. We want you to enjoy your new wireless headphones quickly and to the full.
VERSIONS
RS 6
RF transmission on 433.40...434.50 MHz (European version)
RS 6-9
RF transmission on 925 ... 927.2 MHz (North-American version)
FEATURES
• Lightweight headphone, comfortable to wear
• Excellent sound quality
- Easy to operate
- The headphone operates on environmentally friendly rechargeable accuplugs (nickel-metal hydride)
• Volume can be set directly on the headphone
- Up to two accuplugs can be recharged in special compartments in the transmitter
- Plug-in mains unit available for different operating voltages
• Transmitter in a designer housing
- Three switchable transmission channels allow simultaneous operation of several systems
- Insensitive to interference due to special RF input filter
text_image
1 2 3 4 5 6 7 8 9 10 AUDIO INPUT 13-19V DC CHANNEL MADE IN GERMANY SENNEISER SENNEISER SANNHEISERWIRELESS RF TRANSMISSION TECHNOLOGY
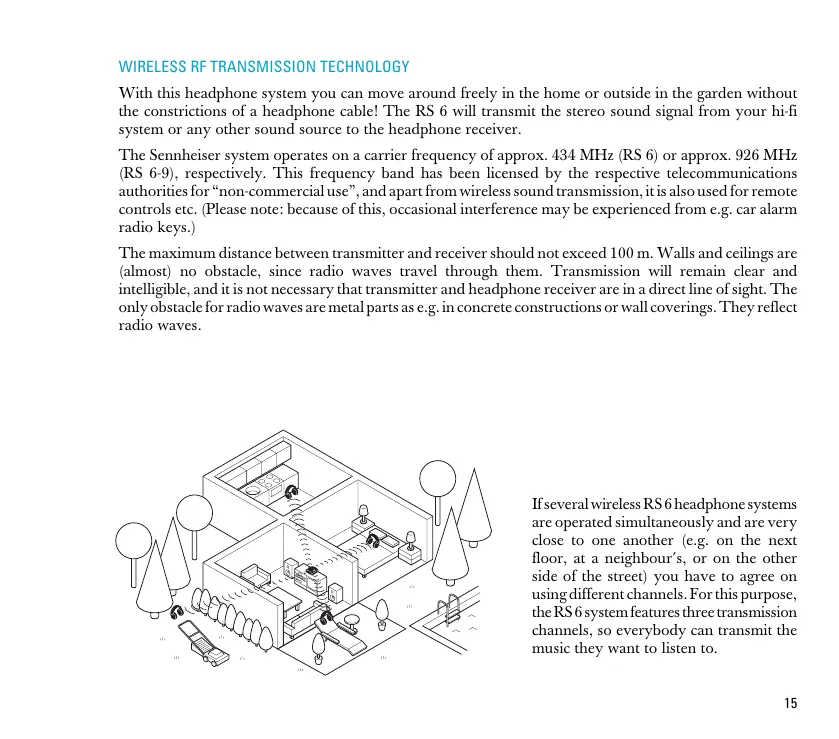
With this headphone system you can move around freely in the home or outside in the garden without the constrictions of a headphone cable! The RS 6 will transmit the stereo sound signal from your hi-fi system or any other sound source to the headphone receiver.
The Sennheiser system operates on a carrier frequency of approx. 434 MHz (RS 6) or approx. 926 MHz (RS 6-9), respectively. This frequency band has been licensed by the respective telecommunications authorities for “non-commercial use”, and apart from wireless sound transmission, it is also used for remote controls etc. (Please note: because of this, occasional interference may be experienced from e.g. car alarm radio keys.)
The maximum distance between transmitter and receiver should not exceed 100 m. Walls and ceilings are (almost) no obstacle, since radio waves travel through them. Transmission will remain clear and intelligible, and it is not necessary that transmitter and headphone receiver are in a direct line of sight. The only obstacle for radio waves are metal parts as e.g. in concrete constructions or wall coverings. They reflect radio waves.
natural_image
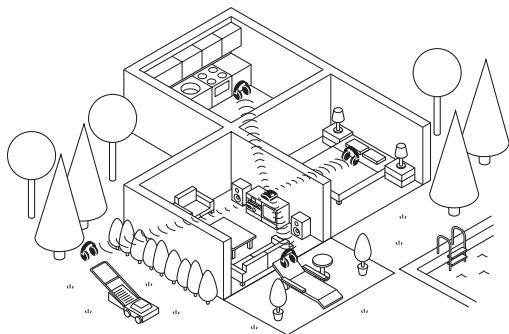
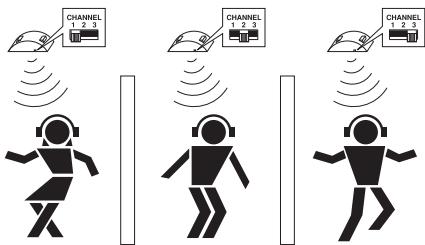
Isometric line drawing of a multi-level residential or industrial space with buildings, trees, and vehicles (no text or symbols)If several wireless RS 6 headphone systems are operated simultaneously and are very close to one another (e.g. on the next floor, at a neighbour's, or on the other side of the street) you have to agree on using different channels. For this purpose, the RS 6 system features three transmission channels, so everybody can transmit the music they want to listen to.
WHERE TO PLACE THE TRANSMITTER
Choose a suitable place near your hi-fi system.
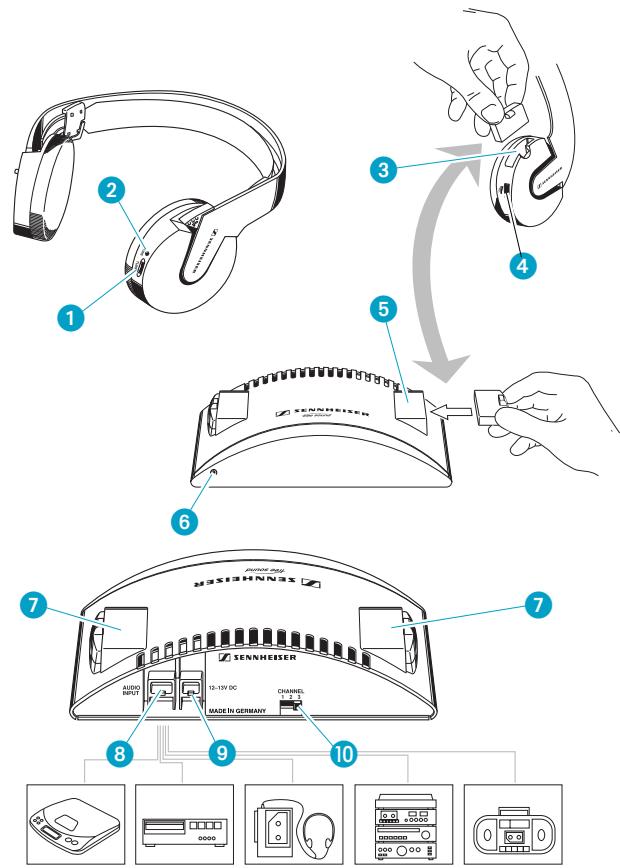
Use the supplied cable to connect socket 8 on the transmitter to the headphone output socket of your hi-fi system. The cable is fitted with a 3.5 mm jack plug suitable for most headphone output sockets. For connection to 1/4" (6.3 mm) headphone outputs, use the supplied adaptor.
Connect the plug-in mains unit to socket 9 on the transmitter and plug the mains unit into a wall socket.
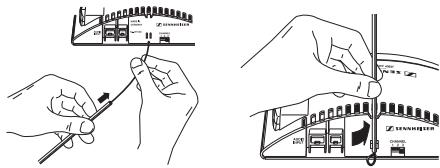
ANTENNA
The wire antenna is an integral part of the transmitter. For best transmission the antenna should be vertical. You can therefore
▶ leave the wire antenna dangling in a vertical position down behind the transmitter - or
(the better option) slide the supplied plastic tubing over the antenna and snap it into the clamps at the back of the transmitter:
text_image
Technical diagram showing hand-drawn steps for assembling a mechanical component with labeled parts and directional arrowsMake sure that there are no metal objects such as shelf bars or lamp stands in parallel with the antenna. Do not place the transmitter on a TV set as it might interfere with the transmitter. Test where exactly in the room the transmitter works best.
AUTOMATIC ON/OFF SWITCHING
The transmitter features a convenient automatic on/off function:
When an audio signal reaches the transmitter, it is switched on. The LED 6 at the front lights up green.
If there is no audio signal for about 3 minutes, the transmitter automatically switches off and the LED 6 goes off. The transmitter is now in stand-by mode, its power consumption is very low so that it can remain connected to the mains.
IMPORTANT
The transmitter's charging function (charging compartments 7) is independent of the automatic on/off function. Accuplugs can always be recharged when the transmitter is connected to the mains.
Insert the BA 150 rechargeable accuplug into the battery compartment 3 on the headphone receiver.
SWITCHING THE HEADPHONE RECEIVER ON
Switch on the headphone receiver and adjust the volume with control 4.
ADJUSTING THE RECEIVER CHANNEL
Transmitter and headphone receiver have to work on the same frequency:
Put the transmitter and the headphone receiver into operation as described above. Switch on the signal source! If possible, switch off its loudspeakers.
Select a transmission channel (1, 2 or 3) on the transmitter with switch 10.
Adjust the volume control 4 on the headphone until you can hear a low hissing.
Slowly turn control ① ("TUNE") on the headphone until you can hear the audio signal loud and clear. Tuning noise should now stop and the LED ② should be lit. The receiver's AFC (Automatic Frequency Control) circuitry stabilises your adjustment.
Transmitter and headphone receiver are now operating on the same frequency.
text_image
CHANNEL 1 2 3 CHANNEL 1 2 3 CHANNEL 1 2 3Your neighbour also likes listening to music with an RS 6? No problem! With switch 10, you simply select a different channel on each transmitter. Then set the headphone receivers to the respective frequencies (with control 1, as described above). Observe a minimum distance of 2 m between two transmitters.
ADJUSTMENTS ON YOUR HI-FI SYSTEM
Please refer to the instruction manual of your hi-fi system to find out whether the volume control also adjusts the headphone output or whether the output has to be regulated separately. You will also find instructions on how to switch off the loudspeakers.
OPTIMUM MODULATION LEVEL OF THE TRANSMITTER
First, set the volume of your hi-fi system to a medium value.
The T 6 transmitter is fitted with an automatic modulation control which prevents overmodulation of the transmitter. The green LED 6 on the front panel indicates optimum modulation. Now adjust the volume on the hi-fi system such that the LED 6 blinks in time with the music, this indicates the correct transmission level.
IMPORTANT!
Only use the transmitter with the suitable Sennheiser mains unit included in the supply schedule. Always disconnect the mains plug when you want to change connections or move the device to a different place.
Never open electronic devices! This must only be done by authorised personnel and is all the more valid for repairs on current-carrying units.
Keep the system away from central heating radiators and electric heaters. Never expose it to direct sunlight.
Use the system in dry rooms only. Transmitter and plug-in mains unit should always remain in the home. You can use the headphone receiver outside if the weather is dry.
▶ Use a damp cloth for cleaning the transmitter and the headphone receiver. Do not use any cleansing agents or solvents.
VOLUME UP? - NO!
When people use headphones, they tend to choose a higher volume than with loudspeakers. Listening at high volume levels for a long time can lead to permanent hearing defects. Please protect your hearing, Sennheiser headphones also sound exceptionally good at low volumes...
WHAT TO DO IF ...
... the volume is up but you cannot hear anything:
... the sound is distorted:
... the sound is slightly noisy:
... you can hear twittering and chirping, and the sound is “squeezed”:
There is no audio signal available. Check the transmitter connection. Is the volume at the headphone socket of your hi-fi system or TV sufficient?
Are you still within the transmitter's range?
Is the receiver on the same frequency as the transmitter?
The headphone accuplug has gone flat, please recharge it immediately.
You are about to leave the transmitter's maximum range. Soon transmission will be interrupted completely.
The transmitter's modulation level is too low. Increase the volume on your hi-fi system (see also page 18).
▶ Two transmitters are interfering!
Choose a different transmission channel.
ACCESSORIES
BA 150
• L 150
• HDR 6 or HDR 6-9
The following items are available to complement your system:
Rechargeable accuplug as a spare, for use when the supplied accuplug is being recharged
Charger for recharging additional BA 150 accuplugs (recommended when more than two headphone receivers are used with one transmitter)
Additional headphone receivers
CHARGING CYCLE OF RECHARGEABLE BATTERIES
The charging time of your accuplug 5 depends on how long you have used the headphone receiver. General rule:
OPERATING TIME x 3 = CHARGING TIME
Example:
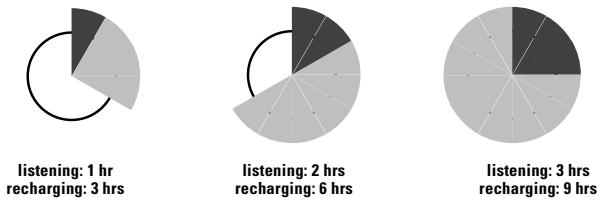
RECHARGING THE BA 150 ACCUPLUG
Do not use rechargeable batteries until they are completely flat. If you do, they will be exhausted and cannot be recharged. This happens e.g. when flat accuplugs remain uncharged for some time. Please observe the two following rules:
If you notice that the accuplug is going flat, turn off the headphone and recharge the battery immediately. If you have a spare accuplug you can use it in the meantime.
Immediately recharge the accuplug after every use, no matter whether it is fully or only partly discharged.
Before using the accuplug for the first time, you should charge it for 24 hours in the transmitter's charging compartment 7.
Please note: the accuplug is also recharged when the transmitter is switched off but remains connected to the mains.
ENVIRONMENT AND HEALTH
Devices which operate on rechargeable batteries are environmentally friendly. They can be recharged many times whereas standard batteries are hazardous waste after use. In case an accuplug is defective or has been damaged due to exhaustive discharge, it can be recycled. Just return it to your specialist dealer. Here you can also get new Sennheiser accuplugs.
According to today's scientific knowledge, the radio waves emitted by this device are by no means harmful.
TECHNICAL DATA
Modulation
Range
Audio frequency response
THD
Power supply
Power consumption of transmitter
RF output power
Signal-to-noise ratio
Frequencies T 6
Frequencies T 6-9
Audio input voltage / Audio connector
Charging compartments
Weight / Dimensions
Transducer principle
Signal-to-noise ratio
Max. sound pressure level
Tuning range HDR 6
Tuning range HDR 6-9
Power supply
Current consumption / Operating time
Weight / Dimensions
SUPPLY SCHEDULE
RS 6 SYSTEM
FM stereo
up to 100 m
20 - 20,000 Hz
< 0.8 %
T 6 TRANSMITTER
12 V DC via plug-in mains unit NT 92
approx. 1 VA
typ. 1.2 mW
typ. 70 dB
433.40 MHz, 434.13 MHz, 434.50 MHz (channels switchable)
925.40 MHz, 926.15 MHz, 926.50 MHz (channels switchable)
10 mV - 3 V / 3.5 mm stereo jack plug + 1/4" (6.3 mm) adaptor
2, for BA 150
approx. 90 g (without plug-in mains unit) / 130 x 140 x 40 mm
HDR 6 HEADPHONE RECEIVER
open
65 dB
105 dB
433 - 435 MHz, stepless
925 - 927.2 MHz, stepless
via BA 150 rechargeable accuplug, 2.4 V
approx. 18 mA / approx. 3.5 hrs per accuplug
approx. 160 g incl. accuplug / 150 x 80 x 200 mm
1 T 6 or T 6-9 transmitter
1 HDR 6 or HDR 6-9 headphone receiver
1 BA 150 rechargeable accuplug
1 plug-in mains unit, 12 V DC, for 230, 120 or
240 V mains voltage
1 connection cable with 3.5 mm/6.3 mm (1/4") jack plug adaptor
1 Plastic tubing
1 RCA adaptor stereo (US-Version only)
1 instructions for use
RSS 210 MANUEL STATEMENT
Operation is subject to the following two conditions:
① This device may not cause interferences and
2 This device must accept any interference, including that may cause undesired operation of the device.
Privacy of communications may not be ensured when using this telephone.
natural_image
Line drawing of a mechanical hook or clamping device (no text or symbols)
natural_image
Isometric line drawing of a multi-level residential or industrial space with buildings, trees, and vehicles (no text or symbols)text_image
Diagram showing hands holding a tool with a ruler and a schematic diagram above, likely illustrating a measurement or design procedure.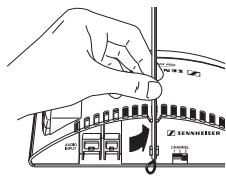
text_image
SUNNHETER CHANNELnatural_image
Technical line drawing of a mechanical clamp or hook component (no text or symbols)
natural_image
Isometric line drawing of a multi-level residential or industrial space with trees, lighting fixtures, and a vehicle (no text or symbols)text_image
Technical diagram showing hands using a tool to adjust or install a component with labeled parts and directional arrows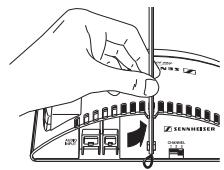
text_image
SENNEISER Spring Springnatural_image
Line drawing of a mechanical clamp or bracket (no text or symbols)
natural_image
Isometric line drawing of a multi-level building with surrounding trees and parked cars (no text or symbols)text_image
Diagram showing hands holding a pen with a schematic diagram above, likely illustrating a technical or engineering procedure.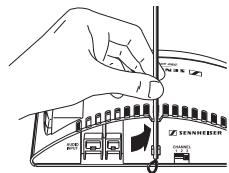
text_image
SENNEHERN CHANNELpie
| Segment | Value | |---|---| | Segment 1 | 45 | | Segment 2 | 38 | | Segment 3 | 32 | | Segment 4 | 27 | | Segment 5 | 23 | | Segment 6 | 20 | | Segment 7 | 17 | | Segment 8 | 14 | | Segment 9 | 11 | | Segment 10 | 9 |natural_image
Technical line drawing of a mechanical clamp or hook component (no text or symbols)
natural_image
Isometric line drawing of a multi-level residential or industrial space with trees, lighting fixtures, and a car (no text or symbols)text_image
Diagram showing hands holding a tool interacting with a mechanical component, labeled with part numbers and Chinese characters.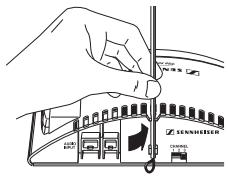
text_image
Diagram showing hand operating a device with labeled components including 'SENSHETER' and 'CHANNEL'1 zender T 6 of T 6-9
Subject to alterations