
TMM20 - Drill Tryton - Free user manual and instructions
Find the device manual for free TMM20 Tryton in PDF.


| Product Type | Cordless Rotary Hammer |
| Model | TMM20 |
| Voltage | 20 V d.c. |
| No-Load Speed | 0–1850 rpm |
| Impact Energy | 2 J |
| Chuck Type | SDS-plus |
| Max Drilling Diameter (Wood) | 30 mm |
| Max Drilling Diameter (Steel) | 13 mm |
| Max Drilling Diameter (Concrete) | 18 mm |
| Weight (with battery) | 2.75 kg |
| Battery Type | Li-ion, 20 V, 4 Ah |
| Charger Input | 220–240 V AC, 50–60 Hz |
| Charger Output | 20 V DC, 2 A |
| Charging Time | 120 minutes |
| Sound Pressure Level (LpA) | 93.6 dB(A) |
| Sound Power Level (LwA) | 104 dB(A) |
| Vibration Level (main handle) | 5.677 m/s² |
| Vibration Level (auxiliary handle) | 6.334 m/s² |
| Operating Modes | No-impact drilling, impact drilling, chiseling |
| Additional Features | Auxiliary handle, variable speed, reverse, overload clutch, auxiliary light, depth stop, dust protection hood |
| Maintenance | Clean with damp cloth, avoid solvents; store dry; compressed air for vents |
| Repairs | Authorized PROFIX Service only, genuine spare parts |
Frequently Asked Questions - TMM20 Tryton
User questions about TMM20 Tryton
0 question about this device. Answer the ones you know or ask your own.
Ask a new question about this device
Download the instructions for your Drill in PDF format for free! Find your manual TMM20 - Tryton and take your electronic device back in hand. On this page are published all the documents necessary for the use of your device. TMM20 by Tryton.
USER MANUAL TMM20 Tryton
E E K T R O N A R Z I

natural_image
Line drawing of a TRYTOR Li-ion battery with visible circuit components and mounting base (no text or symbols)TMM20
EN
Operating instruction
CORDLESS ROTARY HAMMER....5
PL




H
i

J


Original text translation

BEFORE YOU START USING THE MACHINE READ THOROUGHLY THIS MANUAL.
Keep this document for future reference.

WARNING! Read all safety warnings marked with a symbol ⚠️ and all operating safety instructions.
To limit the risk of fire, electric shock and injury while using the device, follow all operating safety instructions and tips provided below.
Keep all work safety instructions and tips for future reference.
In warnings provided herein the expression "power tool" means a power tool powered from the mains (with a power cord) or a battery powered power tool (cordless).

WARNING! General work safety warnings for use of the tool.
Workplace safety:
a) Keep your workplace tidy and well lit. Untidiness and bad lighting result in higher accident rate.
b) Do not use the power tool in explosive environments, created by flammable liquids, gases or dusts. The power tool generates sparks that can ignite dust or vapors.
c) Keep children and unauthorized persons away from the place where the power tools are used. Inattention may result in losing control over your power tool.

WARNING! General warnings regarding the use of power tools.
Electric safety:
a) Plugs used in power tools must match wall outlets. Never modify the plug of your power tool. Do not use any extension cables when operating a power tool with a grounding/earthing conductor (PE). Any modifications of plugs and outlets increase the risk of electric shock.
b) Avoid touching earthed surfaces or grounded items like pipes, heaters, central heating radiators and refrigerators. Touching earthed or grounded surfaces increases the risk of electric shock.
c) Do not expose your power tool to rain or damp environments. Water penetrating the tool increases the risk of electric shock.
d) Do not damage the power cord. Never use the power cord to carry, pull the power tool and do not pull by its power cord to disconnect plug from the outlet. Keep the power cord away from sources of heat, oils, sharp edges and moving parts. Damaged or entangled power cords increase the risk of electric shock.
e) When your power tool is operated outdoors use extension cords intended for outdoor use only. Using an extension cable intended for outdoor use decreases the risk of electric shock.
f) It is recommended to connect the device to a mains supply equipped with a residual current device (RCD) with a rated current of 30 mA or less.
g) When it is unavoidable to use your power tool in a damp environment use an RCD (Residual Current Device) for protection. The use of RCDs decreases the risk of electric shock.

WARNING! General warnings regarding the use of power tools.
Personal safety:
a) This equipment is not intended for use by persons (including children) disabled physically, mentally, sensorial or persons with no experience and knowledge in operating the equipment unless they operate the equipment under supervision or follow user's instructions provided by persons responsible for their safety.
b) It is necessary to predict steps, watch and keep common sense when using power tools. Do not operate power tools when you are tired, under influence of drugs, medicine or alcohol. A moment of inattention while operating a power tool may result in serious personal injury.
c) Use personal protective equipment (PPE). Always wear safety goggles. Wearing personal protective equipment (PPE) including a dust mask, anti-slippery footwear, a helmet and ear protection reduces personal injury.
d) Avoid unexpected start up. Before connecting your power tool to the mains and/or inserting a battery make sure its power switch is in off position. Carrying your power tool with a finger on its power switch or without disconnecting it from the mains (switched on) may result in an accident.
e) Before starting your power tool remove any keys/wrenches. Leaving a key/wrench in the rotating part of your power tool may result in personal injury.
f) Do not lean forward too far. Always remain stable and maintain balance. It will allow you to have a better control over your power tool in unpredictable situations.
g) Wear appropriate clothing. Do not wear loose clothes or jewelry. Keep your hair tied. Keep your clothes away from moving parts. Loose clothes, jewelry or long hair may be caught by moving parts.
h) If your power tool allows for using an external dust extraction or collection system, make sure it is connected and used properly. Using dust collectors may reduce dust affected risks.
i) Do not let your skills gained through the frequent use of the power tool make you overconfident and disregard safety rules. Carelessness may cause injury in a fraction of a second.

WARNING! General warnings regarding the use of power tools.
Use and taking care of your power tool:
a) Do not overload your power tool. Use a power tool with power adjusted to work being done. An appropriately chosen power tool will allow you to work better and safer under load it has been designed for.
b) Do not use a power tool when its powerswitch is out of order (it does not switch it on or off). Any power tool with its power switch out of order is dangerous and must be repaired.
c) Always disconnect the plug from the power source and/or disconnect its battery before changing any settings, performing replacement or storage. Such preventive measures reduce the risk of accidental power tool start up.
d) Keep your power tool out of reach of children and do not allow unauthorized persons to use the power tool. Power tools in hands of untrained persons can be dangerous.
e) Power tools require maintenance. Check power tools for concentricity or jamming of moving parts, any cracks and all
other factors affecting the power tool work safety. If any damage to the power tool is detected, it should be repaired before use. Improper power tool maintenance is a reason for many accidents.
f) Cutting tools should be sharp and clean. Keeping sharp cutting edges in good condition reduces the risk of jamming and facilitates operation.
g) Power tools, equipment, working tools etc. should be used according to this user's manual taking into account operating conditions and the work to be done. Misusing a power tool can result in dangerous situations.
h) At low temperatures and after a long brakes in operation it is recommended to turn the power tool to operate it with no load for a few minutes to provide proper grease distribution inside its driving mechanism.
i) Use soft, damp (cannot be wet) cloth and soap to clean power tools. Do not use petrol, solvents and other agents that may damage your equipment.
j) Power tools can be stored/carried after making sure that all moving components are locked and protected against release with original devices intended for this purpose.
k) Store power tools in a dry, dust and water-protected place.
1) Carry your power tool in its original packaging to provide protection against mechanical damage.
m) Keep handles and grip surfaces clean and free from oil and grease. Secure grip and control over the tool in unexpected circumstances are impossible if handles and grip surfaces are slippery.

WARNING! General warnings regarding the use of power tools.
Repair:
a) Warranty and post-warranty repairs of its power tools are carried out by PROFIX Service, which guarantees the best quality or repair and use of genuine spare parts.

WARNING! , Additional Safety Cordless rotary hammer Warnings –
Personal Safety:
a) Wear ear protectors with rotary hammer. Long-term effect of noise may lead to damage of hearing or deafness.
b) During work, when the working tool might encounter a hidden electricity wire the power tool must be held by the insulated areas of the handle. Cutting accessory contacting a "live" wire may make exposed metal parts of the power tool "live" and could give the operator an electric shock.
c) Use appropriate detectors to determine if utility lines are hidden in the work area or call the local utility company for assistance. Contact with electric lines can lead to fire and electric shock. Damaging a gas line can lead to explosion. Penetrating a water line causes property damage or may cause an electric shock.
d) Do not work materials containing asbestos. Asbestos is considered carcinogenic.
e) Keep your workplace clean and tidy. Material mixtures are extremely dangerous. Light metal dusts can ignite or explode.
f) Protect the object machined. Make sure all clamps are closed and check for excessive clearance. It is safer to fix the object machined in a fixing device or a vice than holding it in your hand.
g) Use auxiliary handles supplied with the tool. Loss of control can cause personal injury.
h) Always hold firmly the power tool with your both hands using
both the main and auxiliary handle keeping a stable position. It is safer to control your power tool with both hands.
i) Turn the power tool immediately when the bit jams. Expect intense vibrations that can result in a kickoff. The bit jams when the power tool is overloaded or is bent inside the object.
j) Before you put the power tool aside make sure it is completely stopped. The bit can jam resulting in losing control over the power tool.
k) Electric tools should be used exclusively with a unit of rechargeable batteries purposefully dedicated for power supply of them. Application of any other batteries may pose a risk of body injuries or a fire.
Safety instructions when using long drill bits:
a) Never use a speed higher than the maximum drill bit speed. Always start drilling at a low speed and after touching the workpiece to the drill bit. At higher speeds, the drill bit may bend if not in contact with the workpiece, resulting in injury.
b) Push the drill bit against the workpiece in line with the drill bit. Do not use excessive force. Drill bits may bend, causing damage and loss of control, which may result in injury.
WARNING! Safe use of rechargeable batteries and battery chargers -
Using the battery:
a) Use only the batteries that correspond to specifications required by the equipment manufacturer. Use of unsuitable batteries may lead to cracks and destruction of the battery, personal injuries or fires.
b) WARNING: In case of damage or improper use of the battery, explosive gases might be released. The battery must be kept away from fire and proper ventilation is to be assured during charging. It cannot be left for a longer period of time in a high temperature environment (areas with strong exposure to the sun, close to radiators or any other place with a temperature above 40 degrees).
c) The battery must be charged within the temperature range of 15 to 25°C.
d) Batteries can be charged exclusively with use of a power adapter recommended by the manufacturer of the tool. Application of any other power adapter may pose a risk of a fire.
e) Never expose the battery to the effect of water or moisture.
f) When another battery is to be charged in sequence the time gap between charging operations must be not less than 30 minutes.
g) In no case may you open the battery.
h) Under unfavourable conditions electrolyte may leak from batteries, be careful to avoid contacts with the liquid. In case of accidental contacts with the liquid wash the affected locations with water. When liquid penetrates eyes, seek also for medical assistance. The liquid that leaks from batteries may be a reason for irritation or scalds.
i) When the battery unit is not in use keep it far away from metallic items such as paper clips, coins, keys, nails, bolts or other metal things that may short the battery terminals. Shorts of battery terminals may cause burns or fires.
j) Never throw batteries to fireplaces.
k) Never charge a damaged battery.

The batteries are intended for multiple use and contain harmful lithium.
Upon the battery lifetime expires the battery must be disposed in accordance with environmental regulations. Discharge the
battery first top the empty state and remove from the electric tool. Hand over to an organization that deals with utilization of batteries or take it back to the shop where the tool had been purchased.
Using the charger:
a) Use only dedicated power adapters to charge the battery. Application of a power adapter dedicated to charge another type of the battery unit poses a risk of fires.
b) The supplied charger should only be used for charging batteries that are supplied together with it. Charging other batteries may cause breaking and disintegration of the battery, bodily harm, or fire.
c) Do not disassemble the charger.
d) The charger is designed exclusively for indoor use. It must not be exposed to water or moisture.
e) Charge only in an ambient temperature between 15-25 degrees.
f) Do not insert metal objects of any kind into the charger.
APPLICATIONS AND CONSTRUCTION:
The cordless rotary hammer is designed for impact drilling of boreholes in concrete, bricks and stone, as well as for light chiselling work. It can be also used for drilling in wood, metals, ceramic items or plastics when the impact functionality if switched off.
It is absolutely prohibited to use the tool in other applications.
The cordless rotary hammer is designed exclusively for DIY applications. The tool must not be used for work requiring a professional tool.
Any use of thee that is not in observance with the above-mentioned purpose is forbidden, leads to the loss of warranty, and relieves the manufacturer from responsibility for the resulting damage.
Any modifications of the tool by the user relieve the manufacturer from responsibility for any damage and injuries to the user and the surroundings. Despite using the tool according to its intended application it is impossible to eliminate certain residual risk factors. Considering the tool construction the following risks may occur when operating the tool:
- Touching the rotating drill bit with the hand or operator's clothes.
- Burns when changing drill bits (Drill bits heat up intensely during operation; use protective gloves when changing the drill bit).
- Throwing back machined object or its fragment.
- Bending/breaking the drill.
■ The set includes:
- Cordless rotary hammer-1 pc.
- Charger -1 pc.
- Battery -2 pc.
- Transportation case – 1 pc.
- Operating instruction -1 pc.
- Warranty card - 1 pc.
■ Device components (seepage 2-4):
Fig.A 1. SDS-plus tool holder
- Dust protection hood
- Locking sleeve
- Fixing button to fit the drilling depth limiter
- Button to release locking of the operation mode selector switch
- Operation mode selectorswitch
- Rotation direction switch
-
On/off switch
-
Battery
- Auxiliary handle
- Auxiliary lighting
- Drilling depth limiter
Fig.B 13. Charger
- Battery level indicator button
- Battery indicator to show the battery status of charge
Fig.C 16. Battery lock clip
Fig.D 17. Drill bit
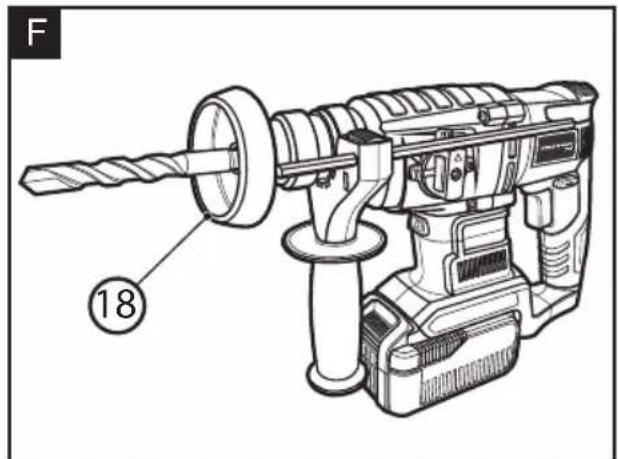
Fig.F 18. Rubber ring for dust collection
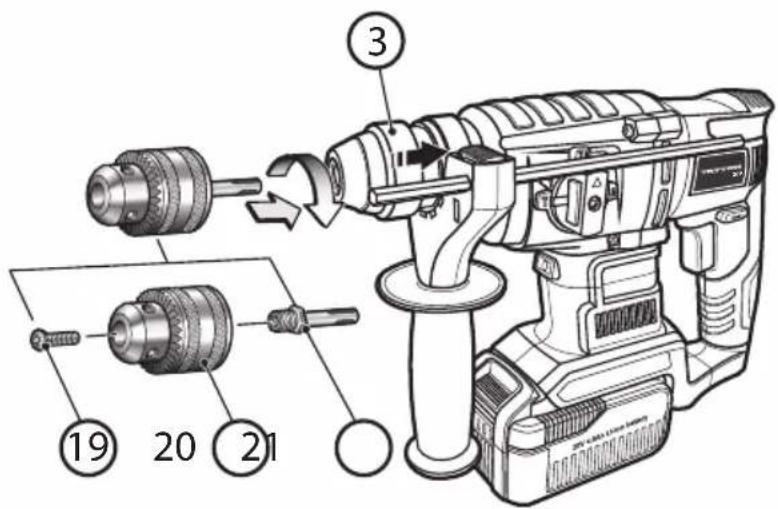
Fig.H 19. Securing bolt for the drilling chuck with a toothed ring*
- Drilling chuck with a toothed ring*
- Adapter stud to fix the drilling chuck to the SDS-plus socket*
Fig.J 22. Key for the drilling chuck with a toothed ring*
- Drilling chuck sleeve *
* Not all accessories presented or described herein are provided as standard with the power tool.
TECHNICAL PARAMETERS:
| Model | TMM20 | |
| Supply voltage | 20 V d.c. | |
| Rotation speed under no-load conditions | n_o=0-1850/min | |
| Impact energy | 2 J | |
| Drill chuck | SDS-plus | |
| Maximum drilling diameter | Wood | 30 mm |
| Steel | 13 mm | |
| Concrete | 18 mm | |
| Weight (with battery) | 2,75 kg | |
| Acoustic pressure level(LpA) | 93,6 dB(A) | |
| Acoustic power (LwA) | 104 dB(A) | |
| Tolerance of measurements K_cpA , K_LwA | 3 dB(A) | |
| Vibration level according to EN 62841 | main handle a_h,HD | 5,677 m/s2 |
| auxiliary handle a_h,HD | 6,334 m/s2 | |
| Tolerance of measurements K | 1,5 m/s2 | |
| Battery type | Li-ion | |
| Battery charging voltage | 20 V | |
| Battery capacity | 4 Ah | |
| Charger power voltage | 220-240V AC, 50-60Hz | |
| Charger output voltage | 20V DC,2A | |
| Charging time | 120 min | |
The vibration level value given refers to basic application of the tool. If the tool is used for other applications or with other tools, or if it is not maintained properly, the vibration level may differ from the values given. The above-mentioned causes may lead to higher exposure to vibrations during the whole work time.
One must implement additional safety measures to protect the operators from exposure to vibrations, such as maintenance of the electric tool and work tools, assurance of proper hand temperature, or determination of the sequence of work operations.
The declared total vibrations and declared noise emissions were measured in accordance with a standard test method and may be used for tool
comparison.
The declared total vibrations and noise emissions can be used in preliminary exposure assessment.
Warnings:
The vibrations and noise emissions during the actual use of the power tool may differ from the declared values depending on how the tool is used and on the type of the workpiece in particular.
Determine safeguards to protect the operator. They should be based on the estimated exposure under actual operational conditions (taking into account all parts of the operating cycle such as when the tool is switched off or idle except the start time).
PREPARATION FOR WORK:
Prior to each use of the tool one has to check whether moving parts of the device are in operating conditions, not seized, cracked or damaged that may affect proper operation of the tool. Damaged tools must be handed over for repairs before they can be used again.
■ Charging the battery
The rotary hammer is supplied with a partially charged battery. You can check the battery level with the battery level indicator button (14) (see Fig.
B). A single LED means the battery level is low, two LEDs mean medium level, and three LEDs mean full battery. Please fully charge the battery before use.
- Press the battery lock button (16) and take the battery (9) out of the rotary hammer (see Fig. C).
- Connect the battery (9) to the charger (13) (see Fig. B).
- Connect charger to an electrical socket 220-240 V, 50-60Hz.
■ Battery charging indicator
A green LED light indicates that the charger is connected to a power source. After the battery is connected, the red LED is on to indicate charging.
When the battery is fully charged, the red LED goes off and the green LED is on.
After charging, disconnect the charger and remove the battery.
NOTE! The battery may get slightly hot when charging. This is not a malfunction.
The lithium-ion battery can be charged at any moment, without detriment to its life. Interrupting the charging process does not entail a risk of damaging the battery cells.
Battery capacity decreases over time. After 100 charging cycles, the battery life and maximum torque of the drill will decrease slightly. This decrease will continue until the battery reaches its minimum capacity after 250 charging cycles. This is a normal situation and does not mean a fault in the battery kit.
■ Auxiliary handle
Always work with use of the auxiliary handle (10). Risk of accidents at work can be avoided or mitigated if the machine is reliably held in both hands. The auxiliary handle is to be attached by encompassing the tool holder with the handle clamp and then the clamp is locked by rotating the handle clockwise (see Fig. C).
The auxiliary handle can be swiveled to whichever direction to enable the operator to work in a convenient position of the body and to avoid excessive fatigue. After rotating the handle anticlockwise swivel it to the desired position and the retighten the clamp by rotating the handle clockwise for final fixation.
ADJUSTMENT DURING WORKING WITH THE TOOL:
■ Selection of drilling tools (bits)
For impact drilling in concrete, bricks or stone as well as for chiseling one has to use SDS-plus tools that are to be inserted into the SDS-plus holder (1) of the machine.

To drill boreholes in steel or wood the tools without the SDS-plus functionality are used (e.g. drilling bits with cylindrical shanks). For such tools quick locking drilling chucks or chucks with a toothed ring are necessary.
CAUTION: Do never use tools without the SDS-plus functionality for impact drilling or chiseling! The non-SDS-plus tools and corresponding drilling chucks shall definitely get damaged during impact drilling or chiseling.
■ Tool replacement
The SDS-plus tool holder makes it possible to replace a working tool easily and conveniently with no need to use additional tools.
Due to the system feature, working tools of the SDS-plus type move in the holder with a little play. It is why axial run-out occurs when the machine runs with the idle speed. It has no influence onto dimension accuracy of the borehole to be drilled as the drilling bit is self-centered during drilling.
The dust protection hood (2) substantially prevents from penetration of dust into the tool holder during the machine operation. Take care to avoid damaging the dust hood (2) while inserting a tool into the tool holder.
Damaged dust protection hood must be immediately replaced. It is recommended to have the dust hood replaced at a service workshop.
■ Installation of the SDS-plus working tool (Fig. D)
- Clean the rear end of the tool to be installed and grease it slightly. Lithium grease is recommended.
- Move the locking sleeve (3) back as far as possible and hold it in this position.
- Insert the tool into the tool holder by rotating it until resistance is felt.
- Release the lock sleeve.
- Check reliability of locking by pulling the tool outwards.
■ Removing SDS-plus working tool

CAUTION: Right after completion of working the tool may be really hot. Avoid direct contact with a tool and wear appropriate protecting gloves.
- Push back the locking sleeve (3) and remove the tool.
- Clean the working tool carefully after removing it from the chuck.
■ Installation of the drilling chuck with a toothed ring (Fig. H)
- Screw the SDS-plus adapter stud (21) into the drilling chunk with a toothed ring (20).
- Lock the drilling chunk with a toothed ring (20) with use of the securing bolt (19).
NOTE: Please remember that the securing bolt has the left-hand thread.
- Clean the rearend of the tool to be installed and lithium grease it slightly.
- Move the locking sleeve (3) back as far as possible and hold it in this position.
- Slide the adapter stud into the SDS-plus tool holder (1) with simultaneous rotation of the drilling chuck.
- Release the lock sleeve.
- Check reliability of locking by pulling the drilling chuck with a toothed ring outwards.
■ Removing of the drilling chuck with a toothed ring (Fig. I)
- Pull the locking sleeve (3) backwards and slide the drilling chuck with a
toothed ring (20) out of the tool holder.
- After removing the replaceable drilling chuck with a toothed ring (20) must be protected from dirt. When necessary, slightly grease the toothed dog.
■ Installation of working tools without SDS-plus functionalities (Fig.J)
• Install the drilling chuck with a toothed ring (20).
- Open the drilling chuck with a toothed ring by rotating the sleeve so much as to enable sliding the working tool shank into the chuck. Insert the working tool.
- Insert the key (22) into appropriate holes of the drilling chuck with a toothed ring and uniformly fix the working tool.
■ Removing working tools without SDS-plus functionalities

CAUTION: Right after completion of working the tool may be really hot. Avoid direct contact with a tool and wear appropriate protecting gloves.
- Use the key (22) designed for the drilling chuck to rotate the sleeve of the drilling chuck with a toothed ring (23) clockwise until the working tool is released.
- Clean the working tool carefully after removing it from the chuck.
■ Selecting mode

NOTE:
Change the operating mode when the power tool is switched off only! Otherwise, the power tool may be damaged.
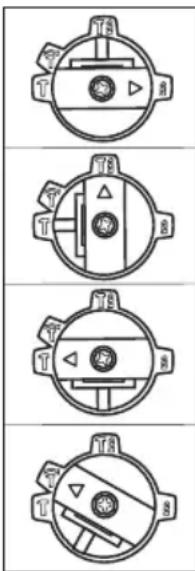
Use the operating mode selector knob (3) to select the operating mode of the power tool. To change the operation mode it is necessary to depress the button (5) that releases locking of the operation mode selector switch and reposition the switch to the desired position until
engagement of the locking pawl is heard.
No-impact drilling:
Set the switch (6) to the symbol -
Impact drilling:
Set the switch (6) to the symbol -T.
Chiseling (rotation disabled):
Set the switch (6) to the symbol - 1.
When the switch is set to the position 'Chiseling', the impact rate is automatically increased, which enables the tool to perform chiseling with the higher performance.
Repositioning of the chisel:
Insert a chisel into the tool holder.
Rotate the operation mode switch (6)
tothe position - 📋.
Rotate the tool holder to set the chisel to the desired working position.
Set the operation mode selector switch (6) to the position 'Chiseling'.
Thus, the tool holder is locked in its position.
While chiseling the operation mode selector switch (6) must always remain in the position 'Chiseling'.
■ Adjustment of the drilling depth (Fig. E)
The drilling depth limiter (12) is designed to set the desired depth of the drilling bit immersion into the material. For that purpose do the following:
- insert the shank of the SDS-plus working tool (17) into the holder (1) and drive it home. Otherwise, excessive play of the SDS-plus tool may lead to incorrect setting of the drilling depth;
- depress the fixing button (4) for the drilling depth limiter and slide the limiter (12) so much as to make the distance between the tip of the drilling bit and the tip of the limiter correspond to the desired drilling depth X,
- lock the depth limiter by releasing the fixing button.
IN USE:
■ Turning on/off
The switch (8) has fluid rotation speed adjustment built-in.
Press the switch to activate the power tool. The rotation speed will increase the further the switch is pushed. To stop the power tool, release the switch.
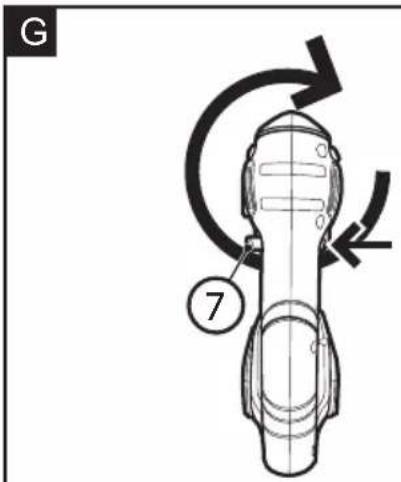
■ Choosing rotation direction (see Fig. G)
The rotary hammer can work with clockwise (right) or counter-clockwise (left) rotation.
- to select clockwise rotation, move the clockwise/counter-clockwise slider (7) to the left (looking from the back of the rotary hammer),
- to select counter-clockwise rotation, move the clockwise/counter-clockwise slider (7) to the right (looking from the back of the rotary hammer),
When the rotation direction switch is in the middle position, the On/Off switch (8) is locked.
For drilling clockwise operation should be selected. For taking out the drill bit, removing a stuck drill bit, counter-clockwise operation should be selected.
■ Setting of the rotation speed/impact rate
By adjustment of the force the On/Off switch (8) is depressed with one can control the rotation speed/impact rate in the infinitely continuous manner.
Slight depressing the On/Off switch (8) moves the machine with the low rotation speed/impact rate.
The stronger the On/Off switch is depressed the faster the machine rotates.
■ Auxiliary light
The rotary hammer is equipped with an auxiliary light (11) for the area of drilling/chiseling, which turns on after the appropriate switch (8) is pushed.
■ Overload safety coupling
When the running tool is seized or jammed, the driving torque is no longer transmitted to the spindle of the rotary hammer. Due to excessive forces and torques occurring when the machine is running operators should always reliably held the machine with two hands and take a steady position of the body.
When the running tool is seized, it is necessary to switch the machine off and release the tool. Be careful as switching the seized machine on leads to strong and rapid reaction torques.
TIPS REGARDING OPERATION:
- To drill holes in ceramic tiles set the operation mode switch (6) to position 'No-impact drilling'. Once the hole in the ceramic tile is ready, set the operation mode switch to position 'impact drill' and continue drilling in this mode.
- When drilling in concrete, stone or walls hard alloy drill bits should be used.
- While drilling holes in a ceiling use a rubber dust collection ring (18),
- which should be installed on the drill bit (see Fig. F) to protect the tool against the falling dust.
- When drilling in metal use sharp metal drill bits only.
STORAGE AND MAINTENANCE:
The tool must be stored in a place that is not accessible to children and must be kept clean and protected from moisture and dust. The storage conditions should prevent potential mechanical damage and impact of the weather conditions.
CAUTION: Remember to always disconnect the battery from the tool prior to starting the cleaning operations and unplug the charger from the outlet. The charger may be cleaned exclusively with use of a dry cloth.
External plastic parts of the machine can be cleaned with use of a wet cloth and a mild cleaning agent.
NOTE: NEVER use any solvent-based cleaning agents.
After drilling in concrete, in intensely dusty environments it is recommended to remove dust from ventilation openings and the drill chuck with a stream of compressed air. It will protect bearings and remove the dust obstructing motor cooling air supply.
TRANSPORTATION:
The rotary hammer should be transported and stored in its transportation case that protects the tool from moisture, penetration of dust and fine particles. In particular it is necessary to protect the ventilation openings. Small objects that get into the device can damage the motor.
If the battery is removed for transport or storage, make sure the contacts will not short circuit. Remove metal items such as screws, nails, clasps, loose bits, wires, or metal filings from the case or transport container or otherwise prevent them from touching the battery.
PROTECTION OF THE ENVIRONMENT:

NOTE: The symbol nearby denotes that old equipment must never be thrown away together with other waste (with the penalty of a fine). Hazardous components of electronic equipment may adversely affect the natural environment and
human health.
Each household may contribute to the recovery and reuse (recycling) of old machinery and equipment. Both in Poland and Europe a system for recovery of used equipment either exists or is being created. The system obliges all organizations that sell such equipment to collect the used machinery and appliances. Moreover, general purpose collecting points for such equipment are available.
MANUFACTURER:
PROFIX Co.Ltd.,
34 Marywilska Street,
03-228 Warsaw, POLAND.
This appliance is in conformity with national and European standards as well as with general safety guidelines.
NOTE: In case of technical issues, contact an authorised technical service. Any repairs are allowed to be carried out exclusively by qualified staff with use of original spare parts.
PICTOGRAMS:
Explanation of the icons located on the nominal plate and the information tags:

«Read this instruction before switching on the power supply and starting the work»

— «Always wear safety goggles»

— «Wear hearing protection»

- «Wear a dust mask»
TROUBLESHOOTING GUIDE:
| PROBLEM POSSIBLE | CAUSE REMEDY | |
| The rotary hammer fails to operate. | No power voltage, damaged motor or the power trigger. | Check the battery status, recharge or replace with a new one when necessary.When the problem persists hand over the tool for repair at a service workshop.Please refer to the warranty sheet for addresses of authorized workshops. |
| Irregularities of the motor operation. | Battery low. Recharge the battery. | |
| The battery has reached its maximum thermal limit. | Wait for the battery to cool down. |

The policy of the PROFIX company consists in permanent improvements of the offered products and therefore the company reserves the right to make amendments to the product specification without a prior notice. The images included into the operation manual are only of the exemplary nature and may slightly differ from actual appearance of the device purchased.
This instruction manual is protected by copyright. Copying it without the written consent of PROFIXCo. Ltd. is prohibited.

PRZED PRZYSTĄPIENIEM DO UŻYTKOWANIA NALEŻY ZAPOZNAĆ SIĘ Z NINIEJSZĄ INSTRUKCJĄ.
natural_image
Three identical mechanical component diagrams with no text or symbols(EN) EC/EU DECLARATION OF CONFORMITY (PL) DEKLARACJA ZGODNOŚCI WE/UE (RO) DECLARAȚIE DE CONFORMITATE CE/UE
(LV) EK/ES ATBILSTIBAS DEKLARACIJA (LT) EB/ES ATITIKTIES DEKLARACIJA (CS) ES/EU PROHLÁŠENÍ O SHODĚ
(HU) EK/EU-MEGFELELŐSÉGI NYILATKOZATA
| (EN)MANUFACTURER | (PL)PRODUCENT | (RO)PRODUCATOR | (LV)RAZOTAS | (LT)GAMINTOJAS | (CS)VYROBCE | (HU)GYARTO |
PROFIX Sp. z o.o. ul. Marywilska 34, 03-228 Warszawa
(EN)Person who was authorized to develop technical documentation:
(EN) 2006/42/EC (OJ L 157, 9.6.2006, p. 24–86); 2014/30/EU (OJ L 96, 29.3.2014, p. 79–106); 2011/65/EU of the European Parliament and of the Council of 8 June 2011 on the restriction of the use of certain hazardous substances in electrical and electronic equipment (OJ L 174, 1.7.2011, p. 88–110) change 2015/863/UE;
(EN) References to the relevant harmonised standards used or references to the other technical specifications in relation to which conformity is declared:
Representative of the Board for Certification

- E E K T R O N A R Z I
- TMM20
- EN
- PL
- BEFORE YOU START USING THE MACHINE READ THOROUGHLY THIS MANUAL.
- WARNING! Read all safety warnings marked with a symbol ⚠️ and all operating safety instructions.
- Keep all work safety instructions and tips for future reference.
- WARNING! General work safety warnings for use of the tool.
- Workplace safety:
- WARNING! General warnings regarding the use of power tools.
- Electric safety:
- Personal safety:
- Use and taking care of your power tool:
- Repair:
- Safety instructions when using long drill bits:
- Using the battery:
- Using the charger:
- APPLICATIONS AND CONSTRUCTION:
- ■ The set includes:
- ■ Device components (seepage 2-4):
- Warnings:
- PREPARATION FOR WORK:
- ■ Charging the battery
- ■ Battery charging indicator
- After charging, disconnect the charger and remove the battery.
- ■ Auxiliary handle
- ADJUSTMENT DURING WORKING WITH THE TOOL:
- ■ Selection of drilling tools (bits)
- ■ Tool replacement
- ■ Installation of the SDS-plus working tool (Fig. D)
- ■ Removing SDS-plus working tool
- ■ Installation of the drilling chuck with a toothed ring (Fig. H)
- ■ Removing of the drilling chuck with a toothed ring (Fig. I)
- NOTE:
- No-impact drilling:
- Impact drilling:
- Chiseling (rotation disabled):
- Repositioning of the chisel:
- IN USE:
- ■ Turning on/off
- TIPS REGARDING OPERATION:
- STORAGE AND MAINTENANCE:
- TRANSPORTATION:
- PROTECTION OF THE ENVIRONMENT:
- MANUFACTURER:
- PICTOGRAMS:
- PROFIX Sp. z o.o. ul. Marywilska 34, 03-228 Warszawa
Brand : Tryton
Model : TMM20
Category : Drill