
610-151 - Car radio Marquant - Free user manual and instructions
Find the device manual for free 610-151 Marquant in PDF.


| Product Type | Car Stereo |
| Brand | Marquant |
| Model | 610-151 |
| Dimensions (W x H x D) | 178 x 100 x 150 mm |
| Weight | 1.2 kg |
| Power Supply | 11-15 V DC, negative earth |
| Max Output Power | 4 x 40 W |
| Speaker Impedance | 4 ohm per channel |
| FM Frequency Range | 87.5 - 108 MHz |
| FM Sensitivity | 10 dB |
| FM Signal-to-Noise Ratio | 50 dB |
| AM Frequency Range | 522 - 1620 kHz (manual says MHz, likely typo) |
| AM Intermediate Frequency | 455 kHz |
| AM Signal-to-Noise Ratio | 45 dB |
| USB/SD Playback Frequency Response | 20 Hz - 20 kHz |
| USB/SD Signal-to-Noise Ratio | >50 dB |
| Bluetooth | Yes, hands-free calling and music streaming |
| AUX Input | Yes, 3.5 mm front input |
| Display | Touch screen |
| Remote Control | Included |
| Equalizer | Preset and customizable |
| Safety Features | Reverse camera input, handbrake control |
| Wiring | Standard ISO connector, negative earth |
Frequently Asked Questions - 610-151 Marquant
User questions about 610-151 Marquant
0 question about this device. Answer the ones you know or ask your own.
Ask a new question about this device
Download the instructions for your Car radio in PDF format for free! Find your manual 610-151 - Marquant and take your electronic device back in hand. On this page are published all the documents necessary for the use of your device. 610-151 by Marquant.
USER MANUAL 610-151 Marquant
EN - Operating instructions in original
Date of production: 2014-12-30
© Jula AB
SVENSKA....4
SÄKERHETSANVISNINGAR....4
TEKNISKA DATA....4
BESKRIVNING ....5
HANDHAVANDE 6
Pekskärmens funktioner 6
Radio 7
Uppspelning....8
Bluetooth 10
AUX-ingång 10
Fjärrkontroll 12
Kopplingsschema 14
NORSK 17
SIKKERHETSANVISNINGER 17
TEKNISKE DATA 17
BESKRIVELSE....18
BRUK....19
SAFETY INSTRUCTIONS 43
TECHNICAL DATA 43
DESCRIPTION 44
OPERATION....45
Touch screen functions....45
Radio 46
Playback 47
Bluetooth 49
AUX input 49
Remote control....51
Wiring diagram 53
SÄKERHETSANVISNINGAR
natural_image
Action scene of a warrior in dynamic combat with horses and fallen figures, displayed within a media player interface (no readable text or symbols)

natural_image
Grid of four black rectangular panels with white geometric shapes: left-pointing triangle, right-pointing triangle, leftward arrow, and right-pointing triangle (no text or symbols)
Stopp

Repetition på/av

Senast

Nästa
Spela slumpvis

Bläddra spår

Bekräfta
Undertext

Kanal

Zooma

Spola bakåt

Spola framåt
Paus

Välj media

Standard/HD
BLUETOOTH

natural_image
Symbol of a trash bin with crossed lines indicating no waste or discharge, and a solid black rectangle below (no text or labels)Värna om miljön!
natural_image
Action scene of a warrior or warrior in dynamic combat with horseback advancing through smoke (no visible text or symbols)

natural_image
Four-panel grid showing white directional icons: left-pointing triangle, right-pointing triangle, left-turn arrow, and right-down triangle (no text or symbols)
Stopp

Repetisjon på/av

Forrige

Neste


Systeminnstillinger Equalizer Fabrikkinnstilt passord 123456
natural_image
Action scene of a warrior or warrior in dynamic combat with horses and fallen figures, displayed within a mobile app interface (no readable text or symbols on the main image)
natural_image
Grid of four black rectangular panels with white geometric shapes (triangle, left-pointing arrow, right-pointing triangle) arranged in rows and columns, no text or symbols present.
Stop


natural_image
Pure electrical circuit lines without any symbolsDBAJ O ŚRODOWISKO!
Read the operating instructions carefully before use!
Please retain for future reference.
- Read the operating instructions carefully in respect of electrical wiring. If connected incorrectly, the car stereo will be damaged.
- If possible, the stereo should be installed by a professional.
- Do not connect the power cable until all other connections to the car stereo have been made.
• Insulate all exposed cables in order to avoid short circuiting. - Once installation is complete, all loose cables should be secured.
- The car stereo is designed to be powered by a 12-15 V system with negative earth. Check that your car has such an electrical system.
- Connect the car stereo in accordance with the wiring diagram. If you do not, it will not work as intended and damage may occur.
- The speakers must be connected correctly, otherwise there is a danger that both the amplifier and the speakers will be damaged.
- If the aerial cable (BLUE) is earthed or is connected incorrectly, the car stereo may break or be impossible to turn on.
- If the power cable (YELLOW) is earthed or is connected incorrectly, the car stereo may break or be impossible to turn on or off.
- If the memory cable (RED) is earthed or is connected incorrectly, the car stereo may break or be impossible to turn on or off.
TECHNICAL DATA
FM receiver
Frequency range 87.5-108 MHz
| Signal/noise ratio 50 dB |
| Radio sensitivity 10 dB |
AM receiver
| Frequency range 522–1,620 MHz |
| Intermediate frequency 455 MHz ±5% |
| Signal/noise ratio 45 dB |
| Radio sensitivity 40 dB |
USB/SD
Frequency range 20 Hz–20 kHz
Signal/noise ratio >50 dB
T.H.D <10 % (1 kHz)
Other
Max. output 4 x 40 W
Voltage supply 11–15 VDC (neg. earth)
Speaker impedance 4 ohm/channel
Dimensions 178 x 100 x 150 mm
Weight 1.2 kg
DESCRIPTION

IR
Receiver for signals from the remote control. The remote control can be used to switch on/off and control the main unit.
MIC
Microphone, when Bluetooth is set to telephone mode.
MOD
Button to change function mode. Used to switch between AUX, SD card, etc.
MENU
Menu button. Used to switch between menu and standard display.
POW/VOL:
-
- Used to turn on the car stereo. Keep pressed to turn the main unit off.
-
- When the car stereo is on, this button is used to select function. Press once to change volume. Press twice for DSP where bass (BAS) and treble (TRE) can be changed. Press again for SOUND, where speaker balance (BAL) can be adjusted. Press three times to enter DISPLAY mode, where you can adjust screen brightness and colour. This only works in playback mode, not in radio mode. Once you have selected a mode, turn the knob or touch the screen to confirm the settings.
-
- Volume button, used to control volume.
RES
Reset button. If the car stereo starts operating abnormally, this can be used to return the unit to its factory settings.
SD
SD card slot. The USB port is located below the SD card symbol.
OPERATION
TOUCH SCREEN FUNCTIONS
Main menu
When the unit starts, the radio interface is shown. Press the MENU button on the panel to open the main menu. The options RADIO, USB, SD, AUX, Bluetooth, TV and SETTING will appear:

RADIO
Press RADIO to switch to radio mode.

The radio screen shows frequency band and set frequency. Press FM1 to switch between FM2, FM3, AM1 and AM2. The numbers 1-6 refer to the set radio channels and their frequencies.

Searches automatically for stations and saves them. Press the icon to start channel scanning and to save channels.
Browse between saved channels.
Switch between mono/stereo.
Switch frequency band.


Press here to initiate automatic channel scanning.

Main menu
Multifunction selection


Manual channel scanning symbols

Automatic channel scanning icon. Once a channel has been found, there will be a five second pause. Save the station and/or press the search icon again.

Switch remote control on/off

Turn screen on/off
PLAYBACK
Playback options include USB and SD. In playback mode, a number of function-specific icons are show as in the figure below. (When the icons disappear after a few seconds, turn the volume knob to display them again.)
NB No RCA video signal is transmitted when HD mode is active.

natural_image
Action scene of a warrior or warrior in dynamic combat with horseback and fallen figures, displayed within an LCD screen (no readable text or symbols)
Press "Select media" to display the following two function symbols.

natural_image
Four-panel grid showing white directional icons: left-pointing triangle, right-pointing triangle, left-turn arrow, and right-down triangle (no text or symbols)
Stop

Repetition on/off

Last

Next

Play random
Browse tracks

Confirm

Subtitle

Channel

Zoom

Rewind
Fast forward

Pause

Select media

Standard/HD
BLUETOOTH
Press the BT symbol to display the Bluetooth interface.
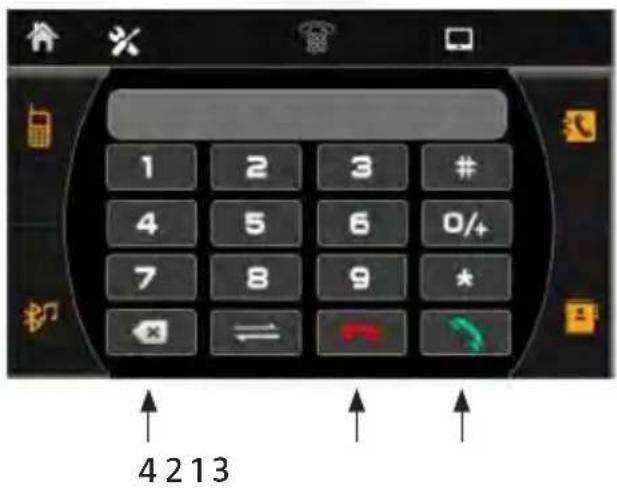

The Bluetooth interface is shown in the top left. Use your mobile phone Bluetooth function to search for the car stereo and pair the units. A message is displayed once pairing has been completed correctly. If your mobile phone rings when it is paired to the car stereo, the stereo will automatically switch to sound mode. Once the call has ended, the car stereo will return to the previous mode (if possible). NB Once ACC has been turned off and then turned back on, it takes around 30 seconds before reconnection can be established.
Dial the telephone number and press (1) to call. Press (2) to end the call, (3) for Bluetooth music and () to clear.
The Bluetooth music interface is shown on the right. Press (5) to play/stop music, (6) to skip back one track and (7) to go to the next track.
AUX INPUT

Settings
Press

to switch to settings mode.
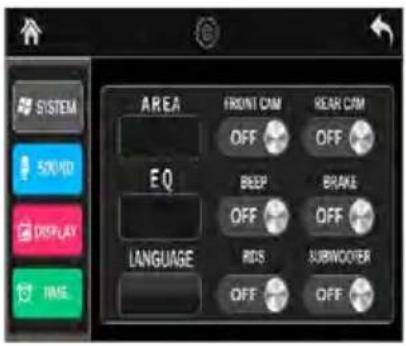

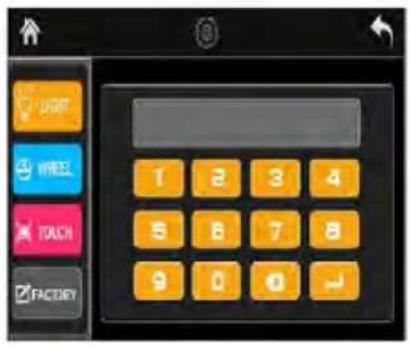
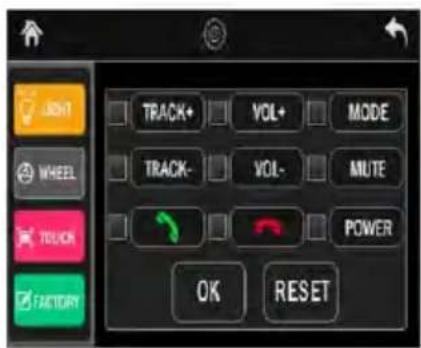
To restore the car stereo to its factory settings, press and hold the FACTORY button to switch off and then press the reset button.

Factory setting Video setting
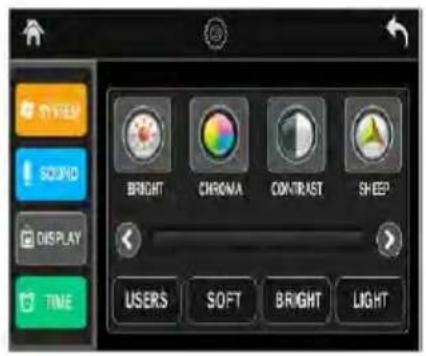

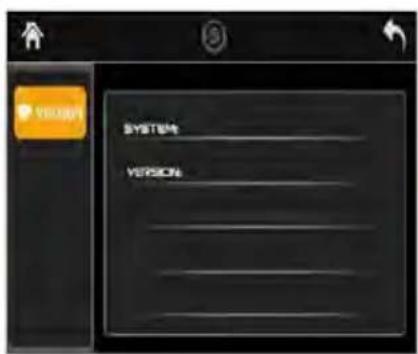
System settings Equaliser Factory setting code 123456

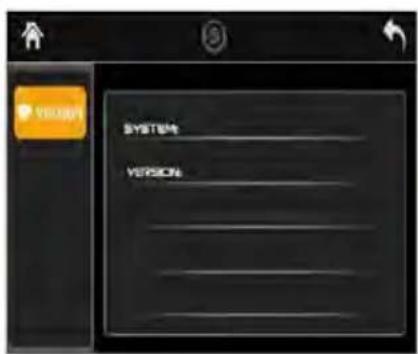
Unit version Change background
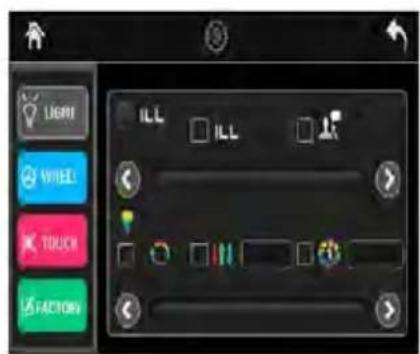
Warning message


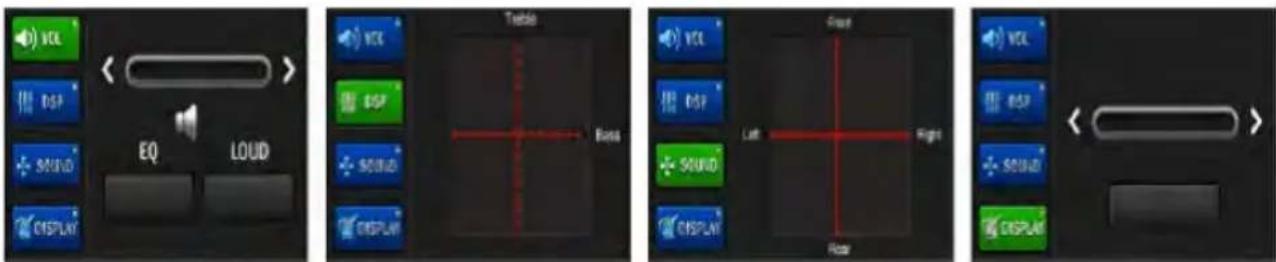
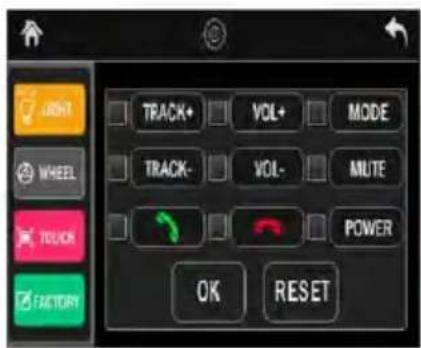
Press 📄 to switch to multifunction mode. If VOL has been selected, use the slider control to adjust volume. Press DSP and change bass and treble using the slider control. Press SOUND and adjust balance using the slider control. Press DISPLAY and use the volume button to switch between brightness (Bright), colour (Chroma), contrast and sleep mode (Sleep). Once you have selected your settings, move the slider control to the required position. (The DISPLAY function is unavailable in radio mode.)
REMOTE CONTROL

-
PWR: Used to turn the car stereo on/off.
-
Mode/: Used to change function. Also used to end telephone calls in Bluetooth mode.
-
AMS button: Automatic channel scanning. Also used to save channels found.
-
MUTE button: Turns off the sound.
-
BAND/ button: Switches between the different frequency bands. Also used to answer telephone calls in Bluetooth mode.
-
The "Arrow up/Arrow down" buttons are used to browse through menus and channels/tracks, etc.
-
VOL+: Increases volume.
-
EQ: Activates the equaliser.
-
"Arrow left/Arrow right" buttons: Used to select between options, e.g. display MP3 covers or to switch between status modes.
-
SEL: Multifunction selection.
-
LOC/: Used to select whether the stereo is to be controlled from the front panel or the remote control.
-
VOL -: Lowers volume.
-
SCAN/: Automatic channel scanning.
-
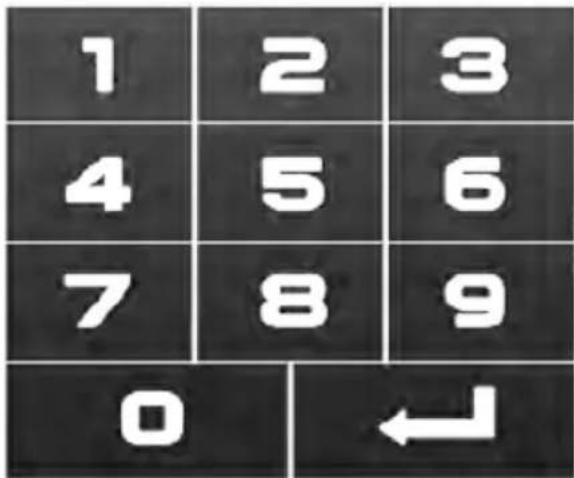
Buttons 0-9. Can be used to select tracks. Buttons 1-6. In radio mode, these are used to select from the 6 saved channels.
– During music playback:
- Press 2 to browse tracks.
- Press 3 to repeat a track.
- Press 4 to play tracks in a random order.
- Press and hold 5 to skip back 10 tracks at a time.
- Press and hold 6 to skip forwards 10 tracks at a time.
- Press and hold 7 to switch to stereo in radio mode.
- Press and hold 8 to switch between MP3/MP5/picture modes.
- Buttons 0-9: In Bluetooth mode, these can be used to place a telephone call.
-
In radio mode - press these buttons ▶▶◀◀ to initiate automatic channel scanning, keep them pressed to initiate manual channel scanning. In playback mode, these buttons are used to select options. Bluetooth calls: Press * # and then the digits of the number you want to call.
-
Enter: confirm your selection.
WIRING DIAGRAM
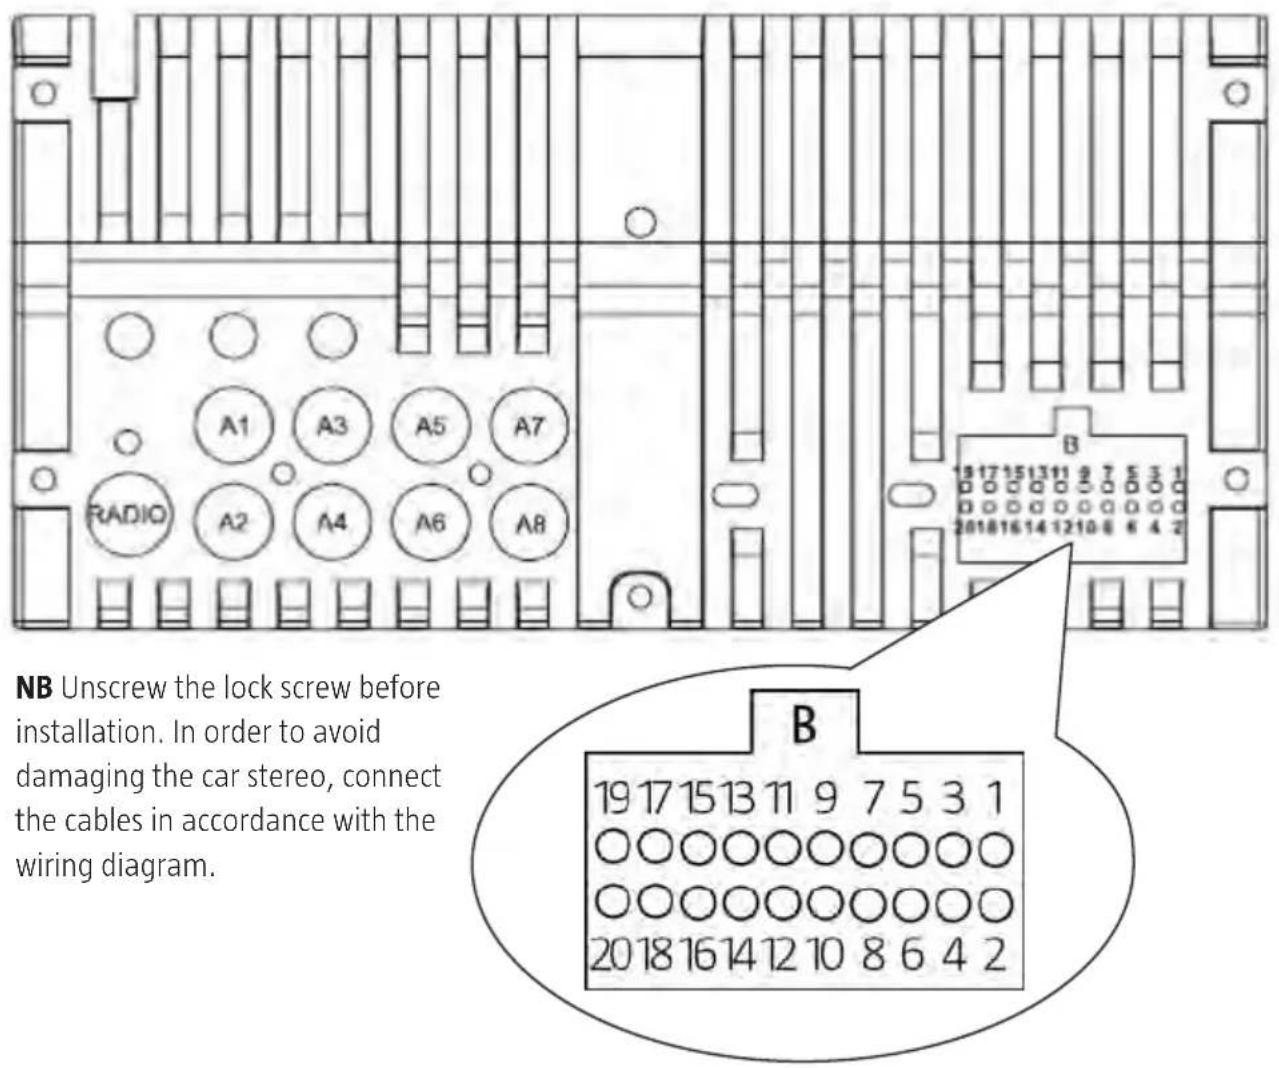
- The car stereo is powered by 12 V DC with negative earth. Check that the electrical system of your car is compatible before starting installation.
- The stereo's automatic aerial and subwoofer have separate power supplies.
- The stereo must be connected in accordance with the wiring diagram. If the stereo is connected incorrectly, the car's electrical system may suffer damage.
- The speaker cables (-) must be connected to the correctly marked input (-).
- Do not obstruct valves or cooling flanges, otherwise the stereo may overheat and break.
A1 Video input, reversing camera A5 Subwoofer output
A2 AUX video input A6 RCA video output
A3 Sound input, AUX right A7 Sound input, AUX left
A4 Sound output RF A8 Sound output LF
B1 Wire 1 - knob control B11 Wire 2 - knob control
B2 Control cable for reversing camera B12
B3 Lighting control B13
B4 Handbrake control B14 ACC – ignition control
B5 Radio aerial B15 B+ power cable
B6 Amplifier control B16 Earth
B7 Speaker RF- B17 Speaker LF-
B8 Speaker RF+
B18 Speaker LF+
B9 Speaker RU-
B19 Speaker LR-
B10 Speaker RU+
B20 Speaker LR+
Jula reserves the right to make changes. In the event of problems, please contact our service department. www.jula.com


Care for the environment!
Must not be discarded with household waste!
This product contains electrical or electronic components that should be recycled.
Leave the product for recycling at the designated station e.g. the clocal authority's recycling station.

EC DECLARATION OF CONFORMITY
EG FÖRSÄKRAN OM ÖVERENSSTÄMMELSE
EF SAMSVARSERKLÆRING
DEKLARACJA ZGODNOŚCI WE

Jula AB, Box 363, SE-532 24 SKARA, SWEDEN
certify that the design and manufacturing of this product
Radio and Telecommunications Terminal Equipment 1999/5/EC
EN 60065:2002+A1+A2+A11+A12, ETSI EN 301 489-1 V1.9.2, ETSI EN 301 489-17 V2.2.1, ETSI EN 300 328 V1.8.1
RoHS Directive 2011/65/EU
This product was CE marked in year -15
Skara 2015-01-13

natural_image
Abstract line drawing with a curved shape and a straight line (no text or symbols)Tobias Hammer
PRODUCT MANAGER

- SVENSKA....4
- SÄKERHETSANVISNINGAR....4
- TEKNISKA DATA....4
- BESKRIVNING ....5
- HANDHAVANDE 6
- Pekskärmens funktioner 6
- Radio 7
- Uppspelning....8
- Bluetooth 10
- AUX-ingång 10
- Fjärrkontroll 12
- Kopplingsschema 14
- NORSK 17
- SIKKERHETSANVISNINGER 17
- TEKNISKE DATA 17
- BESKRIVELSE....18
- BRUK....19
- SAFETY INSTRUCTIONS 43
- TECHNICAL DATA 43
- DESCRIPTION 44
- OPERATION....45
- Touch screen functions....45
- Radio 46
- Playback 47
- Bluetooth 49
- AUX input 49
- Remote control....51
- Wiring diagram 53
- SÄKERHETSANVISNINGAR
- BLUETOOTH
- Värna om miljön!
- DBAJ O ŚRODOWISKO!
- Read the operating instructions carefully before use!
- TECHNICAL DATA
- USB/SD
- Other
- IR
- MIC
- MOD
- MENU
- POW/VOL:
- RES
- SD
- OPERATION
- TOUCH SCREEN FUNCTIONS
- Main menu
- RADIO
- PLAYBACK
- AUX INPUT
- Settings
- WIRING DIAGRAM
- Care for the environment!
Brand : Marquant
Model : 610-151
Category : Car radio