
610-150 - Car radio Marquant - Free user manual and instructions
Find the device manual for free 610-150 Marquant in PDF.


| Product type | Car stereo with radio, USB, SD card, AUX input |
| Brand | Marquant |
| Model | 610-150 |
| Dimensions (W x H x D) | 177 x 115 x 50 mm |
| Weight | 0.79 kg |
| Power supply | 11–15 VDC, negative earth |
| Max. output power | 4 x 45 W |
| Speaker impedance | 4–8 ohm per channel |
| FM frequency range | 87.5–108 MHz |
| FM sensitivity | 10 dB |
| FM signal/noise ratio | 50 dB |
| USB/SD frequency range | 20 Hz–20 kHz |
| USB/SD signal/noise ratio | 50 dB |
| USB/SD total harmonic distortion | < 3% (1 kHz) |
| Supported media | USB stick, SD memory card, AUX input |
| Radio bands | FM1, FM2, FM3 |
| RDS functions | AF, TA, PTY (music and speech categories) |
| Playback modes | Random, repeat, intro scan, 10-track skip |
| Equalizer presets | POP, ROCK, CLASS, FLAT |
| Front panel features | Volume knob, multifunction button, preset buttons, remote control included |
| Display | LCD with clock and RDS information |
| Safety features | Fuse protection, reverse polarity protection (negative earth) |
| Installation | DIN size, wiring diagram provided, professional installation recommended |
| Environmental | Recyclable, do not discard with household waste |
| Certifications | CE, RoHS compliant |
Frequently Asked Questions - 610-150 Marquant
User questions about 610-150 Marquant
0 question about this device. Answer the ones you know or ask your own.
Ask a new question about this device
Download the instructions for your Car radio in PDF format for free! Find your manual 610-150 - Marquant and take your electronic device back in hand. On this page are published all the documents necessary for the use of your device. 610-150 by Marquant.
USER MANUAL 610-150 Marquant
EN - Operating instructions in original
Date of production: 2014-12-29
© Jula AB
SVENSKA....4
SÄKERHETSANVISNINGAR....4
TEKNISKA DATA....5
BESKRIVNING 6
MONTERING 7
Kopplingsschema 7
HANDHAVANDE 8
Frontpanel 8
Fjärrkontroll 11
NORSK 14
SIKKERHETSANVISNINGER 14
TEKNISKE DATA 15
BESKRIVELSE....16
MONTERING 17
Koblingsskjema 17
BRUK....18
Frontpanel 18
Fjernkontroll....21
POLSKI 24
ZASADY BEZPIECZEŃSTWA .....24
DANE TECHNICZNE 25
OPIS 26
MONTAŽ 27
Schemat połączeń 27
OBSŁUGA 28
Panel przedni 28
SAFETY INSTRUCTIONS 34
TECHNICAL DATA 35
DESCRIPTION 36
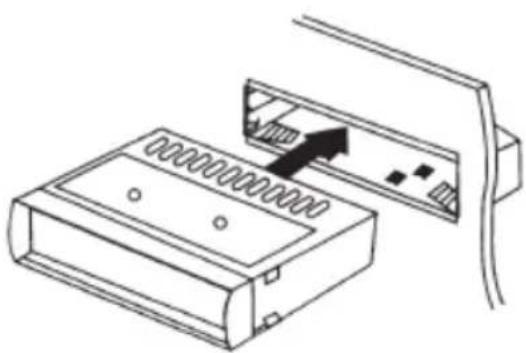
INSTALLATION 37
Wiring diagram 37
OPERATION....38
Front panel....38
Remote control....41
SÄKERHETSANVISNINGAR
natural_image
Illustration of a toolbox with directional arrows indicating movement or force (no text or symbols)natural_image
Diagram of a device component with an arrow pointing to a rectangular panel (no text or symbols)
natural_image
Diagram of an electronic device showing a connector with an arrow pointing to the internal structure (no text or symbols present)MONTERING
KOPPLINGSSCHEMA
natural_image
Simple line drawing of a trash bin with diagonal lines crossing it, no text or symbols present.Värna om miljön!
natural_image
Illustration of a toolbox with arrows indicating movement or force (no text or symbols)natural_image
Simple line drawing of a device with an arrow pointing to a screen (no text or symbols)

natural_image
Diagram of an electronic device showing a connector with an arrow pointing to the internal structure (no text or symbols present)MONTERING
KOBLINGSSKJEMA

natural_image
Diagram of a device component with an arrow pointing to a rectangular panel (no text or symbols)
natural_image
Diagram of an electronic device showing a connector with an arrow pointing to the internal structure (no text or symbols present)natural_image
Pure electrical circuit lines without any symbolsDBAJ O ŚRODOWISKO!
Read the operating instructions carefully before use!
Please retain for future reference.
- Read the operating instructions carefully in respect of electrical wiring. If connected incorrectly, the car stereo will be damaged.
- If possible, the stereo should be installed by a professional.
- Do not connect the power cable until all other connections to the car stereo have been made.
• Insulate all exposed cables in order to avoid short circuiting. - Once installation is complete, all loose cables should be secured.
- The car stereo is designed to be powered by a 12-15 V system with negative earth. Check that your car has such an electrical system.
- Connect the car stereo in accordance with the wiring diagram. If you do not, it will not work as intended and damage may occur.
- The speakers must be connected correctly, otherwise there is a danger that both the amplifier and the speakers will be damaged.
- If the aerial cable (BLUE) is earthed or is connected incorrectly, the car stereo may break or be impossible to turn on.
- If the power cable (YELLOW) is earthed or is connected incorrectly, the car stereo may break or be impossible to turn on or off.
- If the memory cable (RED) is earthed or is connected incorrectly, the car stereo may break or be impossible to turn on or off.
TECHNICAL DATA
FM receiver
| Frequency range 87.5-108 MHz |
| Medium wave 10.7 MHz ±0.3% |
| Signal/noise ratio 50 dB |
| Radio sensitivity 10 dB |
USB/SD
| Frequency range 20 Hz–20 kHz |
| Signal/noise ratio 50 dB |
| T.H.D <3 % (1 kHz) |
Other
| Max. output 4 x 45 W |
| Voltage supply 11–15 VDC (neg. earth) |
| Speaker impedance 4–8 ohm/channel |
| Dimensions 177 x 115 x 50 mm |
| Weight 0.79 kg |
DESCRIPTION


natural_image
Diagram of a device housing with an arrow pointing to a panel (no text or symbols present)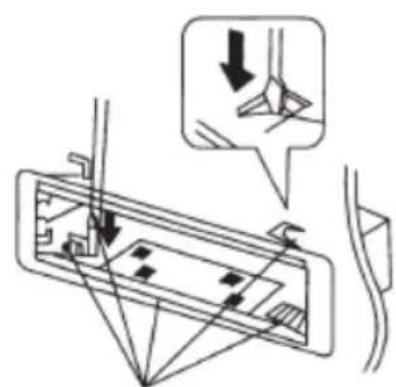

natural_image
Diagram of an electronic device showing a connector with an arrow pointing to a slot (no text or symbols present)Bend these tabs if necessary
INSTALLATION
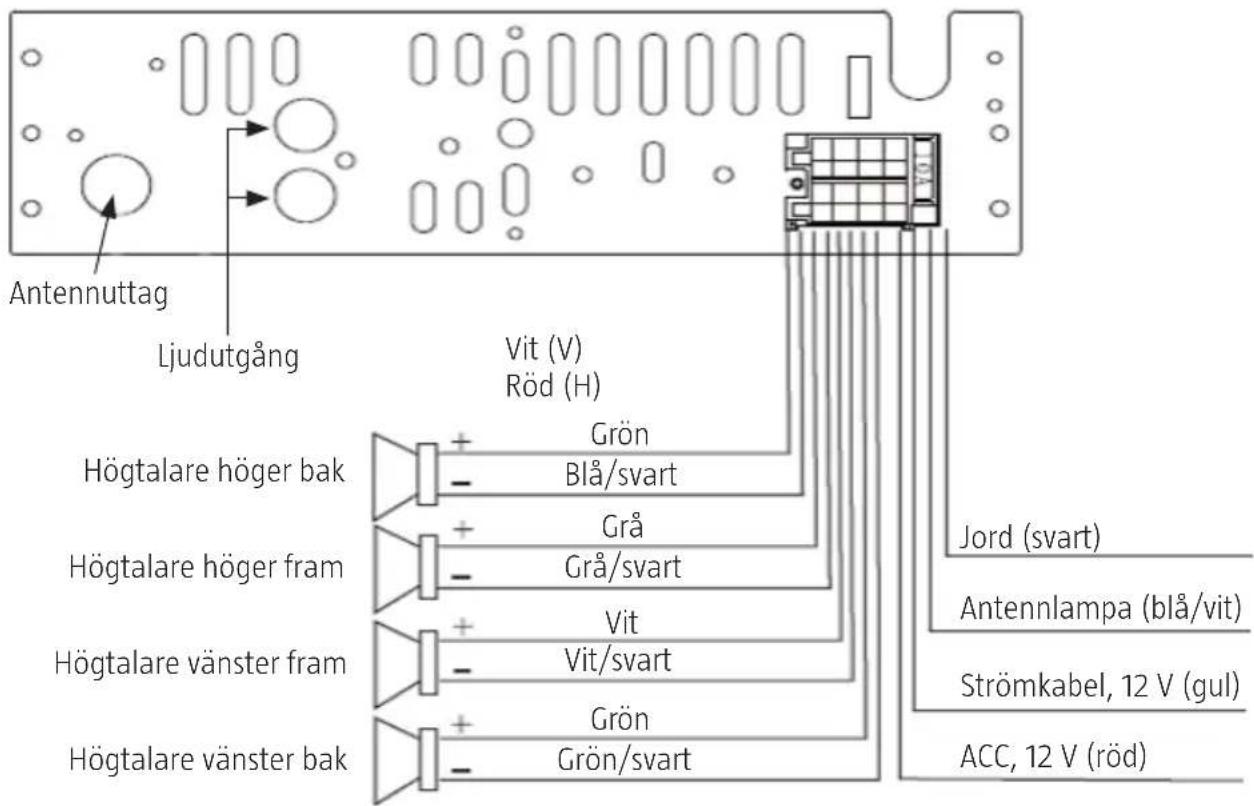
WIRING DIAGRAM

- This car stereo may only be connected to a 12 V system with negative earth.
- In order to avoid a short circuit, completely disconnect the car battery when fitting the stereo.
- Please note that the yellow cable must be connected to either the positive contact (+) or the battery terminal (BAT).
- Check the fuse. The car stereo and car must use the same type of fuses.
- Good quality speakers (4-8 ohm) are required in order to achieve a good sound.
OPERATION
FRONT PANEL
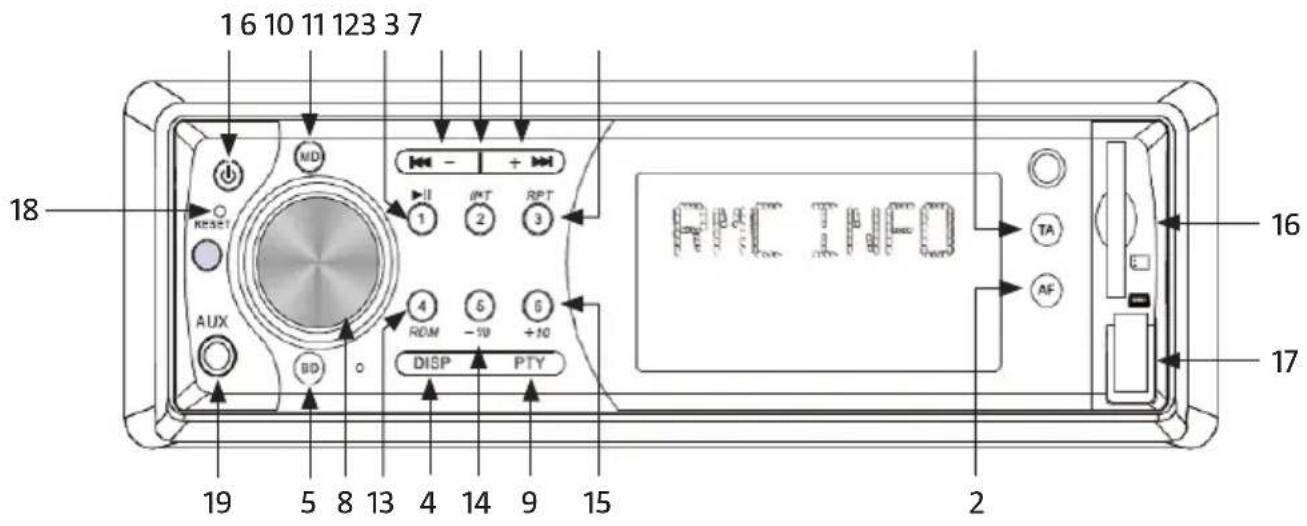
- Turn car stereo on/off.
- In radio mode, turn ANS mode on-off. The AF function must be turned off if channels without ANS are selected.
- SEEK-/+: In radio mode, keep pressed to initiate manual channel scanning, press and release to initiate automatic channel scanning. When playing audio from a USB stick/memory card, press once to go to the next track.
- DISP: press once to show the clock, keep pressed for two seconds to start the hours flashing, turn the volume knob to change the hour. Press the SEL button. The minutes display will start flashing. Turn the volume knob to change the minutes.
- BAND: press to select FM band (FM1, FM2, FM3).
- MODE: Press to switch between radio/USB/memory card/AUX.
- TA: Press to turn automatic ANS station scanning on/off in radio mode. In playback mode, with AF and TA activated, TP will be shown in the display if there is an ANS signal. In playback mode, these signals may be received if the car stereo is set to automatically switch to radio mode.
- 8.1 Volume control knob
8.2 Multifunction button
Keep the button pressed to switch between the following settings: -
Press once for BAS
-
Press twice for TRE (treble)
- Press three times for BAL, allowing you to adjust the balance between right/left speakers
- Press a fourth time to enter fader mode, allowing you to set the balance between front and rear speakers
- Press a fifth time for volume adjustment (VOL)
Keep the button pressed and then press it to adjust the following settings:
- Keep pressed to display LOUD (loudness on/off)
- Press once for DSP mode and turn to switch between POP, ROCK, CLASS and FLAT categories.
- Press a second time for DX, turn the knob to switch to LOCAL (front panel/remote control)
- Press a third time for STEREO, turn to select MONO
- Press a fourth time for TA. SEEK, turn to show TA. ALARM
- Press a fifth time for PI SOUND, turn to select PI MUTE
- Press a sixth time for RETURN L, where you can select ANS setting. PI 90 seconds automatic scanning. Turn for RETURN S - 30 seconds automatic scanning.
-
Press a seventh time for BEEP OFF, turn to select BEEP ON.
-
PTY: press to select function in ANS mode
Press PTY once, "MUSIC" will appear in the LCD screen.
- Press the number button (1) to bring POP M up in the display, press once more for ROCK. M
- Press the number button (2) once to bring EASY M up in the display, press once more for LIGHT M
- Press the number button (3) once to bring CLASSICS up in the display, press once more for OTHER M
- Press the number button (4) to bring JAZZ M up in the display, press once more for COUNTRY
- Press the number button (5) once to bring NATION M up in the display, press once more for OLDIES
- Press the number button (6) once to bring FOLK M up in the display
Press PTY twice, "SPEECH" will appear in the LCD screen
- Press the number button (1) once to bring NEWS up in the display, press once more for AFFAIRS and a third time for INFO
- Press the number button (2) once to bring SPORT up in the display, press once more for EDUCATE and a third time for DRAMA
- Press the number button (3) once to bring CULTURE up in the display, press once more for SCIENCE and a third time for VARIED
- Press the number button (4) once to bring WEATHER up in the display, press once more for FINANCE and a third time for CHILDREN
- Press the number button (5) once to bring SOCIAL up in the display, press once more for RELIGION and a third time for PHONE IN
- Press the number button (6) once to bring TRAVEL up in the display, press once more for LEISURE and a third time for DOCUMENT
Press PTY a third time, PTY OFF will be shown in the LCD display.
-
Press and hold to save radio channel/press once to pause playback from USB/memory card.
-
INT: Keep pressed to save radio channel/press once to browse during USB/memory card playback.
-
RPT: Keep pressed to save radio channel/press once to repeat during USB/memory card playback.
-
RDM: Keep pressed to save radio channel/press once to randomly select a track during USB/memory card playback.
-
Keep pressed to save radio channel/press once to skip back 10 tracks during USB/memory card playback.
-
Keep pressed to save radio channel/press once to skip 10 tracks forwards during USB/memory card playback.
-
Memory card slot. May only be used for memory cards, not in conjunction with USB.
-
USB port. May only be used for USB, not in conjunction with a memory card.
-
Resetbutton.
-
AUX: external input.
REMOTE CONTROL

flowchart
graph TD
    A["POWER"] --> B["MODE"]
    B --> C["1"]
    C --> D["2"]
    D --> E["3"]
    E --> F["RPT"]
    G["BAND"] --> H["4"]
    H --> I["RDM"]
    J["TA"] --> K["VOL+"]
    L["DISP"] --> M["SEL MENU"]
    N["APS"] --> O["SCAN"]
    P["AF"] --> Q["PTY"]
    R["5"] --> S["7"]
    T["8"] --> U["10"]
    V["12"] --> W["19"]
    X["13"] --> Y["13"]
    Z["12"] --> AA["14"]
    AB["18"] --> AC["15"]
    AD["16 17"] --> AE["15"]
    AF["13 4 9"] --> AG["13"]
    AH["16 17"] --> AI["16"]
- POWER: Turn car stereo on/off.
- MODE: Function mode selection.
- :In radio mode: press to select preset channel. In playback mode: press to pause.
- INT: In radio mode: press to select preset channel. In playback mode: press to display track.
-
RPT: In radio mode: press to select preset channel. In playback mode: press to repeat.
-
RDM: In radio mode: press to select preset channel. In playback mode: press for random playback.
- Keep pressed to save radio channel/press once in MP3 mode to skip back 10 tracks.
- Keep pressed to save radio channel/press once in MP3 mode to skip forward 10 tracks.
- MUTE: Turn sound on/off.
- BAND: Select radio band.
- TA: press to turn RDS scanning on/off in radio mode. In playback mode, press TA. TP will be displayed if there is an RDS signal. These signals may be received by switching to radio mode.
- VOL+ och VOL-: Volume control.
- ➞️ ↔ : Used in radio mode for station scanning. In playback mode, the buttons are used to fast forward/rewind or to change track.
- DISP button: press once to display the clock, keep pressed for two seconds to get the hours to flash and press once more to get the minutes to flash. Turn the knob to set hours/minutes. Press the DISP button to change RDS function.
- A.PS: used in radio mode for automatic channel setting and to select a file in MP3 mode.
- SCAN: Automatic channel scanning.
- FA: press to turn RDS function on/off.
- PTY: press to select function in radio mode.
- Press PTY once to bring POP M up in the display, then press SEEK + to browse between music categories: ROCK.M→EASY.M -LIGHT. M→CLASSICS→OTHER.M→JAZZ. M→COUNTRY→NATION.M→OLDIES.M→FOLK.M, DRAMA.
- Press PTY twice to bring NEWS up on the screen. Then press SEEK + to display programme categories: AFFAIRS→INFO-WEATHER→FINANCE→SPORT→VARIED→CULTURE→SOCIAL→TRAVEL→LEISURE→DOCUMENT
- Press the PTY button a third time to bring EDUCATE up on the screen. Then press SEEK + to switch between categories: SCIENCE→CHILDREN→RELIGION→PHONE IN.
- SEL/MENU: Multifunction button, see no. 8.
Jula reserves the right to make changes. In the event of problems, please contact our service department. www.jula.com

natural_image
Symbol of a trash bin crossed with no text or labels, representing waste sorting or disposal (no text present)Care for the environment!
Must not be discarded with household waste!
This product contains electrical or electronic components that should be recycled.
Leave the product for recycling at the designated station e.g. the clocal authority's recycling station.
CE
EC DECLARATION OF CONFORMITY EG FÖRSÄKRAN OM ÖVERENSSTÄMMELSE EF SAMSVARSERKLÆRING DEKLARACJA ZGODNOŚCI WE

Jula AB, Box 363, SE-532 24 SKARA, SWEDEN
RoHS Directive 2011/65/EU
This product was CE marked in year -15
Skara 2014-12-08
Tobias Hammer
PRODUCT MANAGER

- SVENSKA....4
- SÄKERHETSANVISNINGAR....4
- TEKNISKA DATA....5
- BESKRIVNING 6
- MONTERING 7
- Kopplingsschema 7
- HANDHAVANDE 8
- Frontpanel 8
- Fjärrkontroll 11
- NORSK 14
- SIKKERHETSANVISNINGER 14
- TEKNISKE DATA 15
- BESKRIVELSE....16
- MONTERING 17
- Koblingsskjema 17
- BRUK....18
- Frontpanel 18
- Fjernkontroll....21
- POLSKI 24
- ZASADY BEZPIECZEŃSTWA .....24
- DANE TECHNICZNE 25
- OPIS 26
- MONTAŽ 27
- Schemat połączeń 27
- OBSŁUGA 28
- Panel przedni 28
- SAFETY INSTRUCTIONS 34
- TECHNICAL DATA 35
- DESCRIPTION 36
- INSTALLATION 37
- Wiring diagram 37
- OPERATION....38
- Front panel....38
- Remote control....41
- SÄKERHETSANVISNINGAR
- MONTERING
- Värna om miljön!
- KOBLINGSSKJEMA
- DBAJ O ŚRODOWISKO!
- Read the operating instructions carefully before use!
- TECHNICAL DATA
- DESCRIPTION
- INSTALLATION
- WIRING DIAGRAM
- OPERATION
- FRONT PANEL
- REMOTE CONTROL
- Care for the environment!
- CE
- EC DECLARATION OF CONFORMITY EG FÖRSÄKRAN OM ÖVERENSSTÄMMELSE EF SAMSVARSERKLÆRING DEKLARACJA ZGODNOŚCI WE
Brand : Marquant
Model : 610-150
Category : Car radio