
MCR-1256 - Car radio Marquant - Free user manual and instructions
Find the device manual for free MCR-1256 Marquant in PDF.

| Product type | Car radio |
| Brand | Marquant |
| Model | MCR-1256 |
| Radio bands | FM (FM1/FM2/FM3) and AM (MW1/MW2) |
| Power supply | 12 V DC, negative ground |
| Faceplate | Detachable, mechanical lock |
| Playback media | USB (host), SD card, Aux input (3.5 mm jack) |
| Supported audio formats | MP3 |
| RDS functions | PS (station name), AF (alternative frequencies), TA (traffic announcements), EON, PTY (program type) |
| Display | Backlit digital LCD |
| Station memory | 18 FM stations + 12 AM stations (6 preset buttons x 3 FM bands + 2 MW bands) |
| Audio settings | Volume, Bass, Treble, Balance, Fader (front/rear) |
| Station search | Auto scan, auto memory (AS/PS) |
| MP3 playback | Search by track, file, character; repeat, random playback, 10s preview |
| Anti-shock protection | Yes (anti-shock system for MP3 playback) |
| Reset | Reset button accessible with a pointed object |
| Dimensions (standard) | 1-DIN (approx. 178 x 50 x 160 mm) |
| Installation | 1-DIN flush mount, release keys provided |
| Maintenance and cleaning | Clean the faceplate with a soft dry cloth. Do not use abrasive products. |
| Safety | Disconnect power before any intervention. Do not connect speaker wires to ground. |
Frequently Asked Questions - MCR-1256 Marquant
User questions about MCR-1256 Marquant
0 question about this device. Answer the ones you know or ask your own.
Ask a new question about this device
Download the instructions for your Car radio in PDF format for free! Find your manual MCR-1256 - Marquant and take your electronic device back in hand. On this page are published all the documents necessary for the use of your device. MCR-1256 by Marquant.
USER MANUAL MCR-1256 Marquant
natural_image
Back view of a computer interface showing ports, connectors, and memory drives (no text or symbols visible)(19)
REMARQUE: A CHAQUE FOIS QUE LE FIL A ETE DEBRANCHE, LE BOUTON RESET DOIT REINITIALISER AVANT DE FAIRE FONCTIONNER LA RADIO (REFEREZ-VOUS AUX FONCTIONS DU BOUTON RESET POUR PLUS D'INFORMATIONS), SINON LA RADIO NE FONCTIONNERA PAS CORRECTEMENT.
INSTRUCTIONS DE FONCTIONNEMENT
1. COMMANDE POWER ON/OFF
natural_image
Back panel of a computer monitor showing ports and indicators (no readable text or symbols)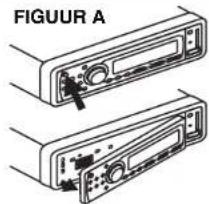
OPMERKING: ALTIJD, WANNEER DE BEDRADING AFGEKOPPELD IS GEWEEST, MOET DE RESET KNOP GE RESET WORDEN VOORDAT DE RADIO BEDIEND KAN WORDEN (RAADPLEEG DE RESET KNOP EIGENSCHAP VOOR BUZONDERHEDEN). ANDERS, ZAL DE RADIO NIET NAAR BEHOREN FUNCTIONEREN.
BEDIENINGS INSTRUCTIES
1. IN-/UITSCHAKELEN
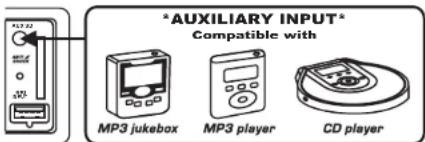
AUX INGANG
17. USB HOST
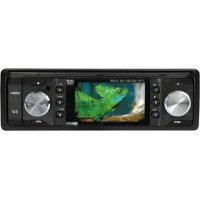
Detachable Front Panel FM/AM Radio / MP3 Receiver USB Host For MP3 Input SD Card Slot Electronic Anti-Shock System RDS-EON Tuning System Auxiliary Input
MCR-1256

CE
e4 021539
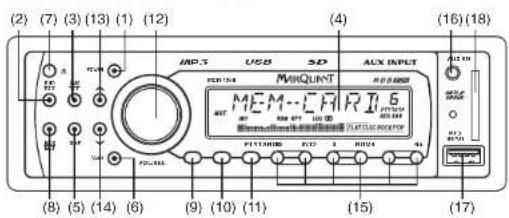
LOCATION OF CONTROLS
natural_image
Back panel view of a computer interface with ports, connectors, and a labeled component (19), no readable text or symbols beyond the label.

REMARK:
AT ANY TIME, IF THE WIRE HAS BEEN DISCONNECTED, THE RESET BUTTON MUST BE NEED TO RESET AGAIN BEFORE OPERATE THE RADIO (REFER TO RESET BUTTON FOR DETAILS). OTHERWISE, THE RADIO MAY NOT WORK PROPERLY
OPERATING INSTRUCTIONS
Press the button to turn the power "ON" or "OFF".
Note : The unit can be turn on by pressing any keys on the panel (except panel release button). It will help the user who cannot find the power button in dark.
- BAND SELECTOR / PAUSE CONTROL
a) On radio mode, each time this button is pressed, the radio band is changed. The indication "FM1", "FM2", "FM3", "MW1" or "MW2" will appear on the display according to your selection.
b) Press this button to pause during playback.
- PRE-SCAN/AUTO-STORE BUTTON / REPEAT CONTROL
a) On radio mode, this button allows you to enjoy "Preset Memory Scan" function by pushing it shortly, and "Auto-Store Memory" function by pushing it more than 2 seconds.
●PS (PRESET MEMORY SCAN) - It calls the memorized station frequencies (from 1-6) automatically every 5 seconds.
- AS (AUTO-STORE MEMORY) - It searches all station frequencies upward and memorize automatically 6 stations by catching the frequency which has scan-stop level, the memorized station is shown on LCD as "Channel 1 to 6". After memorizing, auto-store memory function will be changed to "Preset Memory Scan" function automatically.
b) Press this button to repeat the song during playback.
- LCD DIGITAL DISPLAY
The unit utilizes a digital type display which shows numerical indication of station FREQUENCY and other FUNCTIONS.
- DISPLAY BUTTON
This button serves to show available information as following:
- Band and Frequency
- Programme Type Name
- Station Name
- Time
- Track No. / Playing Time
SETTING CLOCK TIME MANUALLY
-
Press "DISP" button and hold it until the display flash and release.
-
Rotate "VOL/SEL" button clockwise to set HOUR and anti-clockwise to set MINUTE.
6. SCAN CONTROL
Press this button to scan the receivable FM / MW stations during radio mode. When receivable stations are tuned in, they are monitored for approximately 5 seconds before advancing to the next receivable station. Press this button once again to stop scanning as desired.
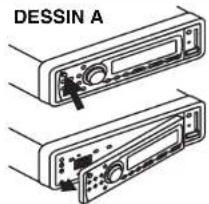
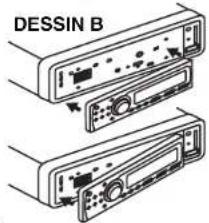
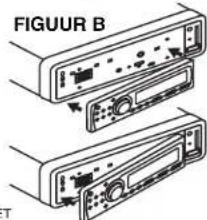
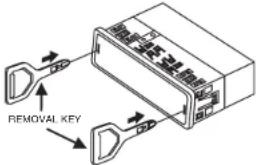
7. PANEL RELEASE BUTTON
This button is used to release the panel from the unit.
●To detach the front panel, press the button so that the left side of the panel is released. Grasp the released side and pull it off of the chassis (FIGURE A).
●To re-attach the panel, insert the right side of the panel in place first and then press the left side of the panel until the chassis hold the panel firmly (FIGURE B).
8. MODE SELECTION / MUTE CONTROL
a) Briefly press this button to select Radio (TUNER), USB (USB-DRIV), SD (MEM-CARD) or Auxiliary Input (AUX) mode.
b) When pressing the button for more than 2 seconds, it will mute volume control and "MUTE ON" will appear on the display.
9. RDS (RADIO DATA SYSTEM) CONTROL
You can enjoy RDS advantages on FM radio as following.
- Program Service Name (PS) : When an RDS station is received, station's name will appear on the display.
- Traffic Program (TF). When station with traffic program is received, TF indicator will appear on the display. - Alternative Frequencies (AF): The unit continuously checking the signal strength of alternative frequencies for the tuned radio station. Every time that new alternative frequency is stronger than current station, it automatically switch over to the new frequency and new frequency will be displayed for 1-2 second. When the button pressed short, AF switching mode is selected and the state of AF switching mode will appear on the display as following.
-RDS indicator on : AF mode is on and RDS signal is received.
-RDS indicator off : AF mode is off.
-RDS indicator flashing : AF switching mode is selected but RDS signal is not received yet.
- Enhanced Other Networks (EON): An RDS service where the broadcaster links some stations together. When tuned to a station which is linked to others by EON, the radio is capable of receiving Traffic Announcement from the linked stations.
- Regional Program (for some countries only): When tuned to a regional program, the radio will stay tuned to that particular regional program as long as possible. If you drive out of the coverage area and the regional program becomes very weak, the radio may tune to another regional program from the same network. To activate the regional program function, pressing the button more than 2 seconds until "REG ON" appear on the display. To switch off the regional program function, pressing the button more than 2 seconds until "REG OFF" appear on the display.
10. TA (TRAFFIC ANNOUNCEMENT) CONTROL
Press the button to select TA mode on/off. When TA mode is on, "TA" indicator will appear on the display and the radio is able to receive traffic announcements on the same stations or stations linked via EON with Traffic Program (TP). The TA mode can work as following.
- If the volume setting is very low, volume level will be raised temporarily during traffic announcement and back to original volume level at the end of traffic announcement.
- Temporary switch over to an EON linked program when EON detects a traffic announcement on that other program.
- If the radio is muted, it will be de-muted for the duration of the traffic announcement.
- If the unit is CD/MP3 mode, it will switch temporarily to radio mode to receive Traffic Announcement.
11. PTY (PROGRAMME TYPE NAME) CONTROL
There are 2 series of programme type (PTY) available for PTY search tuning. Pressing PTY button once or twice and then pressing any Station Preset Button (1-6) until the desired PTY code appears on the display. The radio will stop on station transmitting the selected PTY code. Next PTY searching can be activated by repeating the same procedure. During programme type searching, PTY button can be pressed to stop searching and the radio will back to the original station. "PTY NONE" will appear on the display if the selected PTY code is not receivable.
12. VOLUME/SELECTION BUTTON ("VOL/SEL")
Rotate the button anti-clockwise to decrease, or clockwise to increase volume level.
AUDIO LEVEL CONTROL (WHEN PUSHING ONE AFTER ANOTHER)
Press this button shortly one after another to show VOL/BAS/TRE/BAL/FAD control.
●VOLUME - Press this button once, then rotate anti-clockwise to decrease, or clockwise to increase volume level
●BASS - Press this button once, then rotate anti-clockwise to decrease, or clockwise to increase bass level.
- TREBLE - Press this button once, then rotate anti-clockwise to decrease, or clockwise to increase treble level.
●BALANCE - Press this button once, then rotate anti-clockwise or clockwise to level balance of speaker right and left.
●FADER - Press this button once, then rotate anti-clockwise or clockwise to level fader of speaker front and rear.
AUDIO/SETTING SELECT (HOLD MORE THAN 2 SECONDS)
When pressing the button for more than 2 seconds, it activates as unit setting selection in cyclical mode as following. The unit setting can be changed by rotating the button clockwise or anti-clockwise.
●TA SEEK / TA ALARM
●MASK DPI / MASK ALL
- RETUNE-S / RETUNE-L
●DSP OFF / POP M / ROCK M / CLASS M / FLAT M
●LOUD OFF / LOUD ON
●SCROLL 1 / SCROLL 2 (display showing from left to right/right to left direction)
●BEEP ON / BEEP OFF (not available for this model)
●BEEP ON/DEEP ●STEREO/MONO
●STEREO/M ●DX/LOCAL
13/14. MANUAL UP/DOWN TUNING / TRACK SEEK UP/DOWN CONTROL
On radio mode, pressing the button for more than 2 seconds, it will tune one frequency step higher or lower.
On USB-DRIV/MEM-CARD mode, press this button will locate the beginning of the track being played or will locate the beginning of the next track. When pressing more than 2 seconds, it will move fast forward or fast backward to a specific position.
15. STATION PRESET BUTTON (1-6)
The PRESET BUTTONS on the unit are used to store station frequencies which you may wish to recall. Each preset button can store FM1, FM2, FM3, MW1, MW2 band station frequency. Pressing the button momentarily recalls the station frequency which was memorized. There are 6 preset buttons, giving you capability of storing 18FM / 12MW.
NOTE: When the preset button to be memorized is kept pressed for more than 2 seconds, the receiving station frequency will be stored in the button pressed. After this, the memorized station can be recalled by pressing the button once.
On USB-DRIV / MEM-CARD Mode
●Preset 2 - press this button to scan the first 10 seconds of all the tracks on the USB drive / SD Card.
●Preset 4 - press this button to play USB drive / SD Card at random order.
●Preset 5 - press this button to search -10 track.
●Preset 6 - press this button to search +10 track.
16. AUXILIARY INPUT
Press MODE button (8) until the "AUX" mode is shown on display. The unit is ready to play songs on an external audio device through the auxiliary input directly on the front panel.
17. USB HOST
The unit is ready to play MP3 songs on an external USB device through the USB host directly on the front panel.
18. SD CARD SLOT
Holding the SD card and insert into the slot until you hear the lock sound (Figure C). The unit will automatically engage into MEM-CARD play mode. If you want to eject the SD card, just press the card inward until you hear the unlock sound and then release the card.

The unit will automatically engage into MEM-CARD play mode. If you want to eject the SD card, just press the card inward until you hear the unlock sound and then release the card.
19. RESET BUTTON
The RESET button is located on the front of main panel. It is recessed in order to prevent accidental engagement, and can be activated with the tip of a ball-point pen or any similar pointed object. This reset circuitry is provided in order to protect the unit's microprocessor, and should only be activated under the following conditions:
a) Initial installation after all wiring is completed.
b) Abnormal operation is encountered such as numerical indication on display is erratic.
c) Whenever the reset button is activated, all preset memory content will be erased and must be reprogrammed.
MP3 OPERATION
IMPORTANT NOTES
- The MP3 files recording media acceptable to this unit are USB flash memory and SD memory card.
- The MP3 formats acceptable are limited.
- Do not attempt to play a media containing non-MP3 files or non-MP3 files with MP3 extension.
Otherwise, the USB Drive / MEM-CARD Drive may not work properly. If "ERROR" is shown, it is suggested to reset the unit by pressing the reset button.
PLAY ON MP3 FILE
- Insert the USB flash memory / insert SD card. The unit will start playing and checks all the files and folder on the media.
- If MP3 files and directories are recognized, the media will start playing.
- The MP3 files and directories are accessed according to the order written by the USB flash memory / SD card writer.
TRACK SEARCH
- Press "AMS" button once and "TRK SCH" will be shown on the display.
- Press "VOL/SEL" button to enter track search mode and "TRK 0" will appear on the display for you to enter track number.
- Rotate "VOL/SEL" button clockwise or anti-clockwise to shift number 0 - 9 in loop rotation.
- Press "VOL/SEL" button shortly to select the first digit.
- Repeat the same procedure to enter the other digits if required.
- After the track number is selected, press "VOL/SEL" button more than 2 seconds to start playing the selected
track. - If track number is not entered within 10 seconds, the unit will continue playing the current file.
FILE SEARCH
- Press "AMS" button twice and "FILE SCH" will be shown on the display.
- Press "VOL/SEL" button to enter file search mode.
- Rotate "VOL/SEL" button clockwise or anti-clockwise to view the directories.
- After the selected directory is selected, rotate "VOL/SEL" button clockwise or anti-clockwise to view the files.
- Press "VOL/SEL" button to play the selected file.
- If directories or files name is not entered within 10 seconds, the unit will continue playing the current file.
CHARACTER SEARCH
- Press "AMS" button 3 times and "CHAR SCH" will be shown on the display.
- Press "VOL/SEL" button to enter into character search mode and "* will appear on the display for you to enter first character.
- Enter whole name of files (maximum 8 characters) by rotating "VOL/SEL" button clockwise or anti-clockwise to shift "A-Z", "0-9" & "*" (space) in loop rotation.
- Press "VOL/SEL" button shortly to select the first character.
- Repeat the same procedure to enter the other characters if required.
- After the whole name of file is entered, press "VOL/SEL" button more than 2 seconds to start playing the selected track.
Remark :
1) The media must contain directories or files name written by the USB flash memory / SD card writer in order to use in searching.
2) If only partial letters are entered for searching either in directories or files name, you may not get it correctly.
WIRE CONNECTION

Carstereo ISO-Connection
For A SPEAKERS
From Cable Side

Carstereo ISO-Connection
POWER

CAUTION :
Do not connect the speaker wires to chassis or car body. Each speaker wire cannot be soldered together with other wires. Otherwise, the unit will be damaged and warranty will be void.
INSTALLATION

UNIT REMOVAL
- Remove Front Control Panel.
- Slightly insert the key into the slot and gently to release.
- Separate the mounting case from the unit. Keep removal keys in a safe place as you may need for future removal of unit.
P/N:570-D3A802-01
GB-6

- INSTRUCTIONS DE FONCTIONNEMENT
- COMMANDE POWER ON/OFF
- BEDIENINGS INSTRUCTIES
- IN-/UITSCHAKELEN
- USB HOST
- OPERATING INSTRUCTIONS
- SCAN CONTROL
- PANEL RELEASE BUTTON
- MODE SELECTION / MUTE CONTROL
- RDS (RADIO DATA SYSTEM) CONTROL
- TA (TRAFFIC ANNOUNCEMENT) CONTROL
- PTY (PROGRAMME TYPE NAME) CONTROL
- VOLUME/SELECTION BUTTON ("VOL/SEL")
- AUDIO LEVEL CONTROL (WHEN PUSHING ONE AFTER ANOTHER)
- AUDIO/SETTING SELECT (HOLD MORE THAN 2 SECONDS)
- 13/14. MANUAL UP/DOWN TUNING / TRACK SEEK UP/DOWN CONTROL
- STATION PRESET BUTTON (1-6)
- On USB-DRIV / MEM-CARD Mode
- AUXILIARY INPUT
- SD CARD SLOT
- RESET BUTTON
- MP3 OPERATION
- IMPORTANT NOTES
- PLAY ON MP3 FILE
- TRACK SEARCH
- FILE SEARCH
- CHARACTER SEARCH
- Remark :
- CAUTION :
- UNIT REMOVAL
Brand : Marquant
Model : MCR-1256
Category : Car radio