
15169 - Laser level PROLINE - Free user manual and instructions
Find the device manual for free 15169 PROLINE in PDF.


| Product Type | Cross-line Laser Level |
| Brand | Proline |
| Model | 15169 |
| Laser Class | Class 2 |
| Laser Wavelength | 515–520 nm (green) |
| Laser Output Power | ≤ 1 mW |
| Accuracy | ± 1.5 mm / 5 m (± 3 mm / 10 m) |
| Self-levelling Range | ± 3° |
| Levelling Time | < 5 s |
| Working Range (Indoors) | Up to 20 m (recommended up to 10 m) |
| Generated Planes | 1 horizontal (360°) + 2 vertical (360°) |
| Battery Type | Li-ion 3.7 V, 2800 mAh |
| Charging Input | 100–240 V, 50–60 Hz via USB-C (adapter included) |
| Weight | 0.64 kg |
| Working Temperature Range | +10°C to +40°C |
| Storage Temperature Range | -20°C to +50°C |
| Max. Relative Humidity | 90% |
| Protection Class | IP54 (dust and splash water protected) |
| Equipment Class | III |
| Mounting | 1/4" and 5/8" tripod mounts, universal bracket included |
| Included Accessories | Universal bracket, laser enhancing glasses, target plate, adapter with USB cable, Li-ion battery, case, operation manual |
| Maintenance | Clean with dry or slightly moistened cloth; remove battery before cleaning; no user-serviceable parts |
| Safety Features | Pendulum lock for transport; auto shut-off when out of level range; do not look into beam |
Frequently Asked Questions - 15169 PROLINE
User questions about 15169 PROLINE
0 question about this device. Answer the ones you know or ask your own.
Ask a new question about this device
Download the instructions for your Laser level in PDF format for free! Find your manual 15169 - PROLINE and take your electronic device back in hand. On this page are published all the documents necessary for the use of your device. 15169 by PROLINE.
USER MANUAL 15169 PROLINE
natural_image
Technical line drawing of a mechanical housing or enclosure component (no text or symbols)15169
| EN | Operation manual | CROSS-LINE LASER LEVEL......4 |
| DE | Bedienungsanleitung | LASER-WASSERWAAGE......7 |
| PL | Instrukcja obsługi | POZIOMNICA LASEROWA KRZYŻOWA......10 |
| RU | Инструкция по эксплуатации | ЛАЗЕРНЫЙ УРОВЕНЬ С ПЕРЕКРЕСТНЫМИ ЛУЧАМИ....13 |
| RO | Instrucțiuni de utilizare | POLOBOC CU LASER ÎN CRUCE......16 |
| LT | Naudojimo instrukcija | KRYŻMINIŲ LINIJŲ LAZERIS NIVELYRAS......19 |
| UK | Інструкція з експлуатації | ЛАЗЕРНИЙ РІВЕНЬ З ПЕРЕХРЕСНИМИ ПРОМЕНЯМИ....22 |
| HU | Használati útmutató | KERESZTLÉZER......25 |
| LV | Lietošanas instrukcija | KRUSTENISKAIS LĄZERS......28 |
| ET | Kasutusjuhend | LASERLOOD......31 |
| BG | Инструкция за експлоатация | ЛАЗЕРЕН НИВЕЛИР С КРЪСТОСАНИ ЛИНИИ......34 |
| CS | Návod na obsluhu | LASEROVÁ KŘÍŽOVÁ VODOVÁHA......37 |
| SK | Návod na obsluhu | KRÍŽOVÁ LASEROVÁ VODOVÁHA......40 |
| SL | Navodila za uporabo | KRIŽNA LASERSKA LIBELA......43 |
| HR | Upute za rad | RAZINA KRIŽNOG LASERA......46 |
| BS | Uputstvo za rad | KRIŽNI LASER NIVO......49 |
A
B
C
WARNING:

Before using the cross-line laser level, hereinafter referred to as the "level", please read the manual carefully.

Improper use of the level can result in serious damage to the eyes of the user or others.
SAFETY RULES:
- The level must always be used for its intended purpose.
- The level is a device equipped with a Class 2 laser. Donot look into the laser beam. Looking into a beam emitted by a class 2 laser is not harmful, if it does not last longer than 0.25 s. The reflex to close one's eyes is generally sufficient protection. The use of optical devices, such as glasses or binoculars, does not increase the risk of eye damage.
- Do not direct the light source towards bystanders or animals.
- Do not allow the laser device to be in the hands of children or other persons not familiar with this manual. They may unintentionally blind themselves or others.
- Do not use the laser device when placed at head-level of passers-by or in the vicinity of a surface covered with a reflecting layer, as it can cause the reflected laser beam to be directed in a dangerous manner.
- Ensure there is no uncontrolled change in the direction of the laser beam and it hitting the eyes when the device is in operation.
- Do not wear sunglasses or protective clothing when using the level. They do not provide sufficient protection against a laser and, at the same time, make it difficult to observe the laser beam.
- Do not use laser enhancing glasses as safety glasses. Laser enhancing glasses are used to better identify the laser spot or line, not to protect against laser radiation.
- Do not use laser enhancing glasses as sunglasses or in traffic. Laser enhancing glasses do not provide complete protection against UV radiation and make it difficult to distinguish colours.
- Do not switch on the level in areas at risk of fire or explosion, for example in the presence of flammable liquids or gases.
- Remove batteries/rechargeable batteries when the product is not used for a long time (e.g. during storage). Old batteries/rechargeable batteries may leak, damaging the device!
- Do not throw batteries in a fire, do not disassemble or short circuit, do not dispose of with household waste.
- The product should be stored in a clean, dry place, out of reach of children.
- Do not replace the Class 2 laser diode with another type of diode. The manufacturer is not liable for any damage caused by tampering with the laser device.
- The PROFIX repair service conducts warranty and post-warranty repairs of its power tools, which guarantees the highest quality of repairs and the use of original spare parts.

ATTENTION! The opening of the level housing or any modifications made to the device by the user will void the warranty and the manufacturer's liability for any
resulting damage.
USE:
The self-levelling cross-line laser level is designed for indoor and outdoor use, and is used to determine horizontal and vertical planes through the use of laser beams, which greatly facilitates the execution of various types of craft work.
Use the device for any other purpose is absolutely prohibited.
PIECES:
• Cross-line laser level - 1 pc
• Universal bracket 1 pc
- Laser enhancing glasses 1 pc
• Target plate for the laser 1 pc
- Adapter (charger) with USB cable 1 pc
• Lithium-ion battery 1 pc
- Case - 1 pc
• Operation manual 1 pc
DEVICE PARTS:
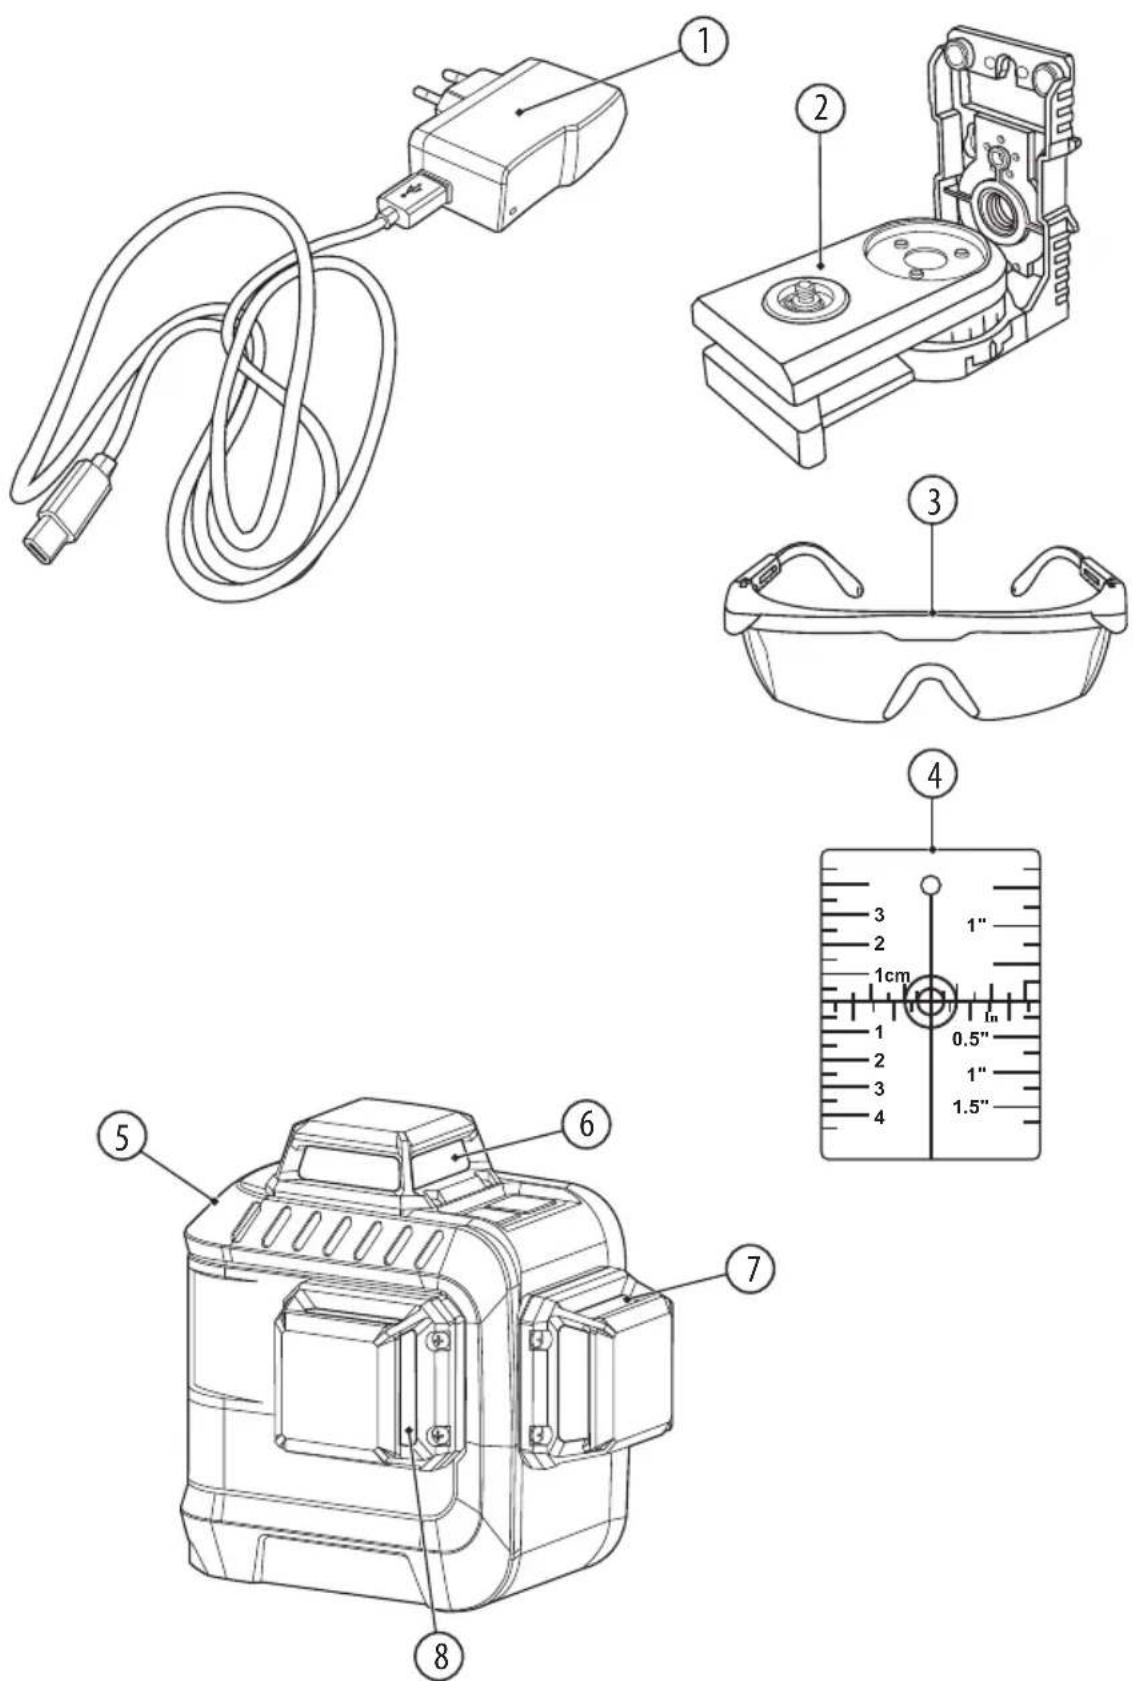
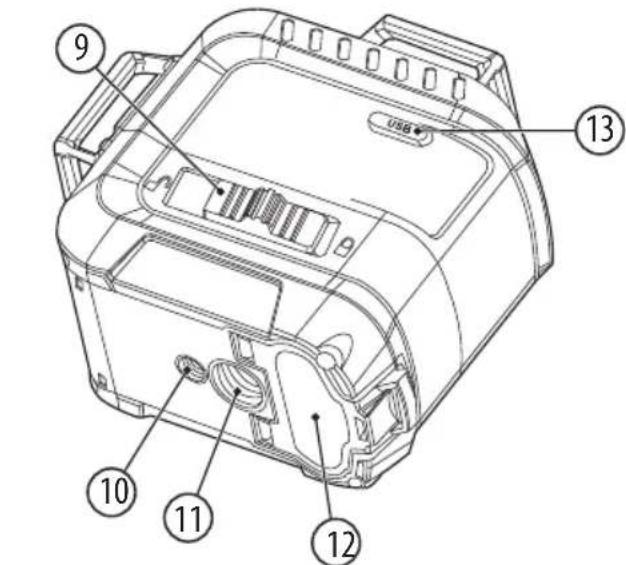
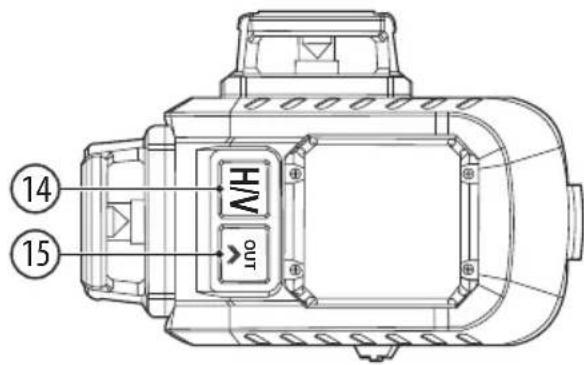
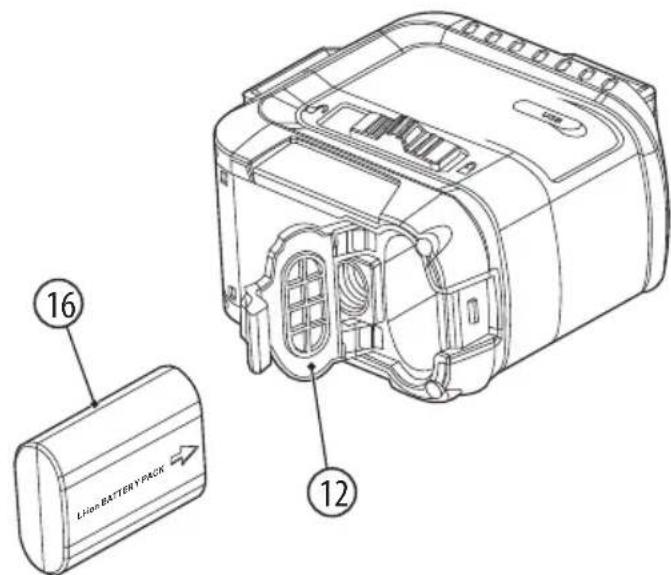
The numbering of device elements refers to the drawing on pages 2-3 of the instruction manual:
Fig. A 1. Adapter (charger) with USB cable
2. Universal bracket
3. Laser enhancing glasses
4. Target plate for the laser
5. Cross-line laser level
6. Horizontal laser beam window
7. Vertical laser beam window
8. Vertical laser beam window
Fig.B 9. Switch locking the compensator pendulum
- Mount for 1/4" tripod
- Mount for 5/8" tripod
- Battery bay cover
-
USB charging connector
-
Switch of displayed laser planes
-
Button for switching between the battery saving mode and the incline mode
Fig.C 16. Lithium-ion battery
TECHNICAL PARAMETERS:
| Laser output power P | ≤slant 1 mW |
| Laser wavelength | 515-520 nm |
| Laser beam | Green, class 2 laser |
| Accuracy | ± 1.5 mm/5m, ± 3 mm/10m |
| Typical self-levelling range | ± 3^ |
| Typical levelling time | <5 s |
| Working range (indoors) | up to 20 m (recommended up to 10 m) |
| Generated planes | 1 x horizontal (360°),2 x vertical (360°) |
| Storage temperature | -20°C... +50°C |
| Working temperature | +10°C ... +40°C |
| Max. relative air humidity | 90 % |
| Equipment class | III |
| Resistance class | IP54 |
| Device power (battery type) | 3,7V 2800mAh Li-ion |
| Weight | 0,64 kg |
PREPARATION FOR WORK:
Before each use, make sure to check the level for any damage (e.g. whether its housing is not cracked or its elements are not broken). If any damage is found, take the device to a service centre to check that it is safe to use.
OPERATING THE DEVICE:
■ Installing and recharging the battery
Use only the supplied lithium-ion battery to power the level.
To install the battery, open the battery bay cover (12). Insert the battery (16) into the bay, paying attention to the correct polarity (see Fig. C). Then close the cover.
The level is supplied with a partially charged battery. Charge the battery completely before use. To do this, connect the adapter (1) using the USB cable to the charging connector (13) and insert the adapter into a 100-240 V, 50-60 Hz mains socket. A red light on the adapter will turn on, indicating that charging is in progress. When the battery is fully charged, the light on the adapter will turn green.
If the device is not used for a long time, remove the battery. It may corrode or become unusable after a longer break in use.
The battery should be recharged when the laser light becomes faint and the laser beam dispersed.
■ Switching the level on/off
- To turn on the device in the auto-levelling mode, move the blocking switch of the compensator pendulum (9) to the left (open padlock symbol □) (see Fig. B). After the instrument is switched on, it generates a horizontal plane, is automatically levelled and compensates for unevenness within a self-levelling range of ± 3^ in 5 seconds. If the device is within its self-levelling limits, the beam will be on continuously. If the laser beam disappears, the device should be levelled. When the laser lines stop moving, the levelling has been completed.
If the level is shaken or its working position changes, it automatically performs self-levelling again.
If automated self-levelling is not possible, e.g. when the surface on which the laser device is standing is more than 3^ from level, the laser
level should be adjusted horizontally using a tripod or universal bracket (2).
- To turn on the device with a locked pendulum (closed padlock symbol 🔒) in order to set oblique lines, press the button (15) and hold it for 5 seconds. In the blocked state the compensator pendulum is immobilised, which makes self-levelling impossible. The laser beams will flash every 7 seconds.
- To turn off the device - move the switch locking the compensator pendulum to the right (closed padlock symbol 🔒) or, when the device was turned on with the pendulum blocked, press the button (15) and hold it for 5 seconds.
■ Control panel – description of functions
The laser is quick and easy to use, allowing 360^ laser planes to be displayed - one horizontal and two vertical. Turning surfaces on and off is done through the laser plane display switch (14) and is performed in the relevant sequence:
- when the device is turned on, only the horizontal plane is shown;
- after the button (14) is pressed, only the vertical laser beam 1 will be shown;
- pressing the button twice will cause only the vertical laser beam 2 to be shown;
- pressing the button three times will cause both vertical laser beams to be shown;
- pressing the button four times will cause the vertical laser beam 1 and the horizontal laser beam to be shown;
- pressing the button five times will cause both vertical laser beams and the horizontal laser beam to be shown;
- pressing the button six times will turn off the laser planes.
■ Laser brightness reduction function
The laser brightness reduction function is useful for saving batteries.
The function is available in the auto-levelling mode. To enable energy saving, press the button (15). To turn off energy saving, press the button (15) again.
TIPS FOR WORKING:
- Protect the level from moisture and direct solar radiation.
- Protect the level from extremely high or low temperatures, as well as temperature fluctuations. For example, do not leave the device for a long time in a car. If the device has been exposed to high temperature fluctuations, allow it to return to normal temperature before use.
- Avoid strong impacts or dropping the spirit level. A damaged laser device can make inaccurate measurements. Therefore, after each strong impact or drop of the device, the laser line should be compared with a previously determined horizontal or vertical reference line.
- A tripod is recommended to ensure correct operation of the device (stable surface). Adjust the tripod before switching on the measuring device.
■ Working with the laser target plate
The target plate for the laser (4) increases the visibility of the laser beam under adverse conditions or at a large distance.
The mirror half of the target plate (4) increases the visibility of the laser's lines.
■ Mounting with the universal bracket
The universal bracket (2) makes it possible to attach the measuring device to vertical planes, pipes or magnetic materials.
Adjust the universal bracket (2) before turning on the measuring device.

ATTENTION! The universal bracket (2) should not be close to pacemakers. Magnets placed on the universal bracket generate a field that can disrupt pacemaker operation.
■ Laser enhancing glasses
Glasses for working with a laser (3) filter out external light. This significantly enhances the green laser light.

ATTENTION! Do not use laser enhancing glasses as safety glasses. Laser enhancing glasses are used to better identify the laser spot or line, not to protect against laser radiation.
CLEANING, STORAGE AND MAINTENANCE:

NOTE: Turn off the device before cleaning. To avoid accidentally activating the level and directing the laser beam at eyes, the battery should also be removed from the bay.
- Clean the device only with a dry or slightly moistened cloth. Never use cleaning or scouring cleaners. Visible dirt in the laser beam windows should be carefully removed with a cotton swab using glass cleaning fluids.
- The level should be kept in a dry place, away from children and animals.
- The device is maintenance-free. There are no components in the device that are meant to be repaired by the user. If any errors in operation or damage to the device are observed, please contact an authorised service centre.
TRANSPORT:
The measuring device should be transported only in the supplied protective case. In order to ensure complete safety during transport, set the blocking switch of the compensator pendulum (9) to the « 🔍 » position, as this the blocks the pendulum unit, which could be damaged in case of stronger motion.
MANUFACTURER:
Profix Sp. z o.o.,
ul. Marywilska 34,
03-228 Warsaw, Poland
This device complies with national and European standards, and with safety guidelines.
All repairs are to be performed by qualified personnel using original spare parts.
PICTOGRAMS:
The device features the following warning symbols:

Laser radiation. Do not look into the beam. Class 2 laser device
ATTENTION! Always check the legibility of the plates and warning signs on the laser device.
ENVIRONMENTAL PROTECTION:
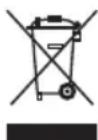
The symbol shown indicates a ban on disposal of used equipment together with other waste (subject to a fine). Hazardous components found in electrical and electronic equipment adversely affect the natural environment and human health.
The user should contribute to the recovery and re-use (recycling) of used equipment. A system of collecting used equipment is being created, or is present, in Poland and Europe, under which all sales outlets of the above-mentioned equipment are required to collect used equipment when new equipment is purchased. In addition, there are collection points for the above-mentioned equipment.
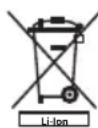
The batteries are rechargeable and contain environmentally harmful lithium.
At the end of their lifetime they must be disposed of in accordance with environmental protection regulations.
To do this, completely deplete the battery, remove it from the power tool, deliver to a battery recycling point or return it to the store where the device was purchased.

PROFIX has a policy of continuous improvement of its products and therefore the company reserves the right to change product specifications without prior notice. Illustrations in the instruction manual are examples and may be slightly different from the actual appearance of the purchased device.
This instruction manual is protected by copyright. Copying it without the written consent of PROFIX Co. Ltd. is prohibited.
WARNUNG:


- WARNING:
- SAFETY RULES:
- USE:
- PIECES:
- DEVICE PARTS:
- PREPARATION FOR WORK:
- OPERATING THE DEVICE:
- ■ Installing and recharging the battery
- ■ Switching the level on/off
- ■ Control panel – description of functions
- ■ Laser brightness reduction function
- TIPS FOR WORKING:
- ■ Working with the laser target plate
- ■ Mounting with the universal bracket
- ■ Laser enhancing glasses
- CLEANING, STORAGE AND MAINTENANCE:
- TRANSPORT:
- MANUFACTURER:
- PICTOGRAMS:
- ATTENTION! Always check the legibility of the plates and warning signs on the laser device.
- ENVIRONMENTAL PROTECTION:
- WARNUNG:
Brand : PROLINE
Model : 15169
Category : Laser level