StrongVision DUAL PRO - Uncategorized Evolveo - Free user manual and instructions
Find the device manual for free StrongVision DUAL PRO Evolveo in PDF.


| Product Type | Trail camera (photo trap) with cellular connectivity |
| Brand | Evolveo |
| Model | StrongVision DUAL PRO |
| Dimensions (H x W x D) | 187 x 118 x 87 mm (with antenna folded: 187 mm height; antenna straightened: 347 mm) |
| Weight | Approx. 600 g (including battery) |
| Power Supply | Built-in 8000 mAh Li-Ion battery; external DC 9-12V 2A (via DC jack 3.5x1.3 mm) |
| Display | 2.4" color TFT LCD |
| Motion Sensor | PIR sensor, adjustable sensitivity (Low/Medium/High/Off), detection angle 90° |
| Daytime Camera | 8 MP sensor, F=6, FOV=60° |
| Nighttime Camera | 5 MP sensor, F=4, FOV=90°, 12 IR LEDs (940 nm), range up to 25 m |
| Photo Resolution | Up to 30 MP (30/24/20/16/12/8/5/3 MP selectable) |
| Video Resolution | Up to 4K at 30 fps (4K, 2K, 1080p, 720p, VGA) |
| Recording Modes | Photo, Video, Photo & Video, Time-lapse |
| Trigger Speed | 0.5 seconds (ideal conditions) |
| Interval (Delay) | Instant, 10 s, 1/3/5/10/15/30 min |
| Storage | SD card up to 256 GB (exFAT format); no internal memory |
| Connectivity | 4G LTE (FDD-LTE B1/B3/B5/B7/B8/B20, TDD-LTE B38/B40/B41); WCDMA B1/B5/B8; GSM 900/1800; Mini SIM (PIN disabled) |
| Cloud Storage | Free 128 MB cloud storage (30-day retention, oldest files overwritten when full) |
| App Compatibility | EVOLVEO CAM for iOS (13.1+) and Android (9+) |
| Protection Rating | IP65 (dust and water resistant) |
| Operating Temperature | -10°C to +50°C |
| Security | 4-digit PIN lock for device; password for cloud access (default: 123456) |
| Spare Parts / Accessories | Spare battery (SGV CAM-BAT3), external antenna (SGV-CAM-EXTA), external power cable (SGV-CAM-PWRC), lock (SGV CAM-LOCK) |
| Warranty | 6-month battery capacity guarantee; standard warranty per local regulations |
Frequently Asked Questions - StrongVision DUAL PRO Evolveo
User questions about StrongVision DUAL PRO Evolveo
0 question about this device. Answer the ones you know or ask your own.
Ask a new question about this device
Download the instructions for your Uncategorized in PDF format for free! Find your manual StrongVision DUAL PRO - Evolveo and take your electronic device back in hand. On this page are published all the documents necessary for the use of your device. StrongVision DUAL PRO by Evolveo.
USER MANUAL StrongVision DUAL PRO Evolveo
natural_image
Two types of video surveillance cameras shown from different angles, one with antenna and one with camera lens (no text or symbols visible)CZ
SK
EN
HU
RO
DE
IT
HR
Obsah / Contents / Inhalt / Tartalom / Indice / Conținut / Sadržaj
Česky 4
Slovensky 38
English 73
Magyar 108
Română 144
Deutsch.... 180
Italiano.... 219
Hrvatski.... 256
Obsah
natural_image
Black and white photo of a military-style container with camouflage pattern and two labeled buttons (1 and 2), no visible text or symbols on the main body.Copyright © Abacus Electric, s.r.o.
www.evolveo.com
www.facebook.com/EvolveoCZ
natural_image
Black and white photo of a military-style container with camouflage pattern and two labeled buttons (1 and 2), no visible text or symbols on the main body.Copyright © Abacus Electric, s.r.o.
www.evolveo.com
www.facebook.com/EvolveoCZ
- Contents of the package .... 73
- First launch 74
- Technical specifications.... 77
- Description of the device .... 80
- Menu 85
- Media Browser 89
- Shooting directly from the menu...... 90
- Application 90
- Troubleshooting 99
- Manual APN setting.... 101
1. Contents of the package
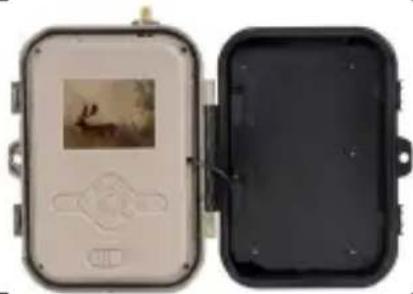 | Photo trap with embedded Li-ion battery | ||
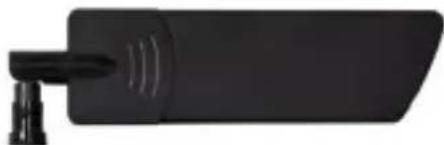 | Antenna | ||
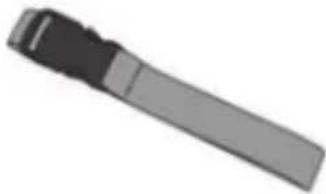 | Strap for fastening | ||
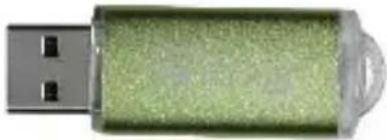 | Micro SD card reader | ||
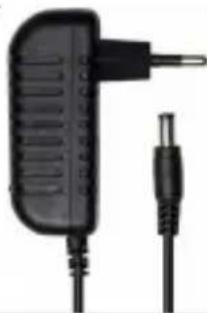 | Charging adapter | ||
 | Instructions |
2. First launch Application
EVOLVEO CAM
Free Cloud Storage app for Apple iOS(from version 13.1 and above) and Google Android(from version 9 and above)
Before starting the device for the first time, remove any protective film that is placed over the camera lens and IR sensor. Films can hinder motion recognition or affect image quality.
An 8,000 mAh Li-Ion battery is inserted into the device at the factory, remove and fully charge it before use. The battery has a charging connector and a charging status LED on it. The battery can be charged even when it is inserted into the device!
TIP: For ease of operation, a spare SGV CAM-BAT3 battery can be purchased, which can be pre-charged using the integrated charging connector and replaced with an already discharged battery at the installation site.
2.1. Insert an SD card into the device, the camera supports SD cards up to 256 GB, the SD slot is located on the side of the device next to the control panel.
2.2 Insert a MINI size SIM card into the device, the SIM slot is located on the side of the device next to the control panel.
WARNING:
- The SIM must not be protected by a PIN code - make sure the SIM is unlocked before using it for the first time.
- SIM card must be activated, make sure the SIM card is activated according to your operator's procedure before using it for the first time
2.3 TEST mode - Turn on the camera by switching the main switch to the middle position "TEST". In TEST mode, the device will boot into the main menu, press the MENU button to switch to the carousel main menu. Use the arrow keys to navigate through the menu and confirm the selected settings with the "OK" button.
2.4 Language settings - the device is factory set to English - to change to your preferred language, proceed as follows: Press the "MENU" button, use the up or down arrow to scroll through the menu to "Language" and confirm by pressing the "OK" button, use the arrow to select your language and confirm by pressing the "OK" button, press the "MENU" button again to return to the home screen.
2.5 Downloading the Application - The Mobile App can be downloaded directly from Apple Store Or Google play - Search for the app by typing its name EVOLVEO CAM. The download link can be generated directly on the device "MENU" → "Network", here select the item Apps for iOS or Android apps, by confirming one of the menus, you will see the QR code, which, when scanned on your mobile phone, redirects you to the relevant app store.
2.6 Adding a device to the application
2.6.1 In the camera menu, select "Network", confirm "OK" and then select "Device ID" - a QR code containing the IMEI of the device will open.
2.6.2 Open the EVOLVEO CAM app on your mobile phone. Press the "+" button in the top left corner and scan the QR Code from the camera display. If for any reason you cannot scan the QR code into your phone, you can enter it manually, in the app at the bottom select "Enter device ID" as the ID enter the IMEI of the device, which you can find on the camera label or in the menu above the QR code "Device ID". This is a 15-digit number.
2.6.3 The following is the name of the device. This name will then appear in your notifications and as the camera name in the Apps menu. Then fill in the password to access the Camera Cloud. For a new device, the base password is set to "123456". We recommend that you change your basic password after you have successfully logged into the application.
2.7 ACTIVATION: If everything is set, you can activate the device by switching the main switch to the "ON" position. The device will start a countdown on the display and the red LED above the camera lens will flash on the front panel. When the LED goes off, the camera is operational and starts taking pictures based on the settings.
3. Technical specifications
3.1 General
| Display | Colour TFT 2.4" |
| Motion sensor | PIR - adjustable sensitivity (3 levels) |
| Motion sensor detection angle | 90° |
| Night light | IR LED 940nm, 12 x IR LEDs under front anti-reflective cover |
| IR LED range | 25 m * |
| Dimensions | V x Š x H. 187**x118x87mm |
| Operating Temperature | -10 °C to +50 °C |
| Storage Temperature | -15 °C to +60 °C |
| Coverage | IP65 |
| Security | 4-digit optional password |
*If there are no other objects in the area in front of the camera from which the IR light can reflect, night images may be dark. Ideally, the area in front of the camera should contain objects from which the IR light will reflect, such as rocks, bushes, logs, etc. Ideal range is between 10-15 m from the camera
** Including mounted antenna bent to 90°, height including straightened antenna 347 mm
3.2 Photographs
| Daytime sensor | 8Mpix |
| Daytime lens | F=6; FOV=60 ° |
| Photo resolution | 30/24/20/16/12MP |
| Night sensor | 5Mpix |
| Night lens | F=4, FOV= 90 |
| Exposure (ISO) | Auto/100/200/400 |
| Timelapse mode (Timelapse) | 5 min/30 min 1/2/3/6/12/24h |
| Multi-frame mode (Burst) | 1/3/6 or 9 frames |
| Information on the photo | Time and Date, Temperature (°C, °F), Moon phase, Optional name |
| Recording modes | Photography, Photography & Video, Timelapse |
| File format | .JPEG |
| Activation speed | 0,5 s * |
| Delay interval | The amount of time the device is inactive after the last motion-based start. Instant, 10 s, 1/3/5/10/15 or 30 min. |
*The PIR sensor detects movement based on changes in surface temperatures. This figure is in an ideal environment, when the object in front of the camera has a sufficient surface temperature difference, and crosses perpendicularly the scanned area (passes from side to side) If the object will approach the camera frontally, it will take longer to recognize the motion.
3.3 Video
| Video resolution | VGA, 720 p, 1080 p, 2K, 4K 30fps |
| Record length | 5/10/30/60 or 90 seconds |
| File format | MP4/H.264 |
| Liveview (Liveview) | <180kBps ** |
**Frequent use of this feature may impact the amount of data consumed!
3.4 Power supply
| Built-in Battery | 8 000mAh Li-Ion for SGV CAM-DUAL-PRO and SGV CAM-2G, SGV CAM-PROA, SGV CAM-DUAL-A. The battery is equipped with a separate charging connector. |
| Power source | DC 9-12V 2A - charges the built-in battery! |
| Connector for external power supply | DC Jack 3.5x1.3 mm |
| External batteries | A 12 V battery can be connected to the external power connector using a cable: SGV-CAM-PWRC |
3.5 Connectivity
| Supported mobile network frequencies: | FDD-LTE: B1/B3/B5/B7/B8/B20TDD-LTE: B38/B40/B41WCDMA: B1/B5/B8GSM:900/1800 |
| Memory card | SD up to 256 GB-exFAT |
| SIM card | Mini SIM card - PIN requirement turned off. |
| LTE antenna | Screw-on with seal for 4G networks, can be replaced by external antenna with extension cable: SGV-CAM-EXTA |
| Internal memory | The device has no internal memory. |
| USB | It can be connected to a PC using a mini USB cable. (not included) |
4. Description of the device
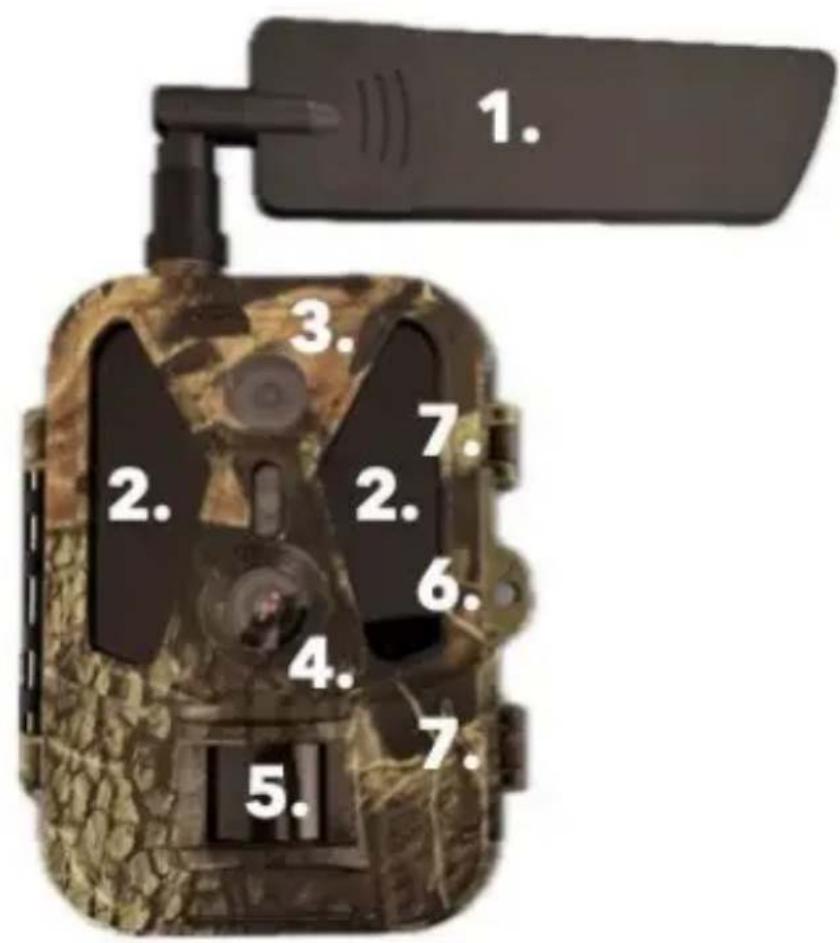
| 1. | Antenna (Rubber cap must always be used) |
| 2. | IR Illuminator |
| 3. | Night lens |
| 4. | Daytime camera lens |
| 5. | PIR sensor (Motion sensor) |
| 6. | Place for locking |
| 7. | Latches |
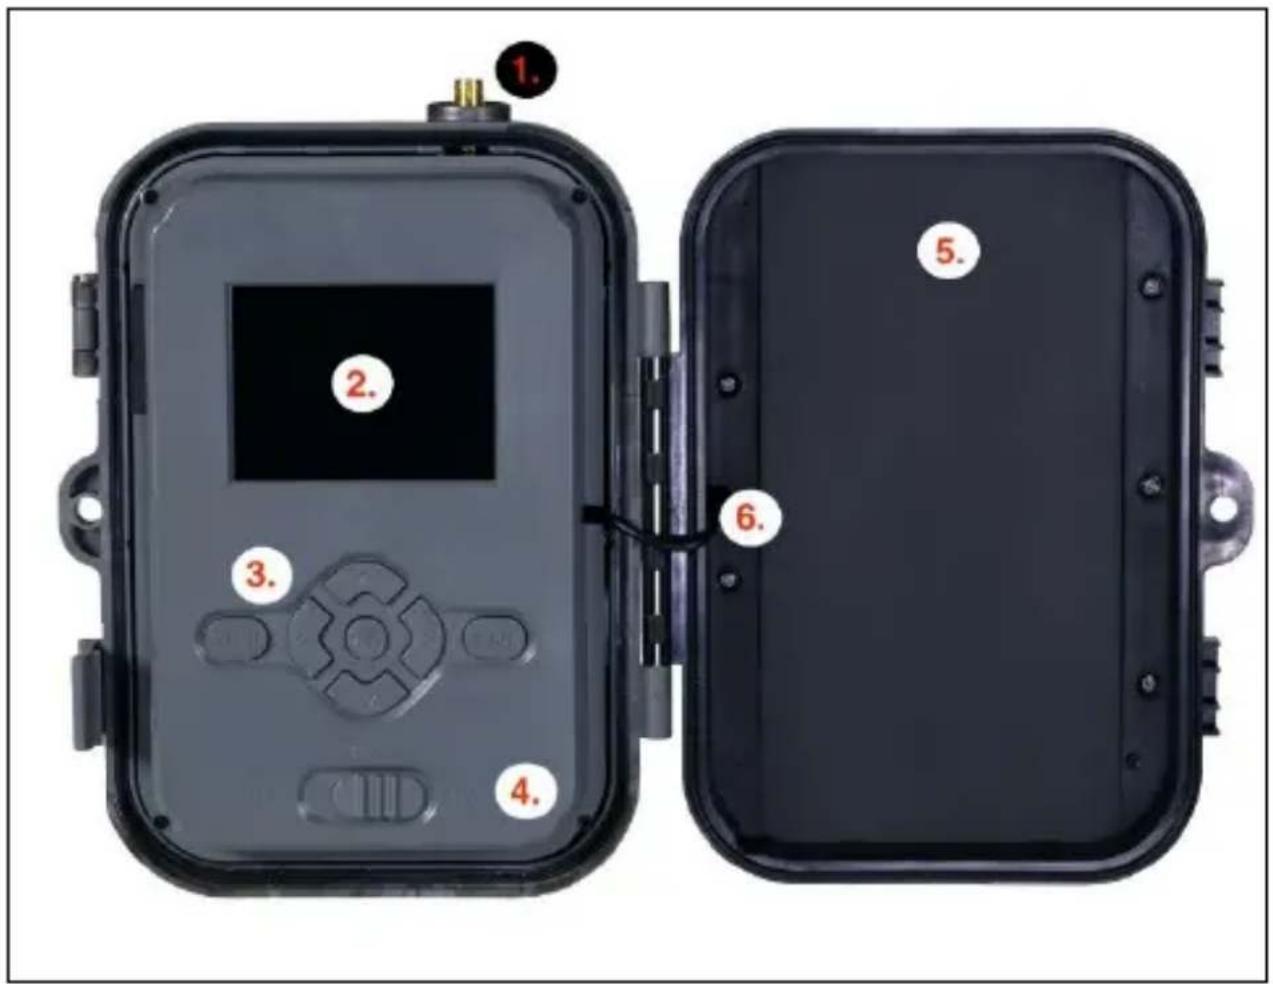
| 1. | Antenna connector (For outdoor use, the antenna must always be attached) |
| 2. | 2.4" Colour LCD display |
| 3. | Control buttons |
| 4. | Main position switch: OFF - TEST -- ON |
| 5. | 8 000mAh Li-Ion Battery |
| 6. | Power connection cable - must not be broken. In case of damage, remove the battery and send the device to an authorized service center. |
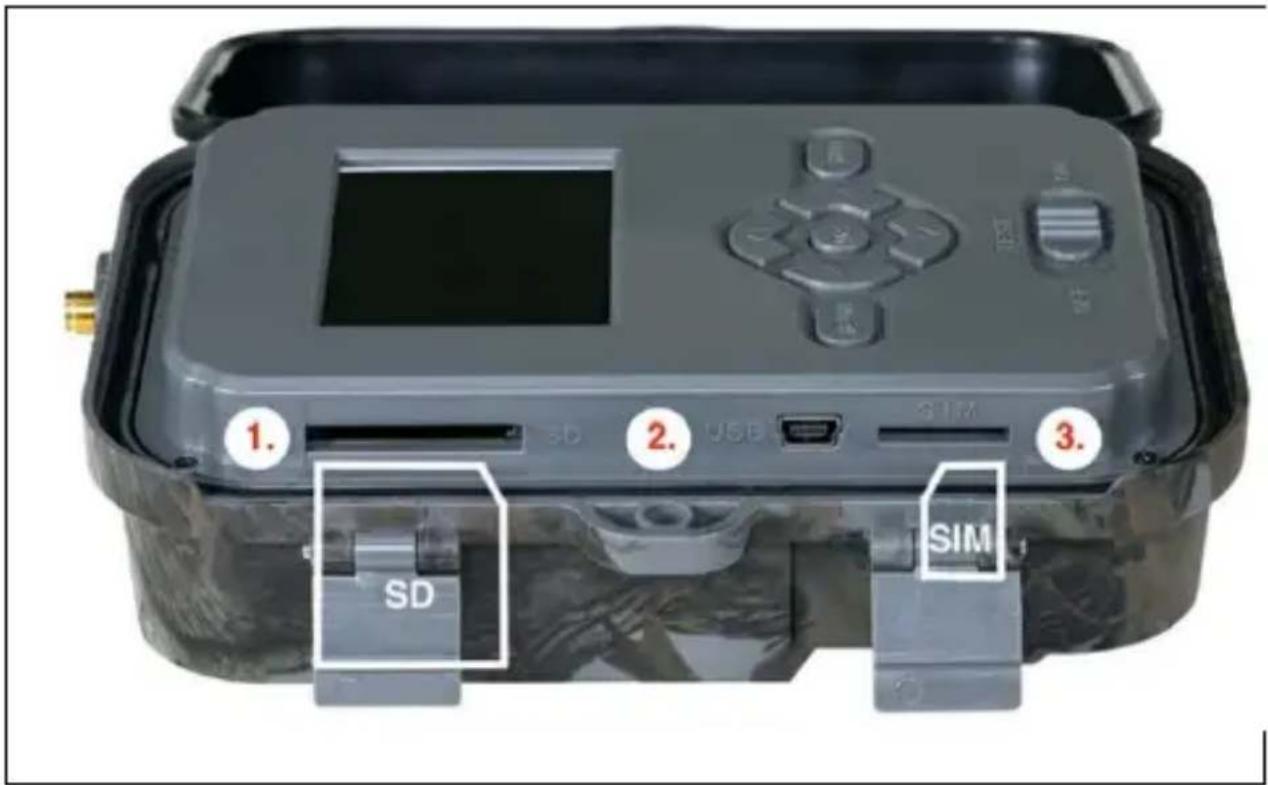
| 1. | SD card slot (max. size 256 GB) |
| 2. | USB-C connector for PC connection (Mass Storage) |
| 3. | SIM card slot (Mini SIM format) |
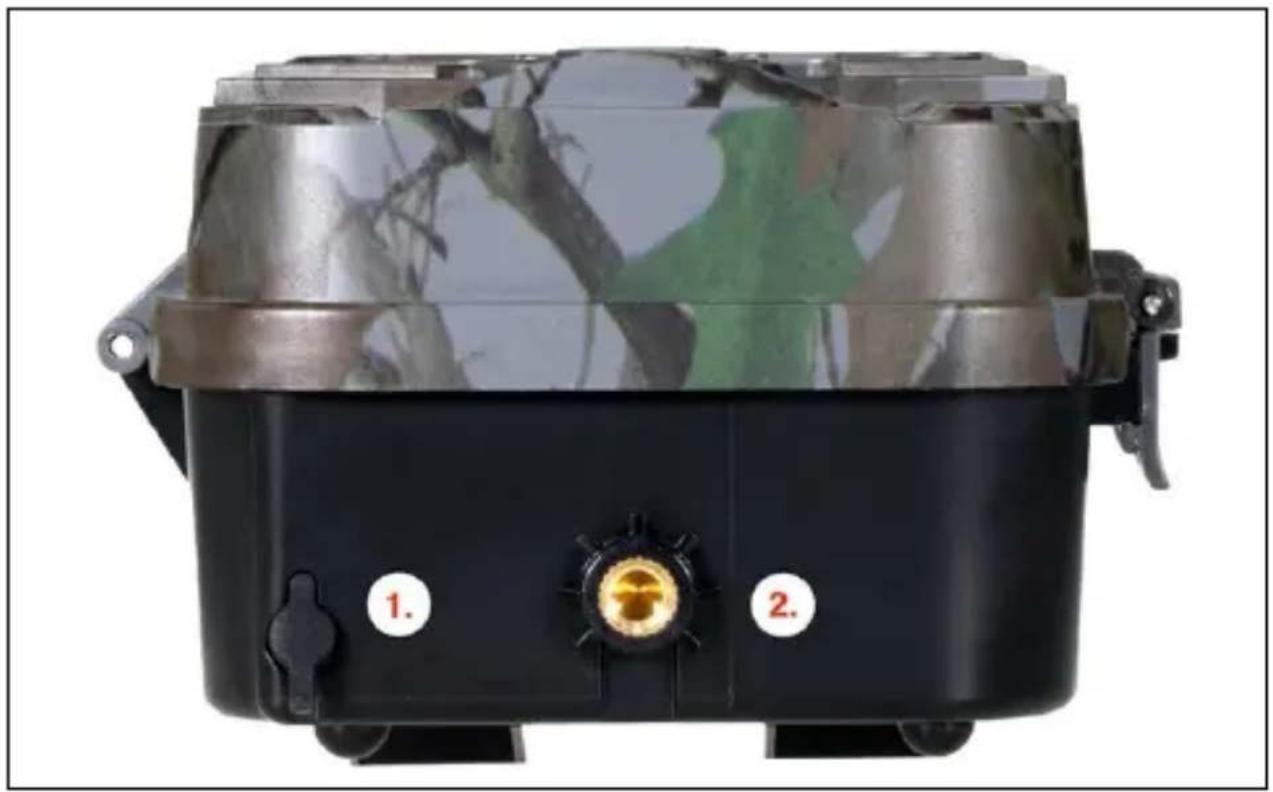
natural_image
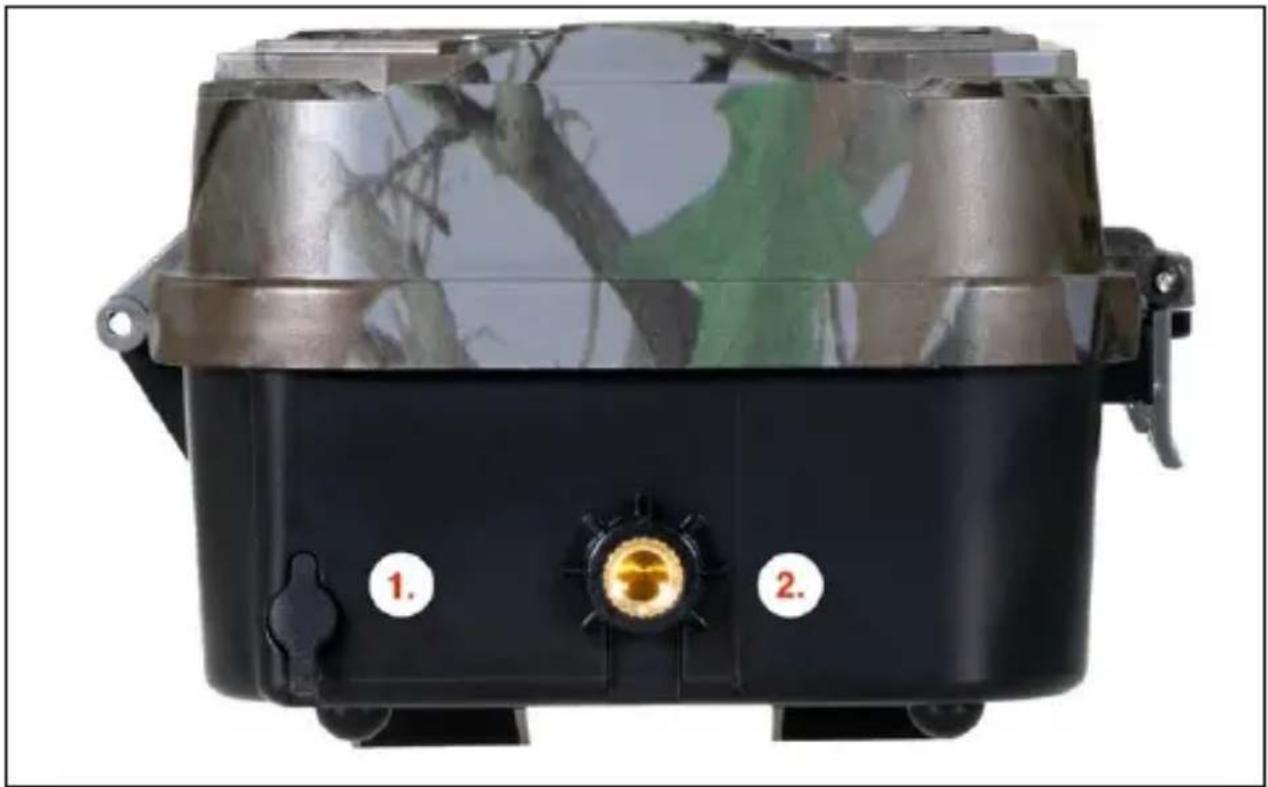
Black and silver portable device with camouflage pattern, labeled parts 1 and 2 (no visible text or symbols on body)| 1. | Connector for DC 9- 12V/ 2A power supply (Charges the inserted battery!) |
| 2. | Tripod thread 1⁄4" |
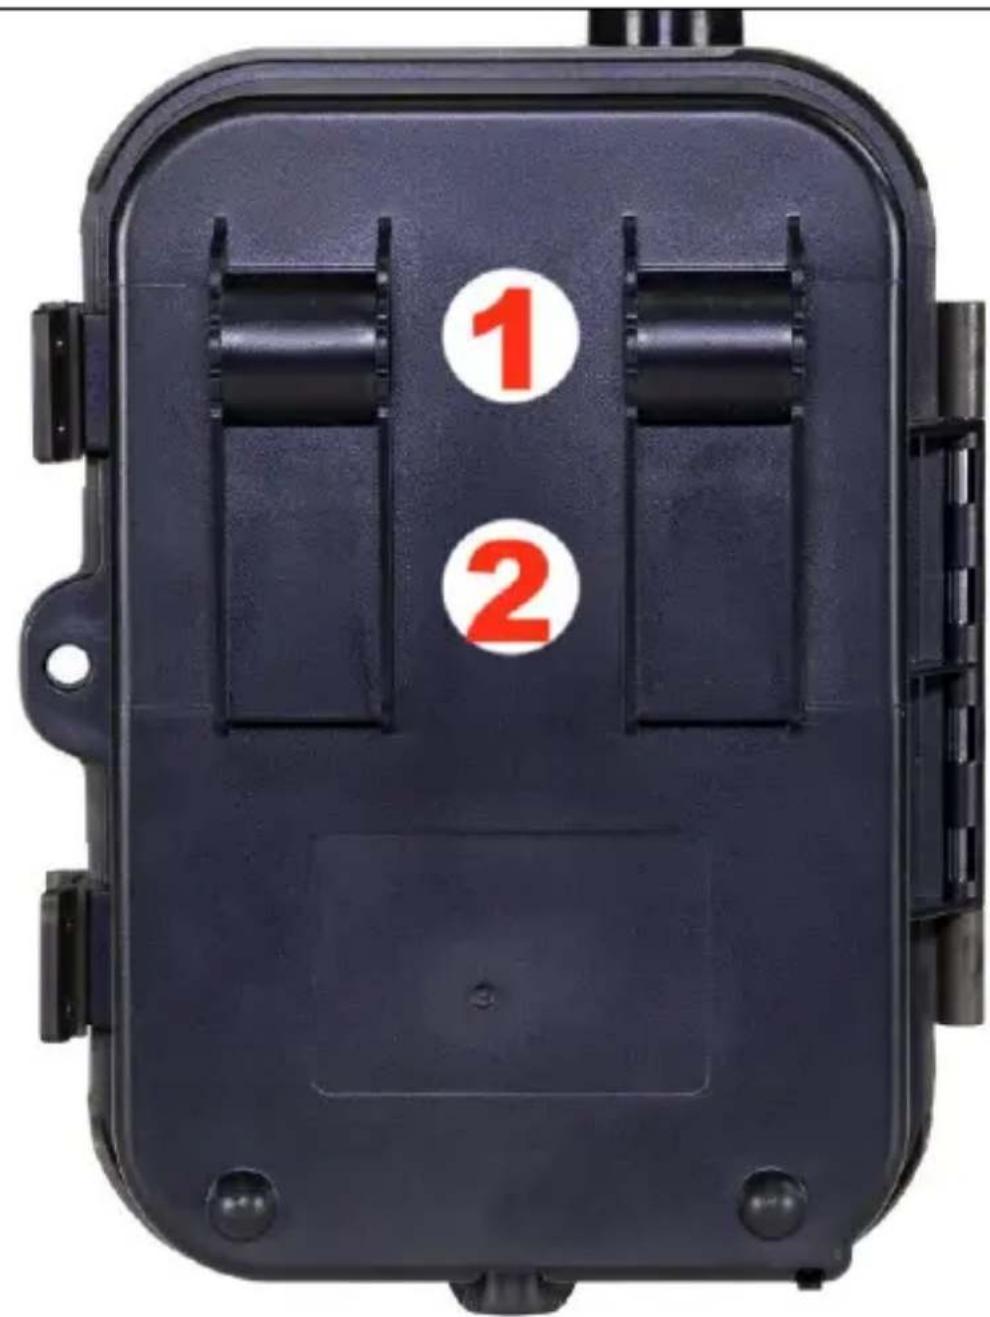
| 1. | Attachment for rope lock (SGV CAM-LOCK) max. diameter 12 mm |
| 2. | Fastening for belt |
5. Menu
| 1. Network | Device ID | Generates a QR code/IMEI to add the device to the app. |
| iOS apps | Generates a QR Code to download the app for Apple devices. | |
| Android apps | Generates a QR Code to download the app for Google devices. | |
| Displays the settings you have entered for sending email - settings using the application. | ||
| FTP | Displays the settings for the FTP server - setup by the application. | |
| APN | Displays the APN settings used - Entered automatically. | |
| 2. Send to | Cloud | Recordings are uploaded to the cloud. |
| Recordings are sent to the selected email | ||
| Cloud+Mail | Recordings are sent to the Cloud and to the selected email. | |
| FTP | Recordings are uploaded to FTP. | |
| Cloud+FTP | Recordings are uploaded to the Cloud and FTP. | |
| 3. Mode | Camera | In this mode, the camera will only take pictures. |
| Video | In this mode, the camera will only record video. | |
| Camera & Video | The camera will capture both images and video. | |
| Time-lapse images | In this mode, the camera will take pictures according to the selected time interval. | |
| 4. Resolution | Resolution setting for Video recording: 4K, 2K, 1080p, 720p or VGA. | |
| 5. Video length | Set the length of the video recording: 5s, 10s, 30s, 60s nebo 90s. | |
| 6. Sound recording | If you select on, it will also record audio when recording video. | |
| 7. Image size | Changes the resolution at which all images will be taken, you can choose between 30, 24, 20, 16, 12, 8, 5, 3 MPX photos, the higher the resolution, the larger the file will be saved and transferred to the cloud! | |
| 8. Interval | The interval is a time value that indicates the time of inactivity after a detected movement. If the camera is activated by a PIR sensor, the | |
| camera performs the desired action and waits for a specified amount of time after the motion is over before taking another picture. Values: 1s, 10s, 1min, 3min, 5min,10min,15min or 30min. | ||
| 9. Timing interval | Setting the capture interval in Time Lapse mode. Images will be taken at the selected time interval. The following values can be set: 5min, 30min, 1h, 2h,3h,6h,12h or 24h. | |
| 10. Sequence | In Photo, Photo&Video and Time-lapse mode, sets how many pictures to take when the camera is activated. Can be set: 1,3,6 or 9 images. | |
| 11. ISO | ISO sensitivity, simply put, the darker the environment the higher the value. If you are unsure of the setting, leave it in automatic mode. Can be set: Auto, ISO 100, ISO 200, ISO 400, ISO 800 and ISO 1600. | |
| 12. Rewrite | Zap. - When the SD card is full, the oldest files are overwritten.OFF - When the SD card is full, no more images are stored. | |
| 13. PIR sensitivity | PIR sensor sensitivity setting. If unwanted activation by distant objects occurs, the sensitivity of the sensor can be reduced. Can be set: Low, Medium, High or Off. | |
| 14. Language | It is used to set the language in the menu. | |
| 15. Frequency | Artificial light frequency filter. If the image flickers during video, you can change the settings to try to minimize this effect. Options 50 or 60 Hz. | |
| 16. Transmission frequency | Setting up the transfer of recorded footage from the camera to the Cloud. 1x, 2x, 6x, 12x per day or every frame taken. The fewer transmissions, the longer the operating time. | |
| 17. Camera ID | The name that appears in the stamp on the captured images. | |
| 18. Heslo/PIN | Camera security with PIN, when you turn on the function, you enter a new PIN, which the devicerequests every time it starts up. | |
| 19. Timer | The device's operating time on the display sets the time range when the device should be active, the rest of the day the device will not take pictures. | |
| 20. Date/Time | Set the date, time and format. Move the arrow keys to select and set, confirm by pressing the OK button. | |
| 21. Formatting | Reformats the SD card memory inserted in the device - data on the Cloud is not erased. | |
| 22. Default settings | It deletes all settings made in the camera, yet the device will download the settings from the Cloud when it syncs again. | |
| 23. View Full Version | Displays the current FW version |
6. Media Browser
It is possible to view the recorded footage directly on the camera display.
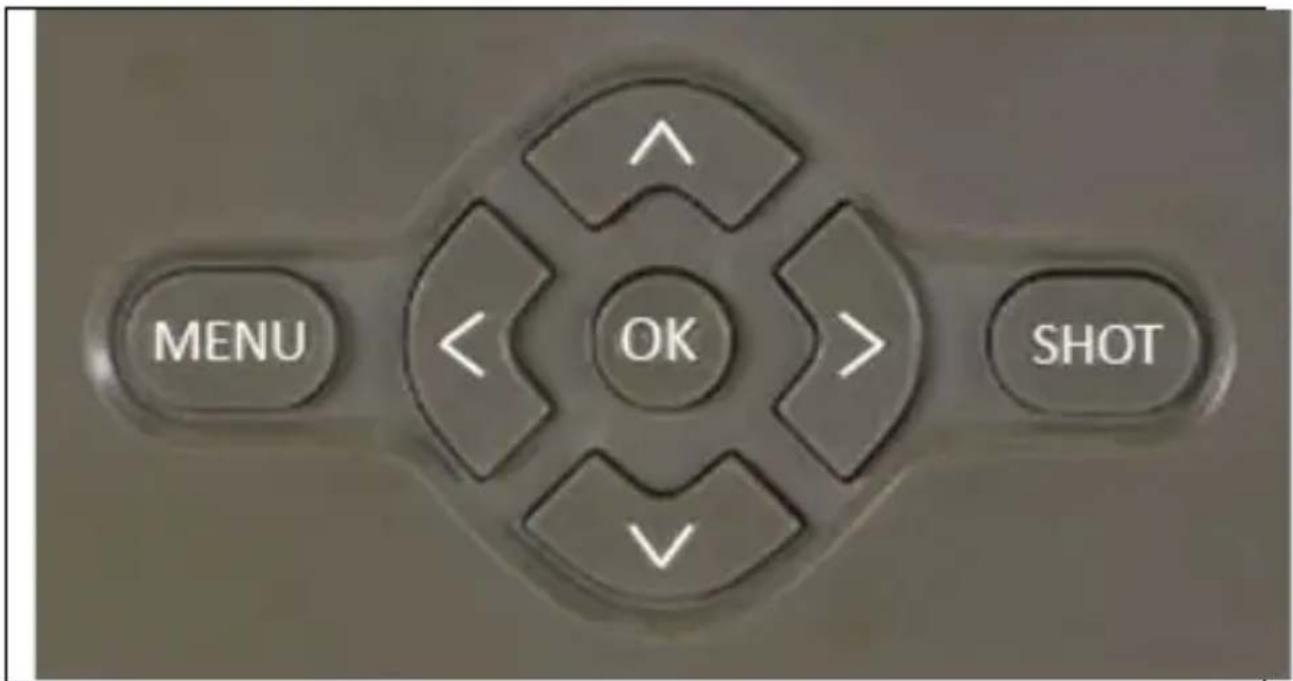
To view, switch to TEST mode, press the "Right Arrow" button on the home screen.
Control by arrow keys:
• Next picture: up arrow
• Previous picture: down arrow
• Play video: left arrow
- Stop Video: right arrow
- Return to main menu SHOT button
7. Shooting directly from the menu
The camera can take photos or record video using only the buttons. Switch the camera to TEST mode. It is then serviced afterwards:
- The up or down arrow switches between Photo or Video mode
- Press the SHOT button to take a picture
8. Application
The camera can only be fully used with the app, which is freely downloadable on iOS and Android platforms. The application does not have a web client. The Application includes a Cloud server where the images are stored. The servers are hosted on
the Amazon platform and are physically located in Germany. The files stored in the cloud are smaller in size, about 100kb per image and 2MB per video, than the original files on the device's SD card. The cloud has a size of 128MB, when it is full the oldest files will be overwritten. Files are stored on the Cloud for 30 days and then deleted. The camera can be shared by an unlimited number of users.
8.1 Download the application:
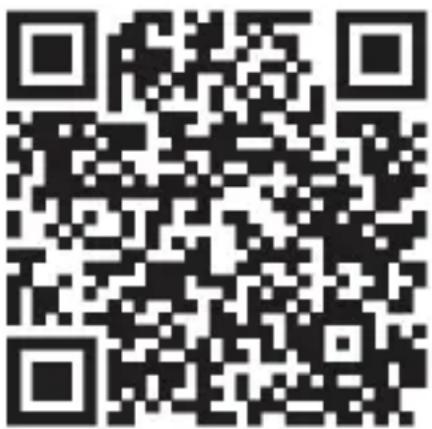
The app is freely downloadable on the Apple Appstore and Google play under the name EVOLVEO CAM. The app can also be downloaded using the following QR Code:
8.2 Controlling the application 8.2.1 Cloud
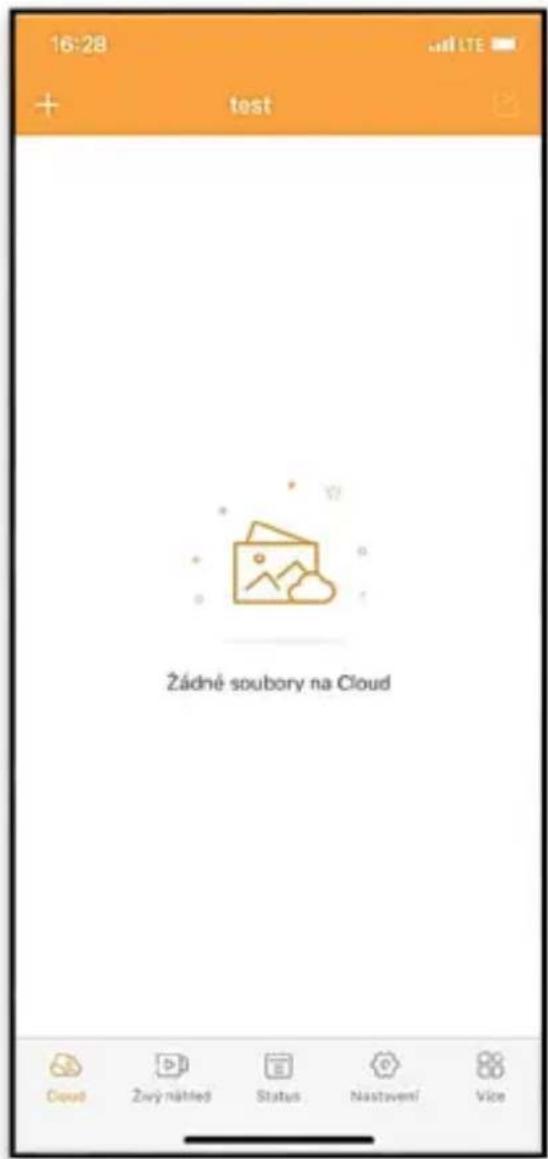
The first tab of the application is used to view the files stored by the camera on the Cloud. The files are sorted in descending order by date of acquisition.
If not all files are displayed, swipe down across the screen and hold for a moment. The data will be synchronised.
Files can be deleted in bulk or downloaded to your phone. Just
press the edit button in the top right corner, and then follow the icons on the screen. You can find the downloaded files in the app - bottom icon "More" and then "Gallery".
This tab is used to view the Live View, send commands for instant recording or browse files on the device (must have an active Live View - established connection to the camera).
Live View - To view the camera image, a SIM with an active data package must be inserted in the camera. To connect, press the arrow in the middle of the black screen - the connection may take several tens of seconds to establish depending on the device's signal quality and connection speed. To end the transfer, switch to another tab or close the application.
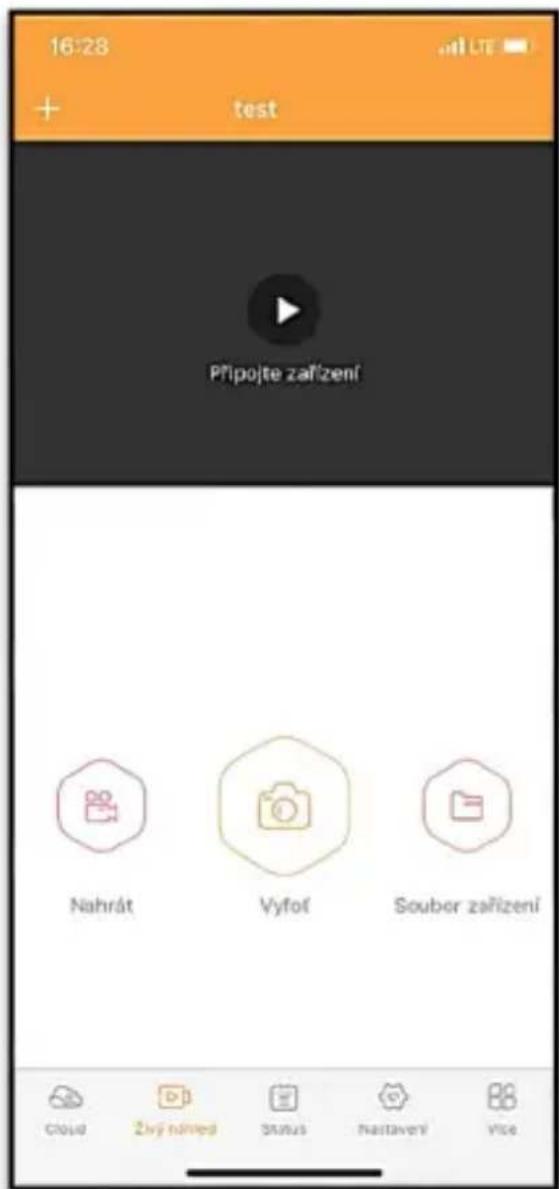
Recording - Pressing the "Record" or "Take Photo" button will capture a photo or video. The action is performed with a delay of a few seconds.
Files on the device - can only be used when Live View is active (a direct connection to the camera is established). You can browse, delete or copy files directly on the device. The downloaded files can be found in the app by clicking the bottom icon "More" and then the gallery.
8.2.3 Status
The "Status" tab is used to display the status of the camera. The status is always up-to-date as of the last data exchange between the server and the camera. You can use the pull-down gesture to update your status.
Signal - Displays the GSM signal level of the camera.
Battery - The current state of charge of the inserted battery. If the camera is connected to external power, it will show 100% charge.
SD card - Displays the percentage of SD card full.
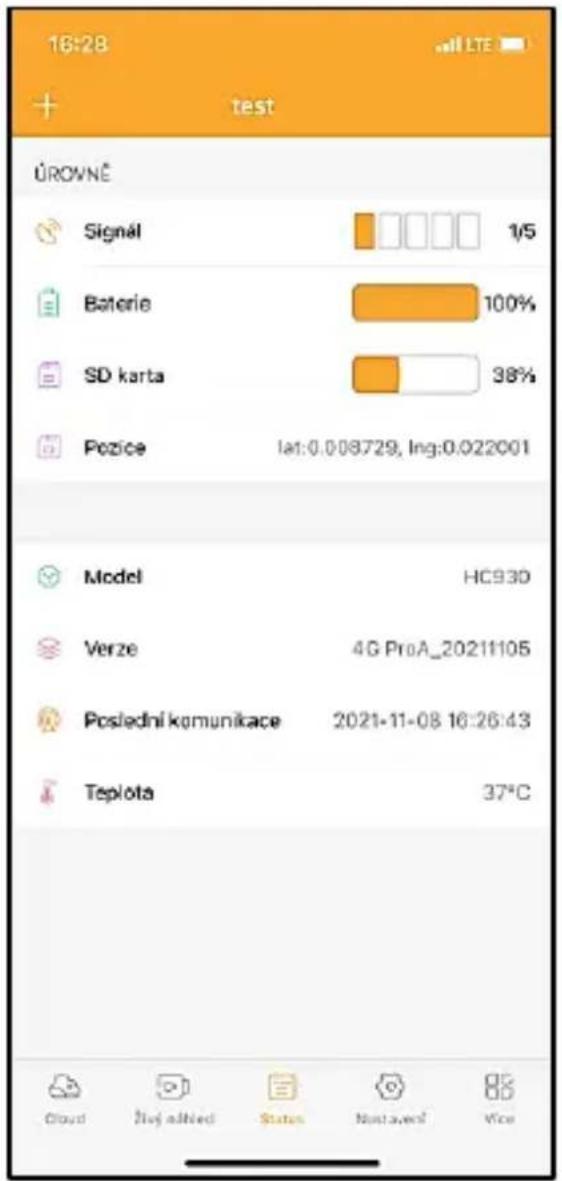
Position - Opens a menu where you can save the current location of the camera, using the map data and GPS on your phone. The camera is not equipped with a GPS module.
Model - Displays the model of your device.
Version - FW version of your camera.
Last communication - Time and date of the last synchronization with the camera.
Temperature - Device Temperature - If you will be using Live View for a long period of time or if the camera will be taking pictures or videos frequently, the temperature reading may be affected by the heat generated by the device during operation.
8.2.4 Settings
Settings can be made even when the camera is active. Every time you change the settings, you need to Save them using the button in the upper right corner, when saving you need to select Instant overwrite, otherwise the changes will be overwritten only during the next data exchange between the Camera and the server.
Basic
Mode - sets the mode in which the camera operates when activated - Photo/Video/Photo&Video/Time-lapse.
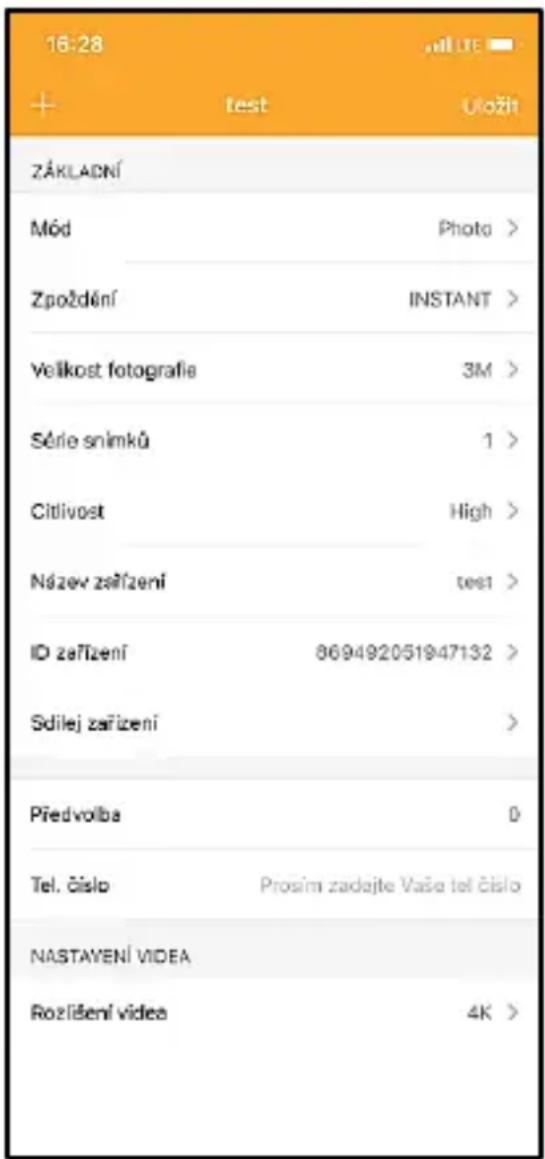
Delay - Interval between each activation. After taking a picture, the camera waits for a selected interval before taking another picture - this is used to eliminate unwanted alarms.
Photo size - You can set the resolution of the photos you take from 3 - 30Mpx - the larger the value, the more space the photos take up. The optimal value for most purposes is 16Mpx.
Burst - How many frames to take when the camera is activated.
Sensitivity - sets the sensitivity of the PIR sensor LOW low, MED medium, HIGH - high.
Device name - This is then displayed in notifications and can distinguish between cameras if you use multiple cameras in the app.
Device ID - IMEI number of the camera.
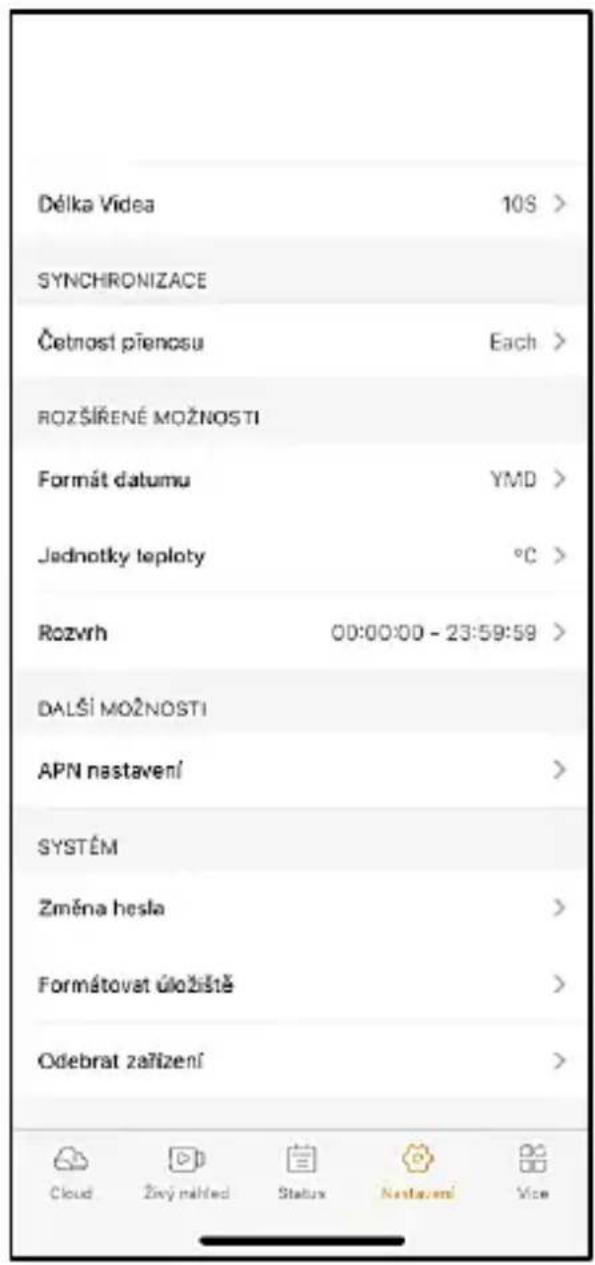
Share Device - Generates a QR code that another user on their phone can use to add the camera to the app.
Dial code - The international country code is entered, for example for CZ "420", for SK "421", for HU "36", for RO "40", for HR "385", for Si "386"
Tel. Number - Enter the Phone number of the SIM card that is inserted in the photo trap without an international area code.

WARNING: Without the Tel number of the SIM card inserted in the photo trap, the camera will not update the settings, nor will it take pictures or issue commands!
Daylight Saving Time - To turn daylight saving time on or off.
Video settings
Video Resolution - Sets the video resolution - VGA to 4K 30fps.
Video Length - The length of the video recording after the camera is activated.
Sync
Synchronisation settings
In the main sync settings menu, you can configure where and how the data will be sent, including selecting the transfer type (Cloud, Email, FTP) and other transfer parameters.
Frequency of transmission
This setting determines how often the data synchronisation will take place. The "Each" option indicates that synchronization will be performed each time new data is captured, for example, each time a video is recorded or after a certain time interval. The user can adjust this frequency to suit his needs.
Send to
Here you can choose where to send the data. There are various options to choose from, such as:
CLOUD - Data will be sent directly to cloud storage.
MAIL - Data is sent to the specified email address.
FTP - The data will be transferred to the FTP server. This method is suitable for users who prefer to manage their data directly on their own server.
CLOUD+MAIL - Combination of sending to the cloud and to email at the same time.
CLOUD+FTP - Combination of sending to the cloud and to an FTP server.
Email settings
If you choose to send data to email, you can specify a specific email address to which the recorded data will be sent. You can enter two email addresses separated by a comma, as follows: email1@email1.EU, email2@email2.eu
FTP
If you choose to synchronize to an FTP server, you must fill in the following information:
Server - The IP address or name of the FTP server where you want to send the data.
Port- Server port (usually 21 for unencrypted connections or 22 for secure SFTP transmission).
Email/Login - Login name to access the server.
Password - Password for the FTP server account.
PATH - The path where the data on the server should be stored.
Extended options
Date format - Change the Day/Month/Year ordering settings.
Temperature units - °C or °F
Schedule - Set the range when the camera should be active.
Other Options
APN Settings - APN is automatically set directly in the camera, you can check if the APN is correct in this.
System
Change Password - used to change the password to the Cloud, the basic password is "123456" if you change the password and forget it, you need to contact technical support at
service@evolveo.com to reset it.
Format Storage - Used to format the SD card inserted into the device - you will lose all data during formatting.
Remove device
Delete the current device from the app
9. Troubleshooting
9.1. The camera does not record photos/videos when moving
- Check the PIR sensor to see if it is damaged or blocked, for example by a leaf.
- Test the camera in places where there are no hot spots. The PIR sensor detects motion based on temperature difference, if the camera environment is overheated, the sensor is not activated.
- In some cases, the water level may cause the PIR sensor to activate unintentionally, in which case turn the camera away from the water level.
-
Set the camera so that it is not pointing directly at the ground.
-
Position the camera so that it does not move and large moving objects, such as a large tree, are not in the frame.
- At night, the device can detect movement outside the range of the IR night light, so no moving object will be detected in the photos.
- Sunset or sunrise may cause the recording to start unintentionally - change the camera position.
- If the animal/person in front of the camera moves quickly, the camera may not record them - move the camera further away from the objects (for example, further away from the path where the animals are moving).
9.2. The camera does not produce any images
- Make sure there is enough free space on the inserted SD card. If the old file overwrite function is disabled, the device no longer records after the SD card is full.
- Check that the Li-Ion battery has enough power to operate the photo trap.
- Make sure the switch is in the ON position and not OFF.
- Format the card on your computer to EXFAT format before using it for the first time.
- Check your SD card adapter - try a different adapter. Micro SD card adapters are very faulty.
9.3. Night light does not have sufficient range
- Make sure the battery in the device is charged, if the battery capacity is lower, typically below 15%, the night light may not activate.
-
For good quality night shots, place the camera in a dark environment with no other light sources.
-
Try to use the camera in locations where it will be surrounded by other objects that can reflect IR light. If you place the camera in an open area, the resulting photo will not be sufficiently illuminated. It's like shining a flashlight on the night sky, you won't see anything either, even if the flashlight is very powerful.
9.4. The camera does not send any images to the Cloud
- Make sure that the SIM card you have inserted has the PIN request deactivated.
- Make sure the SIM is activated and has enough data to transfer photos and livestream!
- Check that the correct international dialling code for your country is entered in the application in the format "XXX", e.g. for the Czech Republic "420".
- Make sure you save all settings in the app and give the app an immediate change.
- Make sure that the device has sufficient signal - there is a signal status indicator directly on the main screen of the camera - the signal strength may not always match the signal strength on your mobile phone, it may only show the signal strength of GSM networks at the moment!
9.5 Coordinates are not accurate - You assign coordinates according to your phone's GPS. This function is only used to enter the position of your device to record the location. The device cannot be actively searched by GPS - The camera has no GPS hardware.
10. Manual APN setting
Your device has a preset APN (Access Point Name) for each network. In case your network provider changes the settings for Internet access, you need to adjust these values manually. This is
a common occurrence and is not covered by the warranty repair claim. The customer can change the settings himself according to the following procedure.
To manually set the APN:
10.1 Insert the SIM and SD card:
Insert the SD card and SIM card into the device.
10.2 Switching on the device:
Switch the device to the TEST position and wait until the operator's name appears on the display.
10.3 Checking SIM registration on the network:
Once the SIM card is registered on the network, you can go to the device menu.
10.4 View APN settings:
In the device menu, go to the following section:
$$ \text { MENU } > \text { Network } > \text { APN } $$
Here you can view the current access point (APN) settings.
10.5 Comparison of settings:
Compare the displayed values with the settings you received from your operator. If the settings are different, a correction must be made.
10.6 Modifying the APN in the file:
The tmp_apnuser.csv file was created on the SD card after powering on and logging into the network.
Remove the card from the device and insert it into the computer.
Open the tmp_apnuser.csv file and change the APN, USER, and PASSWORD fields as specified by your operator. Save the changes and rename the file on the tab to apnuser.csv.
tmp_apnuser
| imsi | apn | username | password | timezone | operators | country | auth |
| 23001 | internet.t-mobile.cz | 1 | 0 |
10.7 Upload the modified file back to the device:
Insert the SD card back into the device when it is switched off.
Switch the device to the TEST position and the device will accept the new settings.
10.8 Check APN settings after change:
As before, in the device menu, go to:
MENU > Network > APN
Check that the settings are correct.
10.9 Connection functionality check:
If your internet connection still doesn't work, check the following:
- Check that the SIM card is not locked with a PIN code.
- Whether you have active data on your SIM card.
If the connection still doesn't work after all the steps, contact your network provider or technical support.
For further questions you can contact us at our support:
service@evolveo.com
The warranty does NOT cover:
- using the equipment for purposes other than those for which it is designed
- installing firmware other than that installed on the device
- electrical or mechanical damage caused by improper use
- damage caused by natural elements such as water, fire, static electricity, power surges, etc.
- damage caused by repairs carried out by an unqualified person
- illegible serial number
- battery capacity drops after 6 months of use (6 month battery life guarantee)
Thank you for reading this far! As a reward we have a discount code for 15% discount on all photo traps and accessories in our e-shop eshop.evolveo.cz. Just enter the code MANUAL15 in the cart when completing your order.

Disposal
The crossed-out container symbol on the product, in the accompanying documentation or on the packaging reminds you that in EU countries, all electrical and electronic equipment, batteries and accumulators must be disposed of separately at the end of their useful life as part of sorted waste. Do not dispose of these products in unsorted municipal waste.
①CE
DECLARATION OF CONFORMITY
Abacus Electric, s.r.o. hereby declares that the EVOLVEO StrongVision Dual PRO video baby monitor complies with the requirements of the standards and regulations that are relevant for the type of device, including the RED Directive (2014/53/EU) and the following standards:
EN 300 328: Electromagnetic compatibility and radio spectrum (ERM) for broadband transmission systems.
EN 301 489-1: Electromagnetic compatibility (EMC) for radio equipment and services.
EN 301 489-17: Specific conditions for broadband data transmission systems.
EN 62368-1: Audio/video, information and communication technologies - Safety requirements.
EN 62479: Evaluation and demonstration of conformity of radio equipment and equipment connected by low frequency power.
The full text of the Declaration of Conformity can be found at http://ftp.evolveo.com/ce/
Importer / Manufacturer
Abacus Electric, s.r.o.
Planá 2, 370 01, Czech Republic
Made in PRC
Copyright © Abacus Electric, s.r.o.
www.evolveo.com
www.facebook.com/EvolveoCZ
All rights reserved.
The appearance and technical specifications of the product are subject to change without notice.
Tartalomjegyzék
natural_image
Black and white photo of a military-style container with camouflage pattern and two labeled buttons (1 and 2), no visible text or symbols on the main body.Copyright © Abacus Electric, s.r.o.
www.evolveo.com
www.facebook.com/EvolveoCZ
Minden jog fenntartva.
natural_image
Black and white photo of a military-style container with camouflage pattern and two labeled buttons (1 and 2), no visible text or symbols on the main body.8.2 Controlul aplicatiei 8.2.1 Cloud
Copyright © Abacus Electric, s.r.o.
www.evolveo.com
www.facebook.com/EvolveoCZ
natural_image
Black and white photo of a military-style container with camouflage pattern and two labeled buttons (1 and 2), no visible text or symbols on the main body.Copyright © Abacus Electric, s.r.o.
www.evolveo.com
www.facebook.com/EvolveoCZ
natural_image
Black and white photo of a military-style container with camouflage pattern and two labeled buttons (1 and 2), no visible text or symbols on the main body.Copyright © Abacus Electric, s.r.o.
www.evolveo.com
www.facebook.com/EvolveoCZ

| 1. | Priključak za antenu (za vanjsku upotrebu antena uvijek mora biti pričvršćena) |
| 2. | 2,4" LCD zaslon u boji |
| 3. | Kontrolne tipke |
| 4. | Glavni prekidač: OFF – TEST – ON |
| 5. | Li-lon baterija od 8 000 mAh |
| 6. | Priključni kabel za napajanje – ne smije biti prekinut. U slučaju oštećenja izvadite bateriju i pošaljite uređaj u ovlašteni servis. |
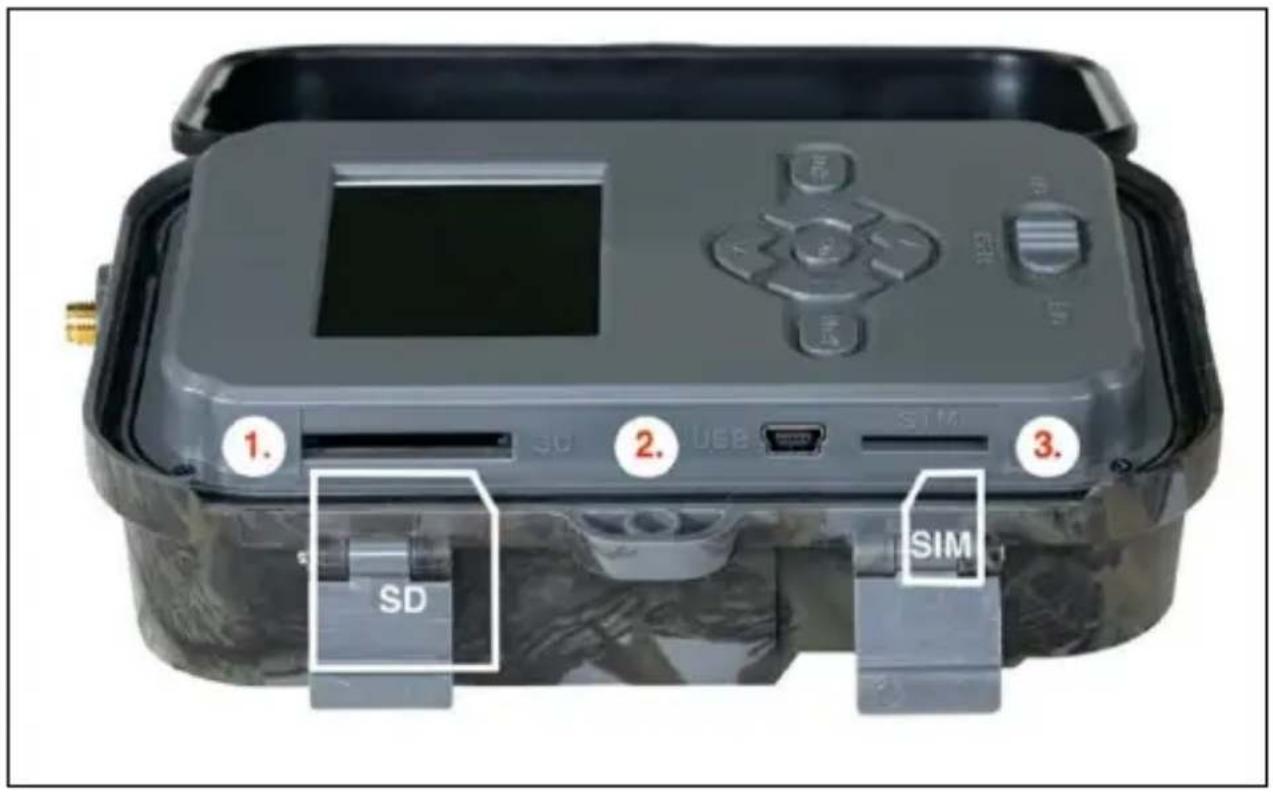
| 1. | Utor za SD karticu (maks. veličina 256 GB) |
| 2. | USB-C konektor za spajanje s PC(Mass Storage) |
| 3. | Utor za SIM karticu (Mini SIM format) |
natural_image
Black and white photo of a military-style container with camouflage pattern and two labeled buttons (1 and 2), no visible text or symbols on the main body.| 1. | Konektor za napajanje DC 9–12 V/2A(Puni umetnutu bateriju!) |
| 2. | Navoj za stativ 14 " |
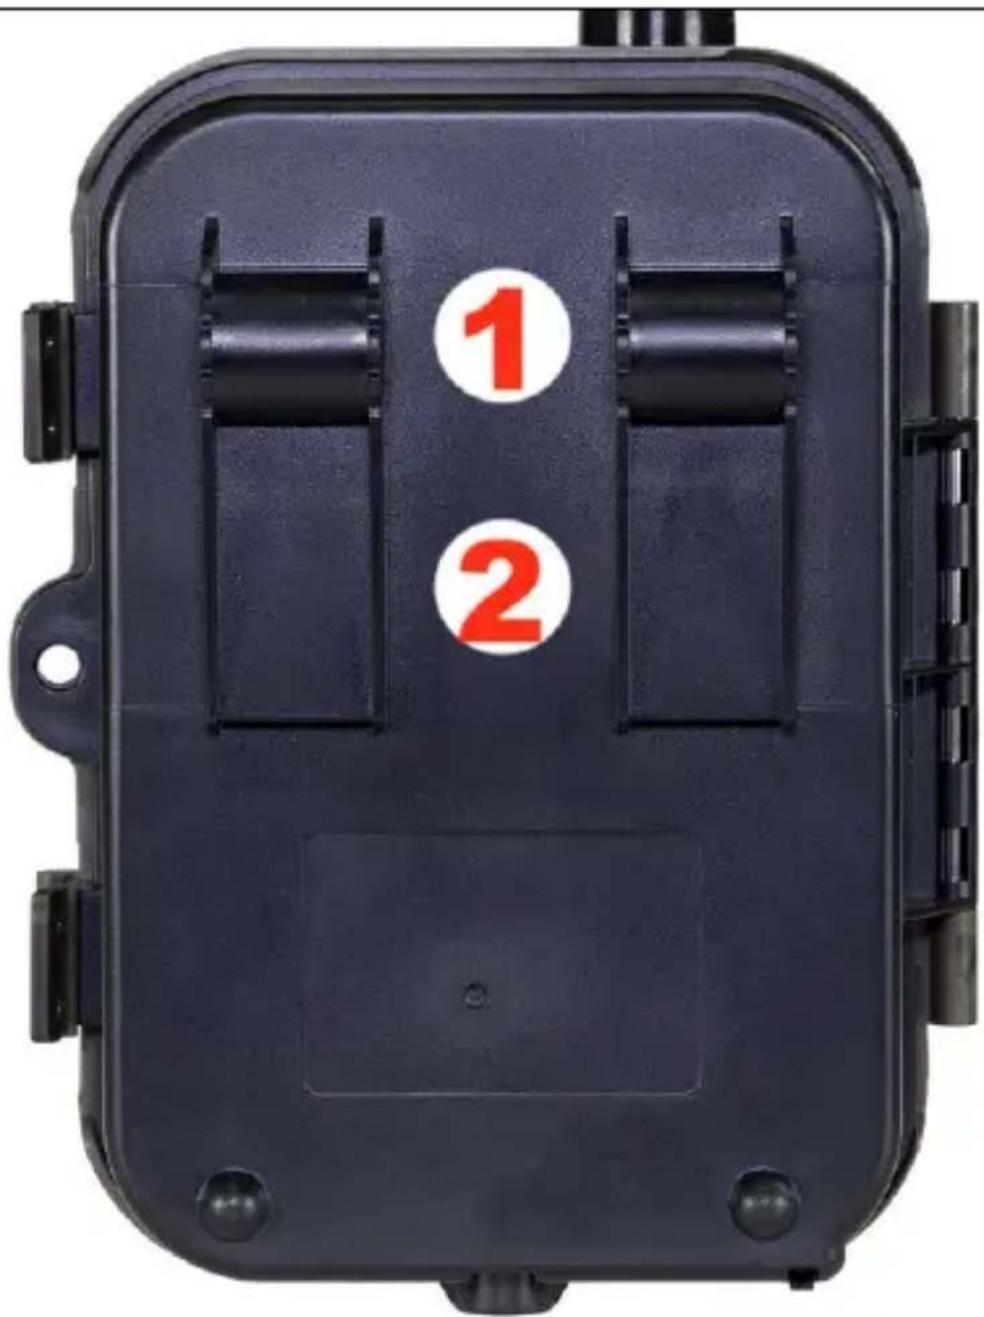
| 1. | Učvršćenje za kabelsku bravu (SGV CAM-LOCK)maks. promjera 12 mm |
| 2. | Učvršćivanje za pojas |
5. Izbornik
| 1. Mreža | ID uređaja | Generira QR kod/IMEI za dodavanje u aplikaciju. |
| Aplikacija iOS | Generira QR kod za preuzimanje aplikacije za Apple uređaje. | |
| Android aplikacija | Generira QR kod za preuzimanje aplikacije za Google uređaje. | |
| Prikazuje navedene postavke za slanje e-pošte – postavke pomoću aplikacije. | ||
| FTP | Prikazuje postavke za FTP poslužitelj – postavke pomoću aplikacije. | |
| APN | Prikazuje korištene APN postavke – Unosi se automatski. | |
| 2. Poslati | Cloud | Snimljene snimke šalju se u cloud. |
| Snimljene snimke šalju se na odabranu mail adresu. | ||
| Cloud+Mail | Snimljeni zapisi šalju se u cloud i na odabranu e-adresu. | |
| FTP | Snimljene snimke šalju se na FTP. | |
| Cloud+FTP | Snimljene snimke šalju se u cloud i na FTP. | |
| 3. Režim | FotoaparatVideo | U ovom načinu rada kamera će snimati samo slike.U ovom režimu rada kamera će snimati samo video. |
| Fotoaparat & Video | Kamera će snimati i slike i video. | |
| Time lapse snimci | U ovom načinu rada kamera će snimati slike prema odabranom vremenskom intervalu. | |
| 4. Rezolucija | Postavke rezolucije za video snimanje: 4K, 2K, 1080 p, 720 p ili VGA. | |
| 5. Dužina video | Postavljanje duljine video zapisa: 5 s, 10 s, 30 s, 60 s ili 90 s. | |
| 6. Zvučni zapis | Ako odaberete uključeno, snimat će zvuk prilikom snimanja. | |
| 7. Veličina slike | Promijenit će rezoluciju u kojoj će slike biti snimljene, možete birati između 30, 24, 20, 16, 12, 8, 5, 3 Mpx, što je veća rezolucija, to će biti veća datoteka spremljena i prebačena u cloud! | |
| 8. Interval | Interval je vrijednost za razdoblje neaktivnosti nakon otkrivenog kretanja. Ako je kamera aktivirana pomoću PIR senzora, kamera će izvršiti potrebnu radnju i nakon završetka pokretačekat će određeno vrijeme prije ponovnog snimanja. Vrijednosti: 1 s, 10 s, 1 min, 3 min, 5 min, 10 min, 15 min ili 30 min. | |
| 9. Interval ubrzan og snimka (Timelapse) | Postavljanje intervala snimanja u načinu rada Timelapse. Slike će biti snimljene u odabranom intervalu. Mogućnost postavljanja sljedećih vrijednosti: 5 min, 30 min, 1 h, 2 h, 3 h, 6 h, 12 h ili 24 h. | |
| 10. Slijed | U režimu rada Foto, Foto&Video i Timelapse, postavlja koliko slika će biti snimljeno nakon aktivacije. Može se postaviti: 1,3,6 ili 9 slika. | |
| 11. ISO | ISO osjetljivost, jednostavno rečeno, što je okolina tamnija, to je vrijednost veća. Ako niste sigurni u postavku, ostavite je u automatskom načinu rada. Može se postaviti: AUTO, ISO 100, ISO 200, ISO 400, ISO 800 i ISO 1600. | |
| 12. Presni mavanje | UKLJ. – Kada je SD kartica puna, najstarije datoteke će se presnimiti.ISKLJ. – Kad je SD kartica puna, slike se više ne pohranjuju. | |
| 13. PIR osjetljiv ost | Postavke osjetljivosti PIR senzora. Ako postoji neželjena aktivacija, osjetljivost se može smanjiti. Može se postaviti: Niska, Srednja, Visoka ili Isključena. | |
| 14. Jezik | Postavljanje jezika u izborniku. | |
| 15. Frekven cija | Frekvencijski filtar umjetne rasvjete. Ako video treperi, možete promijeniti postavke, te probati je li ta pojava minimizirana. Izbor 50 ili 60 Hz. | |
| 16. Frekven cija prijeno sa | Postavke za prijenos snimaka s kamere u Cloud. 1x, 2x, 6x, 12x dnevno ili svaku snimljenu sliku. Što je manje prijenosa, to je duže vrijeme rada. | |
| 17. ID kamere | Naziv koji će se pojaviti u pečatu na snimljenim slikama. | |
| 18. Lozinka /PIN | Osiguranje PIN-om, kada uključite funkciju upisujete novi PIN kojeg uređaj traži pri svakom pokretanju. | |
| 19. Mjerač vremen a | Na zaslonu postavljate vrijeme kada uređaj treba biti aktivan, ostatak dana uređaj neće fotografirati. | |
| 20. Datum/ Vrijeme | Postavite datum, vrijeme i format. Postavite strelicama, potvrdite pritiskom na tipku OK. | |
| 21. Formatiranje | Formatira memoriju SD kartice – podaci na Cloudu neće biti izbrisani. | |
| 22. Zadane postavke | Izbrisat će sve postavke u kameri, ali uređaj će preuzeti postavke iz oblaka prilikom sljedeće sinkronizacije. | |
| 23. Verzija | Trenutna verzija FW-a |
UPOZORENJE: Bez Tel broja SIM kartice koja je umetnuta u fotozamku, kamera neće ažurirati promjene postavki, niti snimati slike ili video na naredbu!
Copyright © Abacus Electric, s.r.o.
www.evolveo.com
www.facebook.com/EvolveoCZ
Sva prava pridržana.
Izgled i tehnička specifikacija proizvoda mogu se promijeniti bez prethodne napomene.
- Obsah / Contents / Inhalt / Tartalom / Indice / Conținut / Sadržaj
- Obsah
- Contents of the package
- First launch Application
- WARNING:
- Adding a device to the application
- Technical specifications
- General
- Photographs
- Power supply
- Connectivity
- Description of the device
- Menu
- Media Browser
- Shooting directly from the menu
- Application
- Download the application:
- Controlling the application 8.2.1 Cloud
- Status
- Settings
- Basic
- Video settings
- Sync
- Synchronisation settings
- Frequency of transmission
- Send to
- Email settings
- FTP
- Extended options
- Other Options
- System
- Remove device
- Troubleshooting
- The camera does not record photos/videos when moving
- The camera does not produce any images
- Night light does not have sufficient range
- The camera does not send any images to the Cloud
- Manual APN setting
- Insert the SIM and SD card:
- Switching on the device:
- Checking SIM registration on the network:
- View APN settings:
- Comparison of settings:
- Modifying the APN in the file:
- Upload the modified file back to the device:
- Check APN settings after change:
- Connection functionality check:
- The warranty does NOT cover:
- Disposal
- ①CE
- DECLARATION OF CONFORMITY
- Tartalomjegyzék
- Controlul aplicatiei 8.2.1 Cloud
- Izbornik
Brand : Evolveo
Model : StrongVision DUAL PRO
Category : Uncategorized