
BVSTDC02B - Coffee maker OSTER - Free user manual and instructions
Find the device manual for free BVSTDC02B OSTER in PDF.


| Product Type | Single-Serve Coffee Maker with Milk Frother |
| Model | BVSTDC02B |
| Brand | Oster |
| Voltage | 220 V~ (127 V~ for certain models) |
| Frequency | 50 / 60 Hz |
| Power | 1400 W |
| Water Reservoir Capacity | 16 oz (max fill line) |
| Included Tumbler Capacity | 650 mL (22 oz) |
| Brew Types | Hot Coffee, Iced Coffee (Over Ice) |
| Frothing Functions | Hot Froth (for lattes/cappuccinos), Cold Foam |
| Frothing Jar Material | Plastic with silicone sleeve |
| Frothing Whisk | Detachable, dishwasher safe |
| Reusable Coffee Filter | Nylon, dishwasher safe |
| Brew Basket | Dishwasher safe |
| Tumbler, Lid, Straw | Hand wash only, BPA-free |
| Drip Tray | Removable, hand wash |
| Safety Features | Auto shut-off, cool-touch handles, scald protection |
| Warranty | 1 year limited warranty |
| Dimensions (approx) | 12 x 8 x 10 inches |
| Weight (approx) | 3.5 lbs |
| Material | Plastic, stainless steel (heating element) |
Frequently Asked Questions - BVSTDC02B OSTER
User questions about BVSTDC02B OSTER
0 question about this device. Answer the ones you know or ask your own.
Ask a new question about this device
Download the instructions for your Coffee maker in PDF format for free! Find your manual BVSTDC02B - OSTER and take your electronic device back in hand. On this page are published all the documents necessary for the use of your device. BVSTDC02B by OSTER.
USER MANUAL BVSTDC02B OSTER
natural_image
Black Oster brand hairdryer with two variants of product packaging, no visible text or symbols on the device itself.MODELOS
MODELS
BVSTDC02B
READ ALL INSTRUCTIONS BEFORE USING THIS APPLIANCE
INTRODUCCIÓN
natural_image
Three different mugs: a gray mug, a clear glass with a white liquid, and a clear glass filled with ice (no text or symbols visible)natural_image
Glass of ice cream with straw, no visible text or symbolsHAGAMOS CAFÉ CALIENTE!
natural_image
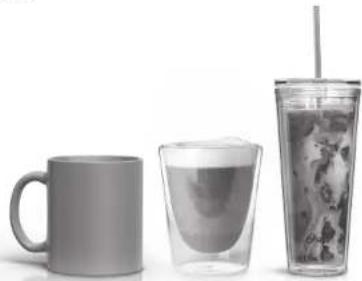
Close-up of mechanical components with no visible text or symbolsHey! Welcome to the Oster® Product Family and congratulations on the purchase of your new Oster® Coffee with Milk coffeemaker. Your coffeemaker brings the coffeehouse home with the ability to make iced and hot coffee and froth milk with one machine. Easily create lattes and cappuccinos with the step-by-step guide and integrated measuring system. To create refreshing iced coffee, follow the suggested measures for water and ice, and the scoop to measure coffee grounds. The perfect ratio of hot, concentrated coffee is brewed over the ice, leaving you with flavorful iced coffee that's never watered down. Your coffeemaker can also make single servings of pod-free hot coffee, giving you better taste and reducing waste. As always, Oster® creates the great tasting coffee and you make it special – add in your favorite flavorings and mix-ins to customize exactly how you like it! Our number one goal is to give you great-tasting coffee every time. If you have any questions about your new Oster® Cofleemaker, please contact us at any of the authorized Oster service centers.
natural_image
Three items: a gray mug, a glass of water with a straw, and a tall glass of ice cream (no text or symbols visible)IMPORTANT SAFEGUARDSINT
When using electrical appliances, basic safety precautions should always be followed to reduce the risk of fire, electric shock, and/or injury to persons including the following:
- Do not touch hot surfaces. Use handles or knobs.
-
To protect against electric shock, do not place or immerse cord, plugs, or appliance in water or other liquid. Avoid spilling water on the connector.
-
This appliance is not intended for use by children or by persons with reduced physical, sensory, or mental capabilities, or lack of experience and knowledge, unless they have been given supervision or instruction concerning use of the appliance by a person responsible for their safety. Children should be supervised to ensure that they do not play with the appliance. Keep the appliance and its cord out of reach of children.
-
Cleaning and user maintenance shall not be made by children without supervision.
-
Unplug from outlet when either the appliance or display clock (if provided) is not in use, and before cleaning. Allow to cool before putting on or taking off parts, and before cleaning the appliance.
-
Do not operate any appliance with a damaged cord or plug or after the appliance malfunctions, or has been damaged in any manner. Return appliance to an Authorized Service Center for examination, repair or adjustment. Do not attempt to replace or splice a damaged cord.
-
The use of an accessory not recommended by the appliance manufacturer for use with this appliance may result in fire, electric shock or injury to persons.
-
Do not use outdoors.
-
Do not let cord hang over edge of table or counter, or touch hot surfaces.
-
Do not place on or near a hot gas or electric burner, or in a heated oven.
-
Always attach plug to appliance first, then plug cord into the wall outlet (for appliances with detachable cords). To disconnect, turn any control to the off position, then remove plug from wall outlet.
-
Do not use appliance for other than intended use. Misuse can cause injuries. Always use appliance on a dry, stable, level surface. Never fill beyond the MAX fill line when a MAX fill line is provided.
-
All lids should be closed during use.
-
Scalding may occur if the lid is removed or brew basket door is opened during or immediately after the brewing cycles. Contents may be hot. Allow to cool before opening the lid.
-
The heating base and heating element is subject to residual heat following a brewing cycle. Do not touch heating base or heating element immediately after a brewing cycle. Allow to cool before handling.
-
Do not place the appliance in a cabinet when in use.
English-1 English-2
For appliances with sealed capsules
- WARNING: To avoid the risk of injury, never open or disengage the brew chamber during the brew cycle.
- Only use capsules intended for this appliance. If the capsule does not fit, do not force the capsule into the appliance.
For appliances with glass containers: - The container is designed for use with this appliance. It must never be used on a range top.
- Do not set a hot container on a wet or cold surface.
- Avoid sudden temperature changes, such as rinsing, washing, filling, or immersing a hot container with cold liquids.
- Do not use a cracked or chipped container or a container having a loose or weakened handle.
- Do not clean container with cleansers, steel wool pads, or other abrasive material.
SAVE THESE INSTRUCTIONS
This appliance is intended to be used in household and similar applications such as:
– Staff kitchen areas in shops, offices and other working environments;
- Farm houses;
– By clients in hotels, motels and other residential type environments;
- Bed and breakfast type environments
PRODUCT NOTICES
- Place the appliance on a hard, flat, level surface to avoid interruption of airflow underneath the coffeemaker.
- Glass decanters only: Discard the decanter immediately if it is ever boiled dry.
- Glass decanters only: Protect the decanter from sharp blows, scratches or rough handling.
- Do not operate the appliance with an empty water tank.
- Keep the area above the appliance clear during use, as hot steam will escape the appliance.
GET TO KNOW YOUR SINGLE SERVE COFFEEMAKER & FROTHER
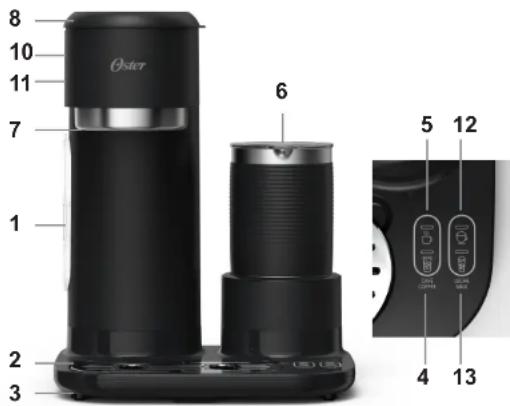
1. Scoop Storage
- Drip tray – helps keep countertop tidy and free from mess. Clean after a few uses to prevent any overflow
- Drip tray cover – handwash only
- Over ice button – press to brew refreshing single servings of iced coffee
- Hot brew button – press to brew flavorful single servings of hot coffee
- Frother jar Frothing jar – is dishwasher safe Frothing jar lid – is dishwasher safe Frothing whisk – is dishwasher safe
- Brew spout – place your cup or tumbler underneath to catch your delicious brew
8. Lid
- Showerhead
- Reusable coffee filter – is dishwashable
- Brew basket – is dishwashable, insert filter filled with grounds here
- Hot Froth – press to make hot froth for lattes or cappuccinos
- Cold Foam – press to make cold foam for iced lattes/cappuccinos
English-3 English-4
GET TO KNOW YOUR SINGLE SERVE COFFEEMAKER & FROTHER
natural_image
Illustration of various household appliances including a bucket, a cup, a glass with 'Oster' label, and two small accessories (no text or symbols on main objects)CLEAN COFFEEMAKER BEFORE FIRST USE
Just follow these simple steps:
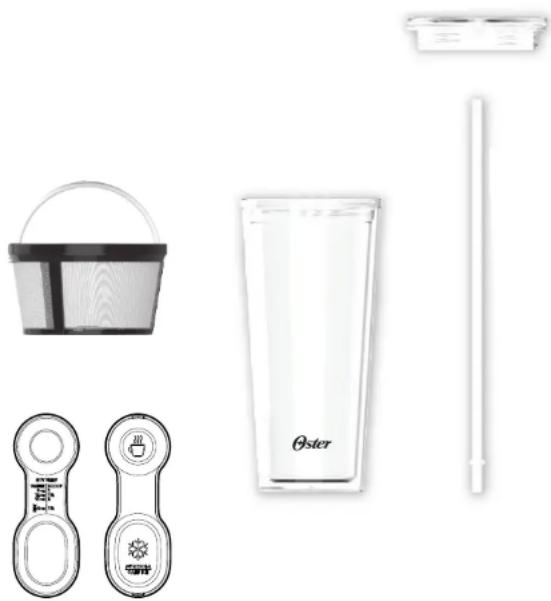
- Wash the frother jar, frothing whisk, frothing jar lid, tumbler, tumbler lid, tumbler straw, reusable coffee filter, coffee ground scoop and brew basket in a mixture of mild detergent and water. Rinse each thoroughly.
- Fill the reservoir up to the 16 oz mark with water. Replace brew basket in position and nylon filter (or paper 5-cup basket style paper filter) into brew basket.
- Position tumbler under brew spout, plug in unit and press ☐. NOTE: the unit is on when the LED is lit.
- When brewing is complete, discard water from tumbler and rinse tumbler thoroughly with clean water.
- Your Oster ^® Latte coffeemaker is now ready for use! NOTE: Wait a few minutes before brewing your next coffee to allow the heater to cool. It is normal for steam to occur if brewing back to back.
DISHWASHER SAFE PARTS OF YOUR COFFEEMAKER
To thoroughly clean your coffeemaker, you can put the following parts into the top-rack of the dishwasher:
-
Reusable coffee filter
-
Milk frothing jar
-
Frothing whisk
-
Brew basket
-
Frother jar lid
CAUTION: The electrical base, power cord and plug are not dishwasher safe and should never be immersed in water or other liquids.
Coffee ground scoop – dual sided for measuring iced or hot coffee grounds
Oster Iced Tumbler – is 650 mL/22oz double-wall insulated and BPA-free, handwash only
Lid – handwash only, BPA-free
Straw – handwash only, BPA-free
Reusable coffee filter - is dishwashable
English-5 English-6
FROTHING MILK TYPES
Experiment and Find Your Favorite Type! Not all alternative milk brands froth the same
| Whole Milk | Preferred | milk type for creating a thick, creamy froth and the best outcome for a latte or cappuccino. |
| Reduced Fat Milk | Creates a lighter foam due to lower fat content. Skim milk will create a more stable foam that is easier to shape. | |
| Oat Milk | Foam results | vary based on different brands. Try using an oat milk based creamer for better results! |
| Almond Milk | Creates | smaller foam bubbles which will dissipate quickly. Try using an almond based creamer for better results! |
NOTE: Frothing results might vary for hot and cold milk.
- Plug the coffeemaker in.
- Ensure that your whisk is properly placed at the bottom of the frother jar by clicking in place and securely fastening it.
- Add the milk of your choice to the latte line indicator in the frothing jar. NOTE: Do not fill frothing jar past lines for best froth outcome.
- Place frothing jar on mount. Put lid back on the frothing jar.
- Plug the coffeemaker in.
- Ensure that your whisk is properly placed at the bottom of the frother jar by clicking in place and securely fastening it.
- Add the milk of your choice to the cappuccino line indicator in the frothing jar.
NOTE: Do not fill frothing jar past lines for best froth outcome. -
Place frothing jar on mount. Put lid back on the frothing jar.
-
Press the button (depending on your model). Ensure the LED is illuminated and frothing will begin. Frothing jar will stop automatically once the cycle is complete.
NOTE: Do not fill frothing jar past lines for best froth outcome. Do not remove frothing jar from mount mid-cycle. If removed, turn off frother by pressing Hot/Cold button again. Cycle will need to be re-started if desired.
-
Add frothed milk into cup. NOTE: the use of a tall cup is recommended to avoid splatter.
-
Press the button (depending on your model). Ensure the LED is illuminated and frothing will begin. Frothing jar will stop automatically once the cycle is complete.
NOTE: Do not fill frothing jar past lines for best froth outcome. Do not remove frothing jar from mount mid-cycle. If removed, turn off frother by pressing Hot/Cold button again. Cycle will need to be re-started if desired.
- Add frothed milk into cup. NOTE: the use of a tall cup is recommended to avoid splatter.
NOTE: Clean frothing jar after each use and wait a minute or so before frothing again to allow the heater to cool down.
CAUTION: Please ensure to handle frothing jar by the silicone sleeve as the bottom of the frothing jar gets hot. Do not touch frothing warming plate after use as it is hot.
- Lift the lid of the unit and pour the water in to the water reservoir to the 4-ounce mark. Discard any excess water.
- Place the reusable coffee filter (or standard 5-cup basket-style paper filter) into the brew basket. Make sure the basket is properly placed in for the lid to close.
- Using the hot side of the coffee spoon, add 2 scoops of coffee grounds to the coffee filter. Move the shower head over the coffee filter and grinds and close the lid. NOTE: If you want a mild coffee, put between 1 - 1 1/2 scoops of coffee grounds.
-
Place the mug with the foamed milk under the brew head. Press the button – ensure the LED is illuminated.
-
Wait until the brewing process is done and enjoy!
CAUTION: Do not open the reservoir lid until it has cooled down, hot steam could come out.
English-7 English-8
LET'S MAKE AN ICED LATTE OR CAPPUCCINO!
- Plug the coffoemaker in. Add clean filtered water to your Oster Iced tumbler to brew a concentrated coffee shot. Lift the lid of the unit and pour the water in to the water reservoir to the 4-ounce mark. Discard any excess water in your tumbler.
- Place the reusable coffee filter (or standard 5-cup basket-style paper filter) into the brew basket. Make sure the basket is properly placed in for the lid to close.
- Using the HOT side of the coffee scoop, add 2 scoops of coffee grounds to the coffee filter. Move the shower head over the coffee filter and grinds. Close the lid. NOTE: If you want a mild coffee, put between 1 - 1 1/2 scoops of coffee grounds.
- Fill your Oster Iced Tumbler with ice to the Ice line indicator.
- Place the tumbler under the brew head. Press the button – ensure the LED is illuminated.
- While your coffee is brewing, prepare your frothed milk. NOTE: Before adding milk, ensure that your whisk is properly placed at the bottom of frother jar by clicking in-place and securely fastening it.
For an Iced Latte:
-
Add the milk of your choice to the latte line indicator in the frothing jar. NOTE: Do not fill frothing jar past the line
-
Place frothing jar on mount. Put lid back on the frothing jar. Press the button to create a creamy cold foam. Ensure the LED is illuminated and frothing will begin. Frothing jar will stop automatically once the cycle is complete. NOTE: Do not remove frothing jar from mount mid-cycle. If removed, turn off frother by pressing button again.
-
Pour frothed milk into mug and enjoy.
For an Iced Cappuccino:
-
Add the milk of your choice to the cappuccino line indicator in the frothing jar. best froth results.
-
Place frothing jar on mount. Put lid back on the frothing jar. Press the button to create a creamy cold foam. Ensure the LED is illuminated and frothing will begin. Frothing jar will stop automatically once the cycle is complete. NOTE: Do not remove frothing jar from mount mid-cycle. If removed, turn off frother by pressing button again.
-
Pour frothed milk into mug and enjoy.
English-9 English-10
- Plug the coffeemaker in.
- Fill the tumbler to the "WATER" marking with clean, filtered water.
- Lift the lid of the unit and pour the water into the reservoir.
- Place the reusable coffee filter (or standard 5-cup basket-style paper filter) into the brew basket. Make sure the basket is properly placed in for the lid to close.
- Using the ICED side of the coffee scoop ⚙, pour 1 scoop of ground coffee into the reusable coffee filter. Close the lid. NOTE: if you want a bolder cup of iced coffee, you can use 1½ - 2 scoops of ground coffee.
-
Fill the tumbler with large ice cubes to the "ICE" marking.
-
Place tumbler full of ice under brew spout and press the button – ensure the LED is illuminated.
-
Wait 2-3 minutes for brewing to complete. Once dripping slows and stops, grab tumbler from underneath the spout. NOTE: a few sparse coffee drips may come from the brew spout post brew – the drip tray will catch these and keep your countertop mess free.
-
Optional: Add in your favorite coffee mix-ins for coffee just how you like it.
-
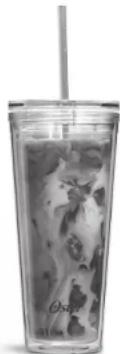
Insert the straw in lid, place on tumbler and enjoy!
natural_image
Glass of ice cream with straw, no visible text or symbols- Plug the coffeemaker in.
- Grab desired coffee cup or mug and fill with as much water as you would like coffee. Tip: Taller coffee mugs work best to avoid any splashing during brewing.
- Pour water into the reservoir. Observe how much water your poured on the water ladder. NOTE: do not pour above 16 oz. max fill line as water reservoir will overflow.
- Place reusable coffee filter in brew basket. Make sure the basket is properly placed in for the lid to close.
natural_image
Close-up of a mechanical component with internal cavities and a handle (no visible text or symbols)- Using the HOT side of the coffee scoop ☐, measure coffee grounds that correspond to amount of water poured. Pour coffee grounds into reusable coffee filter.
NOTE: if you prefer bolder hot coffee, you can use an extra 1/2 - 1 scoop of coffee grounds.
TIP: remove the coffee filter while filling with coffee grounds to prevent accidental spills into the water reservoir
HOT BREW
| Water | Scoop |
| 8 oz | 1 |
| 12 oz | 112 |
| 16 oz | 2 |
- Close the lid.
- Place the mug that was used to measure water under the drip spout. Press "m" button.
- Add in your favorite coffee mix-ins for coffee just how you like it. Enjoy!
English-11 English-12
FAQ
Why is the hot brew or over ice button flashing?
Please wait until the button is no longer flashing before brewing your cup of coffee.
Why is my milk not frothing?
- Make sure your whisk is properly inserted at the bottom of your frothing jar.
- Ensure you're not adding milk past the latte/cappuccino line in the frothing jar.
• Try using a different kind or brand of milk. - Try adding an extra 1/2-1 scoop of coffee grounds.
- Try using finer coffee grounds.
• Try selecting the Ⓐ setting for Hot Coffee, as this pre-infuses the coffee for best extraction.
My iced or hot coffee isn't strong enough for my taste – what now?
Is the tumbler dishwasher safe?
No, the tumbler, lid and straw should be hand-washed only.
Why is there no ice left in my cup after brewing iced coffee?
Try using bigger ice cubes when making your iced coffee – these will melt slower and give you ice in your drink for longer! Also be sure you have filled your tumbler all the way to the "ICE" marking.
Why are there coffee grounds in my coffee?
You may have over-filled your reusable coffee filter with coffee grounds, and they could have spilled over the top. Although this is uncommon, try using a little less grounds next time and that should solve this problem! Decaf coffee can also cause grounds to spill over the top, try using a little less grounds next time. Using a paper filter inside of the permanent filter can also cause grounds to spill over the top.
Can I use a different tumbler or cup for making iced coffee?
Sure thing! Just ensure you keep the same ratio of water-ground-ice to create the best tasting iced coffee!
Why does my coffeemaker continue to drip after the light turns off?
Using paper filters can cause dripping to continue for longer. We suggest using the included nylon filter.
Why does HOT coffee come out for an ICED coffee?
The coffee maker for iced coffee works through a regular drip coffee extraction method; that is, the coffee is prepared directly in the glass with ice, in this way it is cooled little by little until it is with the perfect consistency for an iced coffee of a delicious flavor. Coffee has to be prepared first before it can cool down; therefore, the coffee maker does NOT prepare iced coffee but prepares regular hot coffee and pours it directly into the glass with ice to make it iced later after it cools in the glass.
Oster®
| Características Eléctricas / Electrical Characteristics | |||
| Modelo / Model Voltaje/Voltage Frecuencia/Frequency Potencia/Power | |||
| BVSTDC02B-054 220 V~ 50 Hz 1 400 W | |||
| BVSTDC02B-052 220 V~ 50 Hz 1 400 W | |||
| BVSTDC02B-013 127 V~ 60 Hz 1 400 W | |||
© 2023 Sunbeam Products, Inc. All rights reserved. One year limited warranty – please see insert for details.
www.oster.com
OSTERLATINO / OSTERBRASIL

YouTube


Impreso en China
Printed in China
P.N. NWL0001463661
Latte coffeemaker_BVSTDC02B_22SEPM1 (LA)-GCDS_SL
- INTRODUCCIÓN
- HAGAMOS CAFÉ CALIENTE!
- IMPORTANT SAFEGUARDSINT
- For appliances with sealed capsules
- SAVE THESE INSTRUCTIONS
- PRODUCT NOTICES
- GET TO KNOW YOUR SINGLE SERVE COFFEEMAKER & FROTHER
- Scoop Storage
- Lid
- CLEAN COFFEEMAKER BEFORE FIRST USE
- DISHWASHER SAFE PARTS OF YOUR COFFEEMAKER
- FROTHING MILK TYPES
- LET'S MAKE AN ICED LATTE OR CAPPUCCINO!
- For an Iced Latte:
- For an Iced Cappuccino:
- FAQ
- Why is the hot brew or over ice button flashing?
- Why is my milk not frothing?
- My iced or hot coffee isn't strong enough for my taste – what now?
- Is the tumbler dishwasher safe?
- Why is there no ice left in my cup after brewing iced coffee?
- Why are there coffee grounds in my coffee?
- Can I use a different tumbler or cup for making iced coffee?
- Why does my coffeemaker continue to drip after the light turns off?
- Why does HOT coffee come out for an ICED coffee?
- Oster®
Brand : OSTER
Model : BVSTDC02B
Category : Coffee maker