
BVSTEM3300 - Coffee maker OSTER - Free user manual and instructions
Find the device manual for free BVSTEM3300 OSTER in PDF.


| Product Type | Steam Espresso & Cappuccino Maker |
| Model | BVSTEM3300 |
| Brand | Oster |
| Voltage | 127 V~ |
| Frequency | 60 Hz |
| Power | 950 W |
| Capacity | Up to 4 cups (espresso shots) |
| Water Tank Capacity | Fills to 4-cup mark on glass carafe |
| Pump Pressure | Steam pressure (not pump-driven) |
| Functions | Brew espresso, steam milk, froth milk |
| Control | Manual dial control knob (Off/Steam/Brew) |
| Portafilter | Extra-large, reusable filter basket (2 or 4 cup markings) |
| Steam Wand | Removable wand cover, used for frothing |
| Carafe | Glass with spill-proof lid, up to 4 shots |
| Drip Tray | Removable |
| Safety Features | Pressure release procedure, do not open during use, auto shut-off not present |
| Cleaning | Hand wash portafilter, carafe; descale with vinegar every 1-3 months |
| Maintenance | Descaling recommended; no user-serviceable parts |
| Warranty | One year limited warranty |
| Intended Use | Household and similar (e.g., office kitchen, farm house) |
Frequently Asked Questions - BVSTEM3300 OSTER
User questions about BVSTEM3300 OSTER
0 question about this device. Answer the ones you know or ask your own.
Ask a new question about this device
Download the instructions for your Coffee maker in PDF format for free! Find your manual BVSTEM3300 - OSTER and take your electronic device back in hand. On this page are published all the documents necessary for the use of your device. BVSTEM3300 by OSTER.
USER MANUAL BVSTEM3300 OSTER
natural_image
Exterior view of a Oster coffee maker with glass and straw stand (no text or symbols visible)MODELO MODEL
BVSTEM3300
READ ALL INSTRUCTIONS BEFORE USING THIS APPLIANCE
INTRODUCCIÓN
Welcome and congratulations on the purchase of your new Oster ^® Steam Espresso & Cappuccino Maker. This machine has been designed to help you prepare at home delicious espressos, cappuccinos, lattes and more. If you have any questions about your new Steam Espresso & Cappuccino Maker, please contact any of the authorized Oster ^® service centers.
IMPORTANT SAFEGUARDS
When using electrical appliances, basic safety precautions should always be followed to reduce the risk of fire, electric shock, and/or injury to persons including the following:
-
Read all instructions.
-
Do not touch hot surfaces. Use handles or knobs.
- To protect against electric shock, do not place or immerse cord, plugs, or appliance in water or other liquid. Avoid spilling water on the connector.
- This appliance is not intended for use by children or by persons with reduced physical, sensory, or mental capabilities, or lack of experience and knowledge, unless they have been given supervision or instruction concerning use of the appliance by a person responsible for their safety. Children should be supervised to ensure that they do not play with the appliance. Keep the appliance and its cord out of reach of children.
- Cleaning and user maintenance shall not be made by children without supervision.
- Unplug from outlet when either the appliance or display clock (if provided) is not in use, and before cleaning. Allow to cool before putting on or taking off parts, and before cleaning the appliance.
- Do not operate any appliance with a damaged cord or plug or after the appliance malfunctions, or has been damaged in any manner. Return appliance to an Authorized Service Center for examination, repair or adjustment. Do not attempt to replace or splice a damaged cord.
- The use of an accessory not recommended by the appliance manufacturer for use with this appliance may result in fire, electric shock or injury to persons.
- Do not use outdoors or for commercial purposes.
- Do not let cord hang over edge of table or counter, or touch hot surfaces.
- Do not place on or near a hot gas or electric burner, or in a heated oven.
English-1 English-2
- Always attach plug to appliance first, then plug cord into the wall outlet (for appliances with detachable cords). To disconnect, turn any control to the off position, then remove plug from wall outlet.
- Do not use appliance for other than intended use. Misuse can cause injuries. Always use appliance on a dry, stable, level surface.
- WARNING: To avoid the risk of injury, never open or disengage the brew chamber (portafilter) during the brew cycle. Always properly engage the filter holder to the locking mechanism. Failure to do so may disengage the filter holder during the brew cycle and cause injuries.
- Models with coffee grinders: Check hopper for presence of foreign objects before using.
- The heating base and heating element is subject to residual heat following a brewing cycle. Do not touch heating base or heating element immediately after a brewing cycle. Allow to cool before handling.
- Do not place the appliance in a cabinet when in use. hopper for presence of foreign objects before using.
SAVE THESE INSTRUCTIONS
This appliance is intended to be used in household and similar applications such as: - Staff kitchen areas in shops, offices and other working environments;
- Farm houses;
- By clients in hotels, motels and other residential type environments:
- Bed and breakfast type environments
PRODUCT NOTICES
- Place the appliance on a hard, flat, level surface to avoid interruption of airflow underneath the espresso maker.
- Do not operate the appliance with an empty water tank.
- Keep the area above the appliance clear during use, as hot steam will escape the appliance.
DESCRIPTION OF THE APPLIANCE
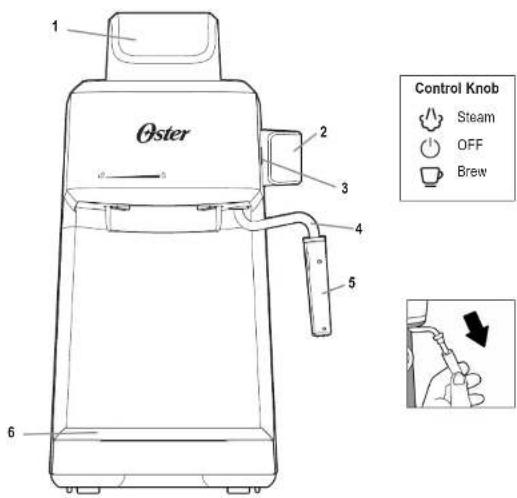
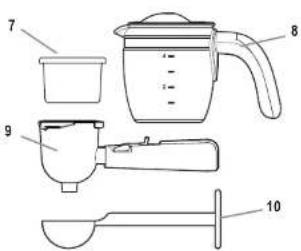
- Water tank cap
- Dial control knob
- Indicator light
- Steam wand
- Removable wand cover
- Removable drip tray
- Reusable coffee filter basket
- Glass carafe with spill-proof lid allows you to prepare up to 4 shots with a single brew
- Extra-large portafilter
- Coffee measuring scoop/tamper
English-3 English-4
CAUTION: PRESSURE
In order to check if the appliance is under pressure, follow these steps:
- Turn the control knob to the off position and unplug the appliance.
- Rotate the control knob to the steam position ⚡f steam comes out of the steam wand, then the water tank is still under pressure. Turn the control knob to the off position ⚡
- To release the pressure, hold a pitcher with water under the steam wand and immerse it in the water. SLOWLY TURN THE CONTROL KNOB TO THE STEAM POSITION AND RELEASE THE STEAM.
- When the steam wand stops releasing steam, turn to the off position and slowly remove the cap.
- Do not remove the portafilter at any time during the brewing process or until pressure is relieved.
- Use caution when removing the portafilter. The metal parts may still be very hot. Also, there may be hot water floating on the top of the filter.
- If coffee does not drip from the portafilter, it could mean it is blocked. Allow the appliance to cool down, and then release the steam with the instructions above. The blockage may be caused by too finely ground coffee. See "PROBLEMS AND CAUSES" section.
- WHEN CLEANING THE STEAM WAND: Place a frothing pitcher or large cup with at least 325 mL (11 oz.) capacity half full of water under the steam wand. Make sure the tip of the steam wand is submerged in liquid before turning the control knob to the steam Position. Froth the water for approximately 15 seconds.
NOTE: In order for your unit to work properly time after time, clean the steam wand after each use.
WARNING: The filling aperture must not be opened during use.
BEFORE USING THE COFFEEMAKER FOR THE FIRST TIME
CLEAN YOUR MACHINE:
To clean the inside of the unit, follow steps the below steps, using water only. Do not immerse the appliance in water or attempt to reach any internal parts of the appliance. NOTE: Portafilter is not dishwasher safe, hand wash only.
- Wash the glass carafe, filter, portafilter and measuring spoon / tamper tool with mild liquid detergent and a soft sponge or cloth.
CAUTION! Make sure the control knob is set to the ⏻ position.
-
Remove the cap from the water tank.
-
Use the glass carafe to fill the water tank with filtered water. Screw the cap back on.
-
Insert the empty portafilter (without grounded coffee) into the machine on the left and turn clockwise to lock in place (Figure 1). This can be difficult the first time you try it, but don't worry. The best way to learn is by looking at the shape of the top of the portafilter. This can be inserted by placing it on the left and securing it to the right. This may require force. The handle should be aligned with the lock symbol and point directly towards you when you stand in front of the machine.
-
Place the glass carafe under the portafilter (Figure 2).
-
Turn the machine control knob to the position. Keep the control knob in the brew position until no more water comes out of the portafilter.
-
Be sure to turn the control knob to the position and unplug the appliance.
CAUTION! Do not immerse the power cord, plug, or espresso machine in water or any other liquid. Do not remove the water tank cap or filter basket until you release the pressure off the unit.
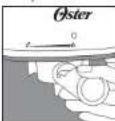
Figure 1
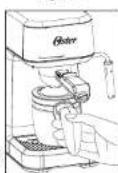
Figure 2
English-5 English-6
HOW TO BREW ESPRESSO
THE COFFEE
The coffee should be freshly ground, dark roasted variety. You may want to try a French or Italian roast. Pre-ground coffee will only retain its flavor for 7 – 8 days, provided it is stored in an air-tight container, in a cool, dark area. Do not store in a refrigerator or freezer. Whole beans are recommended, to be ground just before use. Coffee beans stored in an air-tight container will keep up to 4 weeks before they begin to lose their flavor.
THE GRIND
This is a vital step in the espresso making process and takes practice. The coffee must be of a fine grind.
• The correct grind should look like salt.
- If the grind is too fine, the water will not flow through the coffee even under pressure. This grind looks like powder and feels like flour when rubbed between fingers.
- If the grind is too coarse, the water flows through the coffee too fast, preventing a full-flavored extraction. Be sure to use a quality grinder for uniform consistency in your espresso grind. Oval shaped coffee grinders are not recommended because the grind is not consistent.
HOW TO MAKE ESPRESSO COFFEE
-
Turn the control knob to the off position
-
Fill the glass carafe with cold water up to the mark for the desired number of servings. You are going to prepare espresso or cappuccino coffee. Never use warm or hot water to fill the water tank.
-
Remove the cap from the water tank and pour the water into the tank. Be sure to measure correctly the amount of water that is required. Do not fill the tank completely, since there will not be enough space for steam generation.
ATTENTION: Do not pour water into the tank while the appliance is in functioning. Check that the control knob is in the position ⏻
- Screw the cap back on the water tank. Make sure it stays correctly adjusted.
| SERVINGS SIZE FINE ESPRESSO GROUND COFFEE WATER (COLD) | |
| 2 cups 2-cup marking on filter 2-cup mark on Glass Carafe | |
| 4 cups 4-cup marking on filter 4-cup mark on Glass Carafe | |
PLACING THE COFFEE
- Place the coffee filter basket in the portafilter.
- Fill with freshly ground coffee up to the 2 or 4 cup mark indicated on the coffee filter basket. Do not fill beyond the 4 cup mark. Wipe any excess coffee from the edge of the portafilter. This will ensure a correct fit in the Coffee Maker. ATTENTION: Gently compress the coffee. Do not overfill the filter. This can cause clogging or spillage.
- Place the portafilter under the brew head, move the filter retainer clip to the rearward position, then position the handle to the left until it fits into the slot. Then slowly turn to the right until the portafilter is located in the closed position.
- Check the removable drip tray is in place.
- Place the lid on the carafe, so the opening of the lid is towards the spout, and place it on the drip tray. The handle of the portafilter and the handle of the jug must be aligned.
- Plug the power cord into an electrical outlet and turn the control knob to the symbol which starts the brewing process. The light will turn on to indicate the coffee maker is working.
- The espresso will begin to flow into the carafe in approximately three to five minutes.
- When the espresso has finished flowing into the carafe, turn the control knob to the off position (Unplug the power cord and allow the pressure in the machine to released. Follow the procedure in the 'CAUTION: PRESSURE' section of the page 4. CAUTION: Do not remove the tank cap or portafiller at any time while the appliance is under pressure or until it has cooled down. Follow procedure marked 'CAUTION: PRESSURE' to release pressure before removing cap.
- Once the Brewer has cooled and all pressure has been released, remove the portafilter from the brew head. Using the filter retainer clip to secure the filter basket to the portafilter, rotate the portafilter down to empty it. Rinse the filter and portafilter with water. CAUTION: The metal parts of the portafilter may be very hot. Be sure to use the filter lock when disposing of ground coffee. Cool these parts by rinsing them under cold running water.
- For cleaning instructions, see the "Cleaning your machine after each use" section.
English-7 English-8
HOW TO PREPARE CAPPUCCINOS & MORE AT HOME
CAUTION! Do not remove the water tank cap or filter basket until you release the pressure in the unit. Follow the instructions on page 4 before proceeding.
CAUTION! Make sure the unit is unplugged and the control knob is set to the ① position before using the machine.
NOTE: This is a manual machine with no auto shut off feature. You can control how much espresso is brewed and how long to froth the milk by turning the control knob.
Cappuccino coffee is espresso coffee with steamed milk and milk foam on top. Frothing milk for cappuccino takes practice. Don't be discouraged if you don't do it perfectly the first time. The milk should be half steamed (the bottom of the jug) and half frothed (the top of the jug). It may take several tries before you perfect this process.
For best results, we recommend frothing the milk in a different pitcher and pouring the milk into your coffee mug. The milk and the pticher should be cold. Do not use a carafe that has recently been washed in lukewarm water.
- The first step in the preparation of cappuccino is to prepare the espresso coffee. So fill the glass carafe with cold water to the designated mark for the number of servings desired. Never use warm or hot water to fill the Water Tank.
- Follow steps in the "HOW TO BREW ESPRESSO" section.
- Fill a mug halfway with cold milk and place next to the machine. Skim or 2% milk is easier to froth.
- If making 2 servings, stop espresso brewing at the 2-cup mark. Turn the control knob to the Off position ☐If you prepare 4 servings, stop the preparation of espresso at the 4-cup mark. Turn the control knob to the Off position ☐
- You are now ready to froth and steam the milk. Hold the pitcher under the steam wand so that the steam wand is slightly submerged in the milk. Slowly turn the control knob to the steam position ♦Gently move the jar in a circular motion around the steam tip for approximately 45 s. Remember: the milk and the pitcher must be very cold before frothing.
- When the milk has doubled in volume, or if you are using a beverage thermometer, when the milk has reached 38°C, insert the steam wand further into the milk to further heat it. Do not heat milk above 65°C. To avoid splashing hot milk, do not let the steam wand rise above the surface of the milk. After you have finished frothing, turn the control knob back to the off position
- You are ready to prepare the cappuccino coffee. REMEMBER: It's 1/3 espresso, 1/3 steamed milk, and 1/3 milk froth. Pour the espresso into a cup with a capacity of at least 150 ml. Then add the steamed milk to the espresso and using a spoon add the foam.
- Follow the instructions on page 4, in the section marked "CAUTION: PRESSURE" to rinse any residual milk from the steam wand. It is important to properly clean the steam wand after each use to ensure it continues to work properly.
- Unplug power cord and allow coffeemaker to cool completely. Do not remove the tank lid or portafilter until the pressure in the Brewer has been completely released. Follow the procedures in the section marked "CAUTION: PRESSURE" on page 4 to relieve pressure.
TIPS TO FROTH
If you hear a gurgling sound, the tip of the steam wand is not submerged deep enough into the milk. If you hear a grinding sound, the tip is inserted too deep into the milk. Adjust the position of the lug as necessary.
- Ideal frothing should have a hissing sound and a swirling motion created in the pitcher.
*Takes about 2.5 min to foam 120 ml of whole/2%/skim milk at 65 °C temperature. You can use a thermometer to get accurate results. - Properly frothed milk has a thick microfoam with a silky finish. Tap the pitcher lightly to release any large air bubbles and swirl in a circular motion to blend the milk for a silky texture.
- Clean the steam wand after each use.
CLEANING YOUR MACHINE AFTER EACH USE
Keep your Oster® Espresso, Cappuccino & Latte Steamer running smoothly with proper care after each use. Follow these simple steps to clean your machine:
CAUTION: DO NOT remove water tank cap or filter basket until pressure is released in unit. Follow the instructions on page 4 before proceeding.
- Remove the portafilter to discard the coffee beans. Lift the filter retainer clip so it is positioned over the edge of the filter, hold in place while you discard the coffee beans (Figure 3). This helps keep the filter secured in position.
NOTE: Leaving the portafilter in the machine after brewing can cause it to close improperly, which can lead to leaks and damaged seal. - Rinse the portafilter with fresh water. Please note that the portafilter is NOT dishwasher safe. Hand wash only!
NOTE: If you did not froth milk, skip steps 3-8. - Fill the water measuring jug to the steam mark (Figure 15 on next page) with water and pour into the water tank.
- Screw the cap back onto the water tank.
- Fill a cup or frothing pitcher halfway with water and position so that the frothing wand is submerged in the water.
- Tum control knob to steam position and steam with water instead of milk for 15 seconds. This will help rinse the internal parts of the machine.
- Once the steam wand is cool, remove and rinse the steam wand cover. The steam wand cover is the black plastic piece. Just pull on the bottom to remove it.
- Clean the steam wand with a damp cloth.
- Remove the drip tray cover and empty the water or coffee from the drip tray. Dry with a clean cloth. Clean the outer surface of the machine with a damp cloth. Do not use steel wool pads or abrasive cleaners.
CAUTION: To protect against electrical shock, do not immerse cord, plug, or appliance in water or any other liquid.
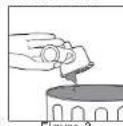
Figure 3
English-9 English-10
CLEANING AND MAINTENANCE BY THE USER
Once every 1 to 3 months, depending on use and type of water, it is recommended descale the coffee maker to keep it working properly.
DESCALING THE INTERNAL PARTS
- Make sure the control knob is in the position. CAUTION: Do not remove the water tank cover or filter hole in unit. See instructions on page 4.
- Fill the water tank to the top with undiluted white household vinegar (Figure 4).
- Brew just enough to get some vinegar to come out.
- Steam just enough to get some vinegar to come out.
- Unplug the machine.
- Let the machine sit overnight with the vinegar solution inside the water tank.
- Dispose of the vinegar through the top opening of the machine, turning the machine inside the sink.
- Rinse the water tank with tap water, filling the tank halfway with water and pour the water into the sink, repeating this step twice.
- Brew and steam with fresh water at least 4 times or until there is no odor of vinegar. MAINTENANCE BY THE USER:
This appliance contains no user-serviceable parts. Any Maintenance service that is not described in the Cleaning section must be performed only by an authorized service representative. Consult the guarantee available online.
CLEANING THE GLASS CARAFE
Hard water can leave white mineral deposits inside the carafe. The coffee discolors these deposits, sometimes leaving brown spots on the inside from the jug. To remove these stains, follow these simple steps:
- Use a solution of equal parts hot water and white vinegar.
- Let the solution sit in the jar for approximately 20 min and then throw it away
- Wash and rinse carafe thoroughly using a soft cloth. Do not use cleaners abrasives. These can damage the finish of the carafe, scratching it and causing it to crack.
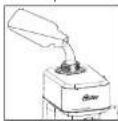
Figure 4
English-11 English-12
USEFUL TIPS
Make sure the control knob is in the ⏻ position before use the machine.
- The filter retainer clip must be in the rearward position when installing the filter.
- Do not try to turn the portafilter handle past the closed position.
- Do not overfill the filter with ground coffee, as this will cause improper sealing to the portafiller, which could result in leaks and damage to the seal.
• For best results, use only high-quality ground espresso coffee quality. - Do not leave excess ground coffee on the edge of the portafilter. Too much grain ground on the edge would cause improper sealing, which could result in leaks and damage to its seal.
- Do not turn the control knob to the brew or steam position with the water tank empty.
- Do not leave water in the water tank between uses.
- Make sure the steam wand is immersed in the milk or alternative milks before turning the control knob to the steam position.
- Do not store the portafilter in the brew head. Remove portafilter after brewing. Leaving the portafilter in the machine could cause improper closing, which could result in leaks and damage to its seal.
- Do not fill the tank to the top with water.
- This is a manual machine with no auto power off feature. You can control the amount of espresso that is brewed by turning the control knob.
• 2% milk creates better foam than alternative milks.
PROBLEMS AND CAUSES
| PROBLEMCAUSESOLUTIONS | ||
| Coffee does not come out | No water in reservoir.Coffee grind is too fineToo much coffee in the filter basket.Water tank cap is not secure, steam is escapingAppliance was not turned on or plugged in.Coffee has been tamped/ compressed too much. | Add water.Grind coffee medium ground.Fill filter basket only to 4-cup mark.Tighten Water tank cap.Plug unit into electrical outlet.Turn on.Refill filter basket with coffee DO NOT TAMP. |
| Coffee comes out around the edge of the filter holder | Portafilter not rotated to full lock position.Coffee grounds around the filter basket rim.Too much coffee in the filter head. | Rotate Portafilter to full lock.Wipe off rim, fill only to 4-cup mark.Fill only to 4-cup mark. |
| No steam is generated | Water reservoir is empty.Too much water in the reservoir - no room for steam.Appliance is not turned on.Steam wand is blocked. | Fill reservoir with correct amount of water. See Page 6.Empty some water from reservoir.Turn on unit with control knob.Following frothing stage, operate frothing function for 1 - 2 seconds to extract excess milk. Or, turn off unit, allow unit to cool, unplug unit and clean out steam wand with a needle or tootpick. |
| Milk is not foamy after frothing | Ran out of steam.Milk is not cold enough. | Pour in the required amount of water to make cappuccino.See Page 8.Chill milk and frothing pitcher prior to making cappuccino. |
| Coffee comes out too quickly | Ground coffee is too coarse.Not enough coffee in filter basket. | Use a finer grind.Use more coffee. |
| Coffee is splattering out of steam wand | Water tank is empty or low, not enough pressure. | Once unit has cooled, use more water to brew espresso. |
English-13 English-14
Espresso Recipes
Café Cubano
Place in a small cup:
1/2 teaspoon sugar
Brew in the cup:
Small espresso
Stir to dissolve sugar.
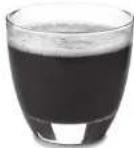
Café Bombon
Place in a small heavy glass:
1-1/2 to 2 tablespoons sweetened
condensed milk
Brew in the glass:
Small espresso
Serve with a spoon to stir just
before drinking.
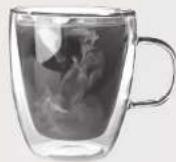
Espresso con Panna
If desired, place in a cup:
1/2 teaspoon sugar
Brew in the cup:
Small espresso
Stir to dissolve sugar,
then fill cup with:
Sweetened whipped cream
Latte Recipes
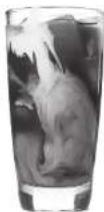
Iced Latte
Place in a large cup: 1 tablespoon sugar
Brew in the cup: Large espresso
Stir in:
1 cup ice cubes 1/2 cup whole or other milk
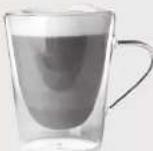
Pumpkin Spice Latte
Place in a cup:
2 teaspoons brown sugar
Pinch of pumpkin pie spice
Brew in the cup:
Small latte
Stir to blend.
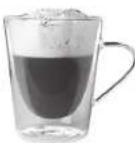
Nutella Latte
Place in a cup:
1 tablespoon Nutella (chocolate hazelnut spread)
Brew in the cup:
Small latte
Stir to blend.
Cappuccino Recipes
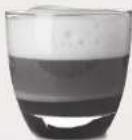
Café Mocha
Place in a cup:
2 teaspoons chocolate syrup
1/2 teaspoon sugar
Brew in the cup:
Small cappuccino
Stir to blend.
Top with additional foam if desired.
Sweet Cappuccino
Place in a cup:
1/2 teaspoon sugar
Brew in the cup: Small cappuccino
Stir to dissolve sugar.
Top with additional foam
Caramel Cappuccino
Place in a cup:
1 tablespoon caramel syrup
1/4 teaspoon sugar
Brew in the cup:
Small cappuccino
Stir to blend.
Top with additional foam if desired.
English-15 English-16
Oster®
| Características Eléctricas / Electrical Characteristics | |||
| Modelo / Model Vol | taje/Voltage Frecuencia/Frequency | Potencia/Power | |
| BVSTEM3300-013 12 | 7 V~ 60 Hz 950 W | ||
© 2023 Sunbeam Products, Inc. All rights reserved. One year limited warranty – please see insert for details.
www.oster.com
OSTERLATINO




Impreso en China
Printed in China
P.N. NWL0001531144
BVSTEM3300-013_23SM1 (LA)-GCDS_JC
- INTRODUCCIÓN
- IMPORTANT SAFEGUARDS
- SAVE THESE INSTRUCTIONS
- PRODUCT NOTICES
- DESCRIPTION OF THE APPLIANCE
- CAUTION: PRESSURE
- BEFORE USING THE COFFEEMAKER FOR THE FIRST TIME
- CLEAN YOUR MACHINE:
- HOW TO BREW ESPRESSO
- THE COFFEE
- THE GRIND
- HOW TO MAKE ESPRESSO COFFEE
- PLACING THE COFFEE
- HOW TO PREPARE CAPPUCCINOS & MORE AT HOME
- TIPS TO FROTH
- CLEANING YOUR MACHINE AFTER EACH USE
- CLEANING AND MAINTENANCE BY THE USER
- DESCALING THE INTERNAL PARTS
- CLEANING THE GLASS CARAFE
- USEFUL TIPS
- PROBLEMS AND CAUSES
- Espresso Recipes
- Café Cubano
- Café Bombon
- Espresso con Panna
- Latte Recipes
- Iced Latte
- Stir in:
- Pumpkin Spice Latte
- Place in a cup:
- Brew in the cup:
- Nutella Latte
- Cappuccino Recipes
- Café Mocha
- Stir to blend.
- Sweet Cappuccino
- Stir to dissolve sugar.
- Caramel Cappuccino
- Oster®
Brand : OSTER
Model : BVSTEM3300
Category : Coffee maker