
BVSTEM5501R - Coffee maker OSTER - Free user manual and instructions
Find the device manual for free BVSTEM5501R OSTER in PDF.


| Product Type | Espresso and Cappuccino Maker |
| Model | BVSTEM5501R |
| Brand | Oster |
| Voltage | 127 V (60 Hz) or 220 V (50/60 Hz) depending on variant |
| Power Consumption | 1050 - 1170 W |
| Water Reservoir Capacity | Approximately 1.2 L (based on typical espresso machines; not explicitly stated) |
| Milk Reservoir Capacity | Approximately 0.5 L (based on typical; not explicitly stated) |
| Material | Plastic and metal housing, stainless steel steam wand |
| Brewing System | Pump-driven espresso system with steam frother |
| Filter Types | Single and double shot espresso filters for ground coffee |
| Porta-Filter | Removable with retention clip for secure locking |
| Steam Function | Integrated frother for milk steaming and frothing |
| Controls | On/Off button, Brew/Steam selector switch, control knob |
| Indicator Lights | Power (white), Temperature Ready (white), Brew/Steam (white) |
| Safety Features | Automatic shut-off? (not specified), caution against hot surfaces |
| Cleaning | Removable drip tray, water reservoir, milk reservoir; descaling recommended every 40-80 brew cycles |
| Accessories Included | Scoop/tamp, single and double shot filters, removable drip tray, milk reservoir |
| Dimensions (approximate) | 12 x 10 x 14 inches (estimated based on typical models) |
| Weight | Approximately 8 lbs (estimated) |
| Warranty | 1-year limited warranty (see insert for details) |
Frequently Asked Questions - BVSTEM5501R OSTER
User questions about BVSTEM5501R OSTER
0 question about this device. Answer the ones you know or ask your own.
Ask a new question about this device
Download the instructions for your Coffee maker in PDF format for free! Find your manual BVSTEM5501R - OSTER and take your electronic device back in hand. On this page are published all the documents necessary for the use of your device. BVSTEM5501R by OSTER.
USER MANUAL BVSTEM5501R OSTER
natural_image
Black and white photo of a Oster coffee maker with glass cups and a side arm, no visible text or symbols on the device itself.MODELOS MODELS
BVSTEM5501B, BVSTEM5501R
PLEASE READ ALL INSTRUCTIONS BEFORE USING THIS APPLIANCE
PRECAUCIONES IMPORTANTES
natural_image
Line drawing of a refrigerator interior with labeled component '17' (no text or symbols beyond label)ANTES DE USAR EL ARTEFACTO
POR PRIMERA VEZ
natural_image
Simple line drawing of a cooking pot with a rotating arrow indicating rotation (no text or symbols)CÓMO LLENAR CON EL CAFÉ
natural_image
Hand holding a small container with dark granular substance, no text or symbols visible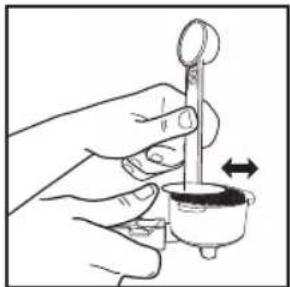
natural_image
Illustration of a hand using a pipette to measure a small object (no text or symbols present)natural_image
Diagram of a mechanical device with a cylindrical component and an arrow indicating direction (no text or symbols)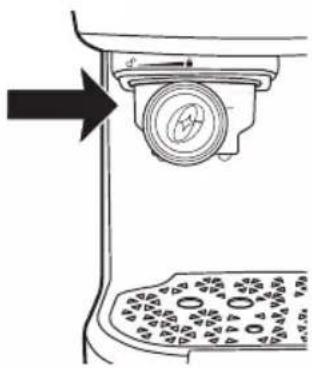
natural_image
Technical diagram of a mechanical component with a circular dial and base plate (no text or symbols)CÓMO PREPARAR ESPRESSO
natural_image
Line drawing of a hand holding a car interior with a valve and handle (no text or symbols)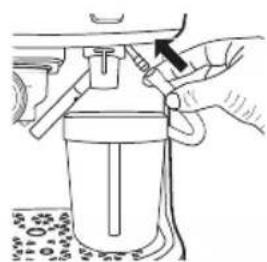
natural_image
Line drawing of a hand using a tool to lift a cylindrical container (no text or symbols)Figura 2Figura 1
natural_image
Simple line drawing of a mechanical device with no text or symbols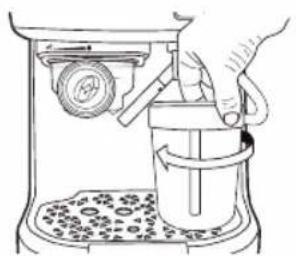
natural_image
Line drawing of a hand using a lathe machine to press or install a cup, with no visible text or symbols.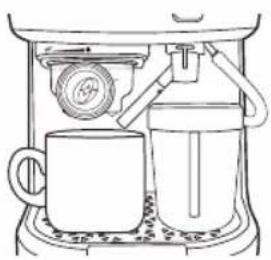
natural_image
Line drawing of a coffee machine with a cup and lid, no text or symbols presentFigura 4 Figura 5Figura 3
PREPARACIÓN:
When using electrical appliances, basic safety precautions should always be followed to reduce the risk of fire, electric shock, and/or injury to persons including the following:
- Read all instructions.
- Do not touch hot surfaces. Use handles or knobs.
- To protect against electric shock, do not place or immerse cord, plugs, or appliance in water or other liquid. Avoid spilling water on the connector.
- This appliance is not intended for use by children or by persons with reduced physical, sensory, or mental capabilities, or lack of experience and knowledge, unless they have been given supervision or instruction concerning use of the appliance by a person responsible for their safety. Children should be supervised to ensure that they do not play with the appliance. Keep the appliance and its cord out of reach of children.
- Cleaning and user maintenance shall not be made by children without supervision.
- Unplug from outlet when either the appliance or display clock (if provided) is not in use, and before cleaning. Allow to cool before putting on or taking off parts, and before cleaning the appliance.
- Do not operate any appliance with a damaged cord or plug or after the appliance malfunctions, or has been damaged in any manner. Return appliance to an Authorized Service Center for examination, repair or adjustment. Do not attempt to replace or splice a damaged cord.
- The use of an accessory not recommended by the appliance manufacturer for use with this appliance may result in fire, electric shock or injury to persons.
- Do not use outdoors or for commercial purposes.
- Do not let cord hang over edge of table or counter, or touch hot surfaces.
- Do not place on or near a hot gas or electric burner, or in a heated oven.
- Always attach plug to appliance first, then plug cord into the wall outlet (for appliances with detachable cords). To disconnect, turn any control to the off position, then remove plug from wall outlet.
- Do not use appliance for other than intended use. Misuse can cause injuries. Always use appliance on a dry, stable, level surface.
- WARNING: To avoid the risk of injury, never open or disengage the brew chamber (portafilter) during the brew cycle. Always properly engage the filter holder to the locking mechanism. Failure to do so may disengage the filter holder during the brew cycle and cause injuries.
- Models intended to be used with sealed capsules: Only use capsules intended for this appliance. If the capsule does not fit, do not force the capsule into the appliance.
-
Models with coffee grinders: Check hopper for presence of foreign objects before using.
-
The heating base and heating element is subject to residual heat following a brewing cycle. Do not touch heating base or heating element immediately after a brewing cycle. Allow to cool before handling.
- Do not place the appliance in a cabinet when in use.
SAVE THESE INSTRUCTIONS
This appliance is intended for household use and similar environments, such as:
- Staff kitchen areas in shops, offices and other working environments;
- in farm houses;
- by clients in hotels, motels and other residential type environments;
- in bed and breakfast type environments.
PRODUCT NOTICES
- Place the appliance on a hard, flat, level surface to avoid interruption of airflow underneath the espresso maker.
- Do not operate the appliance with an empty water reservoir.
- Keep the area above the appliance clear during use, as hot steam will escape the appliance.
IMPORTANT
Please follow these important instructions while using your Oster® Espresso and Cappuccino Maker:
- For better results, brew espresso before steaming the milk.
- Do not brew espresso immediately after steaming milk. This will cause the espresso to overflow from the porta-filter. If you need to brew espresso after frothing follow the next steps: 1) Place the empty portafilter into the machine 2) Place a cup under the portafilter 3) Turn the switch to brew 4) Turn the control knob to brew and wait for 45 seconds then stop the process 5) Before preparing your next espresso wait until temperature ready light turns back on.
- REMOVE RED PLUG FROM THE BOTTOM OF THE WATER RESERVOIR.
- Do not remove the porta-filter at any time during the brewing process.
- Use caution when removing the porta-filter. The metal parts may still be very hot. Also, there may be hot water floating on the top of the filter. Hold it only by its handle and dispose the brewed coffee grounds.
- If coffee does not drip, the filter might be blocked. Turn off the appliance and allow it to cool down. The blockage may be caused by the coffee being too finely ground. See "PROBLEMS AND CAUSES" section.
- Do not brew espresso when switch is on steam.
- For optimal performance please follow the detailed steps in the "CLEANING INSTRUCTIONS" section.
CORRECT USE OF GROUND COFFEE FOR ESPRESSO MAKERS
Do not use sugar roasted* ground coffee or sugar roasted coffee beans as these will clog the filter and damage the appliance. If sugar roasted coffee is accidentally used, stop using the unit and bring it to the closest service center for maintenance.
We recommend descaling the machine periodically to keep it in good working condition. Contact our service centers to learn about this process.
(*) GROUND WITH SUGAR
ENGLISH-2
INTRODUCTION
Congratulations! You have selected the new Oster ^® Espresso and Cappuccino Maker. This unique appliance has been designed to help you prepare delicious espressos, cappuccinos and lattes quickly, conveniently, at the comfort of your house.
ESPRESSO
A unique method of coffee brewing in which hot water is forced through finely ground coffee. Popular in Europe, it is a far richer and more full-bodied brew than regular drip coffee. Because of its richness, espresso is usually served in 30 ml to 60 ml (1 oz. to 2 oz.) portions, in demitasse cups.
CAPPUCCINO
A drink made with about 1/3 espresso, 1/3 steamed milk, and 1/3 frothed milk.
LATTE
A drink made with about 1/4 espresso and 3/4 steamed milk.
IMPORTANT: Please read ALL of the instructions, precautions, notes and warnings included in this instruction manual carefully before you begin to use this appliance. Proper care and maintenance will ensure the long life of the Oster® Espresso and Cappuccino Maker and its trouble-free operation. Save these instructions and refer to them often for cleaning and care tips.
DESCRIPTION OF THE APPLIANCE
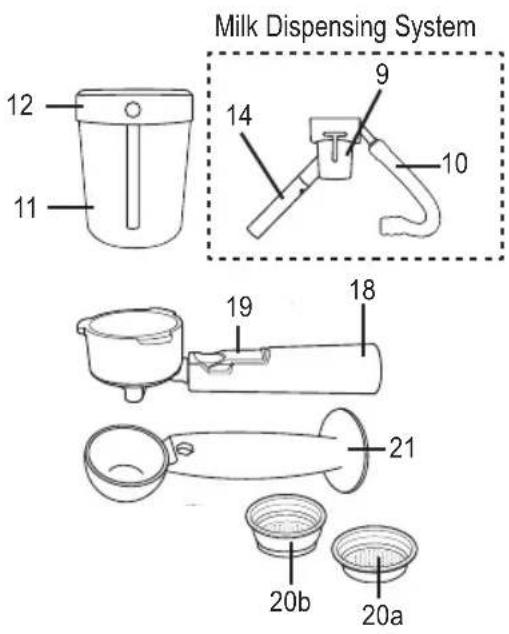
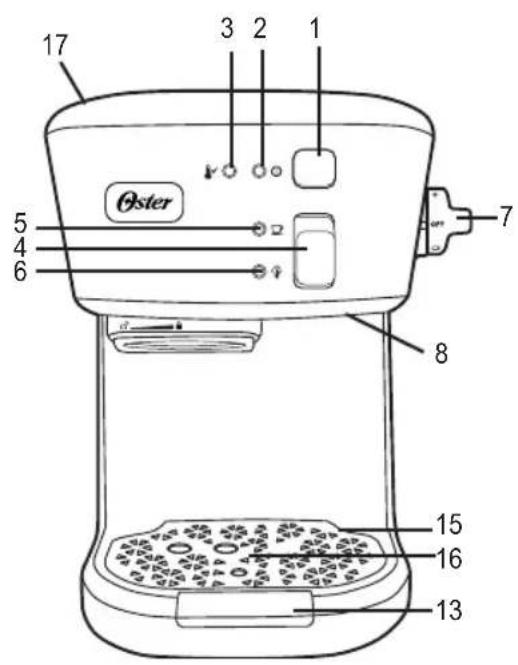
- On/Off Button
- Power Indicator Light (white)
- Temperature Ready light (white)
- Brew/Steam Selector Switch
- Brew Indicator Light (White)
- Steam Indicator Light (White)
- Brew/Steam Control knob
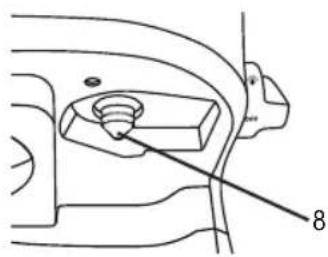
- Steam Outlet
- Frother body
- Frother connector tube
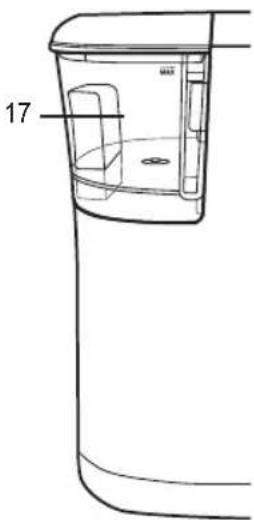
- Removable Milk Reservoir
- Milk Reservoir Lid
- Removable drip tray
- Adjustable frothed milk dispensing tube
- Drip tray cover
- Overflow drip tray floater
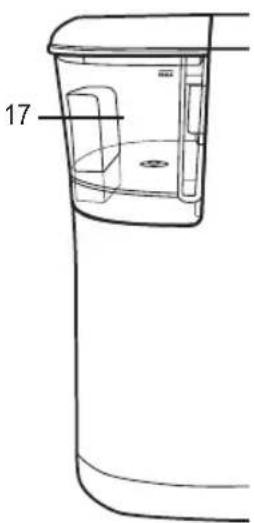
- Removable Water Reservoir
- Porta-filter for ground coffee
- Porta-filter retention clip
- Coffee Filters:
20a. Single shot espresso filter
20b. Double shot espresso filter - Scoop/Tamp
BEFORE USING YOUR APPLIANCE FOR THE FIRST TIME
STEP 1: CLEANING THE UNIT PRIOR TO FIRST USE
Please refer to the "Description of the Appliance" section to familiarize yourself with the product and identify all parts.
- Please make sure the unit is off " ① by pressing the on/off " ② button located on the unit. Make sure it is unplugged from the electrical outlet.
- REMOVE RED PLUG FROM THE BOTTOM OF THE WATER RESERVOIR.
- First remove and then wash the water reservoir, the milk reservoir, the porta-filter, the two filters and measuring scoop/tamper in a mixture of mild detergent and water. Rinse each thoroughly and place them back into the unit.
- Refer to the instructions on "PLACING THE PORTA-FILTER" section before placing or removing the porta-filter and any filter from the unit.
- Ensure frother system is properly installed.
CAUTION: Do not immerse the appliance in water or attempt to reach any of its internal parts.
STEP 2: PRIMING THE UNIT PRIOR TO FIRST USE
To prime the pump before the initial brew, run brewing cycle for 30 seconds following the steps below:
- Add water to the water reservoir.
- Press the On/Off button " ⏱ to turn the unit ON.
- Press the Brew/Steam Switch to the brew "position and wait for Temperature Ready Light" to turn on.
- Place a cup underneath the brew head and turn the control knob to the brew "position.
- After 30 seconds turn the control knob to the off "position. (Some water and/or steam may release during process).
The coffee should be freshly ground and dark roasted. You may want to try a French or Italian roast ground for espresso. Pre-ground coffee will only retain its flavor for 7 – 8 days, provided it is stored in an airtight container and in a cool, dark area. Do not store in a refrigerator or freezer. Whole beans are recommended to be ground just before use. Coffee beans stored in an airtight container will preserve flavor for up to 4 weeks.
THE GRIND
This is a vital step in the espresso making process if you are grinding your own coffee. It may require practice. The coffee must be of a fine grind. The correct grind should look like salt.
- If the grind is too fine, the water will not flow through the coffee even under high pressure. These grinds look like powder and feel like flour when rubbed between fingers.
- If the grind is too coarse, the water flows through the coffee too fast, preventing a full-flavored extraction. Be sure to use a quality grinder for uniform consistency.
OPERATING INSTRUCTIONS
FILLING THE WATER RESERVOIR
-
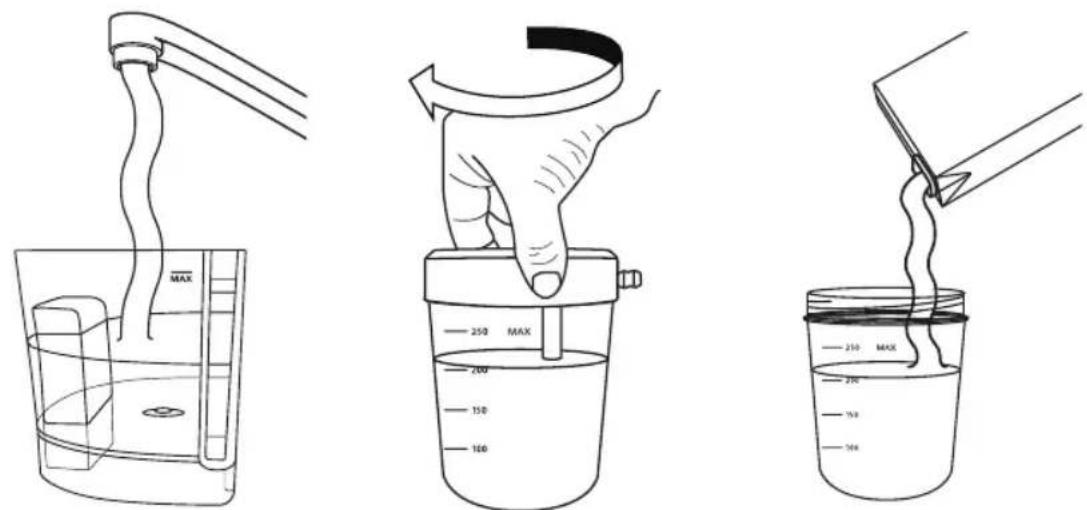
Fill the water reservoir with water (see figure 1). You may use either a jar to fill it up or remove it from the unit and then fill it up under the tap. Fill the reservoir with the desired amount of water below the "MAX" level on the reservoir. Never use warm or hot water to fill the water reservoir.
-
If you have removed it from the unit to fill up with water, please make sure to place it back tightly in its place and return lid on the top of the water reservoir.
FILLING THE MILK RESERVOIR
If you plan to prepare a cappuccino or latte, remove the milk reservoir lid by twisting and lifting reservoir (see figure 2). Then pour the desired quantity of cold milk you estimate you will need into milk reservoir, making sure it is below the "MAX" level on the reservoir (see figure 3). Once finished, place the milk reservoir lid back onto the milk reservoir by twist and lock in place.
HELPFUL TIPS: The milk reservoir can be placed on drip tray or counter top. For optimal frothing performance, place milk reservoir on drip tray. Also for better frothing results its recommended to use whole milk.
Figure 1 Figure 2 Figure 3
PLACING THE FILTER ON THE PORTA-FILTER
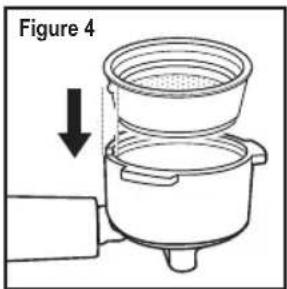
- Insert the filter into the porta-filter, making sure to align the filter dimple to the porta-filter notch (see figure 4).
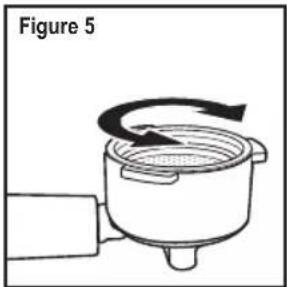
- Turn the filter to the left or right to lock it in place (see figure 5).
NOTE: To remove the filter for cleaning, turn the filter to the left or right to align the filter dimple to the porta-filter notch, proceed to remove.
CAUTION: Make sure the filter is cool before attempting to remove it from the porta-filter.
FILLING WITH COFFEE
Place selected filter on porta-filter as follows:
FOR GROUND COFFEE:
a. Fill the filter with fresh, fine ground espresso coffee (do not overfill).
b. Tamp and compress firmly and evenly ground coffee.
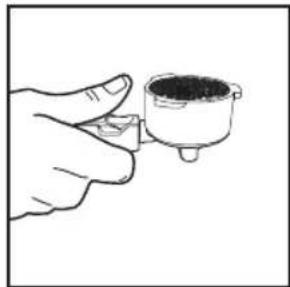
c. Clean any excess coffee from the rim to ensure proper fit under brew head.
Helpful tip: When filling the filter with coffee, make sure that coffee is almost to the top of the filter, and then tamp VERY FIRMLY.
natural_image
Diagram of a cooking pot with a rotating arrow indicating rotation (no text or symbols)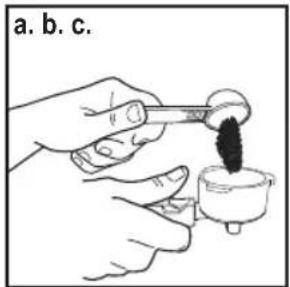
natural_image
Hand holding a small container with dark granular substance, no text or symbols visible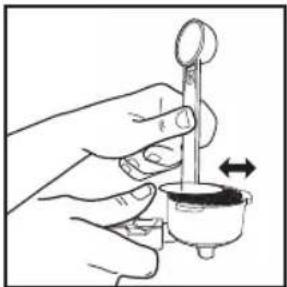
natural_image
Illustration of a hand using a spoon to measure a small object, with no visible text or symbols.PLACING THE PORTA-FILTER
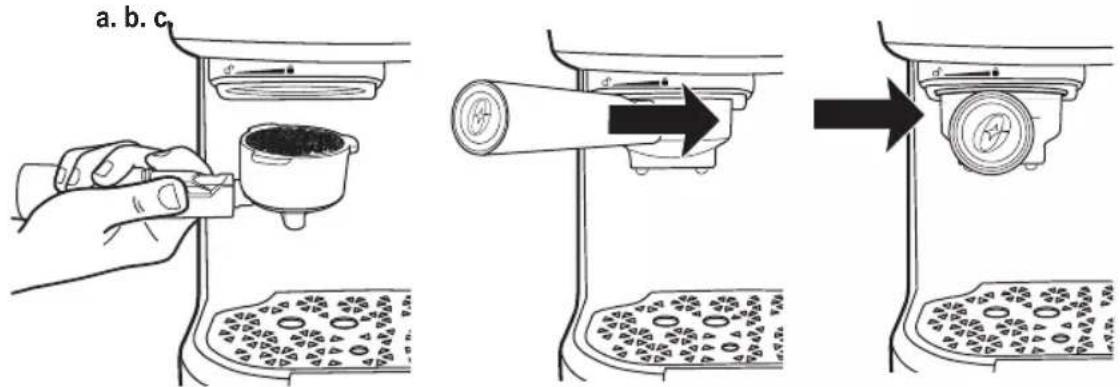
a. Position porta-filter underneath the brew head, attach porta-filter by first moving retainer clip back.
b. Position handle so that the handle lines up with the open lock icon " " on the unit and fits into the groove.
c. Then, slowly turn it to the right until the retention clip is aligned with the closed lock symbol "on the unit.
HOW TO BREW ESPRESSO
PREPARATION: Gather the following prior to brewing
• Fine espresso ground coffee
- Tap Water (or, preferably your favorite bottled water)
- Cup and spoon
-
Make sure the unit is switched off and the control knob is in the "OFF" position.
-
Fill the water reservoir with water. You may either use bottled water or a jar to fill it up or remove it from the unit and then fill it up under the tap. If you have removed it from the unit to fill up with water, please make sure to place it back tightly in its place. Fill the reservoir with the desired amount of water ensuring it ranges within the "Max" marking on the reservoir. Never use warm or hot water to fill the water reservoir.
-
Place the water reservoir lid back in its place.
-
Select the single or double espresso coffee filter.
BREWING ESPRESSO
IMPORTANT: If the unit has not been used for several days, it is recommended to prime the unit for 30 seconds. Refer to the "PRIMING THE UNIT PRIOR TO FIRST USE" section. If unit will be stored in a cold place, run frothing without milk for 30 seconds, turn dial OFF and press button OFF.
CAUTION: Do not leave unit unattended while brewing since the brewing process requires to be manually stopped. This will avoid overflow, spillage and potential damages.
-
Make sure the drip guard is in place on the drip tray. Place the drip tray in the unit.
-
Make sure the control knob is in the off "O" position.
-
Place the cup under the porta-filter ensuring is directly under the outlet spout located under the porta-filter.
-
Plug the power cord into an electrical outlet and press the On/Off "①button to turn the unit on. The power indicator light will turn ON.
-
Turn the Brew/Steam Switch to brew " ” position.
-
When the temperature ready light “ 🚗 is solid rotate the control knob Clockwise to the brew “ 🔔 position. This will initiate the brewing process and espresso will begin to flow in just seconds.
Helpful tip: Espresso recommended timing: When you turn on the knob count the necessary seconds and turn the knob off. Single shot: 8 seconds. Double shot: 15 seconds
-
Once you have prepared the desired amount of espresso, turn the knob manually to the "OR" position and unplug the unit. Allow the unit to cool down before removing parts and accessories prior to cleaning.
-
After the unit has cooled down, remove the porta-filter from the brew head. Turn the porta-filter upside down to remove the used espresso grounds. Rinse the filter and filter holder with water.
-
If you wish to brew additional espresso, repeat the process by following the steps in the "BREWING ESPRESSO" section.
CAUTION: The metal parts of the porta-filter might still be very hot. Cool these parts by running under cold water.
- For cleaning instructions, refer to cleaning your Oster® Espresso and Cappuccino maker section.
HOW TO MAKE CAPPUCCINO
IMPORTANT NOTES:
- To achieve best performance results it is recommended to brew espresso first and then froth the milk. DO NOT BREW ESPRESSO IMMEDIATELY AFTER STEAMING MILK.
Please cool down the unit.
IMPORTANT NOTE: COOLING DOWN THE UNIT: Do not brew espresso immediately after steaming milk. This will cause the espresso to overflow from the porta-filter. If you need to brew espresso after frothing follow the next steps:
1) Place the empty portafilter into the machine
2) Place a cup under the portafilter
3) Turn the switch to brew
3) Turn the control knob to brew and wait for 45 seconds then stop the process
4) Before preparing your next espresso wait until temperature ready light “furns back on.
Cappuccino is espresso topped with steamed and frothed milk. Below recommended serving size:
| Drink type Fine | Espresso Ground Coffee Milk (Skim or 2% forths more easily) | |
| Cappuccino | Use filter for double espresso 60 mL / 2 oz. | 100 mL/ 4 oz. |
| Latte | Use filter for double espresso 60 mL / 2 oz. | 150 mL / 6 oz. |
BEFORE STEAMING THE MILK FOLLOW THESE STEPS:
CAUTION: Check that all connections of the frother system are completely installed before frothing the milk. This will avoid overflow of steam, spillage and potential damages.
PLACING THE FROTHER BODY:
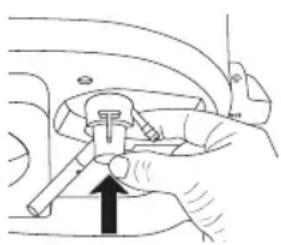
- Frother body must be properly installed in the steam outlet by pushing up the connector until you feel a click between steam outlet and frother body (See Figure 1).
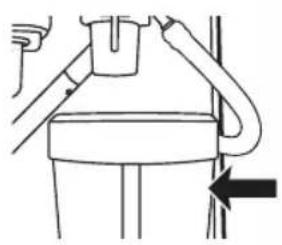
- Check that frother connector tube is properly installed into the frother body (See Figure 2).
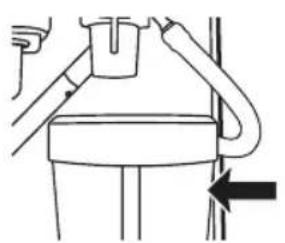
- Check that removable milk reservoir is connected to the frother connector tube (See Figure 3).
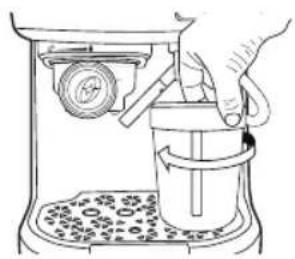
- Removable Milk Reservoir Lid must be closed and back in its place (See Figure 4).
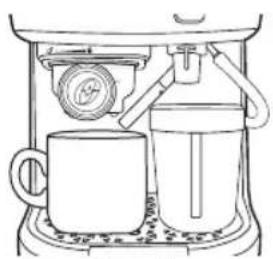
- Adjustable frothed milk dispensing tube must be placed when using small cup to avoid milk spill (See Figure 5).
natural_image
Illustration of a hand holding a tool with an arrow indicating direction (no text or symbols present)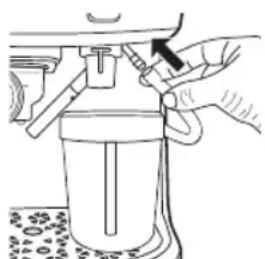
natural_image
Line drawing of a hand operating a mechanical device with a handle and valve (no text or symbols)Figure 2 Figure 1
natural_image
Simple line drawing of a mechanical device with no text or symbolsFigure 3
natural_image
Line drawing of a hand using a lathe machine to press or lift a cup on a tray (no text or symbols)Figure 4
natural_image
Line drawing of a coffee machine setup with a cup and receiver (no text or symbols)Figure 5
PREPARATION:
Gather the following prior to brewing
• Fine espresso ground coffee
- Tap water (or, preferably your favorite bottled water)
- Preferred Milk (Whole milk is recommended for best frothing results)
- Teaspoon and cup
1. The first step in making cappuccino is to make espresso. Therefore, fill the water reservoir with cold water. Never use warm or hot water to fill the water reservoir.
2. Follow the steps in the "BREWING ESPRESSO" section.
3. Fill the milk reservoir with Milk, using as guide the "MAX" marks to achieve best performance.
4. Make sure cup is below the adjustable frothed milk dispensing tube, missing this step might lead to spill the milk in the counter.
6. Turn the Brew/Steam Switch and make sure it is on the Steam “ ” position. When the temperature ready light “ ” turns on, rotate the control knob counterclockwise. to the Steam “ ” position. This will initiate the frothing process and fothed milk will begin to flow out of the adjustable frothed milk dispensive tube in just seconds.
7. You are now ready to make cappuccino. Pour the espresso into a cup, which has the capacity of at least 150 ~mL (5 ounces). Then add the steamed milk to the espresso.
8. When you have made the desired amount of cappuccinos, unplug the power cord and allow the machine to cool.
| Type of drink Coffee volume (ml) Milk volume (ml) Recom mended time (seconds) | |||
| Single espresso 30 NA 8 | |||
| Double espresso 60 NA | 15 | ||
| Americano | 60 NA | 8-12 | |
| Cappuccino | 60 | 100-130 | espresso: 15 | milk: 30-40 |
| Latte | 60 | 150-180 | espresso: 15 | milk: 90-115 |
RECIPES
CLEANING YOUR ESPRESSO & CAPPUCCINO MAKER
IMPORTANT CLEANING TIP: When you are finished steaming milk follow the instructions below to flush out any residual milk from the frother body. It is important to properly clean your frother body after each use to ensure the best performance.
CLEANING THE FROTHER BODY:
- Fill the milk reservoir with WATER ONLY, using the "Max" marks as guidance or you can also sumerge the frother connector tube into a cup full of clean water.
- Press the Brew/Steam Switch and make sure it is on the Steam “position. When the temperature ready light “is on, rotate the control knob counterclockwise to the Steam “position. This will initiate the cleaning process of the frother body and steamed water will begin to flow out of the adjustable frothed milk dispensive tube in just seconds. It’s recommended to run for 15-20 seconds and stop process.
- Turn the control knob to the Off position, unplug from power outlet and let the unit cool down.
- The Frother body may still be hot. Do not touch it with your hands until it has cooled. Deep cleaning recommended once a week.
CLEANING THE UNIT:
- The porta-filter, water reservoir, coffee filters, drip tray and drip cover can be washed with soap. These parts are not diswasher safe. CAUTION: Do not immerse appliance in water.
- Wipe housing with a soft wet cloth. Do not use abrasive cleaners or scouring pads, as they will scratch the finish.
- Do not store or leave the porta-filter in the brew head. This can adversely affect the seal between the brew head and the porta-filter while brewing espresso.
CLEANING THE WATER RESERVOIR:
- Discard the remaining water by removing the reservoir and turning it upside down over the sink. It is recommended to empty the water reservoir between uses and use fresh water for each brew. Do not immerse appliance in water.
CLEANING THE FILTERS
• After use wash with water to remove all coffee excess from the coffee filters. Let dry before storage.
DESCALING THE UNIT
Build-up of mineral deposits in the unit will affect the operation of the appliance. Your appliance must be descale when you begin to notice an increase in the time required to brew espresso, or when there is excessive steaming. Also, you may notice a build-up of white deposits on the surface of the brew head. The frequency of cleaning depends upon the hardness of the water used. The following table gives the suggested cleaning intervals.
SUGGESTED CLEANING INTERVALS
| Type of Water Cleaning Frequency | |
| Soft Water (Filtered Water) Every 80 | Brew Cycles |
| Hard Water (Tap Water) Every 40 | Brew Cycles |
TO DELIME WATER RESERVOIR:
- Fill the reservoir with fresh, undiluted white household vinegar.
- Allow appliance to sit overnight with the vinegar solution in the water reservoir.
- Discard vinegar by removing the reservoir and turning it upside down over the sink.
- Rinse the water reservoir thoroughly with tap water by filling reservoir half full with water and then pouring the water back out into the sink, repeating this step twice.
TO DELIME INTERNAL PARTS:
- Make sure you delime the inside of the water reservoir first by following the "Deliming" steps above.
- Make sure to turn the unit off by pressing On/Off "①button; the power cord must be disconnected from the electrical outlet. Fill the water reservoir with white vinegar above a minimum level of the reservoir.
- Insert the porta-filter (with filter and no coffee) and place jar/carafe or regular cup on top of the drip tray and under the porta-filter
- Plug the power cord into the electrical outlet.
- Press the On/Off button “☐ to turn unit On. Brew/Steam Selector Switch to Brew “☐” Place a cup (with at least 325mL/11oz capacity) under the porta-filter. Once temperature ready light “☐” is on, turn control knob clockwise to Brew “☐” for 30 seconds. Turn control knob to OFF position.
- Place a cup (with at least 325mL/11oz capacity) under the frothed milk dispensing tube. Fill milk reservoir with water to MAX. Brew/Steam Switch to Steam “Once temperature ready light “thermometer checkmark symbol” is on, turn control knob counterclockwise to Steam “Let water dispense for approximately 30 seconds then turn control knob to OFF position to stop the process.
- Repeat Steps 1 – 6 as necessary using only tap water to rinse any remaining traces IMPORTANT: This appliance has no user serviceable parts. Any servicing beyond that described in the Cleaning Section should be performed by an Authorized Service Representative only. See warranty card for contacting an authorized Oster® service center."
PROBLEMS, CAUSES AND SOLUTIONS
| PROBLEM CAUSES | SOLUTIONS | |
| Coffee does not come out. | Haven't used unit in a long time, or haven't primed it.No water in reservoir.Coffee grind is too fine.Too much coffee in the filter.Appliance is not turned on or plugged in.Coffee has been tamped / compressed too much. | Run priming.Add water to water reservoir.Grind coffee to medium ground.Fill filter with less coffee.Plug unit into electrical outlet.Turn it on.Refill filter with coffee, but tamp SOFTLY. |
| Coffee comes out around the edge of the filter holder. | Filter holder not rotated to full lock position.Coffee grounds around the filter rim.Too much coffee in the filter.Residual coffee on group head.Brew after selected frothing temperature or frothing | Rotate filter holder to full lock position.Wipe off rim.Fill with less coffee.Follow instructions to Cool Down the Unit.Ensure frother body is properly installed by pressing up until you hear click. |
| Milk is not foamy · Ran out of steam.Milk is not cold enough.Using 2% or skim milk.Frother body, steam tube or milk are not properly installed.Silicon connecting tube is being folded. | Ensure there is enough water in the reservoir and follow steps to prime the unit.Chill milk prior to making cappuccino.For best results, use whole milk.Refer to “PLACING THE FROTHER BODY” section to do proper installation before steaming milk.CAUTION:Check that all connections of the frother body are completely installed before frothing the milk.This will avoid overflow of steam, spillage and potential damages.Ensure no folded connecting tube. | |
| No froth is generated. | Frother body needs cleaning.Frother body is not installed correctly.Ran out of steam. | Add water to water reservoir.Ensure frother body is properly installed.Clean the frother body.Clean until blockage is clear plus an additional 20 seconds. |
| No steam is generated. | Water reservoir is empty.Appliance is not turned on.Frothing tube is blocked.Brew/Steam Selector Switch not on “mode. | Fill reservoir with correct amount of water and follow steps to prime the unit.Turn on unit and follow the operating instructions.Ensure frother body is properly installed by pressing up until you hear click.Turn off unit, allow unit to cool, unplug unit and clean out frother body.Ensure Brew/Steam Selector Switch is on “mode. |
| Coffee comes out too quickly. | Ground coffee is too coarse.Not enough coffee in filter. | Use a finer grind.Use more coffee.For additional guidance on espresso and milk timing tips consult the manual sections:HOW TO BREW ESPRESSO & RECIPES. |
| Coffee is too weak. | Using small filter for two demitasses.Too much water is used.Ground coffee is too coarse. | Use large filter for two demitasses.Manually stop the brew earlier by turning the control knob clockwise to the off position.Use a finer grind. |
| Steamed water is coming out the frothing dispensing tube before the frothed milk. | Steam is being generated in the unit before frothing the milk. | While milk is being pulled from milk reservoir into frothing body, it is normal to have steam and some drops of water come out from the adjustable frothed milk dispensing tube for a few seconds. |
NOTE
Oster®
| Características eléctricas de los modelos de la serie:Electric characteristics of series models: | |||
| Modelo/Model Voltaje | Voltage Frecuencia/Frequency | Potencia/Power | |
| BVSTEM5501x-013 127 | V 60 Hz 1170 W | ||
| BVSTEM5501x-052 220 | V 50 Hz 1050 W | ||
| BVSTEM5501x-053 220 | V 60 Hz 1070 W | ||
| BVSTEM5501x-054 220 | V 50 Hz 1050 W | ||
XXX where X is any number between 0 and 9 or any letter between A and Z.
The following information is intended for Mexico only.
CAFETERA PARA ESPRESSO Y CAPPUCCINO OSTER®
MODELOS: BVSTEM5501B, BVSTEM5501R
© 2022 Sunbeam Products, Inc. All rights reserved. One year limited warranty – please see insert for details.
www.oster.com
OSTERLATINO

YouTube


Impreso en China
Printed in China
P.N. NWL0001323488 Rev A
GCDS-OST-SL
- PRECAUCIONES IMPORTANTES
- ANTES DE USAR EL ARTEFACTO
- POR PRIMERA VEZ
- CÓMO LLENAR CON EL CAFÉ
- CÓMO PREPARAR ESPRESSO
- PREPARACIÓN:
- SAVE THESE INSTRUCTIONS
- PRODUCT NOTICES
- IMPORTANT
- CORRECT USE OF GROUND COFFEE FOR ESPRESSO MAKERS
- INTRODUCTION
- ESPRESSO
- CAPPUCCINO
- LATTE
- DESCRIPTION OF THE APPLIANCE
- BEFORE USING YOUR APPLIANCE FOR THE FIRST TIME
- STEP 1: CLEANING THE UNIT PRIOR TO FIRST USE
- STEP 2: PRIMING THE UNIT PRIOR TO FIRST USE
- THE GRIND
- OPERATING INSTRUCTIONS
- FILLING THE WATER RESERVOIR
- FILLING THE MILK RESERVOIR
- PLACING THE FILTER ON THE PORTA-FILTER
- FILLING WITH COFFEE
- FOR GROUND COFFEE:
- PLACING THE PORTA-FILTER
- HOW TO BREW ESPRESSO
- BREWING ESPRESSO
- HOW TO MAKE CAPPUCCINO
- IMPORTANT NOTES:
- BEFORE STEAMING THE MILK FOLLOW THESE STEPS:
- PLACING THE FROTHER BODY:
- PREPARATION:
- RECIPES
- CLEANING YOUR ESPRESSO & CAPPUCCINO MAKER
- CLEANING THE FROTHER BODY:
- CLEANING THE UNIT:
- CLEANING THE WATER RESERVOIR:
- CLEANING THE FILTERS
- DESCALING THE UNIT
- TO DELIME WATER RESERVOIR:
- TO DELIME INTERNAL PARTS:
- PROBLEMS, CAUSES AND SOLUTIONS
- NOTE
- Oster®
Brand : OSTER
Model : BVSTEM5501R
Category : Coffee maker