MITT M200Z - Meat Grinder Eldom - Free user manual and instructions
Find the device manual for free MITT M200Z Eldom in PDF.


| Product Type | Meat Grinder |
| Brand | Eldom |
| Model | MITT M200Z |
| Power Consumption | 400 W |
| Maximum Power (MBP) | 700 W |
| Voltage | 220-240 V, ~50 Hz |
| Max Continuous Operation | 30 minutes |
| Required Break Before Next Use | 15 minutes |
| Grinding Plates Included | 3 mm, 5 mm, 8 mm |
| Functions | Meat grinding, sausage making, kebbe making |
| Attachments Included | Pusher, pan, hopper, auger, knife, grinding plates, nut, butcher's set, kebbe set, separator, stop |
| Safety Features | Lock button, reverse function (R switch), overload protection |
| Body Material | Plastic (white and gray) |
| Blade Material | Stainless steel |
| Cleaning | Detachable parts washable in warm water; body wipe with damp cloth. Do not immerse or use dishwasher. |
| Storage | Compartment for grinding plates; attachments store inside pusher |
| Warranty | Domestic use only; improper use nullifies guarantee |
| Intended Use | Household food processing, mostly meat |
| Not For | Frozen meat, bones, hard products, nuts, coffee, dried legumes |
| Environmental | Recyclable materials; dispose at electrical equipment collection point |
Frequently Asked Questions - MITT M200Z Eldom
User questions about MITT M200Z Eldom
0 question about this device. Answer the ones you know or ask your own.
Ask a new question about this device
Download the instructions for your Meat Grinder in PDF format for free! Find your manual MITT M200Z - Eldom and take your electronic device back in hand. On this page are published all the documents necessary for the use of your device. MITT M200Z by Eldom.
USER MANUAL MITT M200Z Eldom
natural_image
Exterior view of a white and gray electrician meat grater with a side blade (no text or symbols visible)natural_image
Exploded view diagram of a mechanical assembly with cylindrical components and an arrow indicating direction (no text or symbols)Please acquaint precisely with whole of this instruction before using the blender for the first time.
- The power cable must be plugged in the socket with parameters the same as those given in that instruction manual.
- Do not immerse the cable or the appliance in water.
- Do not use the appliance outdoors.
- The appliance is not meant to be used via an external clock or a separate remote control system.
- Before switching the appliance on, make sure that all of its elements are appropriately assembled.
- Do not leave your device without supervision.
- Do not use the appliance for breaking ice, bones and other hard products or to crush nuts, coffee and dried leguminous plants.
- Always unplug the appliance after operation.
- The device can be used by children aged 8 and older and by persons with limited physical, sensory or mental capabilities, or persons without sufficient experience and knowledge only under supervision or if previously instructed on the safe use of the appliance and the possible risks. Children shall not play with the appliance. Cleaning and maintenance that are the responsibility of the user shall not be carried out by children without supervision. Protect the appliance and the power cord against children under 8 years old.
- Do not touch the appliance with wet hands.
- Always pull the plug of the socket before cleaning.
- Do not exceed the maximum time of continuous operation of the appliance.
-
Do not move during use.
-
Never reach into the feeding tube with your fingers or an object while the appliance is running. Only the pusher is to be used for this purpose.
- Never use the appliance if the supply cord is damaged. If found dama ged in any way, consult the producer's authorized service centre. The list of service centres is to be found in the appendix and on www.eldom.eu.
- The appliance can be used only with the originally included accessories.
- Refer servicing to an authorized service centre. Modifying the appliance or using spare parts or elements other than the original ones is forbidden and can expose the user to hazard.
WARNING
Plastic bag can be dangerous, to avoid danger of suffocation keep this bag away from babies and children.

Only intended for household use.
EN
INSTRUCTION MANUAL
MEAT GRINDER / MEAT GRINDER + SLICER M200/M200ZT
eldom
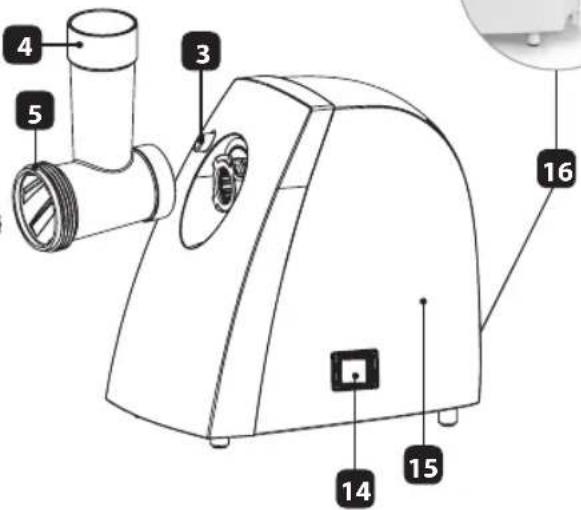
DESCRIPTION
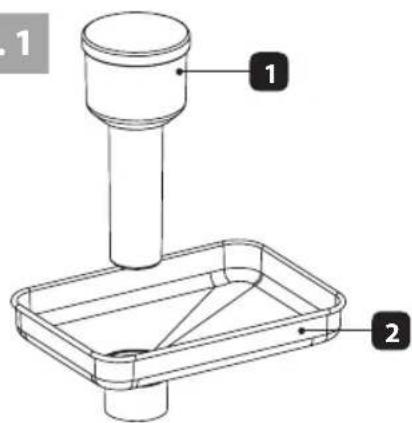
- Pusher
- Pan
- Lock button
- Hopper
- Grinding chamber
- Auger
- Knife
- Grinding plates: 3 mm, 5 mm, 8 mm
- Nut
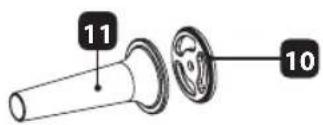
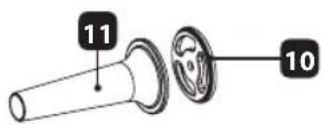
- Butcher's attachment
- Separator
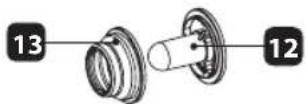
- Kebbe attachment
- Stop
- Switch
- Body
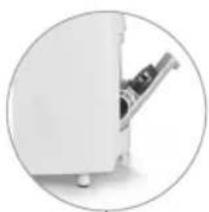
- Compartment
FIG. 1
natural_image
Close-up of a white mechanical component with a metallic bracket and mounting base (no visible text or symbols)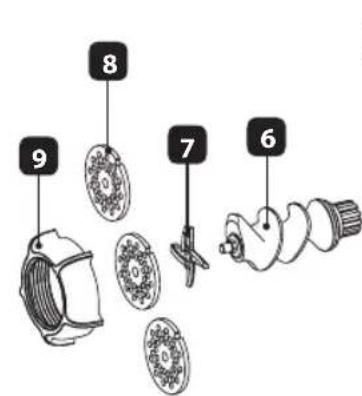
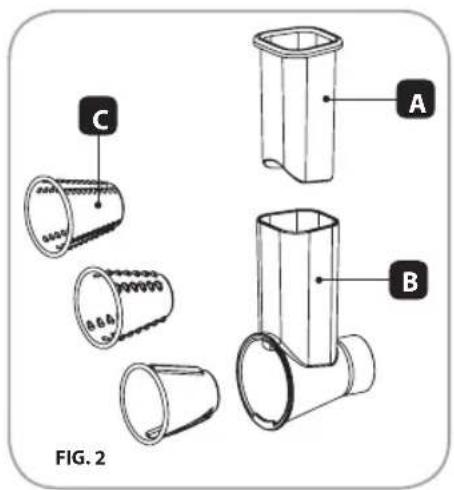
SLICING SET
(ONLY WITH M200ZT)
A. Plug
B. Slicer
C. Blades
TECHNICAL DATA
• power: 400 W
MBP: 700 W
- mains voltage: 220-240 V, \~50 Hz
• maximum time of continuous operation: 30 min.
- break before continuation of operation: 15 min.
INTENDED USE
The appliance is intended for grinding food products, mostly meat.
HOW TO USE
Before the first use:
• read thoroughly this guidebook.
• Make sure that all elements are free of damages.
- Wash the elements that come into contact with food.
OPERATION
- Set the body (15) on flat, hard and stable ground.
• Make sure that the appliance is disconnected from the mains and the switch (14) is in the position "O". - Select the required function of the appliance.
- Before starting the appliance, make sure that all its elements have been correctly installed.
- Do not put fingers or any objects into the hopper.
• If the auger gets stuck, set the switch (14) in the position "R" for 3 to 5 s.
• After processing the whole portion of ingredients, switch off the appliance and let it stop.
• After the end of work, disconnect the appliance from the mains.
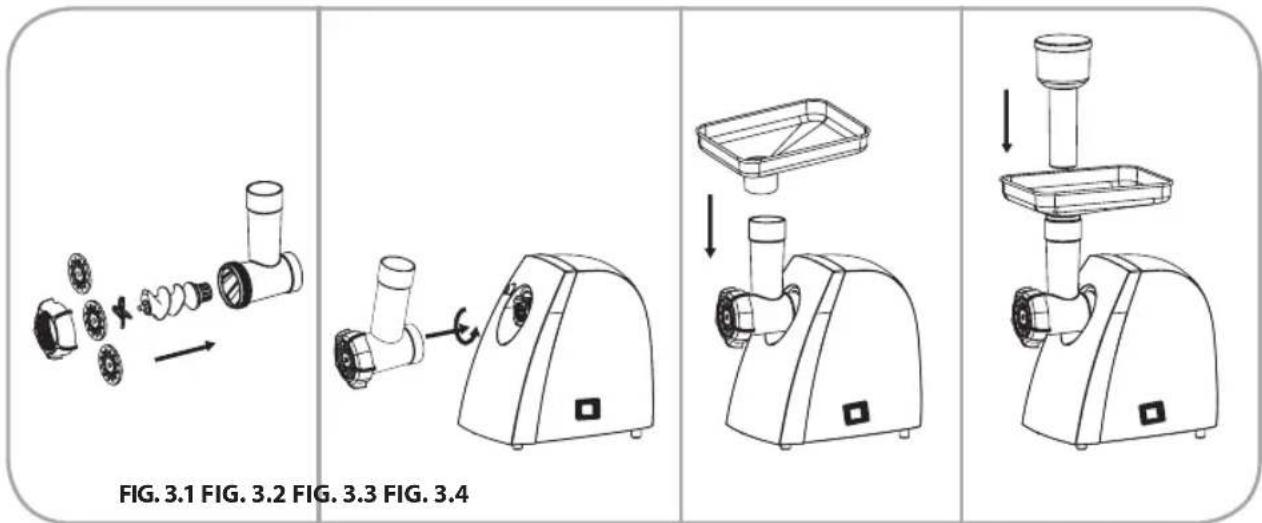
GRINDING
- The order of installation in the grinding chamber (5): the auger (6), the knife (7), a grinding plate of choice (8), and the nut (9), see fig. 3.1.
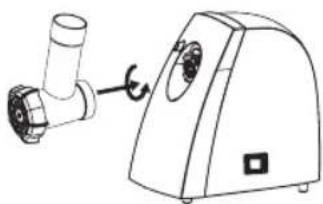
• Install the complete unit in the body (15): see fig. 3.2. Make sure that the chamber (5) is locked.
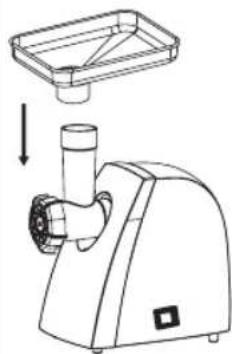
• Attach the pan (2) on the hopper (4): see fig. 3.3.
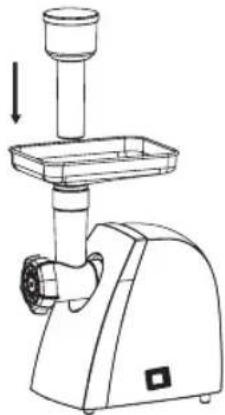
• Insert the pusher (1) in the hopper (4): see fig. 3.4. - Place a bowl under the outlet of the grinding chamber.
- Cut the meat into strips, 10 cm long and 2 cm thick. Remove bone, cartilage and tendons.
- Connect the appliance to the mains of the parameters compatible with those stated above and start it with the button (14): position "ON".
- Place the meat on the pan (2) and use the pusher (1) to gently push it into the hopper (4).
- Meet need to be ground twice for some meals.
NOTE:
DO NOT GRIND FROZEN MEAT!
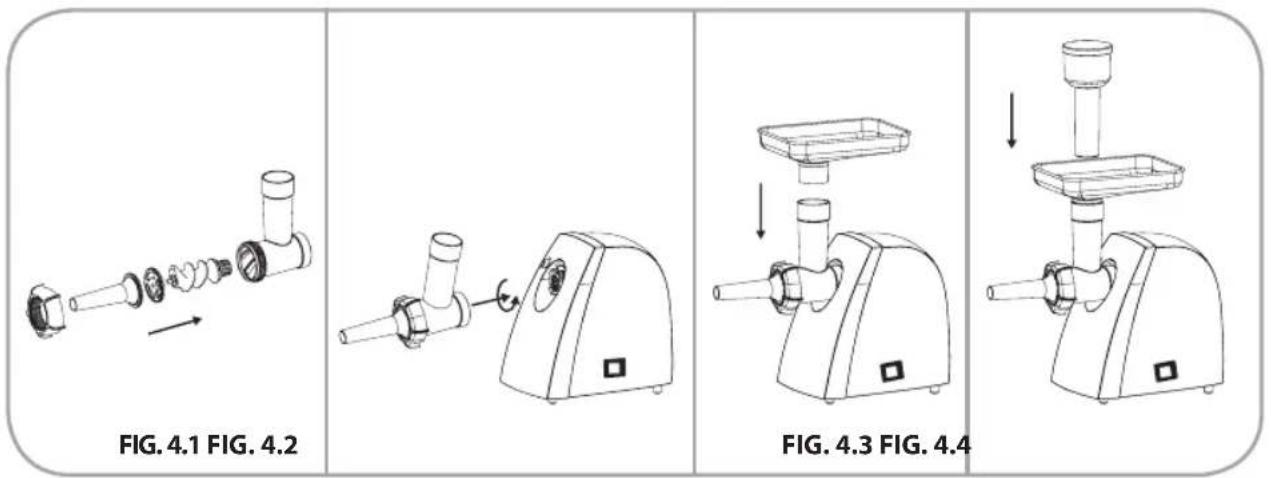
THE BUTCHER'S SET (FOR SAUSAGES)
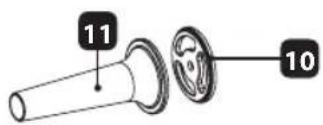
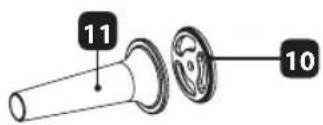
- The order of installation in the grinding chamber (5): the auger (6), the separator (11) and the butcher's attachment (10) and the nut (9): see fig. 4.1.
• Install the complete unit in the body (15): see fig. 4.2. Make sure that the chamber (5) is locked. - Attach the pan (2) on the hopper (4): see fig. 4.3.
- Insert the pusher (1) in the hopper (4): see fig. 4.4T.
- Soak sausage skin in lukewarm water (ca. 10 min.).
- Place the stuffing on the pan (2) and use the pusher (1) to gently push it into the hopper (4).
- Place moist skin on the attachment (10).
- Connect the appliance to the mains of the parameters compatible with those stated above and start it with the button (14): position "ON".
- Fill in the sausage skin and form sections as needed.
NOTE
STUFFING SHOULD NOT BE TOO THIN.
KEBBE SET
Kebbe is a traditional meal from Near East, made mostly of lamb and bulgur groats.
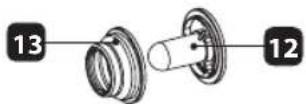
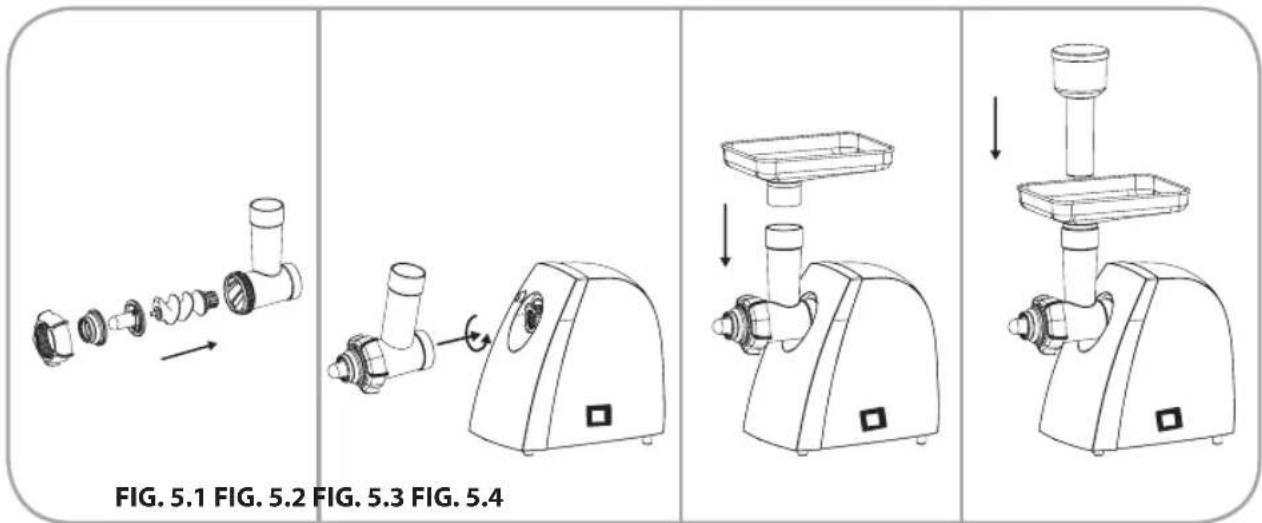
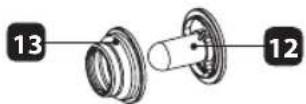
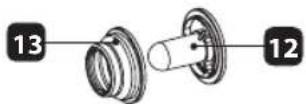
- The order of installation in the grinding chamber (5): the auger (6), the kebbe attachment (13) and the stop (12) and the nut (9): see fig. 5.1.
• Install the complete unit in the body (15): see fig. 5.2. Make sure that the chamber (5) is locked.
• Attach the pan (2) on the hopper (4): see fig. 5.3.
• Insert the pusher (1) in the hopper (4): see fig. 5.4.
SLICER
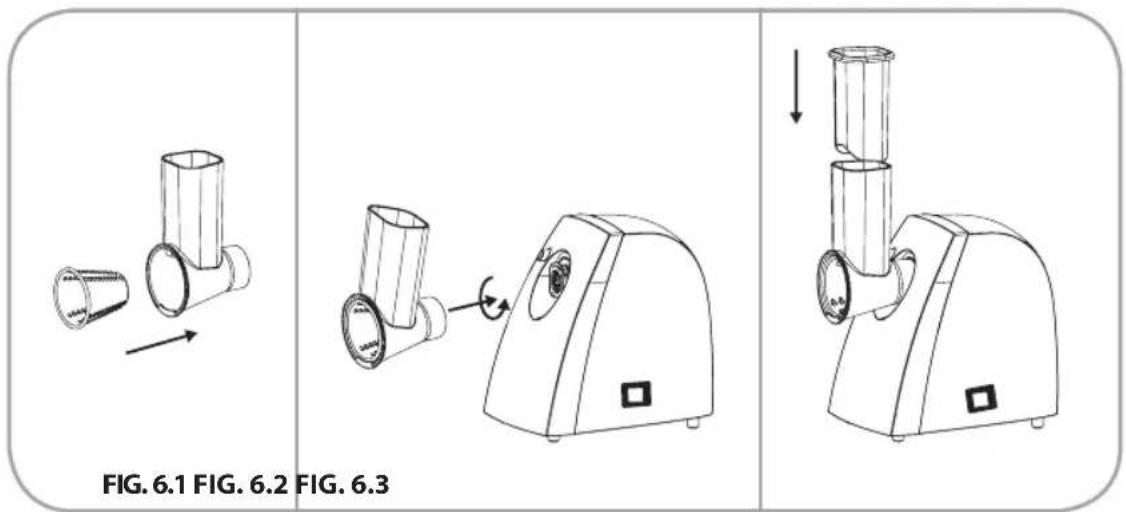
• Install a blade of your choice in the slicer (C): see fig. 6.1.
- Place the whole unit in the body (15): see fig. 6.2. Check whether the slicer (B) is locked.
- Insert the pusher (1) in the hopper: see fig. 6.3.
- Place a bowl under the outlet of the slicer.
- Connect the appliance to the mains of the parameters compatible with those stated above and start it with the button (14): position "ON".
- Put the ingredients one by one into the hopper and use the pusher (A) to slide them downwards to the rotating blade (C).
STORAGE
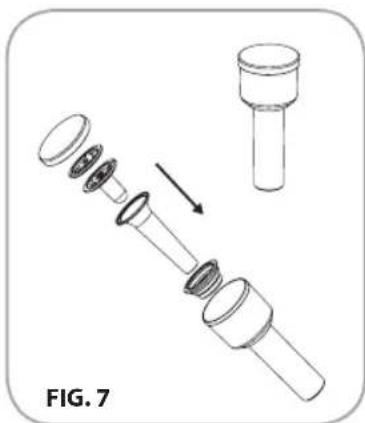
Unused grinding plates may be stored in the compartment (16) see fig. 1. The butchering set (10, 11) and the kebbe set (12, 13) may be put inside the pusher (1): see fig. 7.
CLEANING AND MAINTENANCE
Disconnect the power supply when the unit is not in use or before cleaning it. Clean the device right after its use. Before cleaning, dismantle the parts of the appliance. Wash them in warm water with washing liquid, use a brush, rinse under running water and wipe dry. Put a thin layer of edible oil on the grinding plates and the knife to protect them against rust. Do not use abrasive agents, cleaning powders, acetone, alcohol, etc., for cleaning. Do not immerse the body in water and do not rinse it under running water. Clean the body of the appliance with a damp cloth. The device cannot be immersed in water or washed in a dishwasher.
natural_image
Exploded view diagram of a mechanical assembly showing internal components and a cylindrical component (no text or symbols)The knife is an utility tool and should be replaced regularly. The knife is not covered by guarantee.
ENVIRONMENTAL PROTECTION
- the appliance is made of materials which can be recycled.
- it should be handed over to the applicable collection point for the recycling of electrical and electronic equipment.
WARRANTY
- this appliance is designed for domestic use only.
- it cannot be used for professional purposes or for other than the intended use.
- improper use will nullify the guarantee.
DOPORUČENÍ PRO OBLAST BEZPEČNOSTI
natural_image
Close-up of a white appliance with a metallic handle and mounting bracket, enclosed in a circular frame (no text or symbols visible)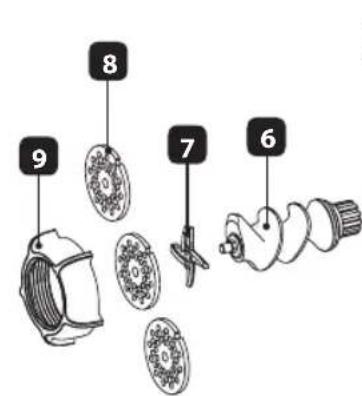
METZGEREI-SET
KEBBE-AUFSATZ
GEMÜSESCHNEIDER
natural_image
Exploded view diagram of a mechanical component with a cylindrical part inserted, showing internal layers and an arrow indicating assembly (no text or symbols)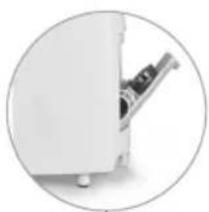
natural_image
Close-up of a white mechanical component with a metallic bracket and mounting base (no visible text or symbols)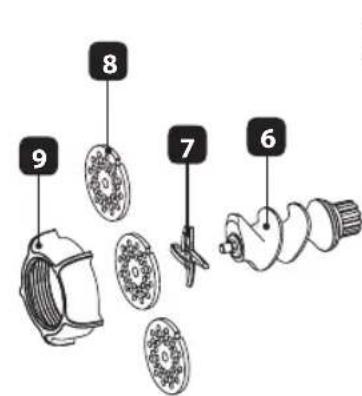
natural_image
Diagram showing exploded view of mechanical components including bolts and a valve assembly (no text or labels)OBR. 3.1
natural_image
Line drawing of a manual pump device with a cylindrical inlet and a curved housing (no text or symbols)OBR. 3.2
natural_image
Line drawing of a manual electrician's motor with a handle and top component (no text or symbols)OBR. 3.3
natural_image
Line drawing of a manual meat processing machine with a downward arrow indicating compression (no text or symbols)OBR.3.4
MLETIE
natural_image
Exploded view diagram of a mechanical assembly with cylindrical components and a separate cylindrical component (no text or symbols)KIBBEH KÉSZLET
SZELETELÓGÉP
natural_image
Close-up of a white mechanical component with a metallic bracket and mounting base (no visible text or symbols)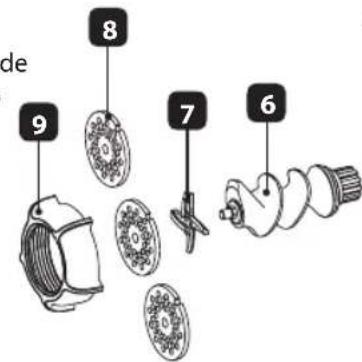
KIT PARA CORTAR
(SÓLO EL MODELO M200ZT)
CORTADOR
natural_image
Diagram of a mechanical assembly showing a cylindrical component being inserted into a multi-layered cylindrical part, with an arrow indicating the process (no text or symbols present)
- WARNING
- EN
- INSTRUCTION MANUAL
- MEAT GRINDER / MEAT GRINDER + SLICER M200/M200ZT
- DESCRIPTION
- SLICING SET
- (ONLY WITH M200ZT)
- TECHNICAL DATA
- INTENDED USE
- HOW TO USE
- OPERATION
- GRINDING
- NOTE:
- DO NOT GRIND FROZEN MEAT!
- THE BUTCHER'S SET (FOR SAUSAGES)
- NOTE
- STUFFING SHOULD NOT BE TOO THIN.
- KEBBE SET
- SLICER
- STORAGE
- CLEANING AND MAINTENANCE
- ENVIRONMENTAL PROTECTION
- WARRANTY
- DOPORUČENÍ PRO OBLAST BEZPEČNOSTI
- METZGEREI-SET
- KEBBE-AUFSATZ
- GEMÜSESCHNEIDER
- MLETIE
- KIBBEH KÉSZLET
- SZELETELÓGÉP
- KIT PARA CORTAR
- (SÓLO EL MODELO M200ZT)
- CORTADOR
Brand : Eldom
Model : MITT M200Z
Category : Meat Grinder