
MP6540 - Exercise bike HMS Premium - Free user manual and instructions
Find the device manual for free MP6540 HMS Premium in PDF.


| Product Type | Exercise Bike |
| Brand | HMS Premium |
| Model | MP6540 |
| Max User Weight | 100 kg |
| Resistance System | Belt tension control with knob |
| Display Functions | Time (00:00-99:59 min/sec), Speed (0.0-999.9 unit/h), Distance (0.00-9999 unit), Calories (0.0-9999 cal), ODO |
| Scan Mode | Auto-cycles through all functions every 5 seconds |
| Auto On/Off | Activates on pedaling or button press; turns off after 4 seconds of inactivity |
| Power Source | 2 AAA batteries (not included) |
| Hand Pulse Sensors | Integrated on handlebars |
| Seat Adjustment | Height adjustable with knob (M12); slide post to desired hole |
| Pedals | Left and right with toe straps |
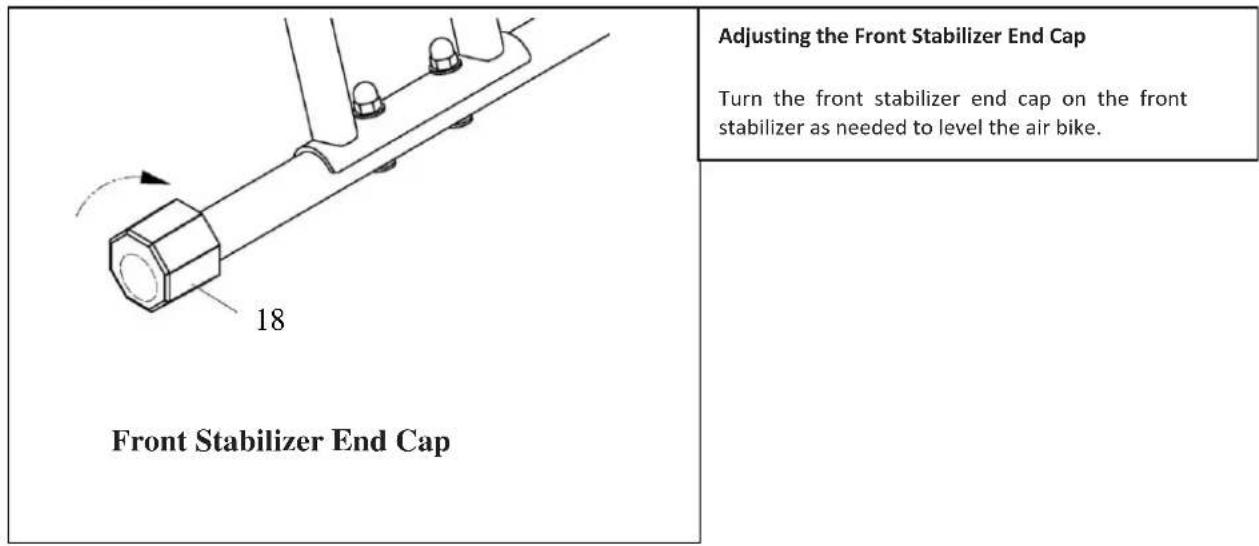
| Stabilizers | Front and rear; front has adjustable leveling end cap |
| Frame Material | Steel |
| Dimensions (approx) | 125 x 55 x 120 cm |
| Weight (approx) | 28 kg |
| Safety Standard | EN ISO 20957-1 class HC (home use, non-therapeutic) |
| Assembly Required | Yes, tools included (Allen wrenches, multi hex tool) |
| Warranty | 24 months (Poland; check local terms) |
| Maintenance | Regularly check and tighten bolts; clean with damp cloth |
| Spare Parts | Available via parts list in manual; contact service center |
| Intended Use | Home fitness, not for therapeutic or rehabilitation purposes |
Frequently Asked Questions - MP6540 HMS Premium
User questions about MP6540 HMS Premium
0 question about this device. Answer the ones you know or ask your own.
Ask a new question about this device
Download the instructions for your Exercise bike in PDF format for free! Find your manual MP6540 - HMS Premium and take your electronic device back in hand. On this page are published all the documents necessary for the use of your device. MP6540 by HMS Premium.
USER MANUAL MP6540 HMS Premium
natural_image
Line drawing of an exercise bike with adjustable arms and body structure (no text or symbols)Lista części
TIME....00:00\~99:59 MIN/SEC
SPEED....0.0\~999.9 ML/H
DISTANCE....0.00\~9999ML
CALORIE....0.0\~9999 CAL
AUTO ON/OFF
- Read this manual carefully before first using and retain it for future reference.
- Observe all warnings and precautions including assembly steps. Use it only for intended purpose.
- Assemble and use it only according to this manual to assure your safety. Inform all other users about safe usage.
-
Keep it away from children and pets. Don't let children unattended near this device. Only an adult person may assemble and use it.
-
Ask your physician for advice before starting any exercise program. It is especially necessary if your suffer from some health problems or if you take some medication that could affect your heart rate, blood pressure or cholesterol level.
-
Observe body signals. If you feel some problems (pain, tightness in chest, irregular heartbeat, breathing shortness, dizziness or nausea), stop immediately, improper exercising can result in serious health problems or in an injury.
-
Put it only on a flat, dry and clean surface and keep a safety safety clearance of at least 0.6 m from other objects for higher safety. Use a protective cover to protect carpet or floor.
-
Wear adequate sports clothes and sports shoes. Avoid too loose clothes.
-
Don't use it outdoors.
-
Check this device for damage or wearing before each using. Regularly check all bolts and nuts. They should be well tightened, Re-tighten, if necessary. Never use damaged or worn device to assure your safety.
-
If some sharp edges occur, stop using.
-
If you hear some unusual noises coming from this device, stop using.
-
No adjustable part should protrude and obstruct user movements. Only one person may use it at time.
-
Braking is independent of the speed.
-
It is not intended for therapeutic purpose.
-
Pay attention while lifting or transporting it to avoid back injury. Use only proper lifting techniques or ask some other person for help.
-
Don't do any improper modification of this product. If necessary, contact authorized service.
-
Max user weight: 100 kgs
Category: The equipment has been tasted and certified according EN ISO 20957-1 under class HC. It is not suite for therapeutic use
EXPLODED VIEW
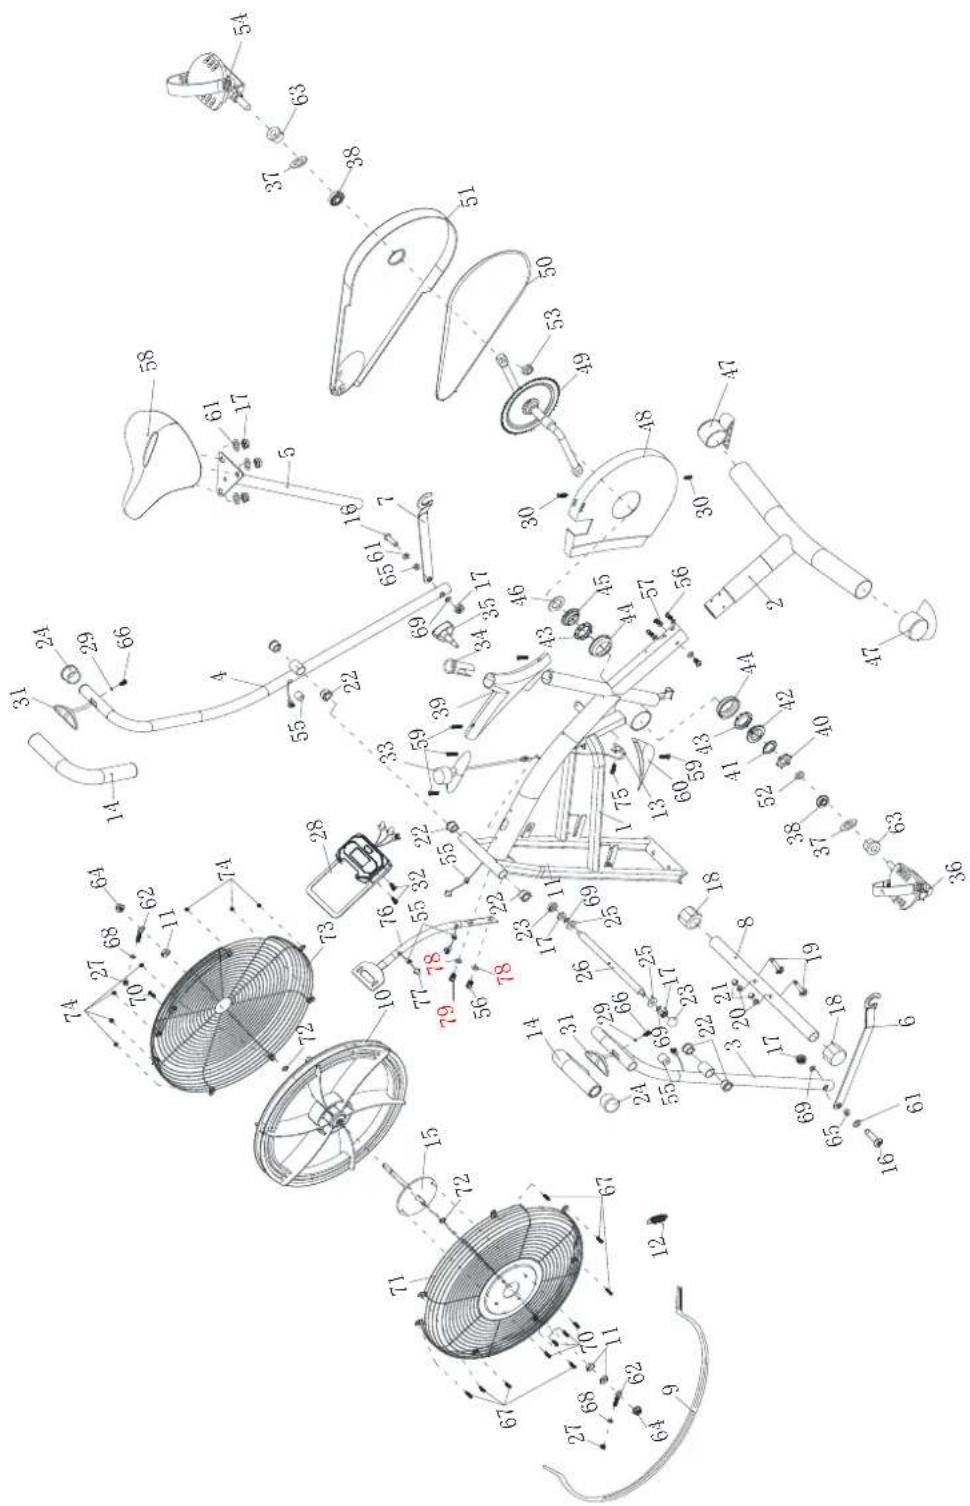
PARTS LIST
| No. | Description | Qty | No. | Description | Qty |
| 1 | Main Frame | 1 | 41 | Stop Washer 35× 2.0 | 1 |
| 2 | Rear Stabilizer | 1 | 42 | Puller Sleeve 7/8" | 1 |
| 3 | Left Handrail | 1 | 43 | Ball Bearing 44.5 | 2 |
| 4 | Right Handrail | 1 | 44 | Bearing Bush 55.6× 16 | 2 |
| 5 | Seat Post | 1 | 45 | Puller Sleeve 15/16" | 1 |
| 6 | Left Connection Bar | 1 | 46 | Flat Washer 40× 2.8 | 1 |
| 7 | Right Connection Bar | 1 | 47 | End Cap for Rear Stabilizer | 2 |
| 8 | Front Stabilizer | 1 | 48 | Decorative Cover 250×290×30 | 1 |
| 9 | Belt | 1 | 49 | Crank | 1 |
| 10 | Fly Wheel | 1 | 50 | Chain | 1 |
| 11 | Hexagon Nut M10 | 3 | 51 | Chain Cover | 1 |
| 12 | Tension Spring | 1 | 52 | Left Nylon Nut 1/2" | 1 |
| 13 | Sensor with Wire | 1 | 53 | Right Nylon Nut 1/2" | 1 |
| 14 | Foam Grip 24× 35× 280 | 2 | 54 | Right Pedal | 1 |
| 15 | Fan Wheel Axle | 1 | 55 | Wire Plug 12 | 5 |
| 16 | Hexagon Bolt M8×50 | 2 | 56 | Hexagon Bolt M5×15 | 5 |
| 17 | Nylon Nut M8 | 7 | 57 | Arc Washer 5× 14× 1 | 4 |
| 18 | End Cap for Front Stabilizer | 1 | 58 | Seat Cushion | 1 |
| 19 | Carriage Bolt M8×40 | 2 | 59 | Cross Pan Head Tapping Screw ST3.9×16 | 5 |
| 20 | Arc Washer 8× 20× 1.5 | 2 | 60 | Decorative Cover158×23×58 | 1 |
| 21 | Cap Nut M8×16 | 2 | 61 | Flat Washer 8× 16× 1.5 | 5 |
| 22 | Round End Cap 25× 1.5 | 6 | 62 | Eyebolt M6×36 | 2 |
| 23 | Nut Cap 24× 13 | 2 | 63 | Spacer Bush 21× 13× 10 | 2 |
| 24 | Handlebar End Cap | 2 | 64 | Flange Nut M10 | 2 |
| 25 | Flat Washer 8× 24× 2 | 2 | 65 | Steel Bushing 18× 14× 8× 10 | 2 |
| 26 | Rotation Rod 16.0× 261.5 | 1 | 66 | Cross Pan Head Self-drilling Screw ST4.2×20 | 2 |
| 27 | Hexagon Nut M6 | 2 | 67 | Cross Pan Head Bolt M5×10 | 7 |
| 28 | Meter | 1 | 68 | Spring Washer 6 | 2 |
| 29 | Flat Washer 5× 9× 0.8 | 2 | 69 | Spring Washer 8 | 4 |
| 30 | Cross Pan Head Screw M5×15 | 2 | 70 | Screw M6×10 | 5 |
| 31 | Hand Pulse with Wire L=700mm | 2 | 71 | Left Flywheel Cover | 1 |
| 32 | Blot M5×10 | 2 | 72 | Circlip 10 | 2 |
| 33 | Tension Control Knob | 1 | 73 | Right Flywheel Cover | 1 |
| 34 | Plastic Bushing 32× 1.5 | 1 | 74 | Nylon Nut M5 | 7 |
| 35 | Seat Height Adjustment Knob M12 | 1 | 75 | Cross Pan Head Tapping Screw ST4.2×12 | 1 |
| 36 | Left Pedal | 1 | 76 | Meter Plate | 1 |
| 37 | Flat Washer 18× 34× 2.0 | 2 | 77 | Middle Wire | 1 |
| 38 | Alien Bearing 31× 29× 13× 11 | 2 | 78 | Flat Washer 5× 14× 1 | 2 |
| 39 | Decorative Cover 350×130×47 | 1 | 79 | Hexagon Bolt M5×25 | 1 |
| 40 | Hexagon Flat Nut 7/8' | 1 |
ASSEMBLY INSTRUCTIONS
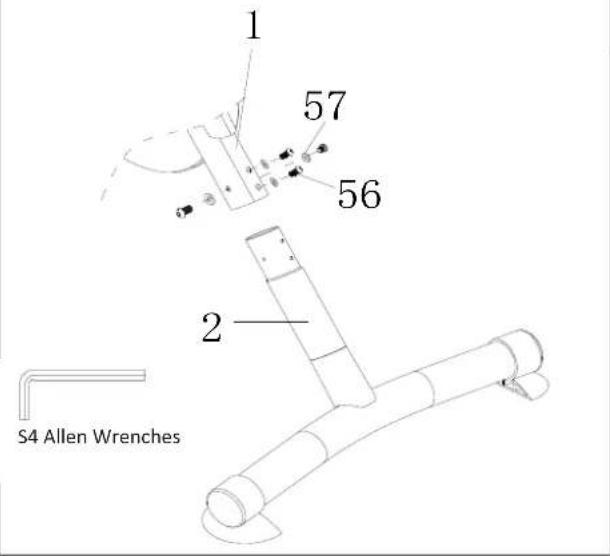
Step 1
56 M5x15 4PCS #57 Φ5xΦ14x1 4PCS


Attach the Rear Stabilizer (2) onto the rear curve of the Main Frame (1) with four Hexagon Bolts (56) and four Arc Washers (57).
Tighten bolts with S4 Allen Wrenches provided.
Step 2
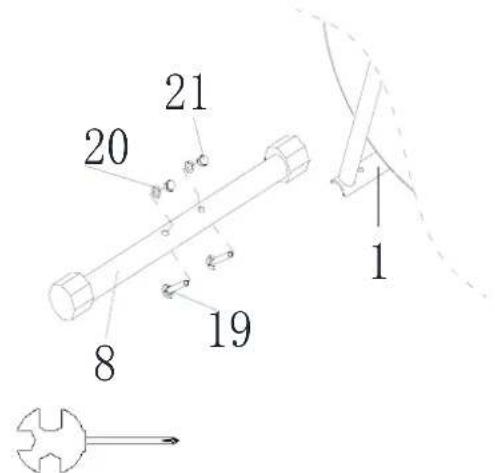
19 M8x40 2PCS #20 Φ8xΦ20x1.5 2PCS #21 M8 2PCS


Attach the Front Stabilizer (8) onto the front curve of the Main Frame (1) with two Cap Nuts (21), two Arc Washers (20) and two Carriage Bolts (19).
Tighten nuts with Multi Hex Tool with Phillips Screwdriver provided.
Multi Hex Tool with Phillips Screwdriver S13, S14, S15
Step 3
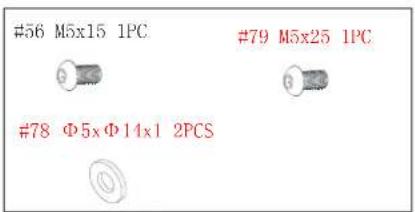
Place the Rotation Rod (26) into the hole of the Main Frame (1). Install the Meter Plate (76) to the Main Frame (1) with one Hexagon Bolt (56) and one Hexagon Bolt (79) and two Flat Washer(78). Tighten bolts with Allen Wrenches provided.
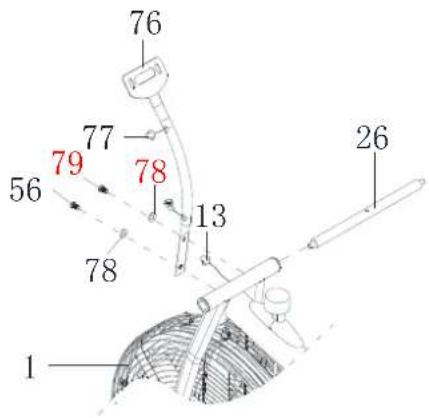
Connect the Middle Wire (77) with Sensor with Wire (13).
Step 4
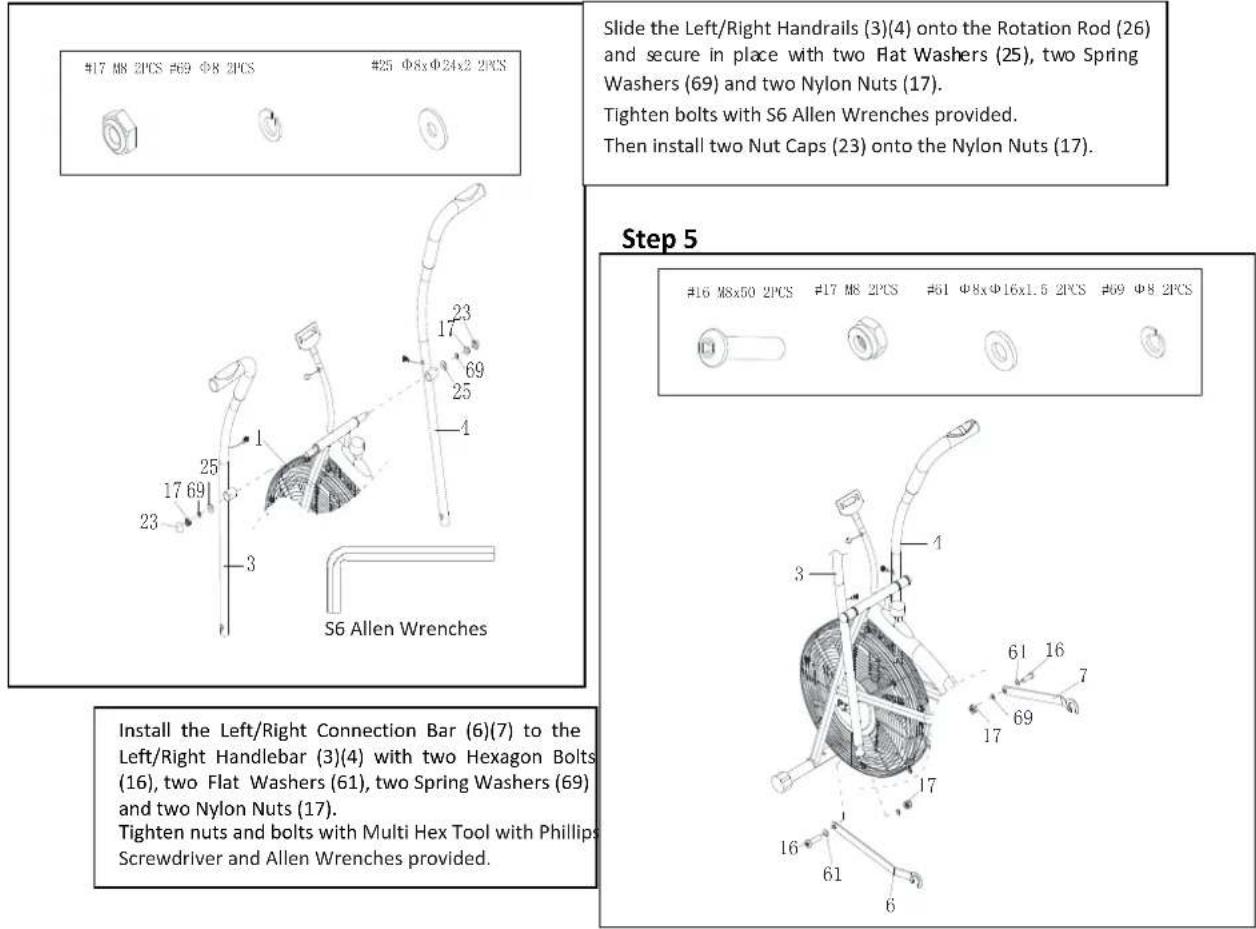
Slide the Left/Right Handrails (3)(4) onto the Rotation Rod (26) and secure in place with two Flat Washers (25), two Spring Washers (69) and two Nylon Nuts (17).
Tighten bolts with S6 Allen Wrenches provided. Then install two Nut Caps (23) onto the Nylon Nuts (17).
Install the Left/Right Connection Bar (6)(7) to the Left/Right Handlebar (3)(4) with two Hexagon Bolts (16), two Flat Washers (61), two Spring Washers (69) and two Nylon Nuts (17).
Tighten nuts and bolts with Multi Hex Tool with Phillips Screwdriver and Allen Wrenches provided.
Step 6
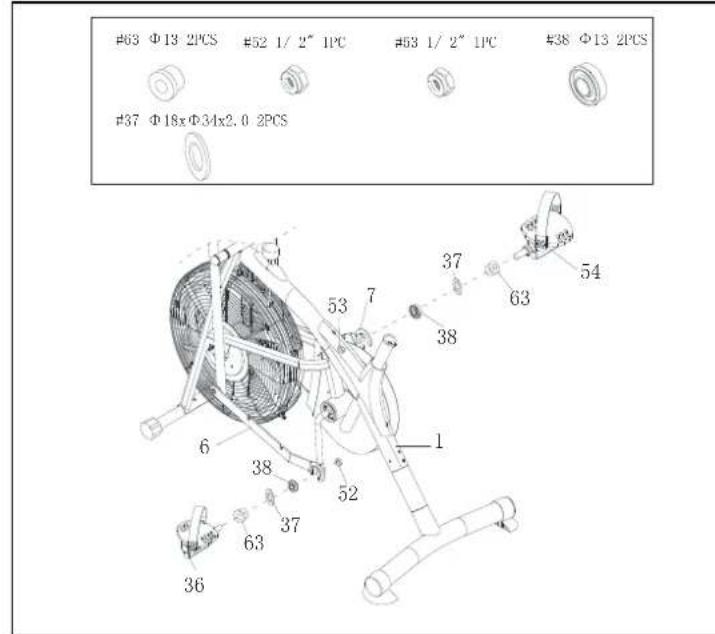
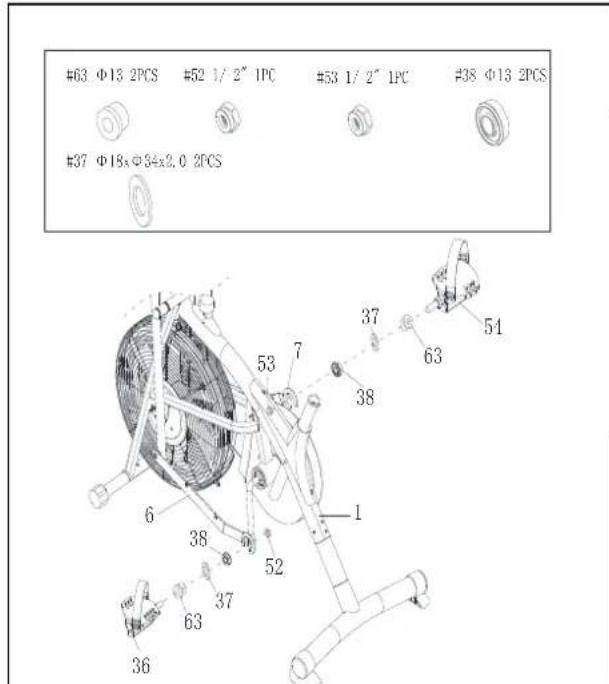
Attach the Left Connection Bar (6) and Left Pedal (36) to the crank with one Spacer Bush (63), one Flat Washer (37), one Alien Bearing (38) and one Left Nylon Nut (52) with clockwise direction.
Tighten nuts with Multi Hex Tol with Phillips Screwdriver provided.
Attach the Right Connection Bar (7) and Right Pedal (54) to the crank with one Spacer Bush (63), one Flat Washer (37), one Alien Bearing (38) and one Right Nylon Nut (53) with counter-clockwise direction.
Tighten nuts with Multi Hex Tbol with Phillips Screwdriver provided.
Step 7
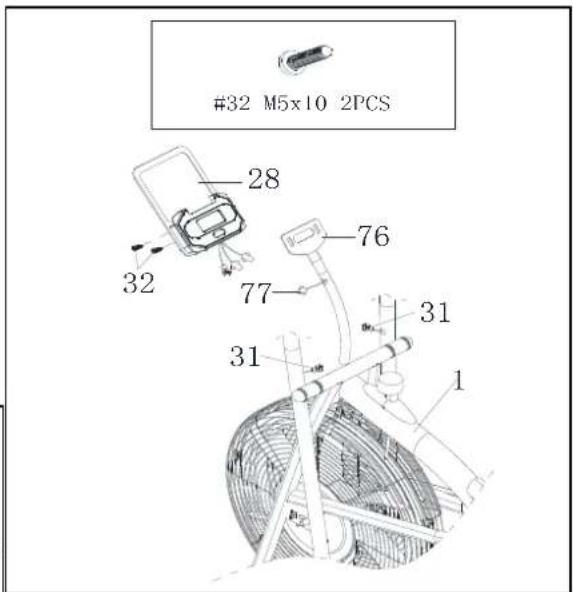
Remove two M5×10 Cross Pan Head Bolts (32) from the Console (28).
Connect the Middle Wire (77) and Hand Pulse Sensor Wires (31) to the wires that come from the Console (28). Tuck wires into the Handlebar Post. Attach Console (28) onto the top end of the Meter Plate (76) with two M5×10 Cross Pan Head Bolt (32) that were removed. Tighten bolts with Multi Hex Tool with Phillips Screwdriver provided.
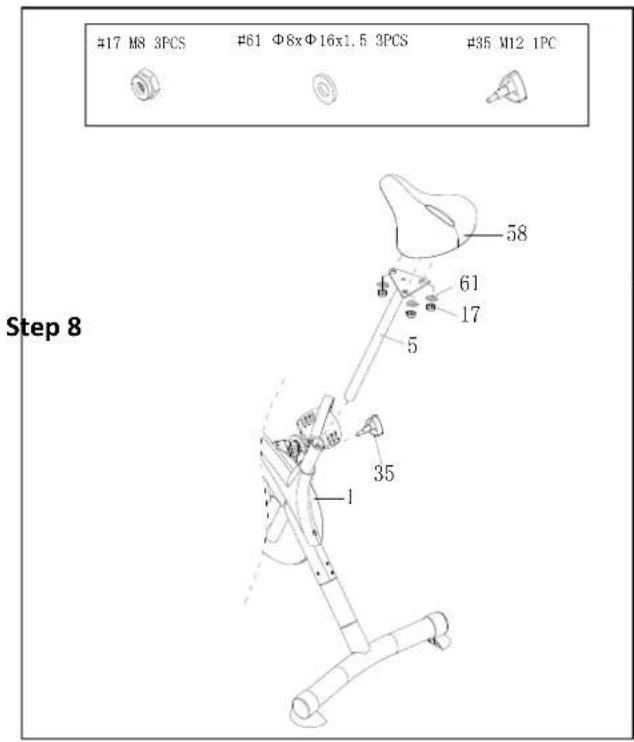
Attach the Seat Cushion (58) onto the Seat Post (5) with three Flat Washers (61) and three Nylon Nuts (17). Tighten bolts with Multi Hex Tool with Phillips Screwdriver provided.
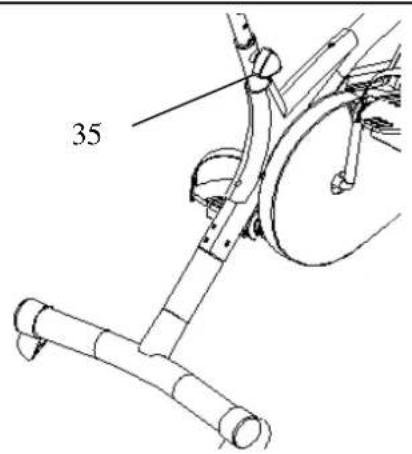
Insert the Seat Post (5) into the Seat Post Plastic Bushing on the tube of the Main Frame (1), and then attach the Seat Height Adjustment Knob (35) onto the tube of the Main Frame (1) by turning it in a clockwise direction to lock the Seat Post (5) in the suitable position.
Adjustments
Adjusting the Tension Control Knob
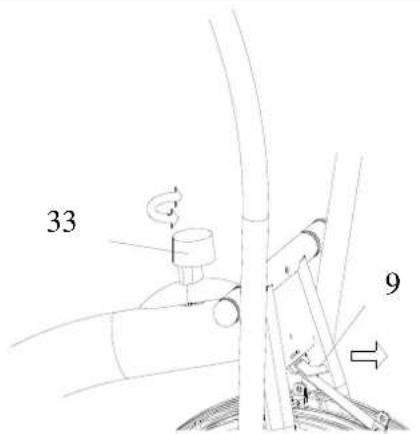
Adjust the resistance by the Tension Control Knob (33). After using a few time, if the belt(9) is loosen then we can tight the belt to recover the resistance.
Adjusting the Seat Height
Remove the seat height adjustment knob from the tube of the main frame. Then slide the seat post up or down slightly to the desired hole for the suitable position. Lock the seat post in place by tightening the seat height adjustment knob in a clockwise direction.
NOTE: When adjusting the height of seat post, make sure the seat post plastic bushing does not exceed the mark line on the seat post.
EXERCISE COMPUTER
TIME....00:00\~99:59MIN/SEC
SPEED....0.0\~999.9ML/H
DISTANCE....0.00\~9999ML
CALORIE....0.0\~9999 CAL
AUTO ON/OFF
The computer turns on when you start pedaling or when you press the button. After 4 seconds without any signal, the power will turn off automatically.
FUNCTION BUTTONS:
MODE: Press this button to select functions. Hold for 3 seconds to clear.
FUNCTIONS:
SCAN: Press "MODE" button until "SCAN" appears, monitor will rotate through all 5 functions: Time, Speed, Distance, Calorie, ODO.
Each function will display for 5 seconds.
TIME: Count the total time from exercise start to end.
SPEED: Display current speed.
DIST: Count the distance from exercise start to end.
CALORIES: Count the total calories from exercise start to end.
ODO: Monitor displays the total accumulated distance. Taking out the batteries resets the odometer.
BATTERIES
The exercise computer uses 2 AAA batteries. If there is a problem with the display try changing the batteries first. Dispose of old batteries according to your regional guidelines.
Bezpečnostní pokyny
Seznam dílů
TIME....00:00\~99:59 MIN/SEC
SPEED....0.0\~999.9ML/H
DISTANCE....0.00\~9999ML
CALORIE....0.0\~9999 CAL
AUTO ON/OFF
Stückliste
Schritt 6
TIME....00:00\~99:59 MIN/SEC
SPEED....0.0\~999.9
ML/H DISTANCE.... 0.00\~9999 ML
CALORIE....0.0\~9999 CAL
AUTO ON/OFF
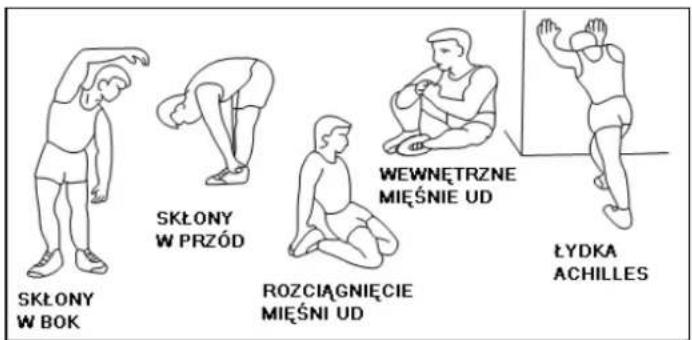
This phase should help improving blood circulation and make your muscles working properly while reducing a cramp risk or injury. It is advisable to do a few stretching exercises as shown below. Each stretching exercise should be taken for approx. 30 seconds. Don't overstretch and don't jerk your muscles. If you feel pain, stop immediately.
II. EXERCISE PHASE
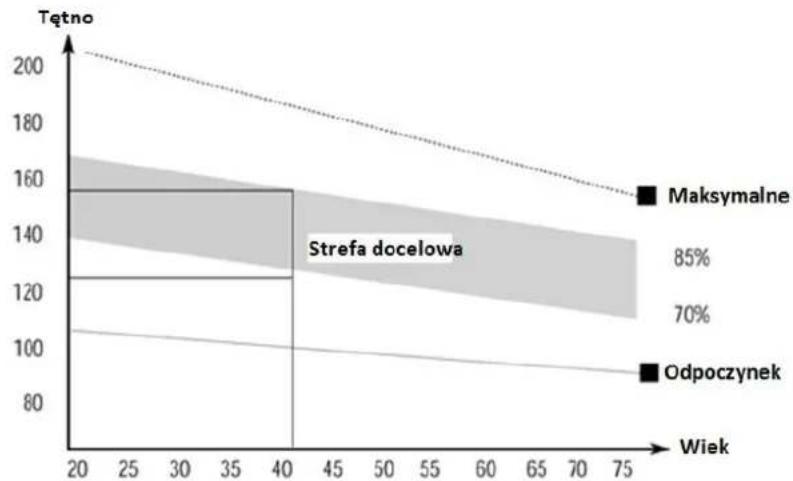
It is a phase, during which you should put in your effort. After regular workout, your leg muscles should get more flexible. Keep steady tempo throughout your exercising. The workout intensity should be sufficient to raise your heartbeat into the target zone as shown below.
NOTE: This stage should last for at least 12 mins. Thus, most people start at approx. 15-20 mins.
area
| Wiek | Tętno | |---|---| | 20 | 200 | | 40 | 160 | | 75 | 140 | | City | Percentage (%) | | :--- | :--- | | Maksymalne | 85 | | Odpoczynek | 70 |III. COOL-DOWN PHASE
In this stage, your cardio-vascular system and muscles should get calm. Repeat the warm-up exercises, reduce your tempo and continue for approx. 5 mins. Repeat the stretching exercises, but don't overstretch or jerk your muscles. As you get fitter, you can exercise longer and harder. It is advisable to train at least three times a week and, if possible, to space your workouts evenly throughout a week.
I. FÁZE ROZCVIČKY
line
| AGE | HEART RATE | | --- | --- | | 20 | 160 | | 40 | 120 | | 75 | 90 |- The Seller provides guarantee on behalf of the Guarantor within the territory of the Republic of Poland for the period of 24 months from the date of sale.
- The Guarantee will be recognised by the shop or service centre after the client provides:
- clearly and correctly filled-in guarantee card with the sale stamp and the seller's signature - valid purchase confirmation for the equipment including the date of sale / bill / - complained product.
- Possible defects and damages revealed during the guarantee period shall be remedied free of charge within not more than 21 days from the delivery of the product to the shop or service.
- Should it be necessary to import some components, the guarantee term can be extended by the period required to import such part, however such period shall not be longer than 40 days.
- The guarantee does not cover:
- mechanical damages and subsequent defects,
- damages and defects resulting from incorrect storage and usage of the equipment against its purpose, - incorrect assembly and maintenance,
-
damages and consumption of such elements as: cables, straps, rubber parts, pedals, sponge grips, wheels, bearings, etc.
-
The guarantee expires in the event of:
-
expiry of the validity term,
- self-repairs,
-
failure to follow the rules of correct operation.
-
No duplicates of the guarantee cards shall be issued.
- The product handed over for repair should be complete and clean. If some parts are missing, the service is entitled to refuse to accept the product for repair. The service may refuse to accept a dirty product or clean in on the client's expense after the client's written permit.
- The guarantee does not cover activities related to assembly, maintenance, which, according to the instruction, the user is obliged to perform themselves.
- The Guarantor also informs that they offer post-guarantee service.
- The product should be provided in its original packaging and should be secured for shipment.
The guarantee for sold goods is not exclusive, does not limit or suspend entitlements of the buyer resulting from the non-compliance of the product with the agreement.
THE EQUIPMENT IS NOT INTENDED FOR REHABILITATION AND THERAPY
NOTES ON THE COURSE OF REPAIRS
| Item | Date of notificacion | Date of provision | Course of repairs | Signature of the recipient (shop, owner) |
ZÁRUČNÍ LIST
Název produktu:
EAN kód:
Datum prodeje:
ZÁRUČNÍ PODMÍNKY
- AUTO ON/OFF
- EXPLODED VIEW
- ASSEMBLY INSTRUCTIONS
- Step 1
- M5x15 4PCS #57 Φ5xΦ14x1 4PCS
- Step 2
- M8x40 2PCS #20 Φ8xΦ20x1.5 2PCS #21 M8 2PCS
- Step 3
- Adjusting the Tension Control Knob
- Adjusting the Seat Height
- EXERCISE COMPUTER
- FUNCTION BUTTONS:
- FUNCTIONS:
- BATTERIES
- Bezpečnostní pokyny
- Schritt 6
- EXERCISE PHASE
- COOL-DOWN PHASE
- FÁZE ROZCVIČKY
- THE EQUIPMENT IS NOT INTENDED FOR REHABILITATION AND THERAPY
- ZÁRUČNÍ LIST
- ZÁRUČNÍ PODMÍNKY
Brand : HMS Premium
Model : MP6540
Category : Exercise bike