
8” Linx - Digital photo frame Clas Ohlson - Free user manual and instructions
Find the device manual for free 8” Linx Clas Ohlson in PDF.


| Type of product | Digital photo frame |
| Brand | Clas Ohlson |
| Model | PF-7AW-103 (Art. no. 18-8114) |
| Display size | 7 inches (16:9 widescreen) |
| Display type | Colour analogue LCD |
| Resolution | 480 x 234 pixels |
| Power supply | 5 V DC, 1 A via mains adaptor (100-240 V AC, 50/60 Hz) |
| Memory card support | SD, MMC, MS |
| USB port | USB 2.0 host (for USB memory, MP3 players) |
| Supported picture format | JPEG (max. 8000 x 8000 pixels) |
| Dimensions (W x H x D) | 219 x 152 x 29 mm |
| Weight | 380 g |
| Operating temperature | 0°C to 45°C |
| Storage temperature | -20°C to 60°C |
| Slideshow time settings | 3 sec, 5 sec, 15 sec, 1 min, 15 min, 1 hour |
| Slideshow shuffle | Random or sequential order |
| Transition effects | Selectable (e.g., fade, slide) |
| Photo rotation | Yes (via down arrow button) |
| Zoom | Yes (up to 4x in display menu) |
| Stand adjustment | Landscape and portrait modes |
| Cleaning | Soft damp cloth with mild detergent; avoid solvents |
| Safety | Do not open casing; avoid water; do not cover ventilation holes; unplug when not in use |
| Repair | Only by qualified service technicians |
Frequently Asked Questions - 8” Linx Clas Ohlson
User questions about 8” Linx Clas Ohlson
0 question about this device. Answer the ones you know or ask your own.
Ask a new question about this device
Download the instructions for your Digital photo frame in PDF format for free! Find your manual 8” Linx - Clas Ohlson and take your electronic device back in hand. On this page are published all the documents necessary for the use of your device. 8” Linx by Clas Ohlson.
USER MANUAL 8” Linx Clas Ohlson
Digital Picture Frame
Digital fotoram
Digital fotoramme
natural_image
Black-and-white photo of a smiling woman resting her chin on her hands, framed in a dark border (no text or symbols visible)Art.no. Model
18-8114 PF-7AW-103-UK
38-3426 PF-7AW-103
Ver. 200906
Digital Picture Frame
Art.no. 18-8114 Model PF-7AW-103-UK
38-3426 PF-7AW-103
Please read the entire instruction manual before using the product and save it for future reference. We reserve the right for any errors in text or images and any necessary changes made to technical data. If you have any questions regarding technical problems please contact Customer Services.
Contents
- Safety 4
- Product description 4
- Buttons and functions 5
- Getting started 6
- Operation 7
- Settings 9
- Care and maintenance 10
- Troubleshooting guide 10
- Disposal 10
- Specifications 10
1. Safety
Caution: Do not open the casing! Certain components within the product's casing contain dangerous currents. Contact with these may give you an electric shock.
- The product should only be repaired by qualified service technicians.
- The product should not be taken apart or modified.
- Do not place the product where it can fall into water or other liquids. Do not place any objects which contain liquid on top of product, e.g. flower vases or drinks.
- Do not cover the ventilation holes. Do not place the product close to heat sources such as on top of the radiator, TV, or on e.g. the sofa where the ventilation holes risk being blocked.
- Always unplug the adaptor from the electrical outlet if the product is not be used for an extended period.
- The product is designed for 8 – 10 hours of continuous operation. Avoid any prolonged use. Let the product sit for a while before re-using.
- The product is intended for indoor use only.
- Do not expose the product to direct sunlight for extended periods of time.
- Do not use the product in damp, dusty, or dirty environments.
- Only use a lightly moistened soft cloth with a little washing up liquid to clean the screen.
- Handle the screen carefully to avoid scratching it.
- Do not disconnect the adaptor while the frame is in use. The attached memory may be damaged. Neither should the connected memory be removed when the frame is in use.
2. Product description
- 7" Widescreen Digital Photo Frame.
- Displays your digital photos without the need for OF computer.
- USB memory and memory card slots (SD/MMC/MS)
- Power adaptor.
3. Buttons and functions
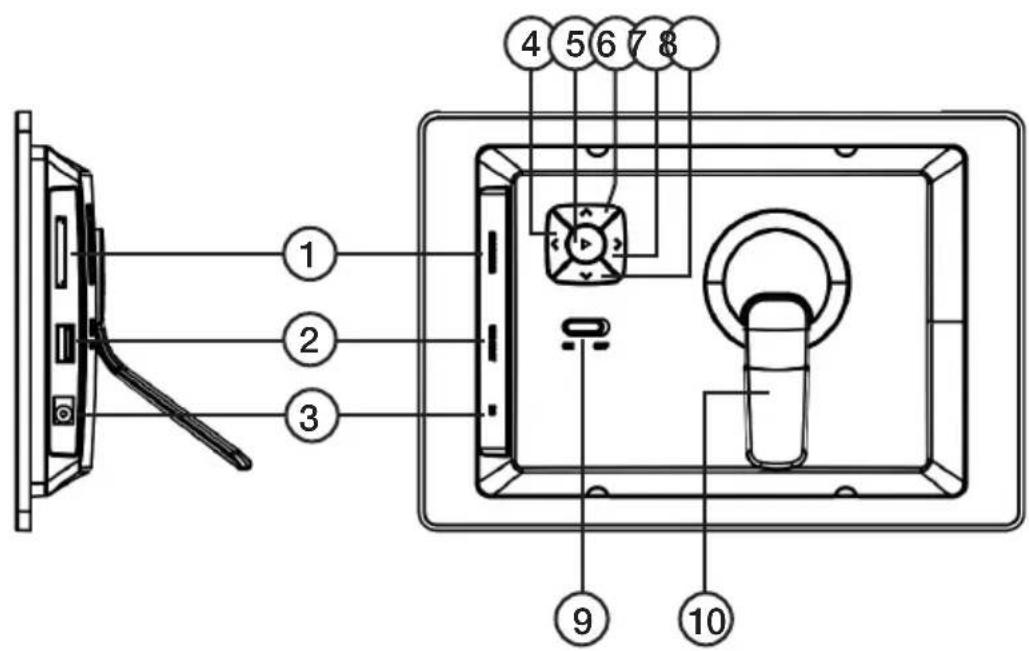
| Button/Connection | Function |
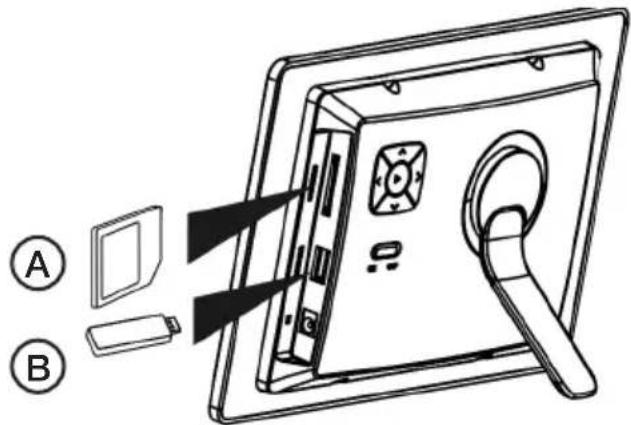
| 1. SD/MMC/MS Memory card slot | |
| 2. USB HOST Connection for USB memory, MP3 players, etc. (USB 2.0) | |
| 3. DC Adaptor connection (5 V DC, 1 A) | |
| 4. < | Goes to the next image. |
| 5. ▶ | [Play/Pause/Confirm. Depress and hold to reach the main menu. |
| 6. ∧ | Up arrow. Goes to the preview menu (miniature). |
| 7. > | Goes to the previous image. |
| 8. v | Down arrow Rotates image when pressed. |
| 9. ON/OFF Power switch. | |
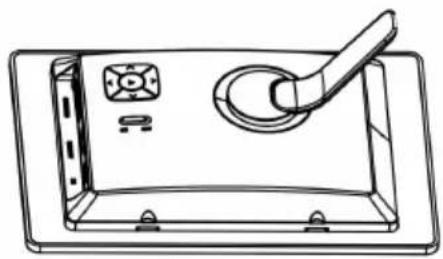
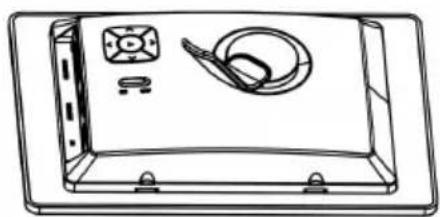
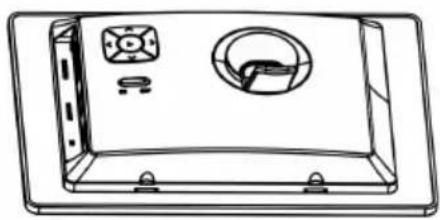
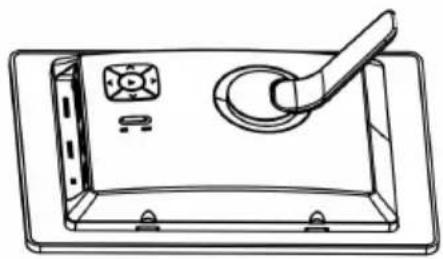
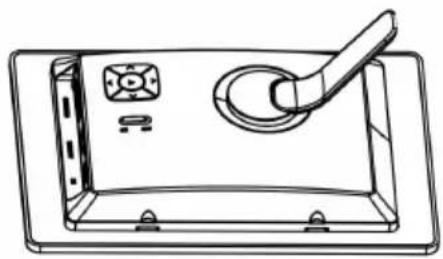
| 10. Support stand Adjustable Can be adjusted to lie in both landscape and portrait modes. | |
4. Getting started
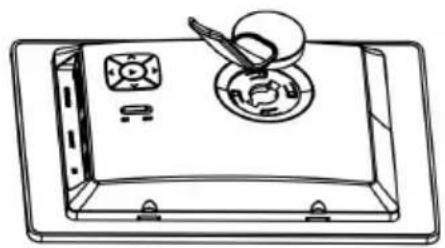
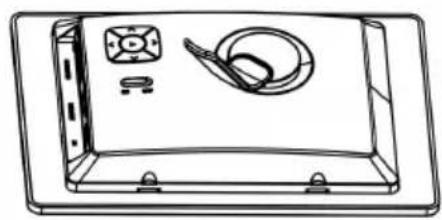
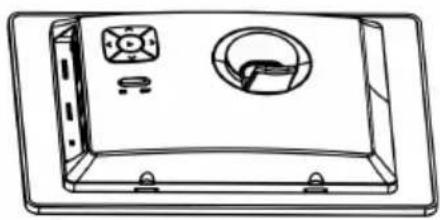
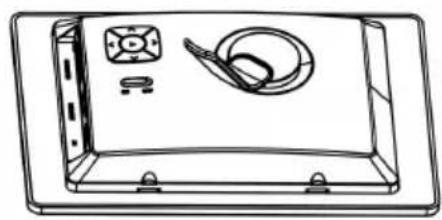
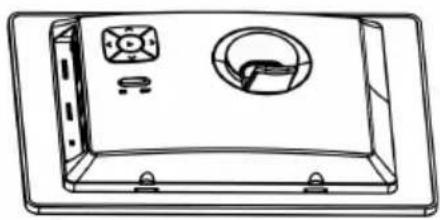
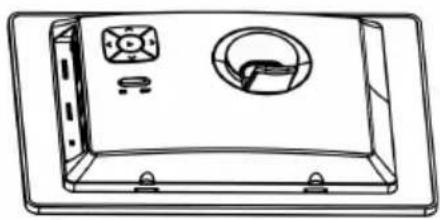
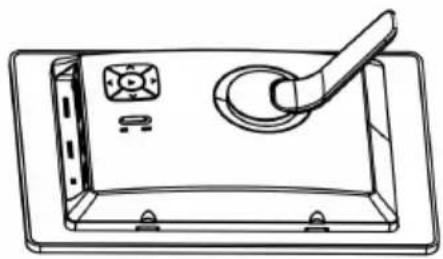
4.1 Assembling the table stand
A
natural_image
Line drawing of a device with a tray, a circular component, and a pen inserted into it (no text or symbols)B
natural_image
Line drawing of a rectangular electronic device with internal components and mounting holes (no text or symbols)C
natural_image
Line drawing of a rectangular electronic device with a circular vent and switch, no text or symbols presentD
natural_image
Line drawing of a rectangular device with a handle and internal components (no text or symbols)4.2 Power supply

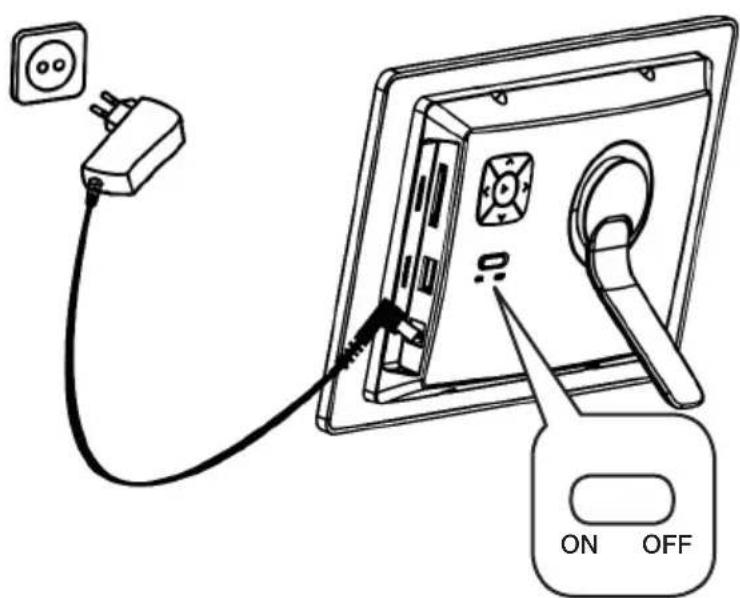
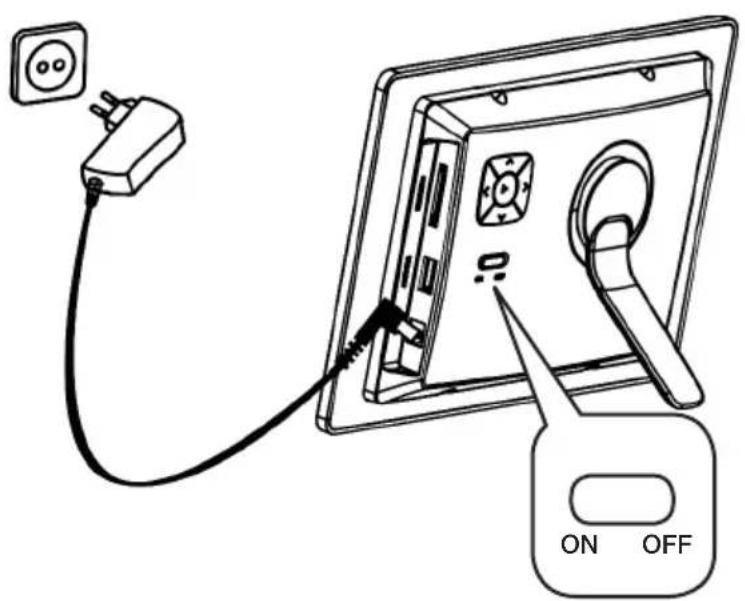
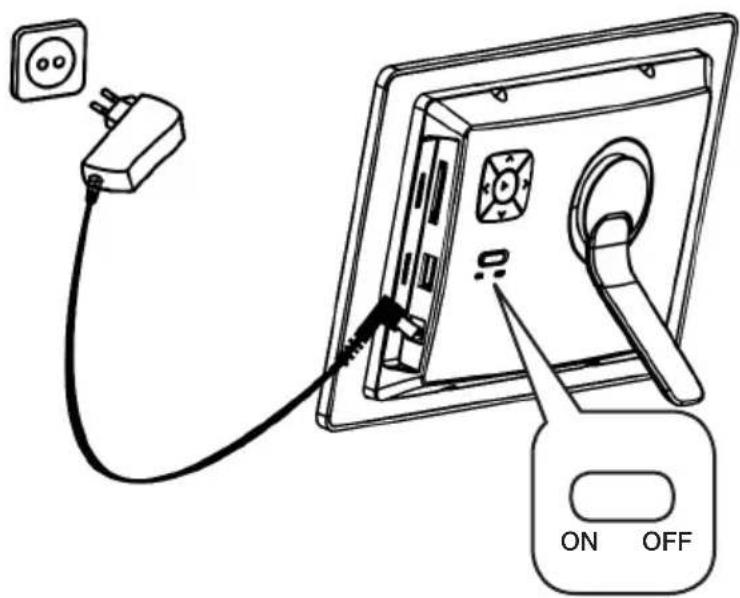
- Connect the adaptor's DC plug to the DC connection on the photo frame.
- Plug the adaptor into a wall socket.
- Set the On/Off switch (9) to ON to turn it on or OFF to turn it off.
4.3 Inserting a memory card or a USB memory
Memory cards
The following memory cards are compatible:
- Secure Digital (SD)
- Multimedia Card (MMC)
- Memory Stick (MS)
If your digital camera uses any of the above mentioned memory cards you can connect the camera's memory card directly to the photo frame.
- Insert the memory card into the slot marked SD/MMC/MS (A). Be careful when inserting.
- Remove the card by pulling it straight out.
USB memory
USB equipment such as a USB flash memory or MP3 players with a USB connection can be connected directly to the USB HOST (B) connection.
5. Operation
5.1 Main menu key
Depress and hold ▶ to reach the main menu.
Buttons for devices, setup and Now Playing (current slideshow) are displayed.
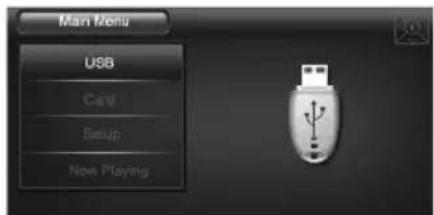
USB Highlighted when a USB memory is selected.
Card Highlighted when a SD/MMC/MS card is selected.
Setup Picture frame settings.
Now Playing Plays current slideshow.
Use [ Λ ]and [ v ] to navigate the main menu. Press ▶ to confirm and to enter the submenus. In the upper right hand corner of the display you will see a button indicator that mirrors the actual button you are pushing on back of the picture frame.
If you insert a USB or memory card when you are in main menu mode the slideshow will start immediately.
5.2 Slideshow
Starting a slideshow:
- Connect a USB memory or a memory card containing JPG/JPEG image files.
- Highlight USB, CARD or Now Playing in the main menu and then press ▶ to confirm.
- The slideshow should now begin.
When the slideshow starts the display menu will appear at the bottom portion of the display. Quickly pressing ▶ during a slideshow playback will also bring up the display menu.
[▶] Play/OSD menu [ ] Preview [ ] Previous (Hold) [▶]: Main Menu [ ] Rotate [ ] Next
Controls (used during slideshow playback):
| ^ | Preview (miniatures) |
| Selects the previous or next image. | |
| v | Rotates the image. |
| Quickly pressing ▶ | Pauses the slideshow. |
| Depressing and holding ▶ | Brings up the main menu. |
5.3 Display Menu commands
You may also use the display menu to display pictures one at a time. During slide-show playback quickly press ▶ to bring up the display menu. The slideshow should now pause.



Use < and > to advance through the commands.
- To start a slideshow, highlight ▶ and then press the ▶-button on back of the picture frame.
- Highlight or to select the next or previous image and then press the -button on back of the picture frame.
- To rotate an image, highlight and then press the ▶-button on back of the picture frame.
- To preview an image, highlight and then press the ▶-button on back of the picture frame.
- To zoom in on an image, highlight 🔒 and then press the ▶-button the desired number of times to enlarge the image.
5.4 Preview mode
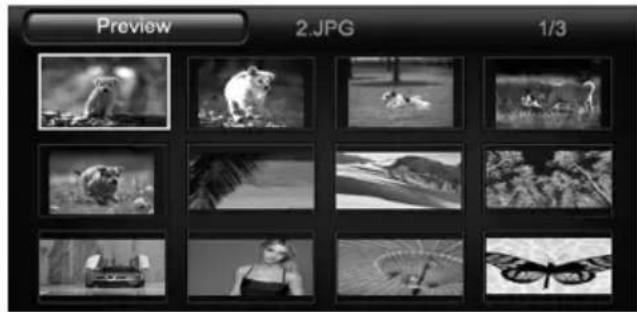
During slideshow playback press to reach preview mode. Navigate between the images using , v, > and < .
Depress and hold ▶ to reach the main menu.
6. Settings
-
Highlight Setup in the main menu and press ▶ to confirm. The setup menu will be shown.
-
Use [] and [v] to navigate the menu and press ▶ to select the chosen setting.
-
Use the [] and [] to select a value. Press to confirm.
-
Depress and hold ▶ to return to the main menu.
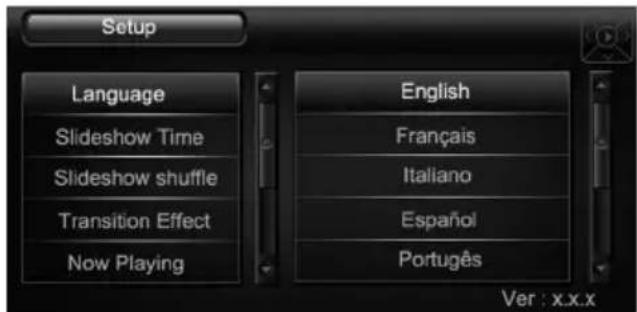
6.1 Setup options
| Settings Description | |
| Language Sets the menu language. | |
| Slideshow Time Sets the duration of each image. (3 sec, 5 sec, 15 sec, 1 min, 15 min or 1 hour.) | |
| Slideshow shuffle Displays images randomly or in predetermined order. | |
| Transition Effect Selects transition effects. | |
| Now Playing Displays slideshow immediately. | |
| Brightness Light – dark. | |
| Contrast Sharp – diffuse. | |
| Saturation Colour intensity. | |
| Hint Time Sets the duration of the on-screen button command during slideshow playback. | |
| Photo Mode Sets the aspect ratio to full-screen or normal mode. | |
| Default Settings Resets the device to factory settings. | |
7. Care and maintenance
Use a soft damp cloth to clean the product. Never use solvents or strong detergents.
8. Troubleshooting
| Problem Solution | |
| The device does not start/no photo is shown. | Check that the adaptor is correctly connected. |
| The device automatically switches to standby mode. | Disconnect the adaptor and re-connect. |
| Cannot read the memory card. | Make sure that the files on the memory card are supported by the device. See Specifications. |
| Some photos are uploaded quicker than others. | Photos with high resolution take longer to upload. Use photos with lower resolution for quicker display. |
9. Disposal
Follow local ordinances when disposing of this product. If you are unsure of how to dispose of this product, please contact your municipality.
10. Specifications
Display 7" colour analogue LCD, 16:9
Resolution 480 (h) x 234 (v)
Operating voltage 5 V DC, 1 A via the supplied mains adaptor (100-240 V AC, 50/60 Hz)
USB port 2.0 (support for USB memory)
Memory card slot SD (Secure Digital), MMC (Multimedia Card), MS (Memory Stick)
Picture format JPEG (Max. resolution 8000 x 8000 pixels)
Storage temperature: - 20 °C \~ 60 °C
Operating temperature 0 °C \~ 45 °C
Size 219 x 152 x 29 mm
Weight 380 g
Digital fotoram
Art.nr 18-8114 Modell PF-7AW-103-UK
38-3426 PF-7AW-103
natural_image
Line drawing of a device with a tray, a circular component, and a pen inserted into it (no text or symbols)B
natural_image
Line drawing of a rectangular electronic device with internal components and mounting holes (no text or symbols)C
natural_image
Line drawing of a rectangular electronic device with a circular vent and two buttons, no text or symbols present.D
natural_image
Line drawing of a rectangular electronic device with a handle and internal components (no text or symbols)4.2 Spänningsanslutning
Usb-minne
[▶] Play/OSD menu [ ] Preview [ ] Previous (Hold) [▶]: Main Menu [ ] Rotate [ ] Next
natural_image
Line drawing of a device with a tray, a circular component, and a pen inserted into it (no text or symbols)B
natural_image
Line drawing of a rectangular electronic device with internal components and mounting holes (no text or symbols)C
natural_image
Line drawing of a rectangular electronic device with a circular vent and two buttons, no text or symbols present.D
natural_image
Line drawing of a rectangular electronic device with a handle and control panel (no text or symbols)4.2 Strømtilkobling
Usb-minne
USB Aktiveres när du velger usb-minne.
Card Aktiveres når du velger et SD/MMC/MS-kort.
Setup Innstillinger for fotorammen.
Now Playing Spille av en bildeframvisning direkte.
[▶] Play/OSD menu [ ] Preview [ ] Previous (Hold) [▶]: Main Menu [ ] Rotate [ ] Next
natural_image
Line drawing of a device with a tray, a circular component, and a pen inserted into it (no text or symbols)B

natural_image
Line drawing of a rectangular electronic device with internal components and mounting holes (no text or symbols)C
natural_image
Line drawing of a rectangular electronic device with a circular vent and two buttons, no text or symbols present.D
natural_image
Line drawing of a rectangular electronic device with a handle and internal components (no text or symbols)4.2 Virtaliitäntä
USB-muistit
[▶] Play/OSD menu [ ] Preview [ ] Previous (Hold) [▶]: Main Menu [ ] Rotate [ ] Next
For consumer contact, please visit
www.clasohlson.co.uk and click on
customer service.
Internet www.clasohlson.co.uk
- Digital Picture Frame
- Contents
- Safety
- Product description
- Buttons and functions
- Getting started
- Assembling the table stand
- Power supply
- Inserting a memory card or a USB memory
- Memory cards
- USB memory
- Operation
- Main menu key
- Slideshow
- Starting a slideshow:
- Controls (used during slideshow playback):
- Display Menu commands
- Preview mode
- Settings
- Setup options
- Care and maintenance
- Troubleshooting
- Disposal
- Specifications
- Digital fotoram
- Spänningsanslutning
- Usb-minne
- Strømtilkobling
- Virtaliitäntä
- USB-muistit
Brand : Clas Ohlson
Model : 8” Linx
Category : Digital photo frame