HI 450 - Uncategorized Cocraft - Free user manual and instructions
Find the device manual for free HI 450 Cocraft in PDF.


| Product Type | Impact Wrench (Mutterdragare) |
| Brand | Cocraft |
| Model | HI 450 |
| Rated Voltage | 230–240 V AC, 50 Hz |
| Power | 800 W |
| Max Torque | 450 Nm |
| No-Load Speed | 0–3400 rpm |
| Drive Size | 1/2" (12.7 mm) square |
| Included Impact Sockets | 17, 19, 21, 22 mm |
| Mains Lead Length | 3 m (rubber cable) |
| Weight | 5.25 kg |
| Dimensions | 365 x 110 x 285 mm |
| Sound Pressure Level (LpA) | 92 dB(A) (K=3 dB(A)) |
| Sound Power Level (LwA) | 103 dB(A) (K=3 dB(A)) |
| Vibration Level (ah) | 6.83 m/s² (K=1.5 m/s²) |
| Forward/Reverse Selector | Yes, for loosening/tightening |
| Power Switch | On/Off trigger |
| Safety Features | Requires ear defenders and safety goggles |
| Maintenance | Clean with damp cloth; only mild detergents |
| Repairability | Repairs only by qualified technicians; use original spare parts |
| Disposal | Do not dispose with household waste; recycle at collection facility |
Frequently Asked Questions - HI 450 Cocraft
User questions about HI 450 Cocraft
0 question about this device. Answer the ones you know or ask your own.
Ask a new question about this device
Download the instructions for your Uncategorized in PDF format for free! Find your manual HI 450 - Cocraft and take your electronic device back in hand. On this page are published all the documents necessary for the use of your device. HI 450 by Cocraft.
USER MANUAL HI 450 Cocraft
Read the entire instruction manual carefully and make sure that you fully understand it before you use the equipment. Keep the manual for future reference.
Viktig information:
Original instructions
Bruksanvisning i original
Originalbruksanvisning
Please read the entire instruction manual before using the product and then save it for future reference. We reserve the right for any errors in text or images and any necessary changes made to technical data. If you have any questions concerning technical problems please contact our Customer Services.
Safety
General safety instructions for power tools
Warning: Read all the instructions. Failure to comply with the following instructions can lead to electric shocks, fires and/or serious injury. The term “power tool” in the warning text below refers to your handheld mains operated or battery operated tool.
SAVE THESE INSTRUCTIONS.
1) Work area
a) Keep the work area clean and well illuminated. Cluttered and poorly lit areas invite accidents.
b) Do not use power tools in explosive environments, e.g. near to flammable liquids, gases or dust. Power tools create sparks which may ignite dust or fumes.
c) Keep children and bystanders away from the area where you are using the power tool. Distractions can cause you to lose your concentration and control.
2) Electrical safety
a) The power tool's plug must fit correctly into the wall socket. Never modify the plug in any way. Never use an adaptor plug together with earthed power tools. Unmodified plugs and matching outlets will reduce the risk of electric shocks.
b) Avoid physical contact with earthed objects such as pipes, radiators, ovens and refrigerators. There is an increased risk of electric shock if your body is earthed.
c) Do not expose the power tool to rain or other wet conditions. Water entering a power tool will increase the risk of electric shock.
d) Do not abuse the mains lead. Never use the lead for carrying, pulling or unplugging the power tool. Keep the lead away from heat, oil, sharp edges and moving parts. Damaged or tangled leads increase the risk of electric shock.
e) When using power tools outdoors, use an extension lead that is suitable for this purpose. The use of an extension lead designed for outdoor use decreases the risk of electric shocks.
f) If using the power tool in a wet environment is unavoidable, a wall socket equipped with a portable residual current device (RCD) should be used. Use of a RCD significantly reduces the risk of electric shock.
3) Personal safety
a) Pay attention to what you are doing and use common sense when using power tools. Never use power tools if you are tired or under the influence of drugs, alcohol or medication. One moment of inattention while using a power tool may result in serious injury.
b) Wear protective clothing. Always wear safety glasses. Using protective clothing such as dust masks, non-slip safety shoes, helmets and ear defenders decreases the risk of injury.
c) Avoid accidental starts. Make sure that the power switch is set to OFF before plugging the power tool into a wall socket, fitting the battery or picking up/carrying the power tool. Never carry a power tool with your finger on the trigger and never connect the power tool to a wall socket when the switch is set to ON, as this may result in bodily injury.
d) Remove all service tools/keys before switching on the power tool. A service tool left on a rotating part of the power tool may result in personal injury.
e) Do not overreach. Keep proper footing and balance at all times. This enables better control of the power tool in unexpected situations.
f) Wear suitable clothing. Do not wear loose-fitting clothing or jewellery. Keep hair, clothes and gloves away from moving parts. Loose-fitting clothes, jewellery or long hair could become caught in moving parts.
g) If equipment for the extraction and collection of dust is available, make sure it is connected and properly used. Use of dust collection equipment can reduce dust related hazards.
4) Use and maintenance of the power tool
a) Do not force the power tool. Use the correct power tool for your application. The correct power tool will do the job better and safer if used at the rate for which it was designed.
b) Never use the power tool if the power switch does not switch the tool on and off. Any power tool that cannot be controlled by the power switch is dangerous and must be repaired.
c) Disconnect the plug from the power source and/or the battery pack from the power tool before making any adjustments, changing accessories or storing the power tool. These precautions reduce the risk of the power tool starting unexpectedly.
d) Store power tools that are not being used out of children's reach. Do not allow people who are unfamiliar with the tool or its functions to operate it. Power tools are dangerous in the hands of untrained users.
e) Maintain power tools. Check for misalignment, binding of moving parts, broken parts or anything else which might affect the operation of the power tool. If damaged, have the power tool repaired before use. Many accidents are caused by poorly maintained power tools.
f) Keep cutting tools sharp and clean. Properly maintained cutting tools with sharp cutting edges are less likely to bind and are easier to control.
g) Use the power tool and any accessories in accordance with these instructions, taking into account the working conditions and the work to be performed. Use of the power tool for a purpose other than that for which it is intended could result in a dangerous situation.
5) Service
a) Repairs and service should only be performed by qualified tradesmen, and only with original spare parts. This guarantees that the safety of the power tool is maintained.
Specific safety instructions for impact wrenches
- Warning: Use only sockets and accessories designed to be used with the impact wrench. Chrome-plated sockets and accessories are only designed for hand tools and MUST NOT be used for impact wrenches. These can fracture and cause bodily harm.
- Always unplug the impact wrench before changing sockets. Unintended starts pose a risk for hand injury.
- The mains lead should be checked regularly. Never use the impact wrench if the mains lead or plug is damaged.
- If the mains lead is damaged in any way it must be replaced by a qualified electrician.
- Any extension leads used must be designed for outdoor use. Using a non-compliant extension lead poses a serious danger.
- Protect the impact wrench from rain or moisture.
- Unplug the impact wrench from the mains when not in use.
- Checklist for avoiding accidents:
- Ensure that the user and any bystanders wear safety glasses and ear defenders.
- Use only sockets and accessories designed to be used with the impact wrench.
- Check that all sockets are intact and undamaged before use.
Note: When tightening wheel nuts/bolts, a torque bar with the correct torque setting should be inserted between the impact wrench and the impact socket, otherwise the nut/bolt might be overtightened and the wheel could be damaged.
Product safety symbols

natural_image
Icon of a person reading a book inside a circle (no text or symbols)Read the entire instruction manual.

natural_image
Simple line drawing of a person wearing sunglasses inside a circle (no text or symbols)Always use ear defenders and safety goggles or a visor.
Buttons and functions
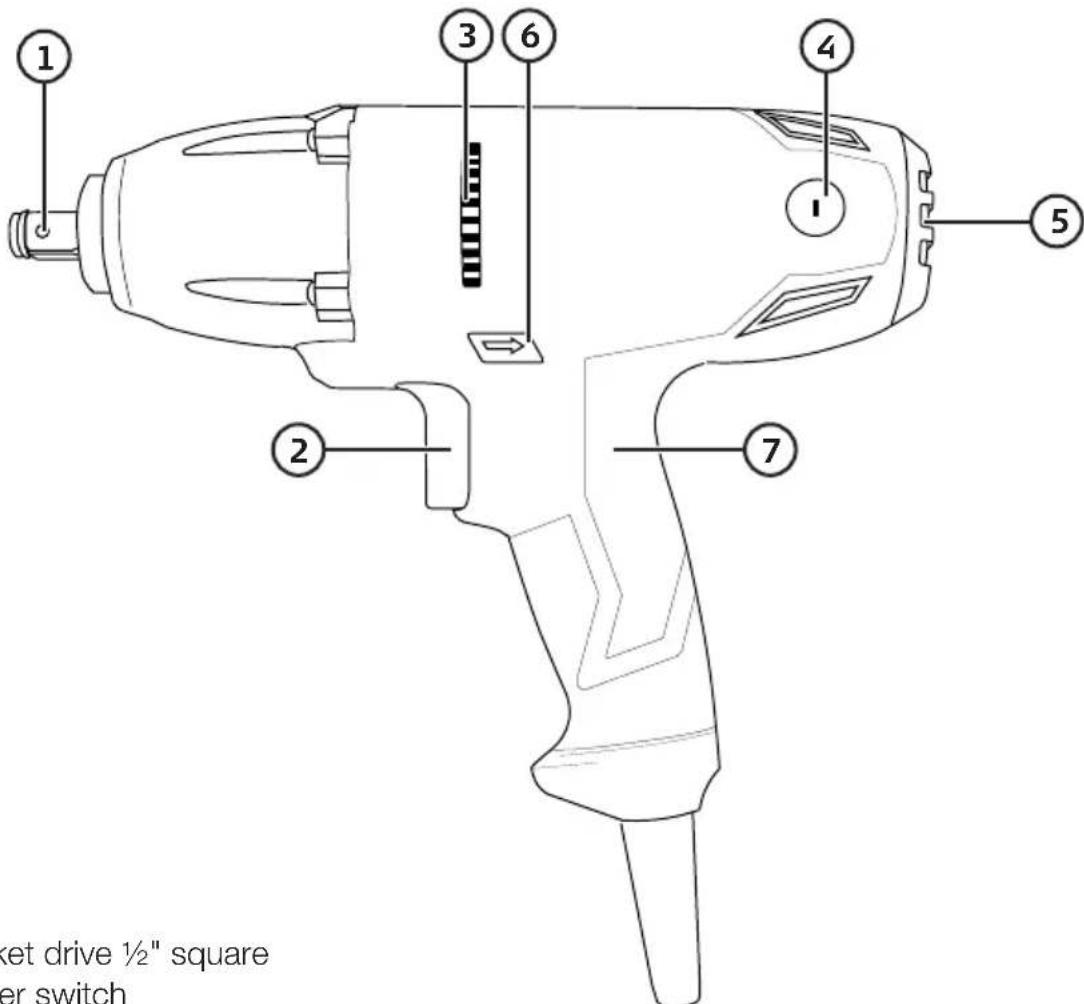
- Socket drive 12 " square
- Power switch
- Ventilation opening
- Carbon brush holder
- Ventilation opening
- Forward/reverse selector
- Handles
Operating instructions
Preparations
- Warning: Park the vehicle in gear and engage the handbrake. Vehicles with automatic gear boxes should be put into P (Park) and the handbrake engaged before attempting to lift the car. Ensure that any wheels still in contact with the ground are securely blocked with wheel chocks to prevent them from moving.
- Read the car's owner's manual if you are at all unsure on how to position the jack under the car.
Things to consider
- Park the vehicle on a firm and stable surface.
- Use a floor jack which can support the weight of the vehicle by a good margin.
- Support the vehicle on axle stands if you need to go under the vehicle for any reason.
- Never place any body part under a vehicle that is only being supported by floor jacks.
- Some vehicles may have different threads on the wheel nuts on the right- and left-hand sides of the vehicle respectively. Check this before loosening the nuts in order to avoid accidentally tightening them.
- Screw on the wheel nuts/bolts by hand, using at least 3 complete rotations in order to prevent possible thread damage when tightening with the impact wrench.
Loosening the wheel nuts/bolts
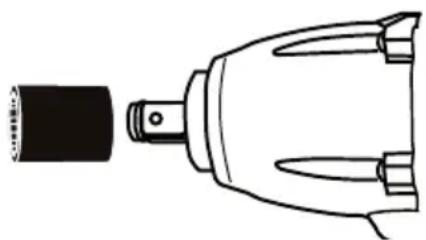
- Attach an impact socket which fits exactly onto the head of the screw/bolt or nut which you want to undo onto the anvil of the impact wrench (1). Use a hexagon impact socket.
- Fit the socket fully over the nut/bolt you wish to loosen.
- Hold the impact wrench firmly with one hand around the front part of the tool, hold the handle (7) with the other hand.
- Press in the selector (6) for anticlockwise rotation of the socket (to loosen the bolt).
△ Note: Do not use the impact wrench for more than 15 seconds at a time in the same direction if the nut/bolt does not loosen. If the nut/bolt does not come undone:
- Change the direction of rotation using the selector (6) and drive the impact wrench in the opposite direction for a couple of seconds.
- Switch the direction of rotation back again and run the wrench in the original direction.
natural_image
Line drawing of a plug with a black connector and three ports (no text or symbols)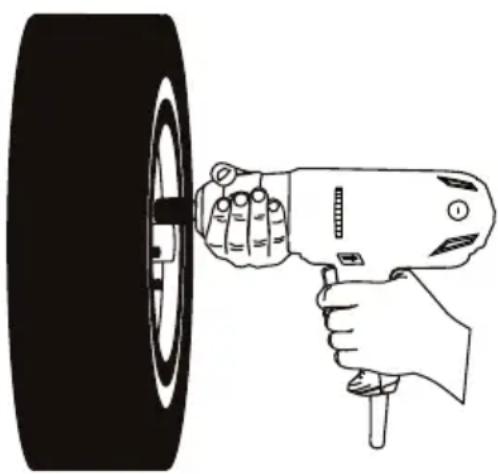
natural_image
Illustration of a hand using a power tool to lift a tire (no text or symbols present)Tightening the wheel nuts/bolts
△ Note: When tightening wheel nuts/bolts, a torque bar (sold separately) with the correct torque setting should be inserted between the impact wrench and the impact socket, otherwise the nut/bolt might be overtightened and the wheel could be damaged.
- Attach a hexagon impact socket which fits exactly onto the head of the screw/bolt or nut which you want to undo.
- Screw the wheel nuts/bolts in place by hand at least 3 complete turns in order to prevent damaging the threads when they are tightened using the impact wrench.
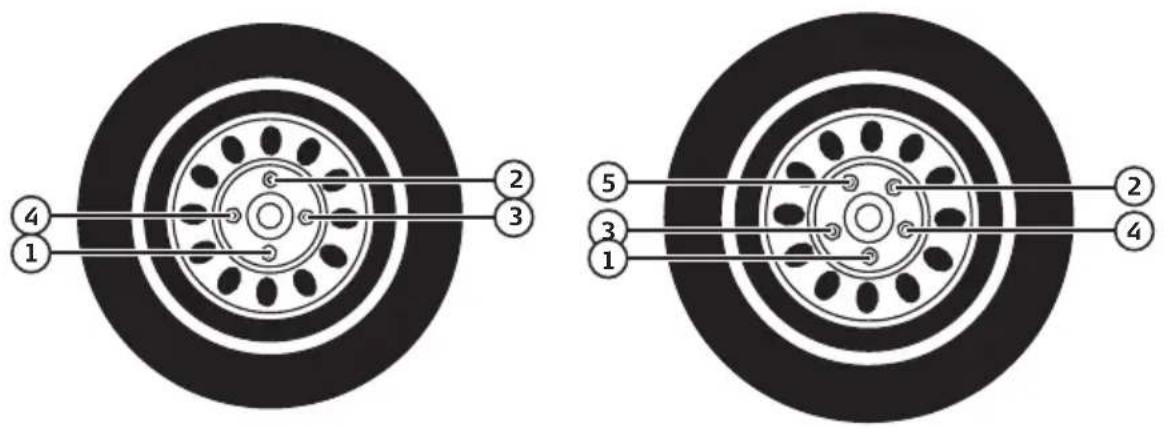
- Fit the socket fully over the nut/bolt you wish to tighten. Always start with the lower nut/bolt (see below pictures).
- Hold the impact wrench firmly with one hand around the front part of the tool, hold the handle (7) with the other hand.
- Press in the selector (6) for clockwise rotation of the socket (to tighten the bolt).
- Lower the jack so that the vehicle is standing on the ground.

Warning: Use a torque wrench to check that the wheels are fastened to
the recommended torque setting before using the car after changing its wheels.

Note: Tighten the wheel nuts/bolts in the correct order. Below is an example of both a 4- and 5-bolt wheel setup.
Care and maintenance
- Clean the product by wiping it with a damp cloth. Use only mild cleaning agents, never solvents or corrosive chemicals.
- Never attempt to repair or modify the product in any way. Repairs (and changing the carbon brushes) must only be carried out by qualified service technicians.
- Troubleshooting guide
The impact wrench will not start.
- Is the plug securely connected to the wall socket?
• Is the wall socket live?
Responsible disposal
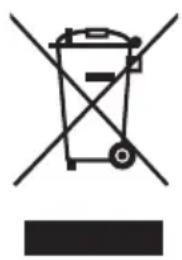
This symbol indicates that this product should not be disposed of with general household waste. This applies throughout the entire EU. In order to prevent any harm to the environment or health hazards caused by incorrect waste disposal, the product must be handed in for recycling so that the material can be disposed of in a responsible manner. When recycling your product, take it to your local collection facility or contact the place of purchase. They will ensure that the product is disposed of in an environmentally sound manner.
natural_image
Symbol of a trash bin crossed with no text or labels, accompanied by a solid black rectangle below (no text or symbols present)Specifications
Rated voltage: 230–240 V AC, 50 Hz
Power 800 W
No load speed 0–3400 rpm
Max torque 450 Nm
Drive 12 "
Included impact sockets 17, 19, 21 and 22 mm
Mains lead 3 m rubber cable
Weight 5.25 kg
Size 365 x 110 x 285 mm
Sound pressure LpA = 92 dB(A), KpA = 3 dB(A)
Sound power LwA = 103 dB(A), KwA = 3 dB(A)
Vibration ah = 6.83 m/s², K = 1.5 m/s²
Mutterdragare
Art.nr 41-2375 Modell P1B-ZTH-13B
natural_image
Icon of a person reading a book inside a circle (no text or symbols)natural_image
Simple line drawing of a person wearing sunglasses inside a circle (no text or symbols)natural_image
Technical line drawings of a tire and a power tool, showing mechanical components (no text or symbols)natural_image
Symbol of a trash bin crossed with a diagonal line, no text or numbers presentSpecifikationer
Nätanslutning 230-240 V AC, 50 Hz
Effekt 800 W
Max varvtal obelastad 0-3400 v/min
Max vridmoment 450 Nm
Hylsfäste 12 "
natural_image
Icon of a person reading a book inside a circle (no text or symbols)Les hele bruksanvisningen.

natural_image
Simple line drawing of a person wearing sunglasses inside a circle (no text or symbols)natural_image
Technical line drawings of a tire and its power tool, showing mechanical components (no text or symbols)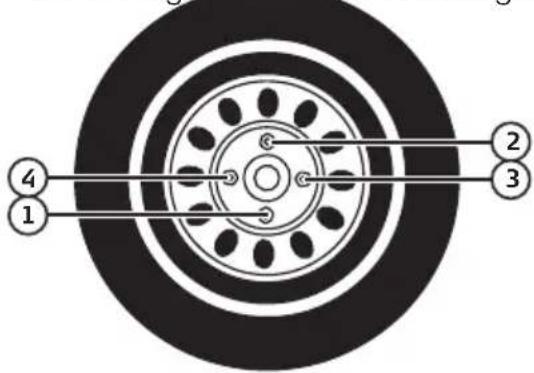
natural_image
Symbol of a trash bin crossed with no text or labels, accompanied by a solid black rectangle below (no text or symbols present)Spesifikasjoner
Strømtilkobling 230-240 V AC, 50 Hz
Effekt 800 W
Maks turtall ubelastet 0–3400 o/min
Maks dreiemoment 450 Nm
Hylsefeste 12 "
natural_image
Icon of a person reading a book inside a circle (no text or symbols)natural_image
Simple line drawing of a person wearing sunglasses inside a circle (no text or symbols)natural_image
Technical line drawings of a tire, a hand holding a power tool, and a mechanical component (no text or symbols)Huolto ja ylläpito
natural_image
Symbol of a trash bin crossed with no text or numbers, representing waste sorting or disposal (no text present)Tekniset tiedot
Äänenpaine LpA = 92 dB(A), KpA = 3 dB(A)
Äänitehotaso LwA = 103 dB(A), KwA = 3 dB(A)
Tärinä ah = 6,83 m/s², K = 1,5 m/s²
Schlagschrauber
natural_image
Icon of a person reading a book inside a circle (no text or symbols)natural_image
Simple line drawing of a person wearing sunglasses inside a circle (no text or symbols)natural_image
Line drawing of a mechanical component with a black shaft and three protruding ports (no text or symbols)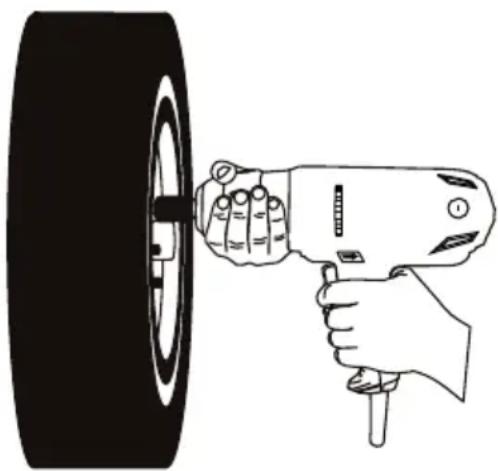
natural_image
Line drawing of a hand using a power tool to lift a tire (no text or symbols)natural_image
Symbol of a trash bin crossed with no text or numbers, representing waste sorting or disposal (no text present)Technische Daten
Declaration of Conformity
Declares that this product complies with the requirements of the following directives and standards
Machinery directive 2006/42/EC
EN62841-1: 2015 + AC: 15
EN62841-2-2: 2014
EK9-BE-88: 2014
EMC directive 2014/30/EU
EN 61000-3-2: 2014
EN61000-3-3: 2013
EN55014-1: 2017
EN55014-2: 2015
Low Voltage Directive 2014/35/EU
Henrik Alfredsson
Product Quality & Compliance Manager
Insjön, Sweden, 20200914
CLAS OHLSON AB, SE-793 85 INSJÖN, SWEDEN
Sverige
Postal 10 - 13 Market Place
Kingston Upon Thames
Surrey
KT1 1JZ
Deutschland
Kundenservice Hotline: 040 2999 78111
E-Mail: kundenservice@clasohlson.de
Homepage
www.clasohlson.de


- Viktig information:
- Safety
- General safety instructions for power tools
- 1) Work area
- 2) Electrical safety
- 3) Personal safety
- 4) Use and maintenance of the power tool
- 5) Service
- Specific safety instructions for impact wrenches
- Product safety symbols
- Buttons and functions
- Operating instructions
- Preparations
- Things to consider
- Loosening the wheel nuts/bolts
- Tightening the wheel nuts/bolts
- Care and maintenance
- - Troubleshooting guide
- Responsible disposal
- Specifications
- Mutterdragare
- Specifikationer
- Spesifikasjoner
- Huolto ja ylläpito
- Tekniset tiedot
- Schlagschrauber
- Technische Daten
- Declaration of Conformity
- Sverige
- Deutschland
Brand : Cocraft
Model : HI 450
Category : Uncategorized