
Trent - Range hood Thermex - Free user manual and instructions
Find the device manual for free Trent Thermex in PDF.


| Product Type | Range Hood (Cooker Hood) |
| Brand | Thermex |
| Model | Trent |
| Width Options | 510 mm / 810 mm |
| Installation Type | Under-cabinet (built-in) |
| Control Type | Touch panel with 5 buttons (Power, Speed, Light, Timer, Slide Control) |
| Number of Speeds | 4 |
| Timer Range | 5–40 minutes (8 increments) |
| Lighting | Adjustable intensity |
| Motor Type | High power, low noise electric motor with centrifugal leaf |
| Filter Type | High-density non-stick metal grease filter (dishwasher safe) |
| Vent Connection | Outlet for ducted installation (recommended insulated hoses) |
| Decorative Cover | Motorized opening/closing with power button |
| Safety Features | Child safety warning, power-off before cleaning |
| Cleaning | Filter: soak in 40–50°C water with detergent or dishwasher at 60°C. Hood exterior: wipe with damp cloth |
| Installation Requirements | Qualified fitter, 15 mm min distance from wall, use included screws ST4×8 and ST4×14 |
Frequently Asked Questions - Trent Thermex
User questions about Trent Thermex
0 question about this device. Answer the ones you know or ask your own.
Ask a new question about this device
Download the instructions for your Range hood in PDF format for free! Find your manual Trent - Thermex and take your electronic device back in hand. On this page are published all the documents necessary for the use of your device. Trent by Thermex.
USER MANUAL Trent Thermex
III. 3
natural_image
Technical line drawing of a mechanical device inside a transparent enclosure, showing internal components and directional arrows (no text or symbols)III. 4
natural_image
Technical line drawing of a mechanical device inside a transparent enclosure, showing internal components and wiring (no text or symbols)Ill. 5
Vedligeholdelse
Timer
Lys
Suge/lysstyrke
Hastighed
Tænd/sluk
III. 3
natural_image
Technical line drawing of a mechanical device inside a transparent enclosure, showing internal components and directional arrows (no text or symbols)Ill. 4
natural_image
Technical line drawing of a mechanical device inside a transparent enclosure, showing internal components and wiring (no text or symbols)Ill. 5
Maintenance
Timer
Lys
Suge/lysstyrke
Hastighet
Tenn/sluk
III. 3
natural_image
Technical line drawing of a mechanical device inside a transparent enclosure, showing internal components and directional arrows (no text or symbols)Ill. 4
natural_image
Technical line drawing of a mechanical device inside a transparent enclosure, showing internal components and wiring (no text or symbols)III. 5
Underhåll
Timer
Belysning
Kuva 3 Kuva 4
natural_image
Technical line drawing of a mechanical device inside a transparent enclosure, showing internal components and directional arrows (no text or symbols)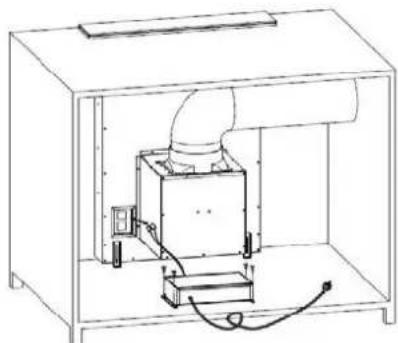
natural_image
Technical line drawing of a mechanical device inside a transparent enclosure, showing internal components and wiring (no text or symbols)Kuva 5
Kunnossapito
III. 3
natural_image
Technical line drawing of a mechanical device inside a transparent enclosure, showing internal components and directional arrows (no text or symbols)III. 4
natural_image
Technical line drawing of an industrial machine with ductwork and control panel (no text or symbols)Ill. 5
Mantenimiento
Temporizador
Luz
Slider
Caudal Encender/Apagar
* Mufflers that minimise noise levels are recommended for flexible hoses.
Thermex recommends using vent hoses insulated against noise and condensation for all bushings in unheated rooms.
Please note that the hood's existing vent size ensures optimal use. Decreasing this dimension will increase the air speed and the back-pressure in the vent duct. This in turn will mean worse performance and higher noise levels. As such, we advise you to keep the existing vent size.
When using flexible hoses, always ensure that these have been fully extended in order to minimise air resistance and, in turn, maximise suction performance and minimise noise levels. You can also use fixed pipes (spiro pipes or plastic pipes) to minimise air resistance in the duct system even further.
SAFETY WARNING
Never let children operate the cooker hood.
The cooker hood is for home use only. It is not suitable for barbecues, Roast shop and other commercial purposes.
The installation must be completed by a qualified and competent fitter, and connect the correct power before use.
The cooker hood and its filter mesh should be cleaned regularly in order to keep it in good working order.
Before cleaning, switch the power off at the main supply.
Clean the cooker hood according to the instruction manual and keep the cooker hood from the danger of burning.
Prohibit putting the cookerhood by fire.
If there is any fault with the appliance, please call the service department to request a service engineer.
Thank you for choosing our cooker hood. Please read this instruction manual carefully before installing and using the cooker hood.
The manufacturer disclaims all liability for any damage or injury caused as a result of not following the instructions for installation that are contained in this manual.
FEATURES
The cooker hood has a streamlined design and is made with high quality materials.
Other features include a large power low noise electric motor and centrifugal leaf that produces strong suction. Also, a non-stick grease filter ensures that the cooker hood is easy to clean.
The cooker hood's special wind tunnel construction and oil collector design enables free dirt to be absorbed in seconds.
INSTALLATION
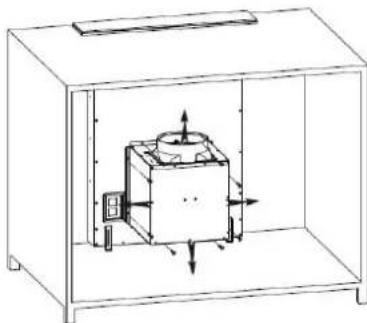
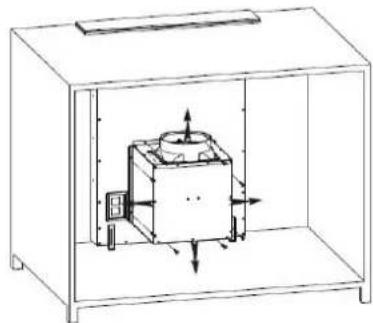
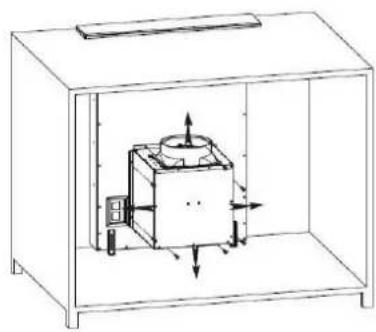
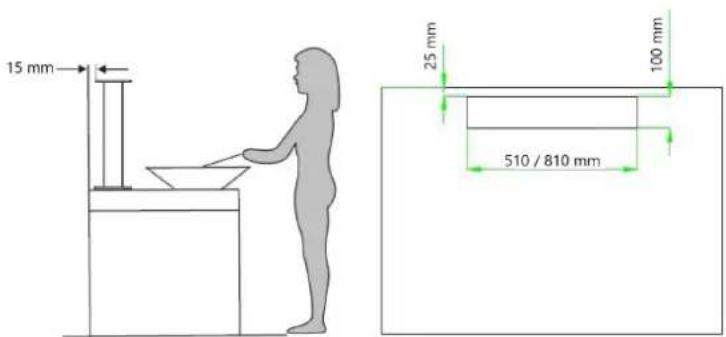
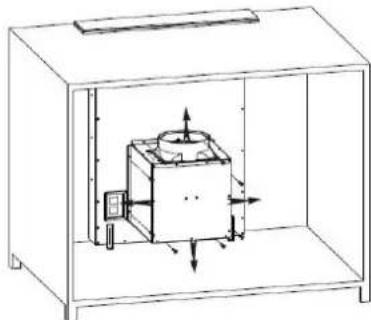
- Drill the hole on table according to the Pic 2 instruction, the cooker hood should be placed at a distance of 15mm from the wall at least. (See Pic1)
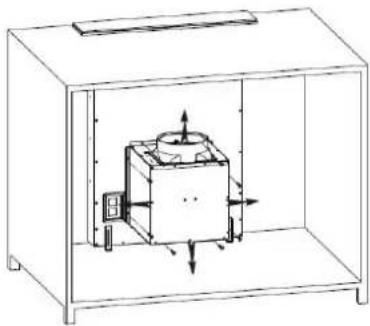
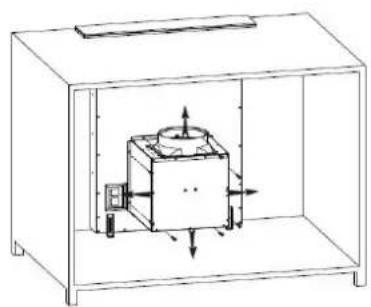
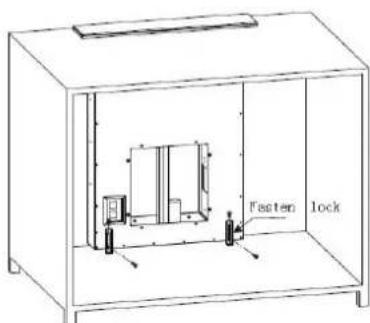
- Put moderate glass cement on the edge of the panel bottom(See pic 3), and put the hood into the hole of the cabinet(See pic 2). Use 4pcs screw ST4*8 & screw ST4*14 & fixing knock to fix the hood.(See pic 4)
- Fix the outlet on the casing by 4pcs screw ST4*8. (See pic 4)
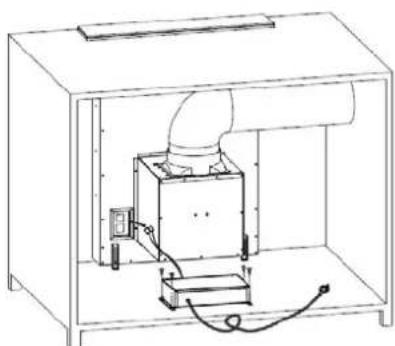
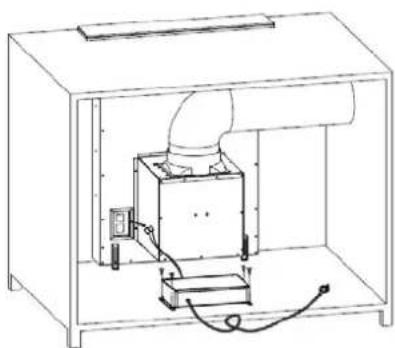
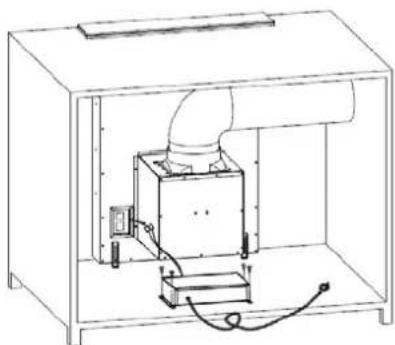
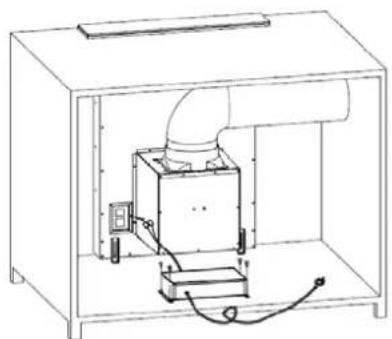
- Fix the extension pipe on the outlet, and use 4pcs screw ST4*14 to fix the electronic box, connect the power and finish the installation.(See pic 5)
Pic 1
Pic 2
Pic 3 Pic 4
natural_image
Technical line drawing of a mechanical device inside a transparent enclosure, showing internal components and directional arrows (no text or symbols)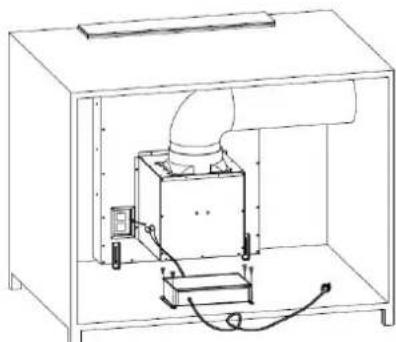
natural_image
Technical line drawing of an industrial machine with ductwork and control panel (no text or symbols)Pic 5
MAINTENANCE
Replace and clean the filter
Method 1: Put the filter into 40-50°C clean water, pour on detergent, and soak for 2-3 minutes. Wear gloves and clean with a soft brush. Please do not apply too much pressure, as the filter is delicate and will damage easily.
Method 2: The filter can be put into a dishwasher. Set the temperature at around 60^ C.
The filter is made of high-density metal. Please do not use corrosive detergent on it. Keeping this filter clean will keep the appliance running correctly.
Note:
- Please do not put anything which can block the up & down of the hood to avoid the damage of the hood and body injury.
- Please keep the power off when clean the hood.
SWITCH INSTRUCTION
This control system consists of two parts, power panel and touch panel.
Touch panel contains five function buttons (power, speed, light, timer, slide control)

Timer
Light
Slide control
Speed
Power
Functional Operation
- Power on: connect the power, the hood will standby with backlight, backlight will be extinguished after 5 seconds without any operation. If use the hood again, touch any key to wake up its standby motion.
2、A long press on the power button " ⏻" for 2s, open the hood's decorative cover, the hood
works at the 1st speed, and "💡" "💡" buttons will be on, also the first two lights on slide control will be on. Long press the power button for 2s after opening, the decorative cover will be closed and the hood stop working. Only with the decorative cover opened, you can operate all of the hood's functions. If you close the decorative cover when power on and reopen it, the hood will
work at the speed it works last time. When enter into speed setting, slide control button is only used to adjust the speed. There are 8 lights on slide control button and divide into 4 speeds, every 2 lights for one speed.
- Speed on/off and set

4.Light button "
- Timer button "①"
5.1 Touch timer button "②" when light or one speed is working, the hood will enter into timer
working. When the pilot light of timer is flashing, slide button "■■" to select the timer section. There are eight sections of timer button when timer is working, they are:5-10-15-20-25-30-35-40, touch the timer button "○" to enter into timer working when confirm the timer section. Or, enter into timer working automatically 5s later. The motor and light are off automatically when finish the timer, the hood will enter into standby, the decorative cover will close automatically.
5.2 Use the timer function again when keep power on, touch the timer button but without time
setting, the hood will keep the time which setted on last time. It will decrease by second after 5s. It will work as new time after new setting.
5.3 Touch the speed button or control the light intensity when timer is working, the timer function will cancel automatically.
THERMEX SCANDINAVIA A/S SERVICEAFD.:
Brand : Thermex
Model : Trent
Category : Range hood