
DVB11CPN - Hob ROSIERES - Free user manual and instructions
Find the device manual for free DVB11CPN ROSIERES in PDF.

| Product type | Built-in hob |
| Brand | ROSIERES |
| Model | DVB11CPN |
| Supply voltage | 230 V |
| Rated current | 16 A |
| Maximum power | 2400 W |
| Electrical supply | Single-phase, cable H05RR-F 3×1,5 mm² |
| Number of cooking zones | 1 zone (domino hob) |
| Cooking type | Grill with 12 adjustment positions |
| Included accessories | Lava rock tray, fixing brackets, sealing gasket |
| Materials | Ceramic glass, stainless steel |
| Installation | Built-in into worktop 25 to 40 mm thick |
| Intended use | Domestic, non-professional |
| Cleaning | Non-abrasive products, glass scraper, washed stone and tray dishwasher-safe |
| Safety | Hot surface, avoid shocks to ceramic glass, do not use steam cleaner |
| Warranty | Warranty certificate provided, after-sales service |
| Mounting options | Can be placed next to other domino hobs |
Frequently Asked Questions - DVB11CPN ROSIERES
User questions about DVB11CPN ROSIERES
0 question about this device. Answer the ones you know or ask your own.
Ask a new question about this device
Download the instructions for your Hob in PDF format for free! Find your manual DVB11CPN - ROSIERES and take your electronic device back in hand. On this page are published all the documents necessary for the use of your device. DVB11CPN by ROSIERES.
USER MANUAL DVB11CPN ROSIERES
Y = couche d'isoation
Fixation au meuble
CE Appareil conforme aux directives europeennes 89/336/CEE, 93/68/CEE, 73/23/CEE et modifications successives.

INSTRUCTIONS D'EMPLOI
Installation is the buyer's responsibility. The manufacturer accepts no liability for this service. Any action that the manufacturer has to take due to an erroneous installation will not be covered by the guarantee.
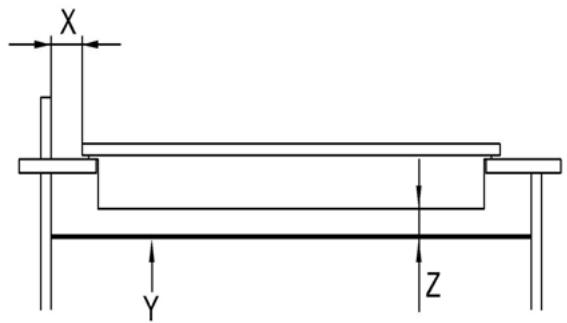
The flush-mounted cook tops are designed for installation in work tops made of all kinds of material, providing they can withstand a temperature of 100^ , and are between 25 and 40mm thick. If the cook top is installed in a position so that the side of a kitchen unit comes up against its left-hand or right-hand side, the distance between the vertical panel and the edge of the cook top must always be at least 150mm . The distance between the back wall and the edge of the cook top must be at least 55mm . A partition made of insulating material (wood or the like) must be inserted between the cook top and the space below. This partition must be at least 10mm from the underside of the cook top tray.
X = minimum 150~mm
Z=10mm
Y = partition

Fixing the cook top to the unit
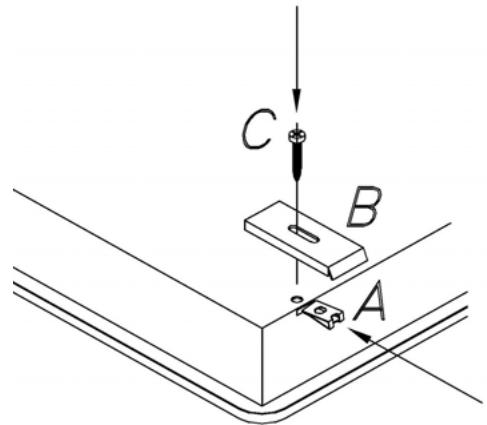
The cook top is fixed to the unit by means of the brackets and accessories provided. Holes are provided in the bottom of the tray where the tabs (A) are inserted so that you can attach the screws (C) that hold the brackets (B) in place.
A = tab for inserting in the bottom of the cook top tray
B = fixing bracket
C = screw
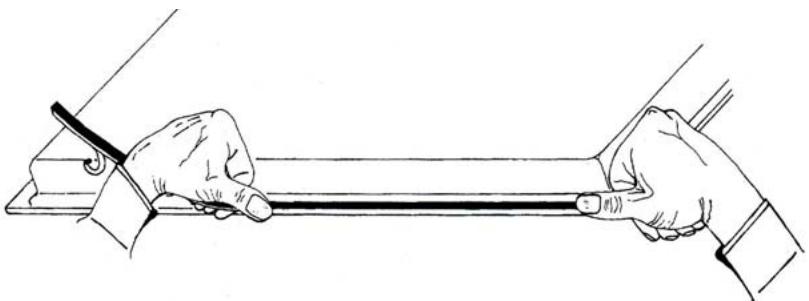
Applying the seal
Important - The figure below shows how the seal must be attached all around the perimeter.
This cook top has been designed for non-professional, domestic use.
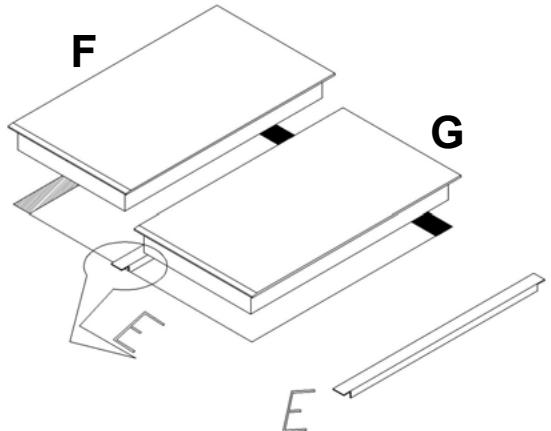
Coupling two or more Domino cook tops
Cut out the work top to allow for the flush mounting of two or more Domino cook tops.
First of all, place the steel supporting element (E) provided in the package in position, then insert the cook top (G) as illustrated in the figure below., Insert the second cook top (F) in the remaining space.
Together with the seal on the two Domino cook tops, the steel support will ensure that the top is watertight.
The Domino cook tops are fixed to the work top using the kit of brackets provided.
2. Electric connections
Check the details given on the nameplate situated on the underside of the cook top, then make sure that the rated mains voltage and power available are suitable for its operation.
Before making the electric connections, check the efficiency of the earthing system. Earthing of the cook top is compulsory by law. The manufacturer will accept no liability for any personal injury or damage to property deriving from failure to comply with this requirement.
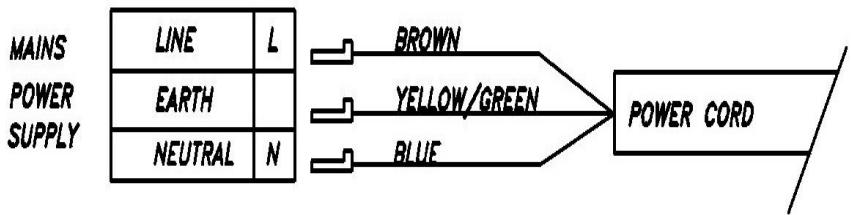
For models without a plug, fit a standard plug capable of withstanding the specified load on the power cord. The cord's earthing conductor is colored yellow and green. The plug must be accessible.
If you prefer to make a fixed connection to the mains, insert an all-pole circuit breaker with a breaking gap of at least 3 mm between the cook top and the mains.
To connect the cook top power cord, loosen and remove the cover on the terminal block in order to access the contacts inside. Make the connection, blocking the cord in place with the cable clamp provided and then close the terminal block cover again immediately.
If you have to change the cord, the earthing (yellow / green) conductor must always be 10 mm longer than the line conductors.
Use only rubber cable type H05RR-F; the cross-section of the wires must be 3 × 1.5 mm .
DECLARATION OF CONFORMITY. In the parts destined to come into contact with foodstuffs, this appliance is in accordance with the requirements of the EC directive 89/109 transposed in the Italian Legislative Decree N° 108 of 25/01/92.
CE Appliance conforming to the European directives 89/336/EEC, 93/68/EEC, 73/23/EEC and subsequent revisions.
INSTRUCTIONS FOR USE
Important: Carefully clean the surface before using the barbecue for the first time, then switch the heating element (resistance) on for 5 minutes at the maximum temperature. This will prevent any food cooked on the barbecue from absorbing the smell the resistance will give off the first time it is switched on.
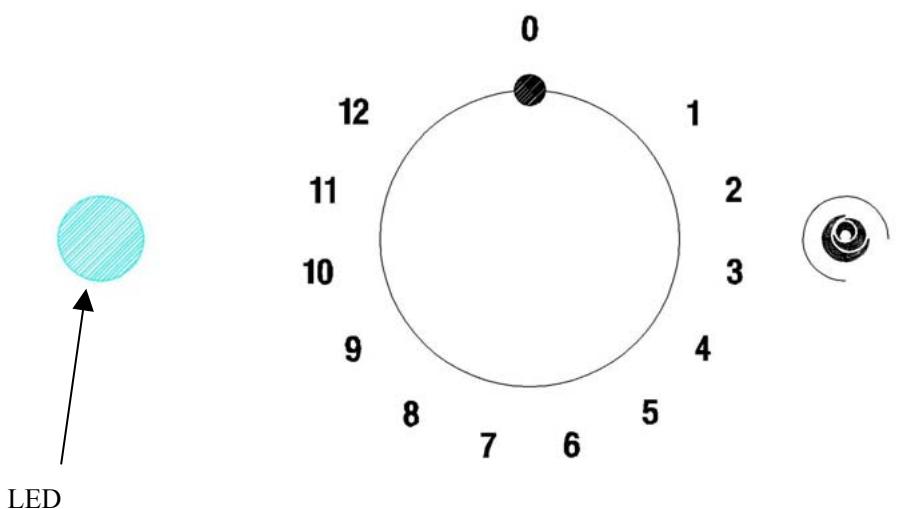
Operate the knob set on the front of the surface to start cooking. The LED which lights up indicates the surface is on and the resistance is heating up. The speed at which the food on the barbecue cooks depends on the position of the knob (1 to 12).
When the knob is set to position 12, a slight click indicates the appliance has reached its maximum setting. The resistance quickly becomes red-hot, ready for the "grill-type" cooking method.
Food will cook more evenly, also inside, if intermediate positions are used, rather than the resistance being very hot or simply warm. These positions are also recommended for cooking more delicate foods.
The container is filled with lava which absorbs any drops of oil or fat produced during cooking. It also accumulates the heat from the resistance in order to ensure food is grilled evenly. This cooking method is similar to the one which would be achieved by using charcoal. The manufacturers recommend preheating the lava for at least 10 minutes at a low temperature before grilling.
Water can be poured into the container in place of the lava, to a level of at least 3cm. The water prevents unpleasant smells from forming during cooking, without negatively altering the performance of the barbecue.
CLEANING AND MAINTENANCE
Advice for cooking
Important
N.B. the surfaces of the cooking areas become red-hot during use. Keep the barbecue out of the reach of children.
Do not drop hard objects on the glass surfaces as under some conditions they are sensitive to mechanical loads. Pointed objects may, therefore, break these surfaces. If the glass-ceramic surface is accidentally broken or cracked, switch the appliance off immediately and contact the Customer Service Department.
Ensure that cables and plugs of other domestic appliances inserted in sockets positioned near the barbecue do not come into direct contact with hot cooking surfaces.
Do not, under any circumstances, clean the surface using steam cleaning appliances or similar.
The surface must be cleaned thoroughly after each cooking session. Wait until it has cooled completely. Even very small residues of food left on the surface will burn the next time the appliance is used. Use the recommended cleaning products currently on sale only. The stainless steel components of the appliance must be cleaned using non-abrasive, non-corrosive products. Do not use chlorine-based products such as bleach etc.. Steel wool, abrasive sponges and scouring powders may scratch the surface. Do not use oven-cleaning products to clean the appliance as they are corrosive.
Surface dirt can be removed using either a damp cloth or hot sodium carbonate. Remove residues of detergents using cold water, and carefully dry surfaces. Any remaining water stains which do not disappear using boiling water can be removed using vinegar or lemon, or lime-scale remover. Clean the frame or stainless steel container immediately using a wet cloth if they come into direct contact with one of these acid detergents.
Any encrustations which remain on the glass can easily be removed using a shave hook for glass. The handle of the shave hook must not be made of plastic as it could melt and stick to hot surfaces. Careless use of this implement may result in injury.
The lava and stainless steel container are dishwasher-proof.
TECHNICAL ASSISTANCE
Before contacting the Technical Assistance:
if the surface is not functioning correctly, check the plug has been correctly inserted in the socket.
If you are unable to find the cause of the malfunction:
turn the appliance off, do not tamper with it and contact the Technical Assistance Service.
The appliance comes with a guarantee which gives the user the right to make use of the Technical Assistance Service. Keep the guarantee, duly filled-out, to hand to show the Authorised Technical Assistance Service if necessary, together with a valid receipt issued by the retailer when the appliance was purchased (delivery note, invoice, receipt, other) which specifies the name of the retailer, the date of delivery, the details of the product and the selling price.
LIMPEZA E MANUTENÇÂO
Brand : ROSIERES
Model : DVB11CPN
Category : Hob