
RDVI342 - Hob ROSIERES - Free user manual and instructions
Find the device manual for free RDVI342 ROSIERES in PDF.

| Product type | Mixed vitroceramic and induction hob |
| Brand | ROSIERES |
| Model | RDVI342 |
| Number of cooking zones | 4 |
| Cooking zone types | 1 vitroceramic zone Ø140 mm (1.2 kW), 1 vitroceramic zone Ø180 mm (1.8 kW), 1 double circuit zone Ø120/180 mm (0.7/1.7 kW), 1 induction zone Ø200 mm (2.3/3.0 kW) |
| Power supply | 220-240 V ~ 50/60 Hz |
| Total power | Approximately 7.0 kW |
| Dimensions (W x D x H) | 560 x 490 x 50 mm (typical) |
| Cut-out dimensions | 550 x 470 mm (typical) |
| Net weight | Approximately 10 kg |
| Main functions | Booster, standby, timer with automatic shut-off, child lock, pause function, recall, pan detection, residual heat indicator |
| Controls | Touch controls with digital display |
| Maintenance and cleaning | Warm water and specific alkaline cleaner for vitroceramic; do not use steam cleaners or abrasive products |
| Safety | Automatic shut-off per zone, thermal protection, pan detection, child lock, overheat cut-off |
| Spare parts and repairability | Parts available from after-sales service; do not attempt repairs yourself |
| General information | Compliant with EU directives (low voltage, electromagnetic compatibility, food contact); household use only |
Frequently Asked Questions - RDVI342 ROSIERES
User questions about RDVI342 ROSIERES
0 question about this device. Answer the ones you know or ask your own.
Ask a new question about this device
Download the instructions for your Hob in PDF format for free! Find your manual RDVI342 - ROSIERES and take your electronic device back in hand. On this page are published all the documents necessary for the use of your device. RDVI342 by ROSIERES.
USER MANUAL RDVI342 ROSIERES
Important warnings and tips for use
- IMPORTANT! This manual constitutes an integral part of the appliance. It must be kept intact and within easy reach during the entire life of the cooktop. Please carefully read this manual and all the instructions contained herein before using the appliance. Keep any spare parts supplied with the appliance. Installation and electrical connections must be carried out by a qualified technician in accordance with the manufacturer's instructions and in full compliance with current laws and safety regulations. This appliance is intended solely for domestic use and is designed for the following functions: cooking and reheating food. Any other use is considered as improper.
The manufacturer declines all liability resulting from poor installation, tampering, inexpert use and use for purposes other than those specifically stated. - Check that the appliance has not been damaged during transport; Keep all packaging materials (plastic bags, polystyrene foam, nylon, etc.) away from children, as they are potentially dangerous.
- This appliance is not intended for use by persons (including children) with reduced physical, sensory or mental capabilities, or lack of experience and knowledge, unless they have been given supervision or instruction concerning use of the appliance by a person responsible for their safety. Children should be supervised to ensure that they do not play with the appliance
- Electrical safety can only be guaranteed if the product is connected to a suitable earth connection.
- It is dangerous to modify or attempt to modify the appliance. In the event of a malfunction, do not attempt to repair the appliance yourself, but contact a qualified technician.
- After using the cooktop, ensure that the control is turned to the "off" position.
- Should you decide not to use the appliance any longer, before scrapping it make it unusable in accordance with current environmental health and safety laws, ensuring any parts which might constitute a danger to children are rendered harmless.
- Warning: in case of disassembly, maintenance and cleaning of the appliance, be careful Please use suitable prevention and protection equipment
- The appliance data plate, with technical specifications, is positioned at a visible point under the bottom and is also enclosed with this manual. The data plate must under no circumstances be removed.
- Never place flammable object on the hob. FIRE HAZARD! The residual heat indicator warns if zones are hot. Be sure to avoid the following actions: do not touch cooking zones that are heated. do not place aluminium foil or plastic containers (the protective films are not suitable for this hob)
- If there is a drawer under the hob, it is advisable not to keep inflammable objects or spray cans in it.
- The power supply cable must never touch hot cooking zones. Cable insulation and the hob might get damaged.
- The cooking zone and pan bottom must always be dry.
- If there are breaks, cracks or splits in the ceramic glass, there is a risk of short-circuiting; If the cooking zone overheats but the display does not work or if the hob switches off by itself: Immediately switch off the appliance and contact the technical assistance service.
- These instructions are valid only for those countries whose ID initials appear on the data plate found on the instructions handbook and on the appliance.
- Illustrations for the use of the appliance are grouped together at the end of this manual.
Declaration of Conformity
This appliance is in compliance with the following European Directives:
93/68/CEE: General regulations
- 2006/95/CE: Concerning low tensions
2004/108/CEE: Electromagnetic compatibility
- CE Regulation n° 1935/2004: this appliance is suitable to come in contact with food products.
COOKING
ANY ADJUSTMENT, MAINTENANCE, ETC. MUST BE CARRIED OUT WITH THE HOB UNPLUGGED AT THE MAINS.
The glass-ceramic cooktop permits rapid vertical transmission of heat from the heating element below the cooktop to the pots or pans placed on top of it. Heat does not spread horizontally, thus at a distance of just a few centimetres from the cooking zone, the glass remains relatively "cool" to the touch.
Before cooking for the first time, it is necessary to clean the surface of the appliance. This should be done using only recommended ceramic hob cleaners. After cleaning, the appliance should be operated in the following manner to remove any residues or moisture that may be present within the appliance.
Before switching on, check the control signal to be sure that the desired cooking zone is selected.
It is best to place the pot or pan on the cooking zone before switching on, and remove it only after switching off. Never cook food directly on the glass-ceramic cooktop; always use suitable pots or containers.
Do not stare at the halogen lamps on the cooktop.
Absolutely do not leave the electric plates working without any pots on it.
Such incorrect usage may cause overheating, damages to the appliance and fire hazzard.
To switch on the electric plate, turn the knob or set the touch-control to the desired power intensity.
Numbers 1 to 6-10 (depending which type of cooktop) indicate the progressive temperature levels.
Depending on the food to cook, adjust the heat intensity following the suggestions below:
| Control settings | Cooking operation suggestions | |||
| Knob control - range | Touch control | |||
| 1-6 | 1-8 | 1-10 | ||
| 0 | 0 | 0 | 0 | Off |
| 1 | 1 | 1-2 | 1 - 2 | For melting processes (butter or chocolate) |
| 2 | 2 | 2-3 | 2 - 3 | For keeping foods hot and heating small amounts of liquids. |
| 3 | 3 | 3-4 | 3 - 4 | For heating larger amounts and beating custards and sauces. |
| 4 | 4 | 5 | 5 | Slow boiling, for soups, pasta and risotto, continuing steaming |
| 5 | 5 | 6 | 6 | processes, and cooking steaks and fried foods in general. |
| 6 | 7-8 | 7 | Browning meat, roasted potatoes, fried fish, bringing large | |
| 6 | 7 | 9 | 8 | amounts of water to the boil. |
| 8 | 10 | 9 | Quick frying, char-grilled steaks, ect. | |
At the end of your cooking, always switch off the hob
RESIDUAL HEAT INDICATOR
These appliances have an indicator light that inform the user that the temperature of the glass is at a dangerous level in the event of contact with the cooking zone.
In models with knobs control, each heating elements has a corresponding residual heat indicator light, in models with touch control any residual heat is indicated by an "H" by the corresponding seven-segm
Once a cooking zone has been turned off, the corresponding light will stay on for a period of time necessary for the zone to cool down below the critical level.
Absolutely do not touch the cooking areas or leave flammable objects near it until the light is off.
USE
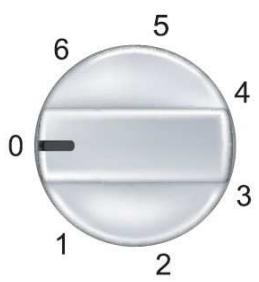
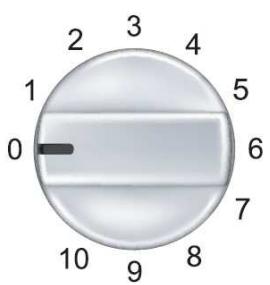
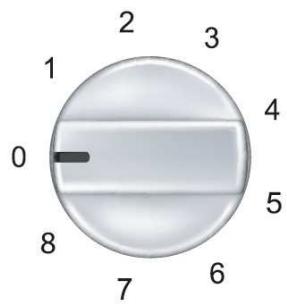
KNOBS CONTROL
In these hobs the cooking zones are controlled by knobs connected to power selectors
Numbers are used to indicate cooking settings where "1" is the minimum setting and the highest number is the maximum setting. Number 0 is the off position. Extensible zones, where available, are activated over max position.
To switch on the extended zone, turn the knob beyond the max setting until a click is heard, then return it to any setting from min to max. The zone controlled by each knobs is identified by the adjacent cooking zone symbol.
Examples:
TOUCH CONTROL
In these hobs the cooking zones are controlled by a Touch-control board.
Depending on the version of your appliance, you can have all or part of the controls shown below. The typology of the controls could change depending on the aesthetics of your appliance however the functions are the same.

On key (ON/OFF Control)

Dual circuit ON/OFF (Optional)

Power level

Extensible zone ON/OFF (Optional)

Selected plate

Dual/Triple circuit indicator (Optional)

Plus
Timer display (Optional)

Select plate
Timer plate indicator

Minus

Lock function (Optional)

Timer ON/OFF (Optional)
Lock indicator (Optional)

Pause function (Optional)

Booster function (Optional)
Turning Touch Control on/off
After start-up, the touch control requires about one second before it is ready for use. After reset, all displays and LED's will flash for about 1 second. After this time, all displays and LED's go off and the touch control is in stand-by status. The touch control can be turned on using the power supply button (key ON/OFF).
The displays of the cooking zones will show. If a cooking zone is hot, the display will show "H". The touch control is turned on exclusively by using only the power supply button alone. Pressing the power supply button at the same time as other keys has no effect and the touch control remains in standby status. The touch control can be switched off at any time using the power supply button. This is also the case if the control has been locked with the child safety feature. The power supply button always has highest priority for shutdown.
Turning on a cooking zone
With the touch control on, select a cooking zone by pressing the selection key. When the respective display shows a "0", the plate is ready. If the area is hot an "H" will be shown on the display for the corresponding plate. By pressing the key "+" you can select a power level and the zone will start heating up. Starting from level 1, it is increased by one every 0.4sec. Upon reaching level 9 you cannot make any further increases. If the cooking zone is selected using the "-" key, the initial level is "9" (the highest level available). If you hold down the key, the active level decreases. When you reach 1 you cannot decrease it any further. Use the "+" or "-" keys for change settings.
Turning off the cooking zones
A cooking zone can be switched off in the following way:
By pressing the "+" and the "-" keys of the desired cooking zone simultaneously
By selecting cooking zone ,0 " for the desired cooking zone by pressing the , " key.
All cooking zones can be switched off immediately, at any moment, by pressing the power button.
Automatic heating function (where supplied)
When the automatic heating function has been activated, the power of the cooking zone reaches 100% for an established heating time, which depends on the selected power level. At the end of this heating time, the touch control returns to the pre-selected power level. Procedure to start automatic heating:
- The control unit is switched on and a cooking zone is selected;
- After setting cooking stage "9" automatic heating is activated by pressing the "+" key again.
Immediately afterwards, a "A" appears on the display.
Once the parboiling boost has ended, only the selected cooking stage is indicated on the display.
Using the "minus" key you can de-activate the function at any time.
Automatic switch off function (limitation of operating time)
Based on the power level, each cooking zone is shut off after a maximum preset time if no operations are performed. Each operation with the cooking zone (using the PLUS or MINUS keys, or the dual circuit in the zone where present) resets the maximum operation time to its initial value.
- When the control is on, the ON/OFF key has priority over all other keys, so that the control can be shut off at any time, even in the event of multiple or continuous activation of keys.
- In standby mode, continuous activation of keys will not have any effect. However, before the electronic control can be turned back on, it must recognize that no key is activated.
Child-Lock function (where supplied)
Where present, press the "key-lock" button to lock. Press it again to un-lock.
Otherwise, to lock press the cooking zone select key of the front right cooking zone and in the simultaneously press the minus key followed by pressing the cooking zone select key again.
All displays show an "L" for LOCKED (= child lock against unintentional activation).
This operational procedure must take place within 10sec and no other key than the one described above may be pressed. The electronics remains in a locked condition until its released, even if the control until is switched off and on again in the meantime. For release, press the cooking zone select and the minus key simultaneously.
"L" for LOCKED disappears from the display and all cooking zones display "0" with a flashing dot. After switching off the control unit the child lock is reactivated. To de-active the lock function definitely, press the cooking zone select key and the minus key simultaneously followed by pressing only the minus key again. After carrying out all steps in the correct order and within a period of 10 sec, the locking is cancelled and the control unit is in a STAND-BY mode. If the control unit is switched on again by pressing the ON/OFF key, all displays show "0", the display dots keep flashing and the control unit may be operated for cooking.
Use of the multiple circuits (where supplied)
Depending on the model, your appliance can have a DUAL or a TRIPLE heating element. When a multiple plate is activated, the internal circuits are turned on. If you also want to turn on the outermost circuit, you need only select the extended zone key. By means of the multiple-circuit key, the outermost circuits of the cooking zone can be de-activated at any time. An active external circuit is shown by a special additional LED. A new activation of the multiple-circuit key activates the external circuits again and the assigned LED's come back on.
If the element to be controlled is a triple-circuit radiant hotplate, the following applies:
Pressing the multiple-circuit button for the first time switches off the outermost circuit and the indicator light at the top of the display.
Pressing the multiple-circuit button a second time switches off the median circuit and the indicator light at the bottom of the display.
Pressing this button a third time, switches on the median circuit again.
Further pressing adds the third circuit and its related indicator light.
Timer / Alarm mode (where supplied)
The timer has two different working modes:
- Timer mode: When the programmed period is over, the timed heating element switches itself off automatically. If the timer is set in this mode, this is indicated by a led near the timer display.
- Alarm mode: This is only a count-down timer that does not control the heating elements;
The working mode is programmable by the user by touching the selection-zone key.
In any working mode, after the time has been set, the countdown starts.
When time has expired, a buzzer goes on and the display flashes until any keys is touched (or after few minutes)
It can be set to any value between 1 and 99 minutes and can be modified at any time;
Continuous activation of PLUS or MINUS provide dynamic increase of the speed of variation up to a maximum value.
To cancel the count-down, select the "00" value using the "-" key or press the the "+" or "-" keys at the same time
Timer
Any of the heating elements under the touch control system, both simple or double, can be timed. When the timed period is over, the timed heating element (and if applicable the twin area as well) switches itself off automatically.
For timer control of a heating element first press the selection-zone key,
then the power level and finally and then the timer keys.
The timer can be apply to one heating element at a time. By selecting another cooking zone after the timer is set,
the display show a led corresponding to the heating zone timed, and the second zone can work normally.
Alarm
The alarm mode is activated by pressing only the "+" or "-" key; It can be activated also when the touch control and the hob are off. If the touch control is turned on (using the power key) the alarm mode goes off automatically.
Thermal protection of the control panel
When the control panel detects an ambient temperature greater than 95^ (+ - 5%) it shuts off the elements. A heating element that is shut off by the thermal protection can be turned on only when the temperature drops below 95^ .
INDUCTION
Warnings:
The Induction complies with the valid EMC standards. Therefore no disturbances with other electronic devices should occur. User with pace maker or other electronic implant are recommended to check with the manufacturer of the electronic device or their medicine if their electronic device is adequate safe respecting to EMC The cooking surface may get hot even in case of inductive heating without direct heating of the cooking surface. But the surface is heated by the pot standing on the cooking zone which reheats the surface. The temperature protection for pots and depends on the planarity of the vessel. In case of an exceeded air gap in the centre of the cooking zone the temperature protection (empty boiling pot, oil flaming) is affected. Kitchenware or others metalworks should not be put onto the hob because they could get hot.
Receptacles
Use only saucepans and frying pans with a sturdy, preferably thick bottom. This is particularly important when preparing food requiring high cooking temperatures, such as fried foods. If the bottom of the pan is not perfectly flat, the food takes longer to cook and uses up more energy. The best heat transfer is obtained when the saucepan and burner are the same size.
The induction cooking method rapidly transfers the energy needed for cooking directly to the pan, so the cooktop surface remains cold but the pan heats up. The result is a fast, cost-effective and accurate cooking method. This type of appliance can be used with enamelled steel or stainless steel pans; it is not suitable for use with glass, ceramic or aluminium pans (unless a special magnetic base plate is used). Turn the hob off through its proper device after use (do not rely only on pot detector)
Limits of pot detection function
The following table shows the limits of the pot detection as they are tested with cast iron:
| Nominal diameter of coil | Limit of pot detection (switches ON) | |
| Min. | Max. | |
| Ø 160 mm | Ø 90 mm | Ø 160 mm |
| Ø 200 mm | Ø 120 mm | Ø 200 mm |
Integrated pot detection
Each one the cooking zones is equipped with a pot detection function. The pot detection prevents a cooking zone from turning on without a pot being put on it. And the cooking zone turns off as soon as the pot is taken away from it. The cooking zone is turned off automatically after a certain time when a cooking level is set but there is no pot put on it. The pot needs to be made of magnetisable material. The pot detection of the induction module depends on the pot and the material it is made of.
Protection against excess temperature
The generator as well as the coils have integrated functions protecting against excess temperature. Inside the power board a temperature sensor controls the temperature of the heat sink to protect the devices.
Soiling on the glass ceramic surface
Soiling, normally food stuffs and/or water can – however, not necessarily – be mistaken as a key touch. Also, dampness in thin layers (film, streaks) may cause this effect. Especially with larger quantities there is a chance that none, one, several or all keys can, thus, be mistaken as touched briefly or permanently. In this respect, soiling can, for a short period, lead to alterations of settings which can just as well be generated by an operator. In case of such an alteration e. g. activation of a cooking zone, the entire Touch Control is disconnected after max. 10 sec (due to permanent operation detection). This implies that the „activating“ effect on the sensors caused by the soiling remains basically unchanged for as long as 10 sec
Overheat control for induction cooking zones
In principle, the induction works intrinsically safe. The induction electronics provide temperature sensors at each cooking zone being located below the glass ceramic surface to monitor temperatures. Further temperature sensors along the heat sink protect the electronics itself against overheating. The software may reduce the power or switch off all cooking zones in case of too high measured temperature values.
Pause Function
When at least one cooking zone is in operation, the heating elements may be switched off by actuating the special key "pause" for >= 1 s. Already programmed times (also egg timer) are stopped and do not continue during the pause. Automatic heat-up and booster are also switched off on all cooking zones during activation, the residual heat calculation and operating time limitation continue and are not stopped. The pause condition may last for max. 10 minutes. If the status is not terminated within this time, the control switches off. The cooking zone may be switched at any time with the on/off key - a possibly activated pause mode is then terminated. In order to terminate the pause mode and put into operation again the cooking zones, the special function key and any other key (not the same again) has to be actuated within 10 seconds.
Recall Function
By using of the recall function the settings may be recovered quickly, when the control had been switched off with the main switch by mistake. After switching off the power key the operator has 6s to switch on again the control and another 6s to actuate the pause key. The pause mode is not possible within the first 6s after switching on. The execution of the function is only possible, if at least one cooking zone was active (cooking stage >0 ), independent from the key-lock status and is confirmed with an acoustic key signal. The following is re-established:
- Cooking stages of all cooking zones
- Minutes and seconds of programmed cooking zone-related timers
- Switching condition of the outer circuits (is guaranteed by outer-circuit memo function)
- Heat up function and booster
Booster function
After selection of a respective cooking zone, the boost function can be selected directly via the boost function key. If the desired cooking zone has the capacity to receive this power, the display shows a "P" symbol. In case the power is not permitted the cooking stage display flashes for 3 sec on the cooking zone which needs to be reduced and which requires automatic adjustment. The boosting time is limited to 10min . After the booster is switched off automatically, the cooking zone continues operation on nominal power. The booster can be reactivated provided that the temperature sensors in the electronics and in the coils have the capacity. In case that the pan is removed from the cooking zone during boosting, the boosting function remains active and boosting time continues. If the booster temperature limit of the electronics or the coil of a boosted cooking zone is exceeded, the booster is cut off automatically and reset to nominal power.
Fan control (Integrated cooling of the generator)
The cooling is integrated within the plastic housing of the Inductor heat element. The operation of the fan is controlled by the temperature which is measured at the heat sink. Then fan switches on, when a certain temperature is reached and switches to a higher speed when the second temperature limit is reached.
Start lower speed 45^
Start higher speed 55^

Generator
Pot with bottom with ferromagnetic material
Magnetic field
Glass-ceramic surface
Coil to spiral of Archimedes
FIT INSTRUCTION
Important!
- These instructions are intended for qualified technicians.
- The appliance must be installed correctly, in compliance with current laws.
- Before carrying out any operation on the appliance, it must be disconnected from the electric supply.
Position (fig.1)
The hob is designed to be fitted into a work surface which is larger than the hob. The dimension of the hole to be made in the worktop and the minimum distances between rear and side walls and those above are showed on figure n°1. The hob is supplied with a seal to prevent infiltration into the unit. The seal must be fitted carefully.
Materials and glues used for the kitchen cabinets must withstand a temperature of at least 100^ .
Isolation (fig.4):
- If the cooktop is installed without an oven below it, a separator panel must be placed between the bottom of the cooktop and the housing below it, at a minimum distance of 10mm .
- If the cooktop is installed over an oven, place a separator panel at a minimum distance of 15mm and follow the oven manufacturer's instructions, ensuring nonetheless sufficient aeration as specified in fig.4.
The heat produced by the oven, measured on the right side of the bottom of the hob, must be lower than 60^ . Otherwise, the heat could damage the knobs or the Touch Control system.
In any event, the electrical connection of the two appliances must be carried out separately, both for safety and for an easy removal. It is mandatory to use an oven equipped with an internal forced cooling system.
Fix in the worktop (fig.2):
To fix the cooktop in the housing, proceed as follows:
- Position the special seal supplied [C] along the outer perimeter of the worktop,
so that the ends of the gasket meet exactly without overlapping. - Position the cooktop into the worktop, taking care to ensure it is placed exactly in the centre.
Fix the cooktop to the worktop using the special brackets supplied [A], and the screws [B], as shown in fig.2.
Electrical connections (fig.6)
Connecting the electrics, ensure that:
- The household power supply meets the requirements on the labels located under the hob and in this booklet
- There is an earth system and that it works correctly (earth connection is required by law);
- For a direct connection to the mains, there must be an omnipolar cut-off device on the power-supply line, with a contact cut-off distance of 3mm or greater. The device must also be located in an accessible position near the hob (the yellow-green earth wire must not be interrupted).
- The lead and plug must be easily accessible after the hob has been installed.
- Do not use reducers or adapters for connect to the mains, since these could overheat and cause burns
- Connect the wire in accordance with the following colours/ codes:
BLUE
NEUTRAL (N)
BROWN
LIVE (L)
YELLOW-GREEN
EARTH (12)
- If the cable is damaged, it must be quickly replaced, immediately turn-off the hob and call the assistance.
Maintenance
- Do not cook with empty neither enamelled or aluminium pans. Use only stainless steel pots and pans with a flat bottom, having same or slightly larger diameter than the heating area (see Fig.5).
Receptacles should not have rough bottoms in order to avoid scratches on the heating glass surface. - If you see a crack on the hob, disconnect immediately the electric power supply and contact the assistance
- Never place hot pans, frying pans, hard or sharpened objects on the control panel, knobs area or the frame
- For cleaning, use only warm water with a mild detergent. Never use abrasive sponges or irritating chemical detergents as they might cause damage to glass. Warning: a steam cleaner is not to be used to clean the appliance.
- Any spilt food like sugar and other cause damage the hob, it must be removed immediately with the scaper. Warning !!! The optional scraper for glass (fig.3) has a sharp blade.
- The following damages will not affect the correct functioning or the stability of the ceramic glass: Scratches due to salt, sugar or sand grains or rough pan bottoms; The formation of gelatinous residues; Alteration glass colour from pan use or decoloration due to using unsuitable detergent
| Error code | Description | Possible error cause | Error clearing |
| E2 | Overheating of the induction coils | / | Cooling down necessary |
| ER03 & permanent tone | Permanent use of keys; Control unit cuts off after 10 sec | Water or cooking utensils on the glass above the control unit | Cleaning of the operational surface |
| E5 | Error on filter board | Controller flash defect; check sum not correct | Exchange filter board |
| E6 | Error on power unit | 5V short circuit with power unit 12V on power unit too low temperature sensor at cooling body defect mains synchronous impulse incorrect | Exchange power unit |
| E7 | Unknown error, cannot be cleary identified | Sub LIN error between filter and power unit | turn-off and call Customer Service |
| E9 | Coil temperature sensor defective | Exchange temperature sensor | |
| ER12 | Control switches off after 10 sec | Short-circuit in the 5V or earthed control relay | Exchange control unit |
| ER13 | Control switches off after 60sec at the latest | Component part defect | Exchange control unit |
| ER16 | Control switches off | Short-circuit or disconnected pan sensor or power supply | Remove the cause (customer service) |
| ER20 | Flash-failure | μC- faulty | Exchange control unit |
| ER21 | Control unit cuts off after controlling due to overheating to avoid damage to the electronics | Standard algorithm reaches limit when overheated. Ambient temperature of electronics still to high | Allow cavity to cool down. Check heat sealing-off of control unit. |
| ER22 | Key evaluation defective; control unit cuts off after 3.5 - 7.5 sec | Short-circuit or discontinuation at NTC in the range of the key evaluation | Exchange control unit |
| ER25 | Secondary voltage of the power supply unit too high (primary>300V). Control switches off after 1s and a permanent acoustic signal is heard | Control wrong connected | Connect to correct mains voltage |
| ER26 | Relay voltage too high in switched-off condition (nominal: 0 Volt) | Short circuit in the relay voltage control | Replace the control |
| ER31 | Configuration data incorrect | Configuration data incorrect | Configuration necessary |
| ER33 | Water on the glass above the control card | Clean | |
| ER36 | NTC value is not within its specification (value < 200mV or >4.9V; control unit cuts off) | Short-circuit or discontinuation at NTC | Exchange control unit |
| ER37 | Faulty feedback of shift register signals to the segment or relay activation | Return of sliding register signals to select, segment or relay triggering incorrect | turn-off and call Customer Service |
| ER39 | Wrong programming options (fuses, lockbits) | turn-off and call Customer Service | |
| ER40 | Secondary operational voltage is min.5 s too low, according to identified under tension; | Primary PTC too hot | Disconnect control unit from the power system |
| ER42 | Operational voltage is too different from the adjusted value | The voltage is exceeding from the valid range or there is too much variance | turn-off and call Customer Service |
| ER47 | Communication error between TC and induction | None or faulty communication | Ensure that connection cable is plugged on correctly |
| U400 | Secondary voltage of the power unit to high (primary > 300V). Control unit cuts off after 1sec releasing a permanent tone. | Control unit is wrongly connected. | Connect to correct mains voltage |
| "H" Flashes | Hot pan on the control card; faulty radiant hotplate seal | Wait until the control card returns to the normal temperature | |
| FA | Error on key "ON-OFF" emitter | Security key error | turn-off and call Customer Service |
| FC | Error on key "ON-OFF" receiver | Security key error | |
| FE | Ntc short | Touch error | |
| Ft | Ntc open | Touch error | |
| Fc | Over temp T>96°C | Touch error | T<96°C |
| Fr | Error on relay | Touch relay failure | turn-off and call Customer Service |
| FH | Eeprom check sum | Eeprom checksum error | |
| FJ | Error on Adc | Security key error | |
| F0 | Error on Sw | Software error | |
| FL | Error on ambient light | Keyboard error | |
| FU | Error divisor | Security key error | |
CUSTOMER ASSISTANCE SERVICE
If you cannot identify the cause of the operating anomaly: switch off the appliance (do not subject it to rough treatment) and contact the Assistance Service.
PRODUCT SERIAL NUMBER. Where can I find it?
It is important you to inform the Assistance Service of your product code and its serial number (a 16 character code which begins with the number 3); this can be found on the guarantee certificate or on the data plate located on the appliance.
This will help to avoid wasted journeyes to technicians, thereby (and most significantly) saving the corresponding callout charges.
Selectioner la plaque
Number of hobs to combined
EN The symbol on the product or on its packaging indicates that this product may not be treated as household waste. Instead it shall be handed over to the applicable collection point for the recycling of electrical and electronic equipment. By ensuring this product is disposed of correctly, you will help prevent potential negative consequences for the environment and human health, which could otherwise be caused by inappropriate waste handling of this product. For more detailed information about recycling of this product, please contact your local city office, your household waste disposal service or the shop where you purchased the product.
- Important warnings and tips for use
- Declaration of Conformity
- COOKING
- RESIDUAL HEAT INDICATOR
- USE
- KNOBS CONTROL
- TOUCH CONTROL
- Turning Touch Control on/off
- Turning on a cooking zone
- Turning off the cooking zones
- Automatic heating function (where supplied)
- Automatic switch off function (limitation of operating time)
- Child-Lock function (where supplied)
- Use of the multiple circuits (where supplied)
- Timer / Alarm mode (where supplied)
- Timer
- Alarm
- Thermal protection of the control panel
- INDUCTION
- Warnings:
- Receptacles
- Limits of pot detection function
- Integrated pot detection
- Protection against excess temperature
- Soiling on the glass ceramic surface
- Overheat control for induction cooking zones
- Pause Function
- Recall Function
- Booster function
- Fan control (Integrated cooling of the generator)
- FIT INSTRUCTION
- Important!
- Position (fig.1)
- Isolation (fig.4):
- Fix in the worktop (fig.2):
- Electrical connections (fig.6)
- Maintenance
- CUSTOMER ASSISTANCE SERVICE
Brand : ROSIERES
Model : RDVI342
Category : Hob