
BDPE400 - Peinture en spray BLACK & DECKER - Free user manual and instructions
Find the device manual for free BDPE400 BLACK & DECKER in PDF.


| Brand | Black & Decker |
| Model | BDPE400 |
| Product type | Edge paint applicator (Speedy Edge) |
| Reservoir capacity | 50 ml |
| Power source | 3 AA batteries (LR06 - Alkaline) |
| Weight (without paint) | 0.3 kg |
| Main functions | Application of emulsion/water-based paint on edges, flow adjustment, control trigger |
| Compatible materials | Water-soluble paints (latex, emulsion) |
| Max storage temperature | 40 °C |
| Warranty | 24 months (domestic use) |
| Included accessories | Applicator, reservoir piston, filling cartridge, battery cover |
| Optional accessories | Applicator refill (ref. BDPE401) |
| Maintenance and cleaning | Clean removable parts with warm soapy water; clean body with a damp cloth |
| Safety | Use gloves and goggles; do not use flammable liquids; reading the manual is mandatory |
| Intended use | Indoor, domestic only |
Frequently Asked Questions - BDPE400 BLACK & DECKER
User questions about BDPE400 BLACK & DECKER
0 question about this device. Answer the ones you know or ask your own.
Ask a new question about this device
Download the instructions for your Peinture en spray in PDF format for free! Find your manual BDPE400 - BLACK & DECKER and take your electronic device back in hand. On this page are published all the documents necessary for the use of your device. BDPE400 by BLACK & DECKER.
USER MANUAL BDPE400 BLACK & DECKER
natural_image
Technical diagram of a mechanical component with labeled parts (no readable text or symbols)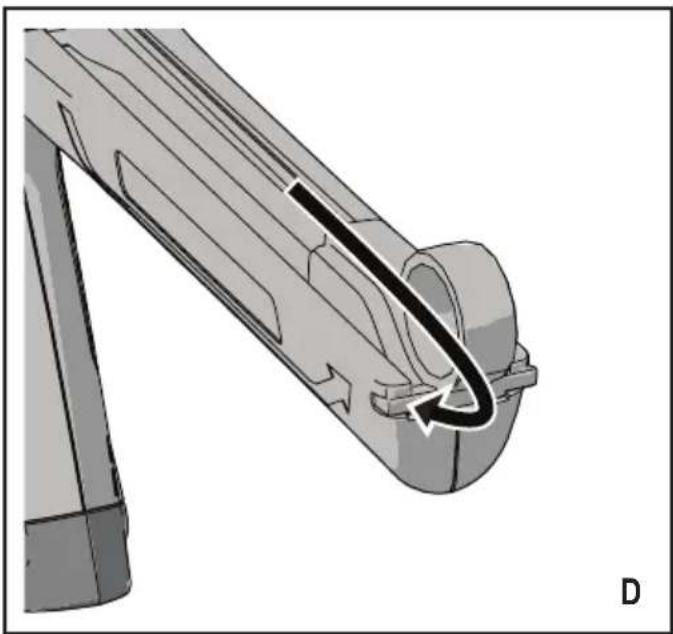
natural_image
Mechanical component diagram showing a curved arm with a black arrow indicating rotation or force direction (no text or symbols)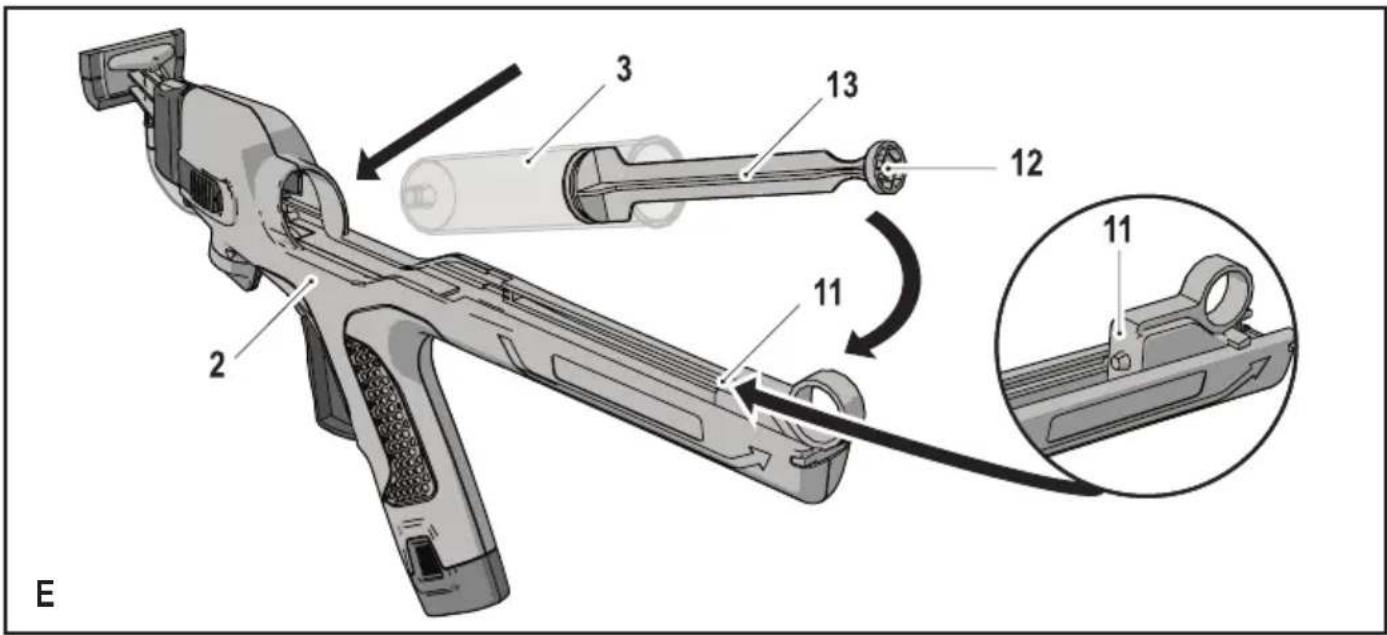
Intended use
Your Black & Decker Speedy Edge has been designed for applying water based / emulsion paints to room perimeters and around trims. This appliance is intended for indoor household use only.
Safety instructions

Warning! Read all safety warnings and all instructions. Failure to follow the warnings and instructions listed below may result in injury.
◆ Read all of this manual carefully before using the appliance.
- The intended use is described in this manual. The use of any accessory or attachment or the performance of any operation with this appliance other than those recommended in this instruction manual may present a risk of personal injury.
◆ Retain this manual for future reference.
Using your appliance
- Never put descaling, aromatic, alcoholic or detergent products into the Speedy Edge, as this may damage it or make it unsafe for use.
After use
- When not in use, the appliance should be stored in a dry place.
◆ Children should not have access to stored appliances.
Inspection and repairs
Before use, check the appliance for damaged or defective parts. Check for breakage of parts, damage to switches and any other conditions that may affect its operation.
- Do not use the appliance if any part is damaged or defective.
◆ Have any damaged or defective parts repaired or replaced by an authorized repair agent.
- Never attempt to remove or replace any parts other than those specified in this manual.
Personal safety
a. Additional personal safety equipment such as appropriate gloves and a respirator or mask must be used when handling chemicals. Safety equipment used for appropriate conditions will reduce personal injuries.
b. Do not paint yourself, any person or animal. In case of skin injection, seek medical attention immediately.
c. Do not treat injection as a simple cut. Toxins from paint may enter the body and cause serious bodily injury. In the event that injection occurs, seek medical attention immediately.
d. Beware of any hazards presented by the material being used. Consult the markings on the container or the information supplied by the manufacturer of the material to be used, including requirements for the use of personal protective equipment. Manufacturer's instructions must be followed to reduce the risk of fire and personal injury, derived from toxins, carcinogens, etc.
Safety of others
- This appliance is not intended for use by persons (including children) with reduced physical, sensory or mental capabilities, or lack of experience and knowledge, unless they have been given supervision or instruction concerning the use of the appliance by a person responsible for their safety.
◆ Children should be supervised to ensure that they do not play with the appliance.
Residual risks.
Additional residual risks may arise when using the tool which may not be included in the enclosed safety warnings. These risks can arise from misuse, prolonged use etc.
Even with the application of the relevant safety regulations and the implementation of safety devices, certain residual risks can not be avoided. These include:
◆ Injuries caused by touching any moving parts.
◆ Injuries caused when changing any parts or accessories.
◆ Injuries caused by prolonged use of the appliance. When using any appliance for prolonged periods ensure you take regular breaks.
Labels on the appliance
The following symbols are shown on the tool:

Warning! To reduce the risk of injury, the user must read the instruction manual.

Warning! Only use non-flammable liquids.

Warning! Wear safety glasses.
Additional safety instructions for non-rechargeable batteries

Warning! Batteries can explode or leak, and can cause injury or fire. Observe the instructions as described below.
- Ensure the switch is in the off position before inserting batteries. Inserting batteries into power tools and appliances that have the switch on invites accidents.
Under abusive conditions, liquid may be ejected from the battery; avoid contact. If contact accidentally occurs, flush with water. If liquid contacts eyes, additionally seek medical help. Liquid ejected from the battery may cause irritation or burns. - Carefully follow all instructions and warnings on the battery label and package.
◆ Always place batteries correctly according to the polarity (+ and -) as marked on the battery and the product.
◆ Do not short-circuit the battery terminals.
When battery/battery pack is not in use, keep it away from other metal objects, like paper clips, coins, keys, nails, screws or other small metal objects, that can make a connection from one terminal to another. Shorting the battery terminals together may cause burns or a fire. - Do not attempt to charge non-rechargeable batteries.
Do not mix old and new batteries. Replace all of them at the same time with new batteries of the same brand and type.
◆ Keep batteries out of reach of children. - Remove batteries if the product will not be used for several months.
◆ Never attempt to open for any reason. - Do not store in locations where the temperature may exceed 40 °C.
- When disposing of batteries, follow the instructions given in the section "Protecting the environment".
◆ Do not incinerate the batteries.
◆ Do not expose the batteries to heat
Features
This appliance includes some or all of the following features.
- Paint applicator
- Paint reservoir syringe
- Plunger drive
- Trigger
- Flow control knob
- Battery cap
-
Fill sleeve
-
Speedy Edge main body
Assembly
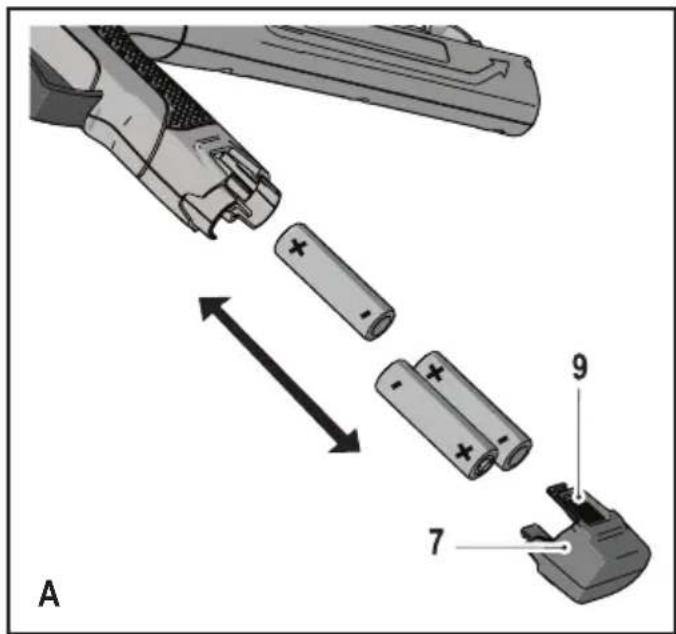
Fitting the batteries (fig. A)
◆ Remove the battery cap (7) by pressing in the tabs (9) and then sliding the battery cap (7) off the handle.
◆ Insert 3 AA (LR06 - Alkaline) batteries into the handle.
◆ Refit the battery cap (7) by sliding it back on to the handle.
Note: Always place batteries correctly according to the polarity (+ and -) as marked on the battery and the product.
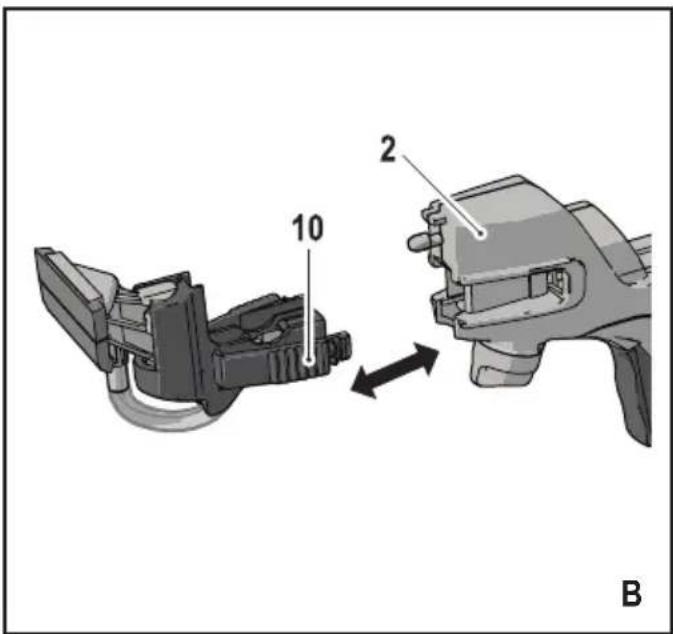
Fitting the paint applicator (fig. B)
◆ Press in the paint applicator release tabs (10).
◆ Slide the paint applicator into the front of the main body (2) of the Speedy Edge.
◆ Release the tabs (10).
Note: The paint applicator can not be fitted with the paint reservoir syringe in place.
Removing the paint applicator (fig. B)
◆ Press in the paint applicator release tabs (10).
- Slide the paint applicator out of the main body (2) of the Speedy Edge.
◆ Release the tabs (10).
Note: The paint applicator can not be removed with the paint reservoir syringe in place.
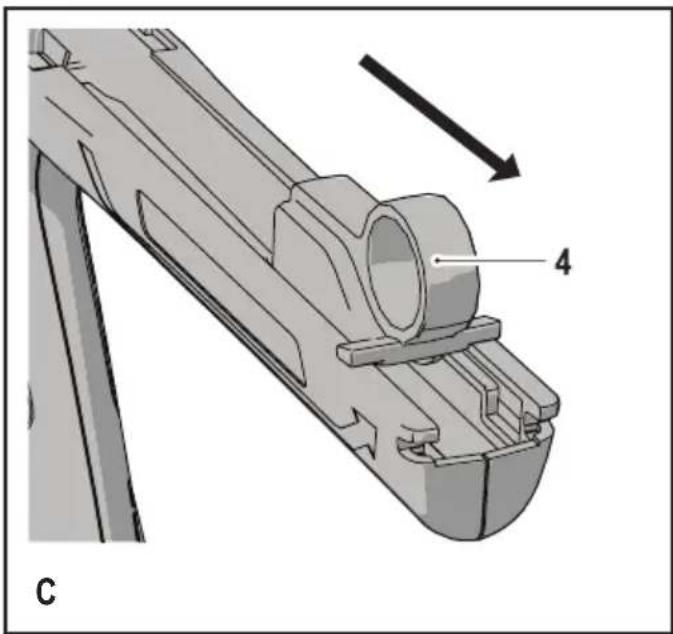
Fitting the paint reservoir syringe (fig. C - E)
Note: The paint reservoir syringe can not be attached until the paint applicator has been fitted
◆ Pull the plunger drive (4) to the back of the main body of the Speedy Edge and clip it in place.
- Slide the paint reservoir syringe (3) into the main body of the Speedy Edge.
◆ Pull the plunger drive (4) back and up to release it then gently guide the plunger drive tip (11) into the recess (12) in the back of the plunger (13).
Removing the paint reservoir syringe (fig. C - E)
◆ Pull the plunger drive (4) to the back of the main body of the Speedy Edge and clip it in place.
◆ Slide the paint reservoir syringe (3) out of the main body of the Speedy Edge.
Use
Filling with paint
Note: Wear disposable gloves to keep your hands clean.
◆ Slide the paint reservoir syringe (3) into the fill sleeve (8).
◆ Lower the tip of the fill sleeve (8) into the paint.
◆ Fill the paint reservoir syringe (3) by slowly pulling back the plunger (13).
Note: Do not over fill the paint reservoir syringe (3)
◆ Remove the paint reservoir syringe (3) from the fill sleeve (8).
Note: Wipe any excess paint from the syringe before reinserting into the Speedy Edge.
Note: The fill sleeve will stand up and can be stored on the lid of your paint tin between fills.
Painting with the Speedy Edge
Note: It is not necessary to mask around door and window frames when using Speedy Edge, however the use of dust sheets to cover floors and furniture is recommended.
◆ Fit the paint applicator (1).
- Set the flow control knob (6) to the minimum flow setting by turning it anti-clockwise.
◆ Fill the paint reservoir syringe (3).
◆ Fit the paint reservoir syringe (3).
◆ Pull the trigger (5), paint will start to flow slowly into the paint applicator.
◆ Increase the flow of paint to the desired amount by turning the flow control know (6) clockwise.
Note: Once paint is showing on the paint applicators foam pad it is ready to use..
- Keeping the paint applicator (1) flat against the wall, pull the trigger and slowly move the Speedy Edge along the edge you are cutting in.
- Increase the flow of paint to the desired amount by turning the flow control know (6) clockwise.
Note: Alter both the flow of paint and the speed at which you move the Speedy Edge to get the best results.
Hints for optimum use
◆ Always hold the paint applicator flat against the surface.
◆ Always hold the Speedy Edge horizontal to the wall.
- The Speedy Edge can be angle left or right to enable a clear view of the edge being painted.
◆ Always use steady movements.
- As required, wipe excess paint from the edges of the paint applicator.
If the paint applicator is sliding on the surface, apply less paint by turning the flow control knob anti-clockwise.
When not in use, pull the plunger drive (4) to the back of the main body of the Speedy Edge and clip it in place.
- When leaving the Speedy Edge unattended for a longer period of time, wrap the paint applicator in a plastic bag to prevent drying, removing as much air as possible from the bag.
◆ Make sure the type of paint you use can be cleaned with a warm water and soap solution (for water soluble paints)
Returning excess paint to paint tin
◆ Pull the plunger drive (4) to the back of the main body of the Speedy Edge and clip it in place.
◆ Slide the paint reservoir syringe (3) out of the main body of the Speedy Edge.
- Hold the syringe over the paint tin and gently push down on the plunger to return paint to the tin.
Note: Wear disposable gloves to keep your hands clean.
Maintenance and cleaning
Your Black & Decker cordless appliance has been designed to operate over a long period of time with a minimum of maintenance. Continuous satisfactory operation depends upon proper appliance care and regular cleaning.
Warning! Before performing any maintenance or cleaning on cordless appliances switch off and remove the battery from the appliance.
◆ Dispose of used accessories and unused paint products in accordance with local regulations.
- The paint applicator should be removed when storing the product.
◆ Wipe the Speedy Edge main body over using a soft damp cloth.
- For stubborn marks you can use a mild solution of soap and water to dampen your cloth.
All removable parts can be washed in warm soapy water, however this will have a negative affect on the performance on your tool. To maintain the highest level of performance the paint applicator and paint reservoir syringe should be replaced after every job.
Accessories
The performance of your tool depends on the accessory used. Black & Decker accessories are engineered to high quality standards and designed to enhance the performance of your tool. By using these accessories you will get the very best from your tool.
◆ Accessory numbers BDPE401
Protecting the environment

Separate collection. This product must not be disposed of with normal household waste.
Should you find one day that your Black & Decker product needs replacement, or if it is of no further use to you, do not dispose of it with household waste. Make this product available for separate collection.

Separate collection of used products and packaging allows materials to be recycled and used again.
Re-use of recycled materials helps prevent environmental pollution and reduces the demand for raw materials.
Local regulations may provide for separate collection of electrical products from the household, at municipal waste sites or by the retailer when you purchase a new product.
Black & Decker provides a facility for the collection and recycling of Black & Decker products once they have reached the end of their working life. To take advantage of this service please return your product to any authorised repair agent who will collect them on our behalf.
You can check the location of your nearest authorised repair agent by contacting your local Black & Decker office at the address indicated in this manual. Alternatively, a list of authorised Black & Decker repair agents and full details of our after-sales service and contacts are available on the Internet at: www.2helpU.com
Batteries

At the end of their useful life, discard batteries with due care for our environment:
◆ Run the battery down completely, then remove it from the tool.
- Batteries are recyclable. Place the battery(s) in a suitable packaging to ensure that the terminals cannot be short-circuited. Take them to any authorised repair agent or a local recycling station.
◆ Do not short-circuit the battery terminals.
- Do not dispose of the battery(s) in a fire as this may result in a risk of personal injury or an Explosion.
Technical data
| BDPE400Type H1 | ||
| Capacity ml 50 | ||
| Battery AA (LR06 - Alkaline) * 3 | ||
| Weight kg 0.3 (Without Paint) |
Guarantee
Black & Decker is confident of the quality of its products and offers an outstanding guarantee. This guarantee statement is in addition to and in no way prejudices your statutory rights. The guarantee is valid within the territories of the Member States of the European Union and the European Free Trade Area.
If a Black & Decker product becomes defective due to faulty materials, workmanship or lack of conformity, within 24 months from the date of purchase, Black & Decker guarantees to replace defective parts, repair products subjected to fair wear and tear or replace such products to ensure minimum inconvenience to the customer unless:
- The product has been used for trade, professional or hire purposes;
◆ The product has been subjected to misuse or neglect; - The product has sustained damage through foreign objects, substances or accidents;
◆ Repairs have been attempted by persons other than authorised repair agents or Black & Decker service staff.
To claim on the guarantee, you will need to submit proof of purchase to the seller or an authorised repair agent. You can check the location of your nearest authorised repair agent by contacting your local Black & Decker office at the address indicated in this manual. Alternatively, a list of authorised Black & Decker repair agents and full details of our after-sales service and contacts are available on the Internet at: www.2helpU.com
Please visit our website www.blackanddecker.co.uk to register your new Black & Decker product and to be kept up to date on new products and special offers. Further information on the Black & Decker brand and our range of products is available at www.blackanddecker.co.uk
Colocar as pilhas (fig. A)
Do not forget to register your product!
www.blackanddecker.co.uk/productregistration Register your product online at www.blackanddecker.co.uk/productregistration or send your name, surname and product code to Black & Decker in your country
DEUTSCH
- Intended use
- Safety instructions
- Using your appliance
- After use
- Inspection and repairs
- Personal safety
- Safety of others
- Residual risks.
- Labels on the appliance
- Additional safety instructions for non-rechargeable batteries
- Features
- Assembly
- Fitting the batteries (fig. A)
- Fitting the paint applicator (fig. B)
- Removing the paint applicator (fig. B)
- Fitting the paint reservoir syringe (fig. C - E)
- Removing the paint reservoir syringe (fig. C - E)
- Use
- Filling with paint
- Painting with the Speedy Edge
- Hints for optimum use
- Returning excess paint to paint tin
- Maintenance and cleaning
- Accessories
- Protecting the environment
- Batteries
- Guarantee
- Colocar as pilhas (fig. A)
- DEUTSCH
Brand : BLACK & DECKER
Model : BDPE400
Category : Peinture en spray