USER MANUAL WQ9 B1L WHIRLPOOL
natural_image
Technical line drawing of a four-panel refrigerator with mounting feet (no text or symbols)
English REFRIGERATOR USER INSTRUCTIONS 3
Italiano ISTRUZIONI PER L'USO DEL FRIGORIFERO 27
Français canadien INSTRUCTIONS D'UTILISATION DU RÉFRIGÉRATEUR .... 51
Proper Disposal of Your Old Refrigerator ....7
PARTS AND FEATURES ....8
INSTALLATION INSTRUCTIONS ......9
Getting Started 9
Unpack the Refrigerator 9
Location Requirements ....10
Electrical Requirements ....10
Remove and Replace Refrigerator Doors ....12
Remove and Replace Freezer/Flexi Freeze Door 14
Refrigerator Levelling 15
Using the Controls ....16
Lighting the Refrigerator 17
REFRIGERATOR USE ....18
Opening and Closing Doors ....18
Food Storage ....18
SHELVES, BINS AND DRAWERS ....19
Freezer Storage Compartments ....20
Audio Reference ....20
Accessories....20
Assistance or Service ....20
REFRIGERATOR CARE ....21
Cleaning 21
Lights 22
Holiday and Moving Care ....22
TROUBLESHOOTING 23
REFRIGERATOR SAFETY
Your safety and the safety of others are very important.
We have provided many important safety messages in this manual and on your appliance. Always read and obey all safety messages.

This is the safety alert symbol.
This symbol alerts you to potential hazards that can kill or hurt you and others.
All safety messages will follow the safety alert symbol and either the word “DANGER” or “WARNING.”
These words mean:
! DANGER
You can be killed or seriously injured if you don't immediately follow instructions.
WARNING
You can be killed or seriously injured if you don't follow instructions.
All safety messages will tell you what the potential hazard is, tell you how to reduce the chance of injury, and tell you what can happen if the instructions are not followed.
SAFETY INSTRUCTIONS
Before using the appliance, read these safety instructions. Keep them nearby for future reference. These instructions and the appliance itself provide important safety warnings, to be observed at all times. The manufacturer declines any liability for failure to observe these safety instructions, for inappropriate use of the appliance or incorrect setting of controls.
⚠️Very young children (0-3 years) should be kept away from the appliance. Young children (3-8 years) should be kept away from the appliance unless continuously supervised. Children from 8 years old and above and persons with reduced physical, sensory or mental capabilities or lack of experience and knowledge can use this appliance only if they are supervised or have been given instructions on safe use and understand the hazards involved. Children must not play with the appliance. Cleaning and user maintenance must not be carried out by children without supervision.
PERMITTED USE
⚠️ CAUTION: The appliance is not intended to be operated by means of an external switching device, such as a timer, or separate remote controlled system.
This appliance is intended to be used in household and similar applications such as: staff kitchen areas in shops, offices and other working environments; farm houses; by clients in hotels, motels, bed & breakfast and other residential environments.
This appliance is not for professional use. Do not use the appliance outdoors.
The appliance is designed for operation in places where the ambient temperature comes within the following ranges, according to the climatic class given on the rating plate. The appliance may not work properly if it is left for a long time at a temperature outside the specified range.
Climatic Class Amb. T. (°C)
SN: From 10 to 32 °C; N: From 16 to 32 °C
ST: From 16 to 38 °C; T: From 16 to 43 °C
This appliance does not contain CFCs. The refrigerant circuit contains R600a (HC). Appliances with Isobutane (R600a): isobutane is a natural gas without environmental impact, but is fl ammable. Therefore, make sure the refrigerant circuit pipes are not damaged, especially when emptying the refrigerant circuit.
⚠ WARNING: Do not damage the appliance refrigerant circuit pipes.
⚠ WARNING: Keep ventilation openings, in the appliance enclosure or in the built-in structure, clear of obstruction.
IMPORTANT TO BE READ AND OBSERVED
⚠ WARNING: Do not use mechanical, electric or chemical means other than those recommended by the Manufacturer to speed up the defrost process.
⚠ WARNING: Do not use or place electrical devices inside the appliance compartments if they are not of the type expressly authorised by the Manufacturer.
⚠ WARNING: Ice makers and/or water dispensers not directly connected to the water supply must be filled with potable water only.
⚠ WARNING: Automatic ice-makers and/or water dispensers must be connected to a water supply that delivers potable water only, with mains water pressure between 0.17 and 0.81 MPa (1.7 and 8.1 bar).
Do not store explosive substances such as aerosol cans with a fl ammable propellant in this appliance.
Do not swallow the contents (non-toxic) of the ice packs (provided with some models). Do not eat ice cubes or ice lollies immediately after taking them out of the freezer since they may cause cold burns.
⚠ For products designed to use an air fi lter inside an accessible fan cover, the fi lter must always be in position when the refrigerator is in function.
Do not store glass containers with liquids in the freezer compartment since they may break. Do not obstruct the fan (if included) with food items. After placing the food check that the door of the compartments closes properly, especially the freezer door.
⚠️ Damaged gaskets must be replaced as soon as possible.
⚠ Use the refrigerator compartment only for storing fresh food and the freezer compartment only for storing frozen food, freezing fresh food and making ice cubes.
Avoid storing unwrapped food in direct contact with internal surfaces of the refrigerator or freezer compartments. Appliances could have special compartments (Fresh Food Compartment, Zero Degree Box, etc.). Unless specified in the specific booklet of product, they can be removed, maintaining equivalent performances.
INSTALLATION
The appliance must be handled and installed by two or more persons - risk of injury. Use protective gloves to unpack and install - risk of cuts.
Installation, including water supply (if any) and electrical connections, and repairs must be carried out by a qualified technician. Do not repair or replace any part of the appliance unless specifically stated in the user manual. Keep children away from the installation site.
After unpacking the appliance, make sure that it has not been damaged during transport. In the event of problems, contact the dealer or your nearest After-sales Service. Once installed, packaging waste (plastic, styrofoam parts etc.) must be stored out of reach of children - risk of suffocation. The appliance must be disconnected from the power supply before any installation operation - risk of electric shock. During installation, make sure the appliance does not damage the power cable - risk of fire or electric shock. Only activate the appliance when the installation has been completed.
⚠ Be careful not to damage the floors (e.g. parquet) when moving the appliance. Install the appliance on a floor or support strong enough to take its weight and in a place suitable for its size and use. Make sure the appliance is not near a heat source and that the four feet are stable and resting on the floor, adjusting them as required, and check that the appliance is perfectly level using a spirit level. Wait at least two hours before switching the appliance on, to ensure that the refrigerant circuit is fully efficient.
⚠️ Tó guarantee adequate ventilation, leave a space on both sides and above the appliance. The distance between the rear of the appliance and the wall behind the appliance should be 50mm, to avoid access to hot surfaces. A reduction of this space will increase the Energy consumption of product.
⚠ WARNING: To avoid a hazard due to instability, positioning or fixing of the appliance must be done in accordance with the manufacturer instructions. It is forbidden to place the refrigerator in such way that the metal hose of gas stove, metal gas or water pipes, or electrical wires are in contact with the refrigerator back wall (condenser coil).
⚠️ If it is necessary to replace the doors, please contact the Technical Assistance Center.
ELECTRICAL WARNINGS
It must be possible to disconnect the appliance from the power supply by unplugging it if plug is accessible, or by a multi-pole switch installed upstream of the socket in accordance with the wiring rules and the appliance must be earthed in conformity with national electrical safety standards.
Do not use extension leads, multiple sockets or adapters. The electrical components must not be accessible to the user after installation. Do not use the appliance when you are wet or barefoot. Do not operate this appliance if it has a damaged power cable or plug, if it is not working properly, or if it has been damaged or dropped.
⚠️ If the supply cord is damaged, it must be replaced with an identical one by the manufacturer, its service agent or similarly qualified persons in order to avoid a hazard - risk of electric shock.
⚠ WARNING: When positioning the appliance, ensure the supply cord is not trapped or damaged.
⚠ WARNING: Do not locate multiple portable socket-outlets or portable power supplies at the rear of the appliance.
CLEANING AND MAINTENANCE
⚠ WARNING: Ensure that the appliance is switched off and disconnected from the power supply before performing any maintenance operation; never use steam cleaning equipment - risk of electric shock.
⚠ Do not use abrasive or harsh cleaners such as window sprays, scouring cleansers, flammable fl uids, cleaning waxes, concentrated detergents, bleaches or cleansers containing petroleum products on plastic parts, interior and door liners or gaskets. Do not use paper towels, scouring pads, or other harsh cleaning tools.
DISPOSAL OF PACKAGING MATERIALS
The packaging material is 100% recyclable and is marked with the recycle symbol ⚙.
The various parts of the packaging must therefore be disposed of responsibly and in full compliance with local authority regulations governing waste disposal.
DISPOSAL OF HOUSEHOLD APPLIANCES
This appliance is manufactured with recyclable or reusable materials. Dispose of it in accordance with local waste disposal regulations. For further information on the treatment, recovery and recycling of household electrical appliances, contact your local authority, the collection service for household waste or the store where you purchased the appliance. This appliance is marked in compliance with European Directive 2012/19/EU, Waste Electrical and Electronic Equipment (WEEE). By ensuring this product is disposed of correctly, you will help prevent negative consequences for the environment and human health.
The symbol on the product or on the accompanying documentation indicates that it should not be treated as domestic waste but must be taken to an appropriate collection center for the recycling of electrical and electronic equipment.
ENERGY SAVING TIPS
Install the appliance in a dry, well ventilated room far away from any heat source (eg. radiator, cooker, etc.) and in a place not exposed directly to the sun. If required, use an insulating plate.
To guarantee adequate ventilation follow installation instructions. Insufficient ventilation at the back of the product increases energy consumption and decreases cooling efficiency.
Frequent door opening might cause an increase in Energy Consumption. The internal temperature of the appliance and the Energy Consumption may be affected also by the ambient temperature, as well as location of the appliance. Temperature setting should take into consideration these factors.
Reduce door opening to a minimum.
When thawing frozen food, place in the refrigerator. The low temperature of the frozen products cools the food in the refrigerator. Allow warm food and drinks to cool down before placing in the appliance.
Positioning of the shelves in the refrigerator has no impact on the efficient usage of energy. Food should be placed on the shelves in such way to ensure proper air circulation (food should not touch each other and distance between food and rear wall should be kept).
You can increase storage capacity of frozen food by removing baskets and, if present, Stop Frost shelf.
Do not worry about noises coming from the compressor which are described as normal noises in this product's Quick Guide.
Proper Disposal of Your Old Refrigerator
WARNING
Suffocation Hazard
Remove doors from your old refrigerator.
Failure to do so can result in death or brain damage.
IMPORTANT: Child entrapment and suffocation are not problems of the past. Scrapped or abandoned refrigerators are still dangerous—even if they will sit for “just a few days.” If you are getting rid of your old refrigerator, please follow these instructions to help avoid accidents.
Before You Throw Away Your Old Refrigerator or Freezer:
■ Take off the doors.
■ Leave the shelves in place so that children cannot easily climb inside.
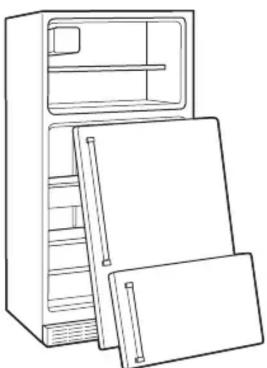
natural_image
Line drawing of a refrigerator with open doors and shelves (no text or symbols)
Dispose of refrigerator in accordance with Federal and Local regulations. Refrigerants must be evacuated by a licensed, refrigerant technician in accordance with established procedures.
PARTS AND FEATURES
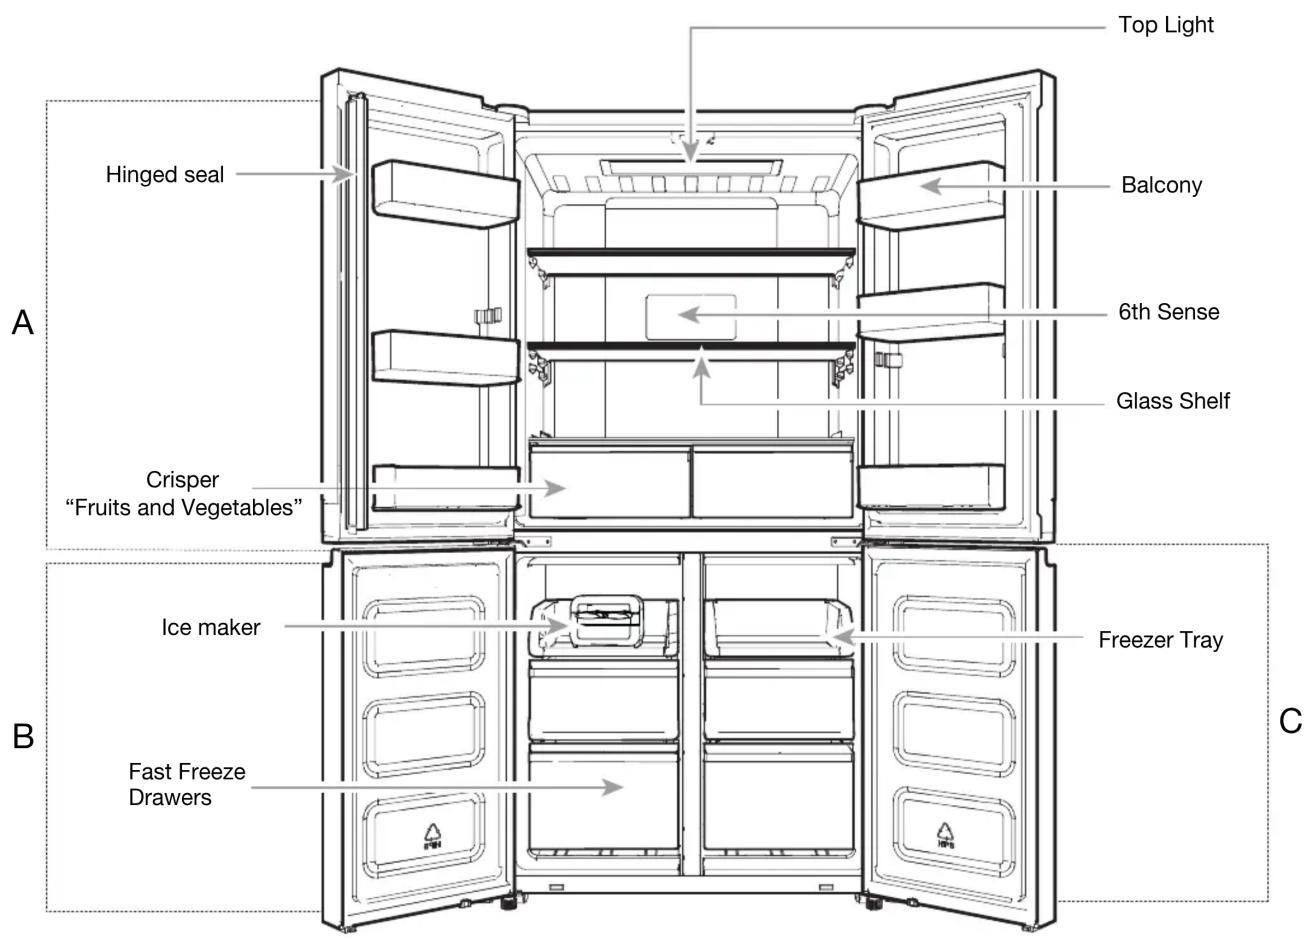
A. Refrigerator
B. Freezer
C. Flexi Freeze (only with WQ9 B1L, 6WM591NIHAS and WQ70900SXX)
INSTALLATION INSTRUCTIONS
Getting Started
INSTALLATION CHECKLIST
√ Electrical Power
WARNING
Electrical Shock Hazard
Plug into a grounded (earthed) outlet.
Do not remove ground prong.
Do not use an adapter.
Do not use an extension cord.
Failure to follow these instructions can result in death, fire, or electrical shock.
■ Plug refrigerator into a earthed socket.
√ Doors
If doors need to be removed during installation, see the "Remove and Replace Refrigerator Doors" and "Remove and Replace Freezer Door Fronts" sections.
■ Doors seal completely.
■ Refrigerator is level. Adjust leveling feet so they are snug against the floor.
■ Doors are even across the top. (Use door alignment feature if necessary).
√ Final Checks
■ Remove all shipping material.
■ Set temperature controls to the recommended setting.
■ Save instructions and other literature.
■ In order to receive a more complete assistance, please register your product on www.whirlpool.eu/register.
Unpack the Refrigerator
WARNING
Excessive Weight Hazard
Use two or more people to move and install refrigerator.
Failure to do so can result in back or other injury.
Refrigerator Delivery
A minimum door opening of 838 mm (33") is required. If door opening is 914 mm (36") or less, then removal of doors, drawer and hinges is required.
Cart the refrigerator from the side for all door openings.
When Moving Your Refrigerator:
Your refrigerator is heavy. When moving the refrigerator for cleaning or service, be sure to cover the floor with cardboard or hardboard to avoid floor damage. Always pull the refrigerator straight out when moving it. Do not wiggle or "walk" the refrigerator when trying to move it, as floor damage could occur.
Remove the Packaging
■ Remove tape and glue residues from surfaces before turning on the refrigerator. Rub a small amount of liquid dish detergent over the adhesive with your fingers. Wipe with warm water and dry.
■ Do not use sharp instruments, rubbing alcohol, flammable fluids, or abrasive cleaners to remove tape or glue. These products can damage the surface of your refrigerator.
■ Dispose of/recycle all packaging materials.
Clean Before Using
After you remove all of the packaging materials, clean inside of your refrigerator before using it. See cleaning instructions in the "Refrigerator Care" section.
Do not clean glass shelves or covers with warm water when they are cold. Shelves and covers may break if exposed to sudden temperature changes or impact, such as bumping. Tempered glass is designed to shatter into many small, pebble-size pieces. This is normal. Glass shelves and covers are heavy. Use both hands when removing them to avoid dropping.
Location Requirements
WARNING
Explosion Hazard
Keep flammable materials and vapors, such as gasoline, away from refrigerator.
Failure to do so can result in death, explosion, or fire.
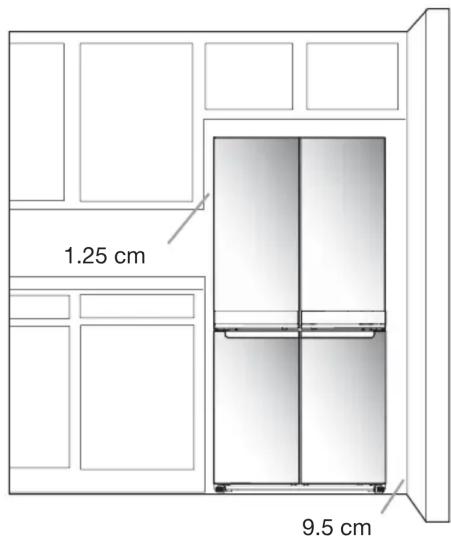
To ensure proper ventilation for your refrigerator, allow for a 1.25 cm space on each side and at the top. Allow for a 5 cm space behind the refrigerator. If your refrigerator has an ice maker, allow extra space at the back for the water line connections. When installing your refrigerator next to a fixed wall, leave a 9.5 cm minimum space between the refrigerator and wall to allow the door to swing open.
NOTE: This refrigerator is intended for use in a location where the temperature ranges from a minimum of 10^ C to a maximum of 43^ C. The preferred room temperature range for optimum performance, which reduces electricity usage and provides superior cooling, is between 15^ C and 32^ C. It is recommended that you do not install the refrigerator near a heat source, such as an oven or radiator.
Electrical Requirements
WARNING
Electrical Shock Hazard
Plug into a grounded (earthed) outlet.
Do not remove ground prong.
Do not use an adapter.
Do not use an extension cord.
Failure to follow these instructions can result in death, fire, or electrical shock.
IMPORTANT: Installation and electrical connection must be carried out by a qualified technician according to the manufacturer's instructions and in compliance with the local safety regulations.
■ The refrigerator is designed to operate on a separate 220-240 Volt, 10 A, 50/60 Hz circuit.
■ Make sure the voltage specified on the rating plate corresponds to that of your home.
It must be possible to disconnect the appliance from the power supply by unplugging it or by means of a main two pole switch installed upstream of the socket.
If the supply cord is damaged, it must be replaced by the manufacturer, its service agent or similarly qualified persons in order to avoid a hazard.
Before you move your refrigerator into its final location, it is important to make sure you have the proper electrical connection:
Recommended Earthing Method
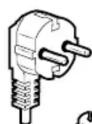
220-240 Volt 50 Hz, 220 Volt 60 Hz, or 230/240 Volt 50 Hz AC only 10 A fused and earthed electrical supply is required.
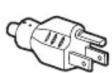
Type B
[NO TEXT]
Type E and F
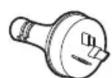
[Non-Text]
Type I
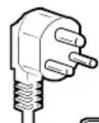
Type M
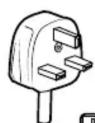
Type G
For Australia and New Zealand:
Your new appliance has been especially manufactured to meet all Australian Standards and Conditions.
Some notations in the installation instructions may refer to electrical requirements in other countries, so we draw your particular attention to these specific notes.
Your appliance needs to be plugged into a 230/240 Volt 50 Hz AC only 10 A earthed socket.
Electrical Requirements (Great Britain and Ireland only)
IMPORTANT: This refrigerator must be earthed.
Fuse Replacement
If the main lead of this refrigerator is fitted with a BS1363A, 13 A fused plug, to replace a fuse in this type plug use an A.S.T.A. approved fuse to BS 1362 type and proceed as follows:
- Remove the fuse cover (A) and fuse (B).
- Fit replacement 13 A fuse into the fuse cover.
- Reinsert both the fuse and its cover into the plug.
IMPORTANT: The fuse cover must be refi tted when changing a fuse. If fuse cover is lost, the plug must not be used until a correct replacement cover is fi tted. A correct replacement is identifi ed by the colour insert or colour “word” embossed on the base of the plug. Replacement fuse covers are available at your local electrical shop.
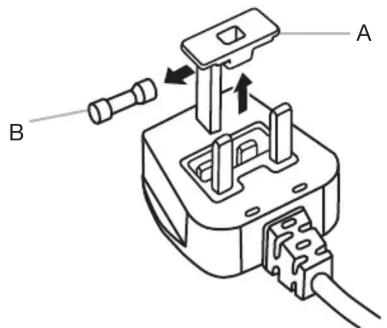
A. Fuse cover
B. Fuse
For the Republic of Ireland (only):
The information given in respect of Great Britain will frequently apply, but a third type of plug and socket is also used, the 2-pin, side earth type.
Socket/Plug (valid for both countries):
If the fi tted plug is not suitable for your socket, please contact After-sales Service for further instruction. Please do not attempt to change the plug yourself. This procedure needs to be carried out by a qualifi ed technician in compliance with the manufacturer's instructions and current standard safety regulations.
Temperature
This refrigerator is designed for operation in places where the temperature comes within the following ranges, according to climatic class shown on the rating plate. The refrigerator may not work properly if it is left for a long time at a temperature outside the specified range.
NOTE: It is recommended that you do not install the refrigerator near a heat source, such as an oven or radiator.
| Climatic Class Amb. T. (°C) Amb. T. (°F) | |
| SN From 10 to 32 From 50 to 90 | |
| N From 16 to 32 From 61 to 90 | |
| ST From 16 to 38 From 61 to 100 | |
| T From 16 to 43 From 61 to 110 | |
Remove and Replace Refrigerator Doors
NOTE: Measure the width of your door opening to see whether or not you need to remove refrigerator doors to move refrigerator into your home. If door removal is necessary, see the following instructions.
IMPORTANT: If refrigerator was previously installed and you are moving it out of the home, turn refrigerator control off before you begin removing the doors. Unplug refrigerator or disconnect power. Remove food and adjustable door or utility bins from doors.
Gather required tools and read all instructions before removing doors.
TOOLS NEEDED: 6 mm socket wrench, 5 mm socket wrench and #2 Phillips screwdriver.
WARNING
Electrical Shock Hazard
Disconnect power before removing doors.
Failure to do so can result in death or electrical shock.
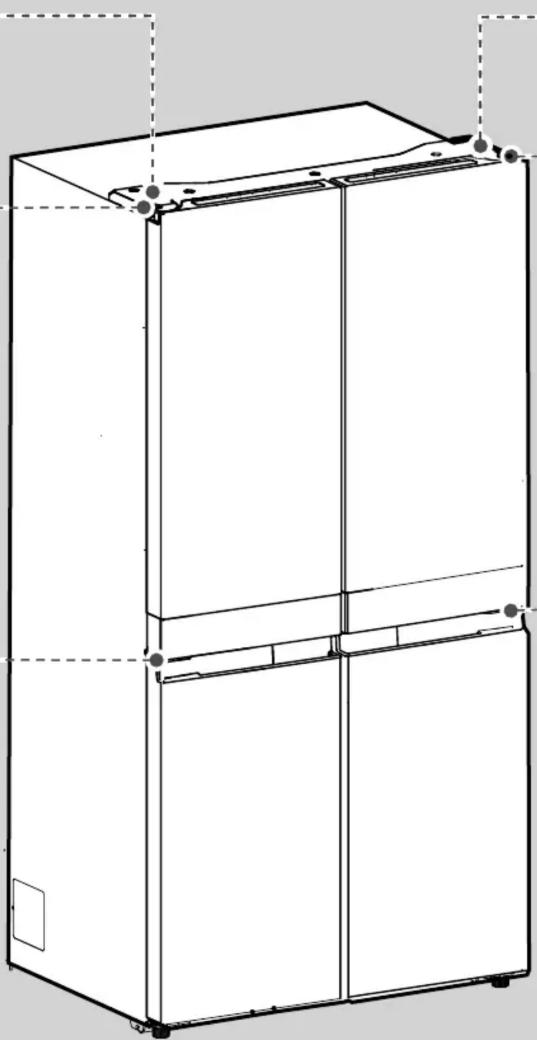
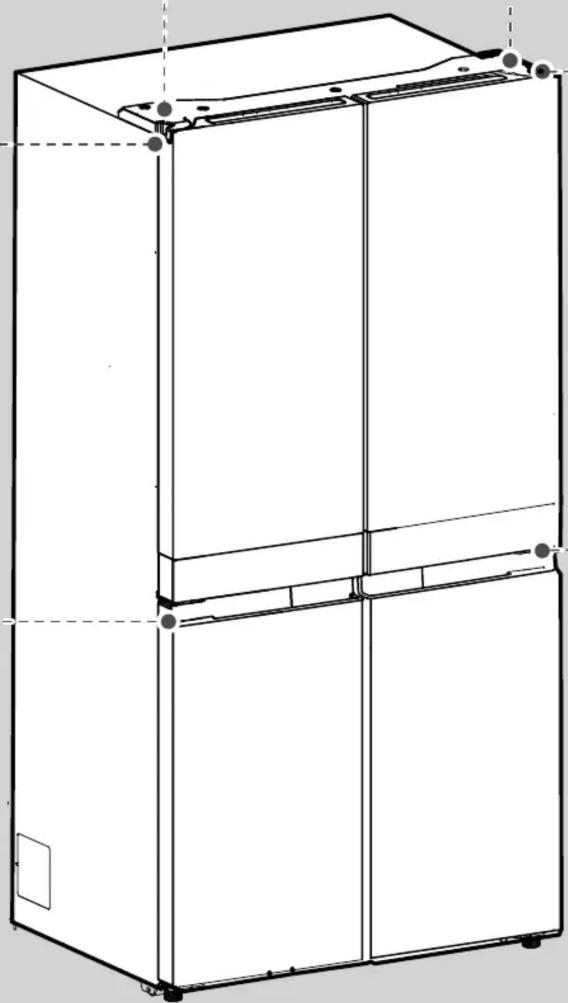
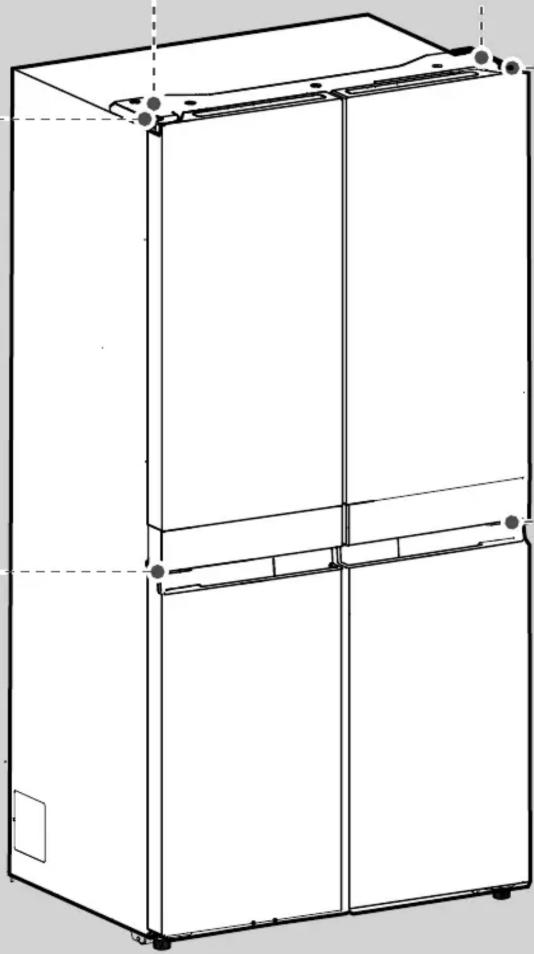
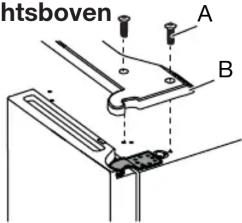
Top Left Hinge Cover
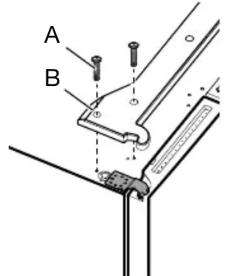
A. Top Hinge Cover screws
B. Top Hinge Cover
Top Left Hinge
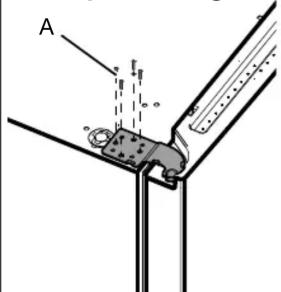
A. 5 mm socket screws
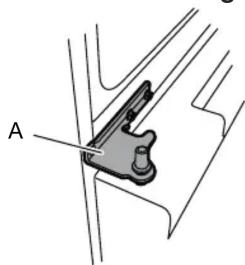
Middle Left Hinge
natural_image
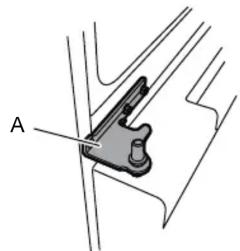
Mechanical assembly diagram showing a bracket labeled A (no text or symbols present)
A. Hinge
natural_image
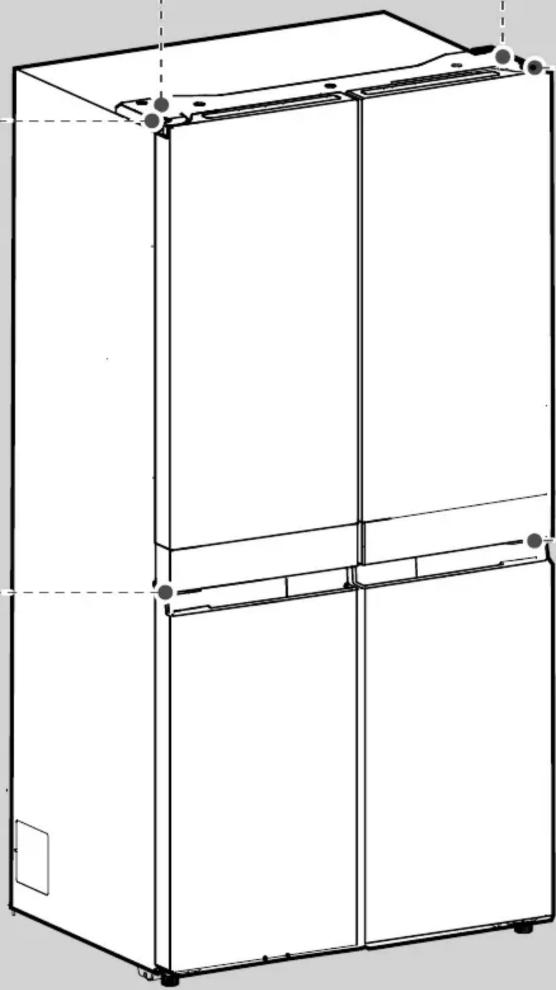
Technical line drawing of a multi-tiered refrigerator cabinet (no text or labels)
Top Right Hinge Cover
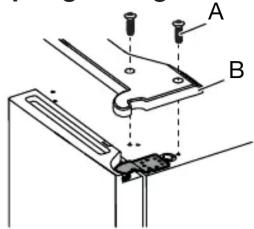
A. Top Hinge Cover screws
B. Top Hinge Cover
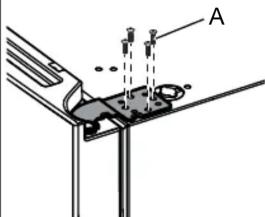
Top Right Hinge
natural_image
Technical diagram of a mechanical assembly with labeled component A (no text or symbols present)
A. 5 mm socket screws
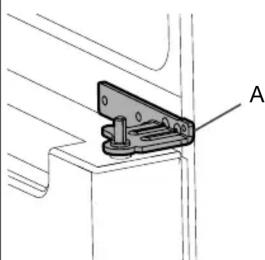
Middle Right Hinge
natural_image
Technical line drawing of a mechanical bracket or clamp assembly with labeled component A (no text or symbols beyond label)
A. Hinge
WARNING
Excessive Weight Hazard
Use two or more people to lift the refrigerator door.
Failure to do so can result in back or other injury.
Remove Refrigerator Doors
WARNING
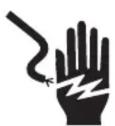
Electrical Shock Hazard
Disconnect power before removing doors.
Failure to do so can result in death or electrical shock.
Remove Right-Hand Door
- Unplug refrigerator or disconnect power.
- Keep refrigerator doors closed until you are ready to lift them free from the cabinet.
NOTE: Provide additional support for refrigerator door while the hinges are being removed. Do not depend on the door gasket magnets to hold the door in place while you are working.
- Using a Phillips screwdriver, remove cover from top hinge.
- Using 5 mm socket wrench, remove four screws from top hinge and set aside.
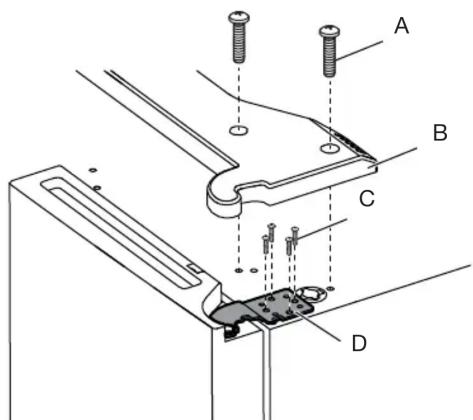
A. Top hinge cover screw
C. 5 mm socket screws
B. Top hinge cover
D. Top hinge
- Lift refrigerator door from the middle hinge pin. The top hinge will come away with the door.
Remove Left-Hand Door
IMPORTANT: The wiring for UI run through left-hand door hinge, so they must be disconnected before removing the door.
- Using a Phillips screwdriver, remove cover from top hinge.
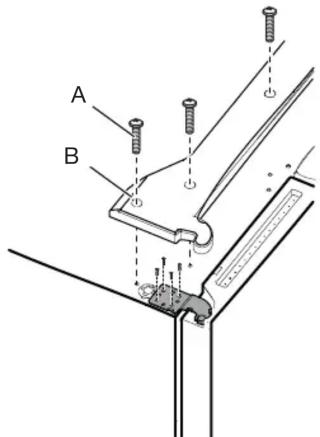
A. Top hinge cover screw
B. Top hinge cover
- Disconnect two wiring plugs located on top of the door hinge.
- Grasp each side of wiring plugs. With your left thumb, press down to release the catch and pull the sections of the plugs apart.
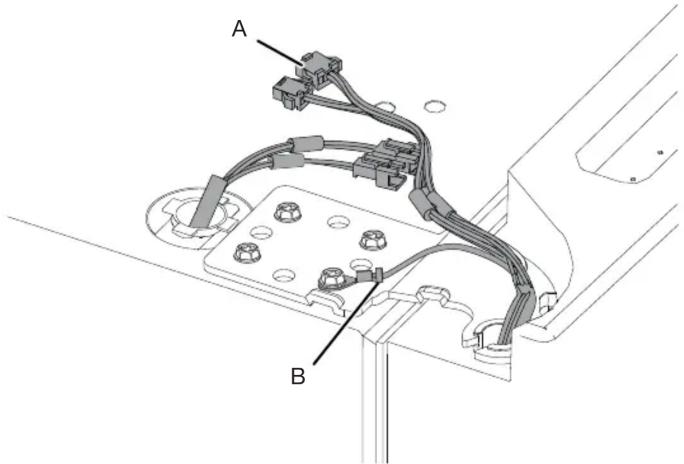
A. Wiring Plug
B. Ground (earth) connector
- Using 5 mm socket wrench, remove four internal screws from top hinge and set aside.
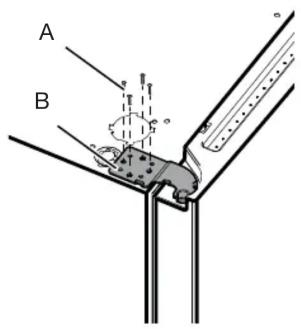
A. 5 mm socket screws
B. Top Hinge
NOTE: Provide additional support for refrigerator door while hinges are being removed. Do not depend on the door gasket magnets to hold the door in place while you are working.
- Lift refrigerator door from bottom hinge pin. The top hinge will come away with door.
NOTE: It may not be necessary to remove bottom hinges and brake feet assemblies to move the refrigerator through a doorway.
■ Only if necessary, use 6 mm socket wrench and #2 Phillips screwdriver to remove middle hinge.
Replace Right-Hand Refrigerator Door
- Set right-hand door onto middle hinge pin.
- Insert top hinge pin into open hole in top of refrigerator door.
- Using four 5 mm socket screws, fasten hinge to cabinet. Do not tighten screws completely.
Replace Left-Hand Refrigerator Door
- Set left-hand door onto middle hinge pin.
- Using four 5 mm socket screws, fasten hinge to cabinet. Do not tighten screws completely.
- Reconnect electrical wiring.
■ Push together two sections of wiring plug.
■ Reconnect earth wire to hinge screw.
Final Steps
- Completely tighten eight 5 mm socket screws.
- Replace top hinge covers.
Remove and Replace Freezer/Flexi Freeze Door
- Keep freezer doors closed until you are ready to lift them free from cabinet.
NOTE: Provide additional support for freezer door while hinges are being removed. Do not depend on door gasket magnets to hold door in place while you are working.
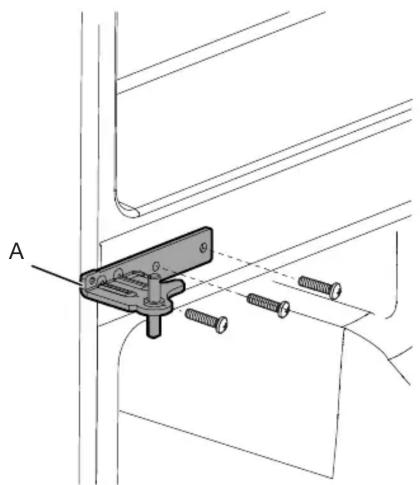
■ Using a #2 Phillips screwdriver and 6 mm socket wrench to remove middle hinge from cabinet.
natural_image
Technical diagram of a mechanical clamp or bracket assembly with screws and a labeled component (no text or symbols present)
A. Middle hinge
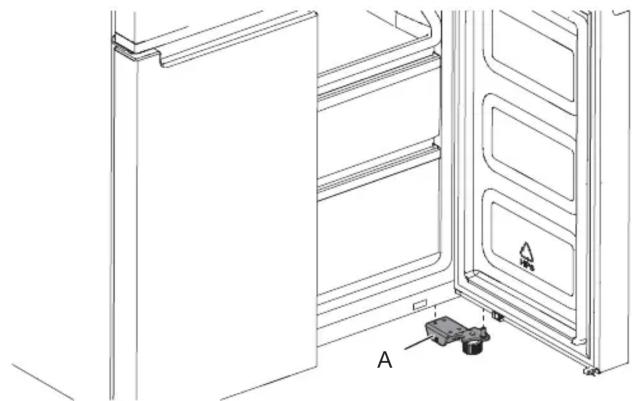
■ Lift freezer door from the bottom hinge pin.
natural_image
Line drawing of an open refrigerator with a small component labeled 'A' at the bottom (no text or symbols on the diagram itself)
A. Bottom hinge
Final Steps
WARNING
Electrical Shock Hazard
Plug into a grounded (earthed) outlet.
Do not remove ground prong.
Do not use an adapter.
Do not use an extension cord.
Failure to follow these instructions can result in death, fire, or electrical shock.
- Plug into an grounded (earthed) socket.
- Return all removable parts and food to the drawers.
Refrigerator Levelling
- Move refrigerator to its final location.
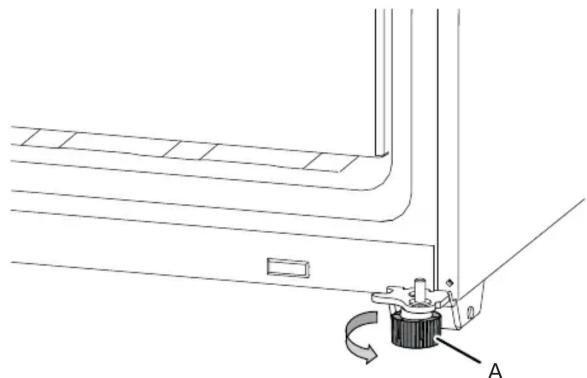
- Using hand, rotate the brake feet. Turn them counterclockwise until the rollers are off the floor and both brake feet are snug against the floor. This keeps refrigerator from rolling forward when opening the doors.
natural_image
Technical line drawing of a mechanical assembly with a knob and rotating component (no text or symbols)
A. Brake feet
IMPORTANT: If you need to make further adjustments involving brake feet, you must turn both brake feet same amount to keep the refrigerator level.
- Use a level to make sure refrigerator is level from side to side and front to back.
Using the Controls
The touch-activated controls are located on the left hand refrigerator door. The control panel includes information about various buttons and indicators. Refrigerator and freezer temperature indicator shows last temperature set point.
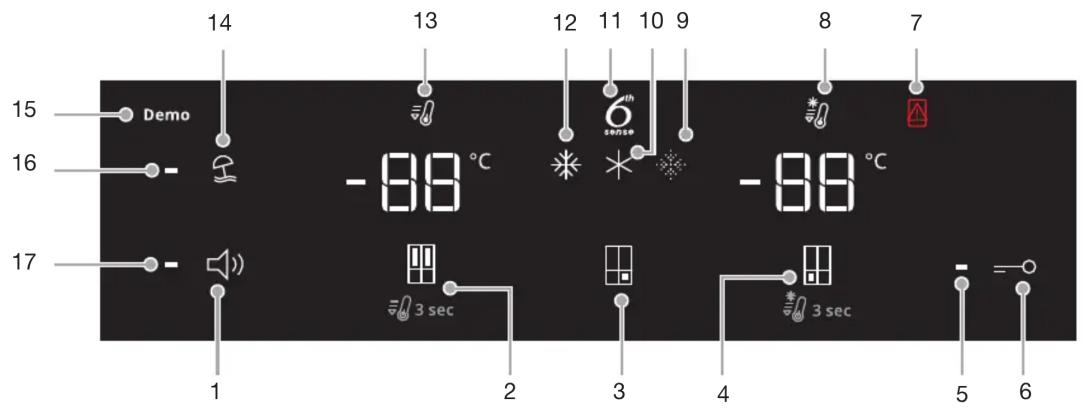
- Sound ON/OFF Button
- Refrigerator Temperature Button (hold 3 sec for Fast Cool)
- Flexi Freeze Preset Temperature Button (only with WQ9 B1L, 6WM591NIHAS and WQ70900SXX)
- Freezer Temp Button (hold 3 sec for Fast Freeze)
- Key Lock Indicator
- Key Lock Button
- Door Open Indicator
- Fast Freeze Indicator
- Soft Freeze Indicator (only with WQ9 B1L, 6WM591NIHAS and WQ70900SXX)
The Control Panel will automatically turn off after one minute of inactivity. To turn on the control panel, press any key.
- Mid Freeze Indicator (only with WQ9 B1L, 6WM591NIHAS and WQ70900SXX)
- 6th Sense Indicator
- Hard Freeze Indicator (only with WQ9 B1L, 6WM591NIHAS and WQ70900SXX)
- Fast Cool Indicator
- Holiday Mode Button
- Demo Mode Indicator (only with WQ9 B1L, 6WM591NIHAS and WQ70900SXX)
- Holiday Mode Indicator
- Sound Indicator
- 88 Viewing and Adjusting Temperature Set Points
Adjusting Refrigerator and Freezer Compartment Temperature:
For your convenience, your refrigerator and freezer controls are preset at the factory.
When you first install your refrigerator, make sure that the controls are still set to the recommended set points. The factory recommended set points are 3^ C for the refrigerator and -18^ C for the freezer.
Pressing Refrigerator or Freezer Temperature button will toggle through temperature set points in Celsius ( ^ C).
IMPORTANT:
■ Wait 24 hours before you put food into refrigerator. If you add food before refrigerator has cooled completely, your food may spoil.
NOTE: Adjusting the set points to a colder-than recommended setting will not cool compartments any faster.
If the temperature is too warm or too cold in the refrigerator or freezer, fi rst check the air vents to be sure they are not blocked before adjusting the controls.
■ The recommended settings should be correct for normal household use. The controls are set correctly when milk or juice is as cold as you like and when ice cream is fi rm.
NOTE: Areas such as a garage, basement or porch may have higher humidity or extreme temperatures. You may need to adjust the temperature away from the recommended settings to accommodate for these conditions.
■ Wait at least 24 hours between adjustments. Recheck the temperatures before other adjustments are made.
6 ^th Sense Fresh Lock and Freeze Control
The 6^th SENSE Fresh Lock sensor ensures precise and consistent temperature control to preserve fresh food for longer, in the most natural way. Once a temperature variation is detected, the sensor activates a compressor that quickly restores the original temperature.
The 6 ^th SENSE Freeze sensor minimizes temperature fluctuations in freezer thanks to an innovative temperature management system. Freezer burns are reduced to preserving quality and color of food.
\* \* Flexi Freeze Setting (only with WQ9 B1L, 6WM591NIHAS and WQ70900SXX)
Flexi Freeze function allows you to toggle preset temperature for Flexi freeze compartment.
| Symbol | Function Temperature |
| ※ | Traditional freezer -18°C | |
| ※ | Mild freezer -12°C | |
| Soft freezer -7°C | |
* To activate/deactivate Coolest setting (-20°C), press Flexi Freeze Preset Temperature Button for 3 seconds.
Adjusting Multi Temperature Setting
■ Traditional freezer (-18°C): Food already frozen and fresh food (max 12 months)
■ Mild freezer (-12°C): Food already frozen (max 1 month)
■ Soft freezer (-7°C): Food already frozen (max 1 week)
When adjusting temperature set points, use the following chart as a guide:
| CONDITION | TEMPERATURE AD |
| Refrigerator too cold Refrigerator setting 1° higher |
| Refrigerator too warm Refrigerator setting 1° lower |
| Freezer too cold Freezer setting 1° higher |
| Freezer too warm/ too little ice | Freezer setting 1° lower |

Fast Cool
The Fast Cool feature assists with periods of high refrigerator use, full grocery loads, or temporarily warm room temperatures.
■ To turn on the Fast Cool feature, press and hold the Refrigerator Temperature button for 3 seconds. When feature is activated, the Fast Cool icon will be illuminated. The Fast Cool feature will remain on for 2 hours unless manually turned off.
■ To manually turn off the Fast Cool feature, press and hold the Refrigerator Temperature button for 3 seconds. The Fast Cool icon will turn off when feature is not activated.
■ Adjusting refrigerator temperature will automatically turn off the Fast Cool feature.

Fast Freeze
The amount of fresh food (in kg) that can be frozen in 24 hours is indicated on the appliance rating plate.
■ Press Freezer Temperature button for 3 seconds (until the Fast Freeze Indicator lights up), 24 hours before placing fresh food in the freezer. After placing fresh food in the freezer, 24 hours on Fast Freeze function is generally suffi cient; After 50 hrs the fast freeze function automatically deactivates.
■ To manually turn off the Fast Freeze feature, press and hold the Freezer Temperature button for 3 seconds. The Fast Freeze icon will turn off.
■ Adjusting the freezer temperature will automatically turn off the Fast Freeze feature.

Holiday Mode
This mode is designed to avoid your appliance from wasting energy during times when it's not in regular use (when you are in holiday for example).
By selecting this function the temperature of refrigerator compartment (RC) will automatically be set to the warmest set point.
■ To use the Holiday mode, press mode button until Holiday mode indicator is lit on the display.
■ To exit the Holiday mode, press the mode button until no mode icon is lit on the display.
■ Adjusting the refrigerator temperature will automatically turn off the Holiday Mode feature.
IMPORTANT: If this mode is selected then all food and drinks must be removed from refrigerator compartment.

Sound ON-OFF
Press button to activate/deactivate Sound Feedback.

Key Lock
JUSTMENT ess and hold the Lock button for 3 seconds to activate lock feature.
■ To deactivate lock, press and hold the Lock button for 3 seconds.
The lock feature will ignore all interaction with control panel until the user unlocks the control panel. This feature is meant to avoid unintentional changing of settings.
Demo Mode (only with WQ9 B1L, 6WM591NIHAS and WQ70900SXX)
This mode is used when refrigerator is on display in a retail shop or if you want to turn the cooling off and deactivate all other functions (except interior lighting).
Demo mode can be used when going on extended holiday. See the “Holiday and Moving Care” section for proper steps on leaving your refrigerator in this mode for long periods of time.
■ If you turn on Demo mode, the “Demo” icon will light up on the display.
■ Enter or exit Demo mode by pressing and holding the Sound On or Off button and the Lock button simultaneously for 3 seconds.
Additional features
Door Open Alarm
■ The Door Open Alarm feature sounds an alarm and blinks the "Door Open" icon ☑ when any of the four doors is open for 2 minutes or more.
■ The alarm will repeat every 5 minutes. Close all doors to turn it off.
NOTE: To mute audible alarm while keeping the doors open, such as while cleaning inside of refrigerator, touch any button on control panel. The alarm sound will be temporarily turned off, but the Door Open icon will still be displayed on the control panel.
Lighting the Refrigerator
The refrigerator has an interior light that comes on any time door is opened.
NOTE: The light is LED which does not need to be replaced. If the LED does not illuminate when the door is opened, call service to replace light.
REFRIGERATOR USE
Opening and Closing Doors
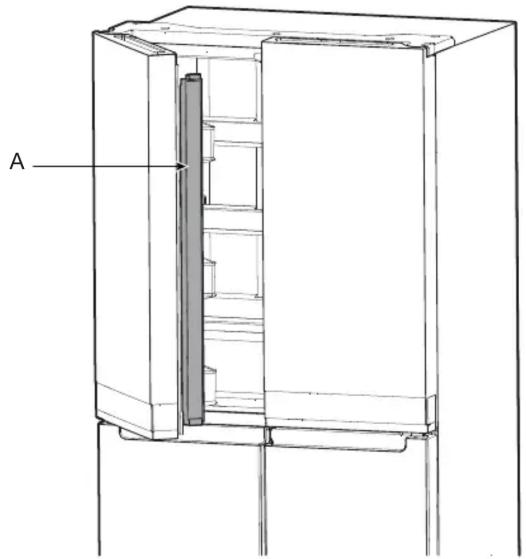
There are two refrigerator compartment doors. The doors can be opened and closed either separately or together. There is a vertically hinged seal on left refrigerator door.
■ When left-side door is opened, hinged seal automatically folds inward so that it is out of the way.
■ When both doors are closed, the hinged seal automatically forms a seal between two doors.
natural_image
Technical line drawing of a refrigerator with labeled component A (no text or symbols beyond label)
A. Hinged seal
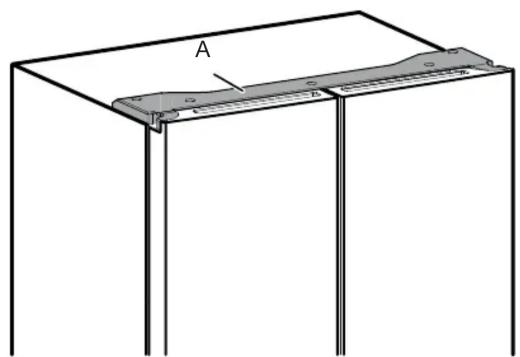
The refrigerator compartment door switch is located in top left and right hinge cover.
■ For Freezer and Multi Temperature Zone, door switch is located in the bottom mullion.
■ The door switch uses magnet to sense door opening/closing.
■ Ensure there are no magnet or electronic devices (Speaker, Coolvox® etc.) within 7.62 cm of the hinge cap.
NOTE: The light will not turn on if door opening is not detected.
natural_image
Simple line drawing of a rectangular frame with a labeled section A and a small inset showing a measurement or scale (no text or symbols present)
A. Hinge cover
Ice Maker
■ To make ice, fill ice tray with purified water and place Manual Ice maker into Freezer top shelf. Allow time till ice gets formed and once ice is ready, turn the knobs in clockwise direction to eject ice cubes into the ice container.
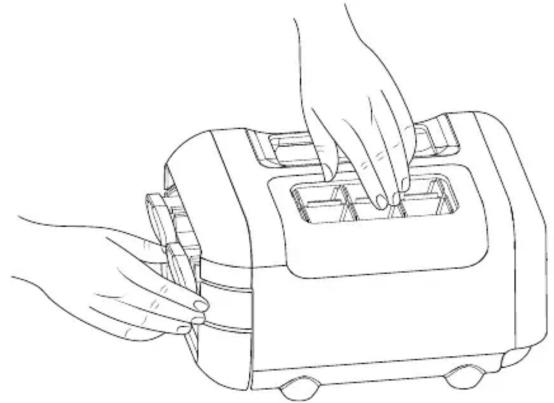
natural_image
Line drawing of hands operating a portable device with buttons and wheels (no text or symbols)
■ Lift ice container slightly and pullout ice container to get access to ice cubes.
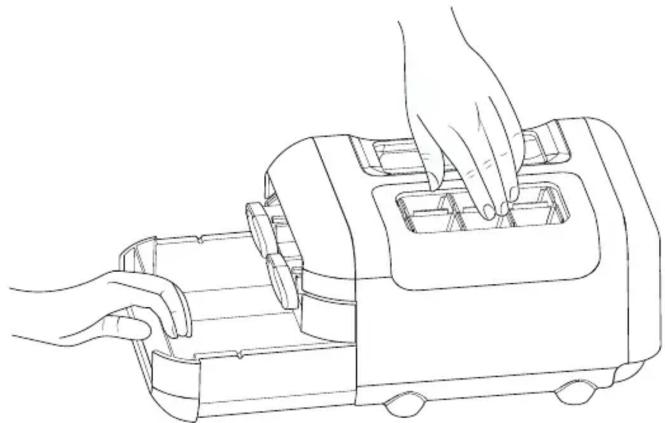
natural_image
Line drawing of hands operating a portable device with a tray and handle (no text or symbols)
Manual ice maker assembly can be taken out of the freezer when ice is not required to make more compartment in freezer.
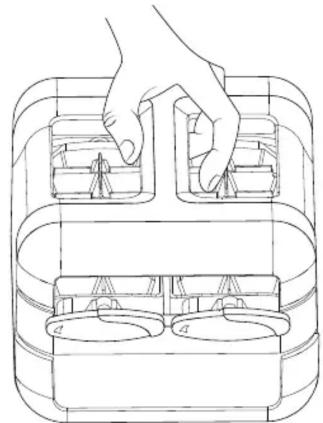
natural_image
Line drawing of a hand placing two blocks into a container with four circular compartments (no text or symbols)
Food Storage
Egg Storage
It is recommended to store eggs at a consistent temperature to keep its freshness, so best is to keep them in the fridge on the middle shelf.
SHELVES, BINS AND DRAWERS
Do not clean glass shelves or covers with warm water when they are cold. Shelves and covers may break if exposed to sudden temperature changes or impact, such as bumping. Tempered glass is designed to shatter into many small, pebble-size pieces. This is normal. Glass shelves and covers are heavy. Use both hands when removing them to avoid dropping.
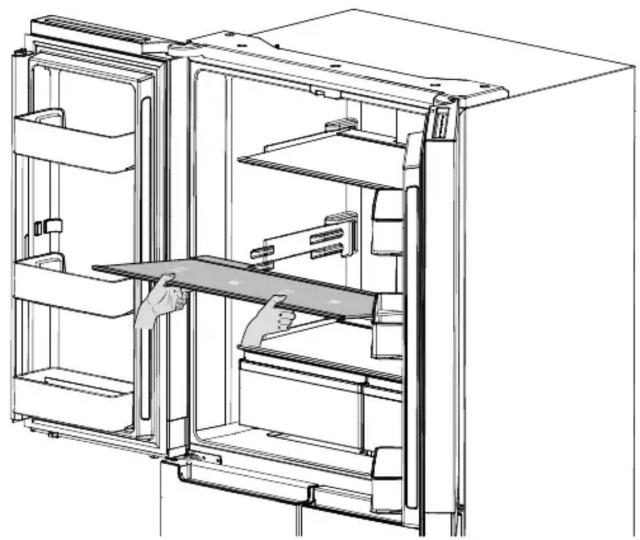
Shelf Height Adjustment
Shelf height can be adjusted by changing its location from bottom support to upper support and vice versa.
■ Open right side door to its full opening.
■ Open left side door to its full opening and then lift the door to open 180°.
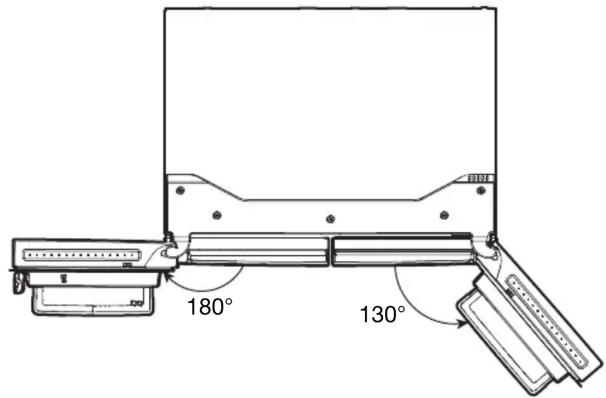
■ Take shelf out of refrigerator and place it to desired mounting position.
natural_image
Line drawing of an open refrigerator with hand placing a tray on the door (no text or symbols)
■ Ensure shelf is properly seated on the shelf mounts.
Shelves and Shelf Frames
The shelves in your refrigerator are adjustable to meet your individual storage needs.
Storing similar food items together in your refrigerator and adjusting the shelves to fi t different heights of items will make fi nding the exact item you want easier. It will also reduce the amount of time the refrigerator door is open and save energy.
To remove and replace shelves:
- Open right side door to its full opening and left side door to its full opening and lift left door to open 180^ .
- Remove middle shelf or top shelf by lifting it up and out of shelf supports. Then pull the shelf forward and tilt down to a vertical position. Turn shelf at an angle and pull out of the refrigerator.
- Remove the bottom shelf by lifting it up and out of the shelf supports. Then pull the shelf forward and tilt up to a vertical position. Turn the shelf at an angle and pull out of refrigerator.
- Replace middle and top shelves by putting shelf in the refrigerator at an angle with shelf front down. Lift front of the shelf up and slide in until the rear of shelf drops into shelf supports. Lower the front of shelf and make sure that the shelf is in position.
- Replace bottom shelf by putting shelf in refrigerator at an angle with shelf up. Lift front of shelf down and slide in until rear shelf drops into the shelf supports. Lower front of the shelf and make sure that shelf is in position.
Crispers
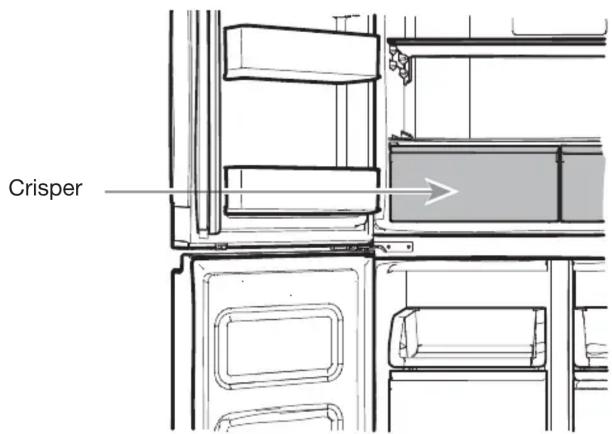
To remove and replace the Crispers:
- Grasp handle of the Crisper and slide Crisper straight out to the stop. Lift the Crisper off the bottom guide.
- Replace/putting back the Crisper by placing it on bottom Crisper guide and pushing it past the Crisper stop into position.
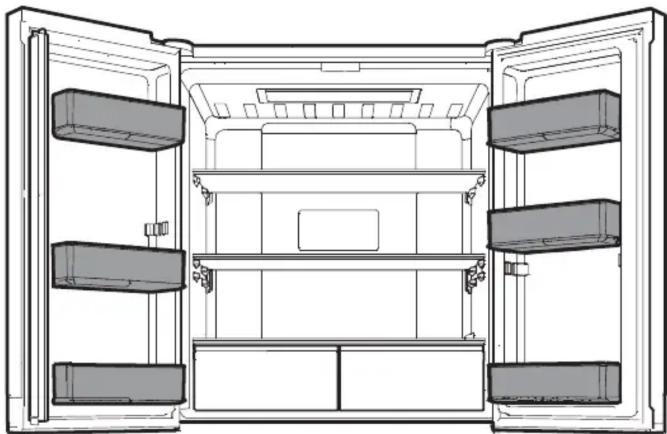
Refrigerator Balconies
The balcony on your refrigerator door are adjustable to meet your individual storage needs.
natural_image
Line drawing of an open refrigerator interior showing front, rear, and side compartments (no text or symbols)
Freezer Storage Compartments
Freezer Tray
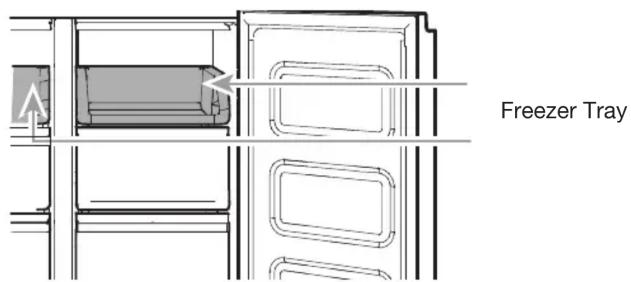
Freezer tray is useful to easily access frequently used products, freeze or simply store leftovers or small items.
Freezer Drawers
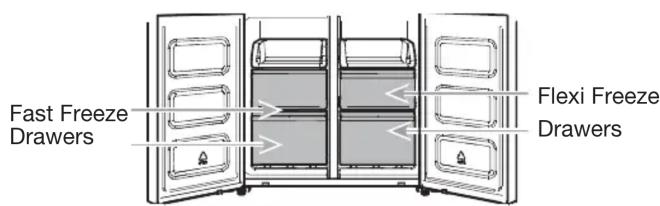
Fast Freeze compartment
■ Fast Freezer drawers allows you to conveniently store big volume items.
■ Fast Freeze option allows you to store all your frozen food safely and transparently.
Flexi Freeze Compartment (only with WQ9 B1L, 6WM591NIHAS and WQ70900SXX)
Flexi Freeze Compartment allows you to select one of three freezer temperature levels: -7^ , -12^ and -18^ to provide the best storing conditions for different types of food.
For maximum freezer capacity, you may remove the freezer drawer to expose the freezer shelf.
To remove the upper drawer:
- Grasp handle of the drawer and slide drawer straight out to the stop. Lift drawer off the bottom guide.
- Replace/putting back drawer by placing it on bottom drawer guide and pushing it past drawer stop into position.
Freezer Shelf (only with WQ9 E1L and WQ9 B1L)
To maximize freezer capacity, you may remove mid drawer to expose freezer shelf beneath. You can then store upper drawer and load food directly on top of the shelf.
Audio Reference
Tone Assignment
| Tone Name Usage Examples |
| Power On Cooling system is turned on every time the product is powered on. |
| Key Press User presses a valid button. |
| Invalid (Error) User presses two or more valid buttons at the same time. Count-down interruption for press-and-hold buttons. |
| Engage Acknowledgement of entry into any mode. |
| Disengage Acknowledgement of exit from any mode. |
| Alert Door Ajar alert. |
This table is for quick reference only. See corresponding sections for details. In case of inconsistency, section details will prevail.
Accessories
To order accessories, contact the dealer from whom you purchased your refrigerator.
Assistance or Service
Before calling for assistance or service, please check the "Troubleshooting" section. It may save you the cost of a service call. If you still need help, follow the instructions below.
If you need replacement parts
To locate factory-specific replacement parts in your area, contact the dealer from whom you purchased your refrigerator.
Warranty
Contact the dealer from whom you purchased refrigerator for warranty information.
Keep this book and your sales slip together for future reference. You must provide proof of purchase or installation date for in-warranty service.
Write down the following information about your appliance to help you obtain assistance or service if you ever need it. You will need to know your complete model number and serial number. You can find this information on the model and serial number label, located on the inside wall of the refrigerator compartment.
Dealer name ____
Serial number ____
Address ____
Phone number ____
Model number ____
Purchase date ____
REFRIGERATOR CARE
Cleaning
WARNING
Explosion Hazard
Use nonflammable cleaner.
Failure to do so can result in death, explosion, or fire.
All of the Refrigerator, Freezer and Flexi freeze sections (only with WQ9 B1L, 6WM591NIHAS and WQ70900SXX) defrost automatically. However, clean all the sections about once a month to avoid build-up of odours. Wipe up spills immediately.
Exterior Cleaning
Please see the exterior cleaning information specific to your model.
Style 1 — Smooth Door
IMPORTANT: Damage to smooth fi nish due to improper use of cleaning products or using non-recommended cleaning products is not covered under the warranty. Sharp or blunt instruments will mar the fi nish.
| DO USE DO NOT USE | |
| √ Soft, clean cloth | ✕ Abrasive cloths✕ Paper towels or newsprint✕ Steel-wool pads |
| √ Warm, soapy water with a mild detergent | ✕ Abrasive powders or liquids✕ Window sprays✕ Ammonia✕ Acidic or vinegar-based Cleaners✕ Oven cleaners✕ Flammable fl uids |
NOTE: Paper towels scratch and may dull clear coat of painted door. To avoid possible damage, use only soft, clean clothes to polish and wipe the doors.
Style 2 — Stainless Steel IMPORTANT:
■ Use recommended stainless steel cleaners and cloths only. Damage to stainless steel fi nish due to improper use of cleaning products or using non-recommended cleaning products is not covered under the warranty.
■ Avoid exposing stainless steel appliances to caustic or corrosive elements such as high-salt, high-moisture, or high-humidity environments. Damage due to exposure to these elements is not covered under the warranty.
| DO USE DO NOT USE | |
| √ Soft, clean cloth | ✕ Abrasive cloths✕ Paper towels or newsprint✕ Steel-wool pads |
| √ Warm, soapy water with a mild detergent | ✕ Abrasive powders or liquids✕ Ammonia✕ Citrus-based cleaners✕ Acidic or vinegar-based cleaners✕ Oven cleaners |
| √ For heavy soil, use only a stainless steel cleaner designed for appliances. To order the cleaner, contact the dealer from whom you purchased your refrigerator. | ✕ Stainless steel cleaner is for stainless steel parts only. Do not allow the stainless steel cleaner and polish to come into contact with any plastic parts such as the trim pieces, dispenser covers, or door gaskets. |
Style 3 — Fingerprint-Resistant Stainless IMPORTANT:
■ Avoid exposing stainless steel appliances to caustic or corrosive elements such as high-salt, high-moisture, or high-humidity environments. Damage due to exposure to these elements is not covered under the warranty.
| DO USE DO NOT USE | |
| √ Soft, clean cloth | ✕ Abrasive cloths✕ Paper towels or newsprint✕ Steel-wool pads |
| √ Warm, soapy water with a mild detergent | ✕ Abrasive powders or liquids✕ Window sprays✕ Ammonia✕ Acidic or vinegar-based cleaners✕ Oven cleaners✕ Flammable fl uids |
NOTES:
If unintentional contact does occur, clean plastic part with a sponge and mild detergent in warm water. Dry thoroughly with a soft cloth.
■ Just because a cleaner is a liquid does not mean it is non-abrasive. Many liquid cleansers formulated to be gentle on tile and smooth surfaces still damage stainless steel.
■ Citric acid permanently discolours stainless steel.
■ To avoid damaging the fi nish of your stainless steel refrigerator:
Do not allow these substances to remain on the fi nish:
✗ Mustard Citrus-based Sauces
✗ Tomato juice Citrus-based products
✗ Marinara sauce
Interior Cleaning
- Unplug refrigerator or disconnect power.
- Hand wash, rinse, and dry removable parts and interior surfaces thoroughly. Use a clean sponge or soft cloth and a mild detergent in warm water.
NOTE: Do not use abrasive or harsh cleaners such as window sprays, scouring cleansers, fl ammable fl uids, cleaning waxes, concentrated detergents, bleaches, or cleansers containing petroleum products on plastic parts, interior and door liners, or gaskets.
- Plug in refrigerator or reconnect power.
Condenser Cleaning
This refrigerator has skin condenser on both sides of refrigerator. It is normal to feel warm on the sides.
Lights
The lights in both the refrigerator and freezer compartments are LEDs which do not need to be replaced. If the lights do not illuminate when the door is opened, contact the dealer from whom you purchased your refrigerator.
Holiday and Moving Care
Holidays
If You Choose to Leave the Refrigerator On While You're Away:
- Use up any perishables and freeze other items.
- If your refrigerator has an automatic ice maker and is connected to the household water supply, turn off the water supply to the refrigerator. Property damage can occur if the water supply is not turned off.
- If you have an automatic ice maker, turn off the ice maker.
■ Press the switch to Off (O) for the door ice maker.
- Empty the ice bin.
If You Choose to Turn Off the Refrigerator Before You Leave:
NOTE: Put refrigerator in Demo Mode while on Holiday. See the "Using the Controls" section.
- Remove all food from the refrigerator.
- If your refrigerator has an automatic ice maker:
■ Turn off water supply to the ice maker at least 1 day ahead of time.
■ When last load of ice drops, press the switch to Off (O) for display to be unlit on the top inside of the refrigerator, depending on your model.
-
Empty ice bin.
-
Turn off temperature controls. See the "Using the Controls" section.
-
Clean refrigerator, wipe it and dry well.
-
Tape rubber or wood blocks to the tops of both doors to prop them open far enough for air to get in. This stops odours and mould from building up.
Moving
When you are moving your refrigerator to a new home, follow these steps to prepare it for the move.
- If your refrigerator has an automatic ice maker:
■ Turn off water supply to the ice maker at least 1 day ahead of time.
■ Disconnect water line from the back of the refrigerator.
■ When last load of ice drops, press the switch to Off (O) either on the ice maker or the control, depending on your model.
-
Remove all food from refrigerator and pack all frozen food in dry ice.
-
Empty ice bin.
-
Unplug refrigerator.
-
Clean, wipe and dry thoroughly.
-
Take out all removable parts, wrap them well and tape them together so they don't shift and rattle during the move.
-
Depending on the model, raise the front of the refrigerator so it rolls more easily or raise the levelling screws so they do not scrape the floor. See the "Adjust the Doors" or "Refrigerator Levelling and Door Closing" sections.
-
Tape doors closed and tape the power cable to the back of the refrigerator.
When you get to your new home, put everything back and refer to the “Installation Instructions” section for preparation instructions. Also, if your refrigerator has an automatic ice maker, remember to reconnect the water supply to the refrigerator.
TROUBLESHOOTING
First try the solutions suggested here to possibly avoid a service call.
WARNING
Electrical Shock Hazard
Plug into a grounded (earthed) outlet.
Do not remove ground prong.
Do not use an adapter.
Do not use an extension cord.
Failure to follow these instructions can result in death, fire, or electrical shock.
| If you experience Possible | Causes Solution | |
| Refrigerator Operation |
| The refrigerator will not operate. | Check electrical supply. Plug the power | cable into an earthed socket. |
| Do not use an extension cable. |
| Make sure there is power to the socket. Plug in a lamp to see if the socket is working. |
| Reset a tripped circuit breaker. Replace any blown fuses.NOTE: If problems continue, contact an electrician. |
| Check controls. Make sure the controls | are turned on. See the “Using the Controls” section. |
| New installation. Allow 24 hours following | ing installation for refrigerator to cool completely.NOTE: Adjusting the temperature controls to the coldest setting will not cool either compartment more quickly. |
| Refrigerator control is in Demo mode (on some models). | If refrigerator is in Demo mode, cooling is turned off and “Demo” will be illuminated on the control panel. See the “Using the Controls” section for more information. |
| The motor seems to run too much. | High-effi ciency compressor and fans. L | larger, more effi cient refrigerators run longer at lower, more energy effi cient speeds. |
| The room or outdoor temperature is hot. | It is normal for refrigerator to work longer under these conditions. For optimum performance, place refrigerator in an indoor, temperature-controlled environment. See the “Location Requirements” section. |
| A large amount of warm food has been recently added. | Warm food will cause refrigerator to run longer until the air cools to the desired temperature. |
| The door(s) are opened too frequently or for too long. | Warm air entering refrigerator causes it to run more. Open the door less often. |
| The refrigerator door or freezer drawer is open. | Make sure refrigerator is level. See the “Refrigerator Levelling and Door Closing” section. Keep food and containers from blocking the door. |
| The refrigerator control is set too cold. A | Adjust refrigerator control to a less-cold setting until the refrigerator temperature is as desired. |
| The door or drawer gasket is dirty, worn, or cracked. | Clean or change the gasket. Leaks in the door seal will cause refrigerator to run longer in order to maintain desired temperatures. |
TROUBLESHOOTING
First try the solutions suggested here to possibly avoid a service call.
| If you experience Possible Causes Solution | |
| The lights do not work. Your refrigerator is equipped with LED lighting which does not need to be replaced. | If there is power to the refrigerator and the lights do not illuminate when a door or drawer is opened, call for service or assistance. |
|
|
|
|
| The Temperature Control UI does not turn on. | Ensure there are no magnets or electronic devices within 7.6 cm (3") of the hinge cover. |
|
|
|
| The Temperature Control UI went to sleep. | Press any button on the UI to wake up the The Temperature Control UI. |
|
|
|
|
| Unable to adjust setting on The Temperature Control UI. | Close the door. |
| Unusual Noise |
| To listen to normal refrigerator sounds, go to the Product Help/FAQ section of the brand website and search for “normal sounds.” Below are listed some normal sounds with explanations. |
| The refrigerator seems noisy. The compressor in your new refrigerator regulates temperature more effi ciently while using less energy and operates quietly. | Due to this reduction in operating noise, you may notice unfamiliar noises that are normal. |
| Sound of the compressor running longer than expected. | Larger, more-effi cient refrigerators run longer at lower, more energy effi cient speeds. |
| Pulsating/Whirring Fans/compressor adjusting to optimize performance during normal compressor operation. | This is normal. |
| Popping Contraction/expansion of inside walls, especially during initial cool down. | This is normal. |
| Hissing/Dripping Flow of refrigerant or flow of oil in the compressor. | This is normal. |
| Vibration | Adjust the levelling screws and lower the levelling foot firmly against the floor. See the “Refrigerator Levelling and Door Closing” section. |
| Rattling/Banging Movement of the water lines against the refrigerator cabinet or of items placed on top of the refrigerator cabinet. | Move excess water line away from refrigerator cabinet or fasten excess tubing to the cabinet. See the “Connect the Water Supply” section or remove items from the top of refrigerator. |
| Sizzling Water dripping on the heater during Defrost cycle. | This is normal. |
| Water running/Gurgling May be heard when ice melts during the Defrost cycle and water runs into the drain pan. | This is normal. |
TROUBLESHOOTING
First try the solutions suggested here to possibly avoid a service call.
| If you experience Possible Causes Solution | |
| Temperature and Moisture |
| Temperature is too warm. The refrigerator has just been installed. | The controls are not set correctly for the surrounding conditions. | Allow 24 hours following installation for refrigerator to cool completely. |
| The door(s) are opened often or not closed completely. Allows warm air to enter refrigerator. | Adjust the controls a setting colder. Check the temperature in 24 hours. See the "Using the Controls" section. |
| A large load of food was recently added. | Minimize door openings and keep doors fully closed. |
| Demo mode is on. Turn off the Holiday mode is on. Turn off the Holiday mode. See the "Using the Control" section. | Allow several hours for refrigerator to return to normal temperature. |
| Temperature is too cold in the refrigerator/crisper. | The refrigerator air vent(s) are blocked. | If the air vent located in the middle rear of the refrigerator compartment is blocked by items placed directly in front of it, the refrigerator will get too cold. Move items away from the air vent. |
| The controls are not set correctly for the surrounding conditions. | Adjust the controls a setting warmer. Check the temperature in 24 hours. See the "Using the Controls" section. |
| The ice storage bin is not in the correct position. | See the "Ice Maker and Ice Storage Bin" section. |
| Temperature is too cold in the temperature controlled drawer. | The control is not set correctly for the items stored in drawer. | Adjust the temperature setting. See the "Using the Controls" in the "Refrigerator Use" section. |
| There is interior moisture build-up. NOTE: Some moisture build-up is normal. | The room is humid. A humid environment contributes to moisture build-up. |
| The door(s) are opened often or not closed completely. Allows humid air to enter the refrigerator. | Minimize door openings and close doors completely. |
| The door(s) are blocked open. | Move food packages away from door. |
| A bin or shelf is in the way. Push bin or shelf back into the correct position. |
| Storing liquid in open containers. | This adds humidity to refrigerator interior. Keep all containers tightly covered. |
| There is frost/ice build-up in the freezer compartment. | The door is opened often or left open. | Minimize door openings and close drawer completely after use. |
| The door has poor door seal. | Ensure door seals are making full contact with the refrigerator cabinet to allow for an adequate seal. |
| Temperature controls are not set correctly. | See the "Using the Controls" section for recommended temperature settings. |
TROUBLESHOOTING
First try the solutions suggested here to possibly avoid a service call.
WARNING
Explosion Hazard
Use nonflammable cleaner.
Failure to do so can result in death, explosion, or fire.
To view an animation showing how to adjust and align the doors, refer to the Product Help/FAQ section of the brand website and search for “Door Closing and Door Alignment.”
| If you experience Possible | Causes Solution | |
| Doors |
| The doors will not close completely. | The door is blocked open. Move food packages away from door. |
| A bin or shelf is in the way. Push bin or shelf back into the correct position. |
| Recently installed Remove all packaging materials. |
| The doors are diffi cult to open. | The door gaskets are dirty or sticky. Clean gaskets and contact surfaces with mild soap and warm water. Rinse and dry with soft cloth. |
| The doors appear to be uneven. | The doors need to be aligned or the refrigerator needs to be levelled. | If you need to align door please call for service. |
| The refrigerator is unsteady or it rolls forward when opening and closing doors. | The refrigerator brake feet are not snug against the floor. | Turn both brake feet (one on each side) counterclockwise, the same amount, until they are snug against the floor. See the “Refrigerator Levelling and Door Closing” section. |
Sommario
SICUREZZA DEL FRIGORIFERO ....28
natural_image
Line drawing of a refrigerator with two doors open, showing internal shelves (no text or symbols)
natural_image
Mechanical clamp assembly diagram with labeled point A (no text or symbols beyond label)
A. Cerniera
natural_image
Line drawing of a multi-tiered refrigerator unit with front panel and side panels (no text or symbols)
natural_image
Technical line drawing of a mechanical bracket or clamp assembly (no text or symbols)
A. Cerniera
AVVERTENZA
natural_image
Technical line drawing of a mechanical clamp or bracket assembly with screws and a labeled component 'A' (no text or symbols beyond label)
A. Cerniera mediana
natural_image
Line drawing of a refrigerator interior showing door, front panel, and side-mounted appliance (no text or symbols)
natural_image
Technical line drawing of a mechanical assembly with a knob and rotating component (no text or symbols)
A. Piedino frenato
natural_image
Technical line drawing of a refrigerator internal structure (no text or symbols)
natural_image
Simple line drawing of a rectangular frame with a labeled section A and a small inset showing a horizontal bar (no text or symbols)
A. Copricerniera
natural_image
Line drawing of hands operating a portable toaster (no text or symbols)
natural_image
Line drawing of hands operating a portable device with internal compartments (no text or symbols)
natural_image
Line drawing of a hand placing two blocks into a container with internal compartments (no text or symbols)
natural_image
Line drawing of an open refrigerator with hand inserting a tray (no text or symbols)
natural_image
Line drawing of an open refrigerator interior showing front, back, and side compartments (no text or symbols)
natural_image
Line drawing of a refrigerator with open doors and shelves (no text or symbols)
natural_image
Line drawing of a three-tier refrigerator with front panels and side door (no text or symbols)
natural_image
Technical diagram of a mechanical assembly with labeled component A (no text or symbols present)
natural_image
Technical line drawing of a mechanical clamp or bracket assembly (no text or symbols)
A. Charnière
⚠ AVERTISSEMENT
natural_image
Line drawing of an open refrigerator with a small component labeled 'A' at the bottom (no text or symbols on the diagram itself)
natural_image
Technical line drawing of a mechanical assembly with a knob and labeled component A (no text or symbols beyond label)
natural_image
Technical line drawing of a refrigerator with labeled component A (no text or symbols beyond label)
natural_image
Simple line drawing of a rectangular frame with a labeled section A and two horizontal bars marked D, showing no text or symbols.
A. Couvre-charnière
Machine à glaçons
natural_image
Line drawing of hands operating a portable device with buttons and wheels (no text or symbols)
natural_image
Line drawing of hands operating a portable kitchen appliance (no text or symbols)
natural_image
Line drawing of a hand placing two blocks into a container with circular compartments (no text or symbols)
Conservation des aliments
Œufs
natural_image
Line drawing of an open refrigerator with hand placing a tray on the door (no text or symbols)
natural_image
Line drawing of an open refrigerator interior showing front, rear, and side compartments (no text or symbols)
natural_image
Line drawing of a refrigerator with open doors and shelves (no text or symbols)
natural_image
Technical line drawing of a three-tiered rectangular cabinet or enclosure with mounting holes and dashed lines indicating hidden edges (no text or symbols present)
natural_image
Technical line drawing of a mechanical bracket or hinge component with labeled point A (no text or symbols beyond label)
A. Петля
ПРЕДОСТЕРЕЖЕНИЕ
natural_image
Technical line drawing of a mechanical clamp or bracket assembly with screws and a labeled component (no text or symbols present)
A. Средняя петля
natural_image
Line drawing of a refrigerator interior showing door, front panel, and side panel with labeled component A (no text or symbols beyond labels)
A. Нижняя петля
ПРЕДОСТЕРЕЖЕНИЕ
natural_image
Technical line drawing of a mechanical assembly with a knob and curved arrow indicating rotation (no text or symbols)
A. Опорные ножки
natural_image
Technical line drawing of a refrigerator internal structure (no text or symbols)
natural_image
Technical line drawing of a rectangular frame with a labeled section A, showing no text or symbols beyond the label.
A. Крышка петли
Льдогенератор
natural_image
Line drawing of hands operating a portable device with buttons and wheels (no text or symbols)
natural_image
Line drawing of hands operating a portable kitchen appliance (no text or symbols)
natural_image
Line drawing of a hand placing a component into a cylindrical device (no text or symbols)
Хранение продуктов
Хранение яиц
natural_image
Technical line drawing of an open refrigerator with visible door, shelves, and handle (no text or symbols)
natural_image
Line drawing of an open refrigerator interior showing front, rear, and side views (no text or symbols)
natural_image
Diagram of a double-door refrigerator with open doors and internal compartments (no text or symbols)
WHIRLPOOL EMEA S.P.A.
VIA CARLO PISACANE N.1,
ВИРЛПУЛ ЕМЕА С.П.А.
natural_image
Line drawing of a refrigerator with open doors and shelves (no text or symbols)
natural_image
Mechanical component diagram showing a bracket with labeled point A (no text or symbols beyond label)
A. Zawias
natural_image
Technical line drawing of a multi-tiered refrigerator unit (no text or symbols)
natural_image
Technical diagram of a mechanical assembly with labeled component A (no text or symbols present)
natural_image
Technical line drawing of a mechanical bracket or clamp assembly with labeled point A (no text or symbols beyond label)
A. Zawias
OSTRZEŻENIE
natural_image
Line drawing of a refrigerator interior showing door, front panel, and side panel with labeled component A (no text or symbols beyond labels)
A. Dolny zawias
OSTRZEŻENIE
natural_image
Technical line drawing of a mechanical assembly with a knob and curved arrow, labeled 'A' (no text or symbols beyond label)
A. Nóżki blokujące
natural_image
Technical line drawing of a cabinet or refrigerator with a highlighted internal component (no text or symbols)
natural_image
Simple line drawing of a rectangular frame with a labeled section A and a small inset showing a horizontal bar (no text or symbols)
A. Pokrywa zawiasu
Kostkarka do lodu
natural_image
Line drawing of hands operating a portable device with a handle (no text or symbols)
natural_image
Line drawing of hands operating a portable device with a handle (no text or symbols)
natural_image
Line drawing of a hand placing objects into a container with internal compartments (no text or symbols)
natural_image
Line drawing of an open refrigerator with hand placing a tray on the door (no text or symbols)
natural_image
Line drawing of an open refrigerator interior showing front, back, and side compartments (no text or symbols)
Komory zamrażarki
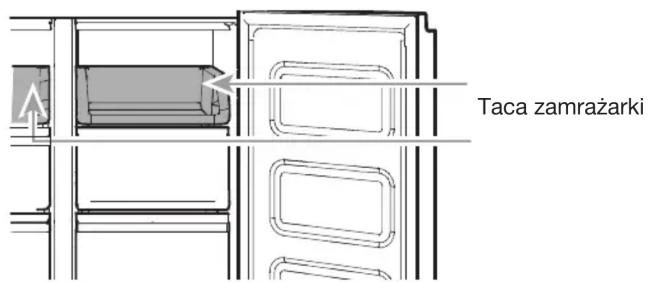
Taca zamrażarki
natural_image
Line drawing of a refrigerator with open doors and shelves (no text or symbols)
natural_image
Mechanical component diagram showing a bracket with labeled point A (no text or symbols beyond label)
A. Balama
natural_image
Line drawing of a multi-tiered refrigerator cabinet (no text or symbols)
natural_image
Technical line drawing of a mechanical bracket or clamp assembly (no text or symbols)
A. Balama
AVERTISMENT
natural_image
Technical line drawing of a mechanical clamp or bracket assembly with screws and a labeled component 'A' (no text or symbols beyond label)
A. Balama mijlocie
natural_image
Line drawing of an open refrigerator with a labeled component 'A' (no text or symbols beyond label)
natural_image
Technical line drawing of a mechanical assembly with a labeled component 'A' (no text or symbols beyond label)
natural_image
Technical line drawing of a refrigerator with a labeled component 'A' (no text or symbols beyond label)
natural_image
Simple line drawing of a rectangular frame with a labeled section A and internal structure, no text or symbols present.
A. Capac balama
natural_image
Line drawing of hands operating a portable device with a handle (no text or symbols)
natural_image
Line drawing of hands operating a portable kitchen appliance (no text or symbols)
natural_image
Line drawing of a hand placing objects into a container with two circular compartments (no text or symbols)
natural_image
Line drawing of an open refrigerator showing internal compartments and a hand placing a tray (no text or symbols)
natural_image
Line drawing of an open refrigerator with multiple doors and shelves (no text or symbols)
natural_image
Line drawing of a refrigerator with open doors and shelves (no text or symbols)
A. Sigorta kapağı
B. Sigorta
natural_image
Mechanical assembly diagram showing a clamp or bracket with labeled point A (no text or symbols beyond label)
A. Menteşe
natural_image
Technical line drawing of a multi-tiered refrigerator unit (no text or symbols)
natural_image
Technical diagram of a mechanical assembly with labeled component A (no text or symbols present)
natural_image
Technical line drawing of a mechanical bracket or clamp assembly with labeled component A (no text or symbols beyond label)
A. Menteşe
! UYARI
natural_image
Technical diagram of a mechanical clamp or bracket assembly with screws and a labeled component (no text or symbols present)
A. Orta menteşe
natural_image
Line drawing of an open refrigerator with a door and labeled component A (no text or symbols beyond label)
A. Alt menteşe
Son İşlemler
! UYARI
natural_image
Technical line drawing of a mechanical assembly with a labeled component 'A' (no text or symbols beyond label)
A. Fren ayakları
natural_image
Technical line drawing of a refrigerator internal structure (no text or symbols)
A. Menteşeli conta
natural_image
Technical line drawing of a rectangular frame with labeled points A and B, showing internal structure and measurement markings (no text or symbols beyond labels)
A. Menteşe kapağı
Buz Makinesi
natural_image
Line drawing of hands operating a portable device with a tray (no text or symbols)
natural_image
Line drawing of hands operating a portable device with a handle (no text or symbols)
natural_image
Line drawing of a hand placing objects into a container with two handles (no text or symbols)
natural_image
Line drawing of an open refrigerator showing internal compartments and hand positioning (no text or symbols)
natural_image
Line drawing of an open refrigerator with multiple doors and shelves (no text or symbols)
WAARSCHUWINGEN M.B.T. ELEKTRICITEIT
natural_image
Line drawing of a refrigerator with open doors and shelves (no text or symbols)
Scharnier links midden
natural_image
Mechanical component diagram showing a bracket with labeled point A (no text or symbols beyond label)
A. Scharnier
natural_image
Line drawing of a three-tier refrigerator cabinet (no text or labels)
Afdekking scharnier rechtsboven.
natural_image
Technical diagram of a mechanical assembly with labeled component A (no text or symbols present)
natural_image
Technical line drawing of a mechanical bracket or clamp assembly with labeled component A (no text or symbols beyond label)
A. Scharnier
⚠ WAARSCHUWING
Gevaarlijk gewicht
natural_image
Line drawing of an open refrigerator with a door, showing internal compartments and a small labeled component (no text or symbols present)
A. Onderscharnier
⚠ WAARSCHUWING
natural_image
Technical line drawing of a mechanical assembly with a central component and directional arrow (no text or symbols)
A. Remvoeten
natural_image
Technical line drawing of a refrigerator with labeled component A (no text or symbols beyond label)
A. Scharnierend rubber
natural_image
Technical line drawing of a rectangular frame with labeled points A and B, showing internal structure and measurement markings (no text or symbols beyond labels)
A. Afdekkap scharnier
IJsblokjesmaker
natural_image
Line drawing of hands operating a portable device with a tray (no text or symbols)
natural_image
Line drawing of hands operating a portable kitchen appliance (no text or symbols)
natural_image
Line drawing of a hand placing objects into a container with two handles (no text or symbols)
Bewaren van voedsel
Bewaren van eieren
natural_image
Line drawing of an open refrigerator showing internal compartments and a hand placing a tray (no text or symbols)
natural_image
Technical line drawing of an open refrigerator with doors open, showing internal compartments and shelves (no text or symbols)
natural_image
Line drawing of a refrigerator with open doors and shelves (no text or symbols)
natural_image
Mechanical component diagram showing a bracket with labeled point A (no text or symbols beyond label)
A. Gångjärn
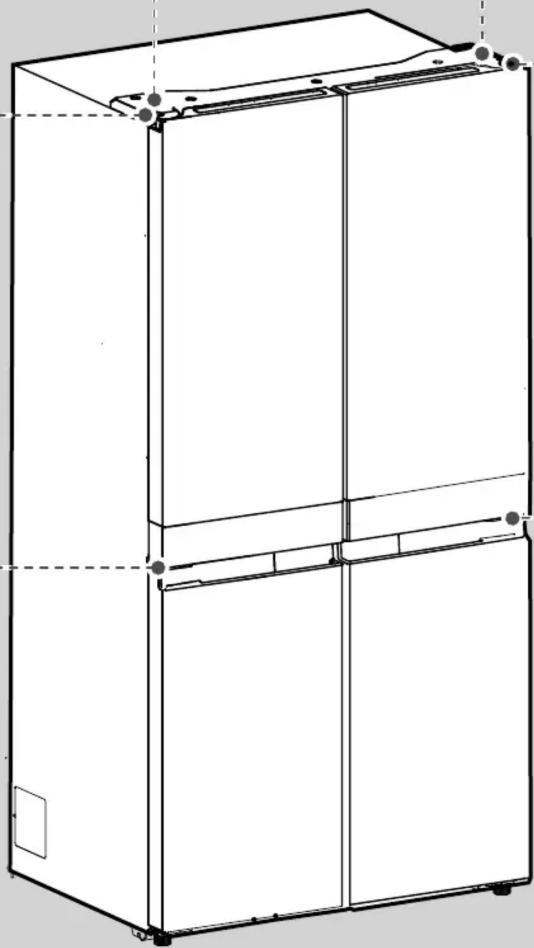
natural_image
Technical line drawing of a multi-tiered refrigerator unit (no text or symbols)
natural_image
Technical line drawing of a mechanical bracket or bracket assembly with labeled point A (no text or symbols beyond label)
A. Gångjärn
WARNING
Fara för tung vikt
natural_image
Technical diagram of a mechanical clamp or bracket assembly with screws and a labeled component (no text or symbols present)
A. Mittre gångjärn
natural_image
Line drawing of an open refrigerator with a labeled component 'A' (no text or symbols beyond label)
A. Nedre gångjärn
Slutliga steg
WARNING
natural_image
Technical line drawing of a mechanical assembly with a rotating component labeled A (no text or symbols present)
A. Bromsfötter
Sound On/Off (Ljud På/Av)
natural_image
Technical line drawing of a refrigerator with labeled component A (no text or symbols beyond label)
A. Ledad tätning
natural_image
Simple line drawing of a rectangular frame with a labeled section A and internal structure (no text or symbols)
A. Gångjärnskåpa
Ismaskin
natural_image
Line drawing of hands operating a portable device with a handle (no text or symbols)
natural_image
Line drawing of hands operating a portable device with a tray and handle (no text or symbols)
natural_image
Line drawing of a hand placing two blocks into a container with three circular compartments (no text or symbols)
Förvaring av mat
Förvaring av ägg
natural_image
Line drawing of an open refrigerator interior showing hand positioning on the tray (no text or symbols)
natural_image
Line drawing of an open refrigerator interior showing front, back, and side compartments (no text or symbols)
Frysavdelningar
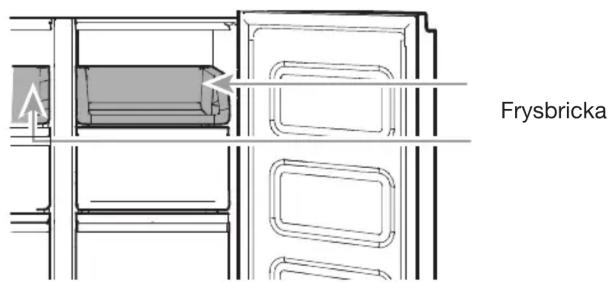
Frysbricka
HYLDER, D∅RHYLDER OG SKUFFER ......239
Fryseafdelingens opbevaringsrum 240
Lydreference 240
Tilbehør 240
Assistance eller Service 240
VEDLIGEHOLDELSE AF K∅LE-/FRYSESKABET ......241
Rengøring....241
Lamper 242
natural_image
Line drawing of a refrigerator with open doors and shelves (no text or symbols)
A. Sikringsdæksel
B. Sikring
Kun for Irland:
natural_image
Technical line drawing of a multi-tiered refrigerator unit (no text or symbols)
natural_image
Technical diagram of a mechanical assembly with labeled component A (no text or symbols present)
A. 5 mm unbrakoskruer
natural_image
Technical diagram of a mechanical clamp or bracket assembly with labeled component A (no text or symbols beyond label)
A. Hængsel
ADVARSEL
Meget tung - fare
natural_image
Technical diagram of a mechanical clamp or bracket assembly with screws and a labeled component (no text or symbols present)
natural_image
Line drawing of a refrigerator interior showing door, front panel, and side panel with labeled component A (no text or symbols beyond label)
A. Nederste hængsel
Afsluttende trin
ADVARSEL
natural_image
Technical line drawing of a mechanical assembly with a rotating component and labeled point A (no text or symbols beyond label)
A. Bremsefod
natural_image
Technical line drawing of a refrigerator with labeled component A (no text or symbols beyond label)
natural_image
Simple line drawing of a rectangular frame with a labeled section A and internal structure, no text or symbols present.
A. Hængselsdæksel
Ismaskine
natural_image
Line drawing of hands operating a portable device with a tray (no text or symbols)
natural_image
Line drawing of hands operating a portable device with a handle (no text or symbols)
natural_image
Line drawing of a hand placing objects into a container with two handles (no text or symbols)
Opbevaring af madvarer
Opbevaring af æg
natural_image
Line drawing of an open refrigerator with hand placing a tray on the door (no text or symbols)
natural_image
Line drawing of an open refrigerator interior showing front, back, and side compartments (no text or symbols)
Fryseafdelingens opbevaringsrum
Frysebakke
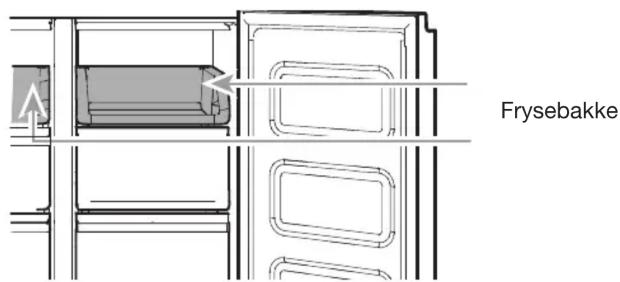
HYLLER, BOKSER OG SKUFFER ....263
Fryserlagringsrom 264
Lydreferanse ....264
Tilbehør 264
KJ∅LESKAPETS SIKKERHET
natural_image
Line drawing of a refrigerator with open doors and shelves (no text or symbols)
A. Sikringsdeksel
B. Sikring
For Irland (kun):
natural_image
Mechanical component diagram showing a lever mechanism with labeled point A (no text or symbols beyond label)
A. Hengsel
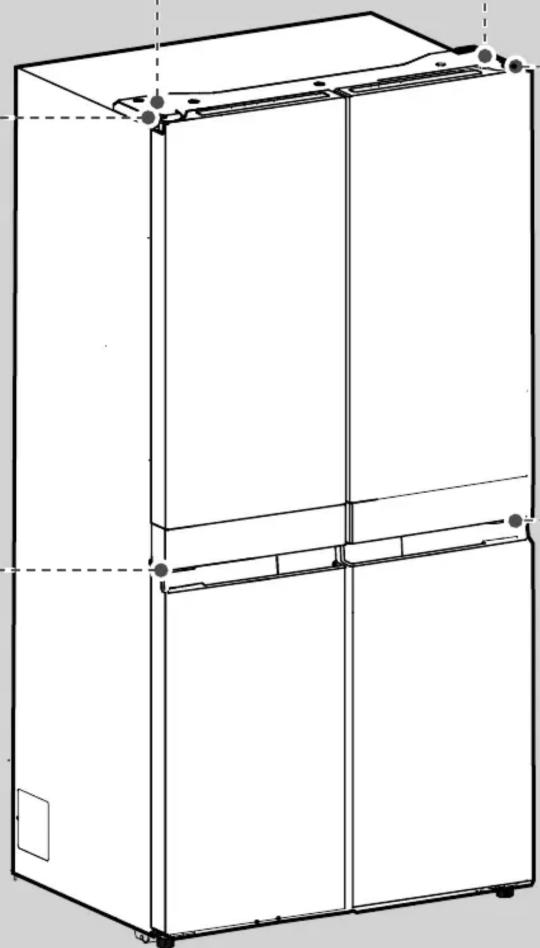
natural_image
Line drawing of a three-tier refrigerator cabinet (no text or symbols)
natural_image
Technical line drawing of a mechanical bracket or clamp assembly with labeled point A (no text or symbols beyond label)
A. Hengsel

ADVARSEL
Fare for høy vekt
A. ∅verste hengseldekselskrue
C. 5 mm sokkelskruer
B. ∅verste hengseldeksel
D. ∅verste hengsel
- Løft kjøleskapsdøren fra den midterste hengselpinnen. Den øverste hengselen vil komme av med døren.
Ta av venstre dør
natural_image
Technical diagram of a mechanical clamp or bracket assembly with screws and a labeled component (no text or symbols present)
A. Midtre hengsel
natural_image
Line drawing of an open refrigerator with a labeled component 'A' (no text or symbols beyond label)
A. Nedre hengsel
Endelige trinn
ADVARSEL
natural_image
Technical line drawing of a mechanical assembly with a labeled component 'A' (no text or symbols beyond label)
A. Bremseføtter
natural_image
Technical line drawing of a refrigerator with labeled component A (no text or symbols beyond label)
A. Hengslet tetning
natural_image
Technical line drawing of a rectangular frame with a sloped edge and labeled point A (no text or symbols beyond label)
A. Hengseldeksel
Ismaskinen
natural_image
Line drawing of hands operating a portable device with a handle (no text or symbols)
natural_image
Line drawing of hands operating a portable device with internal compartments (no text or symbols)
Den manuelle ismaskinenheten kan tas ut av fryseren när isen ikke er nødvendig for å gi mer plass i fryseren.
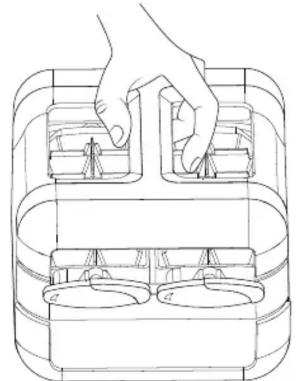
natural_image
Line drawing of a hand placing objects into a container with two labeled parts (a and b), no text or symbols present.
Oppbevaring av mat
Oppbevaring av egg
HYLLER, BOKSER OG SKUFFER
natural_image
Technical line drawing of an open refrigerator showing internal compartments and a handle mechanism (no text or labels)
natural_image
Line drawing of an open refrigerator interior showing front, rear, and side compartments (no text or symbols)
Fryserlagringsrom
Fryserbrett
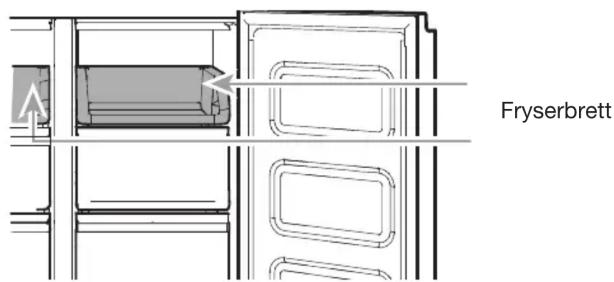
natural_image
Line drawing of a refrigerator with open doors and shelves (no text or symbols)
natural_image
Technical line drawing of a multi-tiered refrigerator unit (no text or symbols)
natural_image
Technical line drawing of a mechanical bracket or clamp assembly with labeled component A (no text or symbols beyond label)
A. Dobradiça
! AVISO
Perigo de peso excessivo
natural_image
Technical line drawing of a mechanical clamp or bracket assembly with screws and a labeled component (no text or symbols present)
A. Dobradiça central
natural_image
Line drawing of a refrigerator interior showing door, front panel, and side door with labeled component A (no text or symbols beyond labels)
A. Dobradiça inferior
Passos fi nais
AVISO
natural_image
Technical line drawing of a mechanical assembly with a labeled component 'A' (no text or symbols beyond label)
A. Pés de travagem
natural_image
Technical line drawing of a cabinet or refrigerator with a vertical panel on the side (no text or symbols)
natural_image
Simple line drawing of a rectangular frame with a horizontal panel and labeled corner point A (no text or symbols beyond labels)
natural_image
Line drawing of hands operating a portable device with a tray (no text or symbols)
natural_image
Line drawing of hands operating a portable device with internal compartments (no text or symbols)
natural_image
Line drawing of a hand placing two blocks into a container with internal compartments (no text or symbols)
natural_image
Line drawing of an open refrigerator with hand inserting a tray (no text or symbols)
Para retirar e voltar a colocar as gavetas:
natural_image
Line drawing of an open refrigerator with multiple doors and shelves (no text or symbols)
natural_image
Line drawing of a refrigerator with open doors and shelves (no text or symbols)
natural_image
Mechanical component diagram showing a bracket with labeled point A (no text or symbols present)
A. Шарнир
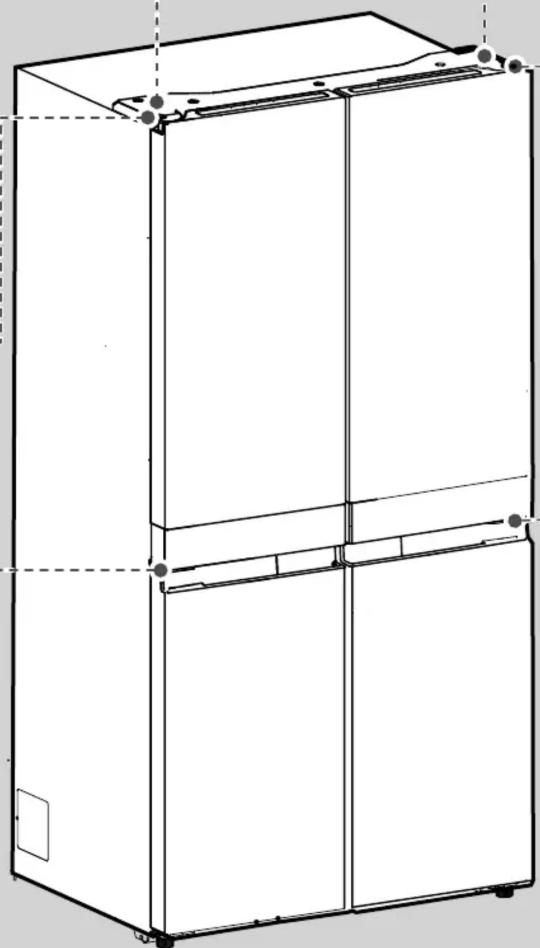
natural_image
Line drawing of a three-tier refrigerator cabinet (no text or symbols)
natural_image
Technical line drawing of a mechanical bracket or clamp assembly with labeled component A (no text or symbols beyond label)
A. Шарнир
ПРЕДУПРЕЖДЕНИЕ
natural_image
Technical line drawing of a mechanical clamp or bracket assembly with screws and a labeled component 'A' (no text or symbols beyond label)
A. Среден шарнир
natural_image
Line drawing of a refrigerator interior showing door, front panel, and side panel with labeled component A (no text or symbols beyond labels)
A. Долен шарнир
ПРЕДУПРЕЖДЕНИЕ
natural_image
Technical line drawing of a mechanical assembly with a labeled component 'A' (no text or symbols beyond label)
A. Спирачни крачета
natural_image
Technical line drawing of a cabinet or refrigerator with a vertical panel inserted, labeled 'A' (no text or symbols on the diagram itself)
natural_image
Technical line drawing of a rectangular frame with a labeled section A, showing no text or symbols beyond the label.
A. Капачка на шарнир
Ледогенератор
natural_image
Line drawing of hands operating a portable toaster (no text or symbols)
natural_image
Line drawing of hands operating a kitchen appliance with a tray and handle (no text or symbols)
natural_image
Line drawing of a hand placing objects into a container with two circular compartments (no text or symbols)
natural_image
Line drawing of an open refrigerator with internal compartments and a hand placing a tray (no text or symbols)
natural_image
Line drawing of an open refrigerator interior showing front, back, and side compartments (no text or symbols)
POLICE, POSUDE I LADICE ....337
Odjeljci za čuvanje u zamrzivaču ....338
Zvučne obavijesti ....338
Pribor....338
Pomoć ili servis ....338
ODRŽAVANJE HLADNJAKA 339
Čišćenje....339
Svjetla 340
Održavanje prilikom praznika i selidbe ....340
OTKLANJANJE POTEŠKOĆA 341
SIGURNOST HLADNJAKA
natural_image
Line drawing of an open refrigerator with multiple doors and shelves (no text or symbols)
A. Poklopac osigurača
B. Osigurač
Za Republiku Irsku (samo za to tržište):
Često će se primjenjivati informacije koje su dane za Veliku Britaniju, ali se koristi i treća vrsta utikača i utičnice, 2-pinska, od tipa s bočnim uzemljenjem.
Utičnica/utikač (vrijedi za obje države):
Ako priloženi utikač nije prikladan za vašu utičnicu, javite se u postprodajnu službu kako biste dobili dodatne upute. Ne pokušavajte sami zamijeniti utikač. Taj postupak treba provesti kvalifi cirani tehničar u skladu s uputama proizvođača i trenutnim standardnim sigurnosnim odredbama.
Temperatura
natural_image
Mechanical component diagram showing a bracket with labeled point A (no text or symbols beyond label)
A. Šarka
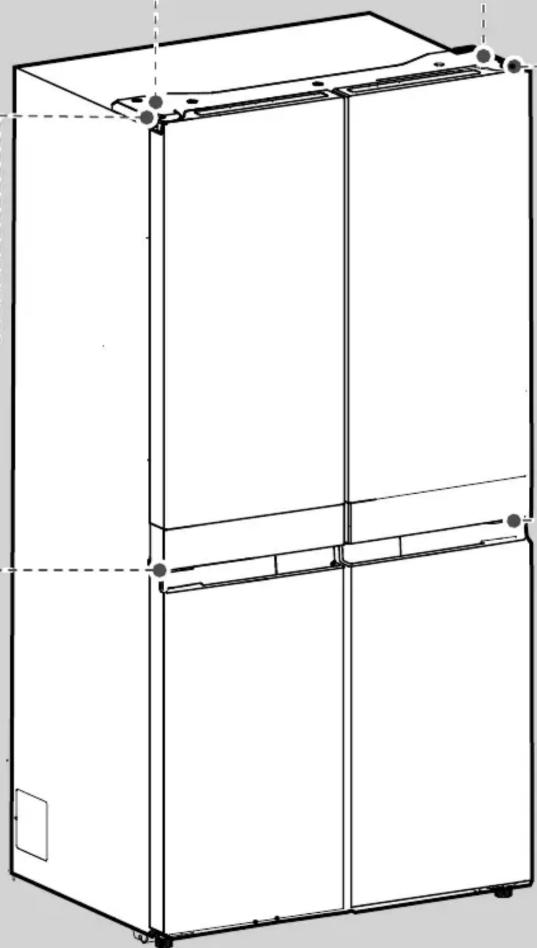
natural_image
Line drawing of a three-tier refrigerator cabinet (no text or labels)
A. Vijci poklopca gornje šarke
B. Poklopac gornje šarke
Gornja desna šarka
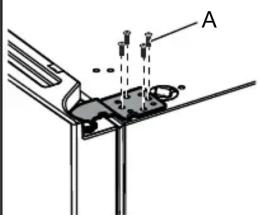
A. Utični vijci od 5 mm
Srednja desna šarka
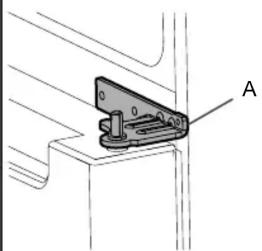
natural_image
Technical line drawing of a mechanical bracket or clamp assembly with labeled component A (no text or symbols beyond label)
A. Šarka

UPOZORENJE
A. Vijak poklopca gornje šarke
C. Utični vijci od 5 mm
B. Poklopac gornje šarke
D. Gornja šarka
- Vrata hladnjaka podignite sa zatika srednje šarke. Gornja šarka skinut će se s vratima.
natural_image
Technical line drawing of a mechanical clamp or bracket assembly with screws and a labeled component 'A' (no text or symbols beyond label)
A. Srednja šarka
natural_image
Line drawing of an open refrigerator with a labeled component 'A' (no text or symbols beyond label)
A. Donja šarka
UPOZORENJE
natural_image
Technical line drawing of a mechanical assembly with a knob and rotating component (no text or symbols)
A. Kočne nožice
natural_image
Technical line drawing of a refrigerator with labeled component A (no text or symbols beyond label)
A. Brtvilo sa šarkama
natural_image
Simple line drawing of a rectangular frame with a labeled section 'A' and a small inset detail (no text or symbols beyond the label)
A. Poklopac šarke
Uređaj za pravljenje leda
Da biste napravili led, pliticu s ledom napunite pročišćenom vodom, a uređaj za ručno pravljenje leda stavite na gornju policu zamrzivača. Ostavite dovoljno vremena da se led formira i čim je led spreman, okrugle regulacijske gumbe okrenite u smjeru okretanja kazaljki na satu kako bi se kockice leda izbacile u spremnik za led.
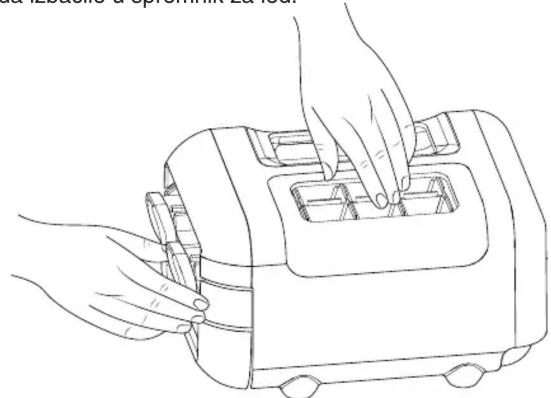
natural_image
Line drawing of hands operating a portable food cart (no text or symbols)
■ Blago podignite spremnik s ledom i izvucite ga kako biste došli do kocki leda.
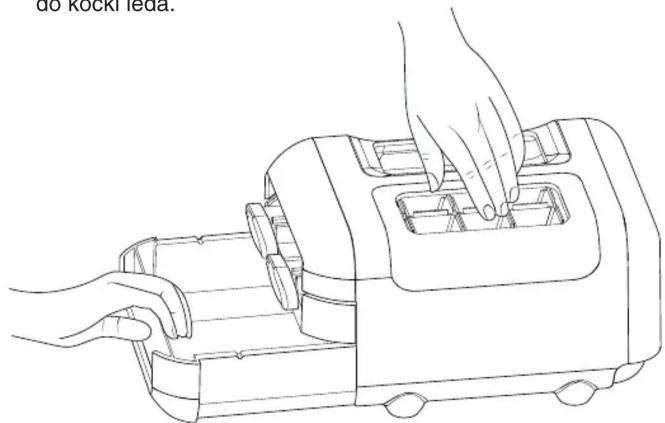
natural_image
Line drawing of hands operating a portable device with a tray (no text or symbols)
natural_image
Line drawing of a hand placing objects into a container with two circular compartments (no text or symbols)
Čuvanje hrane
Čuvanje jaja
POLICE, POSUDE I LADICE
Staklene police ili poklopce ne čistite toplom vodom dok su hladni. Police i poklopci mogli bi se slomiti ako se izlože naglim promjenama temperature ili udarcima, kao što je sudaranje. Temperirano staklo projektirano je tako da se razbije u mnogo malih komadića veličine oblutaka. To je normalno. Staklene police i poklopci su teški. Prilikom njihova vađenja koristite obje ruke kako ih ne bi ispustili.
Prilagodba visine police
natural_image
Technical line drawing of an open refrigerator showing internal compartments and door panel (no text or labels)
natural_image
Technical line drawing of an open refrigerator with multiple doors and shelves (no text or symbols)
POLICE, NÁDOBY A ZÁSUVKY ....361
natural_image
Line drawing of a refrigerator with open doors and shelves (no text or symbols)
A. Kryt pojistek
B. Pojistka
natural_image
Mechanical component diagram showing a bracket with labeled point A (no text or symbols beyond label)
A. Pant
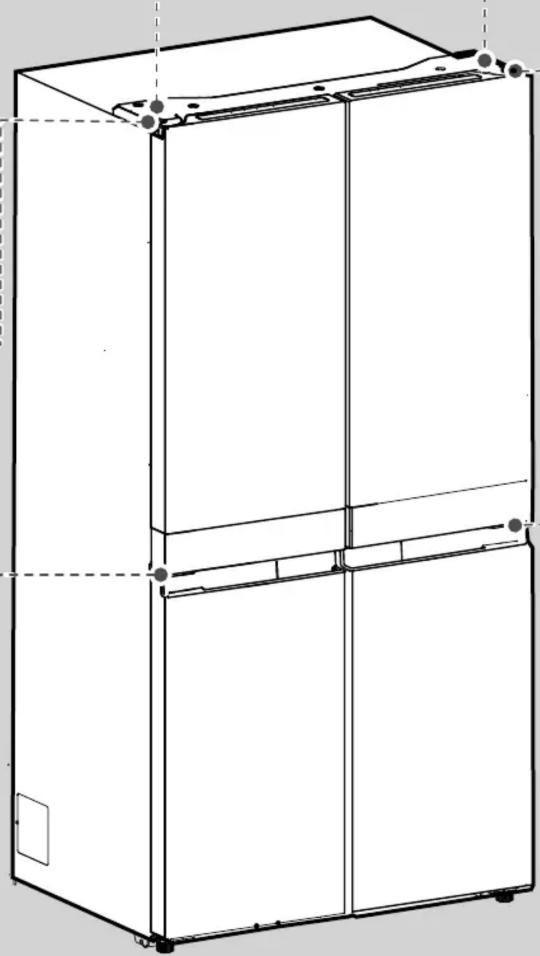
natural_image
Technical line drawing of a multi-tiered refrigerator cabinet (no text or labels)
A. 5 mm šrouby
Pravý střední pant
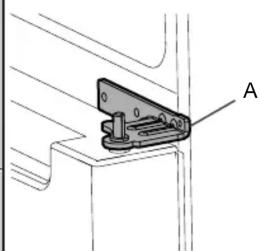
natural_image
Technical line drawing of a mechanical bracket or bracket assembly with labeled component A (no text or symbols beyond label)
A. Pant
VAROVÁNÍ
natural_image
Technical diagram of a mechanical clamp or bracket assembly with screws and a labeled component (no text or symbols present)
A. Středový pant
natural_image
Line drawing of an open refrigerator with a labeled component 'A' and a warning symbol on the door (no text or symbols beyond label)
A. Spodní pant
VAROVÁNÍ
natural_image
Technical line drawing of a mechanical assembly with a curved component and labeled point A (no text or symbols beyond label)
A. Brzdné nožky
natural_image
Technical line drawing of a refrigerator with a labeled component (A), showing internal shelves and door frame structure (no text or symbols beyond label)
A. Závěsné těsnění
natural_image
Technical line drawing of a rectangular frame with labeled points A and B, showing internal structure and measurement markings (no text or symbols beyond labels)
A. Kryt pantu
Výrobník ledu
natural_image
Line drawing of hands operating a portable device with buttons and wheels (no text or symbols)
natural_image
Line drawing of hands operating a portable kitchen appliance (no text or symbols)
natural_image
Line drawing of a hand placing objects into a container with two handles (no text or symbols)
Skladování potravin
Skladování vajec
POLICE, NÁDOBY A ZÁSUVKY
natural_image
Line drawing of an open refrigerator showing internal compartments and a hand placing a tray (no text or symbols)
natural_image
Line drawing of an open refrigerator with multiple doors and shelves (no text or symbols)
natural_image
Line drawing of a refrigerator with open doors and shelves (no text or symbols)
A. Kaitsme kate
B. Kaitse
natural_image
Mechanical component diagram showing a bracket with labeled point A (no text or symbols beyond label)
A. Hing
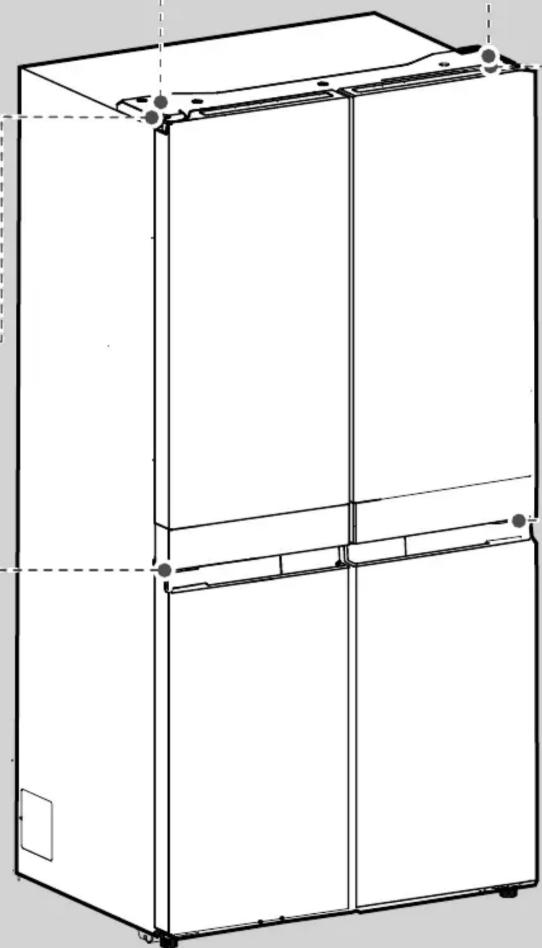
natural_image
Line drawing of a multi-tiered refrigerator cabinet (no text or labels)
Ülemise parema hinge kate A
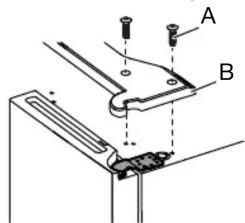
natural_image
Technical line drawing of a mechanical bracket or clamp assembly with labeled point A (no text or symbols beyond label)
A. Hing
HOIATUS!
natural_image
Technical diagram of a mechanical clamp or bracket assembly with screws and a labeled component (no text or symbols present)
A. Keskmine hing
natural_image
Line drawing of an open refrigerator with a small component labeled 'A' at the bottom (no text or symbols on the diagram itself)
A. Alumine hing
HOIATUS!
Elektrilöögioht
natural_image
Technical line drawing of a mechanical assembly with a knob and curved component (no text or symbols)
A. Tugijalg
natural_image
Technical line drawing of a refrigerator with labeled component A (no text or symbols beyond label)
A. Hingedel tihend
natural_image
Line drawing of hands operating a portable device with a handle (no text or symbols)
natural_image
Line drawing of hands operating a portable kitchen appliance (no text or symbols)
natural_image
Line drawing of a hand placing objects into a container with two circular compartments (no text or symbols)
natural_image
Technical line drawing of an internal refrigerator with hand positioning on the door panel (no text or symbols)
natural_image
Technical line drawing of an open refrigerator with doors open, showing internal compartments and shelves (no text or symbols)
natural_image
Line drawing of a refrigerator with open doors and shelves (no text or symbols)
natural_image
Line drawing of a three-tier refrigerator cabinet with doors and front panels (no text or symbols)
natural_image
Technical line drawing of a mechanical bracket or clamp assembly (no text or symbols)
A. Μεντεσές
⚠️ ПРОЕІДОПОІНЕН
natural_image
Technical line drawing of a mechanical clamp or bracket assembly with screws and a labeled component (no text or symbols present)
A. Μεσαίος μεντεσές
natural_image
Line drawing of an open refrigerator with a small component labeled 'A' at the bottom (no text or symbols on the diagram itself)
A. Κάτω μεντεσές
⚠️ ΠΡΟΕΙΔΟΠΟΙΗΣΗ
natural_image
Technical line drawing of a mechanical assembly with a labeled component 'A' (no text or symbols beyond label)
natural_image
Technical line drawing of a refrigerator with labeled component A (no text or symbols beyond label)
A. Αρθρωτό λάστιχο
natural_image
Simple line drawing of a rectangular frame with a labeled section A and a small inset showing a measurement or scale (no text or symbols present)
A. Κάλυμμα μεντεσέ
Παρασκευαστής πάγου
natural_image
Line drawing of hands operating a portable device with a handle (no text or symbols)
natural_image
Line drawing of a hand operating a portable device with handle and tray (no text or symbols)
natural_image
Line drawing of a hand placing objects into a container with two circular compartments (no text or symbols)
Συντήρηση τροφίμων
Συντήρηση αυγών
natural_image
Line drawing of an open refrigerator with a hand inserting a tray into the door (no text or symbols)
natural_image
Line drawing of an open refrigerator with doors open, showing internal shelves and door compartments (no text or symbols)
natural_image
Line drawing of a refrigerator with open doors and shelves (no text or symbols)
A. Biztosítékház
B. Biztosíték
natural_image
Mechanical component diagram showing a bracket with labeled point A (no text or symbols beyond label)
A. Zsanér
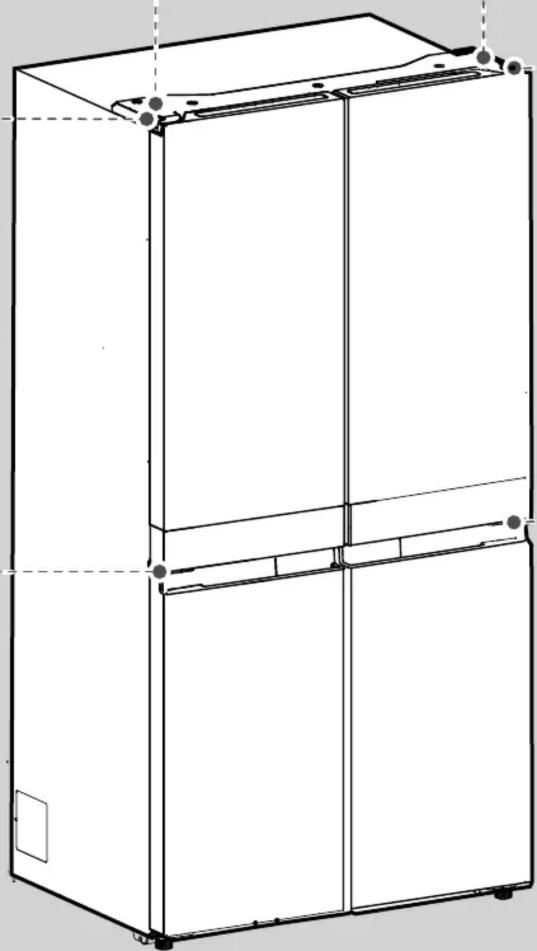
natural_image
Technical line drawing of a three-tier refrigerator cabinet (no text or labels)
natural_image
Technical line drawing of a mechanical bracket or mounting bracket with labeled component A (no text or symbols beyond label)
A. Zsanér
VIGYÁZAT
natural_image
Technical line drawing of a mechanical clamp or bracket assembly with screws and a labeled component 'A' (no text or symbols beyond label)
A. Középső zsanér
natural_image
Line drawing of an open refrigerator with a small component labeled 'A' at the bottom (no text or symbols on the diagram itself)
A. Alsó zsanér
VIGYÁZAT
Áramütés veszélye
natural_image
Technical line drawing of a mechanical assembly with a central component and labeled section A (no text or symbols beyond label)
A. Fékezőláb
natural_image
Technical line drawing of a refrigerator with a labeled component 'A' (no text or symbols beyond label)
A. Csuklós tömítés
natural_image
Simple line drawing of a rectangular frame with a flat top and vertical supports, labeled A (no text or symbols beyond labels)
A. Zsanérfedél
Jégkocka-készítő
natural_image
Line drawing of a hand operating a small device with a handle, no text or symbols present
natural_image
Line drawing of hands operating a portable device with a tray and handle (no text or symbols)
natural_image
Line drawing of a hand pressing down on a mechanical component with multiple circular cavities (no text or symbols)
natural_image
Line drawing of an open refrigerator showing internal compartments and a hand placing a tray (no text or symbols)
natural_image
Line drawing of an open refrigerator interior showing front, rear, and side compartments (no text or symbols)
natural_image
Line drawing of a refrigerator with open doors and shelves (no text or symbols)
natural_image
Mechanical component diagram showing a bracket with labeled point A (no text or symbols beyond label)
A. Enge
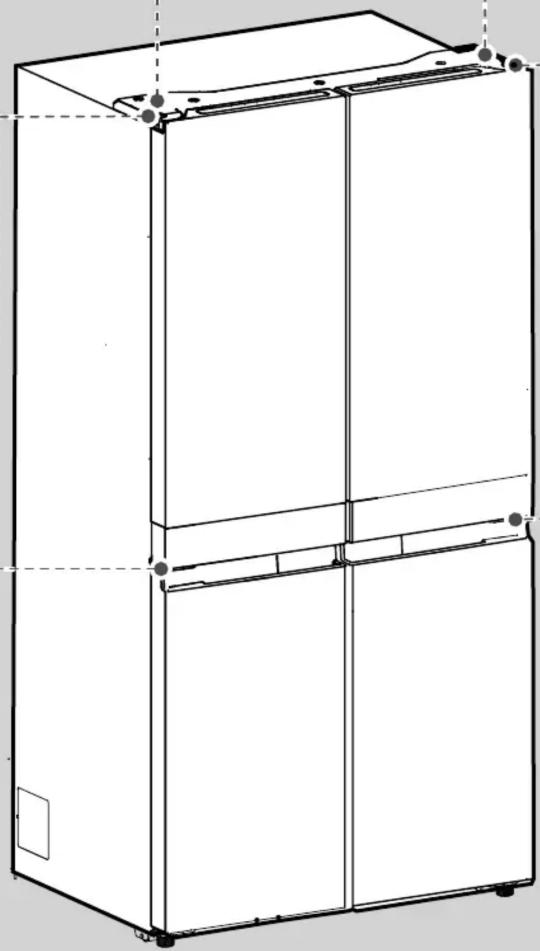
natural_image
Technical line drawing of a multi-tiered refrigerator unit (no text or symbols)
natural_image
Technical diagram of a mechanical assembly with labeled component A (no text or symbols present)
natural_image
Technical line drawing of a mechanical clamp or bracket assembly (no text or symbols)
A. Enge

BRĪDINĀJUMS
Liela svara radita bistamiba
Lai paceltu ledusskapja durvis, ir nepieciešami vismaz divi cilvēki.
natural_image
Technical line drawing of a mechanical clamp or bracket assembly with screws and a labeled component 'A' (no text or symbols beyond label)
A. Vidējā enge
natural_image
Line drawing of an open refrigerator with a door and labeled component A (no text or symbols beyond label)
A. Apakšējā enğe
BRĪDINĀJUMS
natural_image
Technical line drawing of a mechanical assembly with a knob and curved arrow (no text or symbols)
natural_image
Technical line drawing of a refrigerator with labeled component A (no text or symbols beyond label)
A. Enğes blivējums
natural_image
Simple line drawing of a rectangular frame with a labeled section 'A' and a small inset showing a slot (no text or symbols beyond label)
A. Enges pârsegs
natural_image
Line drawing of hands operating a toaster oven (no text or symbols)
natural_image
Line drawing of hands operating a portable kitchen appliance (no text or symbols)
natural_image
Line drawing of a hand placing objects into a container with two handles (no text or symbols)
natural_image
Line drawing of an open refrigerator showing internal compartments and hand positioning (no text or symbols)
natural_image
Technical line drawing of an open refrigerator with doors and shelves (no text or symbols)
natural_image
Line drawing of an open refrigerator with two doors, showing front and side views (no text or symbols)
A. Saugiklio dangtelis
B. Saugiklis
natural_image
Technical line drawing of a mechanical clamp or bracket assembly (no text or symbols)
A. Vyris
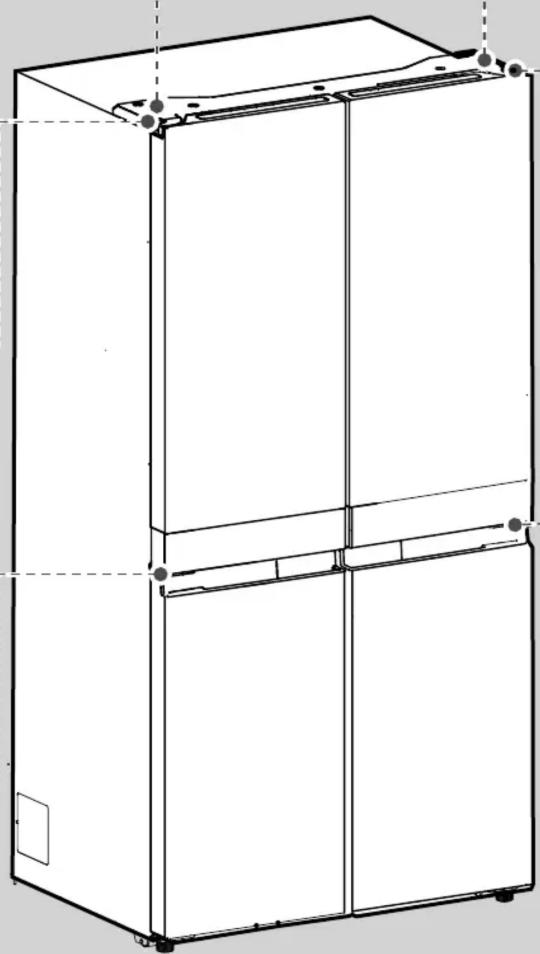
natural_image
Line drawing of a multi-tiered refrigerator cabinet with mounting holes and doorways (no text or labels)
natural_image
Technical diagram of a mechanical assembly with labeled component A (no text or symbols present)
A. 5 mm varžtai
natural_image
Technical line drawing of a mechanical bracket or clamp assembly (no text or symbols)
A. Vyris

ISPÈJIMAS
Pavojus, kylantis dèl per didelio svorio
natural_image
Technical line drawing of a mechanical clamp or bracket assembly with screws and a labeled component 'A' (no text or symbols beyond label)
A. Vidurinis vyris
natural_image
Line drawing of an open refrigerator with a door and labeled component A (no text or symbols beyond label)
A. Apatinis vyris
⚠️ ISPÈJIMAS
Elektros smūgio pavojus
natural_image
Technical line drawing of a mechanical assembly with a labeled component 'A' (no text or symbols beyond label)
A. Stabdymo kojelė
natural_image
Technical line drawing of a refrigerator with labeled component A (no text or symbols beyond label)
A. Vertikalus sandariklis
natural_image
Simple line drawing of a rectangular frame with a labeled section A and internal structure, no text or symbols present.
A. Vyrio dangtelis
natural_image
Line drawing of hands operating a portable device with buttons and wheels (no text or symbols)
natural_image
Line drawing of hands operating a portable device with a tray and handle (no text or symbols)
natural_image
Line drawing of a hand placing a component into a container with four circular compartments (no text or symbols)
natural_image
Line drawing of an open refrigerator showing internal compartments and a hand placing a tray (no text or symbols)
natural_image
Line drawing of an open refrigerator interior showing front, rear, and side compartments (no text or symbols)
Šaldiklio skyriai
Šaldiklio padėklas
natural_image
Line drawing of a refrigerator with open doors and shelves (no text or symbols)
natural_image
Technical line drawing of a multi-tiered rectangular cabinet or enclosure with mounting holes and dashed lines indicating hidden edges (no text or symbols present)
natural_image
Technical diagram of a mechanical assembly with labeled component A (no text or symbols present)
natural_image
Technical diagram of a mechanical clamp or bracket with labeled point A (no text or symbols beyond label)
A. Záves
Stredný pravý záves
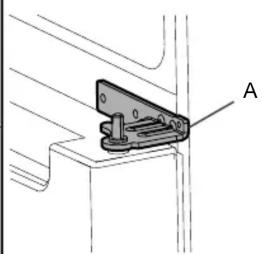
natural_image
Technical line drawing of a mechanical clamp or bracket assembly (no text or symbols)
A. Záves
!VAROVANIE
natural_image
Technical line drawing of a mechanical clamp or bracket assembly with screws and a labeled component 'A' (no text or symbols beyond label)
A. Stredný záves
natural_image
Line drawing of an open refrigerator with a door and labeled component A (no text or symbols beyond label)
A. Spodný záves
Konečné kroky
!VAROVANIE
natural_image
Technical line drawing of a mechanical assembly with a knob and curved component (no text or symbols)
natural_image
Technical line drawing of a refrigerator with labeled component A (no text or symbols beyond label)
A. Tesnenie so závesom
natural_image
Simple line drawing of a rectangular frame with a horizontal panel and labeled corner points (no text or symbols)
A. Kryt závesu
Výrobník ľadu
natural_image
Line drawing of hands operating a portable toaster (no text or symbols)
natural_image
Line drawing of hands operating a portable kitchen appliance (no text or symbols)
natural_image
Line drawing of a hand placing objects into a container with two circular compartments (no text or symbols)
Skladovanie potravín
Skladovanie vajíčok
natural_image
Technical line drawing of an open refrigerator showing internal compartments and doorways (no text or labels)
natural_image
Line drawing of an open refrigerator with multiple doors and shelves (no text or symbols)
Skladovacie oddelenia v mrazničke
Podnos v mrazničke
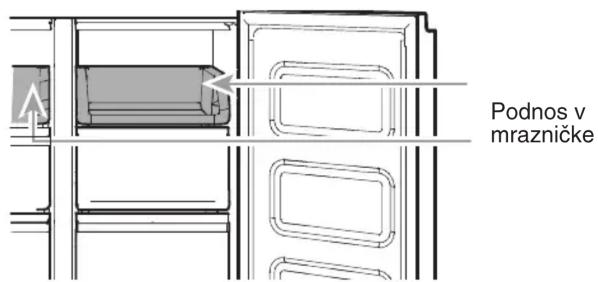
natural_image
Line drawing of a refrigerator with open doors and shelves (no text or symbols)
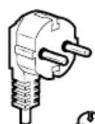
[NO TEXT]
Tip E in F
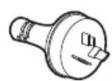
0
Tip I
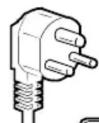
Tip M
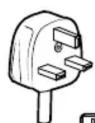
Tip G
Za Avstralijo in Novo Zelandijo:
A. Pokrov varovalke
B. Varovalka
Za Republiko Irsko (samo):
natural_image
Technical diagram of a mechanical clamp or bracket assembly with labeled point A (no text or symbols beyond label)
A. Tečaj
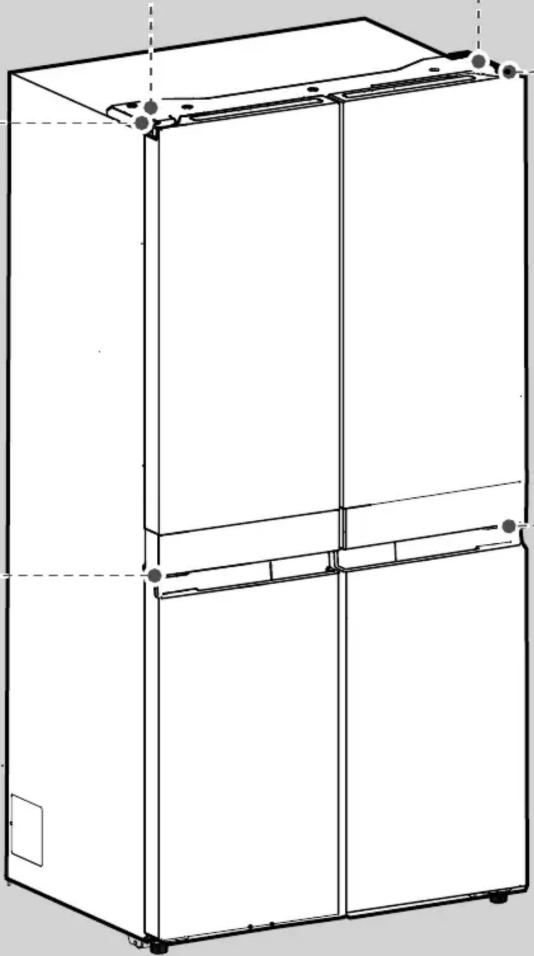
natural_image
Technical line drawing of a multi-tiered refrigerator unit (no text or symbols)
natural_image
Technical diagram of a mechanical bracket or clamp assembly with labeled component A (no text or symbols beyond label)
A. Tečaj
OPOZORILO
natural_image
Technical diagram of a mechanical clamp or bracket assembly with screws and a labeled component (no text or symbols present)
A. Srednji tečaj
■ Dvignite vrata z zatiča spodnjega tečaja.
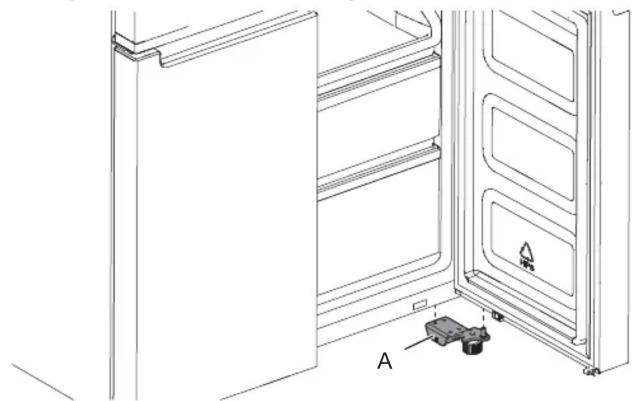
natural_image
Line drawing of an open refrigerator with a door and labeled component A (no text or symbols beyond label)
A. Spodnji tečaj
OPOZORILO
natural_image
Technical line drawing of a mechanical assembly with a labeled component 'A' (no text or symbols beyond label)
A. Zaporna noga
natural_image
Technical line drawing of a refrigerator with labeled component A (no text or symbols beyond label)
natural_image
Technical line drawing of a rectangular frame with a flat base and a sloped top panel, labeled 'A' (no text or symbols beyond label)
A. Pokrov tečaja
Izdelovalnik ledu
natural_image
Line drawing of hands operating a portable device with a tray (no text or symbols)
■ Rahlo dvignite posodo z ledom in jo potegnite navzven, da dobite dostop do ledenih kock.
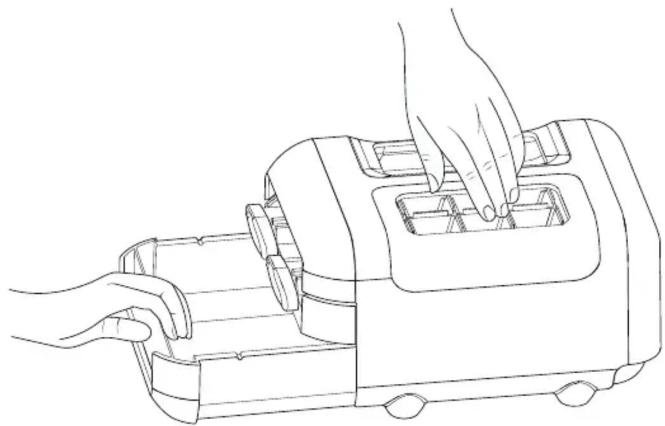
natural_image
Line drawing of hands operating a portable device with a handle (no text or symbols)
natural_image
Line drawing of a hand placing objects into a container with two handles (no text or symbols)
Shranjevanje hrane
Shranjevanje jajc
natural_image
Technical line drawing of an open refrigerator with hand placing a tray (no text or symbols)
Police in okvirji polic
Police v hladilniku so nastavljive tako, da ustrezajo vašim potrebam po hrambi.
natural_image
Line drawing of an open refrigerator with multiple doors and shelves (no text or symbols)
Prostori za shranjevanje v zamrzovalniku
natural_image
Line drawing of a refrigerator with open doors and shelves (no text or symbols)
A. Cubierta de fusible
B. Fusible
natural_image
Line drawing of a multi-tiered refrigerator cabinet with mounting holes and doorways (no text or symbols)
natural_image
Technical diagram of a mechanical assembly with labeled component A (no text or symbols present)
A. Tornillos Allen de 5 mm
natural_image
Technical line drawing of a mechanical bracket or clamp assembly with labeled component A (no text or symbols beyond label)
A. Bisagra
ADVERTENCIA
natural_image
Technical line drawing of a mechanical clamp or bracket assembly with screws and a labeled component (no text or symbols present)
natural_image
Line drawing of an open refrigerator with a small component labeled A, showing no text or symbols beyond the label.
A. Bisagra inferior
Pasos finales
ADVERTENCIA
natural_image
Technical line drawing of a mechanical assembly with a knob and rotating component (no text or symbols)
A. Pies de soporte
natural_image
Technical line drawing of a cabinet or refrigerator with a vertical panel and labeled component 'A' (no text or symbols beyond label)
natural_image
Simple line drawing of a rectangular frame with labeled points A and D, no text or symbols present
natural_image
Line drawing of a hand operating a small device with a handle, no text or symbols present
natural_image
Line drawing of hands operating a portable device with internal compartments (no text or symbols)
natural_image
Line drawing of a hand placing two blocks into a container with internal compartments (no text or symbols)
natural_image
Line drawing of an open refrigerator showing internal compartments and a hand placing a tray (no text or symbols)
natural_image
Line drawing of an open refrigerator interior showing front, rear, and side compartments (no text or symbols)
natural_image
Line drawing of a refrigerator with open doors and shelves (no text or symbols)
m = 311
■ راد الشحن.
■ موصى به.
ع الأخرى.
-
A. غطاء منصر
. منصهر B
natural_image
Technical line drawing of a multi-tier refrigerator unit (no text or symbols)
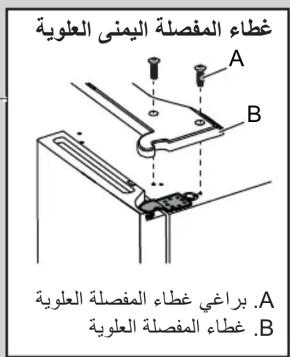
natural_image
Line drawing of hands operating a portable device with buttons (no text or symbols)
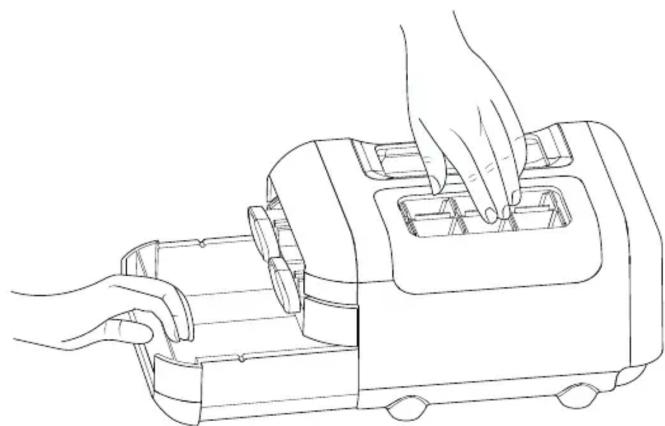
natural_image
Line drawing of hands operating a portable kitchen appliance (no text or symbols)
natural_image
Line drawing of a hand placing objects into a container with two circular compartments (no text or symbols)
tangzǐn有必要 العذائية
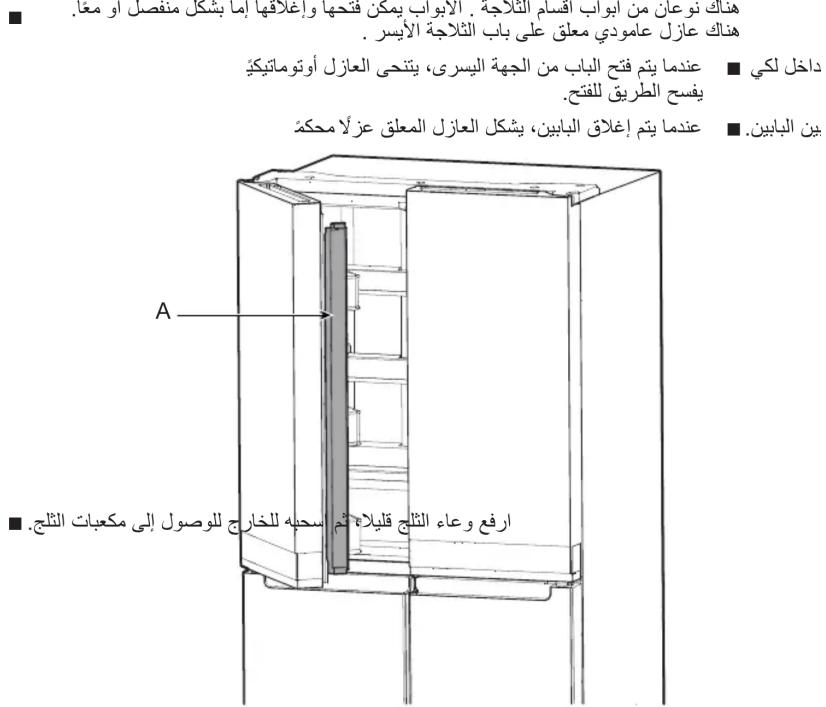
natural_image
Simple line drawing of a rectangular frame with a labeled section A and two side panels, no text or symbols present.
A. غطاء مفصل
tangzǐn البيض
natural_image
Line drawing of an open refrigerator showing internal compartments and hand positioning (no text or symbols)
■ ی حوامله.
| الthrifty | التنظيف الداخلي |
| عندما تقوم بنقل四是 إلى منزل جديد، اtrieخ Capacityات四是 كنون جاهرا لهده expl staying.1.1.2.3.4.5.6.7.8.9.10.11.12.13.14.15.16.17.18.19.20.21.22.23.24.25.26.27.28.29.30.31.32.33.34.35.36.37.38.39.40.41.42.43.44.45.46.47.48.49.50.51.52.53.54.55.56.57.58.59.60.61.62.63.64.65.66.67.68.69.70.71.72.73.74.75.76.77.78.79.80.81.82.83.84.85.86.87.88.89.90.91.92.93.94.95.96.97.98.99.100.101.102.103.104.105.106.107.108.109.110.111.112.113.114.115.116.117.118.119.120.121.122.123.124.125.126.127.128.129.130.131.132.133.134.135.136.137.138.139.140.141.142.143.144.145.146.147.148.149.150.151.152.153.154.155.156.157.158.159.160.161.162.163.164.165.166.167.168.169.170.171.172.173.174.175.176.177.178.179.180.181.182.183.184.185.186.187.188.189.190.191.192.193.194.195.196.197.198.199.200.201.202.203.204.205.206.207.208.209.210.211.212.213.214.215.216.217.218.219.220.221.222.223.224.225.226.227.228.229.230.231.232.233.234.235.236.237.238.239.240.241.242.243.244.245.246.247.248.249.250.251.252.253.254.255.256.257.258.259.260.261.262.263.264.265.266.267.268.269.270.271.272.273.274.275.276.277.278.279.280.281.282.283.284.285.286.287.288.289.290.291.292.293.294.295.296.297.298.299.300.301.302.303.304.305.306.307.308.309.310.311.312.313.314.315.316.317.318.319.320.321.322.323.324.325.326.327.328.329.330.331.332.333.334.335.336.337.338.339.340.341.342.343.344.345.346.347.348.349.350.351.352.353.354.355.356.357.358.359.360.361.362.363.364.365.366.367.368.369.370.371.372.373.374.375.376.377.378.379.380.381.382.383.384.385.386.387.388.389.390.391.392.393.394.395.396.397.398.399.400.401.402.403.404.405.406.407.408.409.410.411.412.413.414.415.416.417.418.419.420.421.422.423.424.425.426.427.428.429.430.431.432.433.434.435.436.437.438.439.440.441.442.443.444.445.446.447.448.449.450.451.452.453.454.455.456.457.458.459.460.461.462.463.464.465.466.467.468.469.470.471.472.473.474.475.476.477.478.479.480.481.482.483.484.485.486.487.488.489.490.491.492.493.494.495.496.497.498.499.500.501.502.503.504.505.506.507.508.509.510.511.512.513.514.515.516.517.518.519.520.521.522.523.524.525.526.527.528.529.530.531.532.533.534.535.536.537.538.539.540.541.542.543.544.545.546.547.548.549.550.551.552.553.554.555.556.557.558.559.560.561.562.563.564.565.566.567.568.569.570.571.572.573.574.575.576.577.578.579.580.581.582.583.584.585.586.587.588.589.590.591.592.593.594.595.596.597.598.599.600.601.602.603.604.605.606.607.608.609.610.611.612.613.614.615.616.617.618.619.620.621.622.623.624.625.626.627.628.629.630.631.632.633.634.635.636.637.638.639.640.641.642.643.644.645.646.647.648.649.650.651.652.653.654.655.656.657.658.659.660.661.662.663.664.665.666.667.668.669.670.671.672.673.674.675.676.677.678.679.680.681.682.683.684.685.686.687.688.689.690.691.692.693.694.695.696.697.698.699.700.701.702.703.704.705.706.707.708.709.710.711.712.713.714.715.716.717.718.719.720.721.722.723.724.725.726.727.728.729.730.731.732.733.734.735.736.737.738.739.740.741.742.743.744.745.746.747.748.749.750.751.752.753.754.755.756.757.758.759.760.761.762.763.764.765.766.767.768.769.770.771.772.773.774.775.776.777.778.779.780.781.782.783.784.785.786.787.788.789.790.791.792.793.794.795.796.797.798.799.800.801.802.803.804.805.806.807.808.809.810.811.812.813.814.815.816.817.818.819.820.821.822.823.824.825.826.827.828.829.830.831.832.833.834.835.836.837.838.839.840.841.842.843.844.845.846.847.848.849.850.851.852.853.854.855.856.857.858.859.860.861.862.863.864.865.866.867.868.869.870.871.872.873.874.875.876.877.878.879.880.881.882.883.884.885.886.887.888.889.890.891.892.893.894.895.896.897.898.899.900.901.902.903.904.905.906.907.908.909.910.911.912.913.914.915.916.917.918.919.920.921.922.923.924.925.926.927.928.929.930.931.932.933.934.935.936.937.938.939.940.941.942.943.944.945.946.947.948.949.950.951.952.953.954.955.956.957.958.959.960.961.962.963.964.965.966.967.968.969.970.971.972.973.974.975.976.977.978.979.980.981.982.983.984.985.986.987.988.989.990.991.992.993.994.995.996.997.998.999.1000 | |
العطلات



