ROG Strix - Headphones ASUS - Free user manual and instructions
Find the device manual for free ROG Strix ASUS in PDF.

| Brand | Asus |
| Model | ROG Strix |
| Category | Gaming headset |
| Connection type | Wired (USB + 3.5mm jack) |
| Compatibility | PC, PlayStation, Xbox, Nintendo Switch, smartphones |
| Frequency response | 20 Hz - 20 kHz |
| Impedance | 32 Ω |
| Speakers | 50 mm neodymium dynamic |
| Microphone | Unidirectional, detachable, noise canceling |
| Microphone frequency response | 50 Hz - 10 kHz |
| Microphone sensitivity | -40 dB |
| Dimensions (L x W x H) | 220 x 190 x 100 mm |
| Weight | 350 g (without cable) |
| Cable length | 1.2 m (USB) + 1.5 m (jack) |
| Power supply | USB (power from port) |
| Main features | Virtual 7.1 surround sound, equalizer, RGB Aura Sync lighting, onboard controls |
| Care and cleaning | Clean with a soft, dry cloth. Do not use abrasive products. |
| Safety | Use at moderate volume to protect hearing. Do not expose to moisture. |
| Spare parts and repairability | Replaceable ear cushions and cables. Not user repairable. |
| Box contents | Headset, detachable microphone, USB cable, jack cable, airplane adapter, carrying bag |
| Warranty | 2 years |
Frequently Asked Questions - ROG Strix ASUS
User questions about ROG Strix ASUS
0 question about this device. Answer the ones you know or ask your own.
Ask a new question about this device
Download the instructions for your Headphones in PDF format for free! Find your manual ROG Strix - ASUS and take your electronic device back in hand. On this page are published all the documents necessary for the use of your device. ROG Strix by ASUS.
USER MANUAL ROG Strix ASUS
natural_image
Abstract black and white graphic design resembling stylized eye or flame (no text or symbols)REPUBLIC OF GAMERS
Q20140b
ROG POWER SUPPLY UNIT

Quick Start Guide (English)
快速使用指南(繁體中文)
快速使用指南(简体中文)
クイックスタートガイド(日本語)
Conventions used in this guide
To ensure that you perform certain tasks properly, take note of the following symbols used throughout this manual.

DANGER/WARNING: Information to prevent injury to yourself when trying to complete a task.

NOTE: Tips and additional information to help you complete a task.
Product overview

The device illustration is for reference only. Actual product specifications may vary with models. You may refer to the actual product specifications at the ASUS support site.

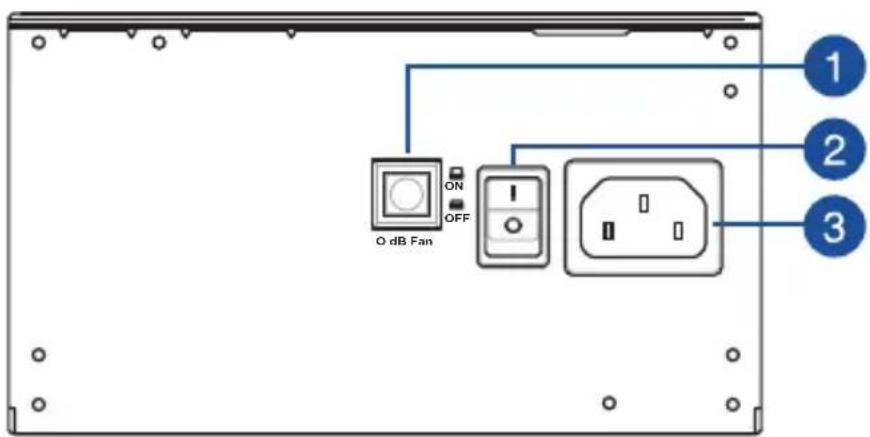

0 dB Fan button* Power connector


Power switch
* Pressing this button will turn off the 0dB function, allowing the PSU fan to spin at all times. Availability of this button and function may vary depending on the model.
ROG PSU

Installing your Power Supply Unit

Before installing or removing cables, ensure that the system is turned off, and all power cables for the system and all attached devices are unplugged.
- Follow the directions of your chassis manual and secure your power supply unit into your chassis using the mounting screws.
- Connect the bundled cables to your power supply unit.
- Connect the power connectors to your motherboard and peripheral devices according to your preference. You may refer to the list below to check which devices each power connector can be connected to.

- The power connectors may vary between different models of power supply units.
-
Refer to your motherboard's user manual for more information on the location and connecting the power connectors mentioned below.
-
Connect the 24-pin or 20-pin Main Power Connector to the motherboard's 24-pin or 20-pin power connector.
- Connect the 4+4 pin CPU +12V Power Connector to the CPU power socket on the motherboard.
- Connect the 4-pin Peripheral Power Connector to peripheral devices if needed.
- Connect the 6+2 pin PCI-E +12V Power Connector to the PCI-E graphics card.
-
Connect the SATA Power Connector to devices with a Serial ATA interface.
-
Connect your power supply unit to a power source using the bundled power cord.
- Flip the Power Switch to the "I" position to turn on your power supply unit
ROG PSU


Safety information
- High voltages are present in the power supply unit, it is extremely dangerous to open the power supply case or attempt to repair/clean the power supply unit. You should NEVER, under any circumstances, open the power supply unit.
- The Warranty will become void if the cover of the power supply unit is opened; there are no serviceable components inside the power supply unit.
• DO NOT insert any objects into the power supply unit. - DO NOT place any objects in front of the fan or the ventilation area of the power supply unit that may obstruct or restrict the airflow.
- USE ONLY the modular cables bundled with the power supply unit.
- DO NOT use the power supply unit near water, or in high temperature or high humidity environments.
- The power supply unit should be operated in suitable environment. (Operating temperature: 0^ to 50^ , Relative Humidity: 20% to 80% )
- The power supply unit is for integration into a computer, and not intended for external or outdoor usage.
- Failure to comply with any manufacturer instructions and any of the safety instructions will immediately void all warranties and guarantees.


ROG PSU
繁體中文
提示符號
1
0dB 風扇按鈕 * 電源插槽
3
2
電源開關

0dB 风扇按钮* 电源插槽


电源开关

1

1
* 0dB

مفتاح الطاقة


1

0 dB ventilatorknap* Strømstik


Strømkontakt
1

הכלה *dB0
הכלה


1


Tombol kipas 0 dB* Soket d


Tombol daya
1
0 dB 팬 버튼* 전원 커넥터
3
2
전원 스위치


0 dB vifteknapp* Strømkontakt


Strømbryter
1
1


1
Dugme za ventilator sa 0 dB* Konektor za struju
2
Prekidač za napajanje


Gumb ventilatorja 0 dB* Napajalni priključek

Napajalno stikalo
1

1