
IAN 87953 - Fitness Equipment CRIVIT - Free user manual and instructions
Find the device manual for free IAN 87953 CRIVIT in PDF.

| Product Type | Arm & Leg Trainer |
| Brand | Crivit |
| Model | IAN 87953 |
| Dimensions (W x H x D) | Approx. 39.5 x 31 x 40.5 cm |
| Weight | 6.5 kg |
| Power Supply | 1.5 V, battery type AAA |
| Max User Weight | 100 kg |
| Intended Use | Private domestic environment (Class HC) |
| Standards | EN957-1, EN957-5 |
| Accuracy Class | C (indicative values) |
| Display Functions | Speed, Time, Distance, ODO, RPM, Calories (SCAN mode) |
| Resistance Adjustment | Manual via rotary knob (+/-) |
| Pedal Types | Standard pedals and pedals with massage nodes (both left/right) |
| Assembly Required | Yes (attach feet and pedals, insert battery) |
| Maintenance | Clean with dry fluff-free cloth; no abrasive cleaners |
| Battery Safety | Keep out of reach of children; dispose properly; polarity correct |
| Warm-up Recommendation | 5-10 minutes before training |
| Training Modes | Leg exercises (seated) and arm exercises (on table) |
Frequently Asked Questions - IAN 87953 CRIVIT
User questions about IAN 87953 CRIVIT
0 question about this device. Answer the ones you know or ask your own.
Ask a new question about this device
Download the instructions for your Fitness Equipment in PDF format for free! Find your manual IAN 87953 - CRIVIT and take your electronic device back in hand. On this page are published all the documents necessary for the use of your device. IAN 87953 by CRIVIT.
USER MANUAL IAN 87953 CRIVIT
PedaleadOr Pedallera Per GaMbe e braCCla
ES
PedaleadOr
Operation and Safety Notes
GB / MT Operation and Safety Notes Page 28
natural_image
Line drawing of a mechanical device with wheels and a switch (no text or symbols)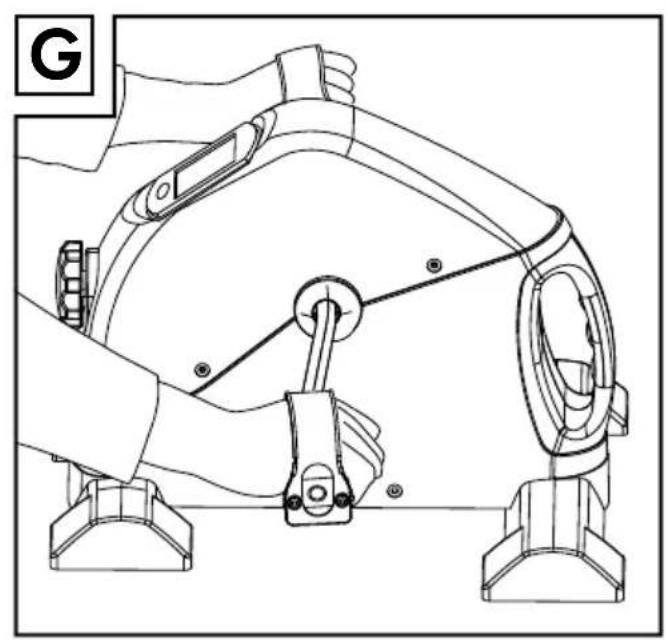
natural_image
Technical line drawing of a robotic arm with levers and sensors (no text or symbols)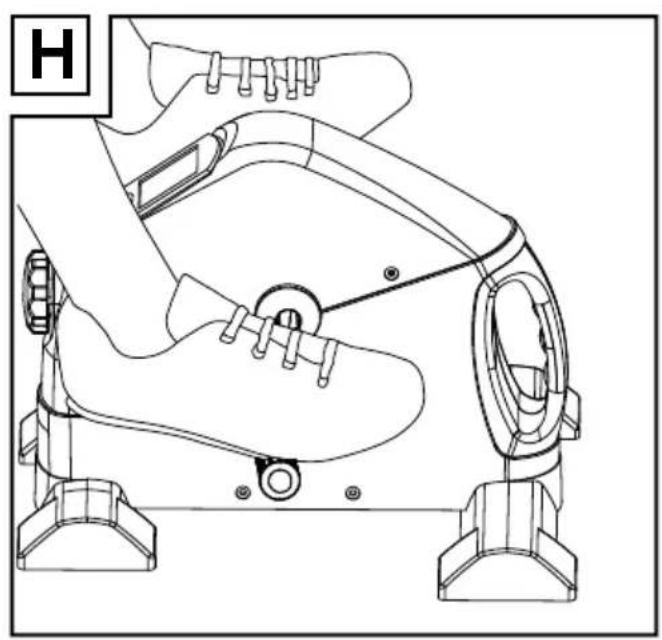
natural_image
Line drawing of a mechanical device with levers and feet (no text or symbols)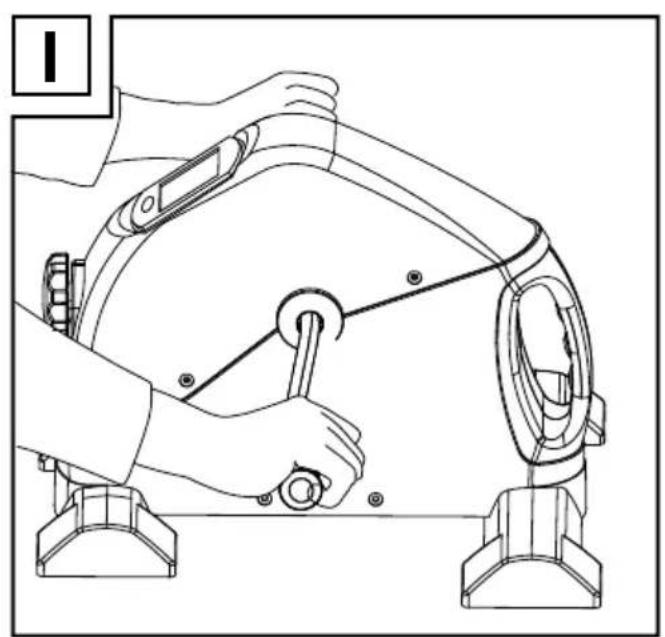
natural_image
Line drawing of a person using a mechanical device to adjust or install a component (no text or symbols present)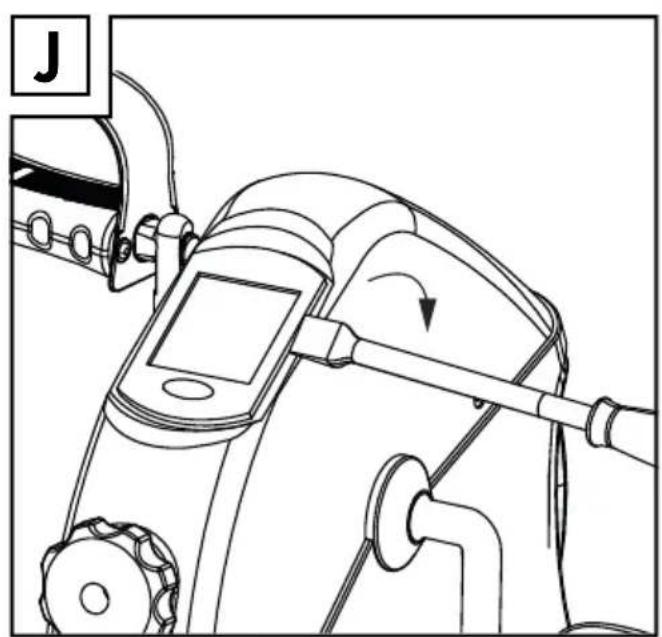
natural_image
Line drawing of a mechanical device with a scroll wheel and adjustment knob (no text or symbols)Introducción
$$ \text { circa } (L \times H \times P) $$
Peso: 6,5 kg
Norme applicate: EN957-1 e EN957-5
Dotazione
in km/h (0.0 - 999.9 km)
ODO:distanzacomplessiva
$$ (L \times A \times P) $$
Peso: 6,5 kg
Intended use....Page 29
Description of parts....Page 29
Technical data......Page 29
Included items Page 29
Safety instructions....Page 29
General safety advice Page 30
Safety advice specifically for arm and leg trainers....Page 30
Important health care advice ......Page 31
Battery safety instructions....Page 31
Assembly Page 31
Bringing into use......Page 32
Warming up......Page 32
Setting the resistance Page 32
Training......Page 32
Computer functions....Page 33
Replacing the battery....Page 33
Troubleshooting Page 34
Cleaning and care....Page 34
Disposal Page 34
Arm & Leg Trainer
- Introduction

You should familiarise yourself with the product before assembling and operating it. In addition, please refer carefully to the operating instructions below and to the advice on your health and safety. Use the product only as described and for the training exercises described. Keep these instructions in a safe place. When passing this product on to third parties, you should also pass on all documents relating to it.
- Intended use
The arm and leg trainer is intended for use as a piece of exercise equipment in a private domestic environment. The device is not intended for exercising leg muscles while you are in a standing position. It is not approved for installation and use in therapeutic or professional gyms. Any use of the product other than that described above or any alteration to the product is not allowed and can lead to injuries and / or damage to the product. The manufacturer does not assume any liability for damage arising from improper use. The product is not designed for commercial use.
• Description of parts
1 Housing
2 Pedal (right)
3 Foot (rear)
4 Foot (front)
5 Rotary knob
6 Training computer
7 Pedal (left)
8 PH screw
9 Plain washer
10 Open-ended spanner
11 PH screwdriver
12 Pedal with massage nodes (left)
13 Pedal with massage nodes (right)
14 Crank arm (right)
15 Crank arm (left)
16 Plug-in connector
17 LC display
18 MODE button
- Technical data
Power supply: 1.5 V, battery type AAA
Dimensions: Approx. 39.5 x 31 x 40.5 cm
$$ (W \times H \times D) $$
Weight: 6.5 kg
Max. user weight: 100 kg
Class: HC (for home use in a private
$$ \text { domestic environment }, $$
$$ \text { accuracy C) } / \text { not intended } $$
$$ \text { for therapeutic training } $$
Area of use: Domestic Use
Standard: EN957-1, EN957-5
Included items
1 Housing
1 Pedal (right)
1 Pedal (left)
1 Pedal with massage nodes (right)
1 Pedal with massage nodes (left)
1 Foot (front)
1 Foot (rear)
4 PH screws
4 Plain washers
1 Open-ended spanner
1 PH screwdriver
1 Battery 1.5=, AAA
1 Instruction manual

Safety instructions
PLEASE READ THE ASSEMBLY INSTRUCTIONS BEFORE USING THE PRODUCT! PLEASE KEEP THE ASSEMBLY INSTRUCTIONS IN A SAFE PLACE!

General safety advice


WARNING! DANGER TO LIFE AND DANGER OF ACCIDENTS FOR INFANTS AND
CHILDREN! Never leave children alone and unsupervised with the packaging material. Danger of suffocation. Always keep children away from the product. This product is not a toy!

CAUTION! Do not leave children alone and unsupervised! The product is not a climbing frame or toy!
Children or persons who lack the knowledge or experience to use the device or whose physical, sensory or intellectual capacities are limited must never be allowed to use the device without supervision or instruction by a person responsible for their safety. Children must never be allowed to play with the device.
⚠CAUTION! RISK OF INJURY! Make sure that all parts are undamaged and correctly assembled. Improper assembly may result in injury. Damaged parts could adversely affect safety and function.

CAUTION! RISK OF INJURY! Never undertake any changes to the device while exercising.
- Do not expose the device to high temperatures or moisture. Failure to observe this advice could result in damage to the product.
■ Regularly check the condition of all parts and screw joints. You may have to tighten lose screws.
■ Repairs may only be undertaken by authorised specialists. Only original parts may be used.
- Do not use a defective device until it has been repaired.
- Keep the device out of reach of other people when it is not in use.
- Check all moving parts regularly for visible signs of wear or damage. Worn or damaged parts must be replaced or repaired before the device is used again.
■ Always wear appropriate clothing and shoes, e.g. sports shoes, when using the device. Never wear loose clothing of a type that could become trapped in the moving parts of the device.

Safety advice specifically for arm and leg trainers


WARNING! RISK OF INJURY AND MATERIAL
DAMAGE! Do not use the device
while standing. Always sit down when exercising with the device.
- Select a place to set the device up with plenty of space for assembly and exercising. The selected area should be at least 1 x 1 m in size and well ventilated. The supporting surface must be level, flat and non-slip. Check that the device is stable.
Some coated surfaces may attack and soften the rubber boots on the feet 3, 4. If necessary, you should place an anti-slip layer under the device.
- Do not use the device outdoors or in damp rooms.

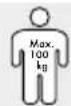
CAUTION! Do not overload the arm and leg trainer. The user's body weight must not exceed 100kg.
Failure to observe this advice may lead to injury and / or damage to property.
Do not use the arm and leg trainer barefoot, in socks, in tights, sandals etc. Wear sports shoes with non-slip soles and comfortable, well-ventilated clothing during exercise.
Check regularly that the pedals 2, 7, 12, 13 are firmly seated. Do not use the arm and leg trainer if you discover it shows irregularities of any kind.
■ This device is rpm-independent.
The training computer 6 is a class C unit. The displayed data are not precisely measured values. The results are to be considered as approximate values only. The data provide no authorities information about a person's health.
- Abrasion debris or lubricants can lead to dirt deposits on the device or on the floor.
■ Protect sensitive surfaces from scratches or damage, by using a mat.

Importanthealth care advice
■ CAUTION! Before using this exercise device for the first time, you must have a general check-up. Consult your doctor before starting to exercise. Present the doctor with the directions of use for this product and let the doctor draw up an individual exercise plan for you.
- You must consult a doctor if you have any of the following complaints: heart conditions, circulatory problems, problems with your balance, orthopaedic problems or breathing difficulties / asthma. Furthermore, consult a doctor if you are pregnant or if you are taking medication that influences your pulse, blood pressure or cholesterol level.
- Do not exercise if you feel unwell or suffer from other illnesses.
- Do not exercise immediately after eating. Stop exercising immediately if the following symptoms occur: breathing difficulties, irregular heartbeat, extreme shortness of breath, drowsiness, dizziness, pain, nausea. Only continue exercising again after consulting your doctor.
- Do not exhaust yourself completely. At first, you should exercise at an appropriate range of performance and increase your exercise intensity slowly.
- Don't forget to include warm-up and cool-down periods.

Battery safety instructions
WARNING! DANGER TO LIFE! Keep
batteries out of the reach of children. Do not leave batteries lying around. There is a risk of children or animals swallowing them. Consult a doctor immediately if a battery is swallowed.

EXPLOSION HAZARD! Never recharge nonrechargeable batteries, short-circuit and / or open batteries.
This can cause them to overheat, burn or burst. Never throw batteries into fire or water. The batteries may explode.
- Immediately remove a spent battery from the appliance. There is an increased risk of leakage
otherwise!
- Check the battery regularly for leaks.
■ Leaked or damaged batteries can cause chemical burns if they come into contact with the skin; in such cases you must wear suitable protective gloves!
■ Remove the battery from the product if it is not going to be used for a prolonged period.
■ Make sure that the polarity is correct when you insert the battery. This is indicated in the battery compartment.
■ Remove any used battery from the device. Very old or used batteries may leak. The chemical liquid will damage the product. - Do not dispose of batteries in the domestic waste!
All consumers are required by law to dispose of batteries properly! - Avoid contact with the skin, eyes and mucous membranes. In the case of contact with battery acid, rinse the affected area with plenty of water and / or consult a doctor!
- Use only batteries of the specified type (see "Technical Data").
- Assembly
■ Make sure the product is only assembled by competent person.
The arm and leg trainer is supplied as almost completely pre-assembled. The few remaining steps in the assembly are described below. To complete these steps you will need the supplied PH screwdriver and open-ended spanner.
Figure A:
☐ Attach the front and rear feet 4, 3 to the housing 1 with the PH screws 8 and plain washers 9. Use the supplied PH screwdriver 11 for this.
Note: Ensure that the front and rear feet are correctly positioned. 4, 3
Figure B or C:
☐ Attach the right and left pedals 2, 7 (identified by R = right and L = left) to the correspond-
Assembly/Bringing into use
ing crank arms 14, 15. Use the supplied open-ended spanner 10 for this.
OR
☐ Attach the right and left pedals with massage nodes 12, 13 (identified by R = right and L = left) to the corresponding crank arms 14, 15. Use the supplied open-ended spanner 10 for this.
Figure D:
☐ Using the screwdriver lift the training computer 6 carefully out of the holder (Fig. J). The training computer 6 is connected by a cable to the housing 1 and can be pulled a maximum of 10 cm out of the holder.
☐ Insert the supplied battery (1.5 V ——, AAA) into the battery compartment on the underside of the training computer 6 (Fig. D).
Note: Make sure you fit the battery the right way round (polarity). The correct polarity is shown inside the battery compartment.
☐ Check that the plug-in connector 16 is correctly inserted. Insert it again if necessary.
☐ Place the training computer 6 back into the holder and lightly press it into position.
CAUTION! Ensure that the cable does not become kinked or trapped.
The arm and leg trainer is ready for use.
● Bringing into use
The arm and leg trainer can be used for exercising your arm and leg muscles. Read all the health and safety advice carefully.
Warming up
In order to avoid the risk of injuries, you should always warm up and relax your muscles before doing any exercise.
☐ Drink enough fluids before training to make up for fluid loss.
☐ Set aside about 5 to 10 minutes to warm up your muscles before you start exercising.
☐ For example, walk or run on the spot and swing your arms in circular motions.
- Setting the resistance
☐ Turn the rotary knob 5 in the + direction to increase the resistance.
☐ Turn the rotary knob 5 in the - direction to decrease the resistance.
- Training
☐ Do not place yourself under too much pressure to achieve. Start training at a level that you find is not overstrenuous. Increase the effort slowly.
☐ As a fitness novice you should begin training as follows:
Warm-up phase: 5-10 minutes at low resistance
Training: 15-40 minutes at increased resistance
Cool-down phase: 5–10 minutes at low resistance
□ Keep your breathing as slow and even as possible.
⚠️ ATTENTION! Pay attention to the signals your body sends you while you are training. Take a break or end your training session immediately if you experience aches or pains.
☐ Use the pedals with massage nodes 12, 13 if you would also like to promote blood circulation (see "Assembly", Figure B or C).
Exercising your leg muscles (Figs. F + H):
☐ Place the device on the floor. Ensure that the supporting surface is level, flat and non-slip.
☐ Place a chair in front of the device.
□ Sit on the chair.
☐ Insert your feet into the straps on the pedals 2, 7 or place your feet on the pedals with the massage nodes 12, 13.
☐ Change the distance between the device and the chair if you find that the distance is too small or too large.
☐ Your foot movements should be smooth and regular.
Exercising your arm m uscles (Figs. G + I):
☐ Place the device on a table. Ensure that the table top is level, flat and non-slip.
☐ Place a chair in front of the device.
□ Sit on the chair.
☐ Insert your hands into the straps on the pedals 2, 7 or grasp the pedals or the pedals with the massage nodes 12, 13.
☐ Change the distance between the device and the chair if you find that the distance is too small or too large.
□ Move the pedals 2, 7, 12, 13 smoothly and regularly.
- Computer functions
You can also use the arm and leg trainer with the training computer 6 switched off. However, the LC display 17 of the training computer 6 (see Fig. E) can give you helpful information about the results of completed training sessions and tells you how your training may be improved.
The arm and leg trainer is a device in accuracy class C. This means no claims are made about the accuracy of the information displayed by the training computer 6.
Switching the device on and off:
The training computer 6 switches itself on automatically as soon as you begin the training session or move the pedals 2, 7, 12, 13. The values are shown in the LC display 17.
If the device is not moved for about 4 minutes, the training computer 6 will switch off automatically.
LC display:
During the training session the first line of the LC display 17 shows
- the current speed (approximate value)
During the training session the second line of the LC display 17 shows
- the various modes in an automatic sequence
Modes:
☐ During training, press the MODE button 18
repeatedly until the SCAN indicator appears. The LC display 17 now shows the following modes for 6 seconds each in sequence:
TIME: Previous training time in
minutes: seconds (0:00 - 99:59)
SPEED: Speed in km/h (0.0 - 999.9 km)
ODO: Total distance covered since the last insertion of the battery (0 - 9999 km)
Note: This value is reset to 0 as soon as the exhausted battery is removed and replaced by a new battery.
RPM: Pedal rotation measured in revolutions/minute (0 - 9999)
DISTANCE: Distance covered km (0.00 - 9999 km)
CALORIES: Calories used 1) (0.00 - 9999)
^1) The calculation is based on the preprogrammed standard values, which are provided as indicative values only.
Resetting the values:
The values in the LC displays ^17 are zero only at the start of your first training session. For all subsequent training sessions, the training computer ^6 continues from the values achieved at the end of the previous session.
You can reset the indicators by pressing the MODE button 18 and keeping it pressed until all the indicators are once more visible at the same time.
The rest total distance (ODO) is reset by removing the battery.
- Replacing the battery
☐ Take the training computer 6 carefully out of the holder. The training computer 6 is connected by a cable to the housing 1 and can
Bringing into use/Troubleshooting/Cleaning and care/Disposal
be pulled a maximum of 10 cm out of the holder.
□ Remove the exhausted battery.
☐ Insert a new battery (1.5 V—, AAA) into the battery compartment on the underside of the training computer ^6 .
Note: Make sure you fit the battery the right way round (polarity). The correct polarity is shown inside the battery compartment.
☐ Check that the plug-in connector ^16 is correctly inserted. Insert it again if necessary.
☐ Place the training computer 6 back into the holder and lightly press it into position.
CAUTION! Ensure that the cable does not become kinked or trapped.
device. To help protect the environment, please dispose of the product properly when it has reached the end of its useful life and not in the household waste. Information on collection points and their opening hours can be obtained from your local authority.
Faulty or used batteries must be recycled in accordance with Directive 2006 / 66 / EC. Please return the batteries and / or the device to the available collection points.
Environmental damage through incorrect disposal of the batteries!
- Troubleshooting
Note: This device has delicate electronic components. Therefore interference may occur when it is near devices which transmit radio signals. If errors occur in the display, remove any such devices from the vicinity of the product. In the case of such malfunctions, remove the batteries briefly and then insert them again.
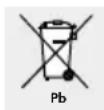
Batteries may not be disposed of with the usual domestic waste. They may contain toxic heavy metals and are subject to hazardous waste treatment rules and regulations. The chemical symbols for heavy metals are as follows: Cd = cadmium, Hg = mercury, Pb = lead. That is why you should dispose of used batteries at a local collection point.
EMC €
- Cleaning and care
■ Use a dry fluff-free cloth when you are cleaning or polishing the product.
□ Remove any stubborn dirt using a moist cloth.
☐ Do not use corrosive or abrasive cleaning agents as they may damage the product.
- Disposal

The packaging is made entirely of recyclable materials, which you may dispose of at local recycling facilities.
Contact your local refuse disposal authority for more details of how to dispose of your worn-out product.

Remove the batteries from the battery compartment before disposing of the
Einleitung
EXPLOSIONSGEFAHR! Laden
RPM: Pedalumdrehungen in Umdrehung / Minute (0 - 9999)
© by ORFGEN Marketing
Last Information Update