
IAN 274619 - Fitness Equipment CRIVIT - Free user manual and instructions
Find the device manual for free IAN 274619 CRIVIT in PDF.

| Product Type | Arm and leg trainer |
| Brand | Crivit |
| Model | IAN 274619 / SP-MB-020 |
| Dimensions (L x W x H) | Approximately 43.5 x 42.6 x 32.3 cm |
| Weight | Approximately 5.0 kg |
| Maximum User Weight | 120 kg |
| Power Supply | 1 x 1.5V AAA battery (LR03) |
| Equipment Class | HC (home use, accuracy C, not for therapeutic training) |
| Protection Class | III (low voltage, battery powered) |
| Display Functions | Speed (km/h), Time, Odometer, RPM, Distance, Calories, SCAN mode |
| Resistance Adjustment | Manual screw with + and - markings |
| Pedal Straps | Adjustable with twist lock |
| Suction Cups | Front and rear for stability on smooth surfaces |
| Assembly Required | Yes, feet and pedals |
| Date of Manufacture | 03/2022 |
| Target Muscles | Arms and legs |
| Warranty | 3 years from date of purchase (private customers) |
| Maintenance | Clean with damp cloth and mild detergent; avoid moisture on display |
| Safety Note | Not for children under 14; consult doctor before use; free area of 0.6 m around |
| Disposal | Separate from household waste; batteries at collection points |
Frequently Asked Questions - IAN 274619 CRIVIT
User questions about IAN 274619 CRIVIT
0 question about this device. Answer the ones you know or ask your own.
Ask a new question about this device
Download the instructions for your Fitness Equipment in PDF format for free! Find your manual IAN 274619 - CRIVIT and take your electronic device back in hand. On this page are published all the documents necessary for the use of your device. IAN 274619 by CRIVIT.
USER MANUAL IAN 274619 CRIVIT
natural_image
White exercise bike with gray wheels and circular head, no visible text or symbols


ES
Before reading, fold out the illustration page and get to knowell of the function of your unit.
图 4
IT / MT: https://www.it/100-22-29
(1) 2017.12.25-2018.12.31

natural_image
Illustration of a person performing seated exercise on a stationary platform, labeled J and K (no text or symbols on the diagram itself)Regular as correias dos pedais 38
Funcionamento 38
Explanation of symbols 44
Scope of delivery / accessories 45
Parts description / parts list 45
Technical information 45
Safety instructions 46
Assembly 48
Assembling the feet and pedals 48
Adjusting the pedal straps 49
Operation 49
Reducing/increasing resistance 49
Notes on suction cup attachment 49
Replacing the battery 49
Training tips 50
Application 50
Leg training 50
Arm training 50
Display indication function 51
Reset values to zero 51
Troubleshooting 51
Maintenance / Cleaning / Storage 51
Notes on disposal 52
Declaration of conformity 53
Notes on warranty and service handling 53
Inhaltsverzeichnis
73635 Steinenberg/Germany
Regular as correias dos pedais (fig. D)
73635 Steinenberg/Germany
E-mail: service@speq.de
Read the instructions for use carefully
Dear customer!
We are pleased that you have chosen our high-quality products, which are strictly produced and certified according to current valid safety standards.
Familiarise yourself with the product before use. Read the instruction manual and the safety information carefully. Only use this product as described and for the indicated areas of use. Please store this manual safely. Please hand over all the documentation when passing this product to third parties.
Intended use
The product is not intended for commercial use. The product allows you to exercise your arms and legs; equipped with a resistance screw to increase and maintain mobility. An integrated display shows the training progress.
Explanation of symbols
The following symbols and signal words are used in these operating instructions, on the product or on the packaging.

This signal symbol indicates a hazard with a moderate risk level which, if not avoided, may result in death or serious injury..

Declaration of conformity (see "Declaration of conformity" chapter): Productsmarked with this symbol comply with all applicable Community regulations for the European Economic Area.

Observe operating instructions

Protection class III. The display is supplied with low voltage via a battery.

DC voltage
Equipment class H/C:
Class H: The product is intended for use in the home.
Class C: The training data shown in the display corresponds to low accuracy.

Maximum user weight: The product is designed for persons with a maximum body weight of 120 kg.

Date of manufacture (month/year)

The "Tested Safety" seal (GS mark) certifies that a tested product meets the requirements of the German Product Safety Act. The GS mark indicates that the safety and health of persons are not endangered when used as intended or in a foreseeable manner.
Scope of delivery / accessories (Fig. A)
Parts description / parts list
1 x arm and leg trainer with resistance screw and display, includes 1 x battery (1,5V LR03, AAA) [1]
1 x foot, small [2]
1 x foot, large [3]
2 x pedals [4] with straps [5] and easy adjusting system
4 x screw [7]
4 x washer [8]
1 x allen key [9]
1 x spanner [10]
1 x battery compartment opener [11]
1 x instructions for use
Technical information
Model: SP-MB-020
article number: 398292
Dimension: approx. 43,5 × 42,6 × 32,3 cm (L × B × H)
Weight: approx.. 5,0 kg
max. user weight: 120 kg
Date of manufacture (month/year): 03/2022
Battery power supply: 1,5V AAA (LRO3)
Equipment class: HC (for use in private households, accuracy C)/ not suitable for therapeutic training; speed-independent training device.
Protection class: III
Safety instructions

Risk of injury!
Carefully read the instructions for use and be sure to keep them in a safe place! You may be injured if the product is handled improperly.
- The product is not suitable for therapeutic purposes.
- Sit relaxed and upright with a straight back during the exercises.
- Note that improper or excessive training may cause damage to health.
- Place the product on a horizontal, level and smooth surface, e.g. tiles, to ensure optimal, secure hold of the suction cups. Avoid delicate surfaces as they may be damaged.
- Check all parts for tight fit and wear before each use. If the product no longer has any pedalling resistance, the drive wheel is worn and the product must be replaced.
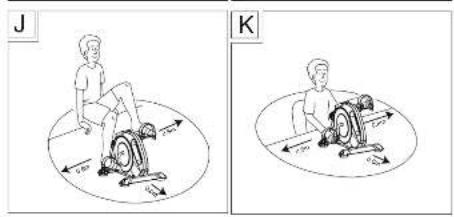
- There must be a free area of approx. 0.6 ~m around the training area (Fig. J and K).
- Cleaning and user maintenance must not be carried out by children without supervision.
- The product is designed for one person. Never allow more than one person to train on the product at the same time.
• Always wear appropriate clothing and footwear, such as training shoes, when exercising. Do not wear loose clothing that might get caught or trapped during exercise. - Do not use the product if it is damaged. Have defective parts replaced and do not use the product until it has been repaired.
- Make sure that nobody can be injured by protruding parts during and after the training session.
- Do not remove any original parts and do not make any improper modifications at this device
· The device must be checked periodically for visible defects.

Danger to life!
- Never leave children unattended with the packaging material. There is a risk of suffocation.
- The product is not a toy! Make sure that people, especially children, do not stand on or pull themselves up on the item. The product may fall over.
- Children are not allowed to play with the device.
· The product is not designed to bear the full weight.
- This product may be used by children aged 14 and above and by persons with reduced physical, sensory or mental abilities or lack of experience and knowledge if they are supervised and instructed in safe use and understand the resulting hazards.
- Consult your doctor before you start using the product or if you feel unwell.

Risk of injury!
- Do not stand on the product with your full body weight. It must only be used as described in the instructions for use.
- Make sure the item is properly stable before using it!
- Check the product for damage or wear before each use. Replace damaged or worn parts of the item immediately, otherwise the function and safety will be impaired.
- The product must only be used for the intended purpose.
- After use, do not touch the metal parts of the product (especially the pedal arms) as they heat up during use

Battery warnings!
Improper use may lead to explosions or burns from leaking battery acid.
- Remove the batteries from the battery compartment when they are used up or if you will not be using the item for a long time.
- Do not use different battery types, brands, new and used batteries with each other or with different capacities as they may leak and cause damage.
- Check the polarity (+ and -) when inserting the battery.
- Replace all batteries at the same time and dispose of old batteries properly.
- Warning! Batteries must not be charged or reactivated by other means, disassembled, thrown into fire or short-circuited.
· Always keep batteries out of the reach of children.
- Do not use rechargeable batteries! - If necessary, clean the battery and device contacts before inserting the batteries.
- Do not expose batteries to extreme conditions (e.g. radiators or direct sunlight). Otherwise there is an increased risk of leakage.
- Batteries can be life-threatening if swallowed. So keep batteries out of the reach of small children. If a battery has been swallowed, you must seek medical attention immediately.
- Danger! Handle a damaged or leaking battery with extreme care and dispose of it properly immediately. Wear gloves.
- If you come into contact with battery acid, wash the area with soap and water. If battery acid gets into your eye, rinse it out with water and seek medical attention immediately!
- The connection terminals must not be short-circuited.
Assembly
Assembling the feet (Fig. B)
- Remove the packaging material.
- Turn the product over so that the bottom side is facing up.
- Screw the small stand [2] to the product using two screws [7] and washers [8] using the allen key [9].
Note: The small stand must be mounted at the front where the resistance screw [1a] and the display [1b] are located.
- Screw the large stand [3] to the product using two screws and two washers.
Assembling the pedals (Fig. C)
When mounting the pedals, make sure that the right pedal is mounted on the right pedal arm and the left pedal is mounted on the left pedal arm. For orientation, the letter R is marked on the right pedal and the letter L is marked on the left pedal and the left pedal arm.
Note: Turn the pedal arm upwards to make it easier to mount the pedals.
- Place the product on its feet.
- Insert the threaded end into the threaded hole of the pedal arm.
- Hold the respective pedal in the thread of the pedal arm with one hand and use the spanner to tighten the pedals to the pedal arm with the other hand.
Attention! Tighten the right pedal clockwise and the left pedal anticlockwise.
Adjusting the pedal straps (Fig. D)
The pedal straps [5] are pre-assembled. You have the option to adjust the straps in several widths.
- Loosen the twist lock [6] on the pedal end by turning it to the left.
- Adjust the pedal straps [5] by sliding them up or down to obtain the desired width.
- Fix the setting by turning the twist lock [6] to the right.
Operation
Reducing/increasing resistance (Fig. E)
Place the product in front of you and turn the resistance screw [1a] to the right to increase resistance and to the left to decrease resistance.
Note: On the resistance screw there are the signs + and - for adjusting the resistance.
The + represents resistance increase and the - resistance decrease.
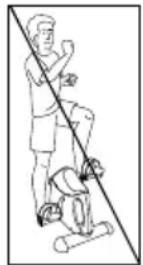
Notes on suction cup attachment (Fig. I)
Choose a smooth surface, such as tiles, that is free of dust and grease. Avoid delicate surfaces as they may be damaged.
Lightly moisten the suction cups before pressing them on. To loosen the suction cups, proceed as follows: Pull up the hooks [1f] on the front suction cups.
Lift the product slightly. Loosen the rear suction cups one after the other by pulling on the hooks [1f].
Replacing the battery
ATTENTION! Observe the following instructions to avoid mechanical and electrical damage. After battery replacement, training data will be lost.

Danger!
A battery is included in the product.
If the battery no longer works, you can replace it.
- Lift up the top of the display [1b] with the battery compartment opener [11] and carefully remove it (Fig. F). The battery is located on the back of the display
- Carefully remove the empty battery from the battery receptacle [1c] and replace it with a new battery.
Note: Make sure the positive/negative poles of the battery are the right way round and correctly inserted. The battery must be completely inside the battery receptacle.
Attention! Check that the sensor [1d] is correctly seated in the sensor holder [1e] (Fig. H). If necessary, insert the sensor into the sensor holder.
Insert the lower edge of the display into the article and carefully press the display in (Fig. F).
Note: Make sure that the button is facing downwards when inserting it.
Training tips
- Contact your doctor before using the product.
· As soon as you feel unwell during the work-out, stop exercising. - Start training slowly and increase the intensity as needed.
· We recommend exercising legs and arms for 30 minutes each per day. - Wear comfortable clothing when using the product. However, make sure that the trouser legs or sleeves are not too wide, as they might get caught in the pedals.
- Do light stretching exercises before each use and start with slow and easy movements. Increase gradually until you reach the desired speed.
· Gradually increase the resistance. - Stop the application by reducing the pace.
Application
Place the product in front of you for training. Start with a light workout at low resistance. To do this, loosen the resistance screw. The tighter the resistance screw is turned, the harder the pedals are to turn. Warm up before each workout by doing stretching and warm-up exercises. After each workout you should relax.
Leg training (Fig. J)
- Place the product in front of you on a flat, stable and smooth floor and sit upright on a chair with your back straight in front of the product..
Note: Make sure that the chair is stable and comfortable.
-
Put your feet on the pedals. The pedal strap should run over your foot.
-
Perform movements with your legs as if you would ride a bicycle.
-
You can do the exercise both forwards and backwards.
Arm training (Fig. K)
- Place the product in front of you on a flat, stable and smooth surface (e.g. at the height of a table) and sit upright on a chair with your back straight.
- Place the palm of your hand on the pedals so that the pedal strap runs over your hand.
- Perform movements with your arms as if you would ride a bicycle.
- You can do the exercise both forwards and backwards.
Display indication function
The display comprises two display lines with different modes. The upper line shows you the speed (km/h) and the following functions can be displayed in the lower line by pressing the button:
- TIME: In this mode, the duration of your current workout is displayed in minutes and seconds.
- ODO: In this mode, the overall distance (km) since the battery was inserted is displayed.
- RPM: In this mode, the pedal rotation per minute is displayed.
- DIST: In this mode the distance travelled since beginning of the workout is displayed in kilometres.
• CAL: This mode displays your calories burned during the current workout. - SCAN: In this mode, the different display modes are shown alternately.
Note: The calorie consumption is only an approximate guide.
Note: When not in use, the display automatically switches off after approx. four minutes
Reset values to zero
Press and hold the button for approx. four seconds to reset the value to 0.
Troubleshooting
Error
Display does not show any measurements despite pedal movement.
Possible cause
Sensor is not seated correctly in the sensor holder.
Solution
Check that the sensor is correctly seated if the display does not show anything despite pedal movement (Fig. H).
- As with changing the battery, open the display and carefully remove it.
- Carefully insert the sensor into the sensor holder if it is not correctly located in the sensor holder.
- Reassemble the display in the product and make sure that the button of the display is facing downwards.
Maintenance / Cleaning / Storage
Clean the product using a damp cloth and mild detergent.
Attention! Do not allow moisture to penetrate the display.
Store the product in a dry place. Parts subject to wear: If the product no longer has any pedalling resistance, the drive belt is worn. The product must be replaced.
Notes on disposal
Disposing of the packaging
Sort and dispose of the packaging according to type. Put cardboard and boxes with the waste paper, plastic films with the recyclables collection.
Disposing of the product
- The product must be disposed of through an authorised waste disposal company or a municipal waste disposal facility in accordance with the laws and regulations in force in your country. (Applicable in the European Union and other European states with systems for the separate collection of recyclables).
- Return the device to a recycling center. The plastic and metal parts used and metal parts can be separated by type and recycled. Ask your local waste disposal company or our service center about this.
- We will dispose of your defective, returned devices free of charge.
Waste equipment must not be disposed of as household waste!
If the product can no longer be used, every user is required by law to dispose of the device separately from household waste, e.g. at a collection point in their community/borough. This ensures that waste equipment is recycled in a professional manner and that negative environmental impacts are avoided. For this reason, electrical equipment is marked with the symbol shown. We will dispose of your defective, returned devices free of charge. Please contact our Service Center.
Batteries and rechargeable batteries must not be disposed of as household waste
As a consumer, you are required by law to return all batteries and rechargeable batteries, regardless of whether they contain harmful substances* or not, at a collection point in your local authority / district or in retail to ensure that they can be disposed of in an environmentally friendly way.
Batteries and rechargeable batteries which are not permanently mounted in the device must be removed and disposed of separately before disposal. Turn in batteries and rechargeable batteries at your collection point in a discharged state only! Ask your local waste disposal company or our service center about this.
* marked with: Cd = cadmium, Hg = mercury, Pb = lead
Declaration of conformity
The EU declaration of conformity can be requested from the following address:
You can find the complete declaration of conformity at
You can find the complete declaration of conformity at
Notes on warranty and service handling
Dear customer,
The product was produced with great care and under continuous quality control. Speq GmbH gives private end customers a three-year guarantee on this product from the date of purchase (guarantee period) in accordance with the following provisions.
Warranty conditions
The warranty period starts from the date of purchase. Please keep the original receipt in a safe place. This is required as proof of purchase. If a material or manufacturing defect occurs within three years from the date of purchase of this product, we will - at our option - repair or replace the product for you free of charge or refund the purchase price. This warranty service requires that within the three-year period, the defective device and the proof of purchase (receipt) are submitted and briefly described in writing what the defect is and when it occurred.
If the defect is covered by our warranty, you will receive the repaired or a new product back. Repair or replacement of the product does not start a new warranty period.
Warranty period and statutory claims for defects
The warranty period is not extended by the warranty. This also applies to replaced and repaired parts. Any damage and defects already present at the time of purchase must be reported immediately after unpacking. Repairs required after the expiration of the warranty period are subject to a charge.
Warranty scope
The device was carefully produced according to strict quality guidelines and conscientiously tested before delivery. Warranty coverage applies to defects in materials or workmanship.
This warranty does not cover product parts that are subject to normal wear and tear and can therefore be considered wear parts or for damage to fragile parts, e.g. switches, batteries or that are made of glass.
This warranty is void if the product is damaged, improperly used or maintained. For proper use of the product, all the instructions given in the operating manual must be strictly observed. Uses and actions advised against or warned against in the operating instructions must be avoided at all costs.
The product is intended for private use only and not for commercial use.
Abusive and improper handling, use of force and interventions not carried out by our authorized service branch will void the warranty.
Handling in case of warranty
In order to ensure a quick processing of your request, please follow the following instructions:
- For all inquiries, please have the receipt and item number (IAN 398292_2110) ready as proof of purchase
- Please refer to the type plate on the product, an engraving on the product, the title page of your manual (bottom left) or the sticker on the back or bottom of the product for the article number.
- If functional errors or other defects occur, first contact the service department named below by telephone or e-mail.
- If the product is found to be defective, you can send it free of charge to the service address provided by you, enclosing the receipt and stating what the defect is and when it occurred.
On www.lidl-service.com you can download these and many more manuals, product videos and installation software. This QR code will take you directly to the Lidl service page (www.lidl-service.com) and by entering the item number (IAN) 398292_2110 you can open your user manual.

Manufacturerer service address:
SPEQ GmbH
Tannbachstr. 10
73635 Steinenberg/Germany
Email: service@speq.de
Service-Hotline: 00800 30 777 999
(kostenfrei)
Please call us before sending the product
8:00 h - 17:00 h
ARM AND LEG TRAINER
Model: SP-MB-020
Brand: Crivit
Allgemeines
73635 Steinenberg/Germany
Email: service@speq.de
Service-Hotline: 00800 30 777 999
(kostenfrei)