
ST1530E - Brush cutter EGO - Free user manual and instructions
Find the device manual for free ST1530E EGO in PDF.


| Product type | Battery-powered brush cutter (string trimmer) |
| Brand | EGO |
| Model | ST1530E |
| Rated voltage | 56 V |
| Battery type | Lithium-ion (compatible with EGO 56V series batteries) |
| No-load speed | 5000 / 6000 min⁻¹ (2 speeds) |
| Cutting width | 38 cm |
| Line diameter | 2.4 mm (twisted nylon) |
| Cutting mechanism | Bump head |
| Weight (without battery) | 4.21 kg |
| Sound pressure level (L_PA) | 94.3 dB(A) |
| Guaranteed sound power level (L_WA) | 96 dB(A) |
| Rear handle vibration | 3.97 m/s² |
| Front handle vibration | 2.78 m/s² |
| User protection | Protective guard, line cutting blade, emergency stop via strap |
| Intended uses | Brush cutting, edge trimming |
| Maintenance | Clean with damp cloth, lubricate gears every 50 h |
| Package contents | String trimmer, protective guard, auxiliary handle, wrenches, shoulder strap, manual |
| Warranty | See egopowerplus.com |
| Repairability | EGO spare parts, repair by qualified person |
Frequently Asked Questions - ST1530E EGO
User questions about ST1530E EGO
0 question about this device. Answer the ones you know or ask your own.
Ask a new question about this device
Download the instructions for your Brush cutter in PDF format for free! Find your manual ST1530E - EGO and take your electronic device back in hand. On this page are published all the documents necessary for the use of your device. ST1530E by EGO.
USER MANUAL ST1530E EGO
natural_image
Line drawing of a mechanical component with three pins and an upward arrow indicating motion (no text or symbols)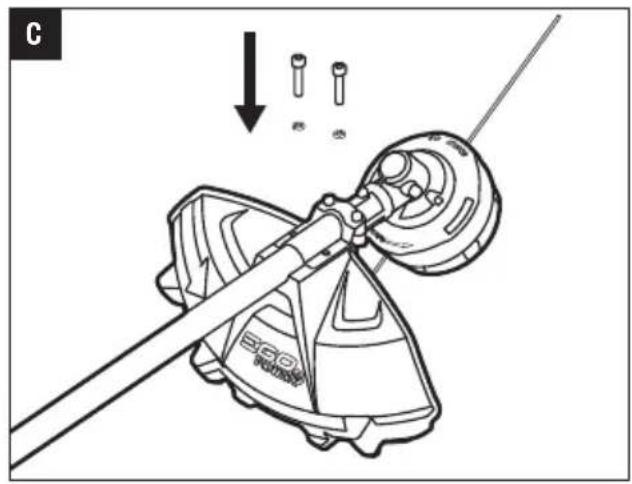
natural_image
Mechanical assembly diagram showing a tool interacting with a cam or wheel component, with no visible text or symbols.
natural_image
Illustration of a hand using a tool to lift a curved mechanical component, with an arrow indicating direction (no text or symbols)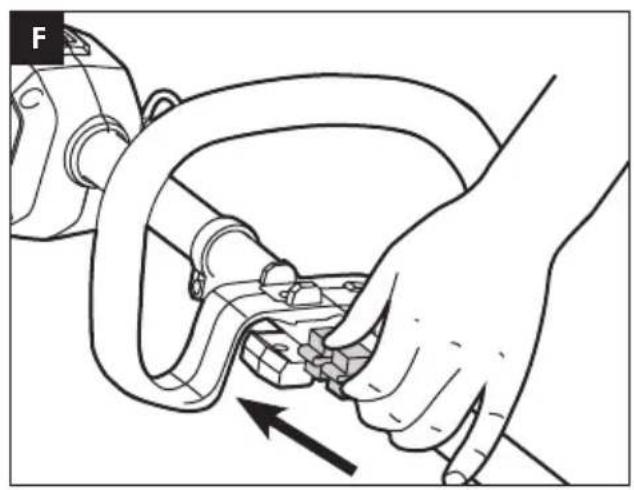
natural_image
Line drawing of a hand adjusting a mechanical component with an arrow indicating motion (no text or symbols)
natural_image
Technical line drawing of a mechanical clamp or clamp assembly with no visible text or symbols

natural_image
Technical line drawing of a mechanical clamp or bracket assembly with a 56V power regulator (no text or symbols present)
natural_image
Line drawing of a car seatbelt assembly with a 56V label, showing mechanical components and wiring (no readable text or symbols beyond label)
natural_image
Technical line drawing of a device with an arrow indicating transformation (no text or symbols present)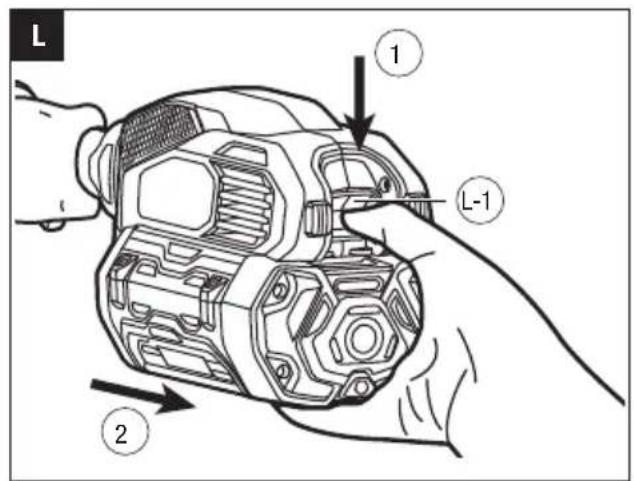

natural_image
Line drawing of a person in full protective gear using a long-handled manual lever to spray or brush (no text or symbols)
natural_image
Line drawing of a person in protective gear using a long-handled tool to spread grass, no text or symbols present
natural_image
Illustration of a person adjusting a belt buckle with a hand holding the buckle (no text or symbols)
natural_image
Diagram of a manual sprinkler system with downward arrows indicating movement or reduction, surrounded by grass (no text or symbols)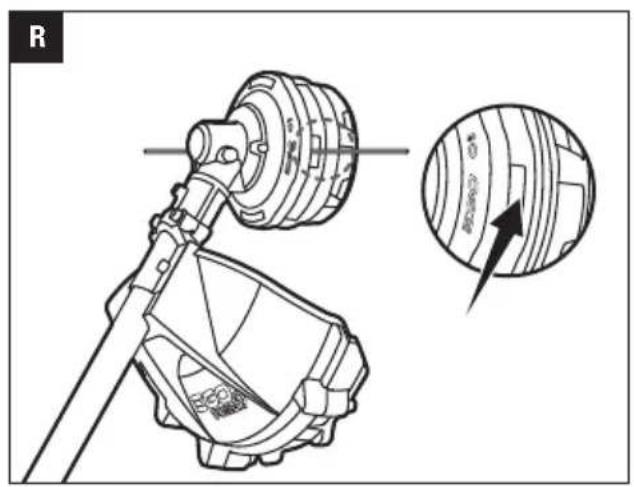


natural_image
Technical line drawing of a mechanical component with a black arrow pointing to a feature (no text or symbols present)
natural_image
Mechanical assembly diagram showing a disassembled component being assembled into a larger mechanical assembly (no text or labels)
natural_image
Illustration of hands assembling a mechanical component with a downward arrow indicating motion (no text or symbols)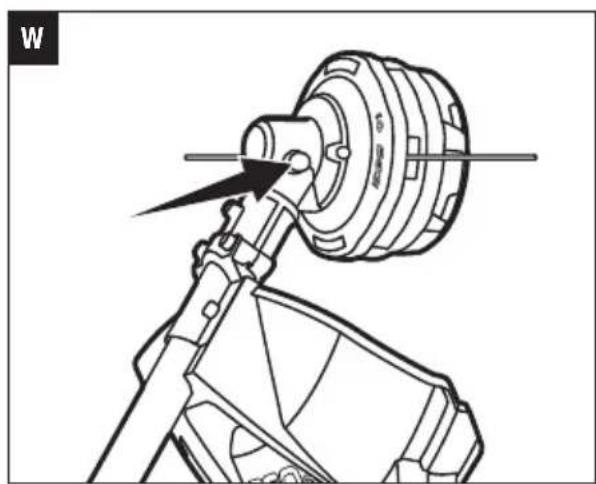
natural_image
Technical line drawing of a mechanical device with a rotating wheel and lever mechanism (no text or symbols)EN
READ ALL INSTRUCTIONS!

READ OPERATOR'S MANUAL
⚠️ Residual risk! People with electronic devices, such as pacemakers, should consult their physician(s) before using this product. Operation of electrical equipment in close proximity to a heart pacemaker could cause interference or failure of the pacemaker.
WARNING: To ensure safety and reliability, all repairs and replacements should be performed by a qualified service technician.
SAFETY SYMBOLS
The purpose of safety symbols is to attract your attention to possible dangers. The safety symbols and the explanations with them deserve your careful attention and understanding. The symbol warnings do not, by themselves, eliminate any danger. The instructions and warnings they give are no substitutes for proper accident prevention measures.
WARNING: Be sure to read and understand all safety instructions in this Operator's Manual, including all safety alert symbols such as "DANGER," "WARNING," and "CAUTION" before using this tool. Failure to follow all instructions listed below may result in electric shock, fire, and/or serious personal injury.
SYMBOL MEANING
SAFETY ALERT SYMBOL: Indicates DANGER, WARNING, or CAUTION. May be used in conjunction with other symbols or pictographs.

WARNING: The operation of any power tools can result in foreign objects being thrown into your eyes, which can result in severe eye damage. Before beginning power tool operation, always wear safety goggles or safety glasses with side shields and a full face shield when needed. We recommend a Wide Vision Safety Mask for use over eyeglasses or standard safety glasses with side shields.
SAFETY INSTRUCTIONS
This page depicts and describes safety symbols that may appear on this product. Read, understand, and follow all instructions on the machine before attempting to assemble and operate it.
 | Safety Alert | Indicates a potential personal injury hazard. |
 | Read Operator's Manual | To reduce the risk of injury,user must read andunderstand operator'smanual before using thisproduct. |
 | Eye Protection | Always wear ear protectionwhen operating this product. |
 | Wear Ear Protection | Always wear ear protectionwhen operating this product. |
 | No Cutting Blade | Do not install metal orplastic cutting blades |
 | Keep Bystanders Away | Ensure that other peopleand pets remain at least15m away from the linetrimmer when it is in use. |
 | Keep Bystanders Away | Ensure that other peopleand pets remain at least15m away from the linetrimmer when it is in use. |
 | Noise Sound pressure level | |
 | Do Not Expose To Rain | Do not use in the rain orleave outdoors while it israining. |
| V Volt Voltage | ||
| mm Millimeter Length or size | ||
| cm Centimeter Length or size | ||
 | Direct Current | Type or a characteristic ofcurrent |
| ### | No Load Speed | Rotational speed, at no load |
| min^-1 | Per Minute Revolutions per minute | |
IMPORTANT SAFETY INSTRUCTIONS
WARNING! When using electric trimmers, basic safety precautions should always be followed to reduce the risk of fire, electric shock, and personal injury, including the following:
READ ALL INSTRUCTIONS
DANGER! Do not rely on the tool's insulation against electric shock. To reduce the risk of electrocution, never operate the tool in the vicinity of any wires or cables which may carry electric current.
CAUTION! Wear appropriate personal hearing protection during use. Under some conditions and durations of use, noise from this product may contribute to hearing loss.
TRAINING
- Read the instructions carefully. Be familiar with the controls and the proper use of the machine.
■ Never allow people unfamiliar with these instructions or children to use the machine. Local regulations can restrict the age of the operator. - Keep in mind that the operator or user is responsible for accidents or hazards occurring to other people or their property.
PREPARATION
■ Never operate the machine while people, especially children, or pets are nearby.
■ Wear eye protection and stout shoes at all times while operating the machine.
■ The distance between the machine and bystanders shall be at least 15m.
■ Do not use metal blades.
OPERATION
■ Use the machine only in daylight or good artificial light.
■ Never operate the machine with damaged guards or shields or without guards or shields in place.
■ Switch on the motor only when the hands and feet are away from the cutting means.
■ Always disconnect the machine from the power supply (i.e. remove the plug from the mains or remove the disabling device).
■ whenever leaving the machine unattended;
■ before clearing a blockage;
■ before checking, cleaning or working on the machine;
■ after striking a foreign object;
■ Whenever the machine starts vibrating abnormally
■ Take care against injury to feet and hands from the cutting means.
■ Always ensure that the ventilation openings are kept clear of debris.
MAINTENANCE AND STORAGE
■ Disconnect the machine from the power supply (i.e. remove the plug from the mains or remove the disabling device) before carrying out maintenance or cleaning work.
- Use only the manufacturer's recommended replacement parts and accessories.
- Inspect and maintain the machine regularly. Have the machine repaired only by an authorized repairer.
■ When not in use, store the machine out of the reach of children.
OTHER SAFETY WARNINGS
- Avoid Dangerous Environments – Don’t use trimmers in damp or wet locations.
■ Always turn the line trimmer off or remove the battery pack whenever leaving the trimmer unattended. - Don’t Use In Rain.
- Keep Children Away – All visitors should be kept at a distance from work area.
- Dress Properly – Do not wear loose clothing or jewelry. They can be caught in moving parts. Use of rubber gloves and substantial footwear is recommended when working outdoors. Wear protective hair covering to contain long hair.
■ Use Safety Glasses – Always use safety glasses while operating the machine.
Use the Right Tool – Do not use the tool for any job except that for which it is intended. -
Don't Force the Trimmer – It will do the job better and with less likelihood of a risk of injury at the rate for which it was designed.
-
Don't Overreach – Keep proper footing and balance at all times.
■ Stay Alert – Watch what you are doing. Use common sense. Do not operate the trimmer when you are tired.
Do not operate the trimmer while under the influence of alcohol or drugs.
- Keep guards in place and in working order.
■ Store Trimmer Indoors – When not in use the trimmer should be stored indoors in a dry and high or locked up place with the battery pack removed – out of reach of children.
EN
- Maintain Trimmer With Care – Keep the cutting attachment clean for best performance and to reduce the risk of injury. Follow instructions for changing accessories. Keep handles dry, clean, and free from oil and grease.
- Check Damaged Parts – Before further use of the trimmer, a guard or other part that is damaged should be carefully checked to determine that it will operate properly and perform its intended function. Check for alignment of moving parts, binding of moving parts, breakage of parts, mounting, and any other condition that may affect its operation. A guard or other part that is damaged should be properly repaired or replaced by an authorised service center unless indicated elsewhere in this manual.
- Clear the area to be cut before each use. Remove all objects such as rocks, broken glass, nails, wire, or line that can be thrown or become entangled in the cutting attachment. Make sure that other persons and pets are at least 15m away.
■ Before using the machine and after any impact, check for signs of wear or damage and repair as necessary.
■ Always hold the trimmer firmly, with both hands on the handles while operating. Wrap your fingers and thumbs around the handles. - Avoid Accidentally Starting—Don’t carry the trimmer with your finger on the trigger.
■ Do not operate the trimmer in petrolic or explosive atmospheres. Motors in these appliances normally spark, and the sparks might ignite fumes. -
Damage to Trimmer – If you strike a foreign object with the trimmer or it becomes entangled, stop the tool immediately, remove the battery pack from the line trimmer, check for damage and have any damage repaired before further operation is attempted. Do not operate with a broken guard or spool.
If the equipment should start to vibrate abnormally, stop the motor, remove the battery pack from the line trimmer. and check immediately for the cause. Vibration is generally a warning of trouble. A loose head may vibrate, crack, break or come off the trimmer, which may result in serious or fatal injury. Make sure that the cutting attachment is properly fixed in position. If the head loosens after fixing it in position, replace it immediately. Never use a trimmer with a loose cutting attachment.
■ Replace a cracked, damaged or worn-out cutting head immediately, even if damage is limited to superficial cracks. Such attachments may shatter at high speed and cause serious or fatal injury. -
Check the cutting attachment at regular short intervals during operation, or immediately if there is a noticeable change in cutting behavior.
■ Only use ^T EGO ^TM authorised polymer trimmer line accessories and trimmer line that are designed for use with this machine. Although certain unauthorized attachments might be fitted to the EGO ^TM line trimmer, their use may be extremely dangerous, and/or damaging to the tools.
■ To reduce the risk of serious injury, never use wire or metal-reinforced line or other material in place of the nylon cutting lines. Pieces of wire could break off and be thrown at high speed toward the operator or bystanders.
■ To reduce the risk of injury from loss of control, never work on a ladder or on any other insecure support. Never hold the cutting attachment above waist height.
■ If situations occur that are not covered in this manual, use care and good judgment. Contact the EGO Service Center for assistance.
■ Do not charge the battery pack in rain, or in wet locations.
■ Use only with EGO's battery packs and chargers.
| BATTERY PACK | CHARGER |
| BA1120E, BA1400, BA2240EBA2800, BA3360, BA4200,BA1400T, BA2800T, BA4200T | CH2100E,CH5500E |
■ The battery pack must be removed from the appliance before it is scrapped.
■ The battery shall be disposed of safely.
■ Do not dispose of the battery in a fire. The cells may explode. Check with local authorities for possible special disposal instructions.
■ Do not open or mutilate the battery. Released electrolyte is corrosive and may cause damage to the eyes or skin. It may be toxic if swallowed.
■ Exercise care in handling batteries in order not to short the battery with conducting materials such as rings, bracelets, and keys. The battery or conductor may overheat and cause burns.
- When servicing, use only identical E replacement parts. Use of any other accessory or attachment may increase the risk of injury.
■ Battery tools do not have to be plugged into an electrical outlet; therefore, they are always in operating condition. Be aware of possible hazards even when the tool is not operating. Take care when performing maintenance or service.
■ Do not wash with a hose; avoid getting water in moto and electrical connections.
■ Save these instructions. Refer to them frequently and use them to instruct others who may use this tool. If you loan this tool to someone else, also loan these instructions to them to prevent misuse of the product and possible injury.
■ Always wear substantial footwear and long trousers while operating the machine.
■ Always be sure of the footing on slopes and to walk, never run.
SAVE THESE INSTRUCTIONS!
SPECIFICATIONS
| Voltage | 56 V--- | |
| No-load speed 5000/6000 min | -1 | |
| Cutting Mechanism Bump Head | ||
| Cutting Line Type | 2.4mm nylon twist line | |
| Cutting Width 38 cm | ||
| Weight (Without battery pack) 4.21Kg | ||
| Measured sound power level L_WA | 94.3 dB(A)K=1.37 dB(A) | |
| Sound pressure level at operator's ear L_PA | 82.6 dB(A)K=3 dB(A) | |
| Guaranteed sound power level L_WA (according to 2000/14/EC) | 96 dB(A) | |
| Vibration a_h | Front-assist Handle | 3.97 m/s2K=1.5 m/s2 |
| Rear Handle | 2.78 m/s2K=1.5 m/s2 | |
PACKING LIST
| PART NAME QUANTITY | |
| Line trimmer 1 | |
| Guard 1 | |
| Front-assist handle assembly 1 | |
| Hex wrench 1 | |
| Multi-function wrench 1 | |
| Shoulder strap 1 | |
| Operator's manual | 1 |
DESCRIPTION
KNOW YOUR LINE TRIMMER (Fig. A)
- Threshold Ring
- Trigger
- Rear Handle
- Air Inlet
- Lock-Off Button
- High/low-Speed Switch
- Shoulder-Strap Mount Hanger
- Adjustable Front-Assist Handle
- Shoulder Strap
- Multi-Function Wrench
- Hex Wrench
- Trimmer Head (Bump Head)
- Cutting Line
- Release Tab
- Line-Cutting Blade
- Guard
- Ejection Mechanism
- Electric Contacts
- Latch
- Rubber Pad Protection
- Battery-Release Button
ASSEMBLY
WARNING: If any parts are damaged or missing, do not operate this product until the parts are replaced. Use of this product with damaged or missing parts could result in serious personal injury.
WARNING: Do not attempt to modify this product or create accessories not recommended for use with this Line trimmer. Any such alteration or modification is misuse and could result in a hazardous condition leading to possibly serious personal injury.
WARNING: To prevent accidental starting that could cause serious personal injury, always remove the battery pack from the tool when assembling parts.
MOUNTING THE GUARD
WARNING: Always wear gloves when mounting or replacing the guard. Take care of the blade on the guard and protect your hand from cutting.
EN
WARNING: Never operate the tool without the guard firmly in place. The guard must always be on the tool to protect the user! When the guard is fixed, never attempt to remove or adjust the guard, if a replacement is needed, it should be performed by a qualified service technician!
- Loosen and remove the two screws from the guard (Fig. B).
- Align the guard mounting holes with the assembly holes and then lock the guard onto the shaft base with the two screws, together with two spring washers (Fig. C).
NOTICE: Make sure the guard is fixed according to Fig. B & C, any reverse fixing will cause great danger!
MOUNTING AND ADJUSTING THE FRONT-ASSIST HANDLE
- Loosen the locking pole in the front-assist handle and remove the locking pole and wing nut form the front-assist handle (Fig.D).
Fig. D parts description see below:
| D-1 | locking pole D-3 | Clamping Block |
| D-2 | Front-Assist Handle D-4 | Wing Nut |
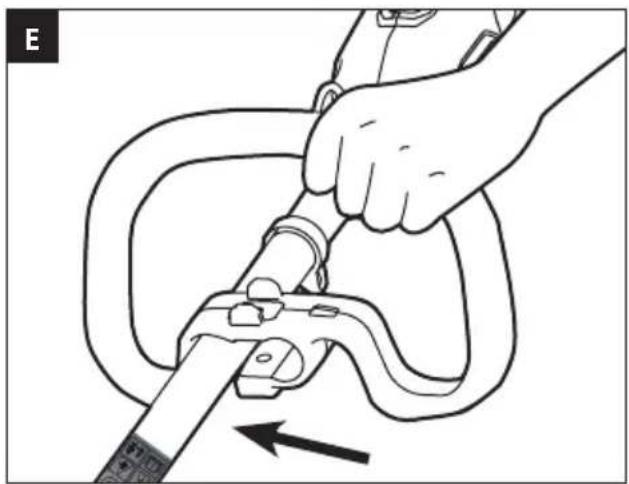
- Push the front-assist handle onto the shaft (Fig. E).
- Insert the clamping block into the handle slot (Fig. F).
- Mount the locking pole, and pre-tighten them with the wing nut. Make sure that the front-assist handle is upwards and points toward the top of the rear handle (Fig. G).
- Adjust the front-assist handle between the threshold ring and the label to make sure your front arm is straight when operating (Fig. H).
- Lock the lever of the locking pole. (Fig. I).
NOTICE: The front-assist handle should be turned upwards to point toward the top of the rear handle.
WARNING: Only fix the front-assist handle between the threshold ring and the label on the shaft.
WARNING: The tool cannot be used without the front-assist handle securely fixed.
MOUNTING THE SHOULDER STRAP
Depress the strap hook to open it and attach it onto the shoulder-strap mount hanger (Fig. J).
OPERATION
WARNING: Do not allow familiarity with this product to make you careless. Remember that a careless fraction of a second is sufficient to inflict serious injury.
⚠ WARNING: Always wear safety goggles or safety glasses with side shield, along with hearing protection. Failure to do so could result in objects being thrown into your eyes and other possible serious injuries.
⚠ WARNING: Do not use any attachments or accessories not recommended by the manufacturer of this product. The use of attachments or accessories not recommended can result in serious personal injury.
⚠ WARNING: To prevent serious personal injury, remove the battery pack from the tool before servicing, cleaning, changing attachments or removing material from the unit.
You may use this product for the purposes listed below:
Trimming: use for removing grass and weeds up against walls, fences, trees and borders.
Cutting: use for cutting the grass that is difficult to reach using a normal mower.
NOTICE: The tool is to be used only for its prescribed purpose. Any other use, for example edge trimming, is deemed to be a case of misuse.
ATTACHING/DETACHING THE BATTERY PACK
Fully charge before first use
To Attach
Align the battery ribs with the mounting slots and press the battery pack down until you hear a "click" (Fig. K).
To Detach
Depress the battery-release button and pull the battery pack out as Fig. L shown.
Fig. L parts description see below:
L-1 Battery- Release button
HOLDING THE LINE TRIMMER
WARNING: Dress properly to reduce the risk of injury when operating this tool. Do not wear loose clothing or jewelry. Wear eye and ear/hearing protection. Wear heavy duty, long trousers, boots and gloves. Do not wear short trousers, sandals or go barefoot.
Before operating, stand in the operating position and check for eye protection, proper clothing, balanced footing, straight arm, which holds the front-assist handle.
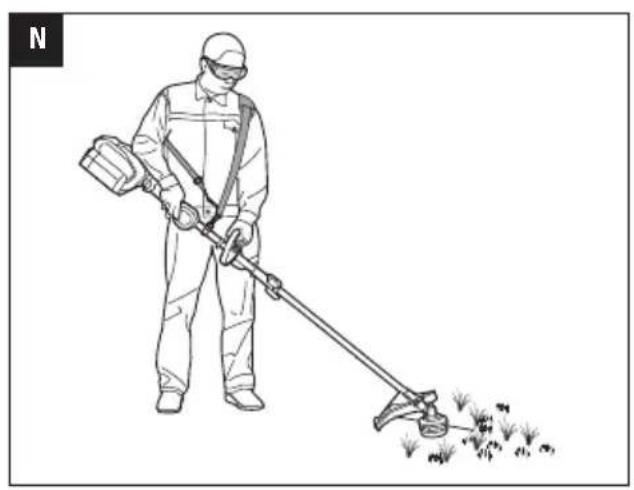
NOTICE: The trimmer head is parallel to the ground at a proper cutting distance without the operator bending over (Fig. N).
For safe and better operation, put on the shoulder strap across the shoulder as Fig. N. Adjust the shoulder strap in a comfortable operating position. Hold the line trimmer with both hands: One hand on the rear handle and the other hand on the front-assist handle.
There are two ways to release the strap. Take it away from your shoulder directly (Fig. O) or press the hook of the strap and take it apart from the shoulder-strap mount hanger fixed on the shaft (Fig. P).
WARNING: The shoulder strap is also a quick release mechanism in a hazardous situation. When an emergency occurs, take it off from your shoulder immediately, no matter what way the strap is in.
STARTING/STOPPING THE LINE TRIMMER (Fig. M)
To Start
Press down the lock-off lever then depress the trigger. Different pressure on the trigger results in variable rotating speed of the cutting line. More pressure, higher speed.
To Stop
Release the trigger.
NOTICE: The motor runs only when the lock-off button and trigger are both pressed.
WARNING: Always remove the battery pack from the line trimmer during work breaks and after finishing work.
Speed Adjustment Function (Fig. M)
The line trimmer has two speeds. Position "1" is for low speed while Position "2" for high speed. Push or pull the high/low speed switch to choose the suitable speed during operation.
Fig. M parts description see below:
| M-1 | High/low-Speed Switch |
| M-2 | Lock-Off Button |
| M-3 | Trigger |
USING THE LINE TRIMMER
WARNING: To avoid serious personal injury, wear goggles or safety glasses at all times when operating this unit. Wear a face mask or dust mask in dusty locations.
Clear the area to be cut before each use. Remove all objects, such as rocks, broken glass, nails, wire, or line, that can be thrown or become entangled in the cutting attachment. Clear the area of children, bystanders, and pets. At a minimum, keep all children, bystanders and pets at least 15m away; there still may be risk to bystanders from thrown objects. Bystanders should be encouraged to wear eye protection. If you are approached, stop the motor and cutting attachment immediately.
Before each use, check for damage/worn parts
Check the bump head, guard and front-assist handle and replace the parts that are cracked, warped, bent, or damaged in any away.
The line-cutting blade on the edge of the guard can dull over time. It is recommended that you periodically sharpen with a file or replace it with a new blade.
WARNING: Always wear gloves when mounting the guard or servicing the blade. Take care of the blade on the guard and protect your hand from cutting.
After each use, clean the trimmer.
CAUTION: Obstructions in the vents will prevent the air from flowing into the motor housing and result in overheating or damaged of the motor.
■ Use only mild soap and a damp cloth to clean the tool. Never let any liquid get inside the tool; never immerse any part of the tool into a liquid.
- Keep air vents in the motor housing from debris at all times.
WARNING: Never use water for cleaning your trimmer. Avoid using solvents when cleaning plastic parts. Most plastics are susceptible to damage from various types of commercial solvents. Use clean cloths to remove dirt, dust, oil, grease, etc.
ADJUSTING CUTTING LINE LENGTH
The trimmer head allows the operator to release more cutting line without stopping the motor. As line becomes frayed or worn, additional line can be released by lightly tapping the trimmer head on the ground while operating the trimmer (Fig. Q).
NOTICE: Line release will become more difficult as the cutting line becomes shorter.
WARNING: Do not remove or alter the line cutting blade assembly. Excessive line length will cause the motor to overheat and may result in serious personal injury.
EN
LINE REPLACEMENT
NOTICE: Always use the recommended nylon cutting line with a diameter that does not exceed 2.4 mm. Using line other than that specified may cause the line trimmer to overheat or become damaged.
WARNING: Never use metal-reinforced line, wire, or rope, etc. These can break off and become dangerous projectiles.
- Remove the battery pack.
- Remove the remaining cutting line, if necessary.
- Cut 4m long cutting line, Insert the line into the mounting hole inside the eyelet (Fig. R). Push and pull the line from the other side until equal amounts of line appear on both sides of the spool.
- Press, while rotating the lower cover assembly in the arrow direction, to wind the line onto the spool until approximately 14cm of line is showing on each side (Fig. S).
- Push the lower cover assembly down while pulling on the lines to manually advance the line and to check for proper assembly of the trimmer head.
When the cutting line breaks from the line outlet or the cutting line is not released when the trimmer head is tapped, follow the steps below:
- Press the release tabs on the upper cover and remove the lower cover assembly by pulling it straight out (Fig. T & U).
- Remove the cutting line from the spool.
- With one hand holding the lower cover assembly, use the other hand to grasp the lower cover assembly and align the tabs on the upper cover with the holes in the lower cover assembly (Fig. V); Use your palm to press the lower cover assembly until the tabs lock with the upper cover.
- Follow the instructions in "LINE REPLACEMENT" to reload the cutting line.
MAINTENANCE
WARNING: When servicing, use only identical replacement parts. Inspect and maintain the machine regularly. To ensure safety and reliability, all repairs should be performed by a qualified service technician.
WARNING: Battery tools do not have to be plugged into an electrical outlet; therefore, they are always in operating condition. To prevent serious personal injury, take extra precautions and care when performing maintenance, service or for changing the cutting attachment or other attachments.
⚠ WARNING: To prevent serious personal injury, remove the battery pack from the tool before servicing, cleaning, changing add-on attachments or removing material from the unit.
CLEANING THE UNIT
■ Clean the unit using a damp cloth with a mild detergent.
■ Do not use any strong detergents on the plastic housing or the handle. They can be damaged by certain aromatic oils, such as pine and lemon, and by solvents such as kerosene. Moisture can also cause a shock hazard. Wipe off any moisture with a soft dry cloth.
■ Use a small brush or the air discharge of a small vacuum cleaner brush to clean the air vents on the rear housing.
The transmission gears in the gear case need be lubricated periodically with gear grease. Check the gear case grease level about every 50 hours of operation by removing the sealing screw on the side of the case.
If no grease can be seen on the flanks of the gear, follow the steps below to fill with gear grease up to 3/4 capacity. Do not completely fill the transmission gears.
- Hold the line trimmer on its side so that the sealing screw is facing upwards (Fig. W).
- Use the multi-function wrench provided to loosen and remove the sealing screw.
- Use a grease syringe (not included) to inject some grease into the screw hole; do not exceed 3/4 capacity.
- Tighten the sealing screw after injection.
STORING THE UNIT
■ Remove the battery pack from the line trimmer when it is not in use.
■ Clean the tool thoroughly before storing it.
■ Store the unit in a dry, well-ventilated area, locked-up or up high, out of the reach of children. Do not store the unit on or adjacent to fertilisers, petrol, or other chemicals.
Protecting the environment

Do not dispose of electrical equipment, battery charger and batteries/rechargeable batteries into household waste!
According to the European law 2012/19/EU, electrical and electronic equipment that is no longer usable, and according to the European law 2006/66/EC, defective or used battery packs/batteries, must be collected separately.
If electrical appliances are disposed of in landfills or dumps, hazardous substances can leak into the groundwater and get into the food chain, damaging your health and well-being.
EN
TROUBLESHOOTING
| PROBLEM CAUSE SOLUTION | ||
| Line trimmer fails to start. | ■ The battery pack is not attached to the trimmer.■ No electrical contact between the trimmer and battery.■ The battery pack is depleted.■ The lock-off button and trigger are not depressed simultaneously. | ■ Attach the battery pack to the trimmer.■ Remove battery, check contacts and reinstall the battery pack.■ Charge the battery pack.■ Press down the lock-off button and hold it, then depress the trigger to turn on the line trimmer. |
| Line trimmer stops while cutting. | ■ The guard is not mounted on trimmer, resulting in an overly long cutting line and motor overload.■ Heavy cutting line is used.■ The motor shaft or trimmer head is bound with grass.■ The motor is overloaded.■ The battery pack or line trimmer is too hot.■ The battery pack is disconnected from the tool.■ The battery pack is depleted. | ■ Remove the battery pack and mount the guard on the trimmer.■ Use recommended nylon cutting line with diameter no more than 2.4 mm.■ Stop the trimmer, remove the battery, and remove the grass from the motor shaft and trimmer head.■ Remove the trimmer head from the grass. The motor will recover to work as soon as the load is removed. When cutting, move the trimmer head in and out of the grass to be cut and remove no more than 20 cm of length in a single cut.■ Allow the battery pack or trimmer to cool until the temperature drops below 67°C.■ Re-install the battery pack.■ Charge the battery pack. |
EN
| PROBLEM CAUSE SOLUTION | ||
| Trimmer head will not advance line. | ■ The motor shaft or trimmer head is bound with grass.■ There is not enough line on the spool.■ The trimmer head is dirty.■ The line is tangled on the spool.■ The line is too short. | ■ Stop the trimmer, remove the battery, and cl the motor shaft and trimmer head.■ Remove the battery and replace the cutting line; follow the section “LINE REPLACEMENT” in this manual.■ Remove the battery and clean the trimmer head.■ Remove the battery, remove the line from the trimmer head and rewind; follow the section “RELOAD THE CUTTING LINE” in this manual.■ Remove the battery and pull the lines manually while alternately pressing down and releasing the trimmer head. |
| Grass wraps around trimmer head and motor housing. | ■ Cutting tall grass at ground level. | ■ Cut tall grass from the top down, removing no more than 20 cm in each pass to prevent wrapping. |
| Cracks on the trimmer head or the lower cover assembly comes loose from upper cover. | ■ The trimmer head is worn out. | ■ Replace the trimmer head immediately performed by a qualified service technician. |
WARRANTY
EGO WARRANTY POLICY
Please visit the website egopowerplus.com for full terms and conditions of the EGO Warranty policy.
HINWEIS: Make sure the guard is fixed according to Fig. B & C, any reverse fixing will cause great danger!
MONTIEREN DES VORDEREN HALTEGRIFFS
ANDERE VEILIGHEIDSWAARSCHUWINGEN
HET APPARAAT SCHOONMAKEN
HET APPARAAT OPBERGEN
RENG∅RING AF APPARATET
OPBEVARING AF APPARATET
VEDLIKEHOLD OG LAGRING
DÔLEŽITÉ BEZPEČNOSTNÉ POKYNY
INÉ BEZPEČNOSTNÉ POKYNY
CITIȚI MANUALUL DE INSTRUCTIUNI
KITI SAUGOS ISPĖJIMAI
LUGEGE KASUTUSJUHENDIT
OLULISED OHUTUSJUHISED
OSTALA SIGURNOSNA UPOZORENJA
■ ยกيم공고 Organic Organic Organic Organic Organic Organic Organic Organic Organic Organic Organic Organic Organic Organic Organic Organic Organic Organic Organic Organic Organic Organic Organic Organic Organic Organic Organic Organic Organic Organic Organic Organic Organic Organic Organic Organic Organic Organic Organic Organic Organic Organic Organic Organic Organic Organic Organic Organic Organic Organic Organic Organic Organic Organic Organic Organic Organic Organic Organic Organic Organic Organic Organic Organic Organic Organic Organic Organic Organic Organic Organic Organic Organic Organic Organic Organic Organic Organic Organic Organic Organic Organic Organic Organic Organic Organic Organic Organic Organic Organic Organic Organic Organic Organic Organic Organic Organic Organic Organic Organic Synthetic Organic Organic Organic Synthetic Organic Synthetic Organic Synthetic Organic Synthetic Organic Synthetic Organic Synthetic Organic Synthetic Organic Synthetic Organic Synthetic Organic Synthetic Organic Synthetic Organic Synthetic Organic Synthetic Organic Synthetic Organic Synthetic Organic Synthetic Organic Synthetic Organic Synthetic Organic Synthetic Organic Synthetic Organic Synthetic Organic Synthetic Organic Synthetic Organic Synthetic Organic Synthetic Organic Synthetic Organic Synthetic Organic Synthetic Organic Synthetic Organic Synthetic Organic Synthetic Organic Synthetic Organic Synthetic Organic Synthetic Organic Synthetic Organic Synthetic Organic Synthetic Organic Synthetic Organic Synthetic Organic Synthetic Organic Synthetic Organic Synthetic Organic Synthetic Organic Synthetic Organic Synthetic Organic Synthetic Organic Synthetic Organic Synthetic Organic Synthetic Organic Synthetic Organic Traditional Economic and Economic Classification
■ გამოთეცხეთ მხოლოდ მწარმოებელის მიურ რევომეხდირებული ნაწილები ან აქსესუარები.
■ Assizgong bqmlshyml ngzymsmgymo
dgmfdgds qs obuzgdoegds. bqmlshyml
dzmogds dosbgoom dbmmmo
szymbofogywn bqmmlsbl.
■ ἀγοβσθγον Βγμλυξγμ δςζάζδολωσην δογφζαρμαγμ σροσμπι.
Uzbek glutarangamgdoi 2006mboqngdo
■ მოციდეთ საშიშ გარემო პირობებს - არ გამოიუნლო სალიში ნესტიან ან სველ პირობებში.
■ ยกจํา equation z_1 sonodg on y_2 dom y_3 y_4 y_5 y_6 y_7 y_8 y_9 y_10 y_11 y_12 y_13 y_14 y_15 y_16 y_17 y_18 y_19 y_20 y_21 y_22 y_23 y_24 y_25 y_26 y_27 y_28 y_29 y_30 y_31 y_32 y_33 y_34 y_35 y_36 y_37 y_38 y_39 y_40
■ ๖๕ ζ๘๐๙๑๖๖๐๙ Φ๕๐๓๐ ๐๐๘๙.
■ მორიდეთ მავშვებს - უველა გარეშე პირი უნდა იძყოვებოდეს სამუშაო არედან გარკვულო დისტანციაზე.
■ ḥσοςζοσ άγλυδασόλυςφ - σή γσμογχβον
γεβογκο, γεποςτης όγελυςθαρο φος
θερούγειγγμανδες. ολοδο άγλυδανης
βσομόκοις βγεμλυξγμις άπαδάσεδες
βεβομηγδας. ήγεμαθβφοσόγενησος
ηγβοβοις βγεμασαδαβδοι φος φοσβγεμγρο
γεβυλυςθαροις γσμογχβδες γεσίχοι
θεγάσμαδουλι. γσμογχβοι σαδοι φοσθεζο
δεσφη δεπαγροι σαδοι φωδοι άγασαβεγεδοι.
■ გამოიექნეთ უსაცრიხოების სათვალექბი - უოველოვის მორგეთ უსაცრიხოების სათვალე ხელსაწყლი სარგებლობისას.
■ გამოიენეთ ხელსაწყო
დანიმნულებისაშერ - არ გამოიენლო
ხელსაწყო ისეთი სამუშაოსთვის,
რომოისთვისაც იღი არაა განკუთვნილი.
■ გასუციავეთ გასათიბი არე მუშაობის დაწყებამდე. მოავილეთ უველა თბიექტი სამუებაო არეს როგორიცა ქვები, დამტვრეული მიხა, ლურსმანი, სადენი ან მაწარი, რომელიც მესაძლოა ჩაიყლოსა ან დაეხვის მოიმავ ნაწილს. დარწმუნდით რომ სხვა პირები და მიხაური ცხოველები იძყოფებიან ბიხიშემ 15 მ მომორებით.
■ bghmlsfgyml zsdmygbdssdqq sb bgdoldoqmo
dgxsbgdol ddqgg, gslubxjom g3gmol
sb qosbosbdol bodbdol qs dgszgjom
lsfommgdolcosgsmsqo.
■ ยกيم Romantic advisory advisory advisory advisory advisory advisory advisory advisory advisory advisory advisory advisory advisory advisory advisory advisory advisory advisory advisory advisory advisory advisory advisory advisory advisory advisory advisory advisory advisory advisory advisory advisory advisory advisory advisory advisory advisory advisory advisory advisory advisory advisory advisory advisory advisory advisory advisory advisory advisory advisory advisory advisory advisory advisory advisory advisory advisory advisory advisory advisory advisory advisory advisory advisory advisory advisory advisory advisory advisory advisory advisory advisory advisory advisory advisory advisory advisory advisory advisory advisory advisory advisory advisory advisory advisory advisory advisory advisory advisory advisory advisory advisory advisory advisory advisory advisory advisory advisory advisory advisory opinions
■ ἀμγδοργον ἀγδανβεγεον κλεφωζυ
- σκ δύσικον δονδυςο ήφοχγόβγ
δονσχυβέγμο τοσοσο.
■ არ ისარგებლოთ მოიბავით მენზინის
ან სხვა ფოქებადი სამუალებების
არსებობის ზონაში. მსგაცს ხელსაწყოებში
არსებული მოტორები იძლევიან
ნაპერწვალს, რომელიმაც შესაძლოა აანთოს
ფოქებადი არები.
■ ὁποδοςτοῦ ψσθονδρός - συγ ἐνσονδον
ωσχαβρόνον ψγδμ ἐνδρησις δὲ
οὐο ὅσοβμσίσμός, ψσγγμβάσμος
ζασούρον βγκλυξμ, ἐνδρησον ἐνσούς
ζεγδησιςδίσμό, ἀγσαμήρον ψσθονδρός
ως ἀγεγμηδρόνον οὐ, ἐνδρι δαγεφόγμόνο
δούον ἐνδρησιςδίς. δὲ σαγάσμον
βγκλυξμ, ψσθονδρόνον ζεύσον δὲ
ʒεύσον.
■ ΜΥ ΒΥΜΙΣΗΥΜ ΥΡΟΥΥΩΙ ΥΒΗΣΥΨΜ
ΖΟΒΗΣΗΟΣ, ΖΑΜΟΔΓΟ ΠΜΥΜΜΟ, ΔΜΒΛΥΒΟΟ
ΣΥΝΥΔΥΜΕΣΥΜΟ ΥΡ ΆΥΣΜΦΗΓΟ ΣΟΒΗΣΗΟΣ
ΔΟΥΒΥΒΟ. ΖΟΒΗΣΗΟ ΚΜΥΜΜΟ ΤΥΠΟ
ΣΜΟΛ ΥΡΣΒΟΣΗΟΣ ΔΜΔΣΗΣΗΥΣΜΟ.
ΔΜΥΣΒΥΣΜΥΣΗΥΜΟ ΟΣΣΟ ΆΥΣΔΗΜΟΣ
ΖΟΒΗΜΟΥΒΩΥΣ, ΖΑΜΟΥΒΜΟΣ Α Σ ΔΜΔΣΗΥΣ
ΔΟΝΔΣΗ, ΕΑΣΔΣ ΆΥΣΔΗΜΟΣ ΖΑΜΟΥΣΗΜΟ
ΛΥΜΟΜΗΥΜΟ Α Σ ΘΣΥΣΜΥΜΟ ΒΟΣΒΟ.
ΨΟΜΗΥΔΥΒΩΟΟ ΕΜΔ ΔΟΝΔΣΟ ΒΑΥΚΟΜΟ
ΣΜΟΛ ΙΧΑΜΑΣΗΜΟ ΦΑΣΔΗΜΥΔΗΜΟ
ΛΥΜΜ ΣΤΗΒΩΟΣΔΟ. ΜΥ ΟΣΣΟ ΔΜΟΥΨΣ
ΛΙΣΥΝΟΜΗ ΣΩΤΩΜΗΥ ΦΑΣΔΗΜΥΔΟΛ ΆΥΔΗΨΑ,
■ გასუციავეთ გასათიბი არე მუშაობის დაწყებამდე. მოავილეთ უველა თბიექტი სამუემაო არეს როგორიცა ქვები, დამტპრეული ბინა, ლურსმანი, სადენი ან ბაწარი, რომელიც მესაძლოა ჩაიყლოსა ან დაეხვის მოიმავ ნაწილს. დარწმუნდით რომ სხვა პირები და მინაური ცხოველები იძყოფებიან ბიხიშემ 15 მ მომორებით.
■ bghmlsfgyml zsdmygbdssdqq sb bgdoldoqmo
dgxsbgdol ddqgg, gslubxjom g3gmol
sb qosbosbdol bodbdol qs dgszgjom
lsfommgdolcosgsmsq.
■ ยกيم Romantic advisory advisory advisory advisory advisory advisory advisory advisory advisory advisory advisory advisory advisory advisory advisory advisory advisory advisory advisory advisory advisory advisory advisory advisory advisory advisory advisory advisory advisory advisory advisory advisory advisory advisory advisory advisory advisory advisory advisory advisory advisory advisory advisory advisory advisory advisory advisory advisory advisory advisory advisory advisory advisory advisory advisory advisory advisory advisory advisory advisory advisory advisory advisory advisory advisory advisory advisory advisory advisory advisory advisory advisory advisory advisory advisory advisory advisory advisory advisory advisory advisory advisory advisory advisory advisory advisory advisory advisory advisory advisory advisory advisory advisory advisory advisory advisory advisory advisory advisory advisory opinions
■ ἀμγδοργον ἀγδανβεγεον κλεφωζυ
- σκ δύσικον δονδυςο ήφοχγόβγ
δονσχυβέγμο τοσοσο.
■ არ ისარგებლოთ მოიბავით მენზინის
ან სხვა ფოქებადი სამუალებების
არსებობის ზონაში. მსგაცს ხელსაწყოებში
არსებული მოტორები იძლევიან
ნაპერწვალს, რომელიმაც შესაძლოა აანთოს
ფოქებადი არები.
■ ὁποδοςτοῦ ψσθονδρός - συγ ἐνσονδον
ωσχαβρόνον ψγδμ ἐνδρησις δὲ
οὐο ὅσοβμσίσμός, ψσγγμβάσμος
ζασούρον βγκλυξμ, ἐνδρησον ἐνσούς
ζεγδησιςδίσμό, ἀγσαμήρον ψσθονδρός
ως ἀγεγμηδρόνον οὐ, ἐνδρι δαγεφόγμόνο
δούον ἐνδρησιςδίς. δὲ σαγάσμον
βγκλυξμ, ψσθονδρόνον ζεύσον δὲ
ʒεύσον.
■ ΜΥ ΒΥΜΙΣΗΥΜ ΥΡΟΥΥΩΙ ΥΒΗΣΥΨΜ
ΖΟΒΗΣΗΟΣ, ΖΑΜΟΔΓΟ ΠΜΥΜΜΟ, ΔΜΒΛΥΒΟΟ
ΣΥΝΥΔΥΜΕΣΥΜΟ ΥΡ ΆΥΣΜΦΗΓΟ ΣΟΒΗΣΗΟΣ
ΔΟΥΒΥΒΟ. ΖΟΒΗΣΗΟ ΚΜΥΜΜΟ ΤΥΠΟ
ΣΜΟΛ ΥΡΣΒΟΣΗΟΣ ΔΜΔΣΗΣΗΥΣΜΟ.
ΔΜΥΣΒΥΣΜΥΣΗΥΜΟ ΟΣΣΟ ΆΥΣΔΗΜΟΣ
ΖΟΒΗΜΟΥΒΩΥΣ, ΖΑΜΟΥΒΜΟΣ Α Σ ΔΜΔΣΗΥΣ
ΔΟΝΔΣΗ, ΕΑΣΔΣ ΆΥΣΔΗΜΟΣ ΖΑΜΟΥΣΗΜΟ
ΛΥΜΟΜΗΥΜΟ Α Σ ΘΣΥΣΜΥΜΟ ΒΟΣΒΟ.
ΨΟΜΗΥΔΥΒΩΟΟ ΕΜΔ ΔΟΝΔΣΟ ΒΑΥΚΟΜΟ
ΣΜΟΛ ΙΧΑΜΑΣΗΜΟ ΦΑΣΔΗΜΥΔΗΜΟ
ΛΥΜΜ ΣΤΗΒΩΟΣΔΟ. ΜΥ ΟΣΣΟ ΔΜΟΥΨΣ
ΛΙΣΥΝΟΜΗ ΣΩΤΩΜΗΥ ΦΑΣΔΗΜΥΔΟΛ ΆΥΔΗΨΑ,
qssygm6y8cm03 ysdm63s6m00 gl bs6p6mo. s6slm6gbl ysdmoy6bmon byeml5fym dm6yg6wmsq qsdsg6y8dmyo dnoods3o bs6p6m0m.
gāngdōm lānāndu fāgān bān
A Assimboqngds: hso30m dglsdolscq, hsss dgsd06mn qsbosbdol molz0 bgmlsfymon lsmgdmddolsu. s6 hso35m gsbgmo, gmosns ysbgdqmo qs dzoqgslgnmds. dmoggo mzsmoi qs mzsmoi/ldgbol qsd3o lsadysmdgdo. hso30m lsadysm zmdqmo adm3smo, qsbgmymo gblsdqmo qs bgmonsodsbdno. qsyj39dmeos 2035m dmzmg dmqdo, lsbqmtdo sb osfmo gbbod3gmds.
bgmllshymlz gsdmygbdgsdqg dmyfhy3qm lsdnydsm 3mbozosdo qs dgsdmfjdgm mzsqmol qsdgszo lsdysmcgdjdo, dglsdsdobo gsblsgdtjmo, lsgmqgfbol dsmsblo, fob bsbgmygndbjg bsfoqgdymo dzmszol boufmng.
- EN
- READ ALL INSTRUCTIONS!
- READ OPERATOR'S MANUAL
- SAFETY SYMBOLS
- SYMBOL MEANING
- SAFETY INSTRUCTIONS
- IMPORTANT SAFETY INSTRUCTIONS
- READ ALL INSTRUCTIONS
- TRAINING
- PREPARATION
- OPERATION
- MAINTENANCE AND STORAGE
- OTHER SAFETY WARNINGS
- SAVE THESE INSTRUCTIONS!
- SPECIFICATIONS
- PACKING LIST
- DESCRIPTION
- KNOW YOUR LINE TRIMMER (Fig. A)
- ASSEMBLY
- MOUNTING THE GUARD
- MOUNTING AND ADJUSTING THE FRONT-ASSIST HANDLE
- MOUNTING THE SHOULDER STRAP
- ATTACHING/DETACHING THE BATTERY PACK
- Fully charge before first use
- To Attach
- To Detach
- HOLDING THE LINE TRIMMER
- STARTING/STOPPING THE LINE TRIMMER (Fig. M)
- To Start
- To Stop
- Speed Adjustment Function (Fig. M)
- USING THE LINE TRIMMER
- Before each use, check for damage/worn parts
- After each use, clean the trimmer.
- ADJUSTING CUTTING LINE LENGTH
- LINE REPLACEMENT
- MAINTENANCE
- CLEANING THE UNIT
- STORING THE UNIT
- Protecting the environment
- TROUBLESHOOTING
- WARRANTY
- EGO WARRANTY POLICY
- MONTIEREN DES VORDEREN HALTEGRIFFS
- ANDERE VEILIGHEIDSWAARSCHUWINGEN
- HET APPARAAT SCHOONMAKEN
- HET APPARAAT OPBERGEN
- RENG∅RING AF APPARATET
- OPBEVARING AF APPARATET
- VEDLIKEHOLD OG LAGRING
- DÔLEŽITÉ BEZPEČNOSTNÉ POKYNY
- INÉ BEZPEČNOSTNÉ POKYNY
- CITIȚI MANUALUL DE INSTRUCTIUNI
- KITI SAUGOS ISPĖJIMAI
- LUGEGE KASUTUSJUHENDIT
- OLULISED OHUTUSJUHISED
- OSTALA SIGURNOSNA UPOZORENJA
- Uzbek glutarangamgdoi 2006mboqngdo
- gāngdōm lānāndu fāgān bān
Brand : EGO
Model : ST1530E
Category : Brush cutter