MiJia Robot Vacuum Cleaner - Robot vacuum Xiaomi - Free user manual and instructions
Find the device manual for free MiJia Robot Vacuum Cleaner Xiaomi in PDF.

| Product Type | Robot Vacuum Cleaner |
| Brand | Xiaomi |
| Model | MiJia Robot Vacuum Cleaner (SDJQR01RR) |
| Dimensions | 345 x 345 x 96 mm |
| Weight | Approximately 3.8 kg |
| Battery | 14.4 V / 5200 mAh Lithium-ion |
| Rated Power | 55 W |
| Wireless Connectivity | Wi-Fi |
| Navigation System | Laser distance sensor and ultrasonic sensors |
| Cleaning Modes | Quiet, Normal, Energetic (via app) |
| Partial Cleaning | Yes (1.5 m x 1.5 m area) |
| Scheduling | Yes, via Mi Smart Home app |
| Virtual Barrier Support | Yes (optional accessory) |
| Dust Collector Capacity | Not specified (approx. 0.5 L typical) |
| Charging Base Dimensions | 230 x 109 x 129 mm |
| Charging Base Input | 100-240 V, 50/60 Hz |
| Charging Base Output | 20 V, 2.2 A |
| Auto-Return to Charger | Yes |
| DND Mode | Yes (default 22:00 - 08:00) |
| Filter Replacement Interval | Every 3 months |
| Main Brush Replacement | Every 6-12 months |
| Side Brush Replacement | Every 3-6 months |
| Laser Safety Class | Class 1 (IEC 60825-1:2014) |
| Manufacturer | Beijing Stone Century Science Technology Co., Ltd. (Xiaomi ecological chain) |
Frequently Asked Questions - MiJia Robot Vacuum Cleaner Xiaomi
User questions about MiJia Robot Vacuum Cleaner Xiaomi
0 question about this device. Answer the ones you know or ask your own.
Ask a new question about this device
Download the instructions for your Robot vacuum in PDF format for free! Find your manual MiJia Robot Vacuum Cleaner - Xiaomi and take your electronic device back in hand. On this page are published all the documents necessary for the use of your device. MiJia Robot Vacuum Cleaner by Xiaomi.
USER MANUAL MiJia Robot Vacuum Cleaner Xiaomi
Before using the product, please carefully read this manual and save it properly
natural_image
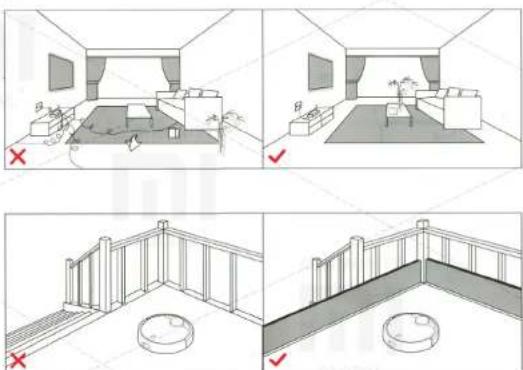
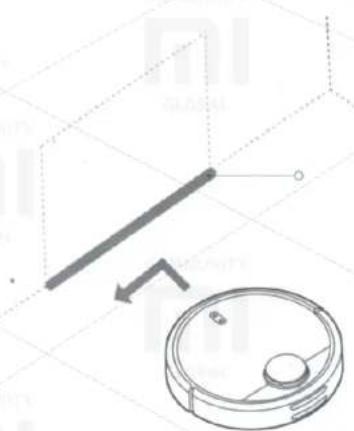
Four-panel line drawing showing interior room layouts and furniture arrangements, with no visible text or symbols.- Connect power cable. Excess of cable is pulled into the housing trough.
Attention! Power cord, hanging down on the floor, can be entangled by the cleaner, or removed from the power outlet, which will cause power interruption.
- On a flat surface set a charging base and connect it to power supply.
Note: Make sure that both sides of a charging base have at least 0.5 m, and front surface has at least 1.0 m of free space.
3. Turning and charging the device.
Press and hold the O button, wait for the ring lamp lights up and press the device to a charging base.
Colour of ring indicator lamp shows an amount of electric charge:
White - 50%;
Yellow - 50% -20%;
Red - less than 20%
Attention! At too low battery level you can not turn on the device, in this case, please press the device to a charging base.
Caution
Before you start cleaning, make sure, that there were no wires and foreign objects on the floor, which are easily overturned, broken or valuable items that may be damaged, or that may be confusing the unit, because of which stucking, collision or whatever may happen way prejudiced person and property.
If the device is used in a space, where there is a height difference, take care of a reliable physical protection - anti-fall device screen, to prevent damage to people and property.
Attention! During a first cleaning, please follow the device personally, and help him in emerging issues - after issues such cleaning is hassle-free. If there are some areas, that do not require cleaning, and the unit can get stuck in them, get a virtual barrier that will deter the unit from entering the above-mentioned areas.
QR code
Fing «Mi Smart Home» App on the manufacturer's page or scan two-dimensional code and download the mobile app, open the lid of the device and search for Wi-Fi status indicator lamp. Follow the instructions in the application.
Wi-Fi status indicator
Slow flashing: Waiting for connection;
Fast flashing: There is a connection;
Continuous combustion: Wi-Fi connection.

Attention! When phone is not connected to a robot cleaner, see «Operating Instructions» - «Reset Wi-Fi».
5. Start Cleaning.
When the round charging indicator finishes blinking white light in the respiratory rate and glows white steady light, it indicates that the device is charged. In this case, briefly press the O button or start the device with a mobile phone.
Thank you for choosing «MiJia» robot cleaner.
«MiJia» robot cleaner - the clever device, which plans a route of cleaning, it is equipped with highly sensitive optical laser and ultrasonic sensors, measuring a distance, and in real-time can build a plan of a room; using space sensors, scanning cleaning route, so cleaning is performed a complete, comprehensive, high-performance.
Cleaning can be carried out in difficult spaces, after cleaning the unit automatically returns to charging, while working, he does not require human attention. You can also remotely control the device, using mobile application, you can see see cleaning scheme and its condition, set cleaning schedule in this one.
Science and technology are changing lives. Starting today, you and your family free from a hassle of cleaning the floor. Enjoy the pleasures of life, use the device with pleasure!
Main device

Charging base
Brush cleaning device
natural_image
Pure electrical circuit lines without any symbolsPower cable
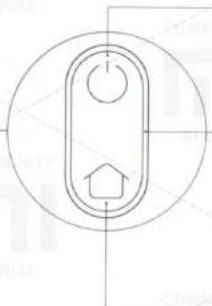
Cleaning / On/Off
Start cleaning by short pressing.
Long pressing - On/Off the device.
Ring indicator lamp;
White color: battery level more than 50%;
Yellow: 50% - 20%;
Red: battery level less than 20%;
Blinking in the respiratory rate: recharge or run;
Fast flashing red: alarm condition.
Return for charging / partial cleaning.
Make a short press the button to return to the charging.
Long press activates a partial cleanup.

Attention! If during cleaning, recharging or partial cleaning, press any button, all the action of the vacuum cleaner temporarily stops.
Overview
- Connect power cable. Excess of cable is pulled into the housing trough.
Attention! Power cord, hanging down on the floor, can be entangled by the cleaner, or removed from the power outlet, which will cause power interruption.
natural_image
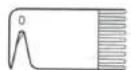
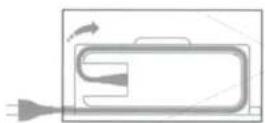
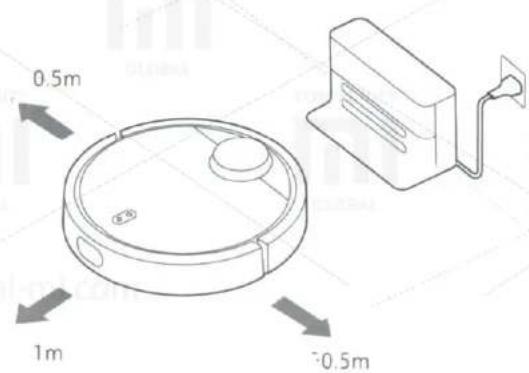
3D diagram of a rectangular electronic component with labeled dimensions (0.5m, 1m, 0.5m) and no readable text or symbols beyond measurement annotations.- On a flat surface set a charging base and connect it to power supply.
Note: Make sure that both sides of a charging base have at least 0.5 m, and front surface has at least 1.0 m of free space.
- Turning and charging the device.
Press and hold the O button, wait for the ring lamp lights up and press the device to a charging base.
Usage
natural_image
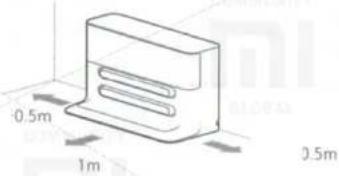
Technical line drawing of a vacuum cleaner with mounting bracket and circular housing (no text or symbols)Colour of ring indicator lamp shows an amount of electric charge: White - 50%;
Yellow - 50% -20%; Red - less than 20%
Attention! At too low battery level you can not turn on the device, in this case, please press the device to a charging base.

Top lid
Wi-Fi status indicator
4. QR code
Fing «Mi Smart Home» App on the manufacturer's page or scan two-dimensional code and download the mobile app, open the lid of the device and search for Wi-Fi status indicator lamp. Follow the instructions in the application.
Wi-Fi status indicator
Slow flashing: Waiting for connection;
Fast flashing: There is a connection;
Continuous combustion: Wi-Fi connection.
Attention! When phone is not connected to a robot cleaner, see «Operating Instructions» - «Reset Wi-Fi».
- Start Cleaning.
When the round charging indicator finishes blinking white light in the respiratory rate and glows white steady light, it indicates that the device is charged. In this case, briefly press the O button or start the device with a mobile phone.
Usage
On/Off
Long press O button and the device is turned on, indicating ring lamp lights up and the cleaner listens for commands. When the appliance is in standby (quiescent), long press O button to switch off, cleaning is finished.
Attention! it is impossible to turn off the device during charging.
Cleaning.
After short pressing O button cleaning starts (cleaning algorithm, see the diagram on the right). Pressing any button during cleaning comes a pause mode.
Caution!
At too low a charge is impossible to start cleaning up, please charge the device and start again.
When, during the cleaning, a battery level falls below a critical line, the unit automatically returns to base to recharge, after the recharge to an acceptable level, it automatically returns to a place, where cleaning was interrupted, and continues it.
Before cleaning, please make sure, that no wire on the floor (including power cable from a charging station), to prevent them tangling the device and pulling them out of the network, damage wires and objects.
If cleaning is finished in less than 10 minutes, it is performed again by default.
Charging.
Auto: After cleaning, the unit automatically returns to base to recharge.
Manual: During pause, quickly press «Home» button, then the unit returns to base to recharge and ring indicator lamp starts flashing slowly.
Note!
If the device is unable to find a charging base, help him manually.
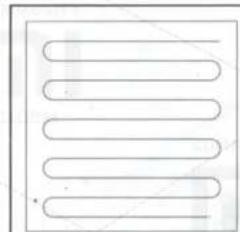
Cleaning algorithm
After starting a cleaning, the device performs its intellectual scheme of scanning, along the walls, dividing the space into zones, building zones of cleaning route as Latin letter Z.
When the cleaner have finished cleaning in one area, it moves to the next with no gaps. When the entire cleaning is finished, the device automatically returns to base to recharge.
Zone 1 - already cleaned
Zone 2 - already cleaned
natural_image
Pure diagram of three parallel U-shaped pipes without any text, numbers, or symbols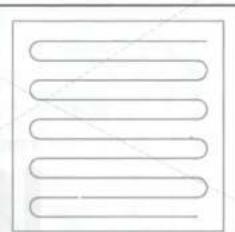
natural_image
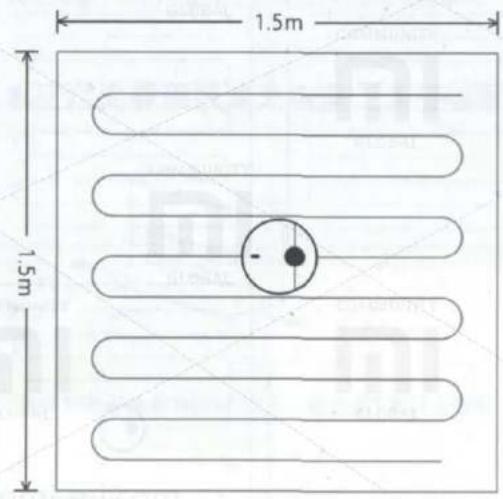
Pure diagram of parallel wavy lines inside a square frame (no text or symbols)Zone 4 - awaiting for cleaning | Zone 3 - now cleaning
natural_image
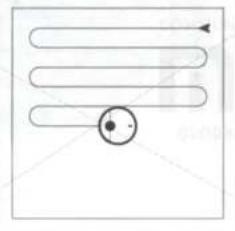
Simple line drawing of a coiled tube with a circular end, no text or symbols presentPartial cleaning
While the device is in standby or pause, long press «Home» button, a partial cleaning automatically begins; its algorithm is cleaning zone 1,5 m x 1,5 m around the device, after the vacuum cleaner automatically returns to the starting point of partial harvesting and goes to stop mode.
Attention! If during a partial turn pause mode, cleaning will be completed.
Pause
During a movement of device, press any button.
When you click O button, cleaning continues. When you press «Home» button, unit returns to base to recharge and cleaning will be completed.
Note: If, during a pause, you press the device to a charging base, cleaning will be completed.
State of accident
When, during the motion of the device, fault occurs, ring light indicator starts rapidly flashing red, accompanied by a voice indication. Ways to solve emergency problems, see. «Solving problems upon detection of faults.»
Note!
If an alarm condition occurs, and the device not taken more than 10 seconds, it automatically goes into sleep mode.
If in event of an emergency condition, press the device to charging base, the cleaning will be completed.
Sleep mode
If the unit does not operate for more than 10 seconds, it automatically goes into sleep mode. A ring light indicator flashes red once per second. If, during sleep, press any button, the device can be awakened.
Note!
During charging on a basis, the device may not enter Sleep mode. After 12 minutes in Sleep mode, it automatically turns off.
Planning of cleaning
Using the mobile app, you can schedule cleaning for some time, and the unit will automatically start cleaning at a selected time, and after automatically return to base to recharge.
Wi-Fi Reset
When, for hardware reasons, or if you have forgotten Wi-Fi password, etc., you can not connect and operate the device, using a mobile phone, open an upper hinged cover, and then you will see a Wi-Fi status indicator, simultaneously press and hold the buttons O and «Home», at this time you will hear a voice command «Reset Wi-Fi». Wait, till indicator flashes slowly again, restart was successful.
Cleaning algorithm
With the mobile app, you can choose a quiet, normal and energetic cleaning mode. By default, the standard mode.
DND mode
In «Do Not Disturb» mode the instrument can not continue to clean and speech means informs about it. Frequency of ring indicator flashing reduced. «Do Not Disturb» mode configured to 22.00 to 08.00 by default. With the mobile application mode «Do not disturb» You can enable or reprogram his time ..
Virtual barrier
This is a non-standard addition, can be purchased at www.mi.com Virtual barrier can be used to limit the location of undesirable areas for the device, for example, dangerous changes in levels, steps, places where it is possible jamming device.
Attention! Very carefully and firmly attach barriers, that they do not come unstuck, otherwise their application will be ineffective.
natural_image
Technical diagram showing a mechanical component with a circular housing and a diagonal line, no text or symbols present.Virtual barrier
Attention! Place virtual horizontal barriers on the way of the device.
natural_image
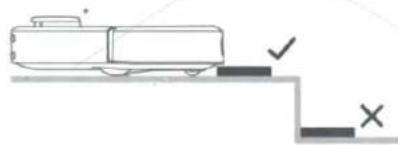
Simple line drawing of a vehicle on a track with checkmark and cross symbols (no text or labels)Charging base
Base for recharging should be placed on a flat surface, leaning to wall, providing each side of not less than 0.5 m, and in front of at least 1.0 m of free space, and attached to a power outlet. To ensure satisfactory reception of Wi-Fi mobile phone, its position in the area of good signal.
Attention! Do not place the recharging base in the areas of direct sunlight or in places, where access to it is difficult, and there can be problems with the device for return to the recharging base.
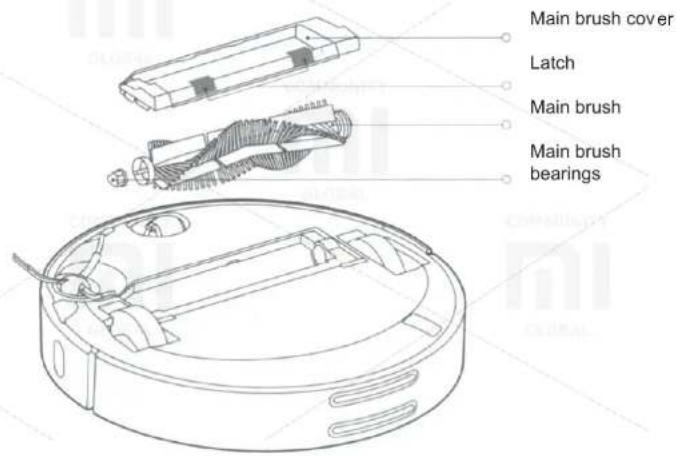
Daily care
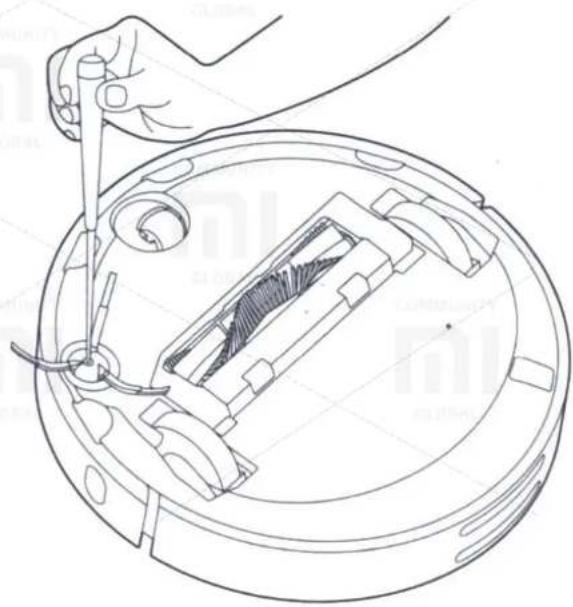
Main brush. Weekly cleaning recommended
- Click on a tab at the bottom of the device and remove a main brush;
- Pull a main brush and clean bearings of the main brush;
- Clean hair, tangled on the main brush, using a tool to clean the main brush that is included;
- Replace the main brush and secure it with the cover latch.
Note!
It recommended for cleaning effectiveness every 6-12 months change the main brush
Daily care
A method of cleaning the main brush with supplied tool.
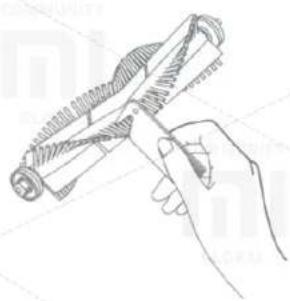
natural_image
Line drawing of a hand holding a coiled spring or screwdriver (no text or symbols)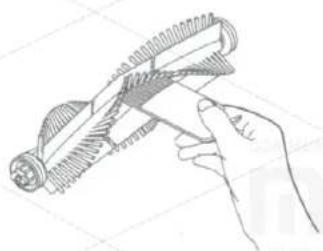
natural_image
Hand holding a mechanical tool with threaded end and base, no visible text or symbols- Open the front cover of the dust container
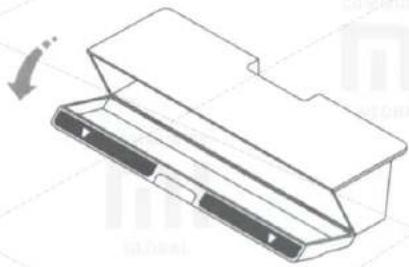
natural_image
Technical line drawing of a mechanical component with a downward arrow indicating motion (no text or symbols)Dust collector and filter grid
It is recommended to clean weekly.
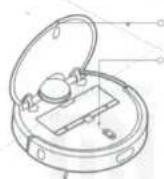
- Lift a top cover of the device, press a latch and pull a dust collector.
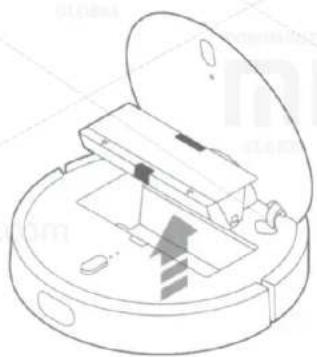
natural_image
Diagram of a robotic vacuum cleaner with open lid and internal components (no text or symbols)- Empty trash from the dust collector
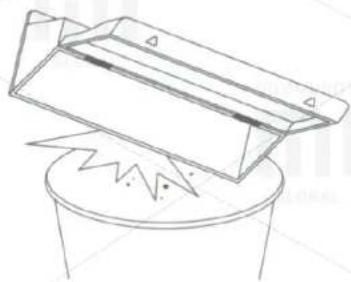
natural_image
Line drawing of a mechanical component with a zigzag base and triangular housing (no text or symbols)Attention! To avoid clogging the filter mesh, please knock on the dust collector, emptying trash.
Filter grid can not be washed with water, otherwise it becomes clogged with dust, and it will affect a cleaning efficiency.
Attention! It is recommended to be changed filter grid every 3 months to ensure cleaning efficiency.
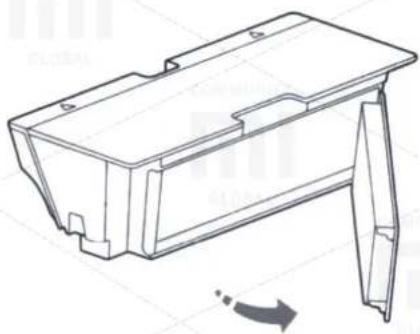
natural_image
Technical line drawing of a mechanical housing component with a directional arrow indicating motion (no text or symbols)Remove and change a filter grid, as illustrated
Battery
The device used a powerful high-performance lithium-ion battery pack; during daily use of the device, please watch a battery status.
Attention! If the device is not used for a long time, during storage of the device at least once in 3 months to charge a battery to prevent abnormal discharge of batteries.
The side brush should be cleaned monthly
- Turn off the device and remove a side brush mounting screws;
- Pull out and clean a side brush;
- Place a side brush back and tighten the screws.
Attention! It is recommended every 3 - 6 months change a side brush to ensure cleaning efficiency.
natural_image
Technical line drawing of a mechanical assembly with a hand holding a tool, showing internal components and no text or symbols.Turning wheel; «360 degrees» recommended to clean daily
- Turn off the device and remove turning wheel;
- Clean a wheel and its bearings from hair and sticky substances;
- Fit a wheel back.
Sensors of the device
recommended to clean monthly
Use a clean cloth to clean all sensors of the cleaner, including:
- Four sensor hovering over a bottom rung of the device;
- The motion sensor along a wall at the right of the device;
- Charging contacts at the back of the device.
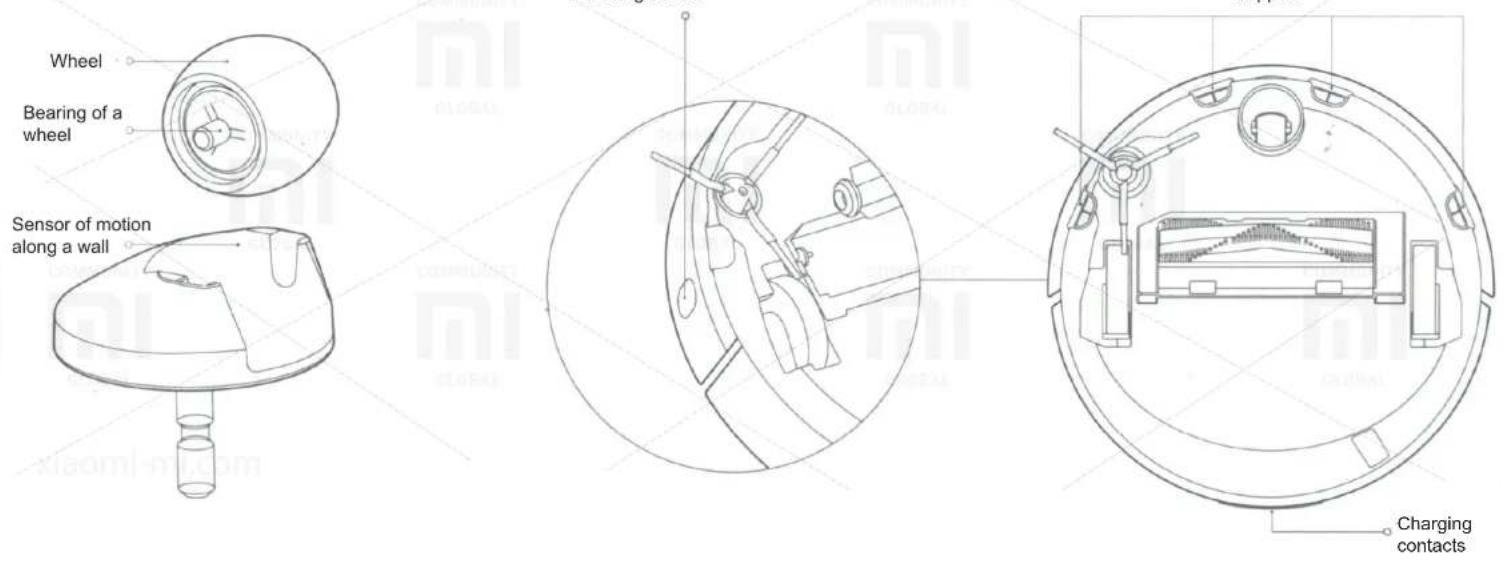
Hovering sensor
Support
Charging base
recommended to clean monthly
Use a clean cloth to clean contacts.
Software update
Use an mobile app to update the device's software, before update, make sure that charge is at least 20%.
When you update a software, ring indicator light quickly flashes white.
System reset
If there is no response on pressing buttons or inability to turn off the device, please try to reboot the system by pressing a system reset button (see. Section 2), and the unit will automatically start again.
Attention! Rebooting the system will destroy properties of scheduled cleanings and cleaning modes and also to reboot the Wi-Fi connection.
Reset to factory settings
If, after reboot, normal operation of the device is not restored, press and hold «Home» button and simultaneously press once a system reboot button, you will hear a voice message «Return to initial factory settings» and system will return to factory settings.
| Main parameters | |
| Dimensions | 345X345X96 mm |
| Battery | 14,4 b/5200 mAh Lithium |
| Weight | About 3,8 kg |
| Wireless connection | Wi-Fi, fast |
| Rated voltage | 14,4 V |
| Rated power | 55 W |
| Charging base | |
| Dimensions | 230X109X129 mm |
| Rated power | 55 W |
| Rated voltage | 100 – 240 V |
| Output rated voltage | 20 V, 2,2 A |
| Rated frequency | 50 / 60 Hz |
The name and contents of harmful substances
| Parts | Harmful substance | |||||
| Pb | Hg | Cd | 6-valent Cr | Polybrominated biphenyls | Polybrominated diphenyl ethers | |
| Circuit board | x | o | o | o | o | o |
| Metallic parts | o | o | o | o | o | o |
| Housing | o | o | o | o | o | o |
| Battery elements | o | o | o | o | o | o |
| Other parts | o | o | o | o | o | o |
| This specification is designed on the basis of requirements, established by SJ / T 11364 regulations.O shows, that the content of this harmful substance in the said portion below the permissible GB / T 26572 standard level.X shows, that the content of this harmful substance in the said part at least in one city over the allowable GB / T 26572 level 5 standard. | ||||||
Troubleshooting
In the event of emergency situations, a ring indicator light flashes red rapidly and you will hear a voice message. In this case, please review contents of the table and fix a problem.
| Fault indication | Method of resolving |
| Error 1: Please check whether a surface of laser distance sensors is not blocked. | If laser distance sensors is covered by foreign objects, you need to remove it and clean sensors, if then the device does not start, move it to a new place and try to run. |
| Error 2: Clean and lightly stir collision sensors. | Collision sensors are stuck, please move them slightly and remove foreign objects, if there are no foreign objects, move the device to a new location and try to run. |
| Error 3: Move the device to another location and start. | Wheels hung over the void. Move the device to a new location and run. |
| Error 4: Clean hovering sensors, move the device to a new location and run. | The device has been in place, where there is a height difference: Move the device to a new location and run; if sensors are hovering over a step very clogged, they can stop working; wipe them. |
| Error 5: Clean a fishing line and bearings of the main brush. | Foreign objects reeled on a main brush. Remove them and clean a bearings and a fishing line of reeled the main brush. |
| Error 6: Remove and clean the side brush. | Foreign objects reeled on a side brush, remove a side brush and clean it. |
| Error 7: Check if main wheels stuck. Move the device to a new location and run. | Foreign objects reeled on main wheels. Clean them, move the device to a new location and run. |
| Error 8: Clean an area around the device from obstacles. | The device can be stuck. Clean an area around the device from obstacles. Move the device to a new location and run. |
| Error 9: Replace a dust collector and filter grid. | Replace the dust collector and filter grid, check whether they are in their places; If yes, but the problem persists, check and adjust the filter grid. |
| Error 10: Clean or change a filter grid. | The filter grid can be clogged, clean it, if you cannot check - change it. |
| Error 11: There may be strong magnetic fields, move the device from a virtual barrier. | When launching, the device was at a virtual barrier. Move the device to a new location and run. |
| Indication of fault | Method of resolving |
| Error 12: Battery level is too low, recharge the device. | The charge is insufficient, please recharge the device and enjoy more. |
| Error 13: Charging fault, check contacts on a charging base. | Clean contacts on a charging base and on the device with a soft cloth. |
| Error 14: Battery fault. | Batteries overheated or too cold, soak the cleaner in normal temperature and use it again. |
| Error 15: Wipe moving along wall sensors. | Orientation along a wall sensors covered with dust, wipe them. |
| Error 16: Place the device on a flat surface and start again. | When launching, the device was on an incline. Place the device on a flat surface and start again. |
| Error 17: Side brushes fault: reset the system. | Side brushes does not work as it should. Reboot the system. |
| Error 18: Suction fan fault, check it and try to reboot the system. | The suction fan is not working as it should. Check it out and try to reboot the system. |
| Error 19: There is no current on recharging base. Check connection to a power supply. | Charging base power cable can be turned out of a socket, check, plug it...in and start the cleaner again. |
| Internal error, try to reboot the system | If the device does not work, try restarting the system. |
System reset should solve some problems
Information about safety
Information about dangers of laser light: Laser distance measurement sensor on this unit complies with IEC 60825-1: 2014 Product type 1, and causes no harmful laser radiation.
Executive Standard: GB 4706.1-2005, GB 4706.7-2005, GB 4343.1-2009, GB17625.1-2012, Q / BJSTS0001-2016, Q / BJSTS0002-2016
The list of possible malfunctions of the robot cleaner «MiJia»
| A list of specific malfunctions of the robot cleaner «Mijia» | |
| Name | Malfunction |
| Main unit | Low efficiency, then described in user's instructions. |
| The device no turns on. | |
| A main brush, side brush, fan, wheels not work. | |
| Charging base | No current on the main unit |
| Power cable | No power on charging base |
| Manufacturer:Beijing Stone Century Science Technology Co., Ltd. (Xiaomi Ecological chain enterprise)Product SKU: SDJQR01RRAddress: Beijing, Haidian District, Heiquan Road, 8, Block C, 6th floor, office 6016,6017,6018Executive Standard: Q / BJSTS0001-2016, Q / BJSTS0002-2016 | Direction: Xiaomi Communication TechnologyCo. Ltd.If you have questions regarding the list of organizations authorized to carry out maintenance Xiaomi, please read it onlinewww.mi.com/service or call Xiaomi service. |