
IAN 287910 - Fitness Equipment CRIVIT - Free user manual and instructions
Find the device manual for free IAN 287910 CRIVIT in PDF.

| Product type | Multifunction fitness equipment |
| Brand | Crivit |
| Model | IAN 287910 |
| Dimensions (L x W x H) | 180 x 100 x 210 cm |
| Device weight | Approx. 85 kg |
| Maximum user weight | 120 kg |
| Materials | Steel, polyurethane foam, leatherette |
| Power supply | None (manual device) |
| Main functions | Bench press, lat pulldown, rowing, leg press, assisted pull-ups |
| Number of exercises | Up to 15 different exercises |
| Adjustments | Adjustable bench height, adjustable pulling strap |
| Included accessories | Pull-up bar, rope, high and low pulley |
| Maintenance and cleaning | Clean with a soft cloth and soapy water. Do not use solvents. |
| Safety | Regularly check the fastenings. Do not exceed the maximum load. |
| Spare parts and repairability | Spare parts available through Crivit customer service |
| Warranty | 3 years (except wear parts) |
| Standards | Compliant with CE and EN 957 standards |
Frequently Asked Questions - IAN 287910 CRIVIT
User questions about IAN 287910 CRIVIT
0 question about this device. Answer the ones you know or ask your own.
Ask a new question about this device
Download the instructions for your Fitness Equipment in PDF format for free! Find your manual IAN 287910 - CRIVIT and take your electronic device back in hand. On this page are published all the documents necessary for the use of your device. IAN 287910 by CRIVIT.
USER MANUAL IAN 287910 CRIVIT
natural_image
Two black metal chain levers with loop handles, one labeled 'PRO' and the other marked 'WW', displayed against a white background (no text or symbols on the levers themselves)www.lidl-service.com
KLIMMZUGSTANGE PULL-UP BAR BARRE DE TRACTION
DE AT CH
KLIMMZUGSTANGE
Bedienungsanleitung
FR BE
BARRE DE TRACTION
Instructions for use
NL BE
PULL UP BAR
Gebruiksaanwijzing
ES
BARRA DE TRACCIÓN
natural_image
Two sequential illustrations of a person performing a pull-up exercise, showing body posture and movement (no text or symbols)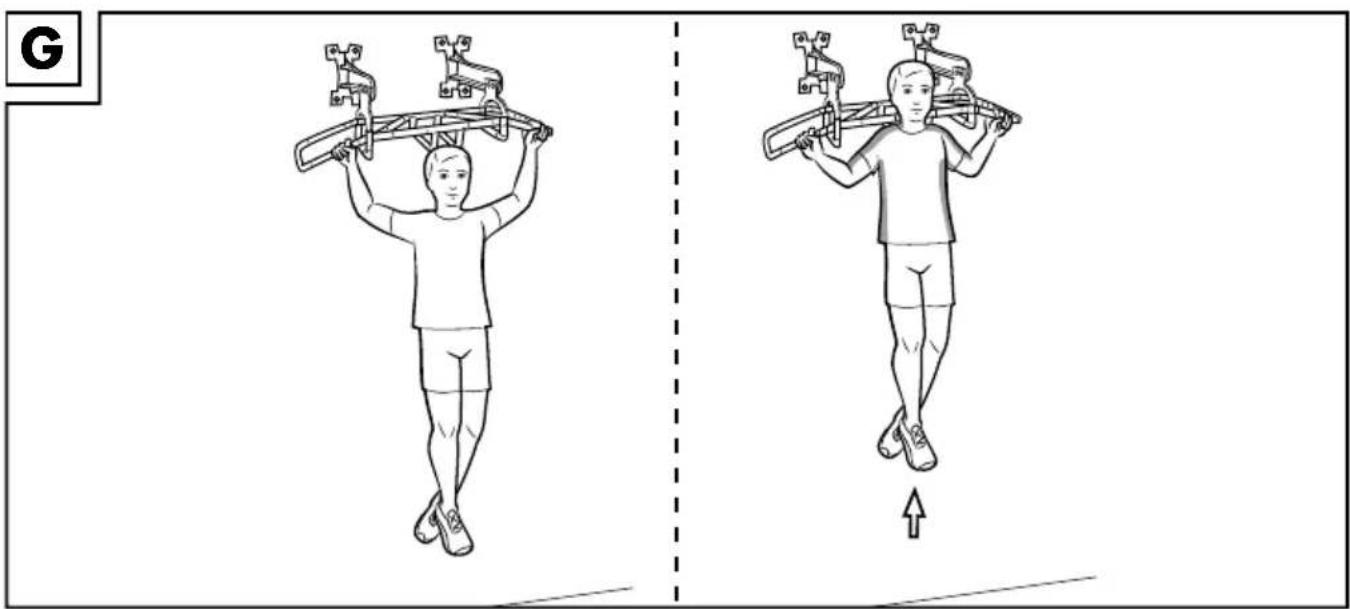
natural_image
Illustration of a person performing a stretching exercise with arms raised, showing two sequential poses (no text or symbols)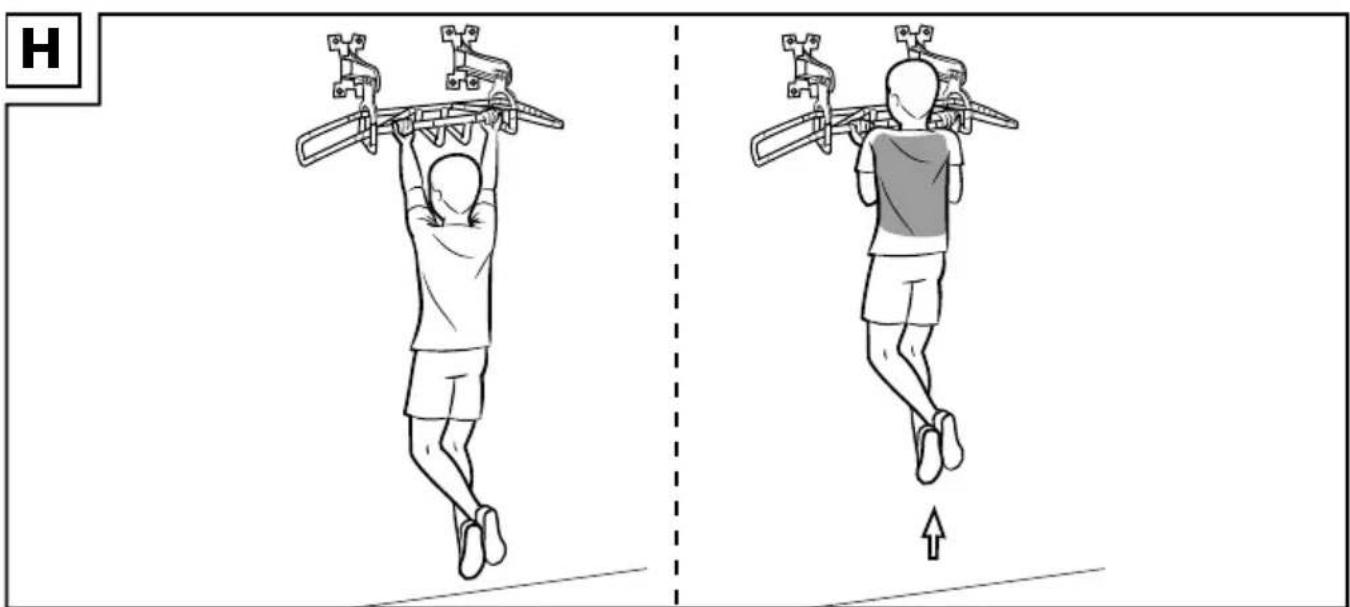
natural_image
Illustration of two athletes performing a physical exercise with arms and weights, showing posture changes (no text or symbols)
natural_image
Three sequential illustrations of a person performing a seated exercise with arms and legs raised, showing posture changes (no text or symbols)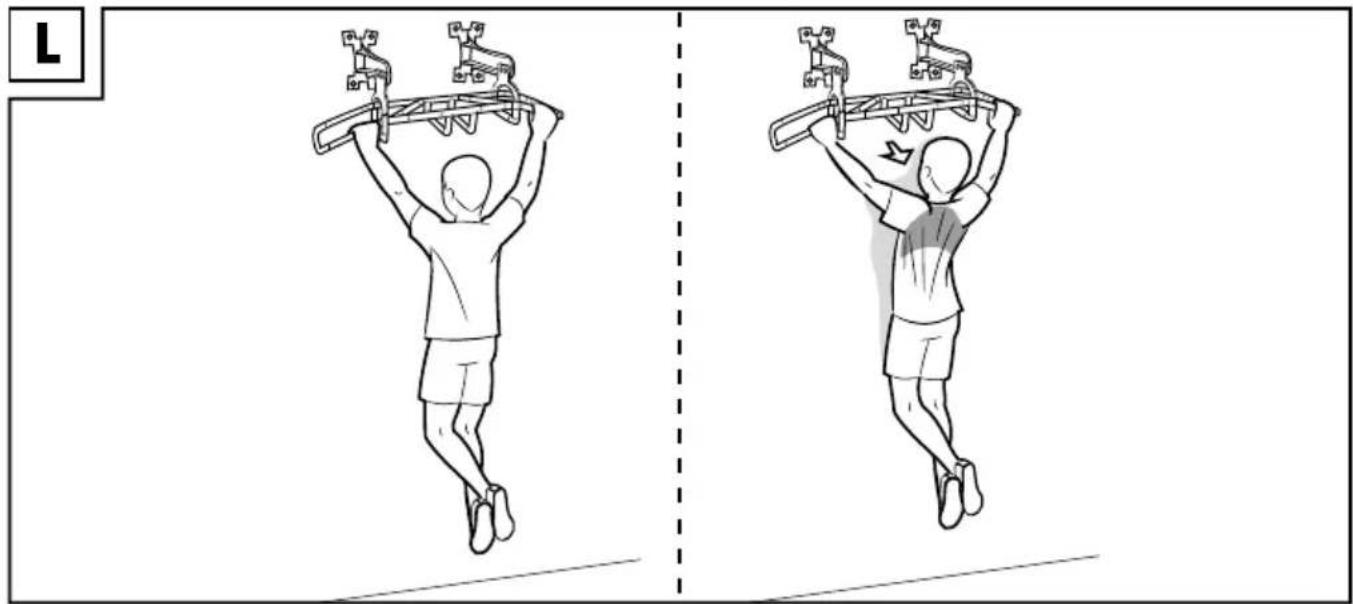
natural_image
Two identical line drawings of a person lifting a beam with weights, shown from different angles (no text or symbols)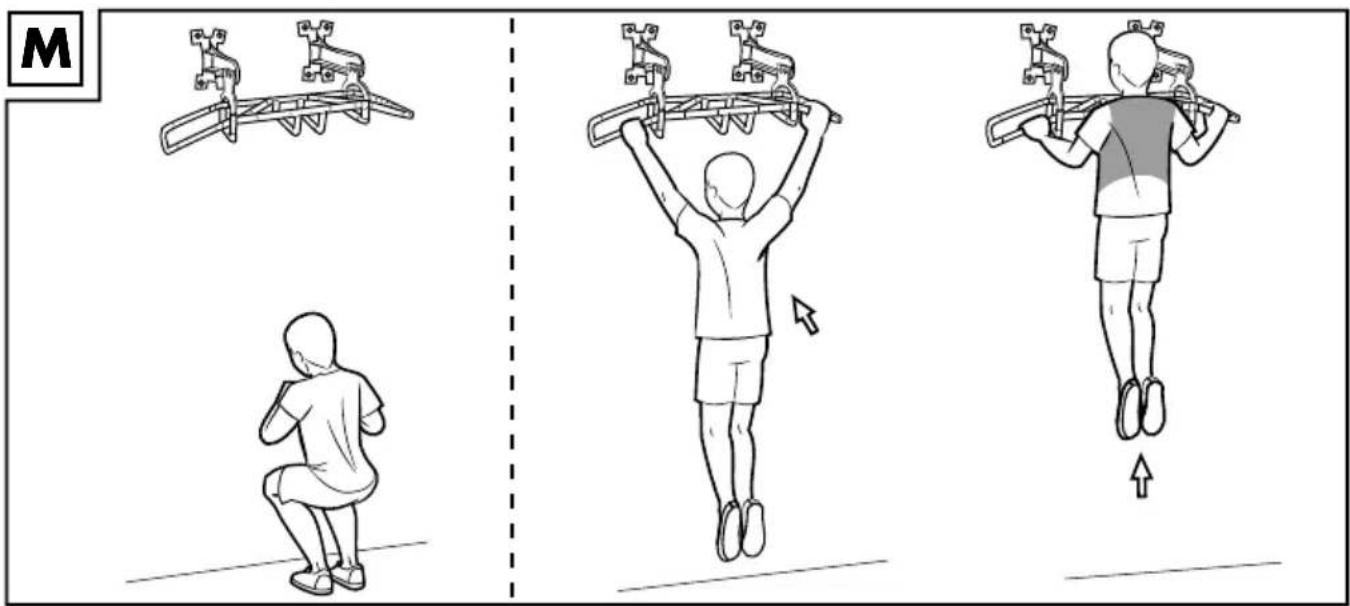
Scope of delivery (fig. A) 17
Technical data 17
Correct use 17
Safety notes 17-18
Risk of injury! 17 - 18
Particular caution - Risk of injury for children! 18
Risks from wear 18
Important information prior to mounting .....18
Mounting the product 18-19
General training notes 19
Warming up 19 - 20
Exercise suggestions 20 - 22
Stretching 22
Care and Storage 22
Disposal 22
Notes on the guarantee and service handling 22
FR BE
With your purchase you have decided on a high-quality product. Get to know the product before you start to use it.
Carefully read the following instructions for use.
Use the product only as described and only for the given areas of application. Keep these instructions safe. When passing the product on to a third party, always make sure that the documentation is included.
Scope of delivery (fig. A)
1 x Pull-Up Bar (1)
2 x Mounts (2)
4 x Screws (3)
4 × Nuts (4)
8 x Washers (5)
1 x Drill template (6)
1 x Training poster
1 x Instructions for use
Technical data
Dimensions ceiling-mounted:
114.5 × 64 × 23cm (W × H × D)
Dimensions wall-mounted:
114.5 × 38.5 × 51cm (W × H × D)
Total weight: 15kg
Class H training equipment (Home area)
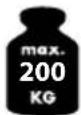
Max. user weight: 200kg

Date of manufacture (month/year):
17
Correct use
This fitness product is designed for private, indoor use and is not suitable for medical or commercial purposes.
The product is not suitable for children under the age of 14.

Safety notes
Risk of injury!
- Consult with your doctor before you begin training. Please ensure that your health is suitable for the training.
- Keep the instructions for use with the exercise descriptions to hand at all times.
- The product is not suitable for children under the age of 14 as children are unable to assess potential risks. The product also contains small parts that could be swallowed by children.
- Attention! The product is only suitable for solid concrete walls. Only use the suitable dowels for corresponding construction materials.
- The assembly must be carried out by an adult and its stability then tested.
- Pregnant women should only train following consultation with their doctor.
• Always remember to warm up before training and train in accordance with your current abilities. Excessive exertion and overtraining may cause serious injury. Cease training immediately if you experience complaints, weakness, or fatigue and consult a doctor
- The product may only be used by one person at a time.
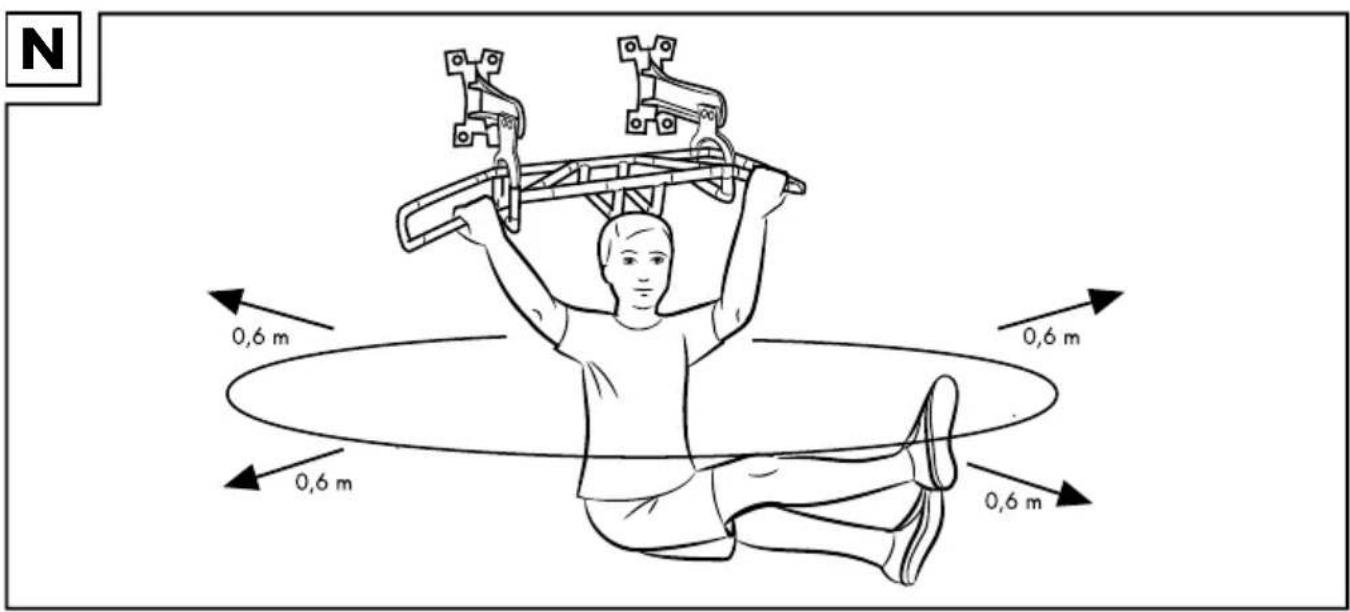
- Please ensure there is a free area of at least 0.6m around the training area (fig. N).
- Do not use the product in the vicinity of stairs or steps.
- Use the product at your own risk.
- This product may only be used by persons who are familiar with the safety notes.
- The maximum load capacity of the product is 200kg.
- Please check the stability again before each use by pulling and shaking the product firmly.
- Check that the screw connections are tight before each use.
- Not suitable for the attachment of dynamic parts, e.g. swings.
- Do not perform exercises during which your head is tilted towards the floor.
• The product is only suitable for private use.
- The product may only be used under adult supervision and may not be used as a toy.

Particular caution – Risk of injury for children!
- Do not allow children to use the product without supervision. Instruct them regarding the correct use of the product and supervise them. Only allow use if the mental and physical development of the children allows it. This product is not suitable for use as a toy.

Risks from wear
- The product may only be used in perfect condition. Inspect the product for damage or wear before each use. The safety of the product can only be guaranteed if it is inspected regularly for damage and wear. Discontinue use if damage is found.
- Only use original replacement parts.
- Protect the product from extreme temperatures, sun, and moisture. Incorrect storage or use of the product can lead to premature wear and this can result in injury.
- The self-locking effect on parts that are susceptible to wear, e.g. the nuts on the screws, can decline after being assembled several times. Replace these parts with original replacement parts where necessary.
Important information prior to mounting
You must observe the following before mounting the product on the wall or ceiling.
Attention! The product is only suitable for solid concrete walls. Only use suitable 10mm bolt anchors or long dowels for corresponding construction materials and ceilings or for load-bearing masonry.
Seek advice from an expert prior to assembly.
Suitable mounting location
A solid concrete wall or ceiling or a full brick wall are suitable locations for mounting.
Note: Other kinds of mounting structure must be checked by an expert for loading capacity and stability.
Attention! It is not permitted to mount the product in perforated bricks, hollow blocks, aerated concrete, plasterboard, gypsum fibreboard, or wood.
Suitable mounting material
The wall or ceiling material must be determined before mounting the product.
Corresponding assembly materials must be selected for mounting if the mounting location is able to carry the load.
The wall mounting must withstand a tensile load of 200kg (2000 N) on each screw.
Mounting materials:
- Long dowels ∅ 10/120 for concrete and load-bearing masonry
- Bolt anchors M10x120 for concrete (plus one washer and one nut per bolt anchor)
Note: Ask a specialist retailer and choose the correct size and thickness of the corresponding material for your own safety.
Suitable height
When you mount the product on the ceiling the height is given. Mount the product on the wall at a height that you can still reach from the floor but so that you can still execute the exercises without touching the floor.
Note: The product must be mounted on the wall horizontally. Otherwise there is a risk of muscle tension caused by an uneven load on arm muscles and the shoulder area.
Mounting the product
You can mount the product on a wall or on the ceiling. Mount the pull-up bar (1) on the mounts (2) depending on where the product is to be attached.
Note: Two people are needed in order to mount the product.
You will need a suitable pen and a spirit level in order to mark the drill holes. You will need a drill with the correct drill bits in order to drill the holes.
Note: Select the correct drill depending on the characteristics of the wall.
In order to mount the product you will need a suitable screwdriver or a ratchet spanner with the standard attachment. The tools are not included in the scope of delivery.
Assembly for wall mounting (fig. B, C)
- Measure the correct height of the product on the wall and place the drilling template (6) at this position (fig. B).
- Take a spirit level and correct the position of the drill template (6) as necessary until it is horizontal on the wall.
- Mark the drill holes with a pen and remove the drill template (6).
- Drill the holes in the wall using the drill.
Make sure that you adhere to the correct drill bit size and the correct drilling depth. - Insert a long dowel or a bolt anchor into each drill hole.
Note: Two people are required to mount the product.
-
Fix the mounts (2) using the corresponding materials (see the section 'suitable mounting material'). Make sure that the Crivit Pro logo is visible on the outside.
-
Hold the pull-up bar (1) from the inside against the holes (2a) (2b) on the mounts (2) and place one washer (5) on each of the screws (3).
-
Insert the screws (3) with the washers from outside through the holes (2a) (2b) on the mounts (2) and the pull-up bar (1).
-
Place a further washer (5) and a nut (4) on each of the screw ends.
-
Tighten the nuts (4).
Note: Ensure that the screws (3) are secured tightly and the pull-up rod (1) is mounted tightly to the mounts (2).
Ceiling mounting (fig. D, E)
- Find a suitable location on the ceiling and place the drilling template (6) at this position (fig. D).
Note: Make sure that you have sufficient space around you.
-
Mark the drill holes with a pen and remove the drill template (6).
-
Use a drill to drill the holes in the ceiling. Make sure that you adhere to the correct drill bit size and the correct drilling depth.
-
Insert a long dowel or a bolt anchor into each drill hole.
Note: Two people are required to mount the product.
-
Fix the mounts (2) using the corresponding materials (see the section 'suitable mounting material'). Make sure that the Crivit Pro logo is visible on the outside.
-
Hold the pull-up bar (1) from the inside against the holes (2a) (2c) on the mounts (2) and place one washer (5) on each of the screws (3).
-
Insert the screws (3) with the washers (5) from outside through the holes (2a) (2c) on the mounts (2) and the pull-up bar (1).
-
Place a further washer (5) and a nut (4) on each of the screw ends.
-
Tighten the nuts (4).
Note: Ensure that the screws (3) are secured tightly and the pull-up rod (1) is mounted tightly to the mounts (2).
General training notes
Training procedure
- Wear comfortable sportswear and trainers.
- Warm up before every session and cool down gradually afterwards.
• Take sufficiently long breaks between exercises and make sure to drink enough. - If you are a beginner, do not start exercising at too high of an intensity. Increase your intensity slowly.
- Perform all of the exercises steadily, without fast, sudden movements.
- Focus on steady breathing. Breathe out upon exertion and breathe in during recovery.
- Focus on the correct posture when performing the exercises.
Warming up
Take enough time before every training session to warm up. Some simple exercises for this purpose are described in the following.
Repeat each exercise 2 to 3 times.
Neck muscles
- Turn your head slowly to the left and then to the right. Repeat this movement 4 to 5 times.
- Circle your head, first in one direction and then in the other.
Arms and shoulders
- Interlock your hands behind your back and pull them carefully upwards. If you bend your upper body forwards at the same time all the muscles are warmed up optimally.
- Circle both of your shoulders simultaneously, first forwards for a minute and then backwards.
- Pull your shoulders up to your ears and then let them fall down again.
- Rotate your left and right arms alternately in circles, forwards for a minute and then backwards.
Important: Don't forget to continue breathing normally during the exercises!
Exercise suggestions
The following shows some of the many possible exercises.
Pull up with overhand grip to chest (fig. F)
Main muscle group: Back muscles
Starting position
- Grip both ends of the product from above, as shown.
- Cross your feet and bend your knees backwards slightly.
End position
- Tense your buttock, arm, and stomach muscles.
- Slowly pull your upper body upwards and pull your shoulder blades towards your spine. Keep your shoulders down and keep tensing your stomach muscles.
- Your arms should be tensed and high enough that your ribcage is level with the middle beam of the product.
-
Your head should be in line with your spine and should not be overextended.
-
Stay in this position for a moment and then lower yourself slowly back down.
-
Repeat this exercise 5 to 10 times for 3 sets.
Important: Perform the movements slowly and maintain your body tension throughout.
Pull up bar with underhand grip to neck (fig. G)
Main muscle group: Back muscles
Starting position
- Stand with your back to the product.
- Grip both ends of the product from below, as shown.
- Cross your feet and bend your knees slightly.
End position
-
Tense your buttock, arm, and stomach muscles.
-
Slowly pull your upper body upwards and pull your shoulder blades towards your spine. Keep your shoulders down and keep tensing your stomach muscles.
-
Your arms should be tensed and high enough that your neck is level with the middle beam of the product.
-
Your head should be in line with your spine and should not be overextended.
-
Stay in this position for a moment and then lower yourself slowly back down.
-
Repeat this exercise 5 to 10 times for 3 sets.
Important: Perform the movements slowly and maintain your body tension throughout.
Pull up bar with narrow underhand grip to chin (fig. H)
Main muscle groups: Back and biceps muscles
Starting position
- Grip the product as shown from below in the middle of the front beams. Your arms should be close to your head.
- Cross your feet and bend your knees backwards slightly.
End position
- Tense your buttock, arm, and stomach muscles.
-
Slowly pull your upper body upwards and pull your shoulder blades towards your spine. Keep your shoulders down and keep tensing your stomach muscles.
-
Your arms should be tensed and high enough that your chin is level with the middle beam of the product.
-
Your head should be in line with your spine and should not be overextended.
-
Stay in this position for a moment and then lower yourself slowly back down.
-
Repeat this exercise 5 to 10 times for 3 sets.
Important: Perform the movements slowly and maintain your body tension throughout.
Hanging leg lifts, bent and straight (fig. 1)
Main muscle group: Stomach muscles
Starting position
- Stand with your back to the product.
- Grip both ends of the product from above, as shown.
- Cross your feet.
End position
- Tense your buttock, arm, and stomach muscles.
- Pull your knees in towards your body and then stretch your legs upwards. Keep your shoulders down and keep tensing your stomach muscles.
- Your arms should be tensed and your legs should be close to your upper body.
- Stay in this position for a moment and then lower your legs to the starting position.
- Repeat this exercise 10 to 15 times for 3 sets.
Important: Perform the movements slowly and maintain your body tension throughout.
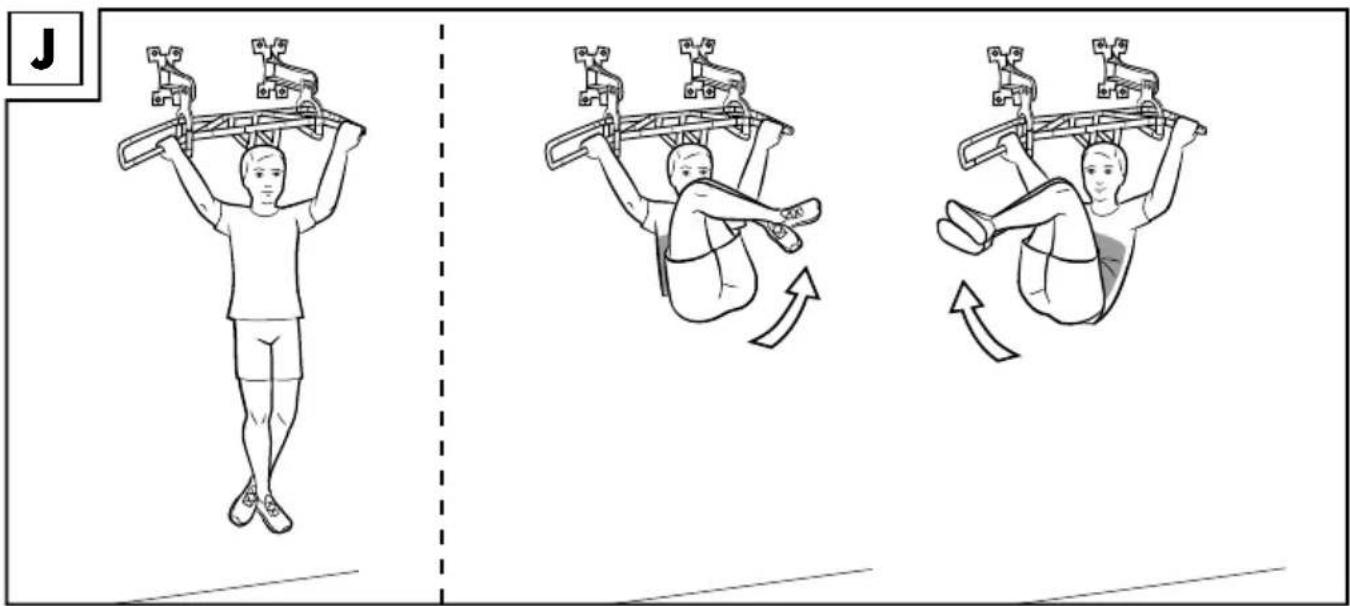
Hanging leg lifts to the left and right (fig. J)
Main muscle group: Stomach muscles
Starting position
- Stand with your back to the product.
- Grip both ends of the product from above, as shown.
- Cross your feet.
End position
- Tense your buttock, arm, and stomach muscles.
-
Pull your knees in towards your body and then tilt your legs alternately to left and right. Keep your shoulders down and keep tensing your stomach muscles.
-
Your arms should be tensed and your legs should be close to your upper body.
-
Repeat this tilting movement 8 to 12 times and then slowly lower your legs back to the starting position.
-
Repeat this exercise 3 times.
Important: Perform the movements slowly and keep your body tension throughout.
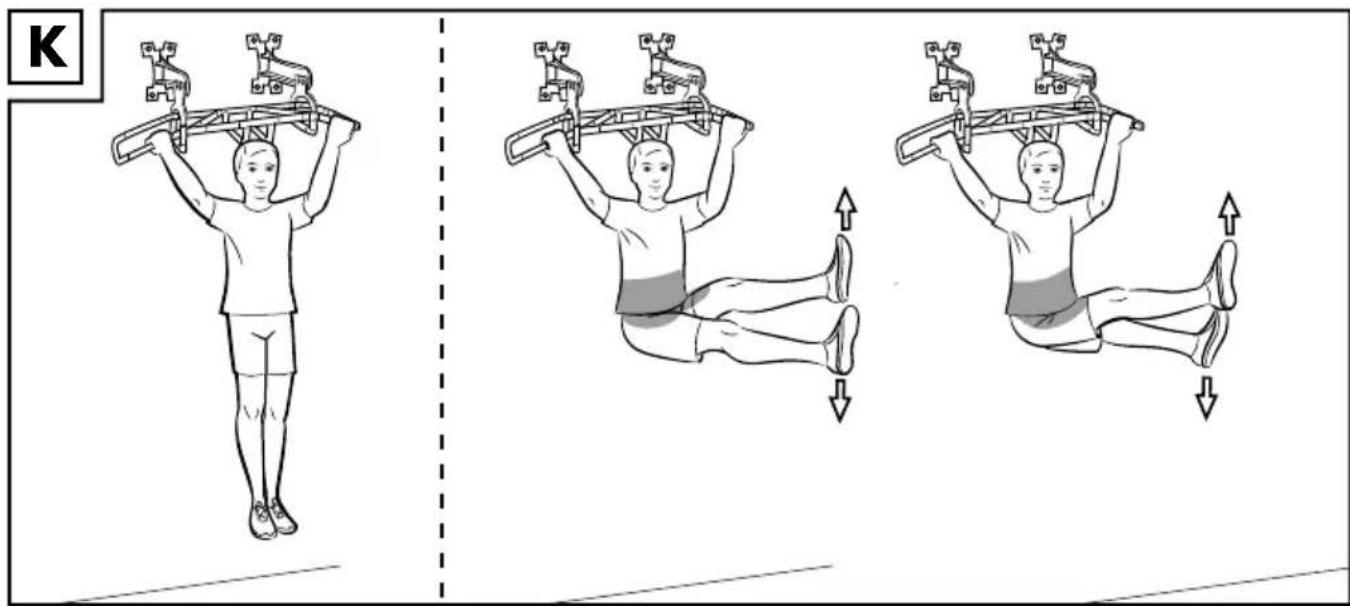
Hanging 'L'-sit (fig. K)
Main muscle group: Stomach muscles
Starting position
- Stand with your back to the product.
- Grip both ends of the product from above, as shown.
End position
- Tense your buttock, arm, and stomach muscles.
- Extend your legs and lift them to a 90 degree angle in front of you.
- Move each leg up and down alternately. Keep your shoulders down and keep tensing your stomach muscles.
- Your arms should be tensed and your legs should be close together.
- Repeat this alternate lifting of your legs 10 to 15 times and then slowly lower your legs to the starting position.
- Repeat the exercise 3 times.
Important: Perform the movements slowly and keep your body tension throughout.
Hanging shoulder retractions (fig. L)
Main muscle groups: Back and trapezius muscles
Starting position
- Grip both ends of the product from above, as shown.
- Cross your feet and bend your knees backwards slightly.
End position
- Tense your buttock, arm, and stomach muscles.
- Pull your hanging shoulders backwards. Your arms should stay outstretched and your upper body should move only through your shoulders.
- Your head should be in line with your spine and should not be overextended.
- Stay in this position for a moment and then lower yourself slowly back to the starting position.
- Repeat this exercise 10 to 15 times for 3 sets.
Important: Perform the movements slowly and maintain your body tension throughout.
Jump into a pull up (fig. M)
Main muscle groups: Leg and back muscles
Starting position
- Stand in front of the product and squat.
- Stay with your legs in a 90 degree position and hold your arms out at an angle.
End position
- Tense your buttock, arm, and stomach muscles.
- Jump while swinging your arms and pull yourself up on the product to chest height. Grip the product from above on the ends.
- Your head should be in line with your spine and should not be overextended.
- Stay in this position for a moment and then lower yourself slowly back to the starting position.
- Repeat this exercise 10 to 15 times for 3 sets.
Important: Perform the movements slowly and maintain your body tension throughout.
Stretching
Take sufficient time after each training session to stretch properly. In the following section we will describe some easy exercises for you to do.
You should repeat these exercises 3 times on each side for 5 seconds each.
Neck muscles
- Stand in a relaxed posture. Pull your head gently with one hand to the left, and then to the right. This exercise stretches the sides of your neck.
Arms and shoulders
- Stand upright with your knees slightly bent.
- Move your right arm behind your head, until your right hand is between your shoulder blades.
- Grasp your right elbow with your left hand and pull it backwards.
- Switch sides and repeat the exercise.
Leg muscles
- Stand upright and lift one foot off the floor.
- Circle your foot slowly in one direction and then in the other.
- Change feet after a while.
Important: Make sure that your thighs are parallel to each other. Push your pelvis forwards during the exercise with your upper body erect.
Care and Storage
Always store the product in clean and dry condition at room temperature. Never clean the product with aggressive agents and wipe it clean with a dry cleaning cloth. Protect the product from extreme temperatures, sun, and moisture.
Disposal
Dispose of the article and the packaging materials in accordance with current local regulations. Packaging materials such as foil bags are not suitable to be given to children. Keep the packaging materials out of the reach of children.
Notes on the guarantee and service handling
The product was produced with great care and under constant supervision. You receive a three-year warranty for this product from the date of purchase. Please retain your receipt. The warranty applies only to material and workmanship and does not apply to misuse or improper handling. Your statutory rights, especially the warranty rights, are not affected by this warranty. With regard to complaints, please contact the following service hotline or contact us by e-mail. Our service employees will advise as to the subsequent procedure as quickly as possible.
We will be personally available to discuss the situation with you. Any repairs under the warranty, statutory guarantees or through goodwill do not extend the warranty period. This also applies to replaced and repaired parts. Repairs after the warranty are subject to a charge.
IAN: 287910
GB Service Great Britain
Tel.: 0871 5000 720
(£ 0.10/Min.)
E-Mail: deltasport@lidl.co.uk
IE Service Ireland
Tel.: 1890 930 034
(0,08 EUR/Min., (peak))
(0,06 EUR/Min., (off peak))
E-Mail: deltasport@lidl.ie
You can also find spare parts for your product at: www.delta-sport.com, category Service - Lidl Spare Parts Service

Félicitations!
- KLIMMZUGSTANGE PULL-UP BAR BARRE DE TRACTION
- KLIMMZUGSTANGE
- BARRE DE TRACTION
- PULL UP BAR
- BARRA DE TRACCIÓN
- FR BE
- Carefully read the following instructions for use.
- Scope of delivery (fig. A)
- Technical data
- Correct use
- Safety notes
- Risk of injury!
- Particular caution – Risk of injury for children!
- Risks from wear
- Important information prior to mounting
- Suitable mounting location
- Suitable mounting material
- Suitable height
- Mounting the product
- Assembly for wall mounting (fig. B, C)
- Ceiling mounting (fig. D, E)
- General training notes
- Training procedure
- Warming up
- Neck muscles
- Arms and shoulders
- Important: Don't forget to continue breathing normally during the exercises!
- Exercise suggestions
- Pull up with overhand grip to chest (fig. F)
- Starting position
- End position
- Important: Perform the movements slowly and maintain your body tension throughout.
- Pull up bar with underhand grip to neck (fig. G)
- Pull up bar with narrow underhand grip to chin (fig. H)
- Hanging leg lifts, bent and straight (fig. 1)
- Hanging leg lifts to the left and right (fig. J)
- Important: Perform the movements slowly and keep your body tension throughout.
- Hanging 'L'-sit (fig. K)
- Hanging shoulder retractions (fig. L)
- Jump into a pull up (fig. M)
- Stretching
- Leg muscles
- Important: Make sure that your thighs are parallel to each other. Push your pelvis forwards during the exercise with your upper body erect.
- Care and Storage
- Disposal
- Notes on the guarantee and service handling
- Félicitations!
Brand : CRIVIT
Model : IAN 287910
Category : Fitness Equipment