
IAN 282674 - Massage device CRIVIT - Free user manual and instructions
Find the device manual for free IAN 282674 CRIVIT in PDF.

| Product Type | Multifunction Exercise Bar |
| Model | IAN 282674 |
| Intended Use | Full-body workout, private use only |
| Dimensions (Steel Bar) | Approx. 108 cm (L) |
| Dimensions (Elastic Cord) | Approx. 150 cm (L) |
| Weight (Steel Bar) | Approx. 1930 g |
| Weight (Elastic Cord) | Approx. 232 g |
| Material | Steel, elastic cord, plastic components |
| Resistance Levels | Asymmetric (1-5) and Symmetric (6-10) with variable force |
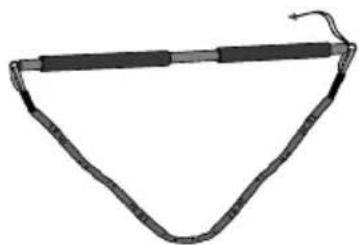
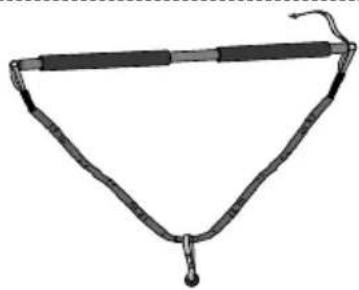
| Accessories Included | Exercise bar (2 parts), elastic cord, door anchor, door sign, snap hook, carrying bag |
| Assembly | Screw bar parts together; attach cord via retaining ring and snap hook |
| Attachment Options | Door, fence, column, or tree (using door anchor or snap hook) |
| Safety Features | Safety strap, door sign, door anchor with locking |
| Cleaning | Wipe with lukewarm water; dry thoroughly |
| Storage | Clean, dry, room temperature; avoid direct sunlight |
| Replacement Interval (Elastic Cord) | Maximum 3 years |
| Warranty | 3 years from date of purchase |
Frequently Asked Questions - IAN 282674 CRIVIT
User questions about IAN 282674 CRIVIT
0 question about this device. Answer the ones you know or ask your own.
Ask a new question about this device
Download the instructions for your Massage device in PDF format for free! Find your manual IAN 282674 - CRIVIT and take your electronic device back in hand. On this page are published all the documents necessary for the use of your device. IAN 282674 by CRIVIT.
USER MANUAL IAN 282674 CRIVIT
EXERCISBAR
GB CY
EXERCISBAR
Operation and Safety Notes
GR CY
GB / CY Operation and Safety Notes Page 5
HR Upute za posluživanje i za Vašu sigurnost Stranica 14
natural_image
Illustration of a screwdriver with a black cable inserted (no text or symbols)
natural_image
Simple line drawing of a triangle with a horizontal bar and curved base (no text or symbols)I
natural_image
Simple line drawing of a triangular object with a looped neck and a hanging hook (no text or symbols)II
6.
7.8.


natural_image
Diagram of a mechanical linkage system with a curved chain and attached rod (no text or symbols)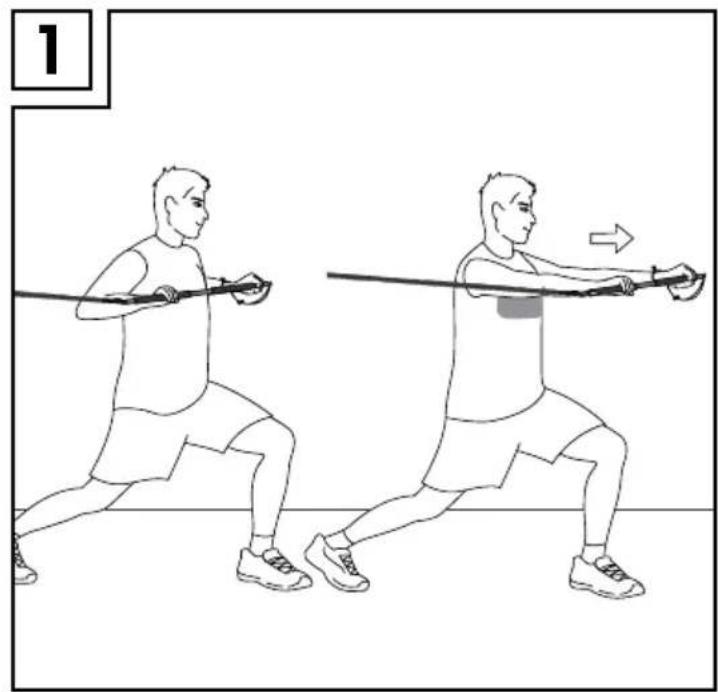
natural_image
Illustration of two people performing a resistance band exercise, showing motion and movement direction (no text or symbols)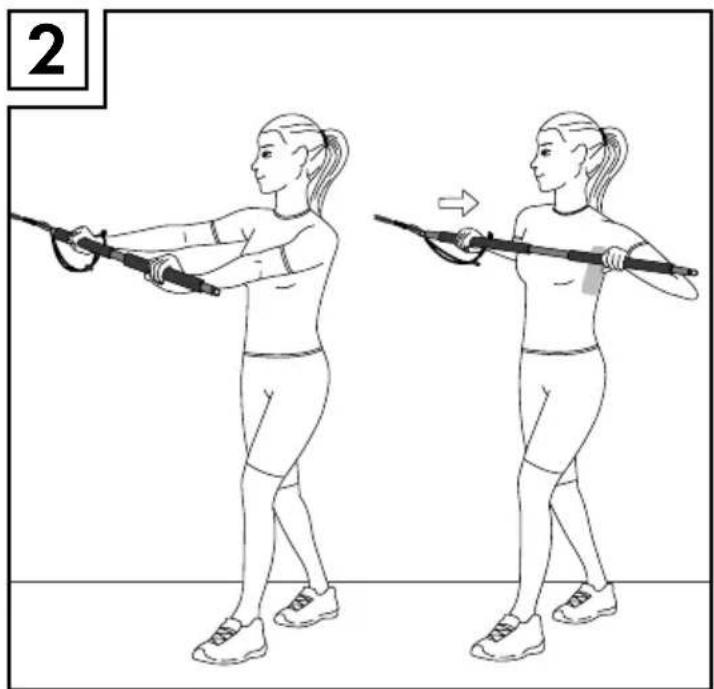
natural_image
Illustration of a woman performing a stretching exercise with a barbell (no text or symbols)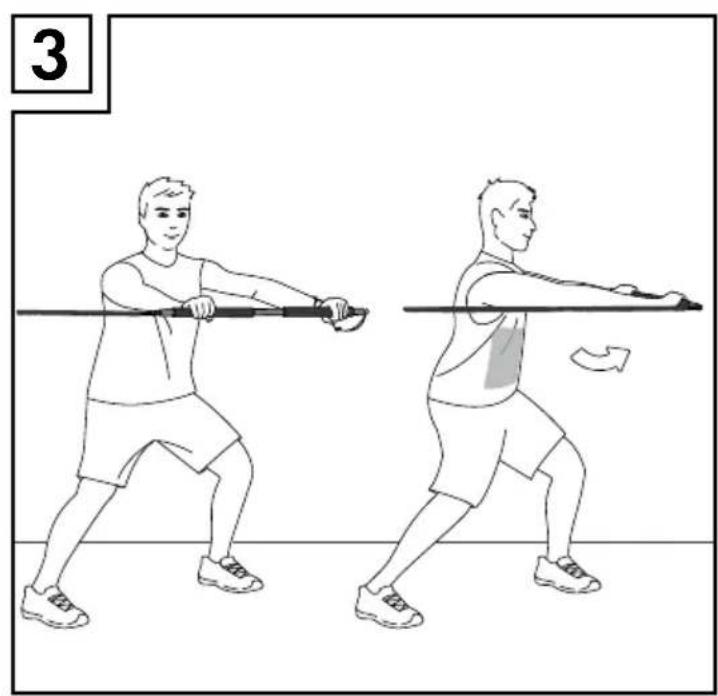
natural_image
Illustration of two people performing a resistance band exercise, showing motion and movement (no text or symbols)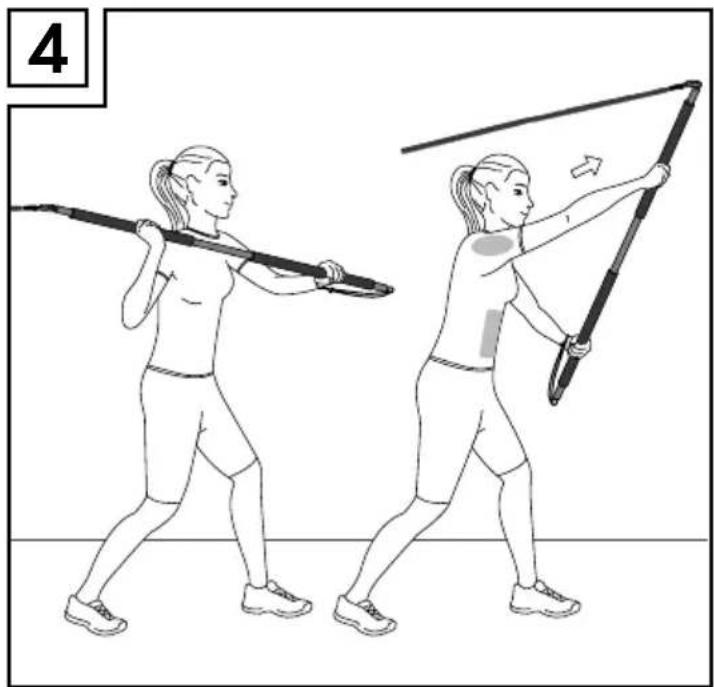
natural_image
Illustration of two women performing a stretching exercise with a long pole, showing motion and movement direction (no text or symbols)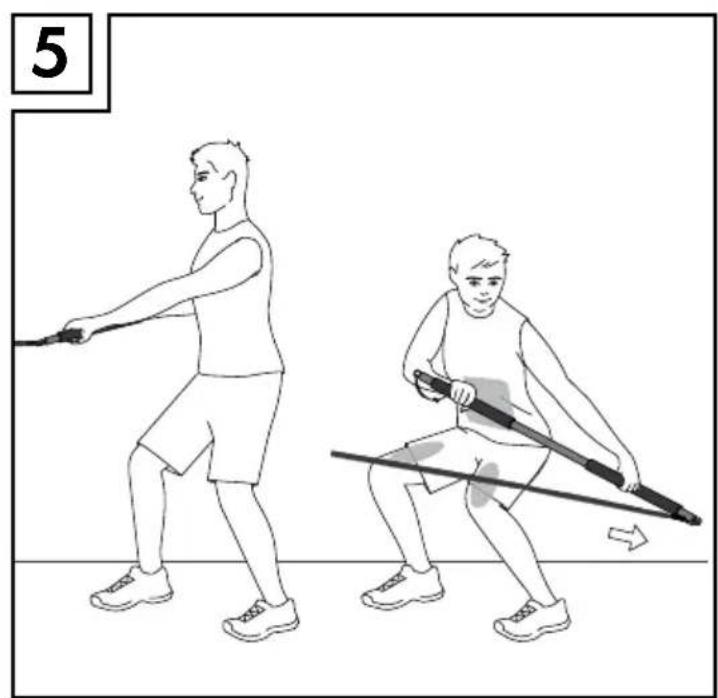
natural_image
Illustration of two people demonstrating a physical exercise with a stick and bar, no text or symbols present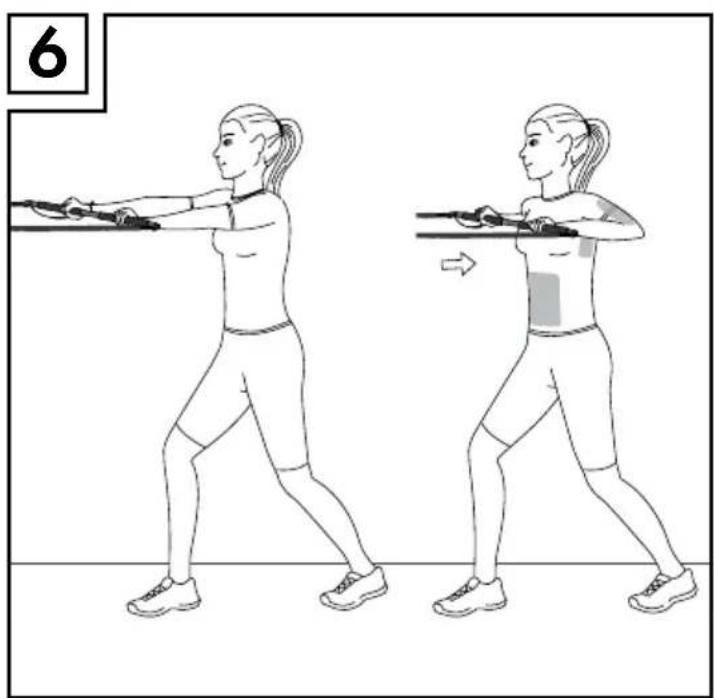
natural_image
Illustration of a woman performing a stretching exercise with two sequential poses (no text or symbols)Introduction......Page 6
Intended Use Page 6
Parts Description......Page 6
Scope of delivery....Page 6
Technical Data Page 6
Safety Notices....Page 6
Exercise area Page 7
Product Assembly Page 7
Attaching the product....Page 7
Attaching the product to a door....Page 7
Attaching the product to a column or tree....Page 8
Attaching the product to a fence....Page 8
General exercise information Page 8
General training plan....Page 8
Exercise instructions....Page 9
Starting positions......Page 10
How do I make exercises more or less intense....Page 11
Suggested exercises....Page 11
Care and Storage Page 13
Disposal Page 13
Warranty Page 13
Exercise Bar
- Introduction
We congratulate you on the purchase of your new product. You have chosen a high quality product. Familiarise yourself with the product before using it for the first time. In addition, please carefully refer to the operating instructions and the safety advice below. Only use the product as instructed and only for the indicated field of application. Keep these instructions in a safe place. If you pass the product on to anyone else, please ensure that you also pass on all the documentation with it.
Intended Use
The various exercise options make this product suitable for a full-body workout. This product is intended for private use and is not intended for medical or commercial purposes.
Parts Description
| 1 | Carrying bag |
| 2 | Exercise bar |
| 2a | Retaining ring |
| 2b | Safety strap |
| 3 | Door anchor |
| 4 | Snap hook |
| 5 | Elastic cord |
| 5a | Start of cord (long) |
| 5b | End of cord (short) |
| 6 | Door sign |
- Scope of delivery
1 Exercise bar
1 Elastic cord
1 Door anchor
1 Door sign
1 Snap hook
1 Carrying bag
1 Instructions for use
- Technical Data
Dimensions:
Steel bar: approx. 108 cm (L)
Elastic cord: approx. 150 cm (L)
Weight:
Multifunction exercise bar: approx. 1930 g
Elastic cord: approx. 232 g
Anchor: approx.
| Stretch (cm): 140 160 185 225 275 | |||||
| Force (N)symmetricexercises | 95 | 110 | 133 195 | - | |
| Force (N)asymmetricexercises | - | 9.5 | 22 | 34.5 | 47 |
The force tolerance range is approx. 20% (+/-).
Asymmetric exercises: 1–5
Symmetric exercises: 6-10

Safety Notices
PLEASE CAREFULLY READ ALL THE INFORMATION BEFORE USING THE PRODUCT. KEEP THE INSTRUCTIONS FOR USE.


CAUTION! RISK OF INJURY!
This product is not a toy and should only be used under adult supervision.

CAUTION! RISK OF INJURY! Never leave children unsupervised with the product. Instruct them in the correct product use and supervise them. Only allow them to use the product if their mental and physical development allows. This product is not a toy.

CAUTION! RISK OF INJURIES DUE TO
WEAR! Only use the product if it is in good condition. Check the product for wear before every use. Product safety is only guaranteed when regularly checking it for wear and damage. Do not use this product if damaged.

Consult your physician before using the product if you have health problems, allergic reactions or an injury. Stop the exercises immediately if you feel sick or unwell whilst exercising or if any other complaints arise.
■ Only use the product in areas where you can maintain adequate distance from persons/objects to avoid injuries and property damage.
■ Do not use the product near steps or stairs.
■ Always exercise on a flat, non-slip surface.
■ Warm up before exercising and adapt the exercise intensity to your abilities.
■ Only use the elastic cord together with the multifunction exercise equipment.
■ Never pull the elastic cord toward your face and never wrap it around your head, neck or chest.
Exercisearea
- Choose an exercise area about 3.00 x 1.80 m (L x W) in size.
⚠CAUTION! Always use the door anchor to secure the product to a door.
⚠CAUTION! RISK OF INJURY! Only secure the product to doors which open outward (away from you)! Never secure the product to doors which open inward (toward you)! The door could open, resulting in injuries.
⚠CAUTION! RISK OF INJURY! Always test the tensile strength of the joints to ensure adequate reserves remain. Injuries may otherwise occur.
⚠️ CAUTION! RISK OF INJURY! Always lock the door you are securing the door anchor to.
⚠CAUTION! Always use the included door sign whilst exercising. Be sure to attach it to the other side of the door so it can be read.
■ Always use genuine replacement parts.
- Protect the product from extreme temperatures, sunlight and moisture. Incorrect product storage and use may result in premature wear and breaks in the structure, which may result in injuries.
- Replace the elastic cord after max. 3 years, as the material will wear.
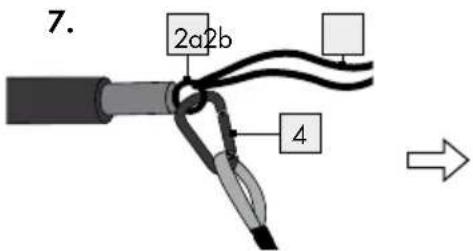
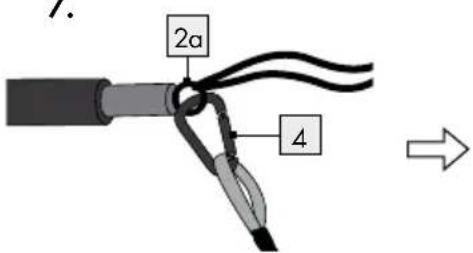
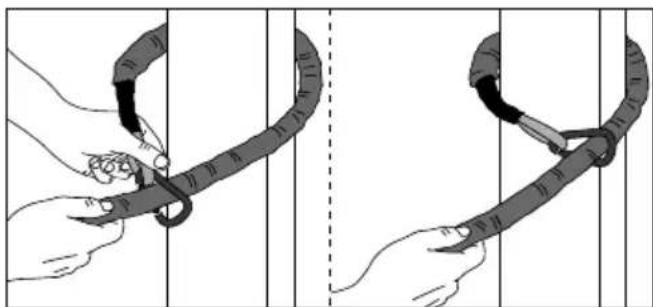
●ProductAssembly (see Fig. B, Step 1–7)
Screw the two parts of the exercise bar together hand tight.
☐ Guide the start of the cord through the retaining ring 2a and pull the elastic cord all the way through the loop at the start of the cord.
Attach the safety loop to the retaining ring 2a.
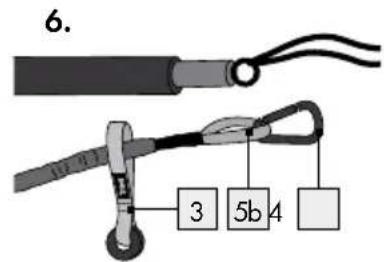
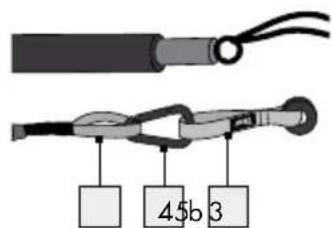
For the cord to have resistance at both ends, hook the snap hook 4 into the retaining ring 2a and the end of the cord 5b (see Fig. BI/II).
Important: The end of the exercise bar 2 has flexible end pieces with retaining ring 2a. Never remove the end pieces; doing so may minimise the stability of the product.
- Attaching the product
☐ Choose an exercise area about 3.00 × 1.80 m (L x W) in size.
- Attaching the product to a door
Secure the door anchor.

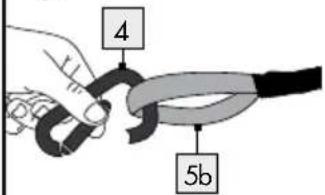
For cord resistance at both ends (see Fig. BI/Step 6-7):
Pull the loop on the door anchor over the middle of the elastic cord 5. Hook the snap hook 4 into the end of the cord 5b and into the retaining ring 2a.
☐ Only secure the product to doors which open outward (away from you).
☐ Attach the door anchor at the middle of the door.
□ Close the door.
For cord resistance at one end (see Fig. BII/Step 6-8):
Attach the door anchor at the middle of the door.
Close the door.
Hook the snap hook into the end of the cord 5b and into the loop on the door anchor 3.
⚠CAUTION! RISK OF INJURY! Always close the door you are securing the door anchor to. Always use the included door sign whilst exercising.
Note: Be sure the door you are attaching the door anchor 3 to is solid and sturdy and can support your body weight. Verify the door anchor 3 is firmly attached. Pull the elastic cord 5 a few times to verify its stability.
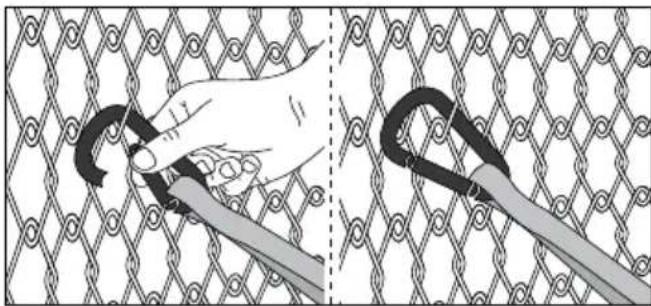
- Attaching the product to a column or tree
For cord resistance at one end only
Hook the snap hook around the elastic cord 5.
natural_image
Illustration of hands tying a rope knot with a loop, showing structural details (no text or symbols)- Attaching the product to a fence
For cord resistance at one end only
Hook the snap hook straight around the fence.
natural_image
Illustration showing two hand-painted techniques on a chain-link fence, one using a hook to draw the knot (no text or symbols present)●Generalexerciseinformation
The following instructions are only examples of possible exercises. Please refer to the respective literature for information about other exercises.
□ Wear comfortable sportswear and trainers.
☐ Warm up adequately before beginning the exercises and cool down slowly.
Take adequate breaks between exercises and drink plenty of fluids.
If you are a beginner, do not exercise too intensively and do not overestimate yourself. Slowly increase the exercise intensity.
☐ Perform all exercises smoothly. Avoid fast and jerky movements.
☐ Be sure to breathe steadily. Breath out when contracting the muscles, breath in when releasing them.
☐ Pay attention to correct posture whilst performing the exercises.
● General training plan
☐ Create an exercise plan to your requirements with about 6–8 sets.
Observe the following principles:
-One set should consist of about 15 reps of an exercise.
- Each set may be repeated 3 times.
- Take a 30 second break after every set.
- To build muscle you should use less reps and increase the intensity.
- For endurance training, use more reps and less intensity.
- Adequately warm up the muscle groups before beginning the exercises.
- We recommend stretching before beginning to exercise.
- Exercise instructions
Below are instructions for exercising safely and effectively and will help you adequately benefit from training. Consult your physician before starting a new exercise program.
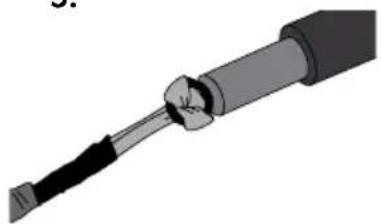
1. Always use the safety strap.
Place the (included) safety strap around your wrist and pull tight.
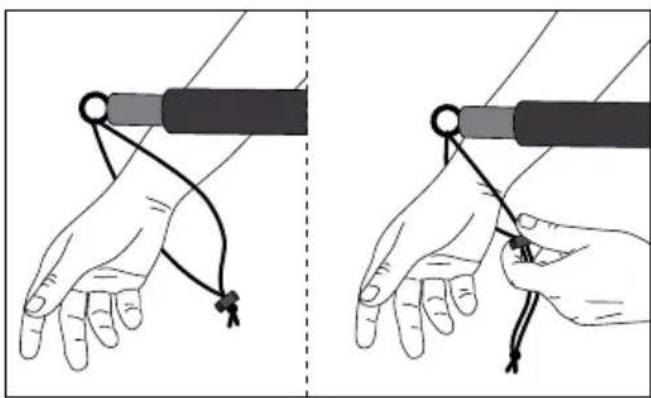
natural_image
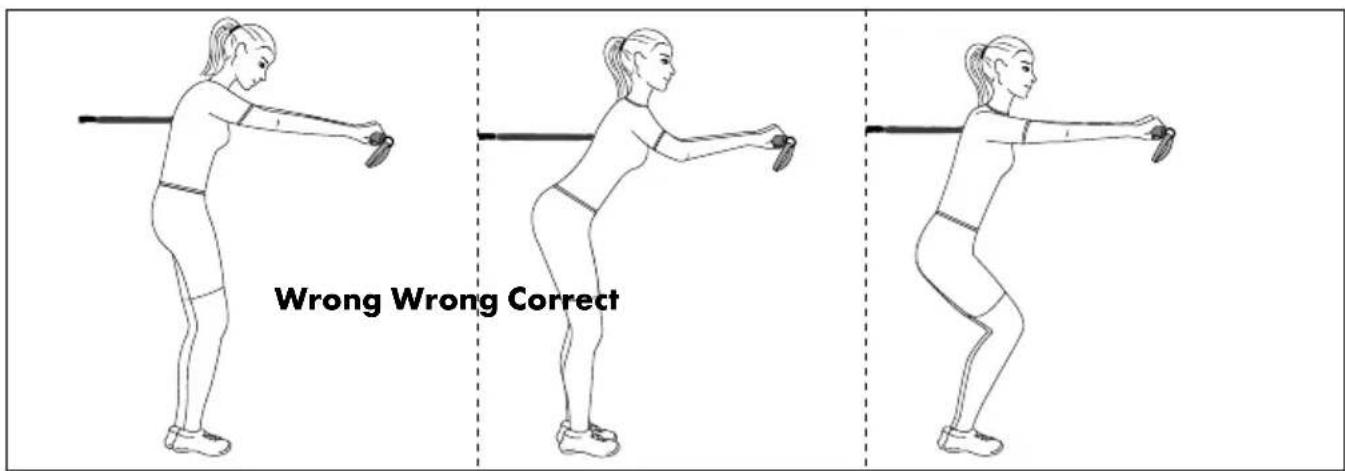
Illustration of two hands demonstrating a cable or wire manipulation technique (no text or symbols present)2. Pay attention to your posture.
Keep your spine straight. Be sure not to overstretch or bend your spine excessively. Keeping your spine straight will ensure more effective training, keep your centre of gravity centred and accident hazards.
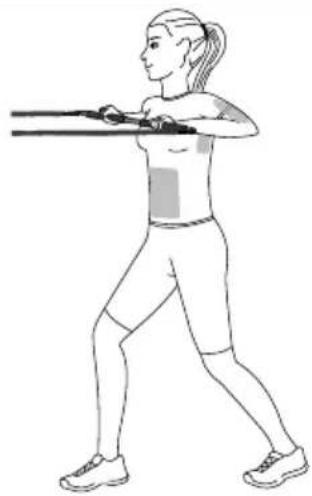
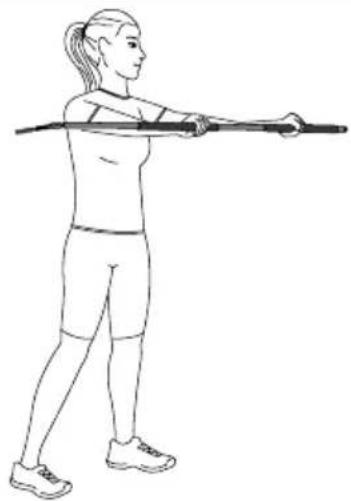
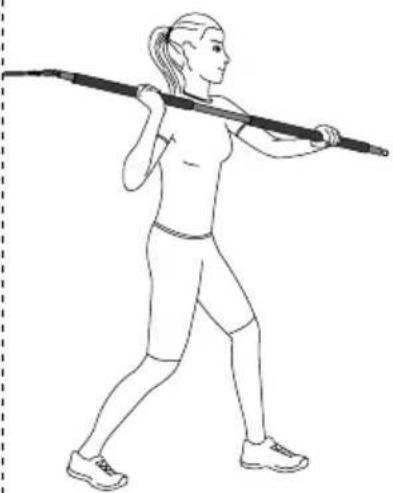
- Starting positions
With every starting position, move away from the anchor point so you will have adequate resistance during the exercise.
Posture
natural_image
Line drawing of a person in a dynamic pose holding a long staff (no text or symbols)Stand with the back to the anchor point.
natural_image
Line drawing of a woman holding a long pole, possibly a resistance band or stick (no text or symbols)Stand sideways to the anchor point.
natural_image
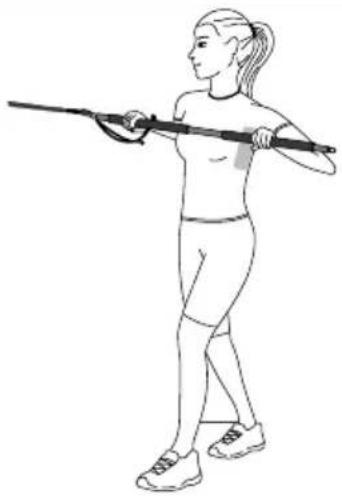
Line drawing of a woman performing a resistance band exercise (no text or symbols)Stand facing the anchor point.
Foot positions
natural_image
Line drawing of a woman performing a stretching exercise with a bar (no text or symbols)Parallel stance Walking stance
natural_image
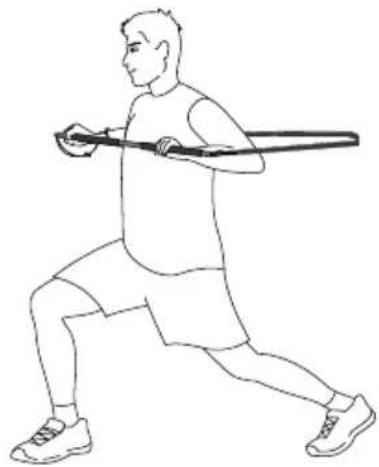
Line drawing of a woman in athletic wear holding a long bar (no text or symbols)Lunge stance

natural_image
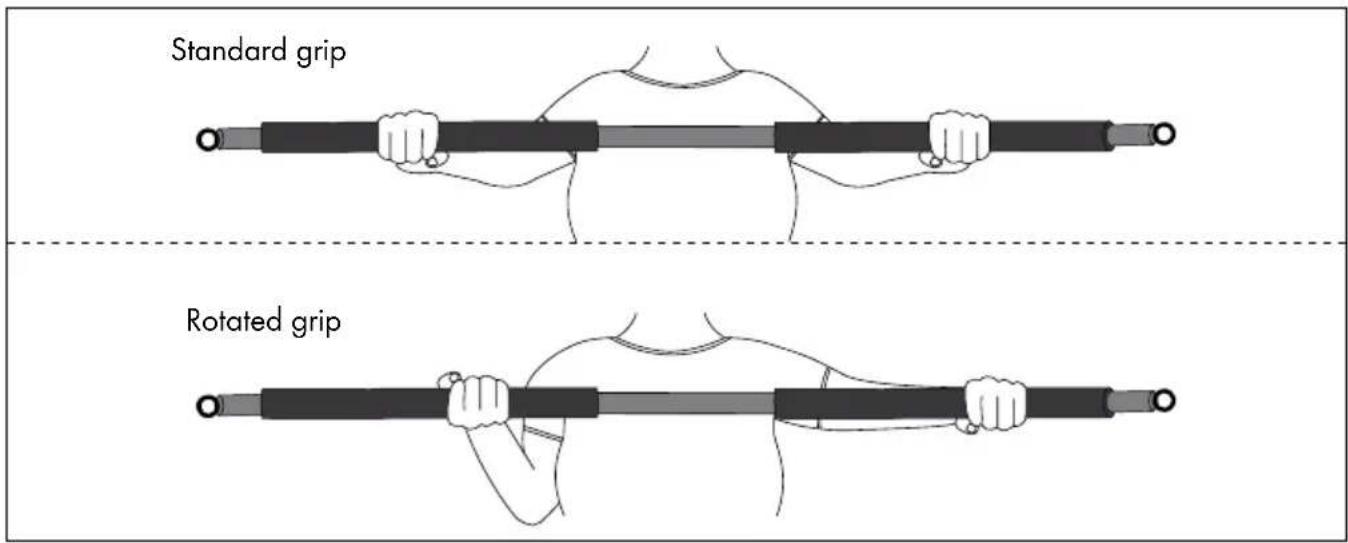
Line drawing of a woman performing a stretching exercise (no text or symbols)Hand positions
How do I make exercises more or less intense
☐ You can easily adapt the intensity of each exercise by changing your posture, grip, speed of movements or the type of resistance cord.
Grip
The farther your hands are from your resistance cord, the more intense the exercise.
Posture
The farther you are from the anchor point, the more intense the exercise.
Speed of movement
Increasing the speed of movements will increase the intensity of the exercise.
● Suggested exercises
For exercises 1–5 (cord resistance at one end), attach the exercise bar to a door, a fence or a tree as described under „Attaching the Product“.
Position 1: back to the anchor point
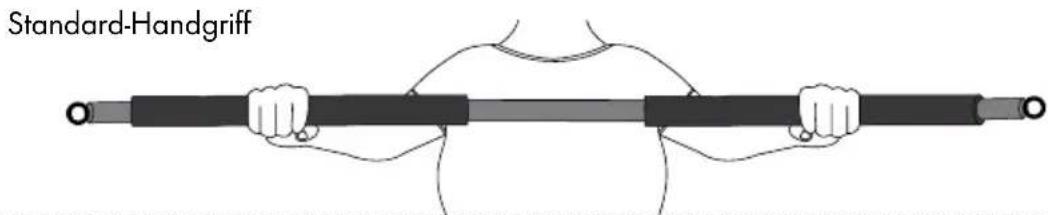
☐ Hold the exercise bar using a standard grip. The resistance cord is at the right.
Take a walking stance with the right foot at the back.
☐ Start with the exercise bar at the chest.
☐ Extend the arms away from the body in a smooth motion.
☐ Return the arms to the starting position.
☐ Perform one complete set. Then switch sides, the left foot at the back.
Position 2: facing the anchor point
☐ Hold the exercise bar using a standard grip. The resistance cord is at the right.
Take a walking stance with the right foot at the back.
☐ Start with the arms extended.
☐ Pull your arms toward the chest in a smooth motion.
☐ Return to the starting position.
☐ Perform one complete set. Then switch sides, the left foot at the back.
Position 3: side to the anchor point
☐ Grab the exercise bar using a standard grip, the left hand at the top. The resistance cord is at the right.
Take a parallel stance.
☐ Start with the arms extended.
☐ Keep your arms extended and turn your entire body away from the anchor point.
☐ Return to the starting position.
☐ Perform one complete set. Then switch sides.
Position 4: back to the anchor point
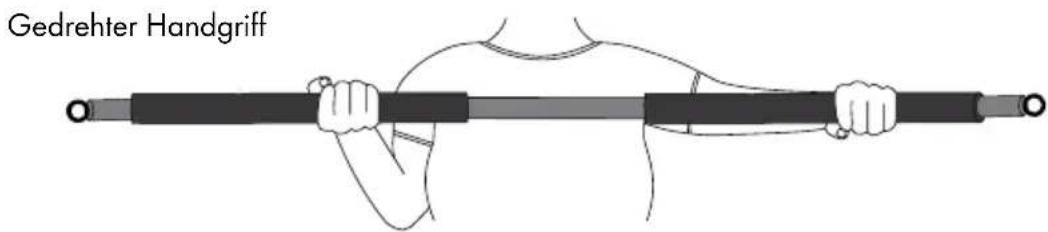
☐ Grab the exercise bar with the hands turned, the left hand at the top. The resistance cord is at the right.
Take a walking stance with the right foot at the back.
☐ Perform one motion overhead as if swinging an axe.
☐ Return the arms to the starting position.
☐ Perform one complete set. Then switch sides.
Position 5: facing the anchor point
☐ Hold the exercise bar using a standard grip. The resistance cord is at the left.
Take a parallel stance.
☐ Row away from the body whilst squatting.
☐ Return to the starting position.
☐ Perform one complete set. Then switch sides.
For exercises 6–8 attach the exercise bar with the door anchor 3. As described under „Attaching the product to a door“ (with cord resistance at both ends).
Position 6: facing the anchor point
☐ Hold the exercise bar using a standard grip.
Take a walking stance with the left foot at the back.
☐ Start with the arms extended.
☐ Pull your arms toward the chest in a smooth motion.
☐ Return to the starting position.
☐ Switch feet halfway through the set.
Position 7: back to the anchor point
☐ Hold the exercise bar using a standard grip.
Take a walking stance with the right foot at the back.
☐ Start with the exercise bar at the chest.
☐ Extend the arms away from the body in a smooth motion.
☐ Return the arms to the starting position.
☐ Switch feet halfway through the set.
Position 8: back to the anchor point
☐ Hold the exercise bar using a standard grip.
Take a walking stance with the right foot at the back.
☐ Begin with the upper arms at head level, elbows near the head.
☐ Extend the forearms in a smooth motion.
☐ Return to the starting position.
☐ Switch feet halfway through the set.
For exercises 9–10 assemble the product as described under „Product Assembly“.
Position 9: standing on the resistance cord
☐ Hold the exercise bar using a standard grip.
Take a walking stance with the front foot on the resistance cord.
☐ Start with the arms at the waist, the elbows fully extended.
☐ Pull the exercise bar up toward the chin.
☐ Return to the starting position.
Position 10: standing on the resistance cord
☐ Grab the exercise bar with both hands using an underhand grip (palms up).
Take a walking stance with the front foot on the resistance cord.
☐ Start with the arms at the waist, the elbows fully extended.
☐ Pull the bar toward the shoulders.
☐ Return to the starting position.
- Care and Storage
Note: Routine maintenance and cleaning helps keep your product safe and ensures its longevity.
■ Never use abrasive or caustic cleaners. Doing so would damage the product.
☐ Protect the product from direct sunlight.
☐ Only clean the product with lukewarm water, then dry well with a cloth.
□ Always store the product clean and dry, at room temperature.
- Disposal

The packaging is made entirely of recyclable materials, which you may dispose of at local recycling facilities.
Contact your local refuse disposal authority for more details of how to dispose of your worn-out product.
- Warranty
The product has been manufactured to strict quality guidelines and meticulously examined before delivery. In the event of product defects you have legal rights against the retailer of this product. Your legal rights are not limited in any way by our warranty detailed below.
The warranty for this product is 3 years from the date of purchase. Should this product show any fault in materials or manufacture within 3 years from the date of purchase, we will repair or replace it - at our choice - free of charge to you.
The warranty period begins on the date of purchase. Please keep the original sales receipt in a safe location. This document is required as your proof of purchase. This warranty becomes void if the product has been damaged, or used or maintained improperly.
The warranty applies to defects in material or manufacture. This warranty does not cover product parts subject to normal wear, thus possibly considered consumables (e.g. batteries) or for damage to fragile parts, e.g. switches, rechargeable batteries or glass parts.
Uvod....Stranica 15
natural_image
Illustration of hands tying a rope knot with a loop, showing structural details (no text or symbols)natural_image
Illustration showing two hand positioning on a chain-link fence, one with a curved hook and the other with a loop handle (no text or symbols)natural_image
Illustration of two hands demonstrating a cable or wire manipulation technique (no text or symbols present)2. Pazite na držanje.
natural_image
Line drawing of a person in a dynamic pose holding a long staff (no text or symbols)natural_image
Line drawing of a woman holding a rifle, standing with arms extended (no text or symbols)natural_image
Line drawing of a woman performing a resistance band exercise (no text or symbols)natural_image
Line drawing of a woman performing a stretching exercise with a bar (no text or symbols)natural_image
Line drawing of a woman performing a resistance band exercise (no text or symbols)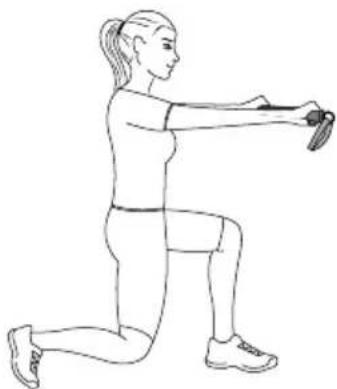
natural_image
Line drawing of a woman performing a stretching exercise (no text or symbols)natural_image
Illustration of hands tying a rope knot, showing two sequential steps (no text or symbols)natural_image
Illustration showing two hand-painted techniques on a chain-link fence, one using a tool to cut the edge (no text or symbols present)natural_image
Illustration of two hands demonstrating a cable or wire manipulation technique (no text or symbols present)natural_image
Line drawing of a person in a dynamic pose holding a long staff (no text or symbols)natural_image
Line drawing of a woman performing a resistance band exercise (no text or symbols)natural_image
Line drawing of a woman performing a resistance band exercise (no text or symbols)natural_image
Line drawing of a woman performing a resistance band exercise (no text or symbols)natural_image
Line drawing of a woman in athletic wear holding a long pole, no text or symbols present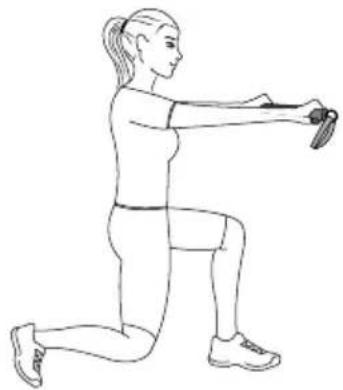
natural_image
Line drawing of a woman performing a stretching exercise (no text or symbols)Θέσεις χεριών
natural_image
Illustration of hands tying a rope knot, showing two sequential steps (no text or symbols)natural_image
Illustration showing two hand positioning on a chain-link fence, one with a curved tool and the other with a loop handle (no text or symbols)natural_image
Illustration of two hands demonstrating a cable or wire manipulation technique (no text or symbols present)natural_image
Line drawing of a person in a dynamic pose holding a long bar, no text or symbols presentnatural_image
Line drawing of a woman holding a long pole with a rifle, wearing athletic wear (no text or symbols)natural_image
Line drawing of a woman performing a resistance band exercise (no text or symbols)natural_image
Line drawing of a woman performing a resistance band exercise (no text or symbols)natural_image
Line drawing of a woman in athletic wear holding a long pole, no text or symbols present
natural_image
Line drawing of a woman performing a stretching exercise (no text or symbols)Handpositionen
natural_image
Illustration of a woman performing a resistance band exercise, showing two sequential poses with no text or symbols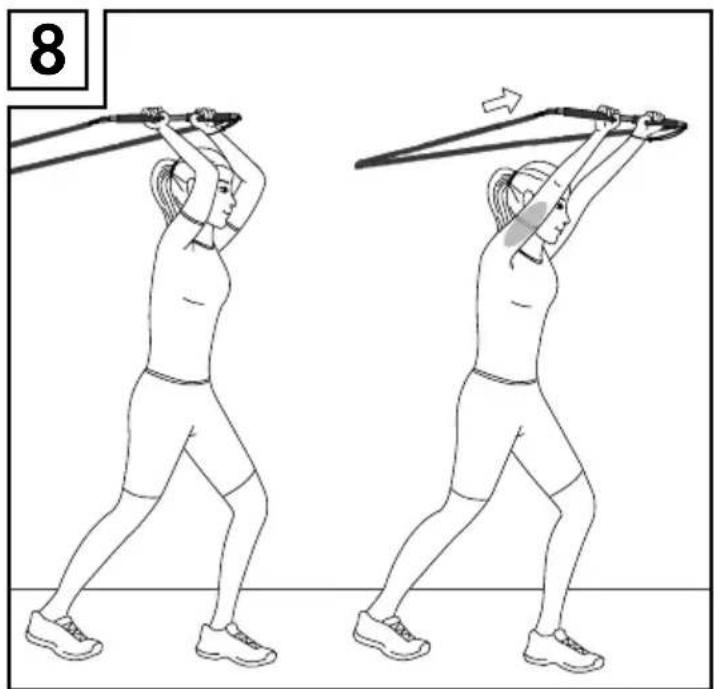
natural_image
Illustration of a person performing a resistance band exercise, showing two sequential poses with no text or symbols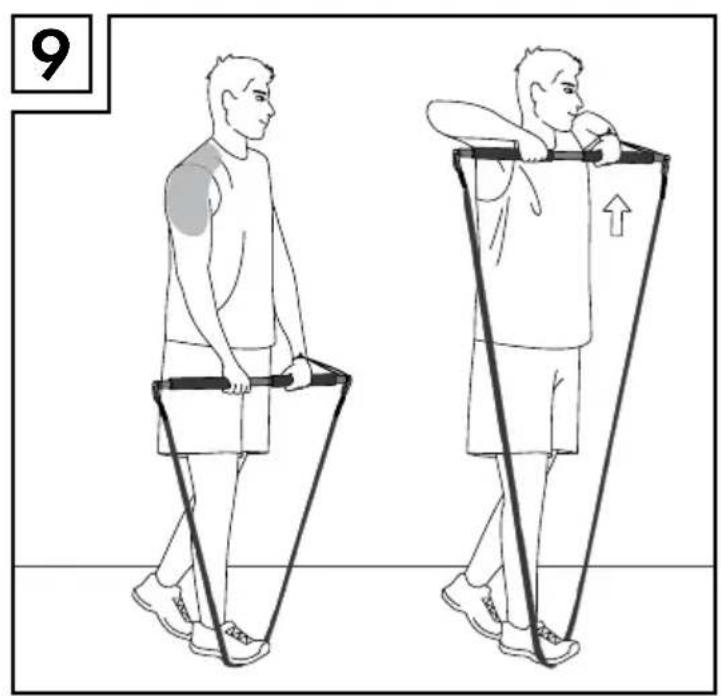
natural_image
Illustration of two men performing a resistance band exercise, one with a shaded knee area and the other holding a support box (no text or symbols)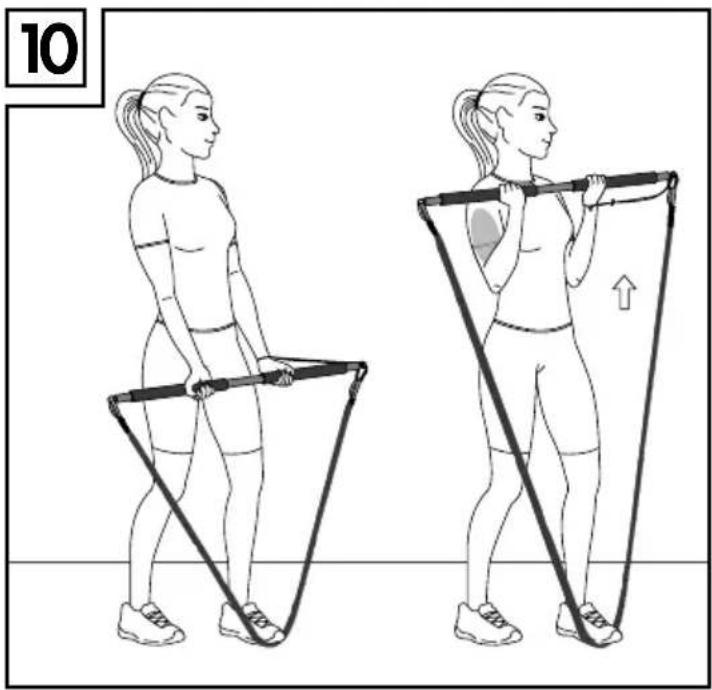
natural_image
Illustration of a woman performing a resistance band exercise, showing two sequential poses with no text or symbolsOWIM GmbH & Co. KG
Stiftsbergstraße 1
DE-74167 Neckarsulm
GERMANY
Model no.: HG02128B
Version: 12/2016
Last Information Update · Stanje informacija


- EXERCISBAR
- Introduction......Page 6
- Safety Notices....Page 6
- Exercise area Page 7
- Product Assembly Page 7
- Attaching the product....Page 7
- General exercise information Page 8
- General training plan....Page 8
- Exercise instructions....Page 9
- Suggested exercises....Page 11
- Care and Storage Page 13
- Disposal Page 13
- Warranty Page 13
- Exercise Bar
- - Introduction
- Intended Use
- Parts Description
- - Scope of delivery
- - Technical Data
- Dimensions:
- Weight:
- Safety Notices
- CAUTION! RISK OF INJURY!
- CAUTION! RISK OF INJURIES DUE TO
- Exercisearea
- ●ProductAssembly (see Fig. B, Step 1–7)
- - Attaching the product
- - Attaching the product to a door
- For cord resistance at both ends (see Fig. BI/Step 6-7):
- For cord resistance at one end (see Fig. BII/Step 6-8):
- - Attaching the product to a column or tree
- For cord resistance at one end only
- - Attaching the product to a fence
- ●Generalexerciseinformation
- ● General training plan
- - Exercise instructions
- Always use the safety strap.
- Pay attention to your posture.
- - Starting positions
- Posture
- Foot positions
- Hand positions
- How do I make exercises more or less intense
- Grip
- Speed of movement
- ● Suggested exercises
- Position 1: back to the anchor point
- Position 2: facing the anchor point
- Position 3: side to the anchor point
- Position 4: back to the anchor point
- Position 5: facing the anchor point
- For exercises 6–8 attach the exercise bar with the door anchor 3. As described under „Attaching the product to a door“ (with cord resistance at both ends).
- Position 6: facing the anchor point
- Position 7: back to the anchor point
- Position 8: back to the anchor point
- For exercises 9–10 assemble the product as described under „Product Assembly“.
- Position 9: standing on the resistance cord
- Position 10: standing on the resistance cord
- - Care and Storage
- - Disposal
- - Warranty
- Uvod....Stranica 15
- Pazite na držanje.
- Θέσεις χεριών
- Handpositionen
Brand : CRIVIT
Model : IAN 282674
Category : Massage device