MR559 - Hand blender Maestro - Free user manual and instructions
Find the device manual for free MR559 Maestro in PDF.


| Type of product | Stand Mixer with Multi-Attachment System |
| Model number | MR-559-M |
| Rated power | 1300 W |
| Maximum locked power | 2000 W |
| Supply voltage | 220-240 V ~ 50 Hz |
| Protection class | II |
| IP rating | IPX0 |
| Speed settings | 6 variable speeds + Pulse (P) |
| Mixing bowl capacity | Approx. 4.5 liters |
| Blender jar capacity | Approx. 1.5 liters |
| Meat grinder features | Fine, medium, and coarse grinding discs; includes meatball and sausage attachments |
| Included accessories | Kneading hook, flat beater, whisk, meat grinder with 3 discs, blender jar, bowl cover, spatula, tamper |
| Housing material | Plastic motor housing with stainless steel accessories |
| Weight | Approx. 5.5 kg |
| Dimensions (H x W x D) | Approx. 40 x 30 x 30 cm |
| Safe micro-switch | Prevents operation when arm is raised |
| Maximum continuous operation (grinder) | 3 minutes, then 30-minute rest |
| Maximum continuous operation (blender) | 1 minute |
| Cleaning instructions | Wipe motor housing with damp cloth; detachable parts wash in warm soapy water |
| Storage | Cool, dry place; store attachments in protective sleeves |
Frequently Asked Questions - MR559 Maestro
User questions about MR559 Maestro
0 question about this device. Answer the ones you know or ask your own.
Ask a new question about this device
Download the instructions for your Hand blender in PDF format for free! Find your manual MR559 - Maestro and take your electronic device back in hand. On this page are published all the documents necessary for the use of your device. MR559 by Maestro.
USER MANUAL MR559 Maestro
feel MAESTRO® at home
EN
DE
PL
RO
RU
UA
Owners manual. Multifunctional planetary mixer 3 in 1
natural_image
Black kitchen mixer with a blender and side arm, no visible text or symbolsEN Description of the appliance 3
DE Gerät 23
PL Konstrukcja urządzenia 42
RO Structura produsului____60
RU Устройство прибора____79
UA Склад приладу____98
Pictures/ Bilder/Rysunki/ Figuri/ Рисунки/ Малюнки
1
Dear customer, we thank you for purchase of goods
feel MAESTRO® at home
Functionality, design and conformity to the quality standards guarantee to you reliability and convenience in use of this device. Please read and comply with these original instructions prior to the initial operation of your appliance and store them for later use of subsequent owners.
This appliance is designed for domestic use only.
Under condition of observance of user regulations and a specialpurpose designation, a parts of appliance do not contain unhealthy substances.
Technical specifications
Model: MR-559-M
Electrical supply:
Alternating current- AC;
Rated voltage 220-240V;
Rated frequency 50Hz;
Max locked power: 2000 W;
Rated power: 1300 W;
Protective class II
Protection class IPX0
Number of operative speeds: 6
Description of the appliance
Picture1 (page 2)
| 1. Ring nut 2. F ine mincing disk | ||
| 3. Medium mincing disk 4. Coarse mincing disk | ||
| 5. Cutter 6. Silicon coupling | ||
| 7. Scroll 8. Meat grinder body | ||
| 9. Meat tray 10. Tamper | ||
| 11. Protective cover 12. Accessory socket | ||
| 13. Swivel arm 14. Blender protective | cover | |
| 15. Upper coupler 16. Safe micro-switch | ||
| 17. Release button 18. Speed control knob | ||
| 19. Motor house 20. Foot pad | ||
| 21. Motor spindle 22. Bowl cover | ||
| 23. Whisk 24. Flat beater | ||
| 25. Kneading hook 26. Mixing bowl | ||
| 27. Spatula 28. Middle cap | ||
| 29. Blender lid 30. Jar | ||
| 31. Cutting blade 32. Cup base | ||
| 33. Meatball canister 34. Meat spreader | ||
| 35. Sausage canister | ||
Safety instructions
When using your appliance, basic safety precautions should always be followed, including the following:
ATTENTION!
NEVER immerse the electric drive case, cable or plug in any liquid. NEVER touch the appliance with wet or damp hands.
ALWAYS disconnect appliance before cleaning, assembling, disassembling, loading and unloading products.
Failure to observe these rules may result in electric shock!
When using electrical appliance, basic precautions should always be followed including the following:
- Read all instructions.
- To protect against risk of electrical shock do not put the appliance unit cord or plug in water or other liquid.
- Close supervision is necessary when a appliance is used by or near children.
- Unplug the appliance when not in use, changing accessory and before cleaning.
- Avoid contacting moving parts.
- If the supply cord is damaged, it must be replaced by manufacturer or its service agent or a similarly qualified person in order to avoid a hazard.
- The use of attachments not recommended or sold by the manufacturer may cause fire, electrical shock or injury.
- Do not use outdoors.
- Do not let cord to hang over edge of table or counter.
- Keep hands and utensils away from moving blades or discs while processing food to reduce risk of severe injury to person or damage to the food mixer.
- Blades are sharp, handle carefully.
- To reduce the risk of injury, never place cutting blades or discs on base.
- Be certain is securely locked in place before operating the appliance.
- Never feed food by hand, always use food pusher.
- Do not attempt to defeat the any interlock mechanism in the machine.
- Always operate blender with cap is placed.
- When blending not liquid, remove center piece of two-piece cap.
- Turn off the machine before replace attachment.
- Use the product and assembly the accessory as mentioned on user manual only.
- Switch off the appliance before changing accessories or approaching parts which move in use.
- This appliance is not intended for use by children or other persons without assistance or supervision if their physical, sensory or mental capabilities prevent them from using it safely. Children should be supervised to ensure that they do not play with the appliance.
- This appliance shall not be used by children. Keep the appliance and its cord out of reach of children.
- Appliances can be used by persons with reduced physical, sensory or mental capabilities or lack of experience and knowledge if they have been given supervision or instruction concerning use of the appliance in a safe way and if they understand the hazards involved. Children shall not play with the appliance.
Always disconnect the appliance from the supply if it is left unattended and before assembling, disassembling or cleaning.
Save these instructions
Control panel speed setting
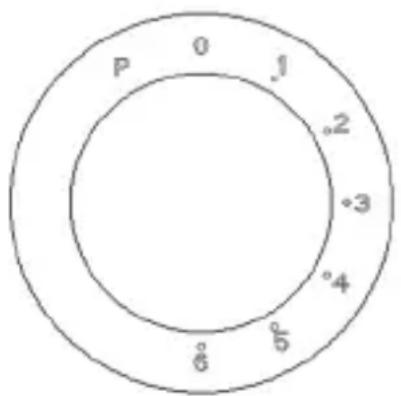
0 ----Stop
Setting 1-6----Operating speed
Setting 1----Minimum speed—slow
Setting 6----Maximum speed—fast
Setting P---- Highest speed
Setting Speed
EN
| Accessories Picture | Speed setting | Time Capacity | ||
| Kneading Hook | 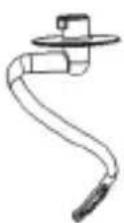 | 1-2 | 30sec at speed1 and 5min at speed2 | 800 g flour and 480 ml water |
| Flat beater 2-4 | 7n 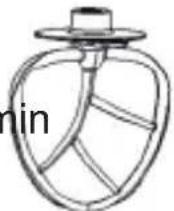 | |||
| Whisk 6 7min | 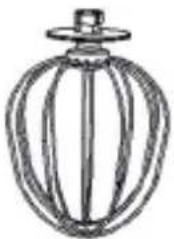 | 14 egg whites or 600 ml cream | ||
| Meat grinder 5-6 | 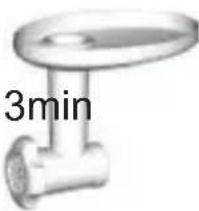 | |||
| Blender 5-6,P | 1mi 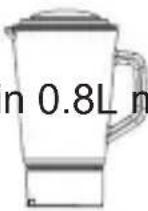 max max | |||
Operating positions
Warning!
Operate the appliance only when the accessory/tool is attached according to this table and is in the operating position.
| Item | Position Accessory | |||
| 1 | 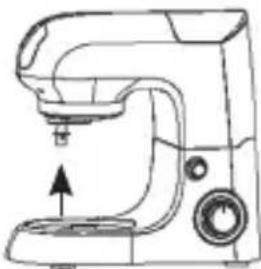 | 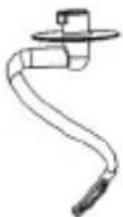 | 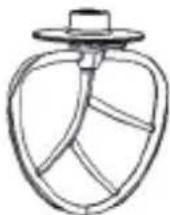 | 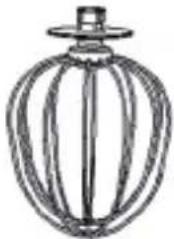 |
| 2 | 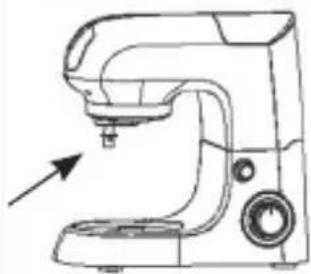 | 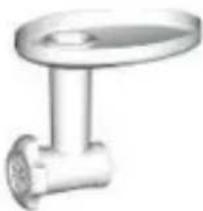 | ||
| 3 | 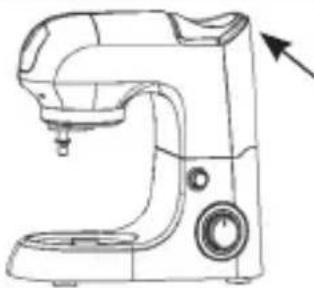 | 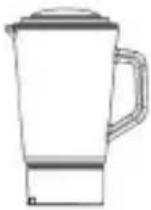 | ||
| 4 | 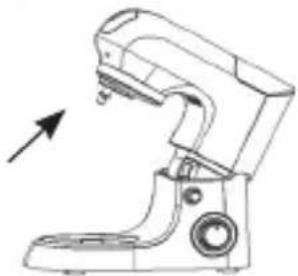 | Set up Kneading Hook,Mixing Hook,Whisk,according to your desire | ||
Risk of injury from the rotating tools!
While the appliance is operating, keep fingers clear of the mixing bowl.
EN
Do not change tools until the appliance is at a standstill and have been unplugged. When switch off, the drive continues running briefly.
How to use Kneading Hook, Flat beater, Whisk
1
natural_image
Line drawings of a kitchen mixer with four sequential steps showing the blade and handle (no text or symbols)- Place the appliance on a flat surface, e.g. a kitchen counter, and make sure it is standing firmly.
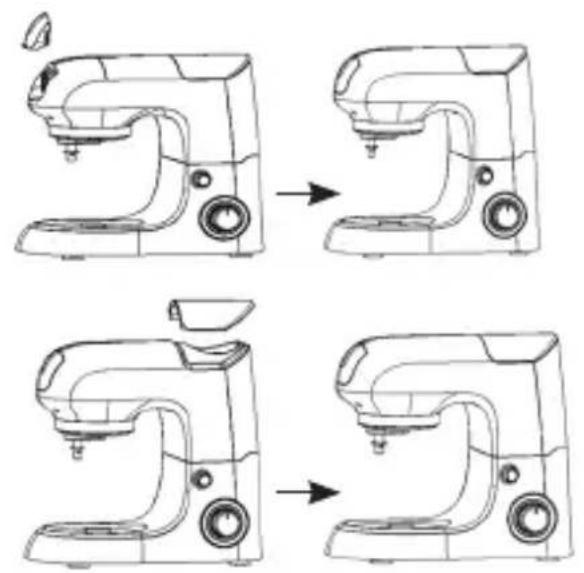
- Ensure that the protective cover (11) is fitted to the Accessory socket (12)
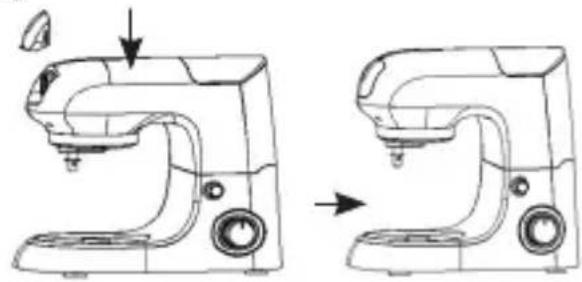
- Place the blender protective cover (14) into the upper coupler of swivel arm(15). (see illustration)
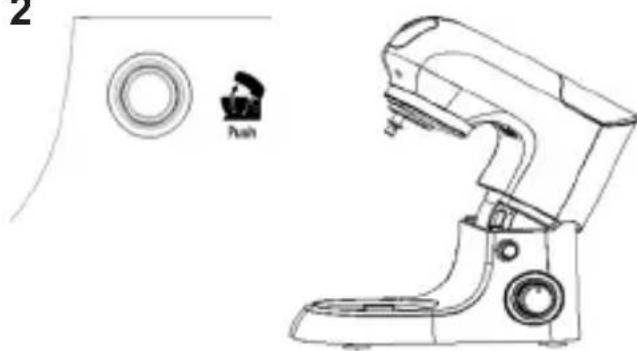
2
natural_image
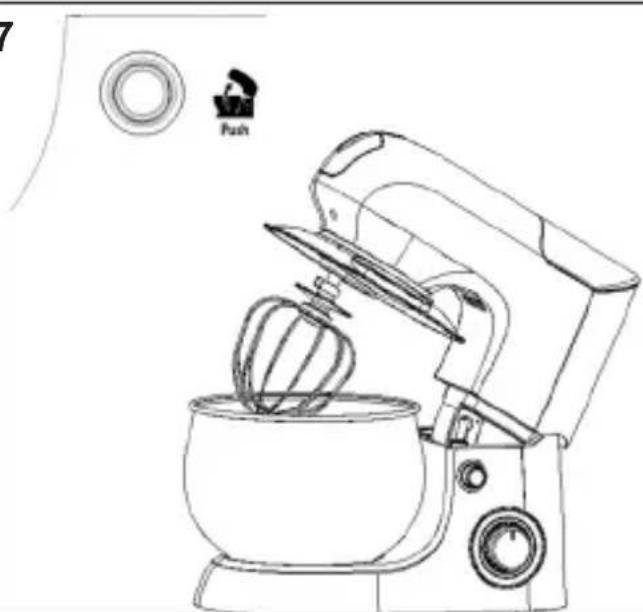
Line drawing of a kitchen mixer with a circular button and push button (no text or symbols)Turn the arm release button (17) clockwise. at the same time lift the swivel arm(13) with hand so that it locks into place with a click, The swivel arm tilts up.
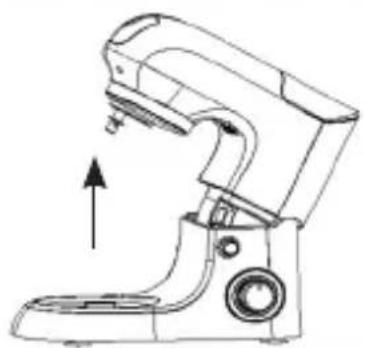
3
natural_image
Line drawing of a kitchen mixer with directional arrow indicating motion (no text or symbols)Fit the bowl cover (22) onto the swivel arm(13) and turn it slightly, so that it is attached into position securely.
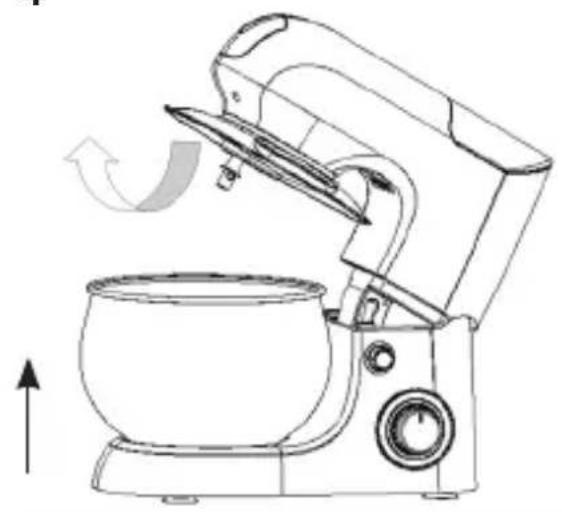
4
natural_image
Line drawing of a kitchen mixer with rotating fan and bowl (no text or symbols)-
Place the food into the mixing bowl(26).
-
Fit the mixing bowl in the recess on the motor house(19).
-
Turn the mixing bowl slightly clockwise, so it locks into position.
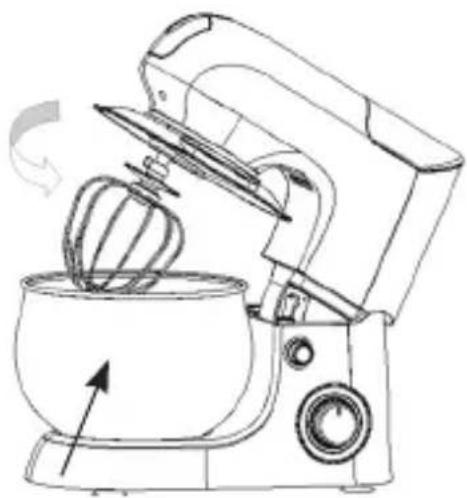
5
natural_image
Line drawing of a kitchen mixer with a hand mixer, showing no text or symbols-
Fit the required accessory (24 with 23, 22or 25) onto the motor spindle (21) on the underside of the swivel arm(13).
-
A. The kneading hook (25) is used for heavy dough, minced meat or other demanding kneading jobs.
B. The flat beater (24) is used to mix lighter types of dough.
C. The whisk (23) is used for whisking cream, egg whites, etc.
- Turn the accessory, so the pins on the spindle are aligned with the depressions on the accessory top edge. Press the accessory against the swivel arm and turn it anti-clockwise at the same time until the pins engage and the accessory locks into position securely. The accessory must not be loose nor should you be able to pull it free.
EN
6
natural_image
Line drawing of a kitchen mixer with control panel and side-mounted buttons (no text or symbols)-
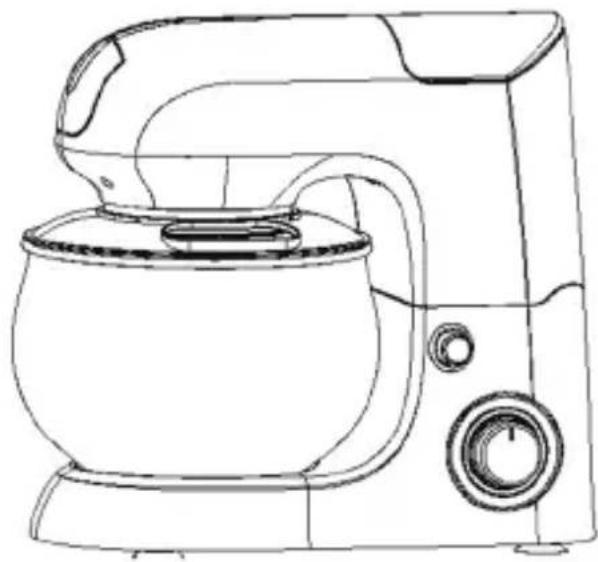
Lower the swivel arm so that it locks into place with a click. The lid(22) must fit tightly with the mixing bowl(26), otherwise it is fitted incorrectly. The appliance is now ready for use.
-
Plug the power cord into main power outlet. Turn Speed control knob to speed 1 (or any speed setting) indicator light on the control panel will now be illuminated.
-
Select the speed you want using . Speed button 1 is the slowest and speed button 6 is the fastest speed.
Recommended speeds, time and capacity are shown in the table above. - If you need to scrape inside the mixing bowl, wait until the accessory has stopped completely. Use the spatula, never your fingers.
7
natural_image
Line drawing of a kitchen mixer with a bowl and stand mixer, no text or symbols present- Switch off the appliance by turning knob to O when you have finished mixing. Unplug it before you change the accessories, or before you take the appliance apart or when not in use.
- Turn the swivel arm release button (17) clockwise. at the same time lift the swivel arm
with hand so that it locks into place with a click, The swivel arm(13) tilts up.
8
8.1 8.2
natural_image
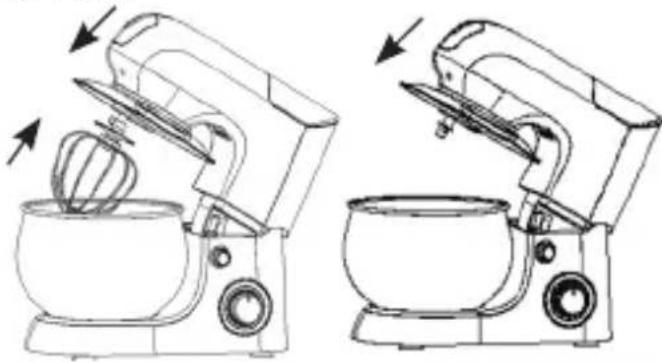
Line drawings of two kitchen mixing machines, one with a whisk and the other with a bowl (no text or symbols)- Detach the accessory by turning it clockwise.
- Remove mixing bowl with prepared food anti-clockwise.
IMPORTANT!
The temperature of water which will be added into dough at 40+/-5°C degree when preparing for dough is on progress.
Meat Grinder
1
natural_image
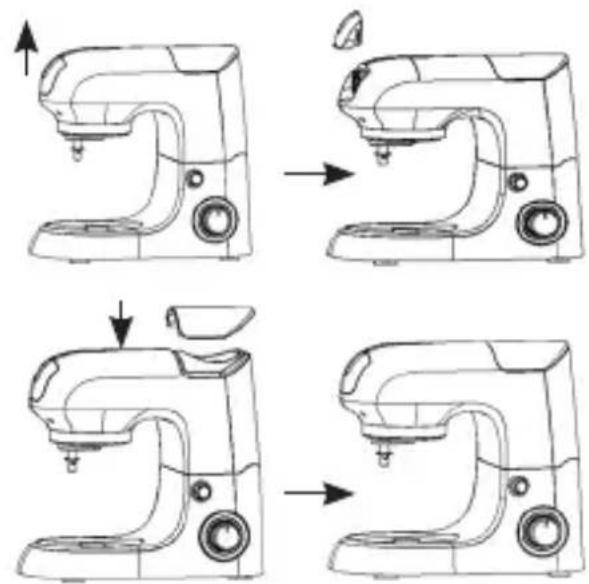
Four-panel line drawing of a kitchen mixer with adjustment arrows indicating action (no text or symbols)- Place the appliance on a flat surface, e.g. a kitchen counter, and make sure it is standing firmly.
- Ensure that the protective cover (11) is fitted to the Accessory socket (12)
- Place the blender protective cover (14) into the swivel arm (13). (see illustration)
EN
2 2.1
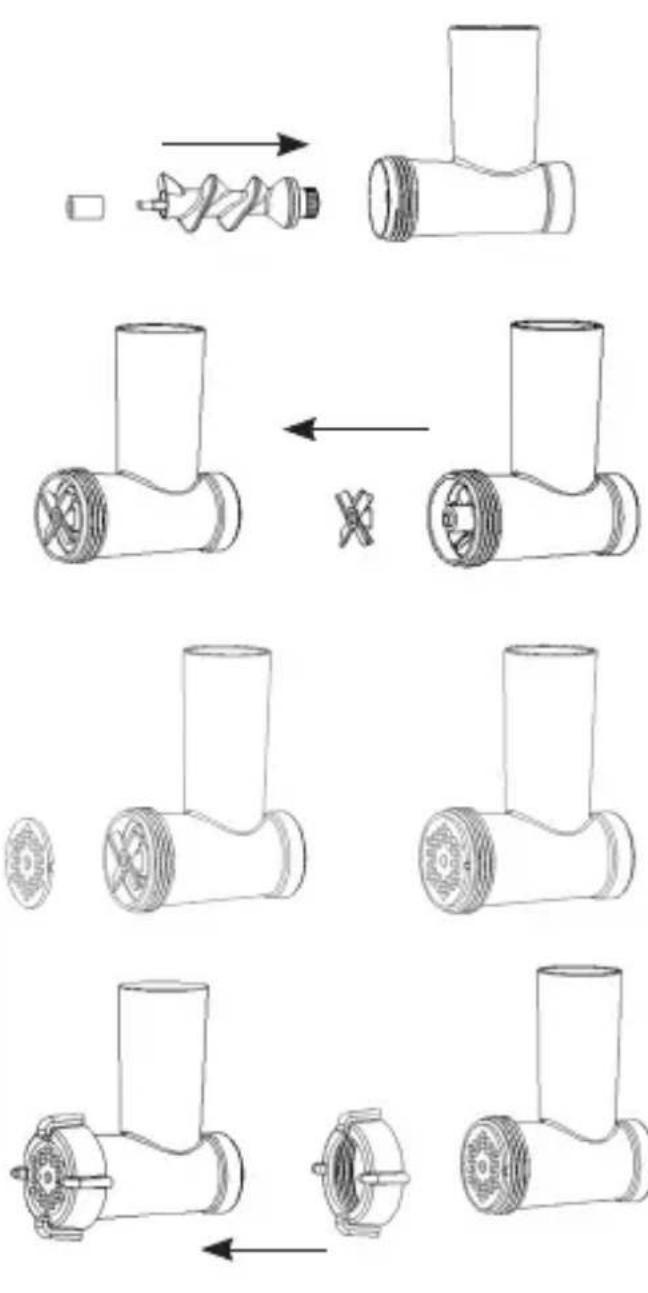
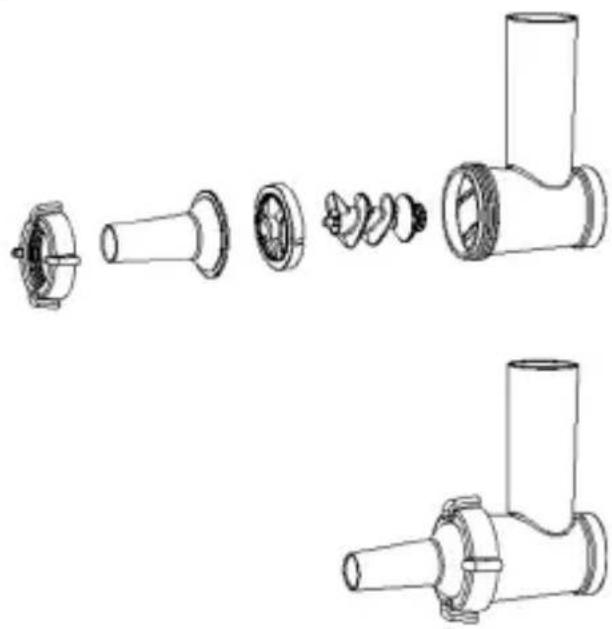
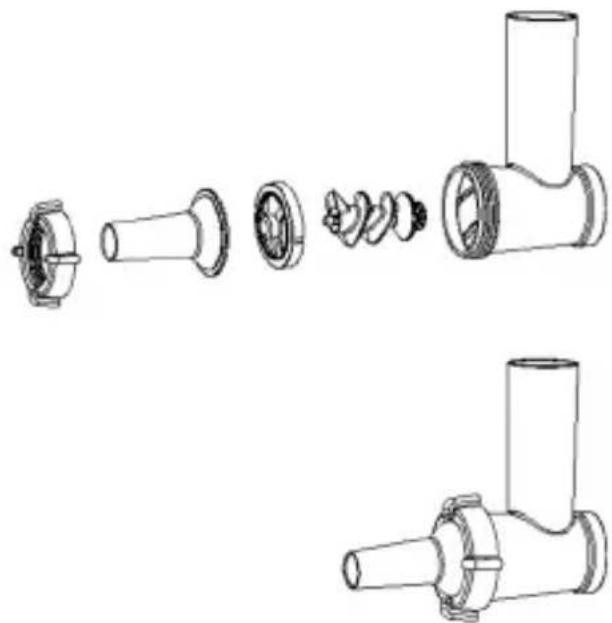
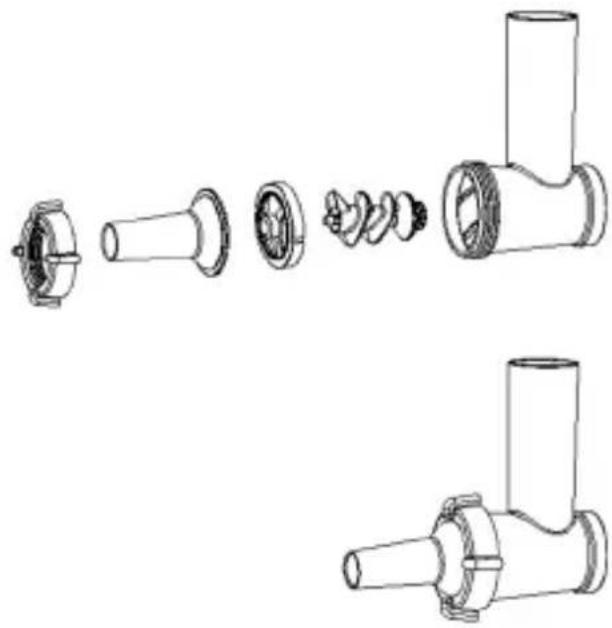
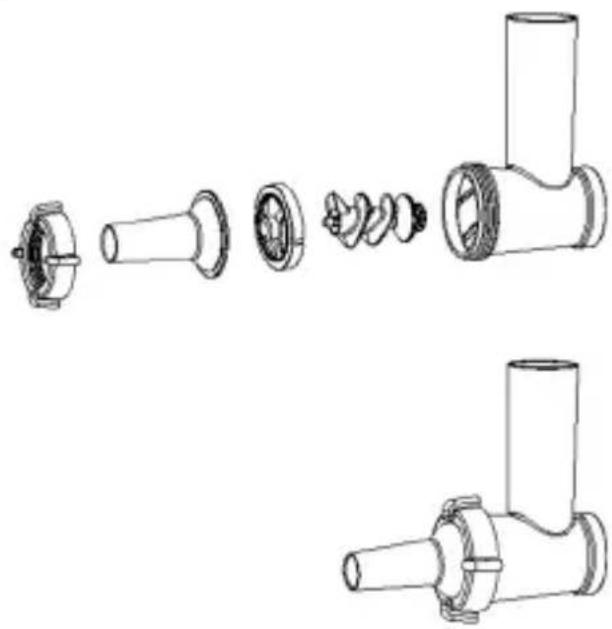
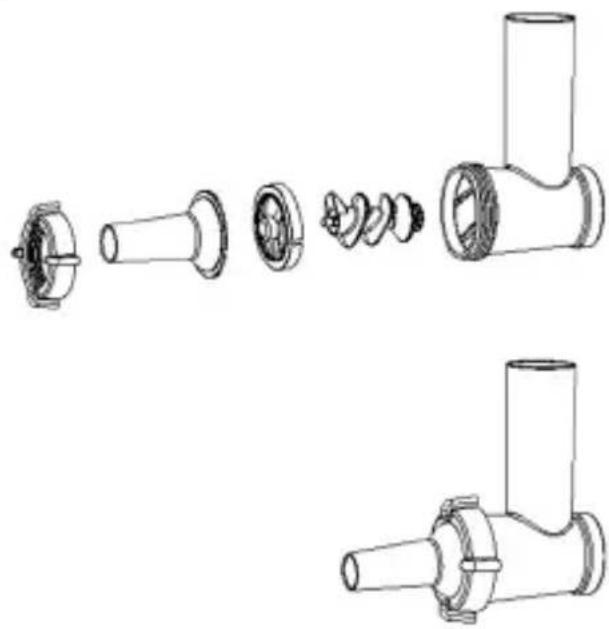
- Fit the scroll(7) into the meat grinder body(8).
- Fit the silicon coupling (6) onto the scroll connection (see illustration).
- Fit the cutter(5) onto the scroll connection (see illustration). The sharp edges of the cutter should point towards the mincing disk.
- Fit one of the three mincing disk(2,3,4) on top of the cutter (see illustration). Turn the mincing disk so that two indentations are aligned with the pins on the meat grinder body. Select the mincing disk for the required consistency. You can choose fine, medium and coarse.
- Fit the ring nut (1) over the mincing disk on the meat grinder body (see illustration). Turn clockwise to lock. The ring nut must hold the mincing disk securely in place. But do not over tighten.
2.2
natural_image
Exploded view diagram of a mechanical assembly showing exploded views of components like a flange, bolt, and pipe fitting (no text or labels)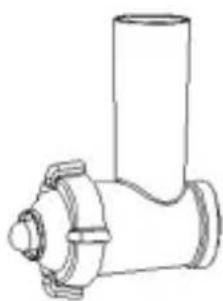
natural_image
Line drawing of a pipe fitting with flanged ends and a cylindrical shaft (no text or symbols)-
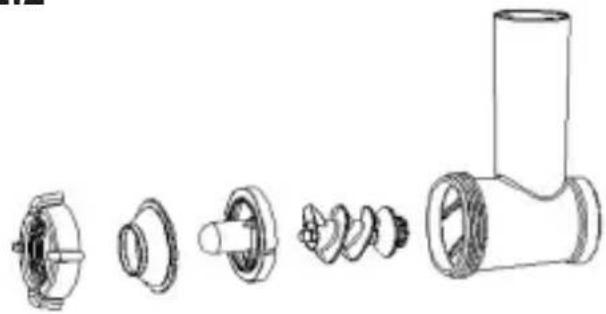
Fit the scroll(7) in the meat grinder body(8) with the thin metal connection outwards, and press firmly into place.
-
Fit the meat spreader(34) and the meatball canister(33) onto the scroll connection (see illustration).Turn it, so the two indentations are aligned with the pins on the meat grinder body.
-
Fit the ring nut (1) over the meatball canister on the meat
grinder body (see illustration). Turn clockwise to lock. The ring nut must hold the meatball canister securely in place. But do not over tighten.
2.3
natural_image
Exploded view diagram of a mechanical component showing exploded view from flange to cylindrical pipe fitting (no text or labels)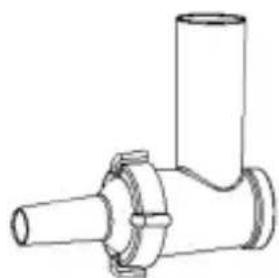
natural_image
Technical line drawing of a mechanical pipe fitting with flanges (no text or symbols)-
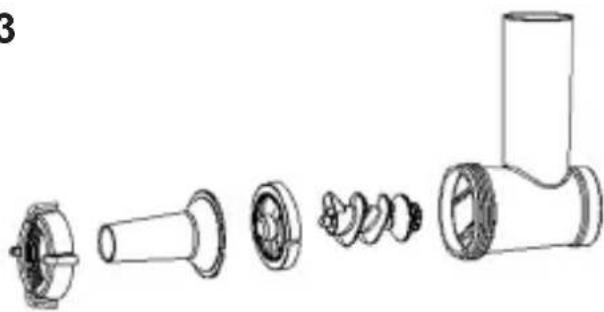
Fit the scroll(7) in the meat grinder body(8) with the thin metal connection outwards, and press firmly into place.
-
Fit the dough spreader(36) and the sausage canister (35) onto the scroll connection (see illustration).Turn it so the two indentations are aligned with the pins on the meat grinder body.
-
Fit the ring nut (1) over the
round meat holder on the meat grinder body (see illustration). Turn clockwise to lock. The ring nut must hold the sausage canister securely in place. But do not over tighten.
EN
3
natural_image
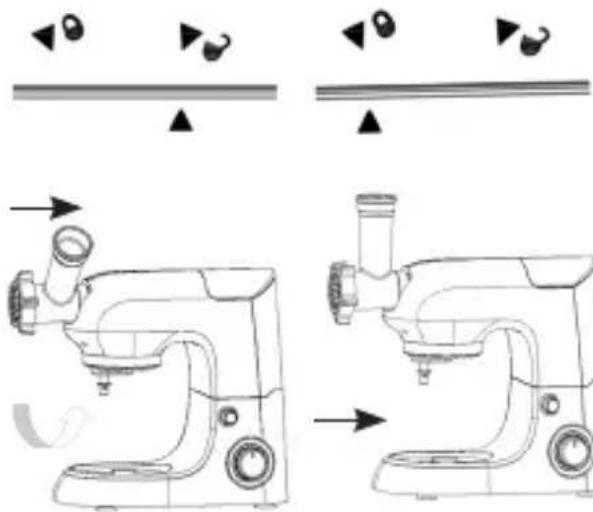
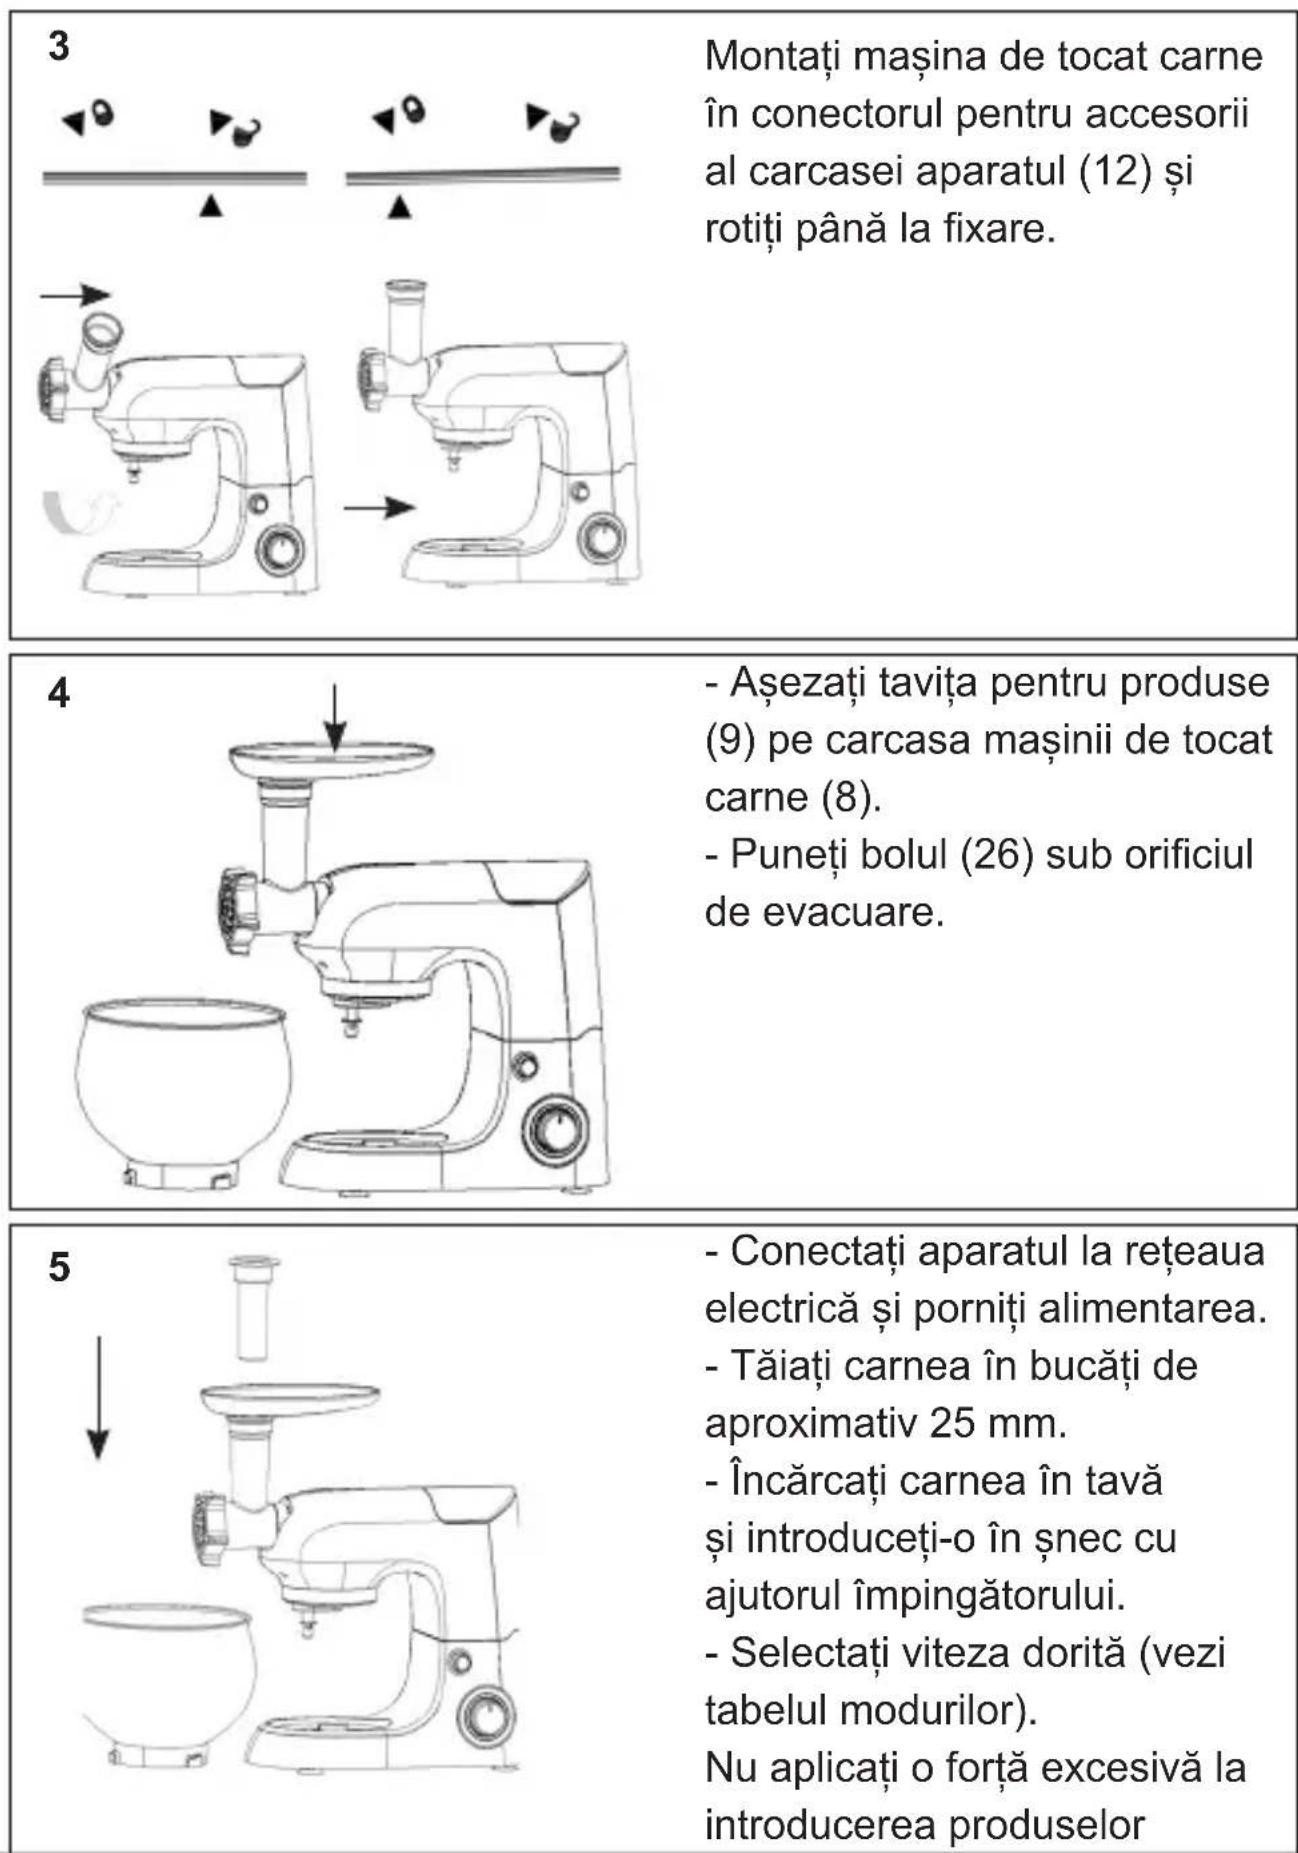
Illustration of two microscope setups with directional arrows indicating motion (no text or symbols)it the meat grinder body(8) in the accessory socket(12),so that the arrow is aligned with the circle.Turn it to the vertical position, so the arrow is aligned with the arrow.
4
natural_image
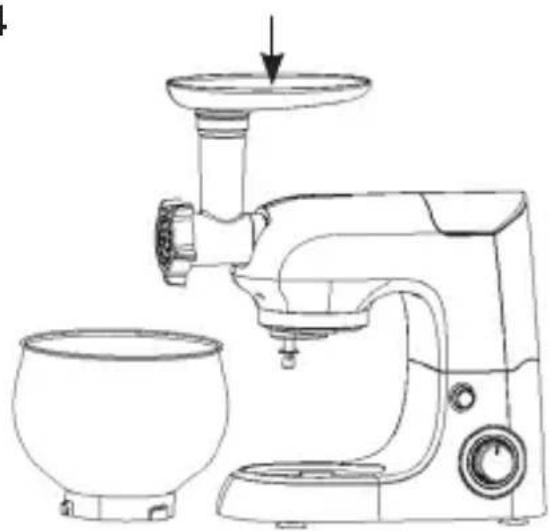
Line drawing of a kitchen grater with a bowl and side sink, no text or symbols present- Fit the meat tray (9) onto the meat grinder body(8) so that the wide part is positioned over the motor house of the appliance.
- Place the mixing bowl(26) or similar under the meat grinder body opening.
- The appliance is now ready for use.
5
natural_image
Line drawing of a kitchen mixer with a bowl and stand, showing no text or symbols- Plug the power cord into main power outlet and switches it ON.
-
Plug the power cord into main power outlet and switches it ON. Turn Speed control knob to speed1(or any speed setting) indicator light on the control panel will now be illuminated.
-
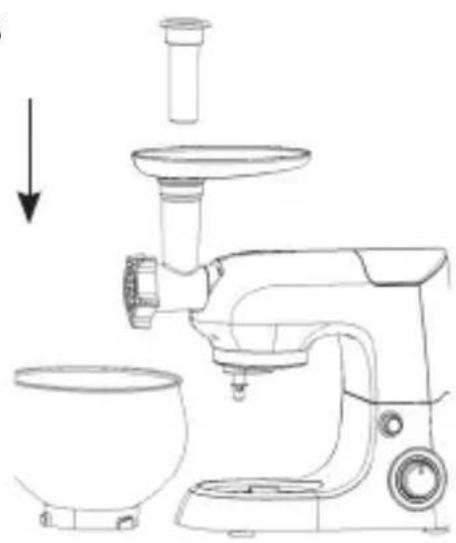
Cut your meat into smaller pieces, so the pieces fit into the feeding tube. Dice or cut into strips with a width of approx. 2.5 cm.
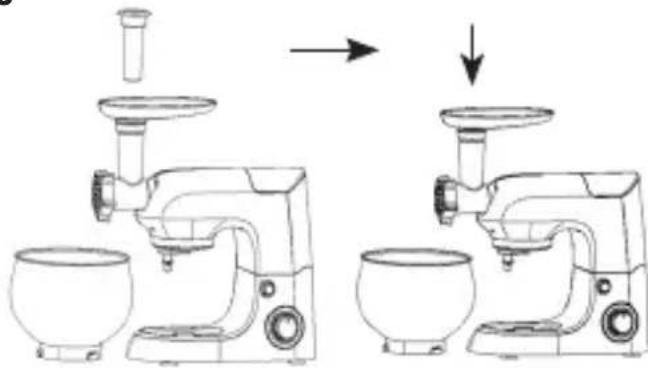
- Put the pieces onto the tray(9).
- Select the speed you want using the four speed buttons. Recommended speeds are shown in the table above.
- The meat pieces travel down the feeding tube. Push down carefully with the tamper (10). Do not press too hard, otherwise you may damage the appliance.
6
natural_image
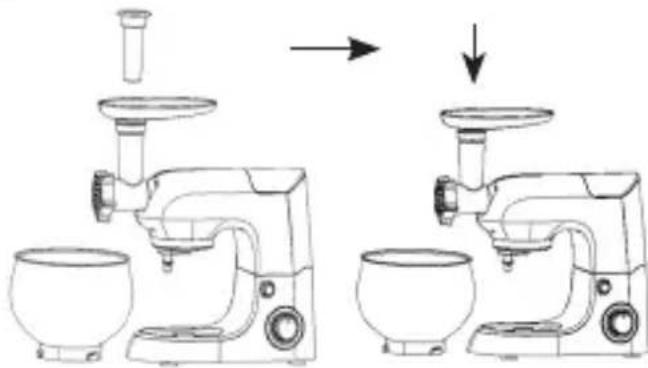
Line drawing of a two-step cooking process: adding a cup into a bowl, then adding a pan to a side bowl (no text or symbols)- Switch off the appliance by turn knob to O when you have finished grinding the meat.
Switch off the appliance at the switch and unplug it before you change the accessories, or before you take the appliance apart or when not in use. - Remove pusher and meat tray.
7
natural_image
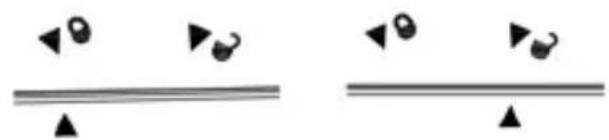
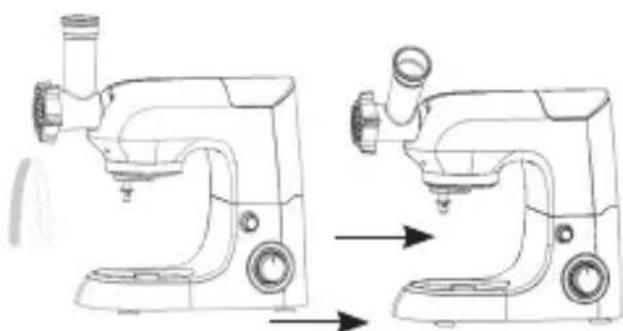
Two horizontal lines with triangular symbols, one slightly above the other, both with no text or labels.To detach the meat grinder, turn the body so the arrow is aligned with the circle and then remove.
natural_image
Line drawing of two microscope devices with adjustment arrows indicating motion (no text or symbols)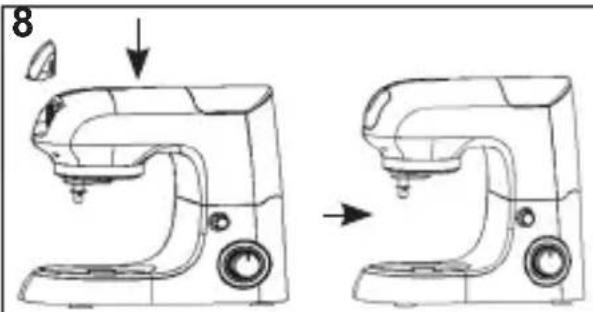
Fit the protective cover over the accessory socket again.
Safety instructions:
Always remove bone, gristle, tendons, and rind before grinding the meat.
Frozen food must be thoroughly defrosted before grinding.
The meat grinder must only be used to grind meat. Avoid grinding pasty foods, e.g. food containing breadcrumbs, as this could damage the appliance.
Never run the meat grinder continuously for more than 3 minutes. Running the meat grinder continuously for too long without a break may reduce the life span of the appliance. After having used the appliance for 3 minutes, take a break and wait at least 30 minutes before using it again.
Blender
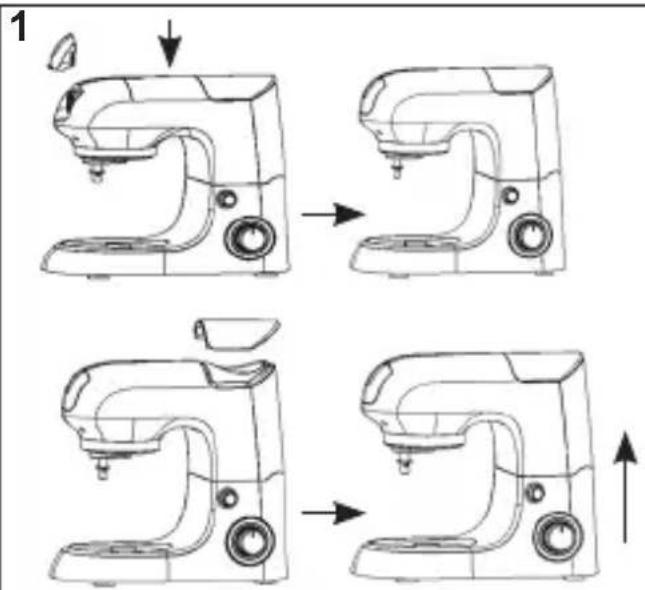
-
Place the motor section on a flat surface, e.g. a kitchen counter, and make sure it is standing firmly.
-
Ensure that the protective cover (11) is fitted to the accessory socket (12).
-
Remove the blender protective cover(14) from the swivel arm(see illustration).
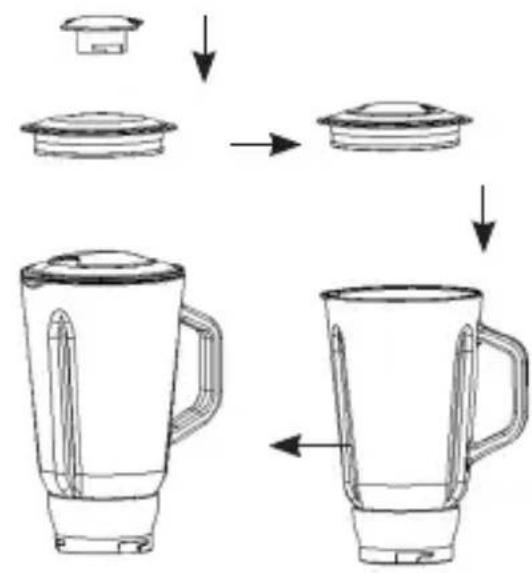
2
flowchart
graph TD
    A["Top Cover"] --> B["Shrinker with lid"]
    B --> C["Shrinker with lid"]
    C --> D["Shrinker with lid"]
    D --> E["Shrinker with lid"]
    E --> F["Shrinker with lid"]
- Place the foodstuff you wish to process into the jar(31).
- Put the blender lid(30) into the jar and ensure it cover well.
- Place the middle cap(29) into the hole in the blender lid.
3
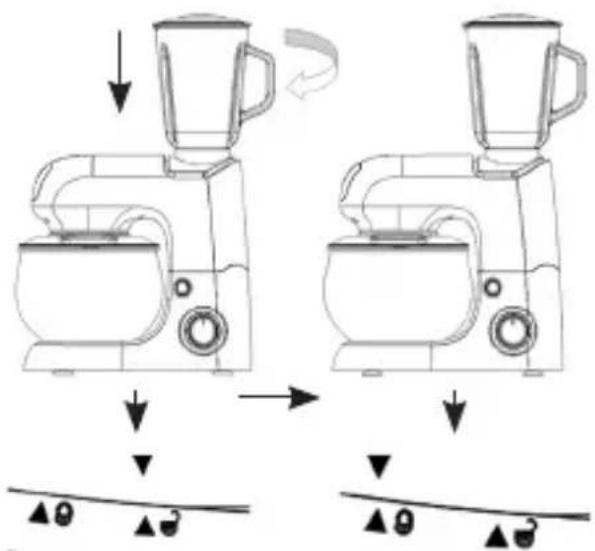
- Place the jar assembly in the motor house, so that the arrow is aligned with the circle. Turn it clockwise, so the arrow is aligned with the arrow.
- Plug the power cord into main power outlet and switches it ON.
- Turn Speed control knob to speed1(or any speed setting)
indicator light on the control panel will now be illuminated.
- Select the speed you want using the four speed buttons. Recommended speeds are shown in the table above.
EN
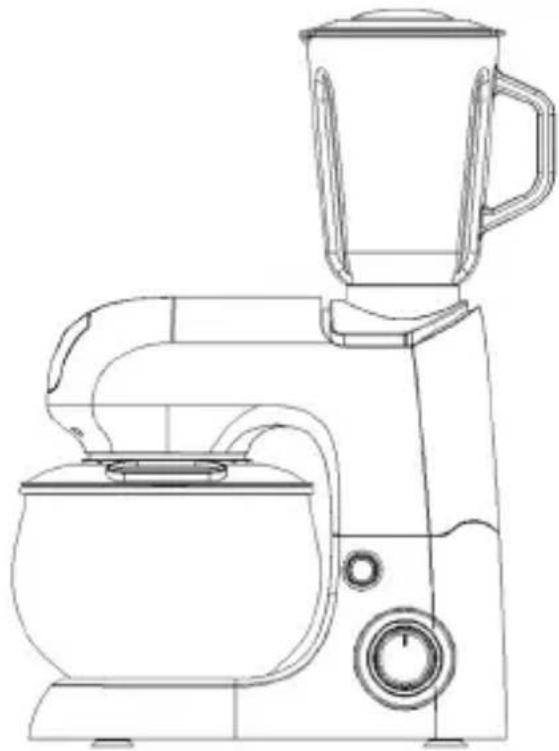
4
natural_image
Line drawing of a kitchen mixer with a blender and side-mounted fan (no text or symbols)- Switch off the appliance by pressing the OFF button after use.
Switch off the appliance at the switch and unplug it before you change the accessories, or before you take the appliance apart or when not in use.
-
To detach the jar assembly, turn the jar so the arrow is aligned with the circle and then remove.
-
Remove blender lid then you may put processed food out.
5
natural_image
Line drawing of a kitchen mixer with two views showing the blade and handle (no text or symbols)Fit the blender protective cover to the swivel arm again.
Safety instructions:
- To achieve the best results when pureeing solid ingredients, place small portions into the jar one by one instead of placing a large quantity all at once.
- If you are processing solid ingredients, cut them into small pieces (2-3cm) first.
- When mixing solid ingredients start off first with a small amount of liquid. Gradually add more and more liquid through the opening in the lid.
-
Always place your hand on top of the blender when you are operating the device.
-
For stirring solid or very thick liquid ingredients we recommend that you use the blender in impulse mode to prevent the blades from becoming stuck.
- NB: Operate the motor for a maximum of 1 minutes to prevent overheating or consequent damage.
- It is advisable to wash appliance before using it for the first time.
- Clean the appliance after each use, thereby avoiding liquid incrustations.
- The switch does not permanently engage in the 'P' setting. You have to hold the switch in the 'P' setting
Cleaning and maintenance
When cleaning the appliance, you should pay attention to the following points:
- Remove plug from the mains socket, and allow the appliance to cool down before cleaning it.
- Do not immerse the motor section of the appliance in water and make sure no water enters the appliance.
- Clean the motor section by wiping it with a damp cloth. A little detergent can be added if the appliance is heavily soiled.
- Do not use scouring pads, steel wool or any form of strong solvents or abrasive cleaning agents to clean the appliance, as they may damage the outside surfaces of the appliance.
• Take the appliance apart and clean all of the accessories separately. The meat grinder body and other parts can be cleaned in warm soapy water. - Be careful not to touch the blades or sharp parts during use and cleaning.
- IMPORTANT! Allow to dry fully after cleaning before using again. Do not use the appliance if damp.
- We recommend you lubricate the meat screens with vegetable oil after cleaning, and store them in grease-proof paper to minimize the
risk of rust and discoloration.
- After washing and drying, immediately place attachment into the protective sleeve for storage.
Storage
- Wipe and dry the appliance before storage.
- Store the appliance in a cool, dry and clean place beyond the assess of children and people with limited physical and mental abilities.
Environmental protection
The equipment is labeled in accordance with the European Directive 2012/19/EC «On the disposal of electrical and electronic waste» crossed-out garbage container sign This label indicates that this equipment must not be disposed of with other household waste at the end of its useful life. The user is obliged to hand it over to the collection point for electrical and electronic equipment waste. Electrical equipment waste is hazardous to the environment. Proper handling of used electrical and electronic equipment avoids harmful effects on human health and the environment resulting from the presence of hazardous components, as well as improper storage and recycling of such equipment. The manufacturer shall not be liable for any damage caused by the intended or improper use of the equipment. The manufacturer has the right to change product specifications at any time without prior notice for design, commercial, aesthetic or other reasons.
| Accessories Picture | Speed setting | Time |
natural_image
Line drawings of a kitchen mixer with four sequential steps showing the blade and handle (no text or symbols)natural_image
Technical line drawing of a kitchen mixer with circular component and push button (no text or symbols)natural_image
Line drawing of a kitchen mixer with handle and control knob (no text or symbols)natural_image
Line drawing of a kitchen mixer with rotating fan and bowl (no text or symbols)natural_image
Line drawing of a kitchen mixer with a hand mixer inside a bowl (no text or symbols)natural_image
Line drawing of a kitchen mixer with control panel and side-mounted buttons (no text or symbols)natural_image
Line drawing of a kitchen mixer with a bowl and stand mixer, no text or symbols presentnatural_image
Line drawings of two kitchen mixing machines, one with a spoon and the other with a bowl, showing mechanical components and motion arrows (no text or symbols)natural_image
Four-panel line drawing of a kitchen mixer with adjustment arrows indicating action (no text or symbols)natural_image
Technical line drawings of mechanical components including a flange, washer, and valve assembly (no text or labels)2.3
natural_image
Exploded view diagram of a mechanical component showing exploded and assembled parts (no text or labels)natural_image
Illustration of two microscope setups with directional arrows indicating motion (no text or symbols)Setzen Sie den
Fleischwolf in die
natural_image
Line drawing of a kitchen grater with a bowl and side sink, no text or symbols presentnatural_image
Line drawing of a kitchen feeder with a bowl and side sink, showing no text or symbolsnatural_image
Line drawing of a kitchen mixer with two cups, showing the process from top to side (no text or symbols)natural_image
Diagram showing two views of a microscope with adjustment knobs and directional arrows indicating motion (no text or symbols)natural_image
Line drawing of a kitchen mixer with two views showing the blade and handle (no text or symbols)DE
natural_image
Line drawings of a kitchen mixer with four sequential steps showing body, seat, and handle (no text or labels)flowchart
graph TD
    A["Top Product"] --> B["Shipped Top Product"]
    B --> C["Shipped Bottom Product"]
    C --> D["Shipped Bottom Product"]
    D --> E["Shipped Bottom Product"]
natural_image
Line drawing of a kitchen mixer with blender and side bowl (no text or symbols)natural_image
Line drawing of a kitchen mixer with two views showing the side and top views (no text or symbols)feel MAESTRO® at home
natural_image
Line drawing of a kitchen mixer with a push button and circular component (no text or symbols)natural_image
Technical line drawing of a mechanical device with no visible text or symbolsnatural_image
Line drawing of a kitchen mixer with rotating fan and bowl (no text or symbols)natural_image
Line drawing of a kitchen mixer with a hand mixer inside a bowl (no text or symbols)natural_image
Line drawing of a kitchen mixer with control panel and side-mounted buttons (no text or symbols)natural_image
Line drawing of a kitchen mixer with a hand mixer, no text or symbols presentnatural_image
Line drawings of two kitchen mixing machines, one with a whisk and the other a bowl, showing mechanical components and motion arrows (no text or symbols)natural_image
Four-panel line drawing of a kitchen mixer with adjustment arrows indicating action (no text or symbols)natural_image
Technical line drawing of a mechanical component assembly (no text or symbols)2.3
natural_image
Exploded view diagram of a mechanical component showing exploded and assembled parts (no text or labels)natural_image
Line drawing of a two-step cooking process: adding a bowl into a mixer and then using a stand mixer (no text or symbols)natural_image
Four-step line drawing of a kitchen mixer with adjustment arrows indicating motion (no text or symbols)flowchart
graph TD
    A["Top Cover"] --> B["Shrinker with lid"]
    B --> C["Shrinker with lid"]
    C --> D["Shrinker with lid"]
    D --> E["Shrinker with lid"]
    E --> F["Shrinker with lid"]
natural_image
Line drawing of a kitchen mixer with a blender and side panel (no text or symbols)natural_image
Line drawing of a kitchen mixer with two views showing the side and top views (no text or symbols)Current electric alternativ;
Frecventa nominala: 50 Hz;
natural_image
Line drawing of a kitchen mixer with two views showing the side and top views (no text or symbols)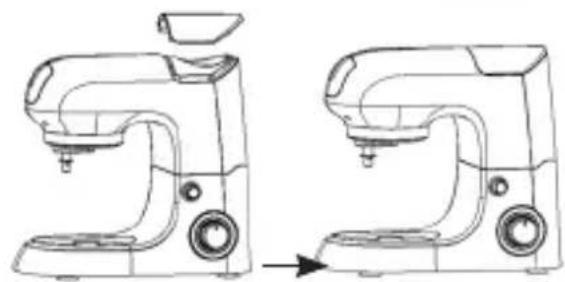
natural_image
Line drawing of a kitchen mixer device before and after assembly (no text or symbols)natural_image
Line drawing of a kitchen mixer with a circular button and push button (no text or symbols)natural_image
Line drawing of a mechanical device with an upward arrow indicating motion (no text or symbols)natural_image
Line drawing of a kitchen mixer with rotating fan and bowl (no text or symbols)natural_image
Line drawing of a kitchen mixer with a hand mixer inside a bowl (no text or symbols)natural_image
Line drawing of a kitchen mixer with control panel and side-mounted dish (no text or symbols)natural_image
Line drawing of a kitchen mixer with a bowl and stand mixer, no text or symbols presentnatural_image
Line drawings of two kitchen mixing machines, one with a bowl and one with a bowl, showing mechanical components and motion arrows (no text or symbols)natural_image
Four-panel line drawing of a kitchen mixer with adjustment arrows indicating action (no text or symbols)natural_image
Technical line drawing of a mechanical component assembly (no text or symbols)2.3
natural_image
Exploded view diagram of a mechanical component showing exploded and assembled parts (no text or labels)Schema de asamblare a accesoriiilor 33, 34, 35 Fig. 2.2.; 2.3
6
natural_image
Line drawing of a two-step cooking process: adding a cup into a bowl, then adding a lid to a bowl (no text or symbols)natural_image
Line drawing of two microscope setups with adjustment arrows indicating motion (no text or symbols)natural_image
Four line drawings of a kitchen mixer with adjustment arrows indicating motion (no text or symbols)flowchart
graph TD
    A["Top Product"] --> B["Shipped Top Product"]
    B --> C["Shipped Bottom Product"]
    C --> D["Shipped Bottom Product"]
    D --> E["Shipped Bottom Product"]
natural_image
Line drawing of a kitchen mixer with blender and side bowl (no text or symbols)natural_image
Line drawing of a kitchen mixer with two views showing the side and top views (no text or symbols)natural_image
Line drawings of a kitchen mixer with four sequential steps showing the blade and handle (no text or symbols)natural_image
Line drawing of a kitchen brush with a circular button and push button, no text or symbols presentnatural_image
Line drawing of a kitchen mixer device with handle and control knob (no text or symbols)natural_image
Line drawing of a kitchen mixer with rotating fan and mixing bowl (no text or symbols)natural_image
Line drawing of a kitchen mixer with a hand mixer inside a bowl (no text or symbols)natural_image
Line drawing of a kitchen mixer with control panel and side-mounted buttons (no text or symbols)natural_image
Line drawing of a kitchen mixer with a bowl and stand mixer, no text or symbols presentnatural_image
Line drawings of two kitchen mixing machines, one with a bowl and the other with a bowl, showing mechanical components and directional arrows (no text or symbols)natural_image
Four-panel line drawing of a kitchen mixer with adjustment arrows indicating action (no text or symbols)natural_image
Technical line drawing of a mechanical component assembly (no text or symbols)2.3
natural_image
Exploded view diagram of a mechanical component showing exploded and assembled parts (no text or labels)natural_image
Illustration of two microscope setups with directional arrows indicating motion (no text or symbols)natural_image
Line drawing of a kitchen mixer with a bowl and stand, no text or symbols presentnatural_image
Line drawing of a kitchen mixer with a bowl and side sink, showing no text or symbolsnatural_image
Line drawing of a two-step cooking process: adding a cup into a bowl, then adding a pan to a bowl (no text or symbols)natural_image
Line drawing of a kitchen mixer with two views showing the blade and handle (no text or symbols)natural_image
Line drawings of a kitchen mixer with four sequential steps showing head, side, top, and front views (no text or symbols)flowchart
graph TD
    A["Top Product"] --> B["Shipped Top Product"]
    B --> C["Shipped Bottom Product"]
    C --> D["Shipped Bottom Product"]
    D --> E["Shipped Bottom Product"]
natural_image
Line drawing of a kitchen mixer with blender and coffee maker (no text or symbols)natural_image
Line drawing of a kitchen mixer with two views showing the side and top views (no text or symbols)RU
feel MAESTRO® at home
natural_image
Line drawings of a kitchen mixer with four sequential steps showing the blade and handle (no text or symbols)natural_image
Line drawing of a kitchen mixer with a circular button and push button (no text or symbols)natural_image
Technical line drawing of a mechanical device with an arrow indicating motion or force (no text or symbols present)natural_image
Line drawing of a kitchen mixer with a bowl and fan, showing motion arrows (no text or symbols)natural_image
Line drawing of a kitchen mixer blending into a bowl with a hand mixer (no text or symbols)natural_image
Line drawing of a kitchen mixer with control panel and side-mounted fan (no text or symbols)natural_image
Line drawing of a kitchen mixer with a hand mixer, no text or symbols presentnatural_image
Line drawings of two kitchen mixing machines, one with a bowl and the other with a bowl, showing mechanical components and directional arrows (no text or symbols)natural_image
Four-panel line drawing of a kitchen mixer with adjustment arrows indicating action (no text or symbols)natural_image
Technical line drawings of mechanical components including a flanged pipe fitting and multiple exploded views (no text or labels)2.3
natural_image
Exploded view diagram of a mechanical component showing exploded and assembled parts (no text or labels)natural_image
Illustration of two microscope setups with directional arrows indicating motion (no text or symbols)natural_image
Line drawing of a kitchen grater with a bowl and side sink, no text or symbols presentnatural_image
Line drawing of a kitchen mixer with a bowl and stand, showing no text or symbolsnatural_image
Line drawing of a two-step cooking process: adding a lid to a bowl and then adding a pan (no text or symbols)natural_image
Diagram showing two views of a microscope with adjustment knobs and directional arrows indicating motion (no text or labels)natural_image
Line drawing of a kitchen mixer with blender and oven (no text or symbols)natural_image
Line drawing of a kitchen mixer with two views showing the side and top views (no text or symbols)feel MAESTRO® at home
Certificated in Ukraine
Made in P.R.C. for Maestro
Apollo Corporation Limited ADD: Room801-2, 8/F., Easey Commercial
Building, 253-261 Hennessy Road, Wanchai, Hong Kong,


- feel MAESTRO® at home
- Dear customer, we thank you for purchase of goods
- Technical specifications
- Description of the appliance
- Safety instructions
- ATTENTION!
- Save these instructions
- Control panel speed setting
- Setting Speed
- Operating positions
- Warning!
- EN
- How to use Kneading Hook, Flat beater, Whisk
- IMPORTANT!
- Meat Grinder
- 2.1
- Safety instructions:
- Blender
- Cleaning and maintenance
- Storage
- Environmental protection
- DE
- RU
Brand : Maestro
Model : MR559
Category : Hand blender