
MTV7525DS - Microwaves Concept - Free user manual and instructions
Find the device manual for free MTV7525DS Concept in PDF.


| Product Type | Microwave Oven |
| Brand | Concept |
| Model | MTV7525DS |
| Capacity | 25 L |
| Power Output | 900 W |
| Voltage / Frequency | 230 V / 50 Hz |
| Dimensions (W x D x H) | 485 x 373 x 287 mm |
| Weight | 12.5 kg |
| Display Type | Digital LED |
| Control Type | Touch + Rotary Knob |
| Turntable | Yes, 315 mm diameter |
| Child Lock | Yes |
| Defrost Function | By weight or time |
| Auto Cook Programs | 8 presets |
| Timer | Up to 99 minutes 50 seconds |
| Interior Light | Yes |
| Door Opening | Push-button, right hinged |
| Interior Material | Stainless steel |
| Cleaning Instructions | Wipe with damp cloth; avoid abrasive cleaners |
| Safety Features | Automatic shut-off, overheat protection |
| Spare Parts Availability | Turntable, glass plate, fuse available |
| User Manual Included | Yes (44 pages) |
Frequently Asked Questions - MTV7525DS Concept
User questions about MTV7525DS Concept
0 question about this device. Answer the ones you know or ask your own.
Ask a new question about this device
Download the instructions for your Microwaves in PDF format for free! Find your manual MTV7525DS - Concept and take your electronic device back in hand. On this page are published all the documents necessary for the use of your device. MTV7525DS by Concept.
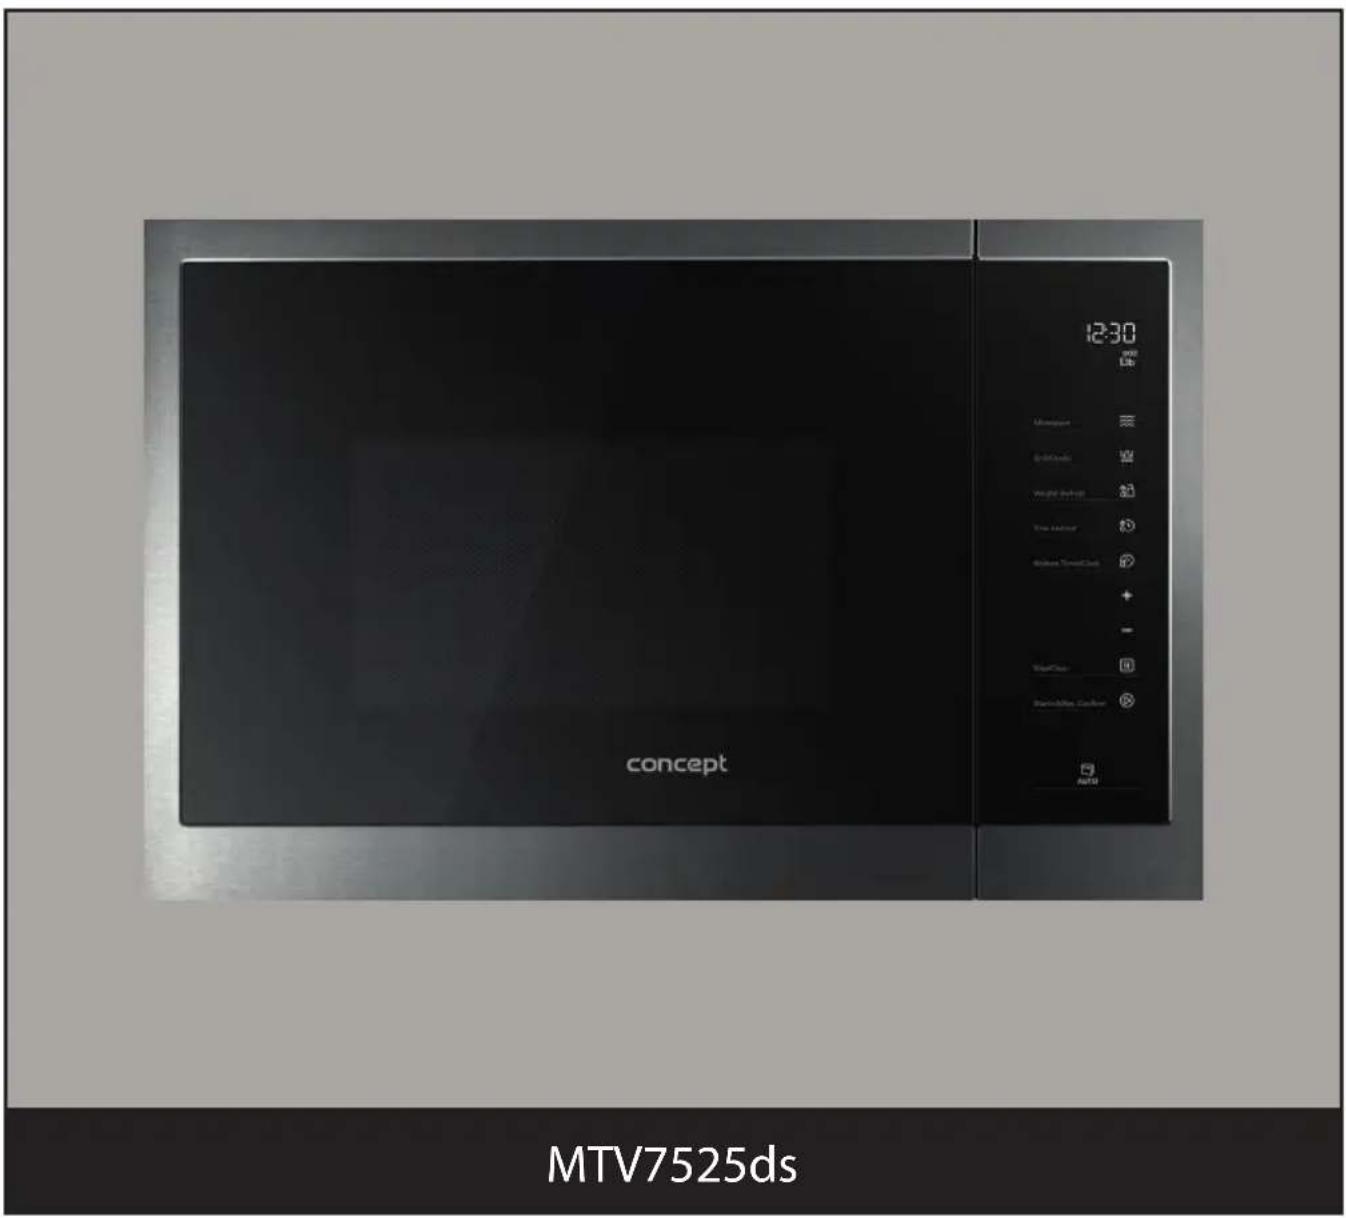
USER MANUAL MTV7525DS Concept
Built-in microwave oven
concept
CZ
PODĚKOVÁNÍ
Přislušenství
natural_image
Three electronic components: a circular component with hatched pattern, a circular plate with internal holes, and a circular coil with arrow (no text or symbols)CZ
concept
concept
CZ
POPIS OVLÁDACÍHO PANELU
SET 8x60ds + MTV7525ds
Obr. 1
Přislušenství
natural_image
Three mechanical components: a cross-section with hatched pattern, a circular plate with four holes, and a wire loop (no text or symbols)POPIS OVLÁDACIEHO PANELA
SET 8x60cds + MTV752scs
Obr. 1
SK
concept
concept
SK
Pripojenie do elektrickej siete
Akcesoria
natural_image
Three abstract diagrams: a shaded circular component labeled A, a circular plate with internal holes, and a circular ring with a loop (no text or symbols)PL
concept
concept
PL
OPIS PANELU STEROWANIA
SET 8x60ds + MTV7525ds
Rys. 1
Piederumi
A Grila stativs
B Rotėjošs aplveida paliktnis
C Rotējošs aplis

natural_image
Three abstract diagrams: a shaded circular shape labeled 'A', a circular plate with internal features, and a wire loop (no text or symbols)VADĪBAS PANELA APRAKSTS
SET 8x60ds + MTV/525ds
- att.
LV
concept
concept
LV
Thank you for purchasing the Concept product. We want you to be satisfied with everything we make every day you use it.
Please read the instructions carefully before initial use. You should retain them for a future reference. Ensure that anyone using the warming drawer is familiarized with the instructions.
TABLE OF CONTENTS
Technical specifications
Important safety information
Radio Interference
Product description
Control panel description
Individual functions
User manual
Basic functions
Suitable/unsuitable cookware for microwave heating
Advanced functions
Cleaning and maintenance
Installation of the appliance
Trouble shooting
Environmental protection
| Technical specifications | |
| Voltage 230 V ~ 50 Hz | |
| Microwave input power 1 450 W | |
| Microwave energy output 900 W | |
| Wave frequency 2 450 MHz | |
| Grill element input power 1 000 W | |
| Dimensions for installation (W x D x H) 564 x 550 x 380 mm | |
| External dimensions (W x D x H) 595 x 400 x 389 mm | |
| Internal volume 25 l | |
| Weight 17.6 kg | |
| Turntable plate diameter 315 mm | |
| Sound performance level | < 62 dB(A) |
The manufacturer reserves the right to make potential technical changes, typographical errors and any differences in the representation without prior notice.
70
71
EN
concept
concept
EN
IMPORTANT SAFETY INFORMATION
Upon delivery of the electric appliance
- Immediately after delivery, check the package for any damage during shipping.
- Caution! Some edges of this appliance that are hidden after installation are sharp! Be careful not to get cut when handling an uninstalled unit.
- Do not install the appliance if it has been damaged. Contact the store where you purchased it immediately.
- Remove all the packaging and marketing materials before first use.
- Keep the packaging materials away from children or dispose of them properly.
- This appliance must be installed in accordance with the regulations in force and should only be used in a well-ventilated area. Read the manuals before installing and using the appliance.
During installation
- Do not use the appliance in any way other than as described in this manual.
- This appliance can be used in households and similar places like:
- Kitchen cabinets in shops, offices and other workplaces.
• Appliances used in agriculture. - Appliances used by guests in hotels and other areas in a hotel environment.
- Appliances used in a Bed and Breakfast environment.
- Do not use the appliance if you are barefoot.
- Do not use the appliance without the turntable plate.
• Max. capacity of the turntable plate is 5 kg. - Do not touch the appliance with wet hands.
- Do not put oversized food or metal objects inside of the appliance. They could cause a fire.
-
Do not store anything inside of the appliance.
-
Do not pour water into the interior of the appliance when it is hot - a large amount of steam may be generated. Fluctuations in temperature may damage the appliance.
- Do not stand or sit on the open door of the appliance.
- Do not allow children or unauthorized people to handle the appliance, use it out of their reach.
• Children should not play with the appliance. - Pay extra attention if the appliance is used near children.
- Do not allow the appliance to be used as a toy.
- This appliance can be used by children aged 8 years and over. Persons with reduced physical, sensory or mental capabilities, or lack of experience and knowledge, should be supervised or familiarized with the instructions for use of the appliance in a safe way and have been made aware of the risks involved.
- Caution! A large amount of steam may be released from the oven or grease may splash when you open the oven door. Be careful. Risk of scalding!
- Do not touch hot surfaces and heating elements during use or shortly after use.
- If a malfunction occurs, turn off the appliance and unplug it from the wall outlet.
- When disconnecting the unit from the wall outlet, never pull the power cord, grasp the plug end and disconnect it by removing it from the receptacle.
- Do not immerse the power cord or the plug in water or any other liquid.
- Check the appliance and the power cord for damage regularly.
- Do not switch on the appliance if it has been damaged.
- Do not use the appliance if the door or the door seals are damaged. Call the authorised service centre.
- Do not use any accessories other than those recommended by the manufacturer.
- Do not use accessories with damaged surface treatment or if it has been worn out or has other defects.
• Children should not clean and maintain the appliance unless they are at least 8 years old and under supervision.
EN
concept
concept
EN
CAUTION!
To avoid injury open the oven door only for a short period of time to insert or remove food. Children may lock themselves inside the appliance (risk of suffocation) or be exposed to other dangers.
Possible defects
- Only qualified service technicians should repair or perform maintenance to this appliance.
- During the repairs the appliance must be disconnected from the power. Switch off the circuit breaker or remove the plug from the wall outlet.
- When disconnecting the unit from the wall outlet, never pull the power cord, grasp the plug end and disconnect it by removing it from the receptacle.
RADIO INTERFERENCE
Operation of the microwave oven can cause interference to your radio, TV, or similar equipment. It may be reduced or eliminated by taking the following measures:
- Clean door and sealing surface of the oven.
- Reorient the receiving antenna of radio or television.
- Relocate the receiver with respect to the appliance.
- Move the receiver away from the appliance.
- Plug the microwave oven into a different outlet so that microwave oven and receiver are on different branch circuits.
If you fail to follow these instructions, the possible repair cannot be recognized as a warranty repair.
PRODUCT DESCRIPTION
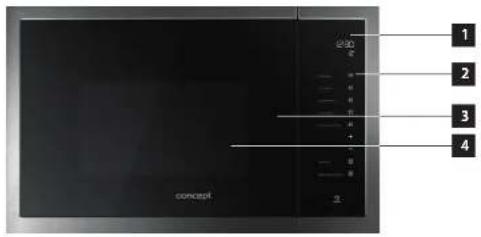
1 Display
2 Control panel
3 Door
4 Door screen
Accessories
A Grill stand
B Rotating glass tray
C Rotating ring

natural_image
Three schematic diagrams of electronic components: a shaded circular component, a circular plate with internal holes, and a circular coil with a loop (no text or symbols)EN
concept
concept
EN
CONTROL PANEL DESCRIPTION
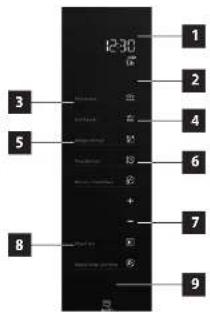
1 Display
2 Cooking type button Micro
3 Cooking type button Grill/Combi
4 Defrosting by time button
5 Defrosting by weight button
6 Clock and countdown setting button
7 Button for turning off and resetting (STOP/Clear)
8 Button for turning-on and confirmation
of selection (START/+30Sec/Confirm)
9 Button to open the door
INDIVIDUAL FUNCTIONS
| Symbol Function description | |
 | Defrost:Air circulation allows faster food defrosting. It is a gentle but fast way how to defrost food.The air at room temperature is blown into the interior of the appliance.Note: This function is suitable for defrosting food or ready meals before final preparation.There are 2 defrost programs (according to time, according to weight). |
 | Grill:This function is suitable for grilling steaks, sausages, pieces of fish or slices of bread. Use the grill rack for this function and place the food to be grilled on it. |
 | Automatic Programs:There are 8 preset baking programs. Program and baking time are preset according to a preset weight of the food. |
 | Microwave Heating:This function is intended for heating food.Microwave heating power is preset to 900 W.The power can be set to 100, 300, 450, 700 or 900 W. |
| —+≈≈ | Grill + Microwave Heating:Two programs can be selected for combined heating.In the first program, microwave heating prevails over the grill, and opposite in the second program.Use the grill rack for this function and place the food to be grilled on it. |
USER'S MANUAL
Before first use
Before first use you should wipe the outside and inside of the appliance with a damp cloth for hygiene reasons. Wash all removable parts with warm soapy water or in a dishwasher. Make sure that the inside of the appliance is free of all packaging and marketing materials.
Principles of microwave cooking
Distribute the food evenly. Place thicker parts to the edge of the container.
Observe the cooking time. Cook the shortest cooking time and, if necessary, increase the cooking time. Overheated food may ignite.
Cover the food when cooking. The lids will prevent splashing of food and allow more even heating.
When cooking food such as chicken or hamburger, turn it over. Larger pieces, such as roast, need to be turned over more than once.
Move foods, such as meatballs, in the middle of the cooking time from the edge of the plate to the middle and vice versa.
Setting the clock
- After you connect the appliance to the mains, you will hear a sound signal and "Welcome" appears on the display. After one minute of inactivity, the display shows 0:00.
- After pressing the hour and minute setting button (6) twice, the display will show 00:00 and the hour setting will flash.
- Use the plus and minus buttons to set the time between 0-23.
- To confirm press the hour and minute setting button (6) or the on/off button (START/+ 30Sec./Confirm) (8).
- Use the plus and minus buttons to set the time between 0-59.
- To confirm press the hour and minute setting button (6) or the on/off button (START/+30Sec./Confirm) (8).
- The display shows the current time.
Resetting the clock
- After pressing the hour and minute setting button (6) twice, the time setting option will flash.
- Use the plus and minus buttons to set the time between 0-23.
- To confirm press the hour and minute setting button (6) or the on/off button (START/+30Sec./Confirm) (8).
- Use the plus and minus buttons to set the time between 0-59.
- To confirm press the hour and minute setting button (6) or the on/off button (START/+30Sec./Confirm) (8).
- The display shows the current time.
Note: If the time is not set, the appliance will not operate even though it is connected to the power supply.
EN
concept
concept
EN
BASIC FUNCTIONS
Microwave Heating
Microwaves are converted to heat, which warms the food. Microwave heating may be used by itself or in a combination with another the grill.
| Power Description | |
| 100 W | Gentle defrosting of frozen food.Rising dough. |
| 300 W | Defrosting of frozen food.Melting chocolate and butter. |
| 450 W Heating soups and rice. | |
| 700 W | Heating food, mushrooms, molluscs and shellfish. Preparing dishes containing eggs and cheese. |
| 900 W | Heating food and water.Roasting chicken, fish and vegetables. |
Setting the microwave heating
- Press the Micro cooking type button (1), the display will show P100 - the highest possible heating.
- Press the button (1) repeatedly to change the microwave heating intensity P100, P80, P50, P30, P10 and again P100.
- Use the plus and minus buttons to set the desired cooking time. The maximum value is 95 minutes.
- Press the on/off button and confirm button (6) to start heating.
Note:
- After selecting the microwave heating the display always shows the highest preset heating power value (900 W).
- By pressing the button (8) during the heating process the time increases by 30 seconds.
- If you open the oven door during the heating process, the cooling fan may stay in operation for a while.
- Setting the time goes as follows:
00:00 min - 01:00 min 5 second steps
01:00 min - 05:00 min 10 second step
05:00 min - 15:00 min 30 second steps
15:00 min - 01:00 hour 1 minute steps
01:00 hour - 01:30 hour 5 minute steps
Quick start
- Press the button (8) in standby mode. Microwave heating will run for 30 seconds at 900 W.
- Every time you press the button (8) the time increases by 30 seconds up to 30 minutes in total.
- You will hear a quintuple sound signal after the heating process is done. The quick start function for microwave heating is done.
- Press the on/off and reset button (7) to finish the quick start function.
Grill, combined heating
Use the grill rack for this function and place the food to be grilled on it.
- Place the food in the oven and close the door
- Press the Grill/Combl button repeatedly to select the desired function. They are marked G, C-1 and C-2 on the display.
- Use the plus and minus buttons to set the desired grilling/combined heating time. The maximum possible value is 95 minutes.
- By pressing the on/off button and confirm button (8) heating will start.
| Function Microwave cooking Grill | ||
| G 0% 100% | ||
| C-1 | 55% | 45% |
| C-2 | 36% | 25% |
Note:
WARNING! If the food is removed from the oven before the set cooking time has elapsed or the oven is not in use, always reset the currently set program.
Suitable cookware for microwave heating
| Type of cookware | Note |
| Tin foil | Only small pieces of the tin foil (for covering the parts of food that get prepared more quickly than others) can be used for the microwave heating. The tin foil shields the radiation and thus slows the preparation time. To prevent arcing, do not allow foil to come close to oven walls or door. The edge of the tin foil should be at least 2,5 cm away from the inner walls of the appliance. |
| Heatproof glass containersGlass-ceramic containersChinawareCeramic containersHeatproof plastic | Observe the manufacturer's instructions. Do not use damaged cookware. |
| Microwave heating bags | Observe the manufacturer's instructions. Must not contain metal parts.Pierce the bag in several places to allow the steam to escape. |
EN
concept
concept
EN
Unsuitable cookware for microwave heating
| Type of cookware Note | |
| Tin baking sheets and trays They can cause sparking or arcing. | |
| Metal cookware It prevents the microwaves to penetrate. | |
| Cookware with metal trimmings, accessories or handles, metal cutlery | May cause sparking, which may lead to fire. |
| Metal clips and tapes May cause sparking, which may lead to fire. | |
| Paper bags They may catch fire during the heating process. | |
| HDPE and polyethylene film or foam It may melt and cause fire. | |
| Wooden cookware It dries up and may burst. | |
If the manufacturer guarantees the applicability of cookware with gold or silver supplements, it may be used.
Attention - sparking!
All metal objects (e.g. spoon) must be placed at least 2 cm far away from the wall of the appliance and the inner side of the door. Sparking may damage the glass and walls of the appliance.
Automatic Programs
You can easily heat your dish by selecting an automatic program. The automatic program delivers optimum settings. There are 8 programs to choose from.
| Menu Function Weight Power | |||
| A-1 Pizza Warming | 200 g | C - 2 | |
| 400 g | |||
| A-2 Meat | Meat cooking | 250 g | 100% (MV) |
| 350 g | |||
| 450 g | |||
| A-3 Vegetables | Vegetables cooking | 200 g | 100% (MV) |
| 300 g | |||
| 400 g | |||
| A-4 Pasta | Pasta cooking | 50 g (450 ml water) | 80% (MV) |
| 100 g (800 ml water) | |||
| A-5 Potatoes | Potatoes cooking | 200 g | 100% (MV) |
| 400 g | |||
| 600 g | |||
| A-6 Fish | Fish cooking | 250 g | 80% (MV) |
| 350 g | |||
| 450 g | |||
| A-7 Beverage | Hot drink | 1 cup (120 ml) | 100% (MV) |
| 2 cups (240 ml) | |||
| 3 cups (360 ml) | |||
| A-8 Popcorn | Popcorn | 50 g | 100% (MV) |
| 100 g |
-
Press the plus button to enter the program menu. Press the button repeatedly to select from 8 preset programs.
-
Confirm the selected program by pressing the on/off button (8).
-
Press the plus and minus buttons to enter the weight of the food.
-
Press the button (8) to start the program.
Defrost programs
Place food on the low grill stand.
Defrost according to the time
- Press the Time defrost button (4) to activate the function. The display shows 00:00.
- Set the desired defrost time using the plus and minus buttons. The maximum value is 95 minutes.
- Confirm the defrost start by pressing the on/off button (7).
Defrost according to the weight
- Press the Weight defrost button (5) to activate the function. The display shows 100.
- Use the plus and minus buttons to set the desired weight to be defrosted in the range from 100-2000 g.
- Confirm the defrost start by pressing the on/off button (7).
EN
concept
concept
EN
ADVANCED FUNCTIONS
Timer function
- Press the hour and minute setting button (6) once. The display shows 00:00.
- Use the plus and minus buttons to set the time in the range from 5 seconds to 95 minutes.
- Press the on/off button and confirm button (8) to start heating.
- After the time has elapsed, a sound signal will be heard (5 beeps).
Child lock function
- To lock the appliance press and hold the button (7) for 3 seconds in a standby mode.
- You will hear a sound signal and the display will show a symbol [::], which indicates locking the appliance.
- To unlock the appliance press and hold the button (7) for 3 seconds in a standby mode.
- You will hear a sound signal and the symbol will disappear.
Note:
- When the child lock s activated the appliance does not respond to handling.
- Child lock can only be activated only in standby mode. When any of the heating functions is selected the child lock cannot be activated.
CLEANING AND MAINTENANCE
Clean the appliance regularly to maintain a good appearance and reliability of the appliance. The modern design simplifies the maintenance to a minimum. Parts of the appliance which come in contact with food need to be cleaned regularly.
- Disconnect the power cord from the wall outlet or switch off the circuit breaker of the appliance before cleaning and maintenance.
- The inside of the appliance should not be hot, wait until the inside cools a little bit - the cleaning is easier when the inside is slightly warm.
• To clean the outside of the appliance use damp cloth, soft brush or fine sponge, then wipe it dry.
• To clean the interior of the appliance use damp cloth, soft brush or sponge. You can use warm water with a non-aggressive detergent when it is needed. - Do not use abrasive cleaners or sharp metal scrapers to clean the glass door screen of the appliance, as they may scratch the surface or you might break the glass.
- Never leave aggressive or acidic substances (lemon juice, vinegar) on the enamelled, varnished or stainless parts.
- Do not use high-pressure cleaners or steam jets.
- The rotating glass plate and grill rack can be washed in a dishwasher.
- Allow all surfaces to dry properly before next use.
| Surface Detergents | |
| The front of the appliance | Hot soapy water:Wash it with a damp cloth and then wipe it dry with a clean dry cloth. Do not use metal or glass scrapers. |
| The front part of the appliance with a stainless steel | Hot soapy water:Wash it with a damp cloth and then wipe it dry with a clean dry cloth. Remove all stains of scale, grease, starch protein (e.g. egg white) as soon as possible. These residues may cause corrosion. Cleaners designed for stainless steel can be purchased in specialized stores. Do not use metal or glass scrapers. |
| The interior | Hot soapy water or a vinegar solution:Wash it with a damp cloth and then wipe it dry with a clean dry cloth.If the interior is heavily fouled:Do not use abrasives, sprays or any other aggressive cleaners. Steel wool, coarse sponge and cleaners for pans are also unsuitable, they can scratch the surface of the appliance.Allow the interior to dry properly. |
| Niches of the appliance | Damp cloth:Do not let any liquid to get inside the turntable motor. |
| Grill stand | Hot soapy water:Use cleaning products designed for stainless steel or wash them in a dishwasher. |
| Glass door screen | Cleaning glass parts:Wash it with a damp cloth and then wipe it dry with a clean dry cloth. Do not use metal or glass scrapers. |
| Sealing | Hot soapy water:Wash it only with a damp cloth, do not scrub the surface. Do not use metal or glass scrapers. |
Note:
Unpleasant odours, e.g. after preparation of fish, are easy to get rid of. Add a few drops of lemon juice into a cup with water. Place a spoon into the cup, that will delay boiling. Place the cup on the tumtable plate, the spoon should not touch the walls of the appliance. Turn on the microwave at maximum power for 1–2 minutes.
EN
concept
concept
EN
INSTALLATION OF THE APPLIANCE
- Defects caused by improper installation are not covered by the warranty.
• Installation is the responsibility of the customer not the manufacturer. - The manufacturer bears no responsibility for damage caused to people, animals or property due to incorrect installation.
- Placing the appliance into suitable furniture ensures its proper functionality.
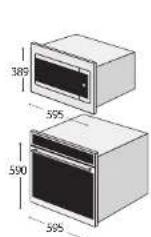
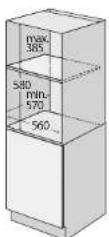
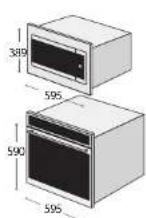
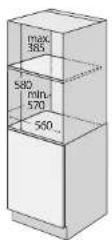
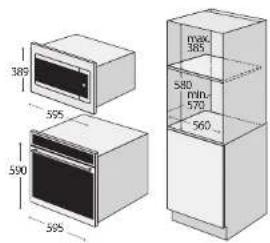
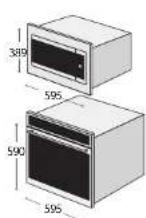
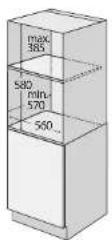
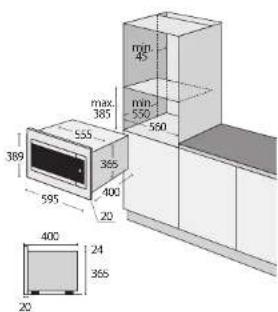
- The appliance is installed in standardized kitchen furniture designed for built-in appliances or in properly adapted furniture of dimensions according to Fig. 1.
- The appliance can be installed under the worktop, as well as in the cabinet (Fig. 1).
- The kitchen furniture must be made of materials resistant to temperatures of at least 120 °C. Any materials and adhesives used must be resistant to heating in compliance with CSN EN 60335-2-6. Materials and adhesives that are not in compliance with this standard may deform or loosen.
- All guards must be placed firmly in their appropriate place in a way they cannot be removed without using special tools.
- The rear board of the kitchen unit has to be removed in order to ensure appropriate air circulation around the appliance.
- If a hob is located above the appliance, there must be at least 50 mm gap between the two appliances.
SET 8x60ds + MTV7525ds
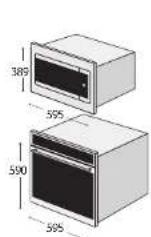
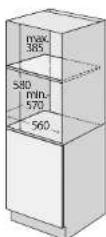
Fig. 1
Connection to the mains
- Make sure the mains voltage and current protection correspond to the values on the rating plate of the appliance. We recommend using a separate outlet with a 16A circuit breaker.
- Only use grounded sockets.
- Do not use multiple sockets, plugs and extension cords. There is a risk of overheating.
- The plug of the power cord on the appliance must be freely accessible even after the installation.
• Changes in a connection may only be performed by a qualified professional. - Electrical safety of the appliance can be guaranteed only if the protective terminal of the appliance is connected to the protective conductor of the mains.
- The manufacturer bears no responsibility for damage to persons or property as a result of missing or bad protective connection.
- The power cord must be positioned in a way it does not come into contact with hot parts of the appliance and it is not being deformed or excessively bent.
When installing the appliance, follow these steps:
- Remove all the packaging and marketing materials before first use.
- The required dimensions of the cabinet for the installation are shown in Fig. 1. Due to effective air circulation the appliance must be located according to the dimensions shown in pictures and the cabinet must be designed that the air can circulate freely into the bottom part of the appliance. There must be at least 50 mm gap behind the rear wall of the appliance when it is the appliance installed.
- Insert the machine on the edge of the cabinet and pass the power cord through the rear wall of the cabinet so its plug will be freely accessible after the installation.
- Carefully insert the whole appliance into the cabinet at the chosen location. Be careful to avoid pinching the power cord.
- Fasten the appliance to the cabinet by screwing two screws into the holes in the front wall of the frame of the appliance. Holes are visible after opening the oven door.
- Plug the power cord into the wall outlet.
Disassembling
If you disassemble the appliance, it is important to follow the steps in the correct order:
- First, unplug the power cord from the mains (pull the plug or switch off the circuit breaker).
- Loosen the fastening screws.
- Slide out the appliance while carefully pull the power cord.
EN
concept
concept
EN
TROUBLE SHOOTING
Malfunctions often have simple explanations. Please read the following notes before calling the after-sales service. Some of the malfunctions may be caused by improper use of the appliance.
The installation and repair of an electrical appliance may only be performed by a qualified professional. Repairs and manipulation with the appliance by an unauthorized person could be dangerous.
| Defect description Possible cause Solution | ||
| The appliance does not work | Faulty circuit breaker | Check the circuit breaker in the switchboard if it is in a working condition. |
| The power cord plug is not plugged in the wall outlet. | Plug the power cord plug in the wall outlet. | |
| Electrical power supply failure. | Check if the lights in the kitchen are working. | |
| The appliance does not work. Display shows a symbol [::] | Child lock is activated | Deactivate the child lock (see paragraph Child lock). |
| Display shows a time 0:00 Electrical power supply failure. Set the clock. | ||
| Microwave heating dos not work The door is not completely closed | Check the oven door if there are any impurities or food reminders. | |
| Preparation of food using the microwave heating takes too long. | The selected microwave heating power is too low | Set a higher microwave heating power value. |
| The portion of food is large | Double the portion of the food = double the heating time. | |
| The food is colder than usual | Mix or turn over the food during the heating process. | |
| The turntable plate squeaks or rattles | Impurities in the area around the turntable plate | Thoroughly clean the rollers and the bottom of the appliance under the turntable plate. |
| Specific functions or heating power values cannot be set | Time, temperature or combined heating function cannot be set. | Select a different function. |
ENVIRONMENTAL PROTECTION
- Prefer recycling of packaging materials and old appliances.
• Package materials may be disposed of as sorted waste. - Dispose the plastic bags made of polyethylene (PE) of as sorted waste.
Recycling of the appliance at the end of its lifespan:

This appliance is labelled in accordance with European Directive 2012/19/EU concerning used electrical and electronic appliances (waste electrical and electronic equipment - WEEE). The symbol on the product or its packaging indicates that this product may not be treated as household waste. It is necessary to take it to a container park for the recycling of electrical and electronic equipment. By ensuring the correct disposal of this appliance you will help prevent potential negative consequences to the environment and human health, which could otherwise result from inappropriate disposal of this product. Disposal must be performed in accordance to the regulations for waste disposal. For more detailed information about recycling of this appliance see the authorized local office or service for household waste disposal or the shop, where you purchased the appliance.

The product meets all the necessary requirements of the EU directives applicable to the specific product.
Changes in text, design, and technical specifications are subject to change without prior notice and we reserve the right to change them.


- concept
- PODĚKOVÁNÍ
- Přislušenství
- POPIS OVLÁDACÍHO PANELU
- POPIS OVLÁDACIEHO PANELA
- Pripojenie do elektrickej siete
- Akcesoria
- OPIS PANELU STEROWANIA
- Piederumi
- VADĪBAS PANELA APRAKSTS
- TABLE OF CONTENTS
- IMPORTANT SAFETY INFORMATION
- Upon delivery of the electric appliance
- During installation
- CAUTION!
- Possible defects
- RADIO INTERFERENCE
- PRODUCT DESCRIPTION
- Accessories
- CONTROL PANEL DESCRIPTION
- USER'S MANUAL
- Before first use
- Principles of microwave cooking
- Setting the clock
- Resetting the clock
- BASIC FUNCTIONS
- Microwave Heating
- Setting the microwave heating
- Note:
- Quick start
- Grill, combined heating
- Attention - sparking!
- Automatic Programs
- Defrost programs
- Defrost according to the time
- Defrost according to the weight
- ADVANCED FUNCTIONS
- Timer function
- Child lock function
- CLEANING AND MAINTENANCE
- EN
- INSTALLATION OF THE APPLIANCE
- Connection to the mains
- When installing the appliance, follow these steps:
- Disassembling
- TROUBLE SHOOTING
- ENVIRONMENTAL PROTECTION
Brand : Concept
Model : MTV7525DS
Category : Microwaves