
MT4420WH - Microwaves Concept - Free user manual and instructions
Find the device manual for free MT4420WH Concept in PDF.


| Product Type | Microwave Oven |
| Brand | Concept |
| Model | MT4420WH |
| Color | White |
| Capacity | 20 L |
| Microwave Power | 700 W |
| Power Levels | 5 levels |
| Control Type | Mechanical knobs |
| Turntable | Yes, glass turntable |
| Timer | 30 minutes |
| Weight | 10.5 kg |
| Dimensions (W x D x H) | 44 x 36 x 26 cm |
| Power Supply | 230 V, 50 Hz |
| Power Consumption | 1050 W |
| Door Type | Side-opening with safety lock |
| Interior Light | Yes |
| Child Safety Lock | Not available |
| Cleaning | Wipe with damp cloth, avoid abrasives |
| Warranty | 2 years |
Frequently Asked Questions - MT4420WH Concept
User questions about MT4420WH Concept
0 question about this device. Answer the ones you know or ask your own.
Ask a new question about this device
Download the instructions for your Microwaves in PDF format for free! Find your manual MT4420WH - Concept and take your electronic device back in hand. On this page are published all the documents necessary for the use of your device. MT4420WH by Concept.
USER MANUAL MT4420WH Concept
natural_image
White conceptual microwave oven with digital display and control buttons, labeled MT4420wh (no other text or symbols visible)PODĚKOVÁNÍ
Thank you for purchasing the Concept product. We want you to be satisfied with everything we make every day you use it.
Please read the instructions carefully before initial use. You should retain them for a future reference. Ensure that anyone using the warming drawer is familiarized with the instructions.
TABLE OF CONTENTS
Technical specifications
Important safety information
Product description
Control panel description
Individual functions
User manual
Basic functions
Suitable/unsuitable cookware for microwave heating
Advanced functions
Cleaning and maintenance
Installation of the appliance
Radio interference
Trouble shooting
Environmental protection
| Technical specifications | |
| Voltage 230 V ~ 50 Hz | |
| Input power 1 280 W | |
| Microwave power 800 W | |
| Wave frequency 2 450 MHz | |
| External dimensions (W x D x H) 451 x 344 x 258 mm | |
| Internal volume 20 l | |
| Weight 11,5 kg | |
| Turntable plate diameter 270 mm | |
| Sound performance level < 63 dB(A) | |
| Luminous flux of the internal LED light source < 60 lm | |
The manufacturer reserves the right to make potential technical changes, typographical errors and any differences in the representation without prior notice.
Follow the instructions for positioning the appliance. Pay special attention to the distance from flammable materials such as curtains, drapes, blankets, paper, clothing, etc.!
IMPORTANT SAFETY INFORMATION
- Use the unit only as described in this operating manual.
- This appliance is intended to be used in household and similar applications such as: staff kitchen areas in shops, offi ces and other working environments; by clients in hotels, motels and other residential type environments; farm houses; bed and breakfast type environments.
- This appliance can be used by children aged from 8 years and above and persons with reduced physical, sensory or mental capabilities or lack of experience and knowledge if they have been given supervision or instruction concerning use of the appliance in a safe way and understand the hazards involved.
• Children shall not play with the appliance.
- Cleaning and user maintenance stall not be made by children unless they are older than 8 and supervised.
- Keep the appliance and its cord out of reach of children less than 8 years.
- WARNING: The appliance and its accessible parts become hot during use. Care should be taken to avoid touching heating elements. Children less than 8 years of age shall be kept away unless continuously supervised. surface of a storage cabinet can get hot.
- Remove all the covering and marketing materials from the unit before the first use.
• Make sure the mains voltage matches the value marked on the rating plate.
- Do not leave the unit unattended during operation.
- Make sure to place the unit on a stable heat-resistant surface, out of the reach of other heat sources. This surface shall have a sufficient load capacity to hold the unit with its contents.
- Do not cover the unit's openings. There is a risk of overheating.
- Do not remove the feet.
- Only use dishes designed for microwave ovens (non-metal, no metal prints or decorations). Plastic containers or packages can become heat-deformed or ignite, so watch them during preparation.
- Do not store anything inside the unit.
- Never touch the hot surface. Use the handles and buttons.
- Use potholders to handle hot accessories.
- Follow the building-in instructions for the unit. Make sure there is a safe distance between the unit and flammable materials, such as furniture, curtains, lace, blankets, paper, clothing etc.!
- Keep the unit clean. Do not let any objects enter the unit through the grille. Contaminants may short out the unit, causing dam-age or fire.
• These could cause a fire.
- Never pull the cord to disconnect the plug from the wall outlet; hold the plug instead.
- The appliance is not intended for and should not be accessible to children or people with reduced capabilities.
• Take extra care when using the unit near children.
- Do not use the appliance as a toy.
- Make sure the power cord does not hang over the working area, to prevent children from reaching it.
- The stovetop is intended for interior use only; do not expose it to moisture. Otherwise, a risk of electrical shock may occur.
- Use manufacturer-recommended accessories only.
- Never use the appliance if the supply cord or plug is damaged.
- Immediately refer to an authorised service centre for repair.
- Never pull the supply cord or use it to carry the unit.
- Keep the stovetop away from any other heat sources such as radiators, ovens etc. Do not expose the unit to direct sunlight or moisture.
- Never operate the appliance with wet hands.
- Turn off the unit and disconnect the plug from the mains outlet in case of any failure.
- Do not touch the moving parts during operation of the unit.
- The appliance is intended for domestic use only, not for commercial use.
- The unit is designed solely for cooking, heating or defrosting food.
- Do not use the unit to fry food. Hot oil can damage parts of the unit, or cause skin burns.
- Do not use the unit if the door or packing is damaged. Have the unit repaired in an authorised service centre.
- For the purpose of protection from microwave radiation no unauthorised person is allowed to perform any servicing or repair, e.g. removing the cover that protects against microwave radiation.
- Do not use the unit for preparing or heating food in sealed vessels, as they may explode.
- Do not try to repair the appliance; instead, refer to an authorised service centre.
- Do not attempt to operate this oven with the door open as this may result in harmful exposure to microwave energy. Do not attempt to break or tamper with security locks.
- If the appliance is not kept in good condition or is dirty, it may degrade the surface and affect the life of the appliance or lead directly to dangerous situations.
- The appliance must not be cleaned with a steam cleaner.
- To avoid overheating, the appliance must not be installed in a cabinet behind a decorative door.
- The appliance is intended for free-standing use.
- The rear wall of the appliance must be placed towards the wall.
Failure to follow the manufacturer's instructions may lead to refusal of warranty repair.
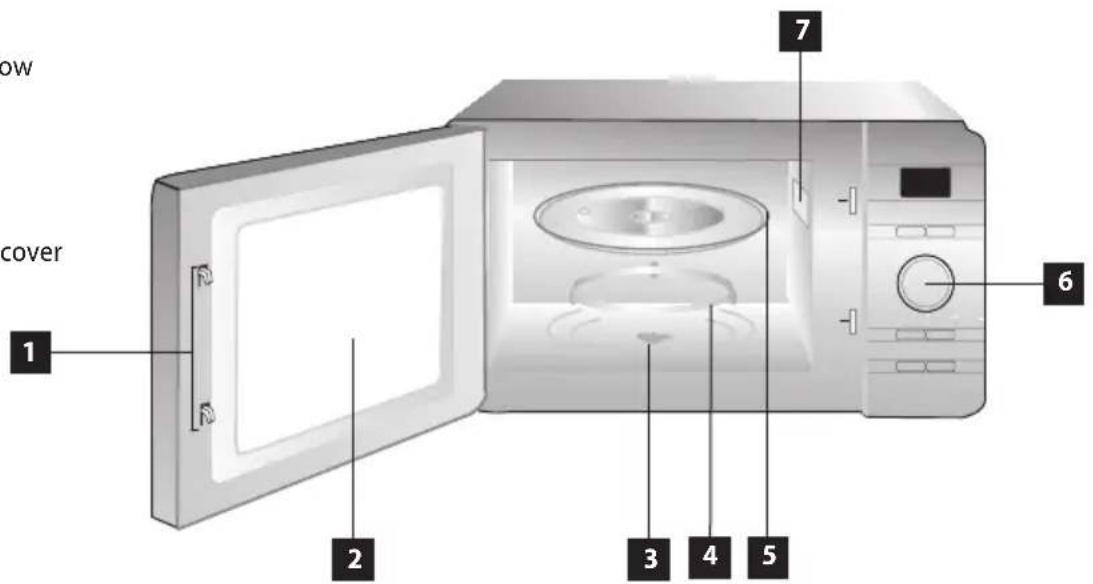
PRODUCT DESCRIPTION
1 Security lock
2 Oven door window
3 Plate pin
4 Turntable ring
5 Glass plate
6 Control panel
7 Microwave light cover
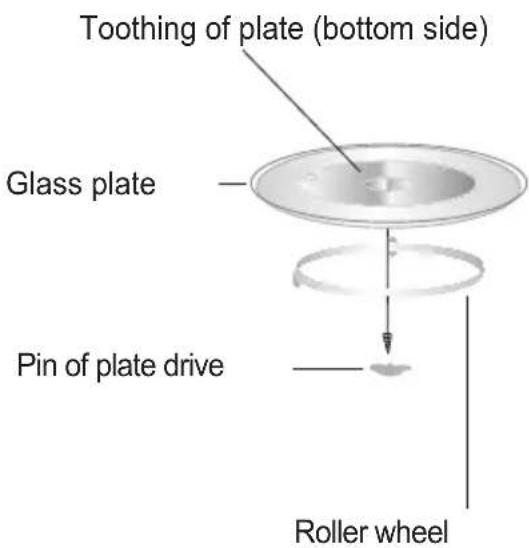
Installation of turntable plate
- Never place the glass plate upside down.
- Nothing should prevent the glass plate from turning.
- The turntable plate and roller wheel assembly must always be used during cooking.
- All meals and food containers must always be placed on a glass plate.
- If the glass plate or roller wheel breaks, contact the nearest authorized service centre
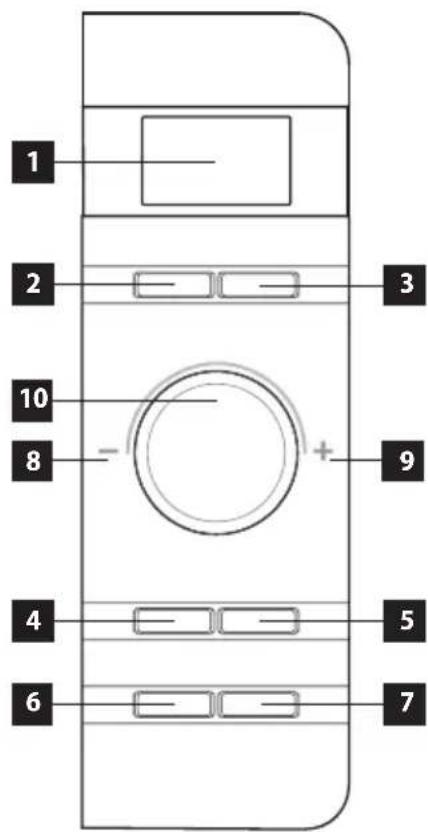
DESCRIPTION OF CONTROL PANEL AND ITS FUNCTIONS
1 Display
2 Microwave heating with power adjustment
3 Express
4 Defrosting / Time setting
5 Automatic heating
6 Pause / Cancel
7 Instant / Start
8 Rotate left - Decrease / Step down in the menu
9 Rotate right - Increase / Step up in the menu
10 Selector knob
Before Cooking
When the appliance is plugged in, the LED flashes 3 times. Then the ":" will flash, prompting you to enter the time.
Time/Weight Control
Turn the knob to increase or decrease the cooking time, time on the clock or weight during operation.
Pause/Cancel
- In the initial or entry phase: press once to cancel the program entry and reset the settings.
- During cooking: press once to stop the oven. Press twice to cancel the cooking program
Automatic Cooking Complete Reminder
When your preset cooking programme is finished, the LED display will show "End" and the microwave will beep three times to prompt you to remove the food. If you do not press the "Pause/Cancel" button once or open the door, the microwave will beep at intervals of 3 minutes.
Instant Cooking
- In standby mode, press the "Instant/Start" button.
• The microwave oven will start heating at its highest power.
• The system default cooking time is 1 minute. - You can increase or decrease the cooking time by turning the knob.
Clock Setting
- When the LED display flashes ":" and the appliance is plugged in, you can use the clock button (Defrost/Clock) to enter the current time.
- If you do not need to display the current time, skip this option.
| Example: setting 12:30. | ||
| Steps | Displayed | |
| 1 When switched on, the colon flashes. 1:00 | ||
| 2 Press and hold the Defrost/Clock button for 3 seconds. 1:00 | ||
| 3 Turn the knob to set the exact hour. 12:00 | ||
| 4 Press the Defrost/Clock button again. 12:00 | ||
| 5 Turn the knob to set the exact minutes. 12:30 | ||
| 6 Press the Defrost/Clock button again or wait 60 seconds for the numbers to stabilise. | ||
Microwave Heating
This function is used to cook and reheat food. Press the "Power" button, the LED display will cycle through 100P—80P—60P—40P—20P.
| 100 P | High power | 100% microwave power. Suitable for fast a thorough cooking |
| 80 P | Medium-high power | 80% microwave power. Suitable for medium-fast cooking |
| 60 P | Medium power | 60% microwave power. Suitable for cooking by steaming |
| 40 P | Medium-low power | 40% microwave power. Suitable for defrosting food |
| 20 P | Low power | 20% microwave power. Suitable for heat retention |
NOTICE!
a. The maximum time that can be set is 60 minutes.
b. Never start the microwave empty.
c. At maximum microwave power, the microwave will automatically reduce power after a certain cooking time to prolong the life of its parts.
d. If you turn the food over during operation, press the "Instant/Start" button once afterwards and the preset cooking program will resume.
e. If you intend to remove the food before the preset time has elapsed, you must press the "Pause/Cancel" button once to cancel the preset cooking program to avoid an unwanted operation the next time you start the appliance.
| Example: Cook at P80 for 10 minutes | ||
| Steps | Displayed | |
| 1 | When switched on, the colon flashes. | 1:00 |
| 2 | Select the desired microwave power by pressing the Power button repeatedly. | 80P |
| 3 | Turn the knob to set the cooking time. | 10:00 |
| 4 | Press the Instant/Start button to start cooking and the LED display will start counting down the time. | |
Express
- Press the Express button, the LED display will cycle through 0:30, 1:00, 1:30, ...
- This feature allows you to conveniently heat a cup of water or beverage without the time setting steps. Select the suitable time depending on the capacity of the beverage.
| Example: Express heating for 1 minute | ||
| Steps | Displayed | |
| 1 | When switched on, the colon flashes. 1:00 | |
| 2 | Press the Express button repeatedly to select the desired menu. | 1:00 |
| 3 | Press the Instant/Start button to start the cooking program. | |
Defrost
This function is used to defrost food. Press the "Defrost/Clock" button and the LED display will cycle through d.1-d.2-d.3.
| d.1 For defrosting meat weighing between 0.1 and 2.0 kg. |
| d.2 For defrosting poultry weighing between 0.2 and 3.0 kg. |
| d.3 For defrosting seafood weighing between 0.1 and 0.9 kg. |
NOTICE!
a. To achieve an even effect, the food must be turned/stirred during operation.
b. Defrosting usually takes longer than cooking.
c. If the food can be cut with a knife, the defrosting process can be considered complete.
d. Microwave radiation penetrates about 4 cm into most foods.
e. Defrosted food should be consumed as soon as possible and it is not recommended to return it to the refrigerator and refreeze it.
| Example: Defrosting 0.4 kg of poultry | ||
| Steps | Displayed | |
| 1 | When switched on, the colon flashes. 1:00 | |
| 2 | Press the Defrost/Clock button once to set the type of food. | d.2 |
| 3 | Turn the knob to set the weight of the defrosted food. 0.4 | |
| 4 | Press the Instant/Start button to start the defrosting. | |
| 5 | During defrosting, the microwave will beep twice to prompt you to turn the food over.Open the door and turn the food over. Then close the door. To continue defrosting, press the Instant/Start button again. | |
Automatic Cooking
The microwave has a default cooking menu for easy operation. When the LED display flashes a colon, turn the knob and the LED display will cycle through A.1, A.2 ..... A.8.
Choose the suitable menu according to the type and weight of food and carefully follow the instructions in the table below, otherwise the cooking effect will be greatly affected.
| Displayed Type of food Heating method | ||
| A.1 | Popcorn | Suitable for a 0.1 kg bag of popcorn, which is commonly available on the market. |
| A.2 Reheating Reheat food weighing 0.2-1.0 kg. | ||
| A.3 Reheating beverages | 1-3 cups of liquid. The initial temperature of the liquid is about 5-10 °C. Use a large mug and do not cover. | |
| A.4 Pizza Heat 1-2 pieces of cooled pizza. | ||
| A.5 | Potatoes | Cooking potato pieces cut into 5 mm width, height and length. The total weight is between 0.45 and 0.65 kg. Place the pieces in a large bowl and cover the bowl with thin foil to prevent water loss. |
| A.6 | Vegetables | There are five options available (0.1, 0.2----0.5 kg). |
| A.7 | Meat | There are six options available (0.1, 0.2----0.5 kg). |
| A.8 | Fish | There are six options available (0.1, 0.2----0.5 kg). |
NOTICE!
a. The temperature of the food before cooking should be 20-25 °C. Higher or lower pre-cooking temperatures would require longer or shorter cooking times.
b. The temperature, weight and shape of the food will largely influence the cooking effect. If any deviation from the factor mentioned in the above menu has been detected, you can adjust the cooking time to ensure best results.
| Example: Cooking 500 g of fish by steaming | ||
| Steps | Displayed | |
| 1 When switched on, the colon flashes. 1:00 | ||
| 2 Press the Auto Cooking button to set the cooking menu. A.8 | ||
| 3 Turn the knob to set the weight of the food. 0.5 | ||
| 4 Press the Instant/Start button to start the heating and the LED display will start counting down the set time. | ||
Automatic Start (Delay Function)
If you do not want your selected program to start immediately, you can preset the heating mode and heating time and the preset menu will automatically start at the time you set.
The setup will consist of 2 steps:
- Setting the current time.
- Setting the cooking mode and heating time.
| Example: It is now 12:30. You would like the microwave to automatically start heating with 100P microwave power for 9 minutes and 30 seconds at 14:20. | ||
| Steps Displayed | ||
| 1 When switched on, the colon flashes. 1:00 | ||
| 1.1 | Press and hold the Defrost/Clock button for 3 seconds. | 1:00 |
| 1.2 Turn the knob to set the hour to 12:00. 12:00 | ||
| 1.3 | Press the Defrost/Clock button again to confirm the hour. | 12:00 |
| 1.4 Turn the knob to set the minutes to 12:30. 12:30 | ||
| 1.5 Press the Defrost/Clock button once to confirm (or it will be automatically saved after 10 seconds). | 12:30 | |
| 2 Selecting the cooking menu and heating time. | ||
| 2.1 | Press the Power button to select the cooking power. | 100P |
| 2.2 | Turn the knob to set the cooking time to 09:30. | 9:30 |
| 2.3 Press and hold the Defrost/Clock button for 3 seconds to return to the current clock. | ||
| 3 Set the estimated time of the start of the heating. Repeat steps 1.2, 1.3, 1.4. | ||
| 4 Press the Defrost/Clock button to confirm the selected delay. The program has now been activated. The program will start at 14:20. | ||
| 5 You can check the preset start time by pressing the Defrost/Clock button. | ||
Multisequence Cooking
- For best cooking results, some recipes require a different cooking mode and time. You can program your personalised menu as follows:
| Example: You want to cook food in the microwave at 100 P for 3 minutes and then at 20 P for 9 minutes.This is a setup of 2 sequences. | ||
| Steps | Displayed | |
| 1 Microwave heating at 100 P for 3 minutes. | ||
| 1.1 | Press the Power button to select the power level. | 100P |
| 1.2 Turn the knob to set the cooking time. 3:00 | ||
| 2 20 P for 9 minutes | ||
| 2.1 | Press the Power button to select the desired menu. | 20P |
| 2.2 Turn the knob to set the cooking time. 9:00 | ||
| 3. Press the Instant/Start button to start the cooking program. | ||
NOTICE!
a. When cooking at 100 P is finished, the microwave will automatically start the next process.
b. You can set a maximum of 4 time sequences by repeating the steps.
Child Lock Function
- Use this function to lock the control panel when cleaning or to prevent children from using the microwave unsupervised. All buttons are disabled in this mode.
- Activating the lock: Hold the Pause/Cancel button for about 3 seconds.
- Disabling the lock: Hold the Pause/Cancel button for about 3 seconds.
NOTE
Prior to using a new unit, wipe the surface and the inside with a wet cloth for hygienic reasons. Wash all the removable parts in warm water with detergent.
WARNING!
Open the door slowly and carefully. When opening the door during operation, or after preparation, a large volume of steam is released, and condensed hot water may drip from the lower door edge. There is a risk of scalding.
Cookware Instructions
It is strongly recommended to use containers that are suitable and safe for microwave cooking. In general, containers that are made of heat-resistant ceramic, glass or plastic are suitable for microwave cooking. Never use metal containers for microwave cooking and combination cooking as sparks may occur. Examples are given in the table below.
| Container material Suitable for the microwave | Notes | |
| Heat-resistant ceramic | Yes Never use ceramics decorated with metal trim or glaze. | |
| Heat-resistant plastic | Yes Cannot be used for long microwave cooking. | |
| Heat-resistant glass Yes | ||
| Plastic foil | Yes | Should not be used when roasting meat or chops as excessive temperature can damage the foil. |
| Grill rack Yes | ||
| Metal container | No | Should not be used in a microwave. Microwave radiation cannot penetrate metal. |
| Lacquered | No | Poor heat resistance. Cannot be used for cooking at high temperatures. |
| Bamboo wood and paper | No Poor heat resistance. Cannot be used for cooking at high temperatures. | |
Cooking Tips
The following factors can affect the cooking result:
Food arrangement
- Place the thicker side of the food towards the outside of the dish, the thinner side towards the centre and spread evenly.
• If possible, ensure that they do not overlap.
Cooking time
- Start cooking with setting a short time, check the food after the time has elapsed and extend it according to actual need. Overcooking can cause smoke and burns.
Even cooking
- Food such as chicken, hamburger or steak should be turned once during cooking.
- Depending on the type of food, if possible, stir once or twice during cooking from the outside to the centre.
Leave to stand
- After the cooking time has elapsed, leave the food in the microwave long enough to allow it to complete its cooking cycle and cool down slowly.
After cooking
The colour and hardness of the food helps determine if everything is cooked properly, which means:
- Steam is coming from all parts of the food, not just the edges.
• The joints of the poultry can be moved easily. - Pork or poultry show no sign of blood.
• Fish is opaque and can be easily cut with a fork.
Baking dish
When using a baking dish or self-heating pot, always place a heat-resistant insulator such as a porcelain plate underneath it to prevent damage to the turntable plate and ring.
Microwave-safe plastic wrap
- When cooking food with a high fat content, do not allow the plastic wrap to come into contact with the food as it may melt
Microwave-safe plastic cookware
Some microwave-safe plastic cookware may not be suitable for cooking foods with high fat and sugar content. Also, the preheating time specified in the instructions for use of the cookware must not be exceeded.
WARNING!
If you remove the food before the preset time expires, or you aren't using the oven, always reset the current program.
CLEANING AND MAINTENANCE
Clean the unit after each use to prevent the accumulation of grease, burned-on remnants of food, and unpleasant smells. Turn the unit off, unplug the power cord from the wall outlet, and let the unit cool before cleaning and after use.
Do not immerse the power cord, plug, or appliance into water or any other liquid.
Wash the replaceable parts in tepid water with detergent and rinse in clean water.
Clean the inner and outer surfaces and door sealing with a wet cloth. You can use a liquid cleaning agent. Do not use sponges, steel wool, abrasive cleaners or solvents (gasoline, thinners, etc.). You might damage the protective layer. You can remove odors from the inside by pouring lemon juice and the skin from a lemon into a microwave bowl filled with water, and leaving the bowl for 5 minutes in the oven while operating. Dry the inside with a soft cloth afterwards. If you need to replace the inner light bulb, contact the distributor.
If you do not keep the unit clean, the surfaces can be damaged, which may lead to a shorter service life and dangerous situations.
Installation
-
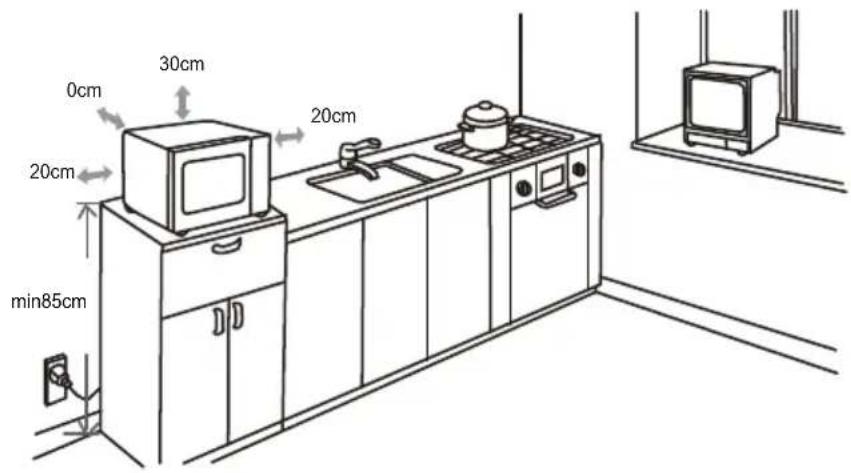
To install the appliance, select a flat surface that provides enough free space for ventilation openings.
-
The minimum height for installation of the appliance is 85 cm.
- The rear of the appliance must be placed against the wall. Leave a minimum distance of 30cm above the top surface of the oven, a minimum distance of 20cm is required between the oven and adjacent walls.
- Do not remove the feet from the bottom of the oven.
-
Blocking the ventilation openings can damage the oven.
-
Plug the oven into a standard household socket. Make sure the voltage and frequency are the same as the voltage and frequency on the rating plate.
Warning:
Do not install the oven on a hob or other heat-producing appliance. Installation near or above the heat source could damage the oven and void the warranty.
Freely accessible walls of the appliance may become hot during normal operation.
GROUNDING INSTRUCTIONS
This appliance has to be grounded. It is equipped with a supply cable with a grounding conductor and grounding plug. It must be connected to a socket that is correctly installed and grounded. In the case of a short circuit this grounding reduces the risk of electric shock. It is recommended to connect the unit to a separate electric circuit. The use of high voltage is dangerous, and any damage to the oven can cause a fire or other emergency.
WARNING!
Incorrect use of the protective conductor can cause the risk of electric shock.
Note: If you have any questions concerning the grounding or electrical connection, contact a qualified electrician or servicing technician. Neither the manufacturer nor the distributor is responsible for injury or damage caused by incorrect electric connection. The conductors in the supply cable are colored as follows:
Green and yellow - protective/grounding conductor
Blue - medium conductor
Brown/black - phase conductor
If an extension cord is required, use only a 3-wire extension cord.
The microwave oven is equipped with a short power cord to reduce the risk of tangling or tripping over a longer cord.
- When using a long cord set or extension cord, the following must be observed:
• The ratings of the electrical cords should be at least as large as the electrical ratings of the appliance.
- The extension cord must be a 3-wire cord with a grounding conductor.
- The long power cord should not hang over a worktop or table where children could pull on it or trip over it unintentionally.
RECEIVER SIGNAL INTERFERENCE
Operation of the appliance can cause interference with the signal of your radio receiver, TV receiver, or similar appliances. This interference may be reduced or eliminated by taking the following measures:
- Clean the door and sealing surfaces of the oven.
- Readjust the receiver antenna of the radio or TV.
- Place the unit further from the receiver.
- Plug the unit in a different socket to make sure other appliances are connected to different circuits.
TROUBLE SHOOTING
| Problem Cause Solution | ||
| The appliance does not work. | The plug has been inserted into the socket incorrectly or insufficiently. | Check the plug connection. |
| The socket is not supplied with electricity. | Check to make sure voltage is present, e.g. by using another appliance. | |
| The oven door is not closed properly. | Check the door. Remove all impurities and foreign objects. | |
| Turning of the tray is noisy. | Dirty wheels of the turning mechanism. | Clean the wheels with a damp cloth. |
| The oven cannot be started | The power cord is not properly connected to the mains | Unplug the power cord from the electrical outlet and plug it in again after 10 seconds |
| Electrical fuse blown or circuit breaker tripped | Replace the fuse or turn on the circuit breaker. Contact an authorized service centre | |
| The oven does not heat The door is not closed sufficiently | Close the door again and check that it is closed | |
| Common phenomena | |
| The microwave oven affects the TV reception | Radio and TV reception may be affected by the operation of the microwave oven. This is similar to the interference that occurs, for example, during the operation of blenders, vacuum cleaners and hair dryers. This is a normal phenomenon. |
| Light fades in the oven | At low microwave heating power, the light inside may fade slightly. This is a normal phenomenon. |
| Accumulation of steam on the door, hot air from the vents | During heating, a large amount of steam may be released from the food. Most of the steam is vented through vents, but some of it condenses in colder places such as the oven door |
| The oven was accidentally started without food inside | It is forbidden to start the oven without food inside. It is very dangerous, the oven may overheat |
MAINTENANCE
SERVICE
Before calling the service centre, please do the following:
- Place one cup of water (approximately 150 ml) in a glass measuring cup in the microwave and close the door firmly. The microwave light should go out if the door is closed properly. Let the microwave run for 1 min. Let the microwave run for 1 min.
- Is the light bulb on?
- Does the cooling fan work? (Place your hand on the rear vents.)
- Does the turntable plate rotate? (The ring can rotate clockwise or counterclockwise. That is normal.)
- Is the water inside the microwave hot?
If "NO" is the answer to any of the above questions, please check your wall outlet and the electrical fuses in your electricity meter or junction box.
If the outlet and fuse are working properly, CONTACT YOUR NEAREST AUTHORIZED SERVICE CENTRE.
SERVICE PROTECTIVE MEASURES
Caution: MICROWAVE RADIATION
- The high-voltage capacitor remains charged when disconnected; short circuit the negative terminal of the high-voltage capacitor to the microwave chassis (use a screwdriver) to discharge it before touching it.
-
During servicing, the parts listed below may be removed and give access to potentials above 250V to earth.
-
Magnetron
• High-voltage transformer
• High-voltage capacitor
• High-voltage diode
• High-voltage fuse -
The following conditions may cause unreasonable exposure to microwaves during servicing.
-
Improper installation of the magnetron
- Improper alignment of door lock, door hinge and door
- Improper mounting of the switch bracket
• Damaged door, door seal or cover
ENVIRONMENTAL PROTECTION
- Prefer recycling of packaging materials and old appliances.
- Package materials may be disposed of as sorted waste.
- Dispose the plastic bags made of polyethylene (PE) of as sort
Appliance recycling at the end of its service life:
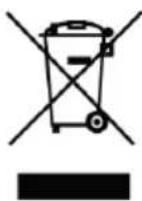
This appliance is labelled in accordance with European Directive 2012/19/EU concerning used electrical and electronic appliances (waste electrical and electronic equipment – WEEE). The symbol on the product or its packaging indicates that this product may not be treated as household waste. It is necessary to take it to a container park for the recycling of electrical and electronic equipment. By ensuring the correct disposal of this appliance you will help prevent potential negative consequences for the environment and human health, which could otherwise result from inappropriate disposal of this product. Disposal must be performed in accordance to the regulations for waste disposal. For more detailed information about recycling of this appliance see the authorized local office or service for household waste disposal or the shop, where you purchased the appliance.
POLSKA sp. z o.o. 30
53-238 Wrocław +48 713 390 444
CONCEPT POLSKA sp. z o.o.


- PODĚKOVÁNÍ
- TABLE OF CONTENTS
- IMPORTANT SAFETY INFORMATION
- PRODUCT DESCRIPTION
- Installation of turntable plate
- DESCRIPTION OF CONTROL PANEL AND ITS FUNCTIONS
- Before Cooking
- Time/Weight Control
- Pause/Cancel
- Automatic Cooking Complete Reminder
- Instant Cooking
- Clock Setting
- Microwave Heating
- NOTICE!
- Express
- Defrost
- Automatic Cooking
- Automatic Start (Delay Function)
- Multisequence Cooking
- Child Lock Function
- NOTE
- WARNING!
- Cookware Instructions
- Cooking Tips
- Food arrangement
- Cooking time
- Even cooking
- Leave to stand
- After cooking
- Baking dish
- Microwave-safe plastic wrap
- Microwave-safe plastic cookware
- CLEANING AND MAINTENANCE
- Do not immerse the power cord, plug, or appliance into water or any other liquid.
- Installation
- Warning:
- GROUNDING INSTRUCTIONS
- Green and yellow - protective/grounding conductor
- Blue - medium conductor
- Brown/black - phase conductor
- RECEIVER SIGNAL INTERFERENCE
- MAINTENANCE
- SERVICE
- SERVICE PROTECTIVE MEASURES
- Caution: MICROWAVE RADIATION
- ENVIRONMENTAL PROTECTION
- Appliance recycling at the end of its service life:
- CONCEPT POLSKA sp. z o.o.
Brand : Concept
Model : MT4420WH
Category : Microwaves