
SPM 200 A1 - Pasta machine SILVERCREST - Free user manual and instructions
Find the device manual for free SPM 200 A1 SILVERCREST in PDF.

| Product Type | Manual Pasta Machine |
| Brand | SilverCrest |
| Model | SPM 200 A1 |
| Material | Stainless Steel Rollers, Chrome-Plated Body |
| Roller Width | Approx. 15 cm (5.9 inches) |
| Thickness Settings | 9 Adjustable Levels (0-8) |
| Included Dies | Spaghetti (1.5mm) and Fettuccine (6.5mm) |
| Dimensions (L x W x H) | Approx. 32 x 18 x 15 cm |
| Weight | Approx. 1.5 kg |
| Mounting | Clamp for Countertop (up to 4 cm thickness) |
| Handle | Removable Crank Handle |
| Cleaning | Wipe with Dry Cloth; No Water Immersion |
| Maintenance | Periodic Lubrication with Food-Safe Oil |
| Safety Features | Stable Clamp; Smooth-Edged Rollers |
| Spare Parts Availability | Replacement Rollers and Cutting Attachments Available |
| Warranty | 3 Years (Standard SilverCrest Warranty) |
Frequently Asked Questions - SPM 200 A1 SILVERCREST
User questions about SPM 200 A1 SILVERCREST
0 question about this device. Answer the ones you know or ask your own.
Ask a new question about this device
Download the instructions for your Pasta machine in PDF format for free! Find your manual SPM 200 A1 - SILVERCREST and take your electronic device back in hand. On this page are published all the documents necessary for the use of your device. SPM 200 A1 by SILVERCREST.
USER MANUAL SPM 200 A1 SILVERCREST
natural_image
Color palette bar with grayscale gradient and a crosshair symbol (no text or labels)SILVER CREST®
natural_image
Black-and-white photo of a white noodle kitchen machine with a plate of food and a plate of vegetables, no visible text or symbols on the device itself.Operating instructions
SE
PASTA MAKER
Bruksanvisning
DE AT CH
PASTA-MAKER
Bedienungsanleitung
FI
PASTAKONE
Käyttöohje
DK
PASTA-MAKER
Be sure to note the fold-out page.
Suomi 17
Huomioi taittosivu
Svenska 32
Beakta utvikssidan
Dansk 46


Contents
- Device description .... 2
- Names of parts (see fold-out page).... 3
- Technical data.... 3
- Safety information 3
- Unpacking and setting up 6
- Dismantle and assemble appliance .... 6
- Make pasta 8
- Pasta recipes 9
- Recipes for pasta sauces 11
- Cleaning the appliance 13
- Disposal.... 14
- HOYER Handel GmbH Warranty.... 14
Service Centre 16
Supplier 16
Congratulations on the purchase of your new product.
You have selected a high-quality product. The operating instructions are a constituent part of this product. They contain important information about safety, use and disposal.
Familiarize yourself with all the operating and safety instructions before using the product. Use the product only as described and for the stated spheres of application.
If you pass the product on to a third party, always pass on all the documentation as well.
1. Device description
1.1 Intended purpose
The SilverCrest SPM 200 Alpasta machine is for making fresh pasta and piped biscuits. This appliance should only be used in dry rooms. It must not be used out in the open or in humid rooms.
This appliance is intended for use in private households and is not suitable for commercial purposes.
The appliance is likewise suitable for:
- use in staff kitchens in shops, offices and other commercial areas,
• use in agricultural settings, - customers in hotels, motels and other accommodations,
• bed-and-breakfast establishments.
1.2 Scope of supply
• 1 pasta machine with kneader and screw
2 GB
- 1 screwing tool
- 1 cleaning brush
- 1 dough scraper
- 5 attachments for different kinds of pasta
• 1 attachment for piped biscuits
• 1 copy of the operating instructions
2. Names of parts (see fold-out page)
1 Lid
2 Lid locator
3 Motor housing
4 Motor shaft
5 Switches: both switches must be in the same position
6 Dough compartment
7 Toothed sleeve
8 Kneader
9 Screw housing
10 Screw ring
11 Screw
12 Attachment for pasta (any of attachments 17 to 22 as an option)
13 Screw ring
14 Screwing tool
15 Dough scraper
16 Cleaning brush
17 Tagliatelle attachment
18 Pappardelle attachment
19 Fettucine attachment
20 Spaghetti attachment
21 Linguine attachment
22 Piped biscuit attachment
3. Technical data
Power supply: 220 - 240 V
\~/ 50/60 Hz
Output: 200 watts
Protection class: II

4. Safety information
4.1 Explanation of terms
The following keywords are used in these user instructions:

Warning!
High risk: ignoring this warning could result in a risk to life and limb.
Caution!
Medium risk: ignoring this warning may result in damage.
Note:
Low risk: points to be noted when handling the appliance.
SPM 200 A1 3
GB


4.2 Special information about this appliance

Warning! To avoid injury or damage, please observe the following information.
- This appliance can be used by children aged from 8 years and above and persons with reduced physical, sensory or mental capabilities or lack of experience and knowledge if they have been given supervision or instruction concerning use of the appliance in a safe way and understand the hazards involved. Children shall not play with the appliance.
- Cleaning and user maintenance shall not be made by children unless they are older than 8 and supervised.
- Keep the appliance and its cord out of reach of children less than 8 years.
- The appliance must not be operated with an external timer or separate remote control system such as a remote control socket.
• Always remove the power supply plug from the mains socket before starting to clean the appliance. - Never immerse motor housing 3 in water.
- Never use abrasive, corrosive or scratching cleaning materials. They could damage the appliance.
4.3 General information
- Please read these user instructions carefully before use. They are a constituent part of the appliance and must be kept to hand at all times.
-
Use the appliance only for the purpose described (see "1.1 Intended purpose" on page 2).
-
To prevent damage, check that the mains voltage required (see type plate on the appliance) is compatible with your mains voltage.
- Please note that any claim under the warranty or for liability will be invalid if accessories are used that are not recommended in these user instructions, or if original spare parts are not used for repairs. This also applies to repairs undertaken by unqualified persons. You will find the service address in "Service Centre" on page 16.
- If the appliance should develop a fault during the warranty period, it may only be repaired by our Service Centre. Otherwise all claims under warranty are null and void. You will find the service address in "Service Centre" on page 16.
4.4 Protection against electric shock

Warning! The following safety information is intended to protect you against electric shock.
- The appliance must not under any circumstances be used if it is damaged. Have the device repaired in such cases by a qualified specialist. The contact data can be found in "Service Centre" on page 16.
- If the mains cable for this appliance is damaged, it must be replaced by the manufacturer or a person with similar qualifications in order to avoid a hazard.
• Under no circumstances may water or other liquids penetrate motor housing 3. For this reason: - never use it outdoors
- never immerse motor housing 3 in water
4 GB


- never place containers filled with liquid, such as drinking glasses, vases etc. on the appliance
- never use in very humid environments
- never use in the immediate vicinity of a kitchen sink, bath, shower or a swimming pool, as water may splash into the appliance.
If liquid should enter the appliance, unplug the mains plug immediately and have the appliance repaired by a qualified technician. The contact data can be found in "Service Centre" on page 16.
- Never touch the appliance, the mains cable or the mains plug with wet hands.
• Always unplug it by pulling out the plug, never pull on the cable itself. - Ensure that the mains cable is not kinked, twisted or crushed.
- Keep the mains cable away from hot surfaces, such as the top of a stove.
- If you are not going to use the appliance for a while, remove the plug from the wall socket. Only then is the appliance completely free of current.
-
Avoid using extension cables. These may only be used under very specific conditions:
-
the extension cable must be able to handle the amount of current drawn by the appliance,
- the extension cable must not be "suspended". Keep children away from it and ensure that it does not present a trip hazard,
- under no circumstances use a damaged extension cable,
- do not connect any other appliances to the mains socket, since it could cause an overload (do not use multiple sockets of any kind).
4.5 Preventing injury

Warning! To prevent injury, please observe the following information.
• Make sure that the power cord never becomes a trip hazard, that no-one can get tangled in it or tread on it.
- During operation, avoid contact with the moving parts of the appliance such as kneader 8 or screw 11. Your hands or hair could be dragged into the appliance, leading to injuries. Only switch on the appliance if lid 1 is in the correct position.
- Before any cleaning operation and whenever you are dismantling the appliance, take the plug out of the socket.
4.6 For the safety of your child

Warning! Children are often unaware of danger and are injured as a result. Please note therefore:
- Only allow children to use this appliance under the supervision of an adult.
- Ensure the appliance is always kept out of the reach of children.
- Ensure that children cannot pull the appliance down onto themselves with the mains cable.
- Ensure that the packing foil does not become a deadly trap for a child. Packing foils are not toys.


natural_image
Three geometric diagrams with crosshairs and central dots, no text or symbols present
natural_image
Pure geometric diagram with crosshair and circular target-like shapes (no text or symbols)4.7 Material damage
Caution! Follow the instructions below to prevent material damage.
- Only place the appliance on a level, dry, non-slip surface so that the appliance can neither fall over nor slide off.
- Do not place the appliance on a hot cooking ring.
- Do not use any hot liquids.
• The appliance and accessories may not be put in a microwave oven.
5. Unpacking and setting up
- Remove the individual parts from the packaging.
- Check that the individual parts are complete (see "1.2 Scope of supply" on page 2) and are undamaged.
-
Clean the appliance thoroughly before using it for the first time (see "10. Cleaning the appliance" on page 13).
-
Place the appliance on a level, dry, non-slip surface so that the appliance can neither fall over nor slide off.
- Reassemble the appliance (see "6.2 Assemble appliance" on page 7).
- Switch both switches 5 to "OFF".
- Put the plug in a suitable socket (see "3. Technical data" on page 3).
The appliance is now ready to use.
6. Dismantle and assemble appliance

Warning! To prevent the risk of an electric shock, injury or damage:
- take the plug out of the socket before any cleaning operation and before you dismantle or reassemble the appliance.
6.1 Dismantle appliance
- Switch both switches 5 to "OFF".
Note: For safety reasons, this appliance has 2 switches, both of which always have to be switched to activate the desired function. If both switches are in different positions, the appliance remains switched off. This prevents an inadvertent malfunction.
-
Ensure that lid 1 is correctly located, otherwise screw housing 9 might fall out when screw ring 13 is undone.
-
Undo screw ring 13.
Note: If screw ring 13 is too tight, use screwing tool 14 to undo screw ring 13. If screw ring 13 is too hard to undo even with screwing tool 14, run the device on "MIX" for 10 to 20 seconds and this will loosen the screw ring a little. Take the plug back out of the socket before unscrewing.
-
Remove attachment 12.
-
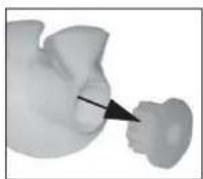
Take off lid 1.
6 GB

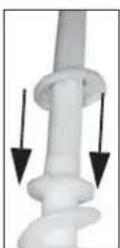
Note: There are two lugs on the front edge of the lid. Pull these forward slightly, lifting lid 1 as you do so, lift it up and then take it off.
-
Turn screw housing 9 anticlockwise and remove it.
-
Remove screw 11 from screw housing 9.
-
Take screw ring 10 off screw 11.
-
Take kneader 8 out of dough compartment 6.
-
Take toothed sleeve 7 off kneader 8.
- Take dough compartment 6 off motor housing 3.
6.2 Assemble appliance
-
Put dough compartment 6 in motor housing 3.
-
Push screw ring 10 onto screw 11. Make sure that the screw ring engages correctly.
-
Put screw 11 in screw housing 9.
-
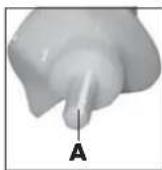
Push kneader 8 onto the shaft of screw 11.
Note: The shaft of screw 11 has a notch, A, with the result that kneader 8 only fits in one position.
- Push toothed sleeve 7 onto the shaft of screw 11.
Note: The shaft of screw 11 has a notch, with the result that toothed sleeve 7 only fits in one position.
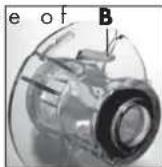
- Push screw housing 9 assembled with screw 11 and kneader 8 into dough compartment 6.
Note: On the inside screw housing 9 is an extension B which has to face upwards when put in so that screw housing 9 can be latched correctly.
-
Push screw housing 9 gently against dough compartment 6 and latch it by turning it clockwise until it engages.
-
Check that dough compartment 6 is correctly located in motor housing 3.
-
Hold lid 1 at an angle and guide it into lid locator 2.
-
Push lid 1 down until it is correctly located on dough compartment 6 and audibly engages.
Note: The safety switch which allows the appliance to operate is activated only if the lid is correctly engaged.


- Take one of the inserts 17 to 22 and use screw ring 13 to help screw it onto screw housing 9.
Note: It is sufficient to screw up the screw ring hand-tight. Screwing tool 14 is not required for this.
The appliance is now ready to use.
7. Make pasta
- Select the appropriate attachment 12:
17tagliatelle attachment
18pappardelle attachment
19fettucine attachment
20spaghetti attachment
21linguine attachment
22piped biscuit attachment
-
Place desired attachment (17 to 22) in hot water for about a minute.
-
Screw desired attachment (17 to 22) onto screw housing 9 with the aid of screw ring 13 (see "6. Dismantle and assemble appliance" on page 6).
-
Take off lid 1.
Note: There are two lugs on the front edge of the lid. Pull these forward slightly, lifting lid 1 as you do so, lift it up and then take it off.
- Pour the desired quantity of flour into dough compartment 6.
Note: If you are not using a very runny liquid (like water, for example) but a more viscous mixture or a mixture containing solid components (such as finely-chopped spinach, for example) this will not pass easily through the lid. In this case, put the liquid straight into dough compartment 6.
-
Hold lid 1 at an angle and guide it into lid locator 2.
-
Push lid 1 down until it is correctly located on dough compartment 6 and audibly engages.
Note: The safety switch which allows the appliance to operate is activated only if the lid is correctly engaged.
-
Put the plug into a suitable earthed socket (see "3. Technical data" on page 3).
-
Switch both switches 5 to "MIX".
-
Slowly pour the desired quantity of liquid into lid 1. From here, it will run into the dough compartment.
Notes:
- If your recipe calls for eggs, lightly beat these in a separate container.
- Pour the beaten egg and oil through lid 1 during kneading.
- Allow the appliance to knead for about 5 minutes until the dough is of the desired consistency.
Note: Once ready, pasta dough should not be sticky necessary, add a little more flour or water through lid 1 from where it will drop into the dough compartment.
With a little experience, you will soon be able to recognize the ideal consistency.
or crumbly. If
8 GB


- Switch both switches 5 to "OFF".
Caution! Before you extrude the pasta dough, you need to leave both switches 5 on "OFF" for at least 5 seconds to allow the dough to rest.
-
Place a container under the appliance to catch the pasta.
-
Switch both switches 5 to "EXT". The pasta is now extruded.
-
Use dough scraper 15 to cut the pasta to the desired length directly at attachment 12.
-
As soon as all the dough has been extruded, switch both switches 5 to "OFF".
Note: For technical reasons, a small quantity of dough is always left behind in dough compartment 6.
- If you want to make a second portion of pasta, remove the rest of the dough from dough compartment 6.
Note: Weigh the remaining quantity you have removed and reduce the total quantity of ingredients for the second batch of dough accordingly. You can then add the remaining quantity of the first batch of dough to the second batch without exceeding the maximum total quantity of approximately 520 g.
- Proceed in the same way with the second batch of dough as with the first.
- When you have finished, take the plug out of the socket.
Caution!
To prevent dough residues drying on, you must dismantle the appliance immediately after use. If dough residues dry on, it can become difficult or even impossible to dismantle the appliance.
- Dismantle the appliance (see "6.1 Dismantle appliance" on page 6).
- Clean the appliance and the accessories (see "10. Cleaning the appliance" on page 13).
8. Pasta recipes
8.1 Tips on making pasta
- Semolina, spelt flour, special pasta flour or instant flour (low-protein plain flour) are especially suitable for making pasta.
-
The total quantity of flour and liquid should always be between 480 g and 520 g. The appliance works best with this. A smaller quantity means the ingredients will not be properly kneaded, whilst a larger total quantity may cause dough to be forced out of the dough compartment.
• Less than 3 minutes' kneading time will lead to ingredients not being properly mixed. -
More than 5 minutes' kneading time will lead to the dough getting too warm and sticky.
- Spread the pasta out on a clean cloth after removing it from the machine to stop it sticking together.
• Herbs are to colour the pasta; they lose their flavour when the pasta is cooked. - You can dry the pasta to make it keep longer. To do this, spread out the pasta on a clean cloth and air-dry for a day or so (or dry in an oven at about 40 °C for 1 - 3 hours) until it is dry.
- If pasta dough is stuck to the lid, you can carefully push it down through the two slots in the lid using dough scraper 15.

• Cook the pasta in plenty of water (3 - 4 litres for 500 g pasta). Add about 2-3 tbsp salt.
• The water foams more with fresh pasta than with dried, so do not cover the pan.
- Fresh pasta cooks more quickly than dried. Fresh pasta usually takes 1 - 3 minutes, whilst dried pasta usually takes between 6 and 12 minutes to cook.
8.2 Basic recipe for pasta
Ingredients
• 340 g durum wheat semolina
- 140 g water
• 1 tbsp oil (10 g)
Preparation
See "7. Make pasta" on page 8.
Notes
• The pasta can be used fresh or dried.
- You can alter the consistency using flour or a little water.
8.3 Egg pasta
Ingredients
• 340 g semolina
• 3 medium eggs
Preparation
See "7. Make pasta" on page 8.
Notes:
• The pasta can be used fresh or dried.
- You can alter consistency using flour or a little water.
8.4 Green spelt pasta
Ingredients
- 340 g spelt flour (pasta flour or instant flour can be substituted)
- 175 g spinach (either freshly blanched and chopped or deep-frozen. Do not
use creamed spinach, as the cream will make the pasta too soft.)
- 1 clove garlic (can be included or not, to taste)
• 1 pinch ground nutmeg
Preparation
- Put all the ingredients straight into dough compartment 6.
- Prepare the pasta as described in "7. Make pasta" on page 8.
Notes
• The pasta can be used fresh or dried.
- You can alter consistency using flour or a little water.
8.5 Red pasta
Ingredients
- 340 g pasta flour (spelt flour or instant flour can be substituted)
• 1 e g g
• 1 tbsp tomato ketchup - approx. 80 - 100 g tomato purée
Preparation
- Put the beaten egg and tomato ketchup in a bowl.
- Top up to a total weight of 160 g using tomato purée.
- Put the flour and the egg-and-tomato mixture straight into dough compartment 6.
- Prepare the pasta as described in "7. Make pasta" on page 8.
Notes
• The pasta can be used fresh or dried.
- You can alter consistency using flour or a little water.
10 GB


8.6 Black pasta
Ingredients
- 340 g pasta flour (spelt flour or instant flour can be substituted)
- 150 g egg
- 10 g sepia ink
Preparation
See "7. Make pasta" on page 8.
Notes
• The pasta can be used fresh or dried.
- You can alter consistency using flour or a little water.
8.7 Piped biscuits
Ingredients
• 230 g plain flour (type 405, cake flour)
• 150 g butter, cold and cut into thin slices
- 100 g sugar
• 1 e g g
• 1 sachet vanilla sugar
• 1 pinch salt
Preparation
- Put the ingredients in the dough compartment.
- Knead for approx. 5 minutes.
- Then extrude the mixture through attachment 22 for piped biscuits.
- Use dough scraper 15 directly at attachment 12 to cut off strands of identical length.
- Place the strands on a baking sheet in an S-shape, in straight lines or in circles.
- Bake at 180 °C for 10 minutes.
Notes:
• You can garnish the biscuits with chopped walnuts or almonds before baking.
- Once the biscuits have cooled after baking, they can be iced.
9. Recipes for pasta sauces
Hints for a good flavour
• Use freshly-milled salt and pepper
• Always use fresh herbs and ingredients
• Grate parmesan freshly
• Use cold-pressed olive oil
• Home-made pasta tastes best if heated in the pan with a little olive oil and garlic after cooking. In this case, you can also brown mushrooms, meat or prawns to taste (before adding the pasta). Add freshly-milled salt and pepper and then serve with torn basil or ruccolalettuce or tomatoes. The parmesan cheese is served at the table and tastes best freshly grated.
9.1 Carbonara sauce
Ingredients
• 2 tbsp olive oil for browning
• 2 cloves garlic, finely chopped
- 150 g diced ham
• 4 eggs
• 1 pinch salt
- 1 tub whipping cream
- 100 ml milk
• 100 g parmesan cheese, grated
• Freshly-milled salt and pepper
- Nutmeg, ground, to season
Preparation
- Combine eggs, cream, milk, salt, pepper and nutmeg using a balloon whisk.
SPM 200 A1 11
GB


- Stir in half the grated parmesan.
- Heat the olive oil with the pan on a medium heat, add the finely-chopped garlic and fry briefly.
- Now pour in the egg-and-milk mixture.
- Finally add the diced ham.
9.2 Tomato sauce
Ingredients
• 850 ml tinned or fresh tomatoes
- 1 small onion
• 1 clove garlic
• 2 tbsp tomato purée
- Salt
- White pepper
- Sugar
- Oregano
- Herbs of Provence
• 3 tbsp olive oil
Preparation
- Heat olive oil in a 2-3 litre-capacity pan.
- Finely chop the onion and sauté until transparent, add the crushed garlic.
- Blend the tinned tomatoes*. Add these to the pan, add the tomato purée and season with salt, pepper and a pinch of sugar.
- Let it all simmer for 10 minutes, stirring occasionally.
- Finally, season the tomato sauce with salt, pepper, oregano and if you like them, herbs of Provence.
Note:
- *Alternatively, scald fresh tomatoes, slip off their skins and blend them in a food processor or using a stick blender.
9.3 Gorgonzola sauce
Ingredients
- 200 ml cream
• 200 g gorgonzola
Preparation
- Heat the cream.
- Stir in the gorgonzola to melt it. Heat, stirring continuously.
Note
• Diced ham can also be added if you like.
9.4 Aglio e Olio
Ingredients
• 4 tbsp oil (olive), cold-pressed
• 2 cloves garlic
- Basil
- Oregano
- Pepper
- Salt
Preparation
- Sweat the garlic in the olive oil, coat the cooked spaghetti.
- Season to taste with freshly-milled salt and pepper.
- Serve with freshly-grated parmesan to taste.
9.5 Pesto (red)
Ingredients
• 150 g tomatoes (dried)
- 1 handful basil
• 1 red onion (quartered)
- 2 tbsp pine nuts
• 1 - 2 cloves garlic
• 2 tsp balsamic vinegar
• 5 t b s p o l i v e o i l
- Salt
- Pepper
12 GB


Preparation
- Finely process the tomatoes, the picked basil leaves, pine nuts, garlic and onion.
- Add vinegar and oil and mix.
- Season with salt and pepper.
Note
- Keep pesto in a screw-top glass jar covered with a layer of olive oil. In this way, it will keep in the fridge for about 4 weeks.
9.6 Pesto (green)
Ingredients
• 1-2 handfuls fresh basil
• 1 - 2 cloves garlic
- 2 tbsp pine nuts
- olive oil
• 2 tbsp parmesan
• Salt + and freshly-milled black pepper
Preparation
- Toast the pine nuts in a pan.
- Finely chop the basil, garlic and pine nuts.
- Add enough olive oil to form a creamy paste.
- Add the parmesan at the end.
- Season with salt and pepper.
Note
- Keep pesto in a screw-top glass jar covered with a layer of olive oil. In this way, it will keep in the fridge for about 4 weeks.
10. Cleaning the appliance

Warning! To prevent the risk of an electric shock, injury or damage:
- disconnect the power plug from the mains socket before any cleaning step.
- Never immerse motor housing 3 in water.
Caution! Under no circumstances use scouring agents or corrosive or abrasive cleaning materials, as these could damage the appliance.
- Dismantle the appliance (see "6.1 Dismantle appliance" on page 6).
10.1 Clean motor housing (3)
- Clean motor housing 3 with a damp cloth. A little detergent may also be used.
-
Wipe off with fresh water.
-
Do not use motor housing 3 again until it is completely dry.
10.2 Clean dough compartment (6), lid (1) and screw housing (9)
Caution! The accessories are not dishwasher-proof. The plastic might go dull and brittle in the dishwasher.
- Put the parts in cold or lukewarm water to soften dough residues.
Note: You can also add a little detergent to the water.
- Remove softened dough residues using cleaning brush 16.
- Rinse off with clean water.
- Allow parts to dry completely before using them again.
10.3 Clean remaining accessories
Caution! The accessories are not dishwasher-proof. The plastic might go dull and brittle in the dishwasher.
- Allow the dough to dry on for at least 24 hours. This makes it hard and brittle.
-
Remove the dried-on dough residues using cleaning brush 16.
-
Tap attachments 17 to 22 gently on the table to knock off the dried-on dough.
- Use a toothpick to clean dough residues out of the holes in attachments 17 to 22.
- Wash the parts in hot washing-up water.
- Rinse off with clean water.
- Allow parts to dry completely before using them again.
11. Disposal
11.1 Appliance

The symbol with the crossed-out rubbish bin on wheels means that within the European Union, the product must be disposed of to a sorted rubbish collection. This applies to the product and all accessories which are marked with this symbol. Marked products must not be disposed of via the regular domestic waste but must be handed in to a
recycling centre for electrical or electronic devices. Recycling helps to reduce the use of raw materials and to relieve the environment. It is therefore imperative that you follow the disposal regulations applicable in your country.
11.2 Packaging
If you wish to discard the packaging, please observe the applicable environmental regulations in your country.
You have a warranty on this product which is valid for 3 years from the date of purchase. In the event of this product being defective, you have statutory rights against the seller of the product. These statutory rights are not limited by our warranty as set out below.
Warranty conditions
The warranty period begins with the date of purchase. Please keep the original till receipt
in a safe place. This is required as your proof of purchase.
If a defect in materials or workmanship occurs within three years of the date your product was purchased, we will repair or replace the product at our discretion at no charge to you. This service under warranty assumes that the defective product and the proof of purchase (till receipt) are submitted within the three-year period and that a brief description in writing is provided of what the defect is and when it occurred.
14 GB


If the defect is covered by our warranty, the repaired product or a new one will be sent back to you. There is no period following repair or replacement of the product.
Warranty period and statutory claims relating to defects
The warranty period is not extended when a service is provided under warranty. This also applies to replaced and repaired parts. Any damage or defects present at purchase must be reported immediately the product is unpacked. Repairs incurred once the warranty period has expired are chargeable.
Scope of warranty
The product has been carefully manufactured in accordance with strict quality guidelines and was thoroughly checked before being delivered.
The warranty applies to defective materials or workmanship. This was extend to product parts exposed to normal wear and tear (and which can therefore be considered wear parts) or to damage to fragile parts such as switches, batteries or parts made of glass.
This warranty is void if the product is damaged or if it is not used or maintained properly. All the information in the operating instructions should be observed precisely to ensure that the product is used properly.
It is essential to avoid intended uses and actions which are discouraged or warned against in the operating instructions.
The product is intended for only private use and not for commercial purposes.
The warranty is void in the event of misuse, incorrect treatment, use of force or interference by anyone other than our authorized service centre.
Warranty process
Please follow the instructions below to ensure that your claim is processed quickly.
- In case of any enquiry, please keep the article number (for this product: IAN 89212) and the till receipt as proof of purchase.
- The article number can be found on the rating plate, as an engraving, on the cover sheet of your instructions (bottom left) or as a label on the back or underside of your appliance.
- If malfunctions or any other defects should occur, in the first instance contact the Service Centre mentioned below by telephone or e-mail.
- Once a product has been recorded as defective, you can then send it Freepost to the service address you are given, enclosing the proof of purchase (till receipt) and quoting what the defect is and when it occurred.
ranty does not

You can download these instructions and many other manuals, product videos and software from www.lidl-service.com.

Service Centre
GB Service Great Britain
Tel.: 0871 5000 720 (£ 0.10/Min.)
E-Mail: hoyer@lidl.co.uk
IR Service Ireland
Tel.: 1890 930 034
(0,08 EUR/Min., (peak))
(0,06 EUR/Min., (off peak))
E-Mail: hoyer@lidl.ie
CY Service Cyprus
Tel.: 8009 4409
E-Mail: hoyer@lidl.com.cy
MT Service Malta
Tel.: 80062230
E-Mail: hoyer@lidl.com.mt
IAN: 89212

Supplier
Please note that the address below is not a service address. In the first instance, contact the service centre mentioned above.
HOYER Handel GmbH
Kühnehöfe 5
D-22761 Hamburg
Germany
Sisältö
natural_image
Blank white image with a color palette bar at the bottom (no text or symbols)HOYER HANDEL GMBH
Kühnehöfe 5
D-22761 Hamburg
Status of information · Tiedot päivitetty · Informationsstatus ·