417-079 - Dehumidifier Anslut - Free user manual and instructions
Find the device manual for free 417-079 Anslut in PDF.


| Product Type | Dehumidifier |
| Brand | Anslut |
| Model | 417-079 |
| Rated Voltage | 230 V ~ 50 Hz |
| Power Output | 440 W |
| Air Flow | 100 m³/h |
| Dehumidifying Capacity | 20 L / 24 h |
| Temperature Range | 5 – 35 °C |
| Refrigerant | R134A |
| Tank Volume | 3 L |
| Noise Level | 45 / 48 dB |
| Dimensions (W x H x D) | 350 x 510 x 245 mm |
| Weight | 13.5 kg |
| Operating Modes | Dehumidification, Continuous Dehumidification |
| Timer | 0 – 24 hours (auto start/stop) |
| Fan Speeds | Normal, Turbo |
| Target Humidity Range | 35 – 85 % RH (in steps of 5 %) |
| Display | Shows set or actual humidity (±5%) |
| Water Drainage | Manual (tank) or continuous (hose, 16.5/13.5 mm) |
| Automatic Defrost | Yes |
| Automatic Restart | After power failure, resumes previous settings |
| Air Filter | Washable (do not use water; clean monthly) |
| Water Container Cleaning | Every 2–4 weeks with mild detergent; not dishwasher safe |
| Safety Features | Auto shut-off when tank full or removed; 3-minute restart delay |
Frequently Asked Questions - 417-079 Anslut
User questions about 417-079 Anslut
0 question about this device. Answer the ones you know or ask your own.
Ask a new question about this device
Download the instructions for your Dehumidifier in PDF format for free! Find your manual 417-079 - Anslut and take your electronic device back in hand. On this page are published all the documents necessary for the use of your device. 417-079 by Anslut.
USER MANUAL 417-079 Anslut
natural_image
White portable air purifier with control panel and ventilation grille (no visible text or symbols)Care for the environment!
Must not be discarded with household waste! This product contains electrical or electronic components that should be recycled. Leave the product for recycling at the designated station e.g. the local authority's recycling station.
SE - Bruksanvisning i original
EN - Operating instructions (Translation of the original instructions)
Jula reserves the right to make changes. In the event of problems, please contact our service department. www.jula.com
Tillverkare/ Produsent / Produenci/ Manufacturer
Jula AB, Box 363, 532 24 SKARA
Importör/ Importør/ Importer/ Importer
Date of production: 2016-02-12
© Jula AB
SVENSKA....4
SÄKERHETSANVISNINGAR....4
TEKNISKA DATA....5
BESKRIVNING 5
HANDHAVANDE 6
UNDERHÄLL 8
FELSÖKNING 9
NORSK 10
CSIKKERHETSANVISNINGER 10
TEKNISKE DATA....11
BESKRIVELSE....11
BRUK....12
VEDLIKEHOLD 14
FEILS∅KING....15
POLSKI 16
ZASADY BEZPIECZEŃSTWA 16
DANE TECHNICZNE 17
OPIS 17
OBSŁUGA 18
KONSERWACJA 20
WYKRYWANIE USTEREK 21
ENGLISH 22
SAFETY INSTRUCTIONS....22
TECHNICAL DATA....23
DESCRIPTION 23
USE 24
MAINTENANCE 26
TROUBLESHOOTING 27
SÄKERHETSANVISNINGAR
natural_image
Line drawing of a portable air purifier device with control panel and ventilation slots (no text or symbols)natural_image
Line drawing of a portable air purifier with a bag and fan, showing internal components and airflow direction (no text or symbols)natural_image
Technical line drawing of a mechanical component with no visible text or symbolsOBS!
natural_image
Line drawing of a portable air purifier with a handle and control panel (no text or symbols)OBS!
natural_image
Three line drawings of a portable air conditioner unit with cooling fins and heat sinks, shown from different angles (no text or symbols)- Håndtak
- Seglass for vannivå
- Vannbeholder
- Luftuttak
- Betjeningspanel

natural_image
Line drawing of a portable air purifier device with ventilation grille and control panel (no text or symbols)- Ta godt tak i håndtakene på sidene og trekk beholderen rett ut.
natural_image
Line drawing of a portable air conditioner unit with an open lid and upward arrow indicating motion (no text or symbols)- Løft opp vannbeholderen. 3. Tøm ut vannet.
natural_image
Technical line drawing of a mechanical component with no visible text or symbolsOBS!
natural_image
Line drawing of a portable air purifier with a handle and ventilation grille (no text or symbols)OBS!
natural_image
Three line drawings of a portable air conditioner unit with cooling fins and ventilation slots, shown from different angles (no text or symbols)natural_image
Three technical line drawings of household air purifiers, showing front, side, and side views with no text or symbols.natural_image
Line drawing of a portable air purifier with cooling unit and handle (no text or symbols)natural_image
Three line drawings of a portable air conditioner unit, showing front, side, and side views with no text or symbols.Read the operating instructions carefully before use.
Save them for future reference.
- Read these instructions carefully before use, and save them for future reference. The troubleshooting guide helps you to identify the causes of common problems and how they can be rectified. Contact your dealer if you experience a problem that is not included in this troubleshooting guide.
- The dehumidifier is not intended to be used by persons (children or adults) with any form of functional disorders, or by persons who do not have sufficient experience or knowledge on how to use it, unless they have received instructions concerning the use of the dehumidifier from someone who is responsible for their safety. Keep children under supervision to make sure they do not play with the dehumidifier. Do not allow children to use, clean or maintain the dehumidifier without supervision.
- Keep children under supervision to make sure they do not play with the dehumidifier.
- A damaged power cord must be replaced by an authorised service centre, or other qualified personnel, to ensure safe use.
- The dehumidifier must be installed in accordance with the instructions and local regulations.
- Do not place the dehumidifier closer than 1m to any flammable material.
- Maintenance and repairs must be carried out by an authorised service centre.
- Do not overload the power point or connection.
- Do not start/stop the dehumidifier by disconnecting/reconnecting the power supply.
- Do not use a damaged or unsuitable power cord.
- Never modify the power cord or plug. Connect the dehumidifier to a separate power circuit. Do not touch the power cord or the plug with wet hands.
- Do not place the dehumidifier near sources of heat. Fire risk.
- Switch off the dehumidifier immediately and unplug the power cord in the event of any abnormal noise, smell, smoke or other abnormality.
- Never attempt to dismantle or repair the dehumidifier yourself.
- Switch off the dehumidifier and unplug the power cord before cleaning.
- Do not use the dehumidifier in the vicinity of flammable liquids or gases.
- Do not drink the water from the dehumidifier.
- Switch off the dehumidifier before removing the water container.
- Do not move the dehumidifier when there is water in the water container.
IMPORTANT:
- Do not use the dehumidifier in confined spaces.
- Do not expose the dehumidifier to splashing water.
- Place the dehumidifier on a level, stable surface.
- Never cover the inlet or outlet openings.
- Do not use the dehumidifier in the vicinity of chemicals.
- Never poke your fingers or any other objects into the inlet or outlet openings.
- Do not place heavy objects on the power cord. Place the power cord so that it cannot be stood on or clenched.
- Do not step or sit on the dehumidifier.
• Always make sure to fit the filter properly. Clean the filter every other week. - If water gets into the dehumidifier, switch it off, unplug the power cord and contact an authorised service centre or other qualified personnel.
- Never place objects filled with water, such as vases, on the dehumidifier.
Electrical safety
- Technical data for the appliance is specified on the type plate on the back.
- The plug must be plugged into a correctly installed earthed mains socket.
- Never modify the plug in any way. If the plug does not fit the mains socket, contact an authorised electrician to install an earthed mains socket.
- The mains socket should be easily accessible.
- Do not use an extension cord unless absolutely necessary. If using an extension cord, it must be approved for the appliance.
• Always unplug the power cord before cleaning, service and/or any other work on the appliance.
TECHNICAL DATA
| Rated voltage 230 V | ~50 Hz |
| Output 440 W | |
| Air flow 100 m3/h | |
| Dehumidifying capacity 20 l/24 h | |
| Temperature range 5–35°C | |
| Refrigerant | R134A |
| Tank volume 3 l | |
| Noise level 45/48 dB | |
| Dimensions 350 x 510 x 245 mm | |
| Weight 13.5 kg |
DESCRIPTION
Control panel

- POWER. Press to start/switch off the dehumidifier. NOTE: A loud noise can be heard when the compressor starts or stops. This is completely normal.
- MODE. Press to select operating mode: Dehumidification or continuous dehumidification.
- NOTE: Drying and smart dehumidification are not included on all models.
- INCREASE/DECREASE. Adjusting buttons for humidity. The target humidity can be set from 35 to 85% relative humidity in steps of 5%. Press the - button for lower target humidity. Press the + button for higher target humidity.
- TIMER. Use the - and + buttons to set the time for automatic start and automatic stop from 0 to 24. Press to activate automatic start and automatic stop. Used together with the buttons - and +.
- TURBO. Used to set the fan speed. Press to select high or normal fan speed. Select high fan speed for maximum dehumidification. Select normal fan speed for silent operation.
- DISPLAY. The set humidity is shown between 35 and 85%, or the time for automatic start/automatic stop (0–24), when adjusting. This is followed by the actual humidity (precision ± 5%) between 30 and 90% RH.
Error and warning codes
AS – Error from moisture sensor. Unplug and plug in the power cord. Contact your dealer if the fault persists.
ES - Error from temperature sensor. Unplug and plug in the power cord. Contact your dealer if the fault persists.
P1 – Defrosting. Wait until the dehumidifier has defrosted. The error will be deleted when the dehumidifier is defrosted.
P2 – The water container is full or has not been properly fitted. Empty the container and insert properly.
E3 – Malfunction. Unplug and plug in the power cord. Contact your dealer if the fault persists.
EC – Leakage of refrigerant detected. Contact your dealer.
Dehumidifier parts

- Handle
- Sight glass for water level
- Water container
- Air outlet
- Control panel

- Air intake
- Air filter
- Holder for power cord
- Power cord with plug
- Wheel
USE
Positioning
- Do not use the dehumidifier outdoors.
- The dehumidifier is only intended for household use. It is not intended for industrial or commercial use.
- Place the dehumidifier on a level, stable surface that can support the weight of the dehumidifier with a full water container.
- Leave at least 20 cm of free space on all sides to ensure the adequate circulation of air.
- The lowest operating temperature is 5^ C. At lower temperatures frost can form on the evaporator coils, which reduces the performance of the dehumidifier.
- Place the dehumidifier at a safe distance from sources of heat.
- Use the dehumidifier to ensure a suitable humidity in the air for books or valuables, and to prevent damage due to damp.
- Only use the dehumidifier in enclosed areas.
- Close windows, doors and other openings for maximum effect.

Before using for the first time
- When using the appliance for the first time it should be switched on continuously for 24 hours.
- When the dehumidifier has been switched off it cannot be started for 3 minutes.
- Connect the dehumidifier to a separate power circuit.
- Put the dehumidifier in a suitable place and make sure that the mains outlet is easily accessible.
- Only connect the dehumidifier to an earthed power point, 220–240 VAC, 50 Hz.
- Check that the water container is properly inserted, otherwise the dehumidifier will not work.
EMPTYING THE WATER
The water can drained off in two ways:
Water container
- 8 audio prompts are given when the dehumidifier is switched off and the water container is full, the indicator lamp for full water container flashes and P2 is shown in the display.
-
The compressor switches off when the dehumidifier is running and the water container is full. The fan runs for another 30 seconds to remove water from the condenser. The fan then switches off, 8 audio prompts are given, the indicator lamp for full water container flashes, and P2 is shown in the display.
-
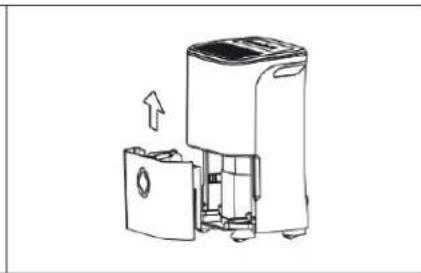
Carefully pull out the water container. Grip both sides firmly and pull the container straight out. Do not put the container down—the bottom is uneven and it cannot stand upright.
- Pour out the water and replace the container. Check that the water container is properly inserted, otherwise the dehumidifier will not work.
- The dehumidifier starts automatically when the container is replaced.

natural_image
Line drawing of a portable air purifier device with a handle and ventilation grille (no text or symbols)- Grip both sides firmly and pull the container straight out.

natural_image
Line drawing of a portable air conditioner unit with an open lid and internal compartments, showing no text or symbols.- Lift up the water container. 3. Empty out the water.

natural_image
Technical line drawing of a mechanical component with no visible text or symbolsNOTE:
- Do not touch any parts inside the appliance when removing the water container, this could damage the appliance.
- Push the water container carefully into the appliance, otherwise the appliance can be damaged.
- Wipe off any spilled water in the appliance before replacing the container.
Continuous drainage
The water can be drained automatically to a drain via a hose with a diameter of 16.5/13.5 mm (sold separately).
- Remove the drain plug on the back of the dehumidifier and put it in a safe place.
- Connect the hose. Check that the connection is tight.
- Put the end of the hose in a suitable drain. The drain must be lower than the outlet on the dehumidifier.
- The hose must go down towards the drain. Avoid bending or running the hose over obstacles.

natural_image
Line drawing of a portable air purifier with a handle and ventilation grille (no text or symbols)NOTE:
- Remove the hose and insert the rubber plug when the hose is not in use.
- Do not bend the drain hose.
- Do not bend the drain hose.
Automatic switching off
The float switch switches off the dehumidifier when the water container is full, or not properly inserted, and when the water container is taken out. The dehumidifier switches off automatically when the set target humidity is reached.
Start delay 3 minutes
When the dehumidifier has been stopped it will not start for 3 minutes. This is a safety function, and is completely normal. The dehumidifier starts automatically after 3 minutes.
Automatic defrosting
If frost forms on the evaporator coils the compressor will switch off, and the fan will run until the frost has melted.
Automatic restart
When the power supply is reset after a power failure the dehumidifier restarts with the previously set function.
MAINTENANCE
NOTE: Switch off the dehumidifier and unplug the power cord before cleaning.
Cleaning the grilles and casing
- Clean the grilles for the air intake and outlet with a vacuum cleaner or brush.
- Use water and a mild detergent. Do not use strong or abrasive detergents.
- Do not expose the dehumidifier to splashing water – this can damage the insulation and result in a risk of electric shock and/or cause corrosion.
Cleaning the water container
- Clean the water container every two or four weeks to prevent the build-up of mildew and bacteria etc. Pour a little fresh water with mild detergent into the water container, swish round, pour out and rinse. NOTE: Do not wash the water container in a dishwasher. Check after cleaning that the water container is properly inserted, otherwise the dehumidifier will not work.
CLEANING THE AIR FILTER
- Check and clean the air filter, located inside the front grille, at least once a month. NOTE: Do not wash the filter with water, or in a dishwasher.
Removing/fitting the air filter
- Pull out the water container.
- Press the flap on the filter inwards a little to release the filter from the holder, and then pull down the filter.
- Clean the filter with hot soapy water. Rinse and allow to dry before fitting. Do not put the filter in a dishwasher.
- Put the filter in the dehumidifier, press the flap inwards and press up the filter. NOTE: Never use the dehumidifier without a filter – dust and impurities will reduce the performance of the dehumidifier.

natural_image
Three line drawings of a portable air conditioner unit with cooling fins and ventilation slots, shown from different angles (no text or symbols)When not using the dehumidifier for a prolonged period
- Switch off the dehumidifier, and empty the water container after one day.
- Clean the dehumidifier, the water container and the air filter.
- Wind up the power cord and secure with the strap on the back of the dehumidifier.
• Cover the dehumidifier with a plastic bag. - Store the dehumidifier upright in a dry, well-ventilated area.
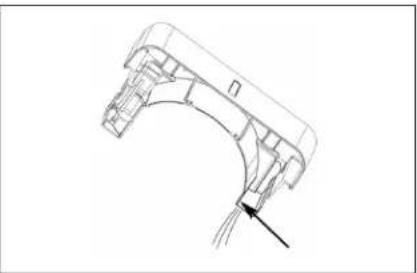
NOTE: Undo the screw on the lid of the water container before cleaning and replace it afterwards.
Check the following points before contacting your dealer for a service.
| Problem Possible cause | |
| The dehumidifier will not start. The power cord is not connected properly to the power point. | |
| The air is not dehumidifying properly. The dehumidifier has not been working long enough. | |
| The air flow to the dehumidifier is blocked by furniture or curtains, etc. | |
| The room temperature is too low (lower than 5°C). | |
| Something in the room is emitting moisture. | |
| The dehumidifier is making a lot of noise. The air filter is blocked. | |
| The dehumidifier is tilted. | |
| The surface is not horizontal. | |
| Frost on the evaporator coils. This is completely normal. The dehumidifier defrosts automatically. | |
| Water on the floor. Leakage from the drain hose or connection. | |
- Care for the environment!
- SVENSKA....4
- NORSK 10
- POLSKI 16
- ENGLISH 22
- SÄKERHETSANVISNINGAR
- OBS!
- Read the operating instructions carefully before use.
- IMPORTANT:
- Electrical safety
- DESCRIPTION
- Control panel
- Error and warning codes
- Dehumidifier parts
- USE
- Positioning
- Before using for the first time
- EMPTYING THE WATER
- Water container
- NOTE:
- Continuous drainage
- Automatic switching off
- Start delay 3 minutes
- Automatic defrosting
- Automatic restart
- MAINTENANCE
- Cleaning the grilles and casing
- Cleaning the water container
- CLEANING THE AIR FILTER
- Removing/fitting the air filter
- When not using the dehumidifier for a prolonged period
Brand : Anslut
Model : 417-079
Category : Dehumidifier