L22DAB10E - Radio Logik - Free user manual and instructions
Find the device manual for free L22DAB10E Logik in PDF.


| Product Type | DAB/FM Portable Radio |
| Brand | Logik |
| Model | L22DAB10E |
| Power Supply | Mains adapter DC 6V 0.5A (included) or 4x AA batteries (not included) |
| Output Power | 1 x 1.0W |
| Frequency Range FM | 87.5 – 108 MHz |
| Frequency Range DAB | 174.928 – 239.200 MHz (Band III) |
| Antenna | Telescopic aerial |
| Preset Stations | 10 each for DAB and FM |
| Display | LCD with backlight |
| Modes | DAB, FM |
| Tuning | Auto scan (Quick/Full) and manual tuning |
| Additional Features | Secondary services support, multiple display modes (Program Type, Signal Strength, Time/Date, DLS/Radio Text), system reset, earphone socket, FM sensitivity selection |
| Dimensions (approx.) | 150 x 80 x 30 mm |
| Weight (approx.) | 0.3 kg |
| Included Accessories | Mains adapter (part EUAD87006-500), instruction manual (part L22DAB10E-002) |
| Maintenance | Wipe with slightly moist lint-free cloth; do not use alcohol, ammonia, or abrasives |
| Safety | Indoor use only; avoid moisture and heat; unplug during storms; no user-serviceable parts |
Frequently Asked Questions - L22DAB10E Logik
User questions about L22DAB10E Logik
0 question about this device. Answer the ones you know or ask your own.
Ask a new question about this device
Download the instructions for your Radio in PDF format for free! Find your manual L22DAB10E - Logik and take your electronic device back in hand. On this page are published all the documents necessary for the use of your device. L22DAB10E by Logik.
USER MANUAL L22DAB10E Logik
Switching on Your Unit for the First Time....7
Basic Operation 8
Powering ON/OFF 8
Selecting Modes 8
Adjusting Volume 8
DAB Operation....9
Memory 9
Storing Stations 9
Recalling a Stored Station 9
Display Modes ....10
Software Version ......11
Auto Scan Modes ....11
Secondary Services ....11
Manual Tuning ....11
System Reset 12
FM Operation ....13
Switching from DAB to FM Mode 13
Auto Scan ....13
Manual Scan 13
Storing Stations 13
Recalling a Stored Station 13
Display Modes 14
Software Version 15
System Reset 15
Using Earphones 15
Select Sensitivity in FM 15
Maintenance ....16
Hints and Tips 16
Specification 16
Safety Warnings 65
Innhold
NO
Utpakking 17
Produktoversikt 18
Strømkilde 19
Strømnett 19
Batteristrøm 19
Slå på apparatet første gang 19
Strøm TÆND/SLUK (ON/OFF) 56
Softwareversion....59
Automatiske scannings-tilstande 59
Sekundære services ....59
Manuel tuning ....59
Systemnulstilling 59
FM-betjening 60
Softwareversion....62
Systemnulstilling 62
Congratulations on the purchase of your new Logik DAB Radio.
We recommend that you spend some time reading this instruction manual in order that you fully understand all the operational features it offers. You will also find some hints and tips to help you resolve any issues.
Read all the safety instructions carefully before use and keep this instruction manual for future reference.
GB
Unpacking
Remove all packaging from the unit. Retain the packaging. If you dispose of it please do so according to local regulations.
The following items are included:
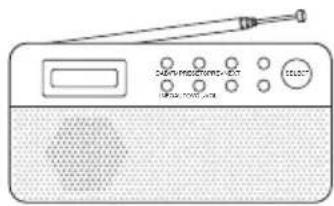
natural_image
Illustration of a portable radio with antenna, speaker, and control buttons (no text or symbols)The Main Unit
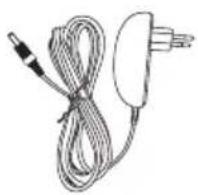
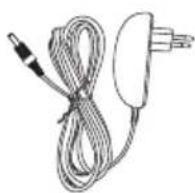
Mains Adapter
part number
EUAD87006-500
Instruction Manual part number L22DAB10E-002
If items are missing or damaged, please contact Partmaster (UK only).
Tel: 0844 800 3456 for assistance.
GB
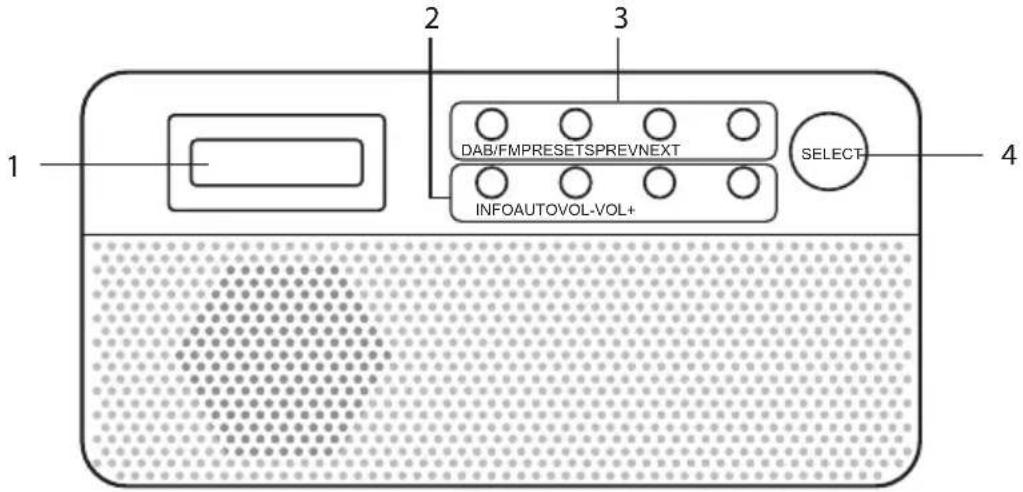
Front View
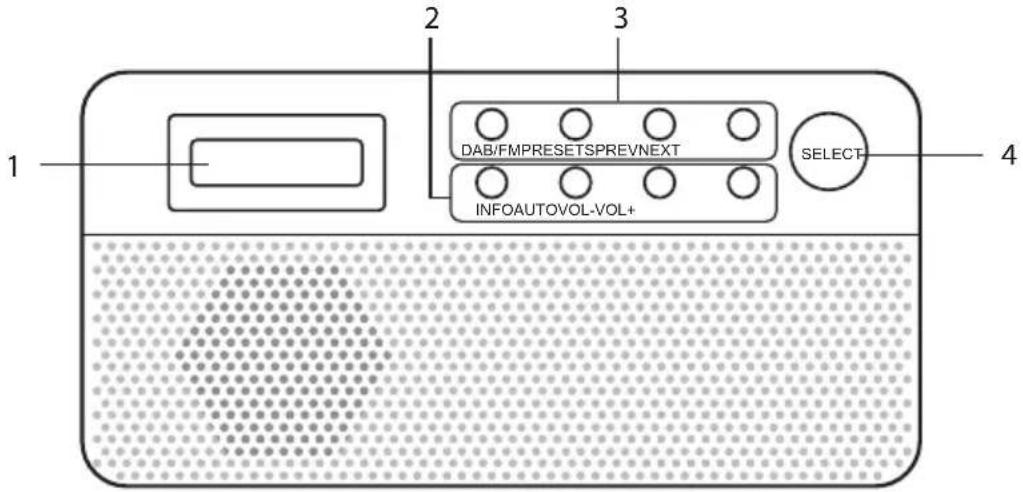
- LCD Display Window
- INFO Button
AUTO Button
VOL- Button
VOL+ Button
- DAB/FM Button
PRESETS Button
PREV Button
NEXT Button
- SELECT Button
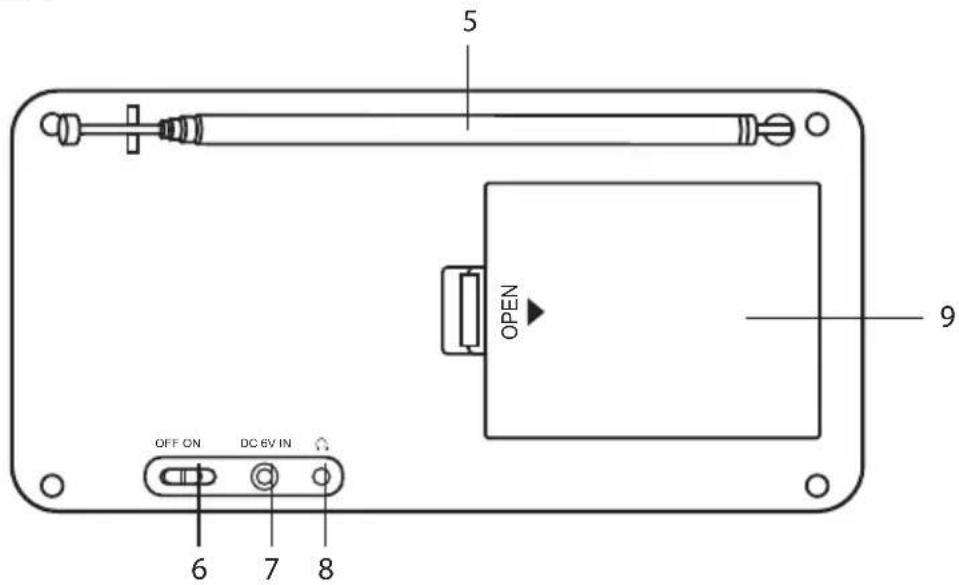
Rear View
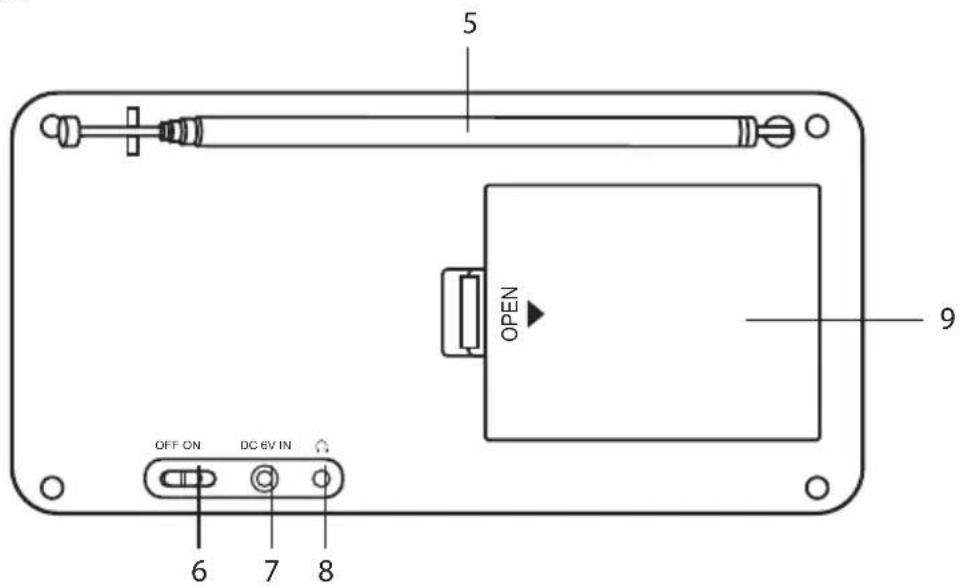
- Telescopic Aerial
- ON/OFF Switch
-
DC 6V IN Socket
-
Earphones Socket
- Battery compartment
Power Source
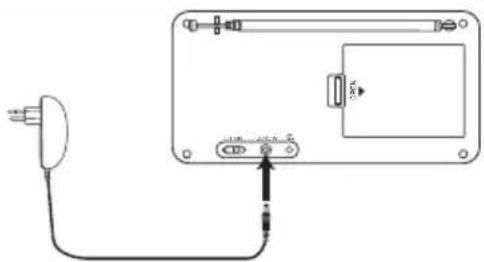
Mains Power
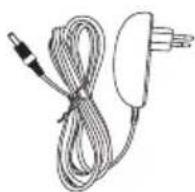
Connect the mains adapter (included) to the DC 6V IN socket and the mains socket.
natural_image
Pure electrical circuit lines without any symbolsBattery Power
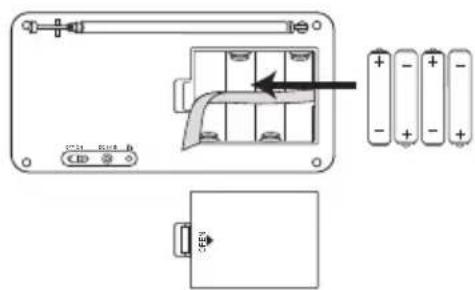
Insert 4 AA batteries (not included) correctly by following the polarity (+ or -) indications in the battery compartment.
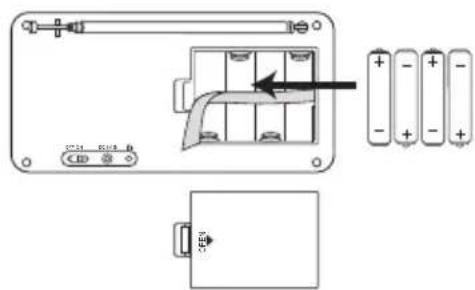
Handling the Batteries
- Improper or incorrect use of batteries may cause corrosion or battery leakage, which could cause personal injury or damage to property.
• Install the batteries correctly by following the polarity (+ and -) indications in the battery compartment.
• Use only the types of the batteries which are indicated in this manual.
• Do not install new batteries with used ones and do not mix different types of batteries. - Do not dispose of the used batteries as domestic waste. Dispose of them in accordance with local regulations.
Switching on Your Unit for the First Time
-
Switch the ON/OFF switch at the back of the unit to "ON" position to turn the unit on. For initial use, the unit will automatically enter the DAB mode and start the auto tune quick scan for DAB stations.
-
During scanning, the LCD will display a slide bar that indicates the progress of the scan, and the amount of radio stations that have been found so far. Once the scan has finished, the unit will select the first alphanumeric station.

The name of the found group of DAB radio stations will be displayed on the bottom half of the display.
GB
Powering ON/OFF
When you first connect the unit to the mains socket and switch the ON/OFF switch at the back of the unit to the "ON" position to switch the unit on.
- Switch the ON/OFF switch to the "OFF" position to turn the unit off.
- Disconnect the power cable of the mains adapter from the mains socket if you want to switch the unit off completely.
Selecting Modes
Press the DAB/FM button repeatedly to switch between modes (DAB or FM).
Adjusting Volume
Press the Vol+ or Vol- button to increase/decrease the volume.
To listen to the tuned stations press either the PREV / NEXT buttons. Each time you press the PREV / NEXT buttons, you will skip to the previous or next stored station. The unit will display the station name.
Memory
When you power up the unit again, the unit plays the same mode and station (DAB or FM) as the last operation.
Storing Stations
You can store up to 10 of your favourite stations to the memory. This will enable you to access your favourite stations quickly and easily.
- To store a preset, you must first be listening to the station that you would like to save, press and hold the PRESETS button.
- Press the PREV or NEXT button to select your desired preset station number.
- Press the SELECT button to confirm the selection.
- The station will be stored and the LCD will then show "Preset # stored".
Recalling a Stored Station
- Once you have saved a station to one of the preset buttons, you can recall it by pressing the PRESETS button.
- Press the PREV or NEXT button to select your desired preset station number.
- Press the SELECT button to confirm the selection.
- If you choose a preset that hasn't been allocated a station, the "Preset empty #" will be displayed.
Display Modes
Every time you press the INFO button, the display will cycle through the following display modes: Programme Type, Multiple Name, Signal Strength, Time/Date, DLS (Scrolling Text).
The information is displayed on the lower segment of the LCD display.
Programme Type
This describes the "Style" or "genre" of music that is being broadcast e.g. "Rock" or "Classical".
Multiplex Name
A multiplex is a collection of radio stations that are bundled and transmitted on one frequency. There are national and local multiplexes. Local ones contain stations that are specific to that area e.g. BBC World.

DAB – unlike normal radio, groups together several radio stations and transmits them on one frequency.
Time/Date
The broadcaster (Radio station) provides clock and date information automatically so there's no need to manually set this information.
DLS (Dynamic Label Segment)
Dynamic label segment is a scrolling message that the broadcaster may include with their transmissions. The message usually includes information, such as program details etc.
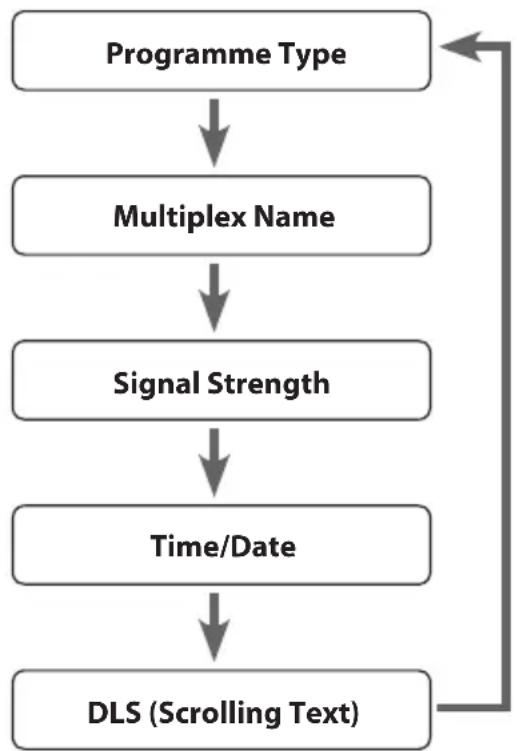
flowchart
graph TD
    A["Programme Type"] --> B["Multiplex Name"]
    B --> C["Signal Strength"]
    C --> D["Time/Date"]
    D --> E["DLS (Scrolling Text)"]
    E --> A
Software Version
- Press and hold the INFO button for 2 seconds and then release it to view the software version of this unit.
- The software version will automatically disappear after 5 seconds.
Auto Scan Modes
There are two types of scans, one is Quick scan and the other is Full scan.
- Quick scan:
Searches the stations between channels 10A and 12D. To activate the quick scan press the AUTO button.
Full scan:
Searches all DAB channels in the UK DAB Band III. Press and hold the AUTO button for 2 seconds.
Secondary Services
You may see a “>” symbol after the name of the station, this indicates that there are secondary services available to that station. These secondary services contain extra services that are related to the primary station. e.g. a sports station may want to add extra commentaries. The secondary services are inserted directly after the primary station in the station list.
To select the secondary station, press the NEXT button when the “>” appears in the LCD before the station name. When the secondary service ends, the unit will automatically switch back to the primary station.
Manual Tuning
As well as the auto tune function, you can manually tune the receiver. This can help you when aligning your aerial or when adding stations that were missed while auto tuning.
- Press and hold the SELECT button, the LCD display will now show Manual tune.
- Press the PREV / NEXT buttons to cycle through the DAB channels, which are numbered from 5A to 13F.
- After your desired channel number is selected, press the SELECT button to enter the current multiplex, the top line will now display the first station in the multiplex.
- Press the PREV / NEXT buttons to see what stations are present in the found multiplex.
- Once you have reached the last station in the found multiplex, it will revert back to the first station again. If you wish to exit the Manual Tuning mode, just press the SELECT button.

System Reset
There may be times when you need to reset your unit back to the factory settings. If you experience reception problems you may want to reset and try again. If you move the unit to another part of the country and pick up the local and national DAB stations in that area, your previously tuned channels may no longer be available.
To do the system reset, press and hold the DAB/FM button. Then press the SELECT button to start the system reset. The unit will then start the Quick Scan for DAB channels immediately.

After the system reset, all the tuned stations, DAB & FM preset stations and alarm settings will be erased.
Switching from DAB to FM Mode
In order to switch the unit from DAB to FM mode, press the DAB/FM button once. The display shows "Switching to FM".
On the top line of the display is the current frequency. On the bottom of the display,
Auto Scan
To search for an FM station, you need to press and then release the AUTO button. This will start scanning up the frequency band. To scan down the frequency band, press and hold the AUTO button. Once a station has been found, the scanning will stop automatically.
If no station is found, then the tuning will stop once it has cycled through the entire FM band (87.5-108MHz).
Manual Scan
To search FM stations manually, simply press the PREV or NEXT button repeatedly until your desired frequency is reached.
Storing Stations
You can store up to 10 of your favourite stations to the memory. This will enable you to access your favourite stations quickly and easily.
- To store a preset, you must first be listening to the station that you would like to save, then press and hold the PRESETS button.
- Press the PREV or NEXT button to select your desired preset station number.
- Press the SELECT button to confirm the selection.
- The station will be stored and the LCD will then show "Preset # stored".
Recalling a Stored Station
- Once you have saved a station to one of the preset buttons, you can recall it by pressing the PRESETS button.
- Press the PREV or NEXT button to select your desired preset station number.
- Press the SELECT button to confirm the selection.
- If you choose a preset that hasn't been allocated a station, the display will show "Preset empty #".
Display Modes
Every time you press the INFO button, the display will cycle through the following display modes: Programme Type, Signal Strength, Time/Date, Channel Frequency, Audio Mode, Radio Text.
Programme Type
This describes the "Style" or "genre" of music that is being broadcast e.g. "Rock" or "Classical".
Signal Strength
The slide bar indicates how strong the signal is, the stronger the signal, the longer the bar will be.
Time/Date
The broadcaster (Radio station) provides clock and date information automatically so there's no need to manually set this information. In the unlikely event that the broadcaster does not transmit any clock information; the display will show
Channel Frequency
This shows the frequency of the current station e.g. 89.80MHz.
Audio Mode
When in FM mode, the display will show if the station being received is in mono or stereo. The receiver will automatically switch between
Stereo and Mono mode. You can however override this function, so that you can manually switch between Stereo and Mono mode, which is helpful if you're listening to a poor FM signal.
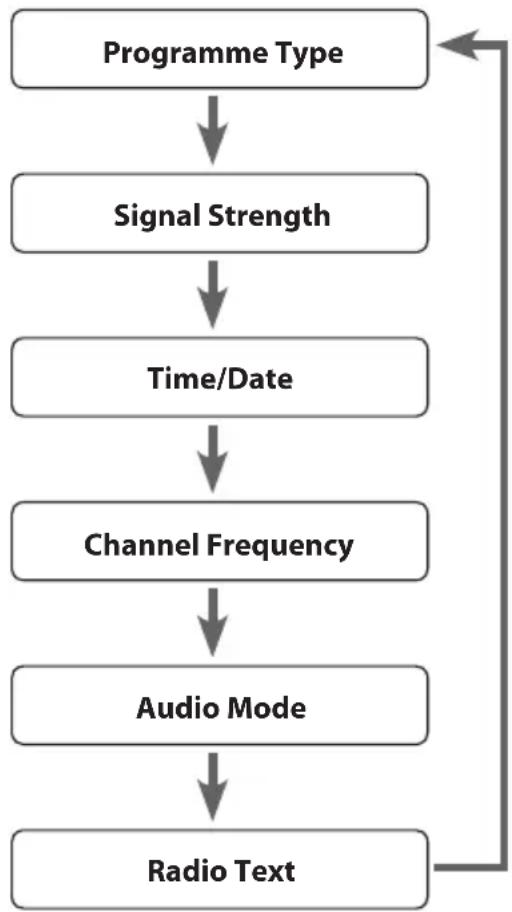
flowchart
graph TD
    A["Programme Type"] --> B["Signal Strength"]
    B --> C["Time/Date"]
    C --> D["Channel Frequency"]
    D --> E["Audio Mode"]
    E --> F["Radio Text"]

To switch between mono and stereo, press the SELECT button once, you will see on the display "Auto" or "Mono". To toggle between each mode just press the SELECT button again.
Radio Text
As with DAB, the broadcaster can include a scrolling text that displays information about the current program. If Radio text information is not available, then the display with show
Software Version
- Press and hold the INFO button for 2 seconds and then release it to view the software version of this unit.
- Press the INFO button again to display the Program Identification code (PI code).
- The software version will automatically disappear after 5 seconds.
System Reset
There may be times when you need to reset your unit back to the factory settings. If you experience reception problems you may want to reset and try again. If you move the unit to another part of the country and pick up the local and national stations in that area, your previously tuned channels may no longer be available.
To do the system reset, press and hold the DAB/FM button. Then press the SELECT button to start the system reset. The unit will then start the Quick Scan for DAB channels immediately.

After the system reset, all the tuned stations, DAB & FM preset stations and alarm settings will be erased.
Using Earphones
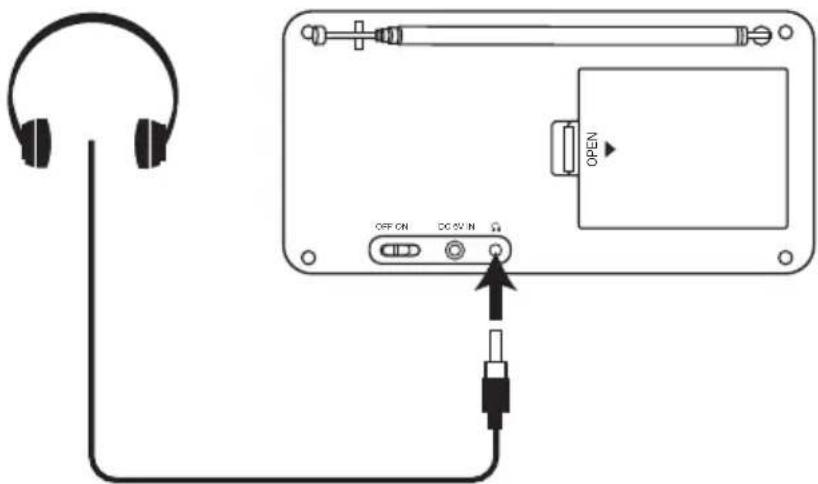
Turn down the volume before connecting the earphones. Slowly raise the volume with the earphones on until you reach your desired volume. When earphones are connected, the speaker is automatically disabled.

Avoid listening to sound at excessive levels which could be harmful to your ears. At full power, the prolonged listening can damage the ears of the user.
Select Sensitivity in FM
- Press and hold the SELECT button for 2 seconds.
- Show 1-10 level, press the PREV or NEXT button to select the sensitivity manually.


Ensure to unplug the unit from the mains socket before cleaning.
• To clean the unit, wipe the case with a slightly moist, lint-free cloth.
- Do not use any cleaning fluids containing alcohol, ammonia or abrasives.
- Do not spray an aerosol at or near the unit.
Hints and Tips
| Problem Cause / Solution | |
| No Sound Adjust the volume control, it may not be turned up. | |
| Static Sound Signal reception is too low. Adjust the aerial or move the unit to a stronger signal location. | |
| Sound is distorted Volume is too high. Adjust the volume control. | |
| Desired station not found | Weak signal. Use the Manual Tune function. |
| The display shows “Not available” | No DAB coverage in your area or poor reception. Adjust the position of the aerial. |
| Poor reception. Adjust the position of the aerial. | |
| The display is blank This | may occur if the broadcaster changes the label of a service or removes a label while tuned. The unit will try to retune or perform a scan. |
Specification
| Mains Supply Mains adapter | pter Input 100-240V ~ 50/60 HzMains adapter Output DC 6V 0.5A |
| DC battery 4 x AA batteries (not included) | |
| Output Power 1 x 1.0W | |
| Radio Frequency Range | FM87.5 – 108 MHzDAB Band III 174.928 – 239.200 MHz |
natural_image
Illustration of a portable radio with antenna, speaker, and control buttons (no text or symbols)Hovedapparat
Strømadapter
delenummer
EUAD87006-500
Brukerveiledning delenummer L22DAB10E-002
Hvis det mangler deler eller deler er skadet, ta kontakt med Partmaster (kun UK). Tlf: ring 0844 800 3456 for assistanse.
Sett forfra
- LCD-display Skjerm
- INFO-knapp
AUTO-knapp
-VOL-knapp
+VOL-knapp
- DAB/FM-knapp
PRESETS-knapp
PREV-knapp
NEXT-knapp - SELECT-knapp
Sett bakfra
- Antenne
- ON / OFF-bryter
-
DC 6V IN-kontakt
-
Kontakt for hodetelefoner
- Batteribeholder
Strømnett
natural_image
Pure electrical circuit lines without any symbolsNO
Batteristrøm
DLS (Dynamic Label Segment) (rulletekst)
natural_image
Illustration of a portable radio with antenna and speaker grille (no text or symbols)Huvudenheten
Nätadapter
del nummer
EUAD87006-500
Instruktionsmanual del nummer L22DAB10E-002
-
Teleskopisk antenn
-
ON/OFF (PÅ/AV) Strömbrytare
-
DC 6V IN Uttag
-
Utttag för hörlurar
-
Batterifack
Strömkälla
Nätspänning
natural_image
Illustration of a portable radio with antenna, speaker, and control panel (no text or symbols)Pääyksikkö
Paristovirta
natural_image
Illustration of a portable radio with antenna and speaker grille (no text or symbols)Hovedapparatet
Netadapter
partnummer
EUAD87006-500
Instruktionsmanual partnummer L22DAB10E-002
- Teleskop-antenne
- ON/OFF-afbryder
-
DC 6V IN-indgang
-
Høretelefonindgang
- Batterirum
Strømkilde
Strømnettet
natural_image
Pure electrical circuit lines without any symbolsBatteristrøm
DK
Strøm TÆND/SLUK (ON/OFF)
DLS (Dynamic Label Segment)
• Quick scan (hurtigscanning):
- Read all the instructions carefully before using the unit and keep them for future reference.
- Retain the manual. If you pass the unit onto a third party make sure to include this manual.
- Check that the voltage marked on the rating label matches your mains voltage.
Damage
- Please inspect the unit for damage after unpacking.
- Do not continue to operate the unit if you are in any doubt about it working normally, or if it is damaged in any way - switch off, withdraw the mains plug and consult your dealer.
Location of Unit
- The unit must be placed on a flat stable surface and should not be subjected to vibrations.
- Do not place the unit on sloped or unstable surfaces as the unit may fall off or tip over.
- The mains socket must be located near the unit and should be easily accessible.
• This unit is designed for indoor use only.
Temperature
- Avoid extreme degrees of temperature, either hot or cold. Place the unit well away from heat sources such as radiators or gas/electric fires.
- Avoid exposure to direct sunlight and other sources of heat.
- Do not expose the battery to direct sunlight or sources of excessive heat.
Naked Flames
- Never place any type of candle or naked flame on the top of or near the unit.
Moisture
- To reduce the risk of fire, electric shock or product damage, do not expose this unit to rain, moisture, dripping or splashing. No objects filled with liquids, such as vases, should be placed on the unit.
- If you spill any liquid into the unit, it can cause serious damage. Switch it off at the mains immediately. Withdraw the mains plug and consult your dealer.
Ventilation
• To prevent the risk of electric shock or fire hazard due to overheating, ensure that curtains and other materials do not obstruct the ventilation vents.
- Do not install or place this unit in a bookcase, built-in cabinet or in another confined space. Ensure the unit is well ventilated.
Safety
• Always disconnect the unit from the mains supply before connecting/disconnecting other devices or moving the unit.
• Unplug the unit from the mains socket during a lightning storm.
- In the interests of safety and to avoid unnecessary energy consumption, never leave the unit switched on while unattended for long periods of time, e.g. overnight, while on holiday or while out of the house. Switch it off and disconnect the mains plug from the mains socket.
Mains Adapter Cable
- Make sure the unit or unit stand is not resting on top of the mains adapter cable, as the weight of the unit may damage the cable and create a safety hazard.
Interference
- Do not place the unit on or near appliances which may cause electromagnetic interference. If you do, it may adversely affect the working of the unit, and cause a distorted sound.
Earphones
- Listening to loud sounds for prolonged periods of time may permanently damage your hearing.
- Before putting on earphones, turn the volume down then put the earphones on and slowly increase the volume until you reach a comfortable listening level.
Supervision
- Children should be supervised to ensure that they do not play with the unit and the remote control.
- Never let anyone especially children push anything into the holes, slots or any other openings in the case - this could result in a fatal electric shock.
Service
- To reduce the risk of electric shock, do not remove screws. The unit does not contain any user-serviceable parts. Please leave all maintenance work to qualified personnel.
- Do not open any fixed covers as this may expose dangerous voltages.
Maintenance
- Ensure to unplug the unit from the mains socket before cleaning.
- Do not use any type of abrasive pad or abrasive cleaning solutions as these may damage the unit's surface.
- Do not use liquids to clean the unit.
Sikkerhetsadvarsler
NO
This symbol on the product or in the instructions means that your electrical and electronic equipment should be disposed at the end of its life separately from your household waste. There are separate collection systems for recycling in the EU. For more information, please contact the local authority or your retailer where you purchased the product.
NO
- Innhold
- Unpacking
- Power Source
- Mains Power
- Battery Power
- Handling the Batteries
- Switching on Your Unit for the First Time
- GB
- Powering ON/OFF
- Selecting Modes
- Adjusting Volume
- Memory
- Storing Stations
- Recalling a Stored Station
- Display Modes
- Programme Type
- Multiplex Name
- Time/Date
- DLS (Dynamic Label Segment)
- Software Version
- Auto Scan Modes
- - Quick scan:
- Full scan:
- Secondary Services
- Manual Tuning
- System Reset
- Switching from DAB to FM Mode
- Auto Scan
- Manual Scan
- Signal Strength
- Channel Frequency
- Audio Mode
- Radio Text
- Using Earphones
- Select Sensitivity in FM
- Strømnett
- Batteristrøm
- DLS (Dynamic Label Segment) (rulletekst)
- Strömkälla
- Nätspänning
- Paristovirta
- Strømkilde
- Strømnettet
- Strøm TÆND/SLUK (ON/OFF)
- Damage
- Location of Unit
- Temperature
- Naked Flames
- Moisture
- Ventilation
- Safety
- Mains Adapter Cable
- Interference
- Earphones
- Supervision
- Service
- Maintenance
- Sikkerhetsadvarsler
- NO
Brand : Logik
Model : L22DAB10E
Category : Radio