78700 - Saw Power Craft - Free user manual and instructions
Find the device manual for free 78700 Power Craft in PDF.


| Brand | Power Craft |
| Model | 78700 |
| Product Type | Saw |
| Power Source | Electric (corded) |
| Motor Power | 1200 W |
| Blade Diameter | 190 mm (7.5 in) |
| Max Cutting Depth (90°) | 65 mm |
| Max Cutting Depth (45°) | 45 mm |
| No-Load Speed | 4500 rpm |
| Weight | 4.2 kg |
| Dimensions (L x W x H) | 350 x 220 x 280 mm |
| Cable Length | 2 m |
| Safety Features | Blade guard, safety switch, anti-slip handle |
| Maintenance | Clean after use, lubricate moving parts, regularly check blade sharpness |
| Spare Parts Availability | Replacement blades and carbon brushes available |
| Warranty | 2 years |
Frequently Asked Questions - 78700 Power Craft
User questions about 78700 Power Craft
0 question about this device. Answer the ones you know or ask your own.
Ask a new question about this device
Download the instructions for your Saw in PDF format for free! Find your manual 78700 - Power Craft and take your electronic device back in hand. On this page are published all the documents necessary for the use of your device. 78700 by Power Craft.
USER MANUAL 78700 Power Craft
natural_image
Industrial machine with red plastic components and a black handle, no visible text or symbols
Fremstillet i P.R.C.
6001 - Yangzhou Triple Harvest, Jiangsu
EU-Importør:
HP Værktøj A/S
7080 Børkop
Danmark
Manufactured in P.R.C.
6001 - Yangzhou Triple Harvest, Jiangsu
EU importer:
HP Værktøj A/S
7080 Børkop
Denmark
All rights reserved. The content of this user guide may not be reproduced in part or whole in any way, electronically or mechanically (e.g. photocopying or scanning), translated or stored in a database and retrieval system without the prior written consent of HP Værktøj A/S.
Produsert i P.R.C.
6001 - Yangzhou Triple Harvest, Jiangsu
EU-importør
HP Værktøj A/S
7080 Børkop
Danmark
BRUGSANVISNING
natural_image
Close-up of a metallic mechanical component with multiple slots and a central knob (no visible text or symbols)natural_image
Close-up of a hand using an adjustable wrench to lift a white cylindrical object on a dark stove (no text or symbols visible)Løsn läsemøtrikken
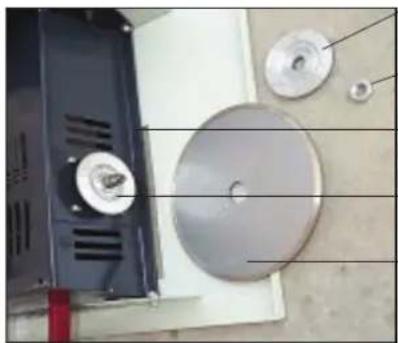
natural_image
Close-up of a mechanical component with a circular disc and two metallic parts mounted on a wall (no visible text or symbols)Yderflange
Låsemøtrik
Savaksel
Inderflange
Klinge
natural_image
Close-up of a metallic mechanical component with slots and a central knob (no visible text or symbols)natural_image
Close-up of a hand using a wrench to lift a white cylindrical object on a dark stove (no text or symbols visible)Løsne läsemutteren.
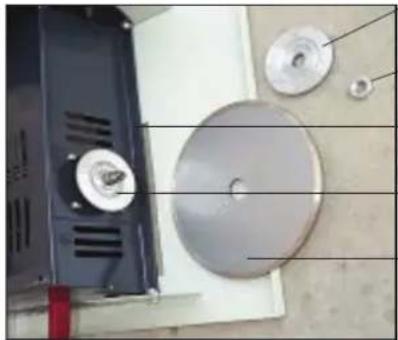
natural_image
Close-up of a mechanical component with circular and rectangular parts, no visible text or symbolsYtre flens
Låsemutter
Sagaksel
Indre flens
Blad
BRUKSANVISNING
natural_image
Close-up of a metallic mechanical component with multiple slots and a central knob (no visible text or symbols)Komma åt sågaxeln
Byta klinga
natural_image
Close-up of a hand using a wrench to lift a white cylindrical object on a dark stove (no text or symbols visible)Lossa läsmuttern
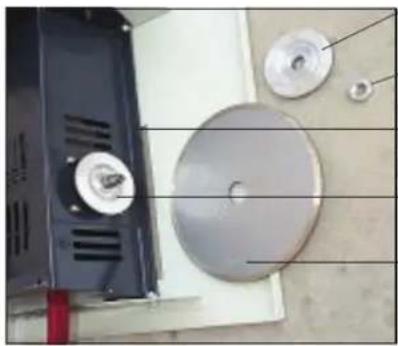
natural_image
Close-up of a mechanical device with a circular disc and multiple circular components mounted on a wall (no visible text or symbols)Ytterfläns
Låsmutter
Sågaxel
Innerfläns
Klinga
natural_image
Close-up of a metallic mechanical component with slots and a central knob (no visible text or symbols)Poista esteet sahan akselin luota
Sahanterän vaihto
natural_image
Close-up of a hand using a wrench to lift a white circular object on a dark surface (no text or symbols visible)Löysää lukkomutteri
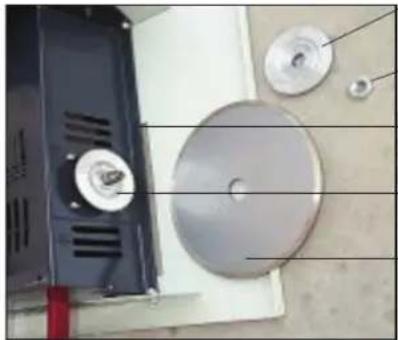
natural_image
Close-up of a mechanical device with a circular component and two metallic parts mounted on a wall (no visible text or symbols)Ulkolaippa
Lukkomutteri
Sahan
akseli
Sisälaippa
Terä
To get the most out of your new tile cutter, please read this manual and the enclosed safety instructions before use.
Please also save the instructions, as you may need to refer to them at a later date.
This cutter is ideal for small and medium-sized tiles for floors and walls. The table can be adjusted to any angle up to 45^ making angled cuts simple and precise.
Technical data
Voltage/frequency: 230 V \~ 50 Hz
Power rating: 450 W
Free rotation speed: 3,000 RPM
Max. cutting height: 34 mm
Table size: 385 × 395 mm
Weight: 12 kg
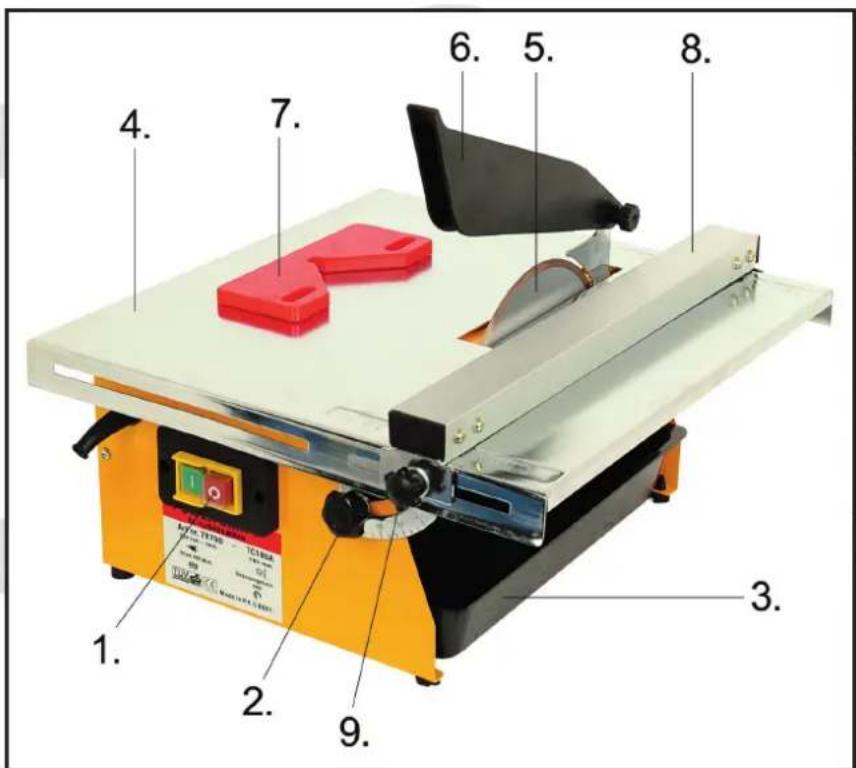
Main components
- Off switch
- Bevel adjustment handle
- Water holder
- Work table
- Blade
- Protective guard
- 45^ adapter
- Parallel guide
- Parallel guide handle
Special safety instructions
For use on flat and stable surfaces only.
Use blades with external diameter between 150 and 180 mm and hole diameter of 22.2 mm.
Ensure water holder is always full to keep blade cool when cutting tiles.
Never use blades that are bent or have missing teeth.
INSTRUCTION MANUAL
Never stop saw blade by applying pressure to saw or side of blade.
Never allow blade to be in contact with item to be cut - or other objects - when starting saw.
Always use protective gloves when handling the blade. Never put your hand near blade or try to remove material
from working area while blade is rotating.
Never use if protective equipment is not fitted or does not work.
Use a piece of scrap wood to feed small items towards blade. Never cut items that cannot be handled safely.
Cutting tiles
Place cutter on a flat and stable surface.
Fill water holder with clean tap water.
Set table angle and parallel guide if required.
Connect to mains electricity.
Switch machine on. Allow blade to reach max. speed.
Push tile towards blade and allow blade to work its way through.
Switch machine off. Remove tile scraps when blade has come to a complete stop.
Sawing mitres (45°)
Place cutter on a flat and stable surface.
Fill water holder with clean tap water.
Set table angle and parallel guide if required.
Connect to mains electricity.
Push corner of tile into angle of 45^ adapter (4).
Push adapter against parallel guide, check it will be clear of blade when cutting.
Switch machine on. Allow blade to reach max. speed.
Push tile towards blade and allow blade to work its way through.
Switch machine off. Remove tile scraps when blade has come to a complete stop.
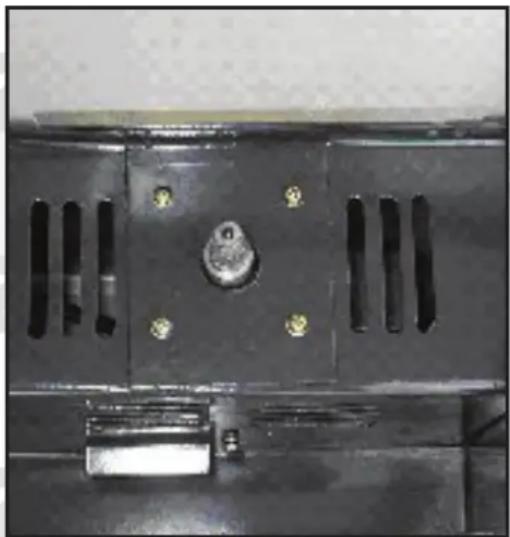
natural_image
Close-up of a black metal panel with four slots and a central knob (no text or symbols visible)Gain access to saw shaft
Blade replacement
Switch machine off, disconnect from mains.
Remove water holder.
Remove blade protective guard with Phillips screwdriver.
You can now access saw shaft and 18 mm lock nut.
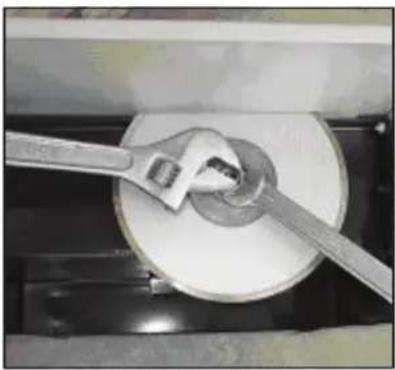
Fit an adjustable wrench on outer end of shaft. Fit an 18 mm fixed spanner to lock nut.
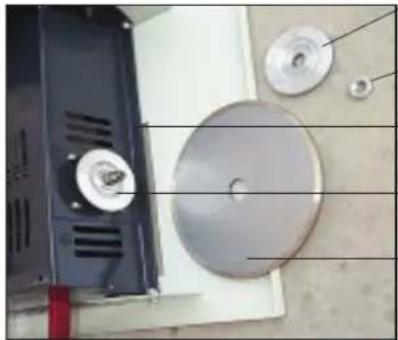
Slacken lock nut and remove. Remove outer flange.
Replace blade. Check rotation direction.
Replace outer flange.
Fit and tighten lock nut using adjustable wrench and spanner.
Replace protective guard.
Cleaning and maintenance
Switch machine off, disconnect from mains.
Wipe using a well-wrung cloth after use, and always keep the surface and ventilation holes free of dirt. Empty and rinse water holder as required.
INSTRUCTION MANUAL
natural_image
Close-up of a hand using a wrench to lift a white cylindrical object on a stovetop (no text or symbols visible)Slacken lock nut
Environmental information
You can help protect the environment! Follow local environmental regulations: Dispose of unwanted electrical equipment at an approved refuse disposal centre.
natural_image
Close-up of a mechanical component with circular features and a metallic disc mounted on a wall (no visible text or symbols)Outer
flange
Lock Nut
Saw shaft
Inner flange
Blade
GEBRAUCHSANWEISUNG
Einführung
GEBRAUCHSANWEISUNG
natural_image
Close-up of a metallic mechanical component with multiple slots and a central knob (no visible text or symbols)natural_image
Close-up of a hand using an adjustable wrench to lift a white circular object on a stovetop (no text or symbols visible)natural_image
Close-up of a mechanical device with circular components and a metallic disc mounted on a wall (no visible text or symbols)CE mark placed: 2007
EC-DECLARATION OF CONFORMITY
Hereby, on our own responsibility declare that:
Is manufactured in compliance with the following:
98/37/EC: Safety of machinery with amendments.
06/95/EEC: Low voltage directive.
89/336/EEC: EMC- directive + (amendments 93/68/EEC)
STANDARDER, NORMER, NORMER, NORMIT, STANDARDS, NORMEN:
EN 61029-1:2000 - EN 55014-1:2000+A1 - EN 55014-2:1997+A1
EN 61000-3-2:2000 - EN 61000-3-3:1995+A1
Brand : Power Craft
Model : 78700
Category : Saw