TAC-70 - Air conditioner TecLime - Free user manual and instructions
Find the device manual for free TAC-70 TecLime in PDF.


| Type | Air Cooler |
| Model | TAC-70 |
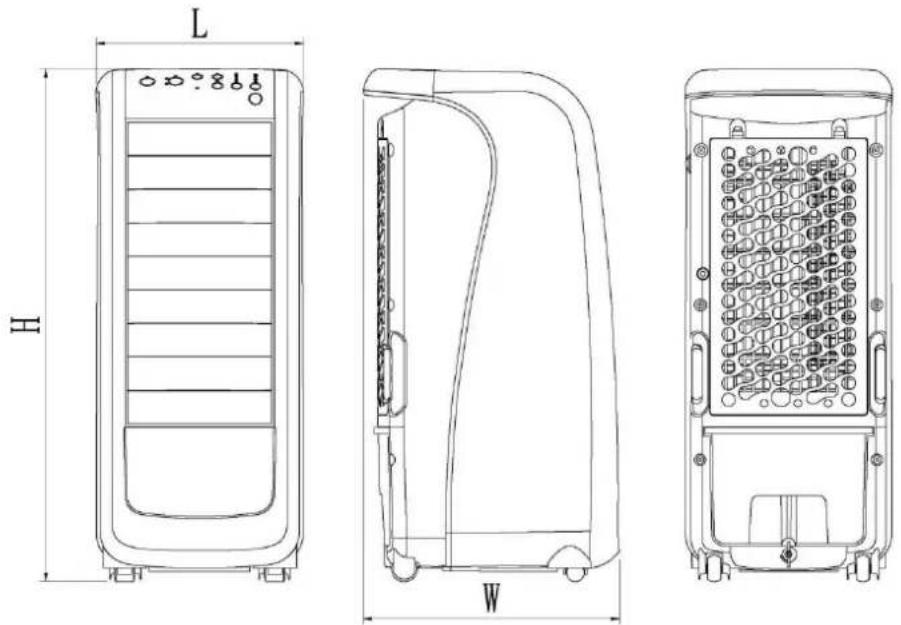
| Dimensions (H x W x D) | 689 x 279 x 345 mm |
| Weight | 2.35 kg |
| Power Rating | 70 W |
| Voltage / Frequency | 230 V ~ 50 Hz |
| Noise Level | ≤ 55 dB |
| Timer Range | 1 - 8 hours |
| Fan Speeds | High (1350 rpm), Medium (1150 rpm), Low (950 rpm) |
| Airflow | 350 m³/h |
| Max Air Speed | ≤ 8.5 m/s |
| Oscillation Angles (Horizontal / Vertical) | 80° / 70°-135° |
| Water Tank Capacity | 6.0 L |
| Mist Volume | 1050 ml/h |
| EER (Energy Efficiency Ratio) | ≤ 8.0 W/W |
| Operating Temperature / Humidity | 5 °C - 43 °C, RH < 95% (at 25 °C) |
| Cooling Method | Evaporative cooling with water and ice packs |
| Functions | Fan (Normal, Natural, Sleep), Cooler/Humidifier, Timer, Oscillation (Horizontal & Vertical), Remote Control |
| Filters | Double filters: dust filter and cooling pad |
| Ice Packs Included | 2 packs |
| Warranty | 12 months |
| Remote Control Battery | CR2032 (not included) |
| Safety Features | Auto shut-off if water level low, clean filter indicator, over 100 hours operation warning |
Frequently Asked Questions - TAC-70 TecLime
User questions about TAC-70 TecLime
0 question about this device. Answer the ones you know or ask your own.
Ask a new question about this device
Download the instructions for your Air conditioner in PDF format for free! Find your manual TAC-70 - TecLime and take your electronic device back in hand. On this page are published all the documents necessary for the use of your device. TAC-70 by TecLime.
USER MANUAL TAC-70 TecLime
Directions for Use (GB) 10
-
Specification.... 10
-
Components....10
-
Functions and features ...... 11
-
Installation and use 13
-
Safety warnings....14
-
Maintenance & Cleaning....14
-
Warranty Provisions ...... 15
-
Environmental Protection 15
natural_image
White portable air conditioner unit with multiple ventilation slots and control panel (no visible text or symbols)GB The features described in this manual are published with reservation to modifications.
flowchart
graph LR
    A["Top-Down Top-Down Component"] --> B["Step 1: Internal Combustion"]
    B --> C["Step 2: Internal Combustion with Red Arrow and Black Box"]
    C --> D["Step 3: Internal Combustion with Black Box and Red Arrow"]
    D --> E["Final Output"]
Please read the instructions carefully before using the product and keep it for future reference. This product is intended for household use only.
1. Specicaon
| Model nr. | TAC-70 |
| Description | Air Cooler |
| Voltage / Frequency | 230V~/50Hz |
| Power rated | 70W |
| Noise | ≤ 55 dB |
| Timer | 1-8 hours |
| Fan speed, r/min, (±80 r/min) | High 1350Medium 1150Low 950 |
| Max air speed | ≤8,5 m/s |
| Air low | 350 m^3 /h |
| Automatic oscillation angle | Horizontal 80°Vertical 70°-135° |
| Water tank capacity | 6,0 l |
| Mist volume | 1050 ml/h |
| EER | ≤8.0 W/W |
| Operation range | 5~43°C RH<95% (25°C) |
| Weight | 2,35 kg |
| Dimensions | 279x345x689 mm |
2. Components
Control panel

flowchart
graph TD
    A["ON/OFF"] --> B["CODLER/HUMIDIFIER"]
    B --> C["CLEAN FILTER"]
    C --> D["OSCILLATION"]
    D --> E["SPEED"]
    D --> F["TIMER"]
    B --> G["SLEEP 8H"]
    B --> H["NATURAL 6H"]
    B --> I["HI 4H"]
    B --> J["MED 2H"]
    B --> K["LOW 1H"]
Remote control panel

flowchart
graph TD
    A["Power Icon"] --> B["Water Drop Icon"]
    B --> C["Clock Icon"]
    C --> D["Rotation Arrow Icon"]
    D --> E["Cycle Arrow Icon"]
    E --> F["Fan Icon"]
3. Funcons and features
Features
- Three fan speeds: high, medium and low;
- Three fan programs: Normal, natural, and sleep mode;
• Cooler/Humidiier function - Timer function
• Automatic swing from left to right and top-down. - Remote Control
- Easily Moved, stands on wheels, swivel
- Easily removable water tank, easy to clean
- Advanced cooling plate, higher efficiency of evaporation and the cooled air
- Advanced water-spray feature, better cooling
- Double itters to collect dust and make clean air.
Functions
| ON/OFF | Plug the power cord into the outlet and press the ON / OFF. The buzzer will sound twice and the unit is now in standby mode. Only ON / OFF button is active.To start the appliance press again the ON / OFF button.The device starts in "Normal Mode" with medium fan speed and goes down to low speed after 3 seconds.Press the ON / OFF again to turn off the unit, the beeper will sound once. |
SPEED
| Used to select fan speed or fan program. |
| Press repeatedly to cycle through the different modes. |
Normal Mode
Chose speed between: Low Medium High
Natural Mode
The unit automatically switches between the three speeds at 5 second intervals. Horizontal oscillation starts immediately and vertical start after 10 sec.
Sleep Mode
The unit automatically switches between the three speeds with 30 second intervals. Works in together with timer function 8H
TIMER
| Repeatedly press this button to set the desired time. (1 to 8 h) An indicator lamp shows the selected time. The countdown begins now. The timer function needs to be activated when the unit has been turned off. |
OSCILLATION
Horizontal
Press this button to start the horizontal swing function. LED indicator lights.
Press again to exit the function. The indicator goes off.
Vertical
Flaps open completely (135 °) when the unit starts.
Press this button to start the vertical swing function. LED indicator lights. The air stream will swing between 70^ - 135^ .
Press the button again to stop the laps at any angle between 70^-135^ .
The laps will close when the unit is turned off.
COOLER/ HUMIDIFIER
This button starts the cooling and humidifier function. The buzzer sounds once and the LED indicator lights up.
Turn off the function by pressing this button again.
NOTE! Make sure the water level in the tank is above the minimum mark in order not to damage the water pump
The water pump will run for 50 sec. If the water level is too low, the function will stop and the buzzer sounds to attract attention.
Fill the water tank.
WARNING SYSTEM
The device will stop working after 100 hours of work and the "Clean Filter" indicator lights up. Clean the ilter according to the instructions and press the "Cooler / Humidiier" for 5 sec. to reset the "Clean Filter" warning. The device is now back to normal status.
The indicator dims down after 1 min. without any action, but lights up when a button is pressed.
4. Installaon and use
Fill water
Fill the tank with water before using the Cooler/Humidiier function
- Turn the tank locking knob 90 ° counterclockwise and remove the water tank.
- Note the Min and Max marks in the tank.
- Always keep the water level above the MIN mark in order not to damage the pump.
- When illing the tank do not exceed the MAX mark.
- Always use clean water (drinking water)
- Replace the water tank and lock knob
Note! At irst use, scents may appear and the water may be discolored. This disappears after a little use.
Ice-packs
Two packs are provided to ensure continuous operation. These contain a luid with special features to store cold. Note that the luid is dangerous to drink or eat!
- Place ice packs in the freezer until completely frozen.
- Put the frozen ice pack in the water tank, replace the tank and lock knob. After 10 minutes the water temperature will be lower than the ambient temperature. This lasts for approx. 4 hours.
Remote Control
- Open the battery cover on the back of the remote. The battery cover can be opened by using a coin or similar tool. Install a battery (type CR2032, not attached). Then close the battery cover.
- There are seven buttons on the remote control; their functions are the same as the keys on the control panel on the unit.
- Aim the remote at the unit and press the desired function. Range is approx. 6 meters.
- Open by turning the battery cover counter clockwise and close by turning clockwise.
5. Safety warnings
Follow these points to ensure a comfortable operation and to avoid the danger caused by improper use.
-
Read all instructions carefully and save this manual for future use. Install and use the humidifier as directed in this manual.
-
This humidifier is only for household use. Do not use outdoors or for commercial or industrial purposes.
-
If something is wrong with your product, do not take apart and try to repair the appliance yourself. Get in touch with the outlet for advice of service agent. To remove parts or replace components yourself is prohibited. Please send the unit to the repair station.
-
Do not change the horizontal laps manually. Use the remote control or the control panel so that they are not damaged.
-
Do not handle the power cord or plug with wet hands.
-
Sharp objects, needles or other metal tools may not be introduced into the inlet or outlet. Risk of electric shock or damage to the humidifier.
-
Do not spray pesticide or lammable liquids around the set.
-
Do not allow the exhaust to be aimed directly at children for a long time.
-
Do not pull the cord when disconnecting the unit
-
Make sure the plug is clean and that it is properly plugged into the socket.
-
If bad odor or noise occurs, turn off and unplug the appliance.
-
If the power cord is damaged it must be replaced by the manufacturer, its service agent or similarly qualified person to avoid danger.
-
The power cord should be routed so that the risk of tripping over it and the risk of breaking the humidifier is avoided. Unplug after use and put away the power cord.
-
The water level must not exceed the maximum mark. Also make sure that the level is higher than the minimum mark in use.
-
When water is loaded do not tilt or bump the unit to prevent water overflow.
-
If the unit have turned over when illed with water, immediately pull the plug and wipe clean. The unit can be restarted after it has dried for 24 hours. It can be damaged if you do not follow these instructions.
-
This appliance is not intended for use by persons (including children) with reduced physical, sensory or mental ability, or lack of experience and knowledge, unless they are supervised or instructed concerning use of the appliance by a person responsible for their safety.
-
Check that the voltage and frequency comply with the device specification.
-
When not used for a long time, disconnect the plug. Drain and dry it to prevent water from standing and becomes ill. Protect your machine from dust and store it in a ventilated, dry place.
6. Maintenance & Cleaning
Filters
To avoid clogged ilters they shall be cleaned at least every month. No chemicals are needed. Always disconnect the plug from the wall outlet before cleaning.

Remove the ilter Turn the knob 90° clockwise Remove the cooling pad
- Remove the ilter
- Clean the dust ilter with a soft brush.
- Dip the cooling pad in the detergent water, rinse clean and allow to dry.
- Mount the ilters in reverse order.
Water tank
- Remove the water, wash it out and remove any deposits. Put it back again.
The casing
- Wipe the appliance with a damp cloth. If necessary, a mild soap solution used. Pouring water on the device is strictly prohibited.
- WARNING: Do not use harsh detergents, chemical cleaners, solvents, abrasive cleaners or steel wool scouring pads as they may damage plastic components.
- Never immerse the appliance, cable, or plug in water or other liquids.
Storage
- Unplug the power cord and wrap it up.
- Ensure that the cooling plate, ilters and water are clean otherwise clean and dry them before installation.
- Store the unit in a dry ventilated storage area.
7. Warranty Provisions
This product comes with a 12-month warranty starting on the date of purchase. Within this period any defects in material or workmanship will be repaired without any charge. The following provisions shall apply regarding this warranty:
- We expressly dismiss all other claims for damage, including consequential damages;
- Any repairs or replacements of components within the term of the warranty will not result in an extension of the term of the warranty;
- The warranty will no longer apply if the product has been modified, non-original parts have been used, or if it has been repaired by third parties;
- The warranty will only apply, when you present the original, dated proof of purchase, provided no changes have been made to it;
- The warranty will not apply to damage caused by actions not in compliance with the Directions for Use, neglect, vandalism;
- Transportation costs and the risk involved during the transportation of the product or its components will always be the responsibility of the purchaser.
In order to avoid unnecessary costs, we recommend that you always read the Directions for Use carefully first. If they offer no solution, please take the product to your dealer for repair.
8. Environmental Protecon
Waste electrical products should not be disposed of with household waste. Please recycle where facilities exist. Check with your Local Authority or retailer for recycling advice.
Brukerhåndbok (NO)
- Directions for Use (GB) 10
- Specicaon
- Components
- Funcons and features
- Features
- Normal Mode
- Natural Mode
- Sleep Mode
- Horizontal
- Vertical
- Installaon and use
- Fill water
- Ice-packs
- Remote Control
- Safety warnings
- Maintenance & Cleaning
- Filters
- Water tank
- The casing
- Storage
- Warranty Provisions
- Environmental Protecon
- Brukerhåndbok (NO)
Brand : TecLime
Model : TAC-70
Category : Air conditioner